
Chapter 9. Particle Animation
Particle animation, collisions, dynamics. What are these terms, so often thrown around in the 3D world? They are your tools for creating cool special effects in LightWave layout. People often equate the term particle with 3D animations involving small dots, such as fireworks. Although you can create sparklers and animated dust using particles in LightWave, that’s only the beginning. Particles are also used to generate wisps of smoke, fire, snow flurries, and even swarming bees. For many 3D-animation pros, the enhanced particle tools, and the new dynamics capabilities introduced in LightWave 10 (and discussed in detail in this and the next chapter, “Dynamics in Motion”), are enough by themselves to justify the cost of the software. You might hear the term dynamics often in computer graphics. Without getting too technical, the concept of dynamics in LightWave refers to the ability of animated objects to influence one another’s motion and interact naturally. But more than their value, these tools give you control and flexibility over the types of images and animations you can create. That, my friends, is what makes LightWave great!
This chapter takes you into the world of LightWave particle animation. We’ll start with the basics so you can familiarize yourself with how the particle tools function in Layout. From there, we’ll apply surfacing to particles using HyperVoxels to create smoke, fire, and water effects. Then we’ll explore how you can apply dynamics, such as wind and collisions, to the particles. In this chapter, you’ll learn about the following:
• Working with particles in LightWave 10
• Creating surfaces for particles using HyperVoxels
• Using dynamics to change particle motions
Particles In LightWave
Many 3D pros think you need to run out and buy the expensive stand-alone particle creation tools to get decent particle animation. Although dedicated tools have their benefits, you’ll see from the following project that you can achieve exceptional particle animation using nothing but Layout. For most everyday animation projects, the robust, easy-to-use particle engine in LightWave is all you need.
Note
To be clear, particles are not objects, points, splines, or curves. However, if you create an emitter as a “Partigon” you will generate single-point polygons.
Creating a Basic Particle-Motion Scene
In this project, you don’t create anything with the particles; you merely apply them to a scene to see how you can interactively adjust parameters for instant feedback.
Note
The LightWave HyperVoxels tool lets you add smoke-like surfaces to particles, as well as more solid forms for things like water, rocks, and gaseous liquids. HyperVoxels apply to points of an object or to particles.
Using Emitters
The first thing you should know is that for particles to “live” in a scene, they need an emitter. You can think of the emitter as a faucet where your particles spill out. The various settings within the particle control panel enable you to adjust how the particles come out, how many, how quickly, and so on. Standard LightWave particle emitters are nonrendering objects you place in your scene, but you can also designate any object as an emitter. A ghostly figure drifting through the air, for instance, might emit a smoke trail consisting of particles with HyperVoxels applied. There aren’t any strict rules about when to use an object as an emitter and when to use a standard emitter; the task at hand usually determines your choice.
Exercise 9.1. Create a Particle Emitter
- Open LightWave Layout.
- On the Items tab under the Add category, click the Dynamic Obj button and choose Particle, as in Figure 9.1. When the Add Particle Emitter panel appears, you could type a new name, but for now simply leave the default name, “Emitter” (Figure 9.2).
Figure 9.1. You add a particle emitter from the Add category of the Items tab, just as you would with an object, light, or camera.
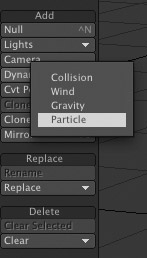
Figure 9.2. After an emitter is added, you can apply a name to it and tell LightWave to make it an HV emitter or a Partigon emitter.

- Change the Emitter Type selection in the Add Particle Emitter panel from the default, HV Emitter, to Partigon.
What’s the significance of this change? An HV emitter generates points, which aren’t rendered unless HyperVoxels are applied to them (hence the “HV” in the emitter name). HyperVoxels are a type of volumetric effect, which simulate fluid, diffuse materials within a defined physical volume, such as the cone of light generated by a streetlamp, or the confines of a room. HyperVoxels and other volumetric effects are used for rendering phenomena such as smoke and fog, which absorb and diffuse light without reflecting it directly—effects that cannot be approximated easily using traditional polygon-based modeling.
A Partigon emitter, on the other hand, generates single-point polygons, particles that render without HyperVoxels. Partigons can cast and reflect light directly, and you can apply surface characteristics to them. Use Partigons to produce particle systems made up of discrete, tiny objects, such as snow, confetti, or the spray of a sparkler.
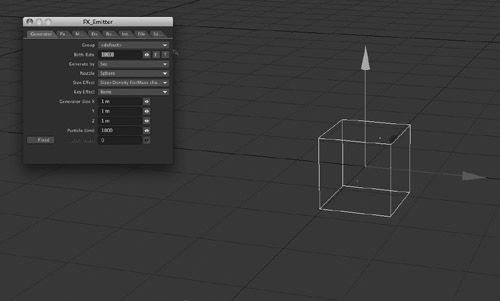
- After the emitter is added, you’ll see an outlined box in the Layout view, and the FX_Emitter panel will pop up (Figure 9.3). In the timeline at the lower right of the interface, set the last frame of the animation to 200.
Figure 9.3. After a particle emitter is added to Layout, it’s represented by a bounding box, and the FX_Emitter panel appears.
- Make sure Auto Key is enabled; click the Auto Key button beneath the timeline if it’s not.
Before you move on, press o to open the General Options tab within the Preferences panel. Make sure that Modified Channels is selected in the Auto Key Create drop-down. This means that when Auto Key is turned on, it will automatically generate keyframes as you make positional or rotational changes at different points in time in Layout.
- Back in Layout, make sure the emitter is selected and then press t to activate the Move tool.
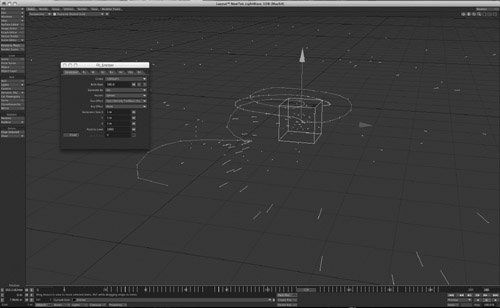
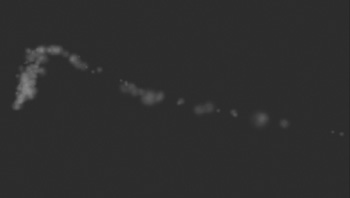
- Press the Play button and drag the emitter around in Layout. Look at that—instant particles (Figure 9.4)!
Figure 9.4. By using Auto Key with Auto Key Create set to Modified Channels, you ensure that your motions are recorded in real time in Layout. Moving the particle emitter around shows the spray of particles.
This effect is great for spraying particles in all directions, as you’d see in a sparkler or in water shaken from a just-bathed dog, but it lacks control. The particles fall out of the emitter without any rhyme or reason. For most other particle systems, such as a stream of smoke or a running faucet, you’ll want your particles to flow in a more controlled fashion. You’ll learn how to make that happen in the next exercise.
Controlling Particles
It isn’t necessary to always move the particle emitter to see moving particles. The particles can move on their own in a variety of ways. This next section shows you how to create a particle stream to simulate smoke, and with minor modifications it is also good for water fountains, molten lava, gooey chocolate, and more.
Exercise 9.2. Controlling Particle Flow
- Select Clear Scene from Layout’s File drop-down. Make sure Auto Key is active, and then add a new particle emitter as you did in Exercise 9.1. Name it Smoke when the Add Particle Emitter dialog box appears.
- For the Emitter Type setting in the Add Particle Emitter dialog box, choose HV Emitter.
You’ll notice that the particle emitter (named “Smoke”) is a set size. You can scale it down to fit objects in your scene (Figure 9.5). With smoke, such as you’ll be creating here, the emitter is often a small, concentrated point of origin, such as a pipe or cigar.
Figure 9.5. Adding a particle emitter to the scene gets you started, but first you’ll need to scale it down.

- When the FX_Emitter panel appears, move it aside as needed, so you can see the emitter in the scene. Set the last frame of the animation to 300 and move the timeline slider to frame 0.
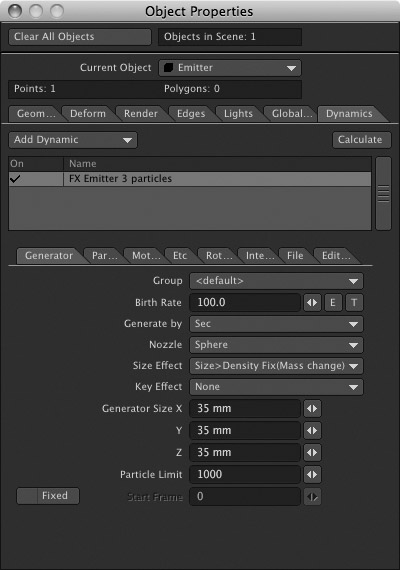
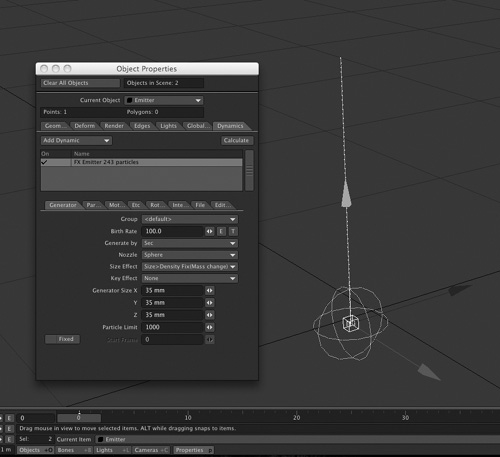
- In the Generator tab of the FX_Emitter panel, change the X, Y, and Z size values to 35 mm, as shown in Figure 9.6.
Figure 9.6. Scale the emitter’s generator to a tiny 35 mm cube to begin creating smoke.
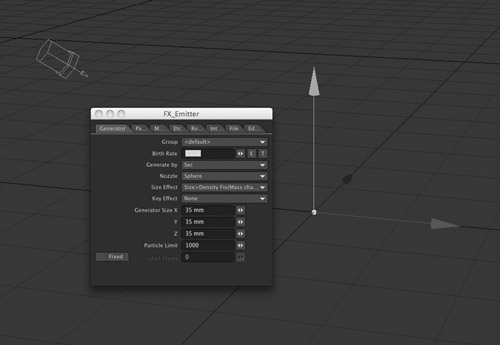
Changing the Generator Size in the FX_Emitter panel tells the emitter to be larger or smaller at the point where particles emerge. Changing the actual size of the emitter in Layout scales the emitter itself, not the area of particle generation.
Note
Should you accidentally close the FX_Emitter panel, don’t worry! Select the emitter item in Layout and press p to open the Object Properties panel. Click its Dynamics tab, and then click the item name that begins “FX_Emitter” in the list on that tab. You’ll see all the controls, as in Figure 9.7. You can also find the FX_Emitter panel in the Additional list of plug-ins, on the Utilities tab.
Figure 9.7. In case you accidentally (or intentionally) close the FX_Emitter control panel, you can find the panel again under the Dynamics tab within the Object Properties panel.
- In the FX_Emitter panel, click the Motion tab and bring the Velocity Y value to 400 mm, as in Figure 9.8. Press the Play button, in the lower-right corner of Layout, and you’ll see the particles start to stream upward. Note that a negative velocity value on the Y-axis would send the particle stream downward.
Figure 9.8. Increasing the Velocity value for the Y-axis shoots the particles upward.
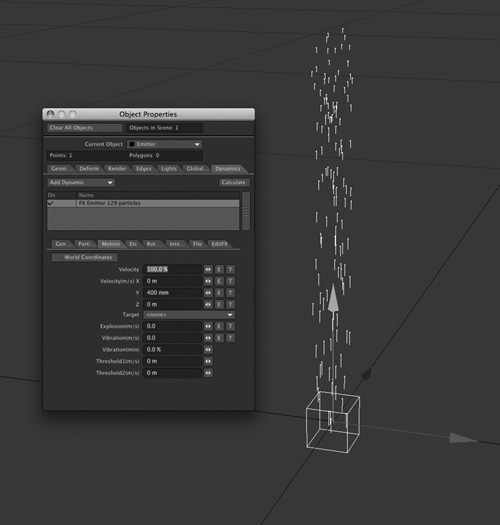
You can see that the particle preview updates in real time as you adjust FX_Emitter settings. You can click and drag the arrow buttons to the right of a value for true interactivity. Play around with the Velocity values for X and Z to see how the particles are affected, and then revert to a Y velocity of 400 mm and X and Z velocities of 0.
- Now that the particles are being generated in the right direction, move the camera around for a better view of the particle stream. Right now, we have an upward spray of points—not exactly wispy smoke.
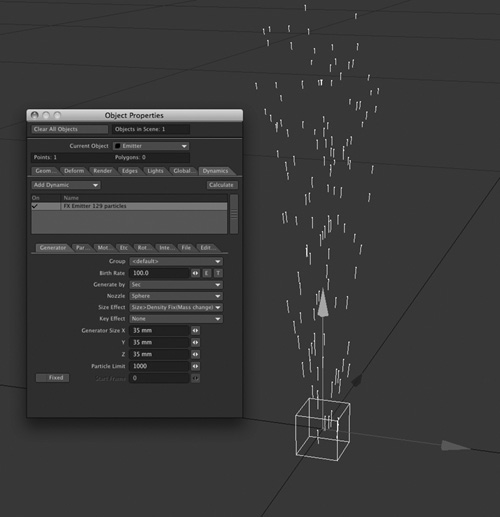
- Set the Birth Rate value to 60. This tells LightWave to emit, or “give birth” to, 60 particles per x, in which x represents the unit (second, frame, collision event, wind event) specified in the Generate By drop-down. For now, leave the Generate By unit set to Sec, so that 60 particles are generated every second.
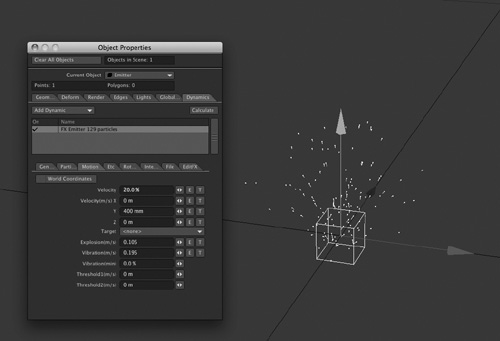
- Click the Motion tab and bring the Explosion value to 0.105, and you’ll see the particles spray outward, as in Figure 9.9. Now try adding a little vibration. Set the Vibration (m/s) value to 0.195 and the particles have a bit of randomness—sort of a scattering effect.
Figure 9.9. Changing the Explosion value makes your particles spray outward, while the Vibration setting adds randomness.
Note
Remember that you can play the animation and make value changes to your particles at the same time. This is the best way to set up particle animations, because you can see exactly what your changes are affecting.
- The second Vibration setting is a minimum percentage that you can apply as well. For now, leave this at 0%. If the first Vibration setting applies the value, or the amount, this second setting determines how much of that amount is used.
- The particles are moving too fast for smoke. So, up at the top of the Motion tab, set the Velocity value to 20%. This causes the particles to move a little more slowly, more like rising smoke. Figure 9.10 shows the settings.
Figure 9.10. Changing the Velocity setting can speed up or slow down your particle stream.
If you watch the particles flow, they seem to be moving evenly at first, but by setting a Velocity value only on the Y-axis, you’re sort of pushing the particles. You want them to appear as if they drift upward. Right now, they come out and just hang in midair. You’ll also notice that with the Velocity value changed, the particle stream is much shorter.
- Click the Particle tab, and set the Particle Weight value to 3.85 or so (Figure 9.11). This boosts the particles’ momentum so they’ll flow a bit farther. Then, on the same tab, set the Life Time value to 120. This tells the particles to “live” for 120 frames and then go away. While you’re at it, set the + – setting to 10. This is a plus or minus randomization for the Life Time setting. It’s good to use so that the particles don’t all die off at the same time but with a variation of up to 10 frames.
Figure 9.11. Adjusting the Particle Weight and Life Time settings help the particles flow and die a bit more naturally.

Note
If you set the Life Time value to 0, you’re telling the particles to flow infinitely. If you leave the value at 60, the particles would only last 60 frames (2 seconds).
- You might notice now with these changes that the particle stream fans out a bit too much. So, jump back to the Motion tab and decrease the value for Explosion to .0655 and for Vibration to .0385.
- Finally, save your scene.
Your LightWave 3D manual gives a good description of the numerous settings and values available to you in the Particle FX_Emitter panel. You should reference this as you work with the tools. These first two exercises have introduced you to particle emitters and the controls available to them. But you can do much more with this system, and you can change how this smoke floats through the air.
Working with Particle Wind
Have you ever been visiting a friend and, later that night, found yourself craving a hamburger? So you find the only place open, one of those all-American pub restaurants, and you grab the first available table. You place your order and sure enough, the old lady with long, dirty, gray hair in the booth next to you lights up a cigarette. What happens? The smoke drifts right over to you as you’re trying to eat. While we can’t offer a solution for that situation in this chapter, it is possible to control the direction of smoke in LightWave. Read on to learn how easy it is to determine where your wind blows.
Exercise 9.3. Adding Wind to Particles
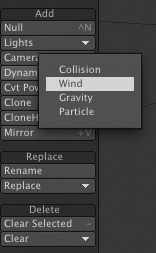
- Continuing from the previous project, make sure your scene is saved. Then, using the Items tab, add a wind effector to the scene by choosing Wind from the Dynamic Obj drop-down menu (Figure 9.12).
Figure 9.12. Add a wind effector to the scene, in the same way that you added a particle emitter earlier.
- If your FX panel was already open from working with the particle emitter, it will automatically change over to the FX_Wind properties. If the panel does not appear, select the wind effector and then press p to open its Properties panel. Click the Dynamics tab and select the FX Wind listing.
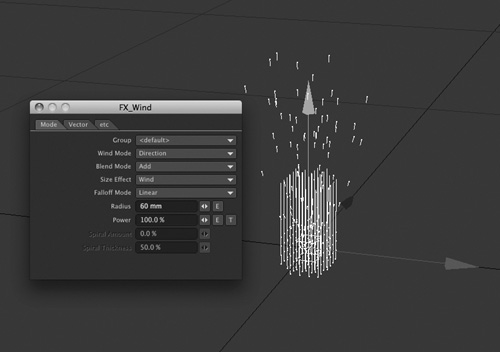
- Because you scaled down the size of the particle emitter in Exercise 9.2, your wind effector is much too large for it. So, in the FX_Wind properties panel, set Radius to something like 60 mm (Figure 9.13).
Figure 9.13. Change the radius of the wind to fit the scene.
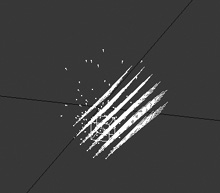
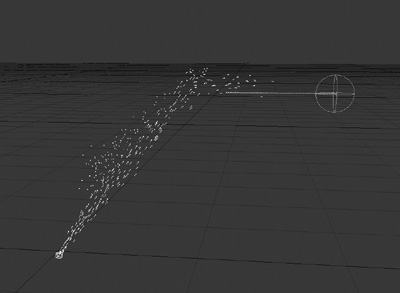
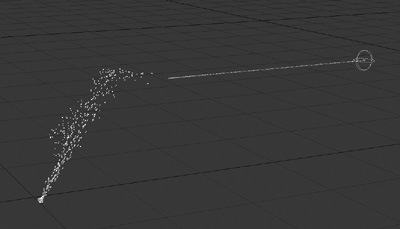
- Rotate the wind effector (press y, and then click and drag). Look what happens—the particle stream changes direction, as shown in Figure 9.14.
Figure 9.14. Rotating the wind effector has a direct effect on the particle stream.
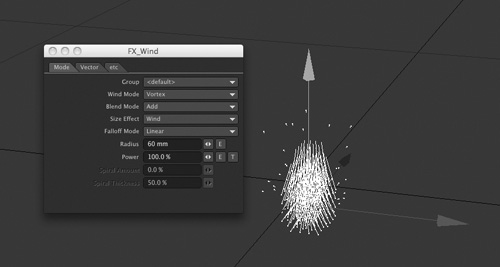
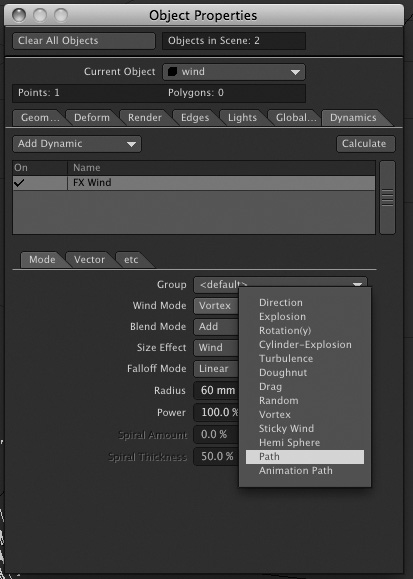
- Remember, you can animate the position or rotation of the wind effector to change how the particles flow throughout an animation. For now, reset the wind effector to its original position by pressing Control+Z (Command+Z on the Mac) to undo your rotational changes. The Wind Mode drop-down determines how the effector acts on particles. Change its setting from Direction (the default) to Vortex, as shown in Figure 9.15 (on the next page). Now the pulsing of the wind effector causes the particles to emit in bursts, at different speeds, adding a bit more realism to the motion.
Figure 9.15. Change the Wind Mode setting to Vortex for random emitter control.
Experiment with the various wind modes to see how they affect the particles. If you find a motion value you like, use it. Remember, you can leave the layout animation playback going to see the particles moving while you make changes to the wind.
- Your scene can contain more than one wind effector, which is pretty cool. So, add another wind effector from the Dynamic Obj drop-down menu on the Items tab.
- For the second wind effector, set its radius to about 120 mm. Then, set Wind Mode to Path, as shown in Figure 9.16. The wind will help “steer” the particles to create a stream of smoke.
Figure 9.16. A second wind effector is added to the scene, and its wind mode is set to Path.
- Move the timeline slider to frame 0, and then select the second wind effector. Activate the Move tool (press t) and drag the effector down, close to the base of the particle emitter, as shown in Figure 9.17.
Figure 9.17. Move the second wind effector down toward the base of the particle emitter.
- Move the timeline slider to frame 80, and then move the wind effector up about 1 m along the Y-axis, and slightly to the right along the X-axis (Figure 9.18).
Figure 9.18. Create a second position for the wind effector.

- Go to frame 160 and move the wind effector again, about 1 m over to the right along the X-axis. Figure 9.19 shows the position.
Figure 9.19. At frame 160, move the wind effector to the right along the X-axis.
- At frame 240, move the wind effector up a bit more on the Y-axis, about 500 mm, and back on the Z-axis about 500 mm. Figure 9.20 shows the position.
Figure 9.20. Move the wind effector up on the Y-axis for frame 240, and back on the Z-axis.
- Click the smoke effector to select it, and then change its Life Time setting to 300. Because the path wind is now dragging the particles, you’ll want them to live a bit longer.
You see, the point here is that you can work through your particle animation and make changes to key factors such as lifetime, velocity, and others at any point. Your settings are always adjustable.
- Finally, if you find that your particles sort of hang around at some point, there’s a chance that the path wind is not large enough to carry them all. So, all you need to do is select the second wind effector and enlarge its radius. If your particles jam up in any area, you can adjust the position of the wind effector.
- Tweak, adjust, and experiment, and then save your scene.
The path wind feature is very powerful. This exercise introduced you to it, but you can go further by rotating the wind at certain keyframes. What would that do, you ask? How about twisting smoke for things like jet exhaust or tornados? Cool stuff. There’s a video called VisualParticle.mov, available as a free download from www.3dgarage.com, that corresponds to this chapter, showing you more about the different particle settings. Be sure to check it out. For now, let’s move on to learn about collisions.
Introducing Particle Collisions
This next section will show you how to apply collision behavior to your particles. The goal is to make particle systems behave realistically when they encounter obstacles in their paths. Think of smoke hitting a ceiling before it dissipates, or water splashing as it hits the bottom of a sink. The next exercise takes the basic emitter example discussed in the previous exercises and expands it by changing its particle flow with collisions.
Exercise 9.4. Interactive Particles
- Use the scene you created in Exercise 9.3 or load the ParticleSmoke scene from the Chapter 9 folder on this book’s DVD. Resave the scene as ParticleCollision.
- Choose Collision from the Items tab’s Dynamic Obj drop-down (Figure 9.21). You can add dynamics to any scene this way.
Figure 9.21. Add a collision effector to the scene.

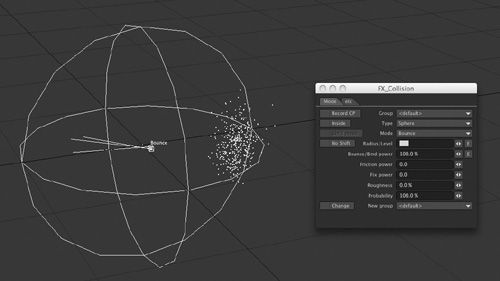
- Take a look at the FX_Collision Properties panel that popped up after you added the collision effector. If you don’t see it, in the Object Properties panel select the Collision dynamic on the Dynamics tab and the appropriate controls appear within the panel. Then, check the layout, and note that your particles have sort of exploded all over your scene. It appears that they are already colliding with the collision effector, as you can see in Figure 9.22.
Figure 9.22. Once a collision effector is added to a scene, it immediately goes to work affecting the particles.
Note
You might have noticed that on the Dynamics tab within the Object Properties panel, you can also add effectors, such as collision. The difference is that adding an effector here will attach it to an object. Since there are no objects in this particular scene, you’ve added a collision from the Items tab instead.
- The default shape of the collision effector, which can be embedded in any object in your scene, is a sphere. We want a flat surface instead for this scene, so in the Properties panel for the collision object, choose Plane from the Type drop-down. Take a look at Figure 9.23 (on the next page) and you’ll see that this creates a collision plane floating above the Y-axis. This is because its Radius/Level setting is 1 m. Changing the Radius/Level setting is similar to changing the radius of the particle emitter, as you did earlier in the chapter. Set this option to 500 mm.
Figure 9.23. New collision planes have a default Radius/Level setting of 1 m.
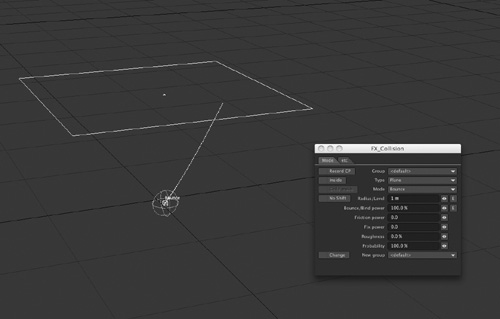
Setting the Type drop-down to Plane is good for particles hitting a floor or wall, and so on, rather than a box or sphere. If you had, say, a building or a car, you could set Type to Object.
Remember, this is as basic as it gets, but collisions work the same no matter what particle scene you’re setting up. The difference here is that you’re working only with effectors and emitters. You can make any object a collision, and place your particle emitter into any object. Be sure to view the VisualParticle.mov movie file (again, available as a free download from www.3dgarage.com) to see this in action.
- Press t to activate the Move tool and move the plane up about 1 m along the Y-axis; then create a keyframe at frame 0 to lock it in place.
Mode is set to Bounce, telling the collision plane to, well, bounce particles that strike it. Alternate settings cause particles to stick to the surface, sink into it, and so on. You’ll see that the Bounce/Bind Power option is set to 100% in the Properties panel. This essentially determines the strength of the collision. For now, this value is fine.
- Save your scene with your changes.
- Drag your timeline slider or click the Play button in the lower-right corner of the interface to see the particles flow. You’ll see them stream up and flow along with the pull of the wind you set up in Exercise 9.3, but now they’ll stop and spread out when they hit the collision plane.
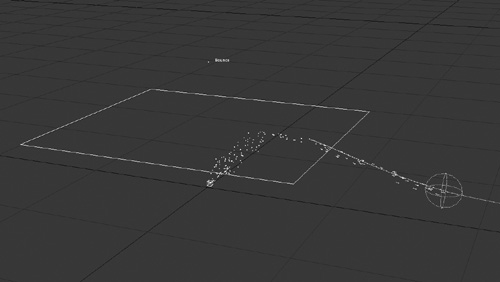
- Click the Inside button in the FX_Collision panel. This tells the particles colliding to be affected in the interior of the collision object, and not just at its surface. Since this object is a flat plane, and it has no interior, this has the effect of stopping the particles from passing through the collision object, so they stay beneath it (Figure 9.24).
Figure 9.24. Inserting a collision plane in the particle stream does not stop the wind effector that’s pulling the particles, but it deflects the particles’ motion.
Note
Particles can be hard to see in Layout. So when previewing a particle animation, it may be helpful to select the scene’s particle emitter(s) first to highlight them and make them easier to see. While shaping the flow of your particle stream, you may also want to set the emitter’s Life Time value to 0 on the FX_Emitter panel’s Particle tab, to make the emitter generate particles indefinitely, without “timing out.”
As you’ve seen in these few exercises, making particles interact and applying dynamics is not difficult. You’ve easily added an emitter, added wind effectors, and included an animation path. You then made those particles interact with an object by adding a collision dynamic. But there’s one other thing that might be really helpful: surfacing the particles.
Surfacing Particles
It’s possible to exert a ton of control over your particles using things like gravity and collision dynamics, and if you watch the videos for this chapter (available as free downloads from www.3dgarage.com), you’ll see more examples. But you can take even the simple particles created here a step further by setting up a cool surface for them. And once the surfaces are set, you can still go back and make changes to the particle emitter and interactively change the parameters with more vibration, less wind, or faster velocity for cooler effects. For now, these particles are cool, but what good are they? If you render a frame, you’ll see nothing. If there were objects loaded in the scene, you’d see only those render, and you still wouldn’t see the particles. That’s because you created an HV emitter earlier in the chapter, meaning you must apply HyperVoxels to them to make them visible.
Another type of emitter you could add is a Partigon emitter. It works similarly to an HV emitter, except that it generates single-point polygons that will show during a render. These are great for tiny sparks, water sprays, or even stars.
Three surfacing options are available for HyperVoxels: Surface mode, for solid blobby objects; Volume mode, for 3D clouds and smoke; and Sprite mode. Sprites are like 2D surface maps that emulate the effect of a HyperVoxel when it’s applied to a 3D volume. They render much more quickly than true 3D HyperVoxels. These settings have no effect on the particles’ motion in Layout, but only on their appearance. They are fast, great for smoke effects, easy to set up, and always visible in Layout!
Exercise 9.5. Surfacing Particles for Smoke
- Load the scene you completed in Exercise 9.4, or load the ParticleCollision scene from the CH9 folder of this book’s DVD. Then press Control+F6, or select Volumetrics and Fog Options from the Window drop-down menu at the top left of the Layout interface. You can also choose HyperVoxels from the Window drop-down menu, but you should understand that HyperVoxels is an effects plug-in. The Effects panel will appear with its Volumetrics tab active (Figure 9.25).
Figure 9.25. Press Control+F6 to open the Volumetrics tab of the Effects panel, home of the HyperVoxels volumetric control.

- Select HyperVoxels from the Add Volumetric drop-down, and then double-click the name in the object list that appears in the tab. The HyperVoxels panel will open.
You’ll see the name of the HV_Emitter (“Smoke”) grayed out in the Object Name list (Figure 9.26).
Figure 9.26. As soon as you load up HyperVoxels, your particle emitter is visible but inactive in the Object Name list.
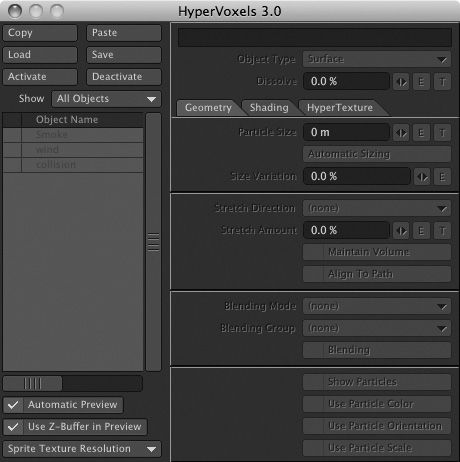
- To activate HyperVoxels for the particle emitter, either double-click the Smoke entry in the Object Name list, or select it once and click the Activate button just above the upper-left corner of the Object Name list window.
The grayed-out controls in the panel’s Geometry tab will become active, and you’ll see that the Particle Size setting has been set for you automatically.
- Move the timeline slider to a frame in which some particles have been emitted. You’ll be previewing your particle-surface settings directly in Layout with VPR, so we need to work in a frame in which some particles appear.
- Now, the best way to begin setting up smoke for these particles is to use VPR. Choose this view option from the top of the Layout window.
- VPR can show the particles in any view, but remember that they’ll render only from the selected camera. If need be, position the camera in such a way that you can see the particle stream. A quick way to do this is to press the Tab key to hide any open settings panels; select the camera in Layout; switch the view mode to Camera; press t to activate the Move tool; and click and drag in the scene window to move the camera in closer to the particles. When set, create a keyframe at frame 0 to lock the camera in place, and then press Tab to unhide the HyperVoxels panel.
- In the VPR layout window, you’ll see some white blobs. By default, HyperVoxels uses Surface as the Object Type. This is great for lava, blood, shaving cream, and things of that nature. It’s also great for water, and you’d just need to add transparency and reflections for the effect. But if you change the Object Type to Sprite, you can make great-looking smoke. Go ahead and change the Object Type setting in the HyperVoxels panel to Sprite.
Note
If you want to see how this setting looks, go ahead and make a preview of your particle animation directly in the VIPER window. From the Preview drop-down menu, click Make Preview. After the preview is generated, play buttons will appear. You can stop the preview generation at any time by pressing the Esc key on your keyboard.
- Click and drag the Particle Size mini-slider and change the setting to 40 mm.
- Set Size Variation to 180% to randomize the size of the Sprite particles a bit. Note that although the mini-slider for Size Variation maxes out at 500%, you can manually enter a value much higher than that for added control.
- Set Stretch Direction to None, so that the particles don’t stretch based on their movement. You would use a stretch direction if you were creating fast-moving particles, or perhaps pooling water. Make sure Align to Path is checked.
- Click the Shading tab and then set the particle color to a grayish blue, using settings of (or close to) R: 172, G: 175, B: 200.
Just as you set up textures throughout the book using LightWave’s Surface Editor, you can do the same here in the HyperVoxels panel. You can apply a texture to the HyperVoxel particles just as you would for an object’s surface.
- Set Luminosity to 70% for a softer look. Set Opacity to about 90%. Making this value lower would add more brightness, almost a glow, to the particles.
- Set Density to 55% to break up the smoke a bit.
- Set Number of Slices to 7, the maximum. LightWave defaults to 1 slice. As stated, a sprite is a slice of a HyperVoxel. The more slices, the more detail, but of course, the more rendering time. In some cases, a setting of 1 is all you need, but in this case, 7 gives you the cleanest render. Figure 9.27 shows the settings.
Figure 9.27. Tweak just a few sprite-surface settings and the particles start looking like smoke.

Note
The Orient Slices To Ray setting is designed to keep the slices pointing towards the camera. This helps cut down on render time, allowing the system to calculate for only what the camera sees.
- Click the HyperTexture tab and choose Turbulence from the Texture drop-down. This applies more variation to the HyperVoxel surfaces. You can experiment with other settings if you like. Set Texture Effect to Billowing and leave the other values at their defaults. Essentially, you’re applying an animated texture, characterized by billowing turbulent noise, to the particle surfaces. The results are easier to see than to describe.
- Slowly drag the timeline slider and watch your particles move, with HyperVoxels applied.
- Save your scene, and then experiment. Note that what you see in the VPR window is what you’ll see when you render your particles. If you’re using just VIPER, the preview is not as accurate. They look much better if you press F9 for a full frame render.
What you’ve done here (Figure 9.28) is basic, but for many types of particle animations, nothing more complex is necessary. With the power of LightWave’s particles, in combination with HyperVoxel surfaces, added textures, and even gradients, the possibilities are endless. Endless how? Read on for another variation on these particles.
Figure 9.28. As you adjust particle-surface settings, remember that VPR will allow you to see instant changes to backdrops as well as particle surfaces.
Note
You can speed up render times slightly by turning off the Volumetric Antialiasing option in the Volumetrics area of the Effects panel (press Control+F6). If you’re using volume-based HyperVoxels, antialiasing will help create a cleaner final render. But for sprites, you can get away with having this setting turned off.
Using Images on Particles
Yes, you read that heading correctly—images on particles. Although it sounds odd, it’s actually a very handy feature for all sorts of animations—falling snow, falling leaves, bubbles—whatever!
Check this out.
Exercise 9.6. Using Images on Particles
- With the same scene loaded from the previous exercise, open the Image Editor. Load the MapleLeaf.png image from the CH9 folder of this book’s DVD, as shown in Figure 9.29.
Figure 9.29. Loading a 32-bit image from the Image Editor can make your particle systems flow with pictures!

- Back in the HyperVoxels panel, make sure you’re still using Sprite for Object Type.
- Next, click the panel’s Shading tab, and then select the Clips tab that appears there.
- Select the MapleLeaf image from the Add Clip drop-down. Watch what happens in Layout—you’ll see the leaf image applied to the particles. They grossly overlap each other and probably are showing a white outline, but that’s OK.
- Change the Alpha setting to Embedded. Then, go back to the Geometry tab and set Particle Size to about 15 mm and Size Variation to 50%; Stretch Direction should still be set to None. Figure 9.30 (on the next page) shows Layout with the MapleLeaf image in place.
Figure 9.30. A small image is replicated and applied to every particle in the emitter using a HyperVoxel sprite and clips.

That’s it! You now have a stream of floating leaves. HyperVoxel sprites with clips are quite useful. As we just saw, one of the reasons they’re so useful is that you can take tiny images and animate them quickly using particles. You can see them directly in Layout, so you know what’s happening with their size and color, and they always face the camera.
Of course, you can adjust the motion of the particles, perhaps by adding another wind effector at the top of the path to make the particles spread out as they reach their end. You can also change the emitter to a large, long, flat shape to emit sprite clips such as coins, bubbles, puffs of smoke, and so on. Or how about multiple streams, each with an image of a letter? The examples here should get you started with your own particle animations. All you need to do is create a 32-bit image so that the Alpha channel is embedded. You can do this in Adobe Photoshop. Just load up the image you want, place it on a transparent background, and save.
Editing Particles
You can do a lot to particles within LightWave. As you’ve seen, you can push them, pull them, make them collide with other objects, and so on. They can look like foam, smoke, or leaves. But what happens when you have everything looking just as you like, and then some pesky particle, following the semi-random rules of particle motion, goes astray and gets in the way of your animation? You don’t have to live with it; you can edit your particles. Read on to learn how.
Exercise 9.7. Editing Particles
- Load the Particle Image scene from the CH9 Scenes folder on this book’s DVD.
- Go to a Perspective view and arrange the viewport so that you can see the majority of the particles.
- Select the particle emitter named “Smoke” and press p to open the Properties panel.
- Click the Dynamics tab in the Properties panel and select the FX_Emitter listing. Click the Calculate button in the middle of the panel.
- After the calculation is complete, drag the timeline slider, and you’ll see the particles moving. There are one or two that are sort of hanging out of the stream, so let’s remove them.
- To fix these crazy particles, click the EditFX tab in the FX_Emitter properties.
- Click the Edit tool, and then select one of the wayward particles directly in Layout, as shown in Figure 9.31. When the particle is selected, you’ll see a line appear—that’s its motion path, also shown in Figure 9.31. The number you see is its ID.
Figure 9.31. With the Edit tool in the FX_Emitter properties, you can isolate any particle.

- When the particle is selected, click the Delete button in the FX_Emitter properties and the selected particle will be deleted. You can also just reposition the particle using the Move tool (press t).
- Repeat steps 7 and 8 as needed to remove (or move) any other stray particles in the stream.
Cloning a particle, copying its motion path, and rotating its path are just some of the other things you can do on the EditFX tab.
The Next Step
This chapter introduced you to some of the coolest features in LightWave’s arsenal. The information in these exercises can easily be applied to projects of your own and ones for your client. You’ll find that particles are so fun to use, you’ll be looking for projects to use them in. Be careful, though—don’t let your client know how easy it is! For now, turn the page and learn about more dynamic effects you can create in LightWave beyond particles.