
Chapter 12. The LightWave Render Engine
LightWave provides you with a variety of rendering methods that are easy to set up and use. You’ve seen throughout the book that right from the starting gate you can use VPR, the viewport preview render function, to instantly see your rendered scene as you work. But for final animations, you’ll also want to use the full set of rendering tools LightWave is famous for.
In this chapter, you’ll learn about the following:
• Applying global settings the Render Globals panel
• Setting up renders for animations
• Saving renders
• Changing render color space
• Using the RenderQ control
Working in the Render Globals Panel
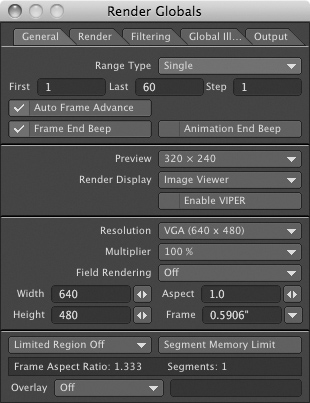
Figure 12.1 shows the LightWave Render Globals panel in Layout. You can find this panel by first going to the Render menu tab at the top of Layout and then clicking the Render Globals command on the left side of the interface.
Figure 12.1. The LightWave Render Globals panel is one location where you can set up your camera and rendering options.
You’ll find that the LightWave render engine is one of the best in its class. It’s fast, efficient, and—most importantly—good at what it does. As you can see from the images throughout this book and on NewTek’s Web site, LightWave produces the highest-quality renders in its class. Through the software’s radiosity rendering, area lighting, and shadow options, the LightWave rendering engine can deliver beautifully rendered images and animations. But before you get to that level of rendering, it’s good to know the process of setting up an animation to render.
The Render Globals panel might seem confusing at first. It’s a part of LightWave that houses your camera properties, render options, and saving properties. You can work with the Camera Properties panel as you have throughout this book and in the past, but you can also work in just the Render Globals panel tool. On a simple level, you can set up properties, including resolution, for your camera for rendering. Then, use the Render Globals panel to save your animation.
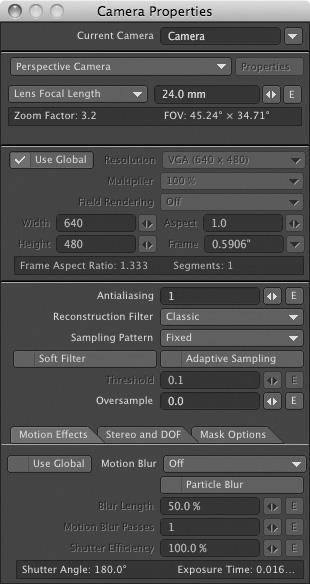
You can also tell the Camera Properties panel to “Use Global” and then set your resolution, output settings, and more, all within the Render Globals panel. If you do that, what happens to the Camera Properties panel, you ask? You can still use this panel for various camera controls. All other render-related settings will be done in Render Globals. The Use Global option is found in a check box right in the middle of the Camera Properties panel (Figure 12.2). By selecting the Cameras listing at the bottom of the Layout interface and then pressing p, you’ll find this panel. In the middle of the panel, you’ll see that the Use Global option is checked. The resolution settings are now ghosted. When you set the resolution in the Render Globals panel, those values will be applied. This alleviates the problem of jumping back and forth between the Camera Properties panel and the Render panel to set up an animation. Additionally, the Render Globals panel is useful for dealing with multiple cameras in a scene, and for having only one place to make sure that all cameras are rendering the same resolution/size, and so on.
Figure 12.2. To use the Render Globals panel fully, make sure Use Global is checked within the Camera Properties panel.
Setting Up an Animation to Render
Before you can render an animation (on one machine or across a network), you need to set up the animation properly. There are a few details you need to run through first to properly set up an animation for rendering, all of which will be done in the Render Globals panel.
Using the Render Globals panel, you can check your settings for rendering. For proper camera placement, these values should be set up before you begin animating, and it’s always a good idea to double-check them before you render. In addition, you can set up any motion blur, field rendering, or antialiasing here.
Range-Type Rendering
Normally you wouldn’t find too much information in this chapter about single-frame rendering, because it’s a very old process not often used anymore. This process involved a special cable connected to a broadcast-quality tape recorder. From there, using a single-frame command setting, LightWave would render a frame, and then record it directly to tape. Today, animators render to digital movie formats, such as AVI or QuickTime, and also image sequences. Press F9, and you’ve rendered a single current frame. But there’s more to this feature in LightWave 10. At the top of the Render Globals panel, you’ll see a selection named Range Type. Here, you have three options for rendering:
• Single: Setting Range Type to Single tells LightWave to render one frame at a time. Pretty easy, huh?
• Arbitrary: This cool setting enables you to render a range of frames. Let’s say you wanted to render frames 1 through 10, as well as 12, 13, and 20. Set these frames in the panel, and away you go! LightWave renders the specific frames.
• Keyframe: Here, you pick one object for the keyframes on which to render. Say you wanted to render the penguin from Chapter 11, “Bones & Rigging,” on just the Z-axis. Set those values next to Range Type and render your animation. The Keyframe option renders the frames that have keyframes on an object’s channel. For example, if you had a keyframe on the Z channel for a light at 0, 12, 30, 45, and 60, those frames would be rendered with this setting.
General-Purpose Rendering
After you’ve chosen the Range Type setting you’ll use, you need to set up the rest of the render options. Most often, to render a full animation, you’ll choose Single as the Range Type. This exercise guides you through the kind of rendering most commonly used by LightWave animators: rendering that generates animations for video or computer work. If, however, you are using LightWave for rendering anything other than video or computer work, such as film or print, the information here still applies, and the differences are noted.
Exercise 12.1. Creating a Basic Render
- In Layout, load the RenderMe scene from this book’s DVD.
This scene is from Chapter 7, “Motion Graphics,” with surfaces, animation, and camera settings applied. Figure 12.3 shows the scene when loaded.
Figure 12.3. A premade scene loaded, for you to test out some rendering.

Generally, you would have set up your camera when you set up the animation in Layout. You’d do this because a different camera setting can change how your Layout setup looks. The first thing to do when you’re ready to render is display the Camera Properties panel. You are ready to render when you have all your lighting, textures, and motions in place. This scene has all these in place.
- Make sure your scene is set up in the Camera view. You can press 6 on your keyboard for a quick change. Select the camera (if it’s not already selected) and press p to enter the Camera Properties panel. When the panel opens, click the Use Global option. Also make sure that Use Global is checked on under the Motion Effects tab.
The Current Camera setting at the top of the panel should read Camera, because there is only one camera in the current scene.
- From the Render tab at the top of Layout, click the Render Globals option on the left of the interface.
- Set the Resolution to HDTV (1280 x 720). Make sure that the Resolution Multiplier is set to 100% for actual-size output. You’ll see the Width and Height values change when you do so.
- You won’t need to change the Segment Memory Limit setting because LightWave defaults to 256 MB. A value this high means that a rendered frame will be drawn in one pass. If you’re short on system memory, you can use a RAM setting lower than 256 for rendering. In that case, the Segments value can be greater than 1—say, 64 or 32 (the pre-LightWave 10 default value). Your project won’t render as quickly, but your scene will still look great.
LightWave now has more memory with which to work and will render your frames in single segments.
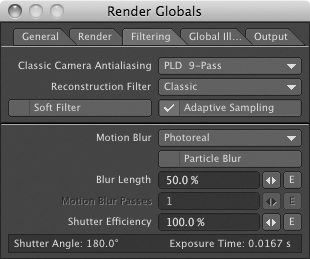
- Click over to the Filtering tab at the top of the panel. Set Antialiasing to PLD 9-Pass, with a Classic Reconstruction Filter. Then, click Adaptive Sampling.
A lower PLD pass will render faster but have less filtering accuracy. A higher PLD pass will take longer to render but result in a very accurate render. PLD 9-Pass is a good midpoint value for most render jobs.
Activating this setting tells LightWave to look for the edges to antialias in your scene. The Threshold value compares two neighboring pixels, and a value of 0 sees the entire scene. A good working value is .1. You can set the value higher, which lowers rendering time but performs a less accurate antialiasing.
Note
While you’re working, it’s not necessary to have antialiasing on, but you definitely want it on for your final renders. Although you have the choice of Low to Extreme settings, I recommend that you render all your animations for video in at least Enhanced Low Antialiasing. Medium or Enhanced Medium Antialiasing can provide you with a cleaner render. High Antialiasing is overkill and a waste of render time for video. It might actually make your images look blurry.
- Set Motion Blur to Photoreal. With future renders, you can experiment with setting this value higher for more blur, or lower for less. There are no particles in this scene so you don’t need to check Particle Blur.
- Shutter Efficiency should remain at 100%. This is another option in LightWave to help simulate a real-world camera and the shutters it uses. Figure 12.4 shows the panel.
Figure 12.4. Make sure properties are set in the Filtering tab to keep your renders clean.
- Save your scene, and all of your settings are saved along with it.
You should visit the Render Globals panel at least twice during an animation, if not more—once to set up the camera and zoom factors before beginning animation setup, and once before you are ready to render to set up antialiasing, motion blur, field rendering, and proper resolution size. From here, you can set up the other options in the Render Globals panel.
Exercise 12.2. Creating a Render with LightWave
- With the RenderMe scene from this book’s DVD still loaded, open the Render Globals panel.
Figure 12.1 shows the Render Globals panel. You can see First (indicating first frame of render) and Last (last frame of render) values at the top of the panel. If your LightWave animation in Layout has a first frame of –30 and a last frame of 300 (or any start or end frames different from the customizable default values of 1 and 60), it will not render those frames unless they are entered here.
Note
Frame End Beep is useful for monitoring the completion of your rendered frames, but is not necessary. It’s kind of annoying after a while. However, LightWave lets you change the default frame end beep to a specific sound file. This can be even more fun with the new Render End Beep to tell you your scene is finished rendering.
The frame numbers you assign to your timeline in Layout do not automatically apply in the Render Globals panel.
Leave First set to 1, and set Last to 300 (10 seconds). LightWave defaults to a last frame of 60; however, you can change this default in the General Options panel (press o).
- Set the Step value to 1 to render every frame. A render-frame Step value of 2 would render every two frames, for example.
- Click Auto Frame Advance. A crucial setting!
This tells LightWave to advance to the next frame and continue rendering, which is very important for full animations!
- Turn off the Render Display by setting it to None.
Note
The Image Viewer and Image Viewer FP render display remembers your rendered frames. Turn this on while performing test renders on individual frames (press F9) and leave it open. You can select any of your previously rendered images from its Layer list. You also can view the Alpha channel in this viewer and save an image.
- Click the Render tab at the top of the Render Globals panel.
- Make sure Ray Trace Shadows is on, but not Ray Trace Reflection or Ray Trace Refraction. These options are not needed in this particular case. No refraction is used in this scene, so keeping this option on would only increase render times. If you wanted your object to reflect what’s around it, such as other objects, the set, or props, you’d first set a reflection value in the Surface Editor (or Node Editor) and then turn on Ray Trace Reflection. The same applies to Ray Trace Refraction, for instance, if you wanted a transparent object such as a glass to refract light traveling through it.
You also can add Ray Trace Transparency for objects that need to have a transparent surface reflect a certain way, such as a car window. For now, this can be left off.
- Render Mode is usually set to Realistic and is not often changed. However, you do have the option to render wireframe or quickshade versions of your animations here.
- Click Extra Ray Trace Optimization. Set the Ray Recursion Limit value to 6. The higher the value, the longer LightWave takes to render, but the more accurate your Ray Tracing is.
Note
Setting a Ray Recursion Limit value too low for scenes that have transparent surfaces may result in a black, opaque surface instead of a see-through surface! If this happens, just up the Ray Recursion Limit value a bit.
The Ray Recursion Limit setting, which doesn’t often change, determines the number of times LightWave calculates the bounced rays in your scene. In the real world, this is infinite, but in LightWave, you can set a Ray Recursion Limit value up to 24. Changing this setting increases render times. A good working value is 12. However, setting a lower value of 6 or 8 can be a real time-saver when using the Ray Trace Reflection option. For best results, try not to set this value lower than 6. If you find render errors, such as black dots, bring this value back up to 12 or so.
- If your computer has more than one processor, select 2, 4, 8, 16, or even 64 for Multithreading. If you have only one processor, set Multiprocessing to 1. Better yet, leave this set to Auto and LightWave will set it for you.
Some plug-ins might not be compatible with multithreading, so remember to check this setting if you find errors in your render.
Note
This book was written for LightWave 10.0, which now supports multithreading up to 64 processors!
- Back in the General tab, you can set Overlay to display the Frame Number, SMPTE Time Code, Film Key Code, or Time in Seconds in the lower-right corner of your animation.
This is good for reference test renders. In addition, when one of these values is set, you can add a note in the Label area. This feature comes in handy when you’re doing test renders for clients who have a history of not paying and/or of stealing your work. You can put a copyright notice in the upper corner, for example.
- After you’ve set all the render options, be sure to save your scene.
Those are the main parameters you must set up to render an animation. However, you still need to tell LightWave where to save the files and what type of files to save. The next section discusses the various file formats and procedures for saving your animations.
Note
Saving regularly before any render (even a single-frame render) is a good habit to get into.
Saving Renders
Within the Render Globals panel is another tabbed area, titled Output. This area is where you tell LightWave what type of file you want to save, where to save it, and in which format it should be saved. Figure 12.5 shows the Output tab within the Render Globals panel.
Figure 12.5. A render is no good if you don’t tell the system where to save it. You do that here in the Output tab.
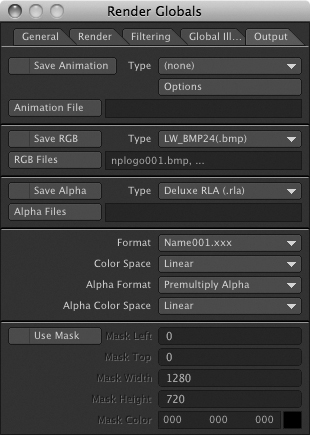
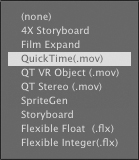
The first area within the Output tab is the Save Animation selection. This confuses many people. You’re creating an animation in LightWave, right? Save Animation! It makes sense—but it means something a little different. Clicking Save Animation enables you to save your rendered frames as one animation file, in a format such as AVI, QuickTime, or RTV (Video Toaster). It saves one complete file, as opposed to a series of individual rendered frames. You select different types of animations to save by using the Type selection option. Note that you’ll need a Video Toaster board from NewTek for the RTV option.
Using Save Animation is great for previewing QuickTime movies or for using Aura and Video Toaster, but you also can save individual frames—and do so at the same time. If you select the Save RGB button, you’re telling LightWave to save the individual frames as they’re rendered. Similarly, with Save Animation, you select from a variety of RGB formats in which to save your animations by selecting the one you want from the Type drop-down list, as pictured in Figure 12.6.
Figure 12.6. You can save directly to an animation file simply by choosing the appropriate type.
Color Space
This is a great new addition to LightWave, and it allows you to change the color space of your renders. Why would you do this? Often, an animation output is mixed with a video edit later in postproduction, and sometimes the color values don’t quite match. Additionally, the color space in LightWave 10 offers you greater control over how your scene lighting appears. To make things clearer, there’s a video on the book’s DVD all about color space.
Finally, in the Output tab, you also can save the Alpha channels of individual frames. This is great for later compositing in a postproduction environment. Remember that all these file types can be saved with one rendering. You can save a QuickTime or AVI file, plus the RGB and alpha files, all at once. Depending on what’s in your scene, you can save a sequence of 32-bit files, such as TIFF or PNG, and the Alpha channel will be embedded in the RGB frames. Simply load that sequence into your compositing program and you’ll instantly be able to blend it into other projects.
When all this is set—the camera resolutions, the rendering information, and the output file information—you’re finally ready to render your animation. Press the F10 key to render your animation. Congratulations!
Render Selected Objects
If you click the Render tab in Layout, you’ll see the Sel Object option under the Render category on the left of the interface. Because LightWave enables you to select multiple objects, you can save significant amounts of rendering time with this option. In the Scene Editor or in Layout, you can select all objects at once by holding the Shift key and clicking the objects. Rendering selected objects has two useful functions:
• It saves render time by rendering only the objects you’re interested in at the moment.
• It enables you to render multiple passes of the same animation with or without certain objects. This is great for special effects or compositing, or even for rendering before-and-after sorts of animations.
Note
You might have a high-resolution frame that needs to render over a long period of time. You can tell LightWave to automatically save this frame by setting up the render options as though you were rendering a full-length animation. Set the RGB format, output filename, and location for saving, and then click Auto Frame Advance. Make the First frame and the Last frame the same frame you want to render—say, frame 10. LightWave renders that frame and saves the RGB, and because it’s also the Last frame, rendering then stops.
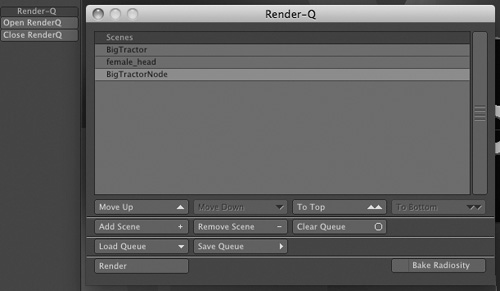
RenderQ
A terrific feature that you might find exceedingly useful on long weekends is the RenderQ control. From the Render tab in Layout, you’ll find RenderQ on the left side of the interface. Clicking this button brings up a panel that lets you create batch renders very simply. Figure 12.7 shows the RenderQ window with multiple scenes loaded. You can set up as many as you like and let the rendering begin. When one animation finishes, LightWave loads the next and automatically starts rendering. However, there’s one huge thing you need to do to get this to work. You must make sure that your scene is saved with all the information properly set up from within the Render Globals panel, such as what to save, where to save it, how much to render, and so on. Basically, if you’ve set everything up as described in this chapter, just save the scene with the render setup, and load ’er up in the RenderQ.
Figure 12.7. Use the RenderQ command to set up a batch render of multiple LightWave scenes.
Thoughts on Rendering
You can refer to this section of the book often when it’s time to render your animations and images. But then you have to answer the question that arises: “What’s next?” When your animations are complete, the next step is to bring them into a digital animation recorder and lay them off to tape or edit your final animations with audio and effects in a nonlinear editor.
No matter what you create in LightWave, unless you export your scene or model to another artist, you must render your scene. Someday, you might not need to render, as processors and video cards become increasingly powerful. For now, though, LightWave still has to render, just like any other 3D application. But you’ll find that the rendering engine inside LightWave is one of the best around. It’s strong and stable, and most importantly, it produces beautifully rendered images.
NewTek has added many OpenGL enhancements. These speed up your workflow and give the poor F9 (Render Current Frame) key a break. Work through the exercises in this book and make your own animations anytime you can. You can’t be in front of your computer 24 hours a day—well, maybe you can, but you shouldn’t. If you need to be in front of a screen, try going out to a movie! When you get ready to take a break, set up a render. Don’t just wait until the animation is “perfect.” Render often and see how your animation looks. You might find new ways to enhance it and make it even better. Or you might just find that it’s perfect the way it is. Now, if they only had a way to do LightWave while driving to work...
The Next Step
As you’ve seen, LightWave has plenty of rendering power. These examples can help you maximize your use of your computer, as well as your time. There’s not much more to it, other than using moving images rather than stills. Use programs like Apple Final Cut Pro, Adobe After Effects, or even Apple’s Motion for compositing final rendered images, and make your work really stand out!