
Chapter 4. Lighting
Working in 3D animation requires you to wear many hats. You’re a draftsman, a 3D modeler, a producer, a painter, and even a gaffer—the person on a film set who takes care of the lighting. As a 3D animator, unless you’re working in a big animation studio, you do your own lighting. And like many, you might consider lighting to be one of the less important aspects of your 3D animations, or simply an area that’s outside your comfort zone. But lighting is crucial to your success as an animator, and fortunately it’s not that hard to set up once you learn a few basic rules.
Lighting can be used for so much more than simply brightening a scene. Lighting can completely change the look of a shot. It can convey a mood, a feeling, or even a reaction. Lighting is vital in film, photography, and of course, 3D animation. Basic lighting can make your renders hot or cold; in other words, the color of the light you choose, where the lights are placed, and other aspects of lighting play a role in the final image. Lighting can improve your animations. But you need to be aware of some basic real-world principles before you can put it all together.
Lighting has an evil twin: texturing. OK, maybe it’s not evil, but it can be challenging, and understanding texturing and how it’s affected by lighting is one of your main goals as a 3D artist. This is probably one of the areas animators struggle with the most, and an area that can often make or break your project. However, don’t worry; LightWave makes it easy to apply complex surfaces and get instant feedback. The look of a texture can change significantly based on the lighting associated with it. So, the two go hand in hand.
The previous chapter introduced you to LightWave 10’s surfacing capabilities, including the Node Editor. Take that knowledge and move through this chapter to learn how to light your models and scenes.
This chapter instructs you on the following:
• Understanding basic lighting principles
• Using different light sources
• Enabling radiosity
• Lighting with gobos
• Creating soft shadows
• Interacting with materials
Working with Lights
Eight light types are available in LightWave Layout. Each has a specific purpose, but none is limited to that purpose. One thing to note is that each light has variances in settings. The area light, for example, can be scaled, but the spotlight can’t. Distant lights use only rotation for their effect, whereas point lights use only position. Check out the Lighting Basics video on the book’s DVD to see them in action.
Note
While you’re working in LightWave’s Modeler, you will not see a light source illuminating your shaded model in a Perspective viewport. Do not let that fool you, because it has nothing to do with your final lighting setup. Lights are available only in Layout.
• Area lights. The best choice for creating true shadows, area lights create a brighter, more diffuse light than distant lights and therefore result in greater realism. They do, however, take longer to render than spotlights, distant lights, or point lights.
• Distant lights. You can use a distant light for simulating bright sunlight, moonlight, or general lighting from a nonspecific source. Shadows from this light are hard. A distant light’s position does not matter to your scene; only its rotation matters.
• Dome lights. Used for creating a pseudo-environmental lighting environment, the dome light encompasses the entire scene.
• Linear lights. You can use linear lights as elongated light sources, such as fluorescent bulbs and neon tubes. Linear lights can have realistic shadows but consume additional rendering time.
• Photometric lights. Photometric lights have become more common in 3D applications over the last few years. This type of light uses a predetermined file called an IES file. You can find more about these file types at www.CGArena.com.
• Point lights. You can use a point light to create sources of light that emit in all directions, such as a candle, lightbulb, or spark. Unlike a distant light, a point light’s rotation does not matter in your scene; only its position matters. It, too, yields hard-edged shadows.
• Spherical lights. Simliar to a point light, a spherical light might prove a better source of light for bulbs or special effects. Light is more concentrated to a sphere and less streaked than, say, a point light. The size of the light is important too; it affects the sharpness of the shadow. Smaller lights, sharper shadows. Larger lights, softer shadows.
• Spotlights. The most commonly used lighting type, spotlights can be used for directional lighting, such as canister lighting, headlights on cars, studio simulation lighting, volumetric lighting, and more. Spotlight rotation and position play roles in your scene. A spotlight’s shadows can be either hard or soft with shadow mapping.
The environment in which your animation lives is crucial to the animation itself, which is why we dedicate a chapter to lighting and textures. You should consider color, intensity, and ambient light each time you set up a scene. Too often, tutorials overlook the power of light, but you know better! Using lights, along with shadows, as elements in your animation can be as important as the models and motions you create. As you work through setting up lights in your 3D scenes, you should get used to setting one variable in particular: light intensity, also called brightness.
Note
Although we could dedicate this entire chapter and more to theory, design, and usage, we thought it better to demonstrate by doing. This chapter focuses specifically on using LightWave’s lighting system so you can achieve results immediately. For an excellent lighting reference book, check out Digital Lighting & Rendering, second edition, by Jeremy Birn (New Riders, 2006).
As you work through lighting setups in this chapter and throughout this book, check out the types of lights LightWave has to offer. At the bottom of the LightWave Layout interface, you’ll see the familiar item selection buttons—Objects, Bones, Lights, and Cameras. Click the Lights button, and then click the Properties button to the right. Alternatively, you can always press p to open any item’s properties. You’ll see the LightWave Light Properties panel (Figure 4.1).
Figure 4.1. The Light Properties panel, as shown with a single default light.
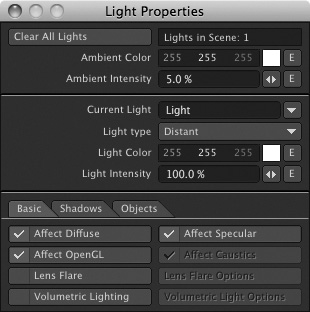
Looking closely at Figure 4.1, you can work your way down the panel, using the following explanations as your guide. At the very top of the panel, you can quickly clear all lights by clicking the Clear All Lights button. Be careful with this, as it clears all the lights in your scene, except for the default distant light. If you’ve changed the default light, clicking this option resets it. Next to the Clear All Lights button, you’ll see an information display called Lights in Scene.
Another interesting part of LightWave when it comes to lighting is the Global Illumination option. This is an important area of your 3D lighting setup. However, you won’t find Global Illumination settings in the Lights panel but in the Render Globals panel. We’ll cover these settings just after the basic lighting information, later in this chapter.
Note
The Current Light drop-down list near the top of the Light Properties panel contains the name of each light in your scene. The default single distant light is named, simply, Light. Select this entry in the list and you can quickly rename it. You can do this for any light you add. Lighting in 3D animation is an art all its own.
Light Color
The color of the light you use is important and useful in your images and animations because it can help set tone, mood, and feeling. No light is ever purely white, and it’s up to you to change LightWave’s default pure-white light color. The color selector works the same as the other color selectors in LightWave. You can also animate the RGB values with the Graph Editor. In LightWave, you can even animate colored lights. Clicking the E button takes you to the Graph Editor, allowing you to vary the light color over time. Very cool! You’ll use this for all kinds of things, such as animating a rock concert where you need to have fast-moving lights shining on the stage. By animating the light color, you can change the colors over time at any speed you want.
Light Intensity
When you start LightWave Layout or choose Clear Scene, by default there is always one light in your LightWave scene. It has a light intensity of 100% and is a distant light. Although you can use this one light and its preset intensity as your main source of light for images and animations, it’s best to adjust the light intensity to more appropriately match the light and the scene at hand.
Did you know that light intensities can range from values in the negative to values in the thousands? You can set a light intensity to 9000% (or higher) if you want, just by typing in the value. The results might not be that desirable and may even be unstable, but you never know what your scene might call for. In general, if you want to create a bright, sunny day, you can use a point light, which emits light in all directions, with a light intensity of 150% or so for bright light everywhere. On the other hand, if you want to light an evening scene, perhaps on a city street, you can use spotlights with light intensities set to around 60%. As you build scenes throughout this book, you’ll be asked to set up different light types, with varying intensities. This will also help you get a feel for setting the right intensity.
Note
The mini-slider (the left and right arrows) next to the Light Intensity setting in the Light Properties panel allows you to click and drag values ranging from 0 to 100. However, by manually entering values, you can set higher or even negative values!
Negative lights, or “dark lights,” can also be handy depending on the scene you’re working on. Whereas lights with a positive light intensity can brighten a scene, negative lights can darken a scene. You might be asking why you would darken a scene with a negative light instead of just turning the lights down. For example, you might have to add a lot of light to make areas appear properly lit. Depending on the surfaces you’ve set, the extra light might make one area look perfect while making other areas too bright. This is where negative lights come into play. Adding a negative light (any light with a negative light intensity value) takes away light from a specific area.
Adding Lights
In most cases, you’re going to use more than a single distant light in your 3D scenes. This section shows you how to add lights. Follow these simple steps to add lights to LightWave Layout to get a feel for how they work. And remember, unless you’re working with Auto Key enabled, you’ll need to create a keyframe to lock your lights into position after they’re moved, just like objects.
Exercise 4.1. Adding Lights to Layout
- Jump into Layout, and load the UnlitTractor scene from the book’s DVD. This is similar to the scene file from Chapter 3, but with one default distant light.
- Make sure you are in Perspective view so that you have a full view of Layout. You can press 4 to quickly jump to the view. On the Items tab, under the Add category, select Lights, and then select Spotlight to add a spotlight to the scene. Figure 4.2 shows the menus.
Figure 4.2. You can add lights directly in Layout under the Items tab.
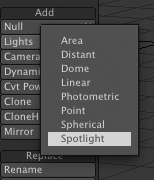
You can choose to add any type of light you want.
- Before the light is added to Layout, a Light Name panel appears (Figure 4.3).
Figure 4.3. After you add a light, the Light Name panel appears, enabling you to set a specific name for your light.
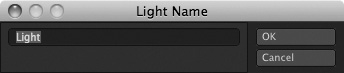
- Type the word Fill to name the new spotlight.
Note
You don’t have to change the name of a new light. Instead, you can accept LightWave’s default light name by clicking OK when the Light Name panel appears. By default, LightWave names new lights Light (1), Light (2), Light (3), and so on.
Layout places the new light at your scene’s origin point (the 0 coordinate shared by the X, Y, and Z axes).
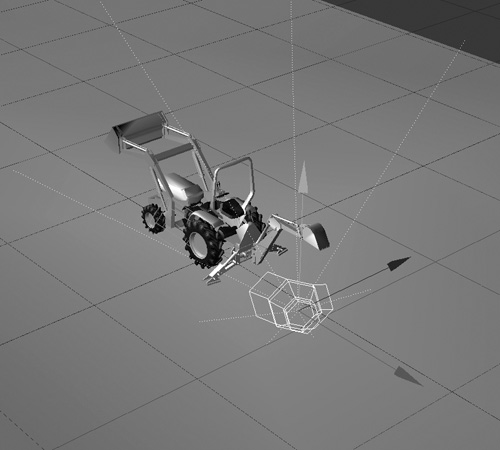
- Move this new spotlight off and to the side of the tractor. Then rotate it so it points to the tractor, as in Figure 4.4 (on the next page).
Figure 4.4. Move the light off and to the side of the tractor to cast light onto the darker areas of the tractor.
Adding lights is as simple as that. Certainly there’s more to it, such as cloning and mirroring, so read on.
Clone Lights
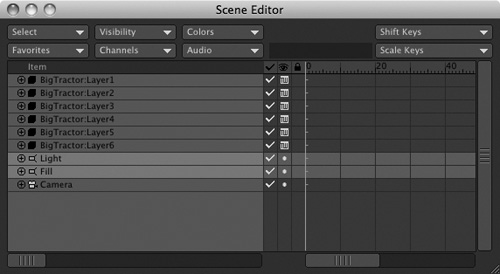
Besides adding lights, you can clone lights. Cloning a light creates an exact duplicate of a selected light. This includes the light’s color, intensity, position, rotation, and so on. Any parameter you’ve set will be cloned. Cloning lights is just as easy as adding lights, but it’s often good to do after you’re sure of your existing light’s settings. You don’t want to clone a light 20 times, only to realize that you forgot to change the color! You’d need to make changes to 20 lights. However, should you have to make changes to many lights at once, you can quickly select the lights to change in the Scene Editor. Figure 4.5 shows two lights in the Scene Editor selected at once.
Figure 4.5. If you have one light, two, or twenty, you can use the Scene Editor to edit variables for those lights all at once.
To clone a light, first select the light to be cloned in Layout, and then select the Clone button under the Items tab in the Add category. Enter the number of clones (copies) of the light you want in the pop-up panel, and click OK or press Enter. Shazaam! The selected light is cloned. You know what else? This operation works the same for cloning objects or cameras. Figure 4.6 shows the command.
Figure 4.6. You can clone lights (or any other item) directly in Layout from the Items tab.

Note
You can multiselect lights directly in Layout. Just hold down the Shift key and select them. Then rotate, move, and so on.
Mirror Lights
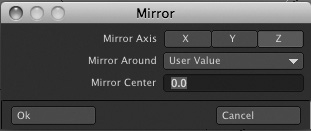
You know what’s cool? Mirroring your light! Let’s say you move the light to a specific position. Use the Mirror button in the Add category on the Items tab. Select a light (or other item in Layout) and click the Mirror button in the Item tab’s Add tool category. Choose the axis to mirror across, and go! Figure 4.7 shows the operation. You can also choose to mirror around an object’s keyframes or at frame 0. Mirroring at frame 0 is important for more complex setups such as bone rigs for characters.
Figure 4.7. In addition to cloning lights, you can mirror them.
Ambient Light and Ambient Color
Did you know that the light around you is either direct or ambient? Direct light comes predominantly from a light source. Ambient light has no specific source or direction, such as the light underneath your desk or behind a door.
Back in the Light Properties panel, you can set the intensity of your ambient light. To open it, click the Lights button at the bottom of the interface and then press p or click the Properties button. The Ambient Controls are at the top of the panel. A typical Ambient Light setting is around 5%, which is LightWave’s default value. In some cases, it is better to lower the value, sometimes to 0%, and use additional lights for more control over your scenes. Don’t rely on ambient light to brighten your scene. Instead, use more lights to make areas brighter. This will create a more dramatic look, with more depth in the final render.
You also can set the color of your ambient light so that the areas not hit by light still have some color to them. Let’s say you have a single blue light shining on an actor on a stage. Only the portions of the actor upon which the light falls directly will be lit. If you want to reveal more of the actor, or just lessen the severity of the boundary between light and shadow, you can apply an Ambient Intensity setting. Set the Ambient Color values to the same shade of blue as the light, and your shot will look accurate. Remember, ambient light hits all surfaces, not just those that are unlit by actual lights, which is why knowing about ambient intensity is important.
Lens Flares
The lens flare, often overused but needed, was introduced in LightWave v3. Lens flares are a popular addition to animated scenes, because too often when you add a light (such as a candlestick) to a scene, the light source emits but no generating source is visible. By adding a lens flare, you can create a small haze or glow around the candlelight. You can also add lens flares to lights on a stage, sunlight, flashlights, and headlights on a car. Any time you have a light that is in view in a scene, you should add a lens flare so the viewer understands that the light has a source. Lens flares in LightWave can be viewed directly in Layout before rendering. You’ll be setting up lens flares later in this chapter.
Volumetric Lights
You need to be aware of one more area when it comes to LightWave lighting before you start working through exercises. Volumetric lighting is a powerful and quickly rendered effect that can create beams of light. Have you ever seen how a light streaks when it shines through a window? The beam of light that emits from the light source can be replicated in LightWave with volumetrics. Volumetric settings add volume to a light source. Additionally, you can add textures to a volumetric light to create all sorts of interesting light beams.
Global Illumination Options
Have you ever stopped to look around you? Take your face out of this book or away from the computer for a moment, and just look around. Whether you’re at your desk, in your living room, or outside, everything has global lighting properties. You can control these global properties—global light intensity, global lens flare intensity, ambient intensity, ambient color, radiosity, and caustics—on the Global Illumination tab of the Render Globals panel. To open it, click the Render tab at the top of the Layout interface, and then click the Render Globals tool button. The Global Illumination settings are found in the Global Illum tab, among the five settings tabs at the top of the panel (Figure 4.8).
Figure 4.8. The Global Illumination control tab, found in the Render Globals panel, governs such properties as global light intensity, global lens flare intensity, radiosity, and caustics.
Global Light and Lens Flare Intensity
In the Global Illumination panel, click the Render tab at the bottom of the panel. At the bottom of the panel is a (light) Intensity value, currently set at 100%. Because it’s in the Render Globals panel, it globally changes the intensity on all lights in your scene. This can be useful for scenes that have multiple lights that need to become brighter or dimmer over time.
Let’s say you’re animating a stage play or musical concert, for example. You have 29 spotlights shining on the stage, the players, and the actors. All their intensities are randomly and quickly changing to the beat of the music, and perhaps focusing on key performers. At the end of the song, you want all the lights to fade out equally. Instead of setting the light intensity 29 times for each light, which you could do through the Scene Editor, it is better to ramp down the Global Light Intensity setting. Similarly, if you have lens flares applied to these lights, you can globally change the Flare Intensity setting for lights, just below the Intensity setting.
Radiosity and Caustics
Also within the Global Illumination panel (within the Render Globals panel) are the Enable Radiosity and Enable Caustics settings. These two features in LightWave enable you to take your 3D creations even further by adding more real-world lighting properties.
Note
The radiosity and caustics features are not active by default. You need to activate them to see their effects on a scene, but be warned—rendering times will increase.
Radiosity is a rendering solution that calculates the diffused reflections of lights in a scene. It is the rate at which light energy leaves a surface. This also includes the color within all surfaces. In simpler terms, radiosity is bounced light. A single light coming through a window, for example, can light up an entire room. The light hits the surfaces of the objects and bounces, lighting up the rest of the room, in turn creating a realistic image. Ambient light is often considered a poor man’s radiosity. You can use ambient light to brighten areas not directly lit by lights.
You’ll use radiosity and learn more about its settings in Chapter 8, “3D Product Shots.”
Caustics are created when light is reflected off a surface or through a refracted surface. A good example is the random pattern often seen at the bottom of a swimming pool when bright sunlight shines through the water. Another example is the dapples of light that appear on floors or ceilings when light glints off a crystal vase or a gold-plated statue.
Applying Lights in LightWave
You will encounter many types of lighting situations when creating your animation masterpiece. This next section steps you through a common lighting situation that you can use for character animation tests, product shots, or logo scenes.
Simulating Studio Lighting
One of the cool things about LightWave is that you don’t have to be a numbers person to make things happen. You can see what’s happening throughout the creation process from object construction to surfacing to lighting. Exercise 4.2 introduces you to basic three-point lighting often used in everyday video production. You can apply this lighting style to LightWave and create a photographer’s backdrop (or cyc, short for cyclorama) to act as a set for your objects. Creating a set in LightWave is a good idea so that even simple render tests are not over a black background. By rendering objects on a set, you add more depth to your animation.
The goal of this project is to introduce you to a common lighting setup that can be useful in just about any type of render situation when simulating studio lighting. You’ll use a premade scene from this book’s DVD.
Exercise 4.2. Simulating Studio Lighting
- In Layout, load the unlit_female_head.lws scene from this chapter’s folder on the accompanying DVD (in the “3D_ContentScenesCh4” directory).
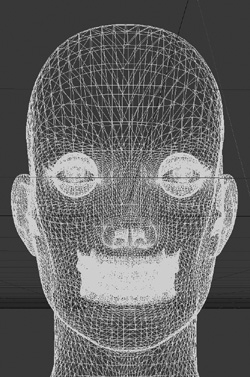
This loads the multilayered object, which includes eight layers—all the parts of the model, from teeth to skin. The light box is a flat polygon that will be used to help light the subject. Figure 4.9 shows the loaded scene in Wireframe mode.
Figure 4.9. A preexisting scene with one multilayered object, perfect for testing some lighting configurations.
- Click the Lights button at the bottom of the Layout interface (or press Shift+L) to select the only light currently in the scene, which is generically named Light. (If the scene contained more than one light, you’d also need to select the one you want to work with from the Item drop-down.) This is a distant light and is not the most effective lighting. To see how it lights the scene, press F9 to render the current frame (Figure 4.10 on the next page).
Figure 4.10. Pressing F9 lets you preview a render of the current frame. By default, the render isn’t any different from what you see in Layout.
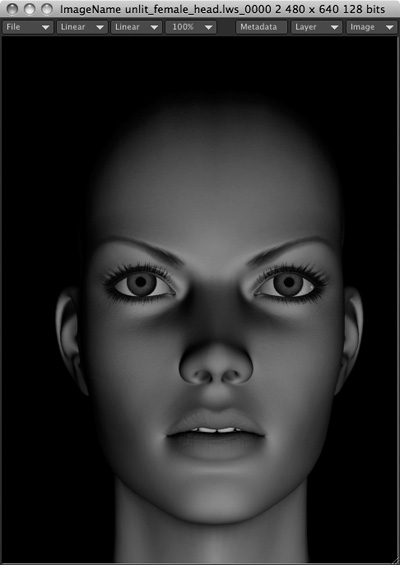
To see the render when you press F9, be sure that you have Image Viewer selected for Render Display with a chosen resolution, or choose Render Frame from the Render drop-down.
- The render looks flat and ordinary, and you need some definition from the background. Add a spotlight from the Add category in Layout, under the Items tab.
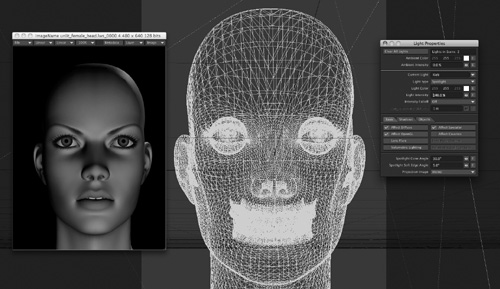
- Name the light backlight, and position it up and behind the female head object. In the Light Properties panel, set the Light Intensity to 140%. You can select Lights at the bottom of the interface, and then press the p key to open the panel. Figure 4.11 shows the render, with the Light Properties settings. You can turn Shadows to Shadow Map within the Light Properties panel as well.
Figure 4.11. Adding a kick light to the back of the model helps separate her from the black background.
Note
If you want to convert the Shadow Map Size to actual megabytes, square the size value, multiply by 4, and divide by 1,000. So, (2000 × 2000 × 4) ÷ 1000 = 16MB. That means a Shadow Map Size of 2000 will take an extra 16MB of memory for calculation.
The trick to this simple setup is using bounce cards. In a real photography studio (such as www.AblanGallery.com) large softboxes are used for photographing people. In the 3D world, directional lights like spotlights can be harsh. But with a colored board, set to white or off-white, you can bounce light and softly diffuse the surface of the model.
Note
Three-point lighting is a common lighting setup used in many studios. It consists of a key light, which is the primary source of brightness; a fill light, which is less bright than the key and used opposite the key; and a backlight, sometimes referred to as a hair light, which is used to separate the subject from the background. You’ll find a similarly set scene called studio_lit_female_head.lws on the book’s DVD.
If you view the scene from a Perspective view, you’ll see two bounce cards. One is white and off to the right of the model. Its surface is bright white and has a Luminosity value. The other board is off-white and is used to bounce light underneath the model. But when you rendered before you didn’t see the effect of these. That’s because on their own, objects can’t cast light. With Global Illumination turned on, they can.
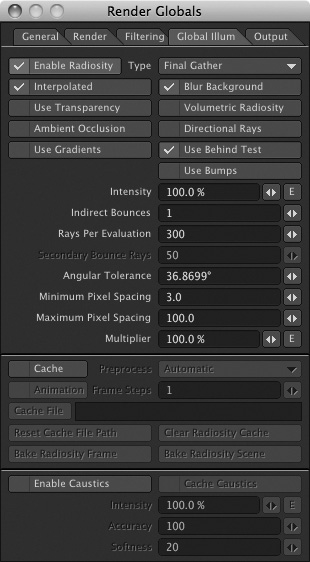
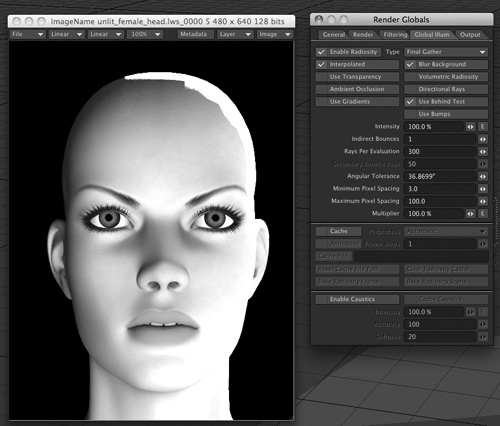
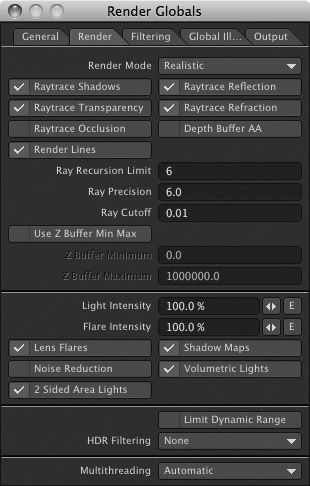
- In the Render tab, open Render Globals. In the Render Globals panel, click into the Global Illum tab and click Enable Radiosity. Press F9 again. Your model now looks completely different, and actually too lit! Figure 4.12 shows the render along with the Global Illumination settings.
Figure 4.12. Turning on Enable Radiosity allows the bounce cards to cast a soft, diffuse light on the scene, but the scene is too bright with the existing spotlights.
- Jump back to the Light Properties panel and bring the Light Intensity to 0% for both lights. Alternatively, you can deselect Affect Diffuse for each light and they won’t affect the surface. However, other properties will still be affected, such as specularity.
Note
You can use shadow maps only with spotlights.
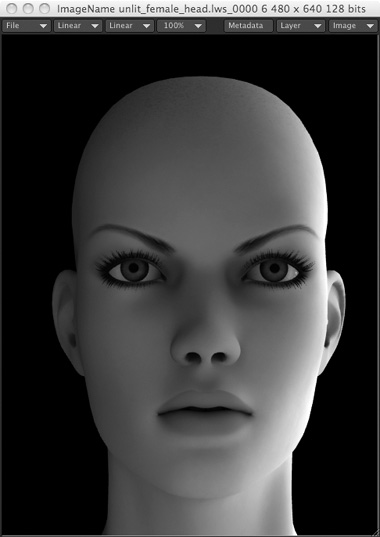
- Press F9 to render again, and you’ll see a much softer look to the model, but with a slight darkness on the left side. Figure 4.13 shows the render.
Figure 4.13. Turning down the intensity of the existing light sources will help even out the values with radiosity applied.
Note
You can quickly choose different lights in the Light Properties panel by clicking the small arrow to the right of the Current Light drop-down list.
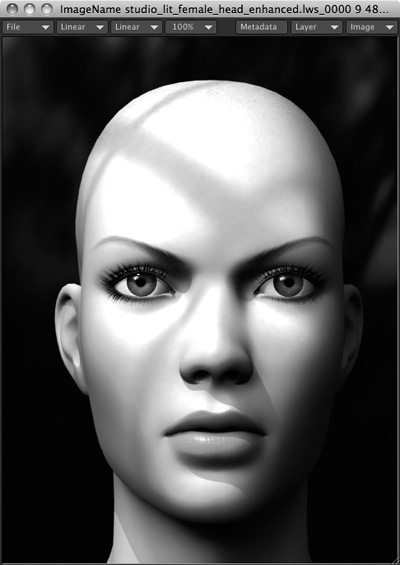
- Select the back spotlight you created earlier. Clone it one time by pressing Control+C. Move this clone to the top front left of the female model. Set the Light Intensity value to 45% and press F9 to render. Ah! Now there are catchlights in the model’s eyes, but a nice soft diffuse from the bounce card on the right. Figure 4.14 shows the render, along with the Perspective view to see the lighting setup.
Figure 4.14. Adding a spotlight to fill the darker area of the model’s face works well to enhance her surfacing, while the Enable Radiosity setting allows the bounce cards to fill in other areas.

Enhanced Lighting with HDR
Now that you have some basic lighting set up and can see how useful radiosity can be, it’s easy to take your lighting a step further. HDR (High Dynamic Range) is a technique that allows you to use an image as a light source. However, HDR images hold more data within them than meets the eye. But LightWave can see what’s there, so let’s see how it works.
Exercise 4.3. Enhanced Lighting Setups
- Continue from the previous scene, making sure Enable Radiosity is still selected in the Global Illum (Illumination) tab in the Render Globals panel.
- From the Windows drop-down menu, choose Backdrop Options. This will open the Effects panel, with the Backdrop tab selected.
- From the Add Environment drop down menu, select Image World. When the plug-in loads, double-click it to see the settings, as shown in Figure 4.15.
Figure 4.15. Add the Image World plug-in from the Add Environment menu in the Backdrop tab of the Effects panel.
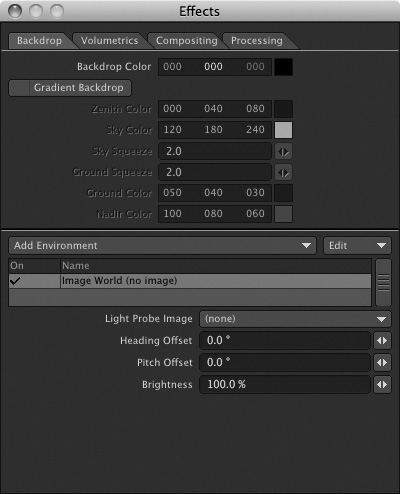
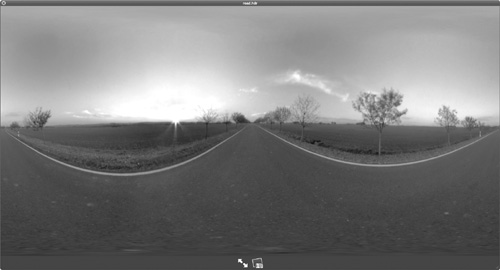
- From the DVD included with this book, load the road.hdr image from the Light Probe Image selection. Figure 4.16 shows the image. Set the Heading Offset to 90. And then bring Brightness for the HDR image down to about 80%.
Figure 4.16. An HDR image used for environmental lighting.
- With the HDR image loaded, you don’t need the other light sources. Go ahead and delete the extra spotlights, and make sure the main light has Affect Diffuse deselected in the Light Properties panel.
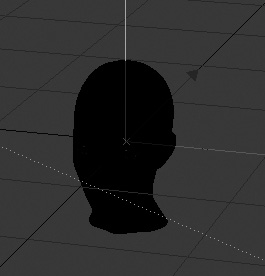
- Next, delete the bounce card objects. Figure 4.17 shows Layout from a Perspective view with the changes.
Figure 4.17. Layout in Perspective view with the bounce card objects deleted.
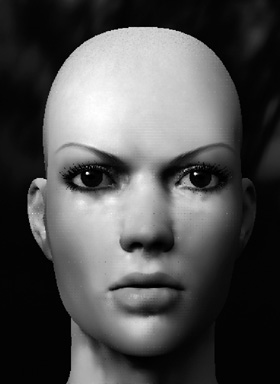
- That’s it! Instead of pressing F9 to render, turn on VPR from the top of the Layout interface, rather than Shaded Solid. Figure 4.18 shows the interface with VPR active and with the Image World settings.
Figure 4.18. With an HDR image set in place through the Image World plug-in, the color values within the image light the scene entirely.
HDR images are a remarkable way to light your scene, not only for ease of use, but more for blending your 3D object into a real world. The world around us has light of different temperatures bouncing and diffusing all over the place, and by using an HDR image in LightWave, you can mimic the real world.
Using Projection Images on Lights
LightWave’s Projection Image feature is a useful lighting tool that mimics real-world lighting situations in which cookies or gobos are used to throw light onto a set. A gobo, also referred to as a cucoloris or cookie, is a cutout shape that is placed in front of a light, sort of like a cookie cutter. Certain areas of the gobo hold back light, whereas other areas let light through. In Exercise 4.4, you use a gobo that creates the look of light coming through trees.
Although the previous exercise was basic in design, it is the core lighting situation for many of your LightWave scenes. Perhaps with a slight variation, this basic three-point lighting scheme can be used for product shots, animated plays, logos, and much more. Things like simple stage sets, equipment, figures, generic objects, or any element can benefit from this type of lighting design. Of course, you are not limited to using just three lights for these types of situations. You can start with the basic three, and then add or remove lights to highlight certain areas, brighten dark areas, or use additional lights as projection lights.
The gobo image is nothing more than a Photoshop file of a black-and-white windowpane. Using a simple image-editing program, it was converted to grayscale mode, its contrast was boosted, and the image was blurred. When this image is applied to a spotlight, the white areas allow light to shine through, whereas the black areas do not. The blurring helps create a soft, less harsh look where the light falls off.
Tip
Gobo images can be created with a paint package such as Adobe Photoshop. Image dimensions should match your render resolution, and 24-bit color depth generally works best for most applications. However, if it’s a smaller image that’s not viewed close-up in your 3D scene, you can save memory and use 8-bit images. Perhaps you just need to project a small logo onto a wall? A smaller image would serve your needs well. Video-resolution gobo images should have pixel dimensions of 720 × 486.
Exercise 4.4. Creating Gobo Lights
- Continuing from the last project, use the same scene. Select the single spotlight left in the scene and name it Gobo Light or something similar. You can rename lights from the Light Properties panel. The idea is that you stay organized by identifying the lights properly as you set them up. Select the new spotlight and press 5 on the keyboard to switch to Light view.
- At the bottom of the Light Properties panel, load the SixWindowCookie.tif image from the book’s DVD.
- Press 5 on the keyboard to jump to the Light view. There, you’ll see the projection of the image through the light. The white areas will let light pass through, and the dark areas will hold it back. Blurring the image helps blend the transition. Figure 4.19 shows the shot.
Figure 4.19. The SixWindowCookie.tif image in Light view.
- Move the gobo light up and to the upper-right or upper-left side of the scene. Height doesn’t matter too much; just be sure your projection will be able to hit the set. Point the light onto the floor, and be sure to create a keyframe for it at frame 0 to lock it in place.
Remember, everything should have a keyframe at the first frame of your animation even if it is not moving. In this case, the first frame is 0.
Note
While you can’t tell LightWave to create off-white lights by default, you can change multiple lights to off-white (or any other color) at the same time. Select all of the lights you want to adjust, and change the color settings in the Light Properties panel to affect all of the lights at once. In the same way, you can modify other light properties for all selected lights.
- Make the new gobo light slightly off-white in color and set Light Intensity to anywhere from 40% to 60%.
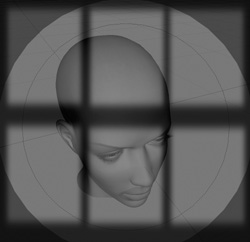
- After the image has been loaded, press F9 to render. You’ll see what appears to be light through a window, across the face of the object. The light is now projected through the grayscale image, which you can see from Light view (see Figure 4.20). You can take a closer look at the gobo image in the Image Editor. Note that your image might appear slightly different due to variances in light placements.
Figure 4.20. With the gobo image in place, you now see the shadows of a windowpane across the subject’s face.
You can load this final scene into Layout from this book’s DVD and check the final settings if you want. The scene is called studio_lit_female_head_enhanced.lws (in the “3D_ContentScenesCh4” directory). Take a look at it and modify it for your own scenes if you like.
Adding gobos is easy. But it’s probably a more powerful feature than you realize. Creating a simple pattern on a set is nice, but you can accomplish much more with gobos:
• Use a grayscale image of tree branches to simulate shadows from a tree.
• Use color images for added dimension. Darker areas will hold back more light, and lighter areas will shine more light. For example, you can create the effects of light through a stained-glass window.
• Use softer, blurry images for added effects.
• Use animation sequences as projection images.
• Use imported movie files! Create real projected movies in your animation by projecting an AVI or QuickTime movie onto a movie screen in 3D.
• Create custom shapes and project them onto your set to create the look of light coming through a stage light projection system.
Using Area Lights
Distant lights and point lights produce hard-edged, ray-traced shadows. Ray-traced shadows take more time to calculate, which of course means more time to render. Spotlights also can produce ray-traced shadows, but with spotlights you have the option to use shadow maps, which take less time to render than ray-traced shadows. Softer than ray-traced shadows, shadow maps use more memory to render than ray-traced shadows. Ray-traced shadows use more processing power.
Area lights also can produce realistic ray-traced shadows, but to do so they require more rendering time. For example, say a person is standing outside in bright sunlight. The shadow that the person casts has sharp edges around the area by the subject’s foot, where the shadow begins. As the shadow falls off and away from the subject, it becomes softer. Ray-traced shadows from distant lights, point lights, and spotlights cannot produce this effect—neither can shadow maps. Only area lights can produce these true shadows and create a softer overall appearance to animations.
Spotlights are the most common lights, and they are the most useful for your everyday animation needs. But on occasion, the added rendering time generated from area lights is worthwhile. An area light is represented in Layout by a flat square and emits light equally from all directions except at the edges, producing very realistic shadows.
Exercise 4.5. Working with Area Lights
- From the book’s DVD, load the AreaLightTractor.lws scene. Select the single default light, and then press p to open the Light Properties panel. Change Light Type from Distant to Area Light.
- Change the Light Intensity setting to 75%. Keeping the default 100% Light Intensity setting could be too bright, and the image would appear washed out. Area lights are often “hotter” than spotlights and also give you more control.
- Move the Light Properties panel aside and return to Layout. Rotate the light and place it above the tractor.
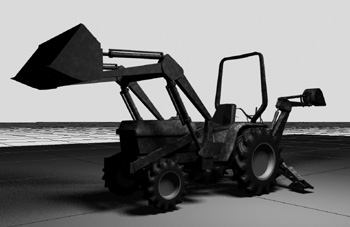
- If the new area light is not selected, select it and change your Layout view to Perspective to get an overall view of the scene. Figure 4.21 shows the Perspective view and the light newly positioned above the tractor object. The area light appears as a box outline. This light is positioned in front of the tractor, closer to the ground. Not ideal. All you’ve done now is change the type of light you’re using. Everything else, such as position and rotation, has remained the same.
Figure 4.21. The Perspective view with a distant light converted to an area light.

- In Layout’s Render tab, click Render Globals. Then, on the Render Globals panel’s Render tab, select Raytrace Shadows to have LightWave calculate shadows for the area light, as shown in Figure 4.22.
Figure 4.22. Make sure you tell the render to calculate for shadows and other options.
Note
To help set up lights in Layout, change the Maximum Render Level setting to Textured Shaded Solid. You can find this setting by clicking the drop-down arrow to the right of the viewport style buttons at the top of Layout. Make sure Max OpenGL Lights is set to at least 1 or above from the Display Options panel (press d). Also, always make sure that the Affect OpenGL option for the light in the Light Properties panel is turned on. This makes the light source’s effect visible in Layout and helps you line up the direction of the light source.
Note
While you’re in the Render Options panel, make sure you choose a Preview setting, such as 320 × 240. This enables you to see the render as it’s being drawn. Also make sure that Render Display is set to Image Viewer to see a full-sized version of your render when it’s complete. The full-sized version will be 640 × 480, as this is its resolution setting by default. You can also change this setting in the Render Globals panel. You’ll learn more about different resolutions (and not of the New Year’s kind) in Chapter 5, “3D Cameras.”
- With the light selected, go to Layout’s Modify tab and choose Size. Click and drag the area light so that it’s about 4 times its original size, then turn on VPR in Layout to see the light and how it affects the objects. You’ll see that the shadow has a soft edge, as shown in Figure 4.23.
Figure 4.23. Setting the area light above the model and increasing the size creates a much softer shadow, which often gives your scene a more realistic look.
Note
The cool thing about area lights is that you can size them. Because the area light here was originally a spotlight, its size has remained. If, however, you created a new area light, you would need to increase the size to soften the shadows. By increasing their size, you soften their shadows. Don’t forget to keyframe any size changes. You can use the Size tool on the Modify tab. Try it out!
Sizing a light might seem odd, but it helps spread the amount of light and thereby the shadow as well. Area lights take a long time to render, but they produce the best results.
Here are a few more things to remember when using area lights:
• Quality settings can be adjusted. The default Area Light Quality setting of 4 results in 16 samples per area light. Values of 2 and 3 result in 4 and 9 samples per area light, respectively.
• Linear lights perform like area lights but emit light from a two-point polygonal shape, similar to a fluorescent tube.
• You can mix spotlights, distant lights, point lights, and linear lights with area lights for added effects.
Earlier in the chapter we mentioned that textures play a key role in how your lighting affects your objects. This couldn’t be more true for a scene such as the one you’ve been working on here.
Glass, copper, and metallic surfaces work well because they reflect their environment. The Environment setting is currently black, which you can change by going to the Windows drop-down menu and choosing Background Options. But what happens with the highly reflective surface is that it reflects a black backdrop, which blends with the color of the surface. The reflection also picks up the cup and ground nearby, as well as the light box (the large flat polygon off camera). These added elements create the illusion of a metallic surface. Nice, isn’t it? In the past, many artists would simply have the metallic surface reflect an image, but reflecting the environment is a bit more convincing.
Note
If you increase the size of the area light, the shadow softens. However, it might appear grainy or jagged. If so, simply increase the Area Light Quality setting in the Light Properties panel. The default is 4—good for most renderings. Often, setting a value of 5 works slightly better but takes more render time. Isn’t that always the case? Note that 5 is your maximum value.
From here, you can tweak the scene and perhaps add colored lighting as you like. Experiment with the information provided in this chapter and see what variations you can come up with. One dramatic thing you can do is to bring the intensity of the key light down, and then increase the Fill and Radiosity settings. Have the key light only as an accent, so that the scene is primarily lit from behind.
The Next Step
The information in this chapter can be applied to any type of scene you create in LightWave, from outdoor scenes, to sets, and even to fantasy-type renders. It can be applied to any of the exercises and projects in this book. These basic lighting setups and core functions apply to all of your LightWave work in one way or another, either in simple or complex form. Use the information here to branch out on your own and create different lighting environments. Use lights to your advantage—remember, there are no wires or electricity bills to worry about when creating virtual lighting situations. You don’t need to worry about lightbulbs burning out either!
Experiment by adding more lights to your everyday scene or perhaps taking some away. Use negative lights, colored lights, dim lights, overly bright lights, and whatever else you can think of to make your models and animations look as good as they can. But what will make them stand out from the rest of the pack is your own creative input. Don’t worry about rules too much. Learn the basics, understand how the tools work, and try it out! If you think you’d like more light on a particular area of the scene, add it. Don’t ask people on Internet forums—just try it!
What adds even more interest to your scenes is the camera. LightWave 10’s camera tools are quite powerful, so turn the page to understand this updated feature set.