
3. Loading Your Digital Images into iPhoto ’11
Explore the various ways to import photos into iPhoto ’11, allowing you to view, organize, edit, enhance, print, share, and archive them.
After shooting a photo using any digital camera, you need to import (or copy) it into iPhoto ’11 to take advantage of the features and functions this program has to offer.
This chapter explains how to import digital images into iPhoto ’11 from the following sources:
• A digital camera
• A memory card via USB-connected memory card reader
• Your Mac’s internal hard drive, an external hard drive, or another storage device
• An iPhone or iPad
• Apple’s MobileMe service
• An incoming email attachment
• A scanner41
• The Web
As you import your photos, you definitely should keep them organized within separate Event folders or Albums, a concept focused on later in this chapter, as well as in Chapter 4, “Organizing Your Photos.”
Loading Images Directly from Your Digital Camera
Your digital camera came with a cable that connects it to your iMac or MacBook via the USB ports on both devices. Your camera most likely has a small, proprietary-size USB connection port. With your camera turned off, connect the USB cable to the camera and your Mac. Your Mac can either be turned on or off.
Tip
Some digital cameras must be set to a particular mode to be able to transfer photos to a computer, so consult the owner’s manual for your camera to determine whether this step is necessary.
When both devices are connected to each other and turned on, your Mac detects the camera and automatically loads iPhoto ’11 if the program isn’t already running. Within a minute after the connection is established, iPhoto ’11 displays thumbnails for the images currently on your camera’s memory card that are available to be imported, as shown in Figure 3.1.
Figure 3.1. When your Mac is connected directly to a digital camera, iPhoto ’11 automatically prompts you to import the available photos.
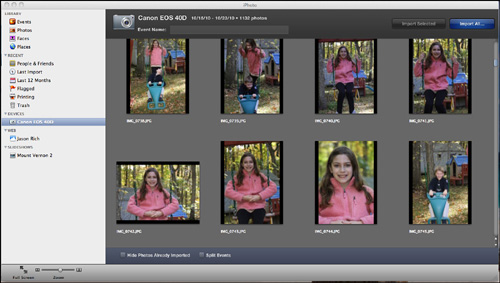
When both devices are connected to each other and turned on, your Mac will detect the camera and automatically load iPhoto ’11 if the program isn’t already running. Within a minute after the connection is established, iPhoto ’11 will display thumbnails for the images currently on your camera’s memory card that are available to be imported (as shown in Figure 3.1).
Importing Images That iPhoto ’11 Detects
When the thumbnails of the images available for importing are displayed on the iPhoto ’11 screen, you have a variety of options for importing those photos.

SHOW ME Media 3.1—Importing photos from your camera into iPhoto ’11
Access this video file through your registered Web Edition at http://www.quepublishing.com.
![]() LET ME TRY IT
LET ME TRY IT
Importing Photos from a Digital Camera into iPhoto ’11
Before you can begin using all of the features built into iPhoto ’11 to manage almost all aspects of your digital photography (except actually shooting the photos), you must transfer your images from a digital camera’s memory card (or another source) into iPhoto ’11. Here’s how:
- Turn off your digital camera and connect the USB cable that came with your camera to both the camera and your Mac. (Your Mac can be either turned on or off.)
- After the two devices are connected, turn them on. Depending on your camera, you may need to set it to the appropriate mode for transferring images.
- When your Mac detects that images are present on the camera’s memory card that have not yet been imported into iPhoto, the iPhoto program will automatically launch and you’ll be prompted to import your photos.
- In the upper-left corner of the image display area of iPhoto ’11, your camera name is displayed, along with the date range during which the images you’re about to import were shot. The number of images available for transfer is also displayed.
- Directly below the camera is an Event Name field. Within this field, you can type a custom name, such as Joey’s 6th Birthday Party, for the Event folder iPhoto is about to create. The default Event name is the current date.
- At the bottom-left corner of the image display area of iPhoto ’11 are two options; you can place check marks next to them using the mouse if you want to activate them. The first option is Hide Photos Already Imported. When this option is checked, you are not given the option to import images you’ve previously imported into iPhoto ’11. The second option is Split Events. As you import your photos, iPhoto ’11 can automatically create multiple Events, based on the different dates the images were shot, if this option is checked. So, if your memory card contains images that were shot over a three-day period, separate Event folders for your images are created in iPhoto ’11 for each day. Thus, your photos are sorted chronologically.
- Within the main image viewing area of the iPhoto ’11 screen are thumbnails for the images currently stored on your camera’s memory card that are available to be imported into iPhoto ’11. You can either import all the photos on that memory card or manually select which images you want to import. To select specific photos, press the Command key on the keyboard while clicking on each photo thumbnail you want to import. Doing this highlights each thumbnail. When the appropriate images are highlighted, click on the Import Selected icon located in the upper-right corner of the screen.
- To import all the available photos, click on the Import All icon also located in the upper-right corner of the screen. Your images are then copied from your digital camera’s memory card to your computer and stored within iPhoto. Depending on the resolution in which the images were shot and the number of images being transferred, this process could take several minutes. In the upper-left corner of the screen, an animated blue progress bar is displayed during the transfer process.
- When the transfer process is complete, thumbnails of the images you copied into iPhoto ’11 are displayed under the heading Last Import. If you click on the Events option on the left side of the iPhoto ’11 screen, you’ll discover your newly created Event folder(s). Your images are now ready to be viewed, edited, enhanced, printed, shared, or used within photo projects.
- Click the Eject button on your Mac’s keyboard or drag the camera’s icon to the iPhoto Trash in the Source list on the left side of the screen to close the connection between your camera and the Mac. You can now turn off your digital camera and disconnect the USB cable.
Caution
After the images are copied from your camera’s memory card into iPhoto ’11, you have the option to delete the images from your camera’s memory card. For now, click on the Keep Photos icon until you have confirmed that all your images have transferred correctly. You’re better off keeping copies of the photos on the camera’s memory card for now as a backup and then manually formatting your camera’s memory card later, after you know the images have transferred safely and have been backed up.
Tip
Before initiating an image transfer between your camera and Mac, make sure your digital camera’s battery has ample power remaining; otherwise, the transfer process could stop mid-session if the battery dies. This could result in image data being lost or corrupted.
Wirelessly Transferring Images Between Your Camera and Mac
It is possible to wirelessly transfer images between your digital camera’s memory card and your Mac if a Wi-Fi Internet connection is available, you possess a Wi-Fi–compatible memory card or camera, and on your Mac you have Wi-Fi turned on.
Follow the transfer directions provided by your wireless memory card or camera manufacturer because the process varies based on what equipment you’re using.
Note
Eye-Fi, Inc. (www.eye.fi) offers wireless camera memory cards, starting at $49.95 (4GB capacity), which are compatible with virtually all digital cameras. A memory card adapter may be required, however, to use an Eye-Fi card with your camera.
Importing Images from a Memory Card Reader Using a USB Connection
Instead of transferring images into iPhoto ’11 directly from a memory card that’s inserted into your digital camera, you can use a separate memory card reader (with the camera’s memory card inserted), which also connects to your Mac via a USB cable.
The benefit to using a memory card reader is that you can leave it connected to your Mac, and it doesn’t require battery power from your camera to operate. You simply insert the camera’s memory card into the appropriate slot of the memory card reader, connect the card reader to your computer via a supplied USB cable, and you’re ready to transfer files.
Memory card readers are readily available from consumer electronics and photography stores. Some support just one memory card format, whereas others have multiple slots and are compatible with many different memory card formats. The cost of a good-quality memory card reader is between $15 and $40.
Caution
When purchasing a memory card reader, make sure it is compatible with the memory card format your camera uses. There are more than a dozen different memory card formats.
To transfer (or copy) your digital photos from your camera’s memory card using a memory card reader, first connect the memory card reader to your Mac using the supplied USB cable. Your Mac can be turned on or off while you make this connection.
With the Mac turned on and the memory card reader connected, insert the camera’s memory card containing your digital images into the memory card reader. Your Mac detects that a memory card containing new digital images for import has been connected, and iPhoto ’11 loads automatically. At this point, follow the import directions described earlier in the “Importing Images That iPhoto ’11 Detects” section.
Adding Images into iPhoto ’11 from Your Computer’s Hard Drive
If you have digital images stored on your computer’s internal hard drive, an external hard drive, or a flash drive that you’d like to import (copy) into iPhoto ’11, connect the external drive containing the image files, if applicable, to your computer.
After the drive is connected (a step that isn’t necessary if you’re loading images from the Mac’s internal hard drive), open Finder on your Mac by clicking the Finder icon located on the Dock at the bottom of the screen (see Figure 3.2).
Figure 3.2. Use Finder to easily drag and drop images from a hard drive to iPhoto ’11.
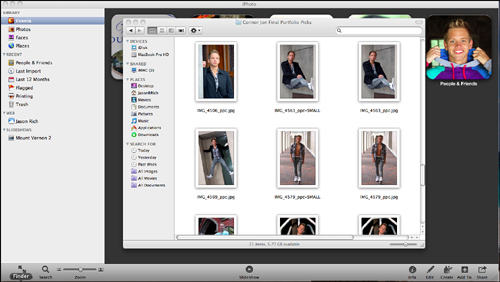
Next, locate and highlight the directory containing the photos you want to import. You can import all images in a directory by simply dragging and dropping the entire directory from the Finder into the iPhoto ’11 main viewing window. Alternatively, you can open a specific directory within Finder, select and highlight one or more images to import, and then drag and drop those images into the main photo viewing area of iPhoto ’11.
Another way to import photos that are stored on a hard drive (or flash drive) into iPhoto ’11, without using Finder, is to select the Import to Library command under iPhoto ’11’s File pull-down menu (see Figure 3.3).
Figure 3.3. You can import files from your computer’s hard drive, an external hard drive, or a flash drive, for example, using the Import to Library command under iPhoto ’11’s File pull-down menu.
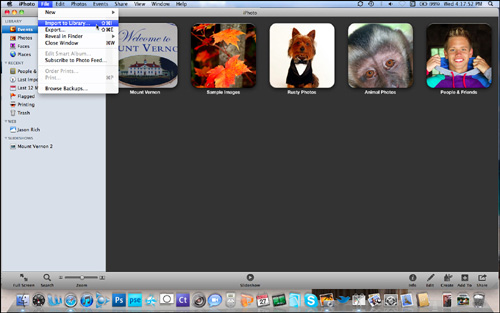
When you use any of these methods to import photos from your hard drive, a new Event folder is created in iPhoto ’11 to accommodate those images.
Tip
The Import to Library command can also be used to import image files into iPhoto ’11 from a CD or DVD that’s inserted into your Mac’s drive. During the import (copying process), do not eject the disc. Using this method, you can import entire directories of photos, or you can select one or more individual image files.
Importing Photos Received via Email into iPhoto ’11
One of the convenient new features of iPhoto ’11 is that you can send and share photos via email without ever leaving the iPhoto program (assuming your Mac is connected to the Internet). It’s also easy to import photos you receive from other people via email; however, you need to use your regular email program to do this.
If you’re using Apple’s Mail application, follow these steps:
- Open the email message containing the photo attachment.
- Open iPhoto ’11 but manually shrink the program window so that you can see the Mail application and iPhoto ’11 simultaneously on your Mac’s screen. You can do this by positioning the mouse on the extreme lower-right corner of the iPhoto ’11 program window. Hold down the mouse button and drag the program window diagonally up and to the left. Do the same for the Mail program window.
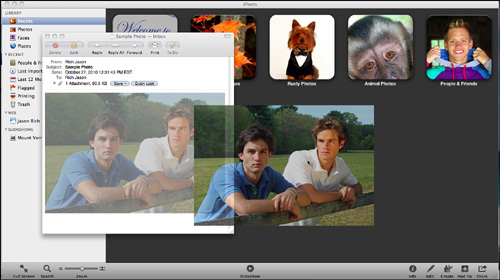
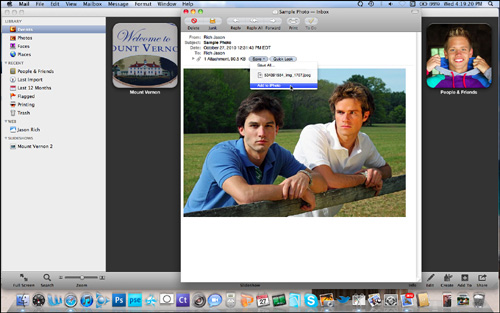
- From the Mail application, drag the photo that’s attached to the email directly into iPhoto ’11’s photo viewing window to import it, as shown in Figure 3.4.
Figure 3.4. Drag the photo attachment from an email to the photo viewing area of iPhoto 11 to import it.
- Alternatively, with the email message open, you can click on the Save icon within the email message header and choose the Add to iPhoto command, as shown in Figure 3.5. Using this method, you don’t need to drag and drop any files. The image or images are saved in a newly created Event folder within iPhoto ’11. (The default name for the Event folder is the current date.)
Figure 3.5. From within Apple’s Mail application, you can also transfer a photo that’s attached to an incoming email directly into iPhoto ’11 using the Add to iPhoto command.
![]() Chapter 14, “Emailing or Publishing Your Photos Online,” explains how to email images to others from within iPhoto ’11.
Chapter 14, “Emailing or Publishing Your Photos Online,” explains how to email images to others from within iPhoto ’11.
If you’re using any other email application on your Mac, follow these steps to import a photo that’s attached to an incoming email message:
- Use your email program to open and read the message that contains the attached photo or photos.
- Save the attached photo to your Mac’s hard drive (on the Desktop or within the Pictures or Downloads folder, for example). Remember in which directory you save the image.
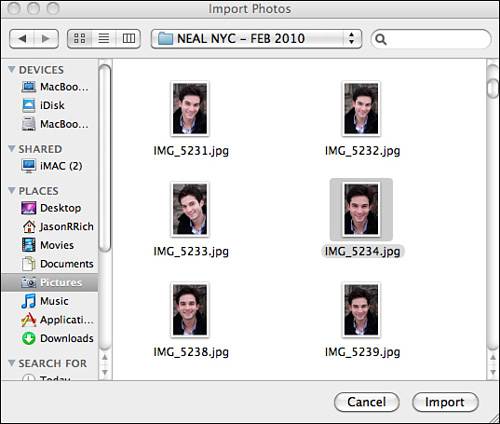
- From iPhoto ’11, use the Import to Library command under the File pull-down menu. When the Import Photos window appears, access the directory where you saved the emailed image, highlight it, and click the Import icon located in the lower-right corner of the window, as shown in Figure 3.6.
Figure 3.6. After you save a photo that was attached to an email, you can import it into iPhoto ’11 using the Import to Library command.
Tip
From the Safari web browser, if you’re accessing Google Gmail, Yahoo! Mail, or Microsoft Hotmail and want to import a photo that’s attached to an email message, open the message to view the image. While viewing the image, press the Control key while simultaneously clicking on the image and then select the Add Image to iPhoto Library option.
Importing Digital Photos from Your iPhone or iPad
Just as you transfer or sync many other types of data between your computer and your iPhone/iPad, you use a sync process to transfer photos between an iPhone or iPad and iPhoto on a Mac.
![]() LET ME TRY IT
LET ME TRY IT
Importing Digital Photos from Your iPhone or iPad
Follow these steps to quickly move photos shot and stored on your iPhone (or stored on your iPad) into iPhoto ’11:
- Connect your iPhone/iPad to your computer using the standard Dock Connector to USB cable that came with your phone.
- iPhoto should automatically open when the iTunes Sync process begins because iPhoto automatically detects there are images stored on your iPhone (or iPad) that need to be transferred.
- After a minute or two (sometimes less, depending on the number of photos to be imported), thumbnails of the images stored on your iPhone/iPad appear within the iPhoto image viewing area. You can now choose which images you want to import or opt to import all the images.
- Follow the directions offered with the “Importing Images That iPhoto ’11 Detects” section earlier in this chapter.
- The photos you import from your iPhone/iPad are included within a newly created Event folder within iPhoto ’11. The default name of the Event is the current date.
Caution
Do not disconnect your iPhone/iPad from your Mac during the file transfer process. Also, when the transfer is complete, make sure the images have been copied correctly before you delete them from your iPhone or iPad.
Note
It is possible to import photos into iPhoto that were taken using another type of cell phone, Smartphone, or tablet. Follow the directions that came with your mobile device for transferring images to your Mac’s hard drive. When the photos are stored on your Mac’s hard drive or on an external hard drive, for example, follow the directions described in the “Adding Images into iPhoto ’11 from Your Computer’s Hard Drive” section earlier in this chapter.
From within iTunes, you can customize the photo-syncing process between your Mac and iPhone or iPad. Connect your Apple mobile device to your Mac and allow iTunes to load. On the left side of the iTunes screen, under the Devices heading, highlight your iPhone or iPad. The Summary screen appears for that device. At the top center of the iTunes screen, click on the Photos icon. You can now customize your photo-syncing preferences.
Transferring Images from MobileMe to iPhoto ’11
Apple’s MobileMe is designed to work seamlessly with iPhoto ’11. The process for creating, publishing, and sharing online photo galleries on MobileMe is covered in Chapter 16, “Using Apple’s MobileMe with iPhoto ’11.” Although you can upload and publish photos to MobileMe, you can also import or copy photos from MobileMe to iPhoto ’11 using the following steps:
- Assuming you have a MobileMe account already set up, it is displayed under the Web heading on the left side of the main iPhoto ’11 screen. Click on the MobileMe icon to access photos already on the site.
- The main iPhoto ’11 image viewing window contains thumbnails that represent online Galleries already published on MobileMe. Open any online photo Gallery by double-clicking it; then choose which photos you want to import into iPhoto ’11 by selecting each of them. To do this, hold down the Command button while clicking on the desired images. As shown in Figure 3.7, a yellow border appears around the selected image or images.
Figure 3.7. Select images stored on MobileMe that you want to import into iPhoto.
- Using the mouse, drag the highlighted/selected images to the Events heading that’s located at the top-left side of the iPhoto ’11 screen.
- A new Event folder is created, and the photos from MobileMe you selected are downloaded and placed within this Event folder. The default Event name is the current date.
Using a Scanner to Transfer Hard-Copy Prints into iPhoto ’11
A scanner allows you to create a digital image file from any type of hard-copy photo or artwork. Depending on the scanner you have, use the method outlined in its manual to create a digital image scan and save the scanned image on your hard drive in a .JPG or .TIFF format. Remember within which directory you store the saved image.
To load the saved image that was just scanned and is now stored on your computer’s hard drive, follow the steps described in the “Adding Images into iPhoto ’11 from Your Computer’s Hard Drive” section earlier in this chapter.
Your scanner may have come with its own photo-scanning software; however, after the scanner is connected to your Mac, you can also use the Import from Scanner command under the File pull-down menu within the Preview program that comes bundled with all Macs.
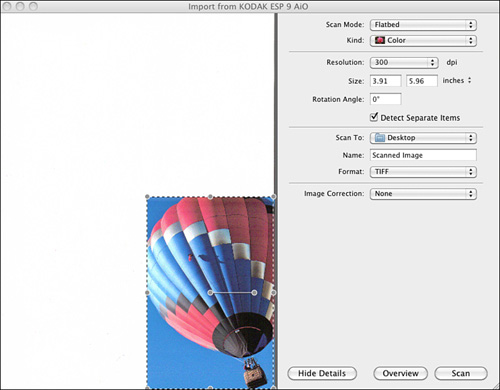
Using Preview, select the Import from Scanner command, place your hard-copy photo (print) on the scanner bed, and adjust the options that appear in the Import from [Scanner Name] window, as shown in Figure 3.8.
Figure 3.8. You can scan any hard-copy image using a scanner and save it in a popular graphic file format, such as .JPG or .TIFF. Choose a directory in which to store the scanned image on your hard drive (such as Pictures or Downloads).
After the hard-copy picture (or print) is scanned, choose the Save command to store it in the directory and in the file format you desire. To import the image into iPhoto ’11, follow the steps described in the “Adding Images into iPhoto ’11 from Your Computer’s Hard Drive” section earlier in this chapter.
Importing Photos from the Web into iPhoto ’11
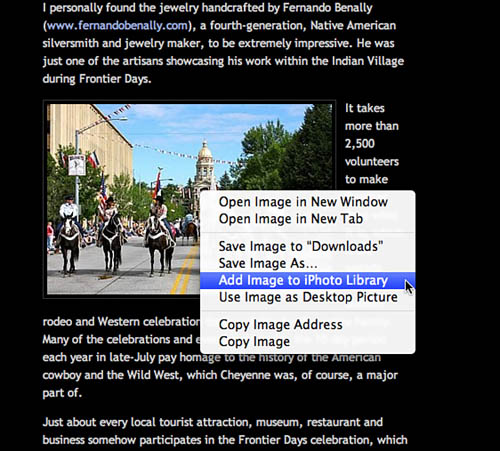
As you surf the Web, you may come across photos you want to save and import into iPhoto. To copy a photo you see on a website (provided that it’s not protected), simply hold down the Control key on the Mac’s keyboard and simultaneously click on the desired photo.
A window appears, giving you multiple options for saving that image. The fifth option from the top is Add Image to iPhoto Library (as shown in Figure 3.9). Select this command by clicking on it. That selected photo from the Web is automatically copied into iPhoto and inserted into a newly created Event folder, with the default name being the current date.
Figure 3.9. You can import a photo from a webpage into iPhoto using the Add Image to iPhoto Library option.
Caution
Copyright laws apply to all images and photos displayed on the Web, so be careful how you use the images you copy directly from websites or blogs operated by other people or businesses.
Note
Not all artwork on the Web can be copied using this method. It is possible for website designers to add copy protection to images displayed on websites, in which case the method for importing photos from the Web described in this section does not work.
Changing Image Filenames After They’re Loaded into iPhoto ’11
Regardless of how you import photos into iPhoto ’11, after they’re placed into Events, you have the option to custom name each Event folder. You can also change the default filename given to each image, plus associate a description, rating, or keywords with the image, and also add Faces and Places tags.
SHOW ME Media 3.2—Changing event and image filenames within iPhoto ’11
Access this video file through your registered Web Edition at http://www.quepublishing.com.
When looking at the Event folders within iPhoto, you can change the name of an Event by clicking on the current Event name once (it’s displayed below the Event’s Key Photo thumbnail image). When the title field becomes active, and the text is highlighted in blue, simply type in the new Event name you want.
To change the filename, description, rating, keyword, as well as the Faces or Places tags associated with a particular image, double-click the Event folder in which the desired image is stored.
When the thumbnails for the images within that Event appear, click on the current filename of the image you want to change. The filename is displayed below the image thumbnail, as shown in Figure 3.10.
Figure 3.10. To change the filename for an image, click on the current filename displayed under the image’s thumbnail and type in a new filename.
With the desired image highlighted (surrounded by a yellow border), to associate a description, rating, or keywords to that image, click on the Info command icon located in the lower-right corner of the screen.
In the Add a Description box that appears on the right side of the screen, as shown in Figure 3.11, you can add a text-based description to be associated with that photo.
Figure 3.11. A photo’s description can be a short phrase or sentence.
Also in the Info window that appears on the right side of the screen, you can add a rating for that image by clicking on the number of stars (between one and five) that appear next to the image’s filename.
About halfway down the Info window is a field for entering keywords to associate with that image. Enter a keyword or phrase and then press the Return key. You can enter multiple keywords or phrases for each photo.
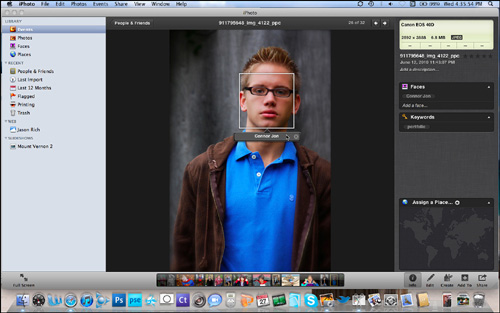
To tag the photo with the names of the people featured within it, place the cursor directly on one of the faces appearing in the photo. A white box appears. Adjust the size of the box to accommodate the person’s entire face. Below the box, in the Name field, enter the person’s name (see Figure 3.12). Repeat this process to tag each person appearing in a photo.
Figure 3.12. Tag the people in your photos so you can later use the Faces feature of iPhoto ’11 to sort your images based on who appears within them.
Finally, if your camera or its memory card doesn’t have geo-tagging built in, you can manually enter the geographic location where the photo was taken. To do this, refer back to the Info screen and click on the Assign Place command located toward the bottom of it. Manually enter the city, state, or country where the photo was shot. A Google Map appears displaying that location.
Tip
The more information you enter about each of your photos, the easier it will be to find them later when using iPhoto ’11’s Search feature.
Tip
If you don’t want to spend time renaming each individual image stored within an Event, you can also add a description, keywords, face tags, and geo-tagging to an entire Event by highlighting just the Event from iPhoto’s main screen and then clicking on the Info command icon.
![]() More information about how to organize and sort Events, Albums, and individual images is included in Chapter 4, “Organizing Your Photos.”
More information about how to organize and sort Events, Albums, and individual images is included in Chapter 4, “Organizing Your Photos.”
The Next Step...
After importing photos into iPhoto ’11, you can begin to view, organize, edit, enhance, print, share, and archive them using the many features and functions built into the software.