
8. Adding Effects to Your Images
Learn to use the Effects image enhancement and special effects tools offered by iPhoto ’11.
In addition to fixing visual problems with photos or using the Crop command to reframe photos after they’ve been shot, you can use iPhoto ’11 to quickly add a handful of special effects to your photos that will dramatically alter their overall appearance.
Although each special effect can be added with a single click of the mouse, you also are able to adjust the intensity of most effects, so you can customize them in a way that will make your photos stand out in a positive way and be unique.
Especially if you’re creating a traditional photo album or scrapbook, photo book, or slideshow that showcases multiple images, adding a few special effects to several of your featured photos can add visual appeal to the overall Photo Project.
This chapter focuses on the special effects you can add to your photos using the Effects features offered in iPhoto ’11’s Edit window. Each of these effects can be used in conjunction with the other editing tools offered in the program, which are described in Chapter 7, “Using iPhoto ’11’s Simple Photo Editing Features,” and Chapter 9, “Advanced Photo Editing with iPhoto ’11.”
Discovering the Edit Window’s Effects Options
To begin adding special effects to your images or fine-tune their colorization, select and highlight an image you want to edit while viewing your image thumbnails from the Events, Photos, Faces, or Places viewing modes. Double-click on that image’s thumbnail so it appears in the main image viewing area.
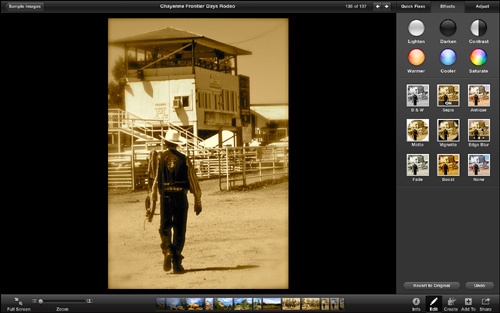
Next, click on the Edit command icon located in the lower-right corner of the screen to open the Edit window. At the top of this window are three tabs, labeled Quick Fixes, Effects, and Adjust. Click on the middle tab, labeled Effects. Notice the content of the Edit window completely changes (see Figure 8.1).
Figure 8.1. The edit and image enhancement tools are displayed under the Effects tab of the Edit window located on the right side of the screen.

Displayed under the Effects tab at the top of the Edit window are a handful of colored spheres. Nine additional effects thumbnail command icons are positioned toward the center of the window. At the bottom of the Edit window are the familiar Revert to Original and Undo icons, which remain constant regardless of which Edit window tab you access.
Each icon and effects thumbnail command icon displayed in the Edit window represents a different type of effect or enhancement you can add to your photos. After you select a particular effect, in most cases, you can control the intensity of that effect and fine-tune the impact it has on each of your images. You can also easily mix and match effects to give each of your photos a truly unique and often more professional appearance.
The effects spheres at the top of the Edit window allow you to fine-tune the colorization and contrast of your images by clicking on one or more of the spheres using your mouse. The effects thumbnail command icons allow you to add more dramatic special effects to your photos. For example, with a single click of the mouse, you can transform a vibrant and colorful photo into a black-and-white image. Alternatively, you can blur the edges of an image so the focus of attention is on its main subject when viewers look at your photo.
Tip
The trick to successfully using special effects in your photos is to use them sparingly and tastefully. After all, you want the focus to remain on your photos and their subjects, not on the visual effects you added. Choose effects that add to the overall impact of a photo in a positive way, without distracting the people who will ultimately be viewing your images.
Anytime you add a special effect to one of your images, the impact of your action is immediately reflected on the photo you’re editing in the main image viewing area. If you don’t like a particular effect or you want to try something else, click on the Undo command icon, use the Undo command from the Edit pull-down menu, or press Command + Z on the keyboard to undo the last action you did in iPhoto ’11.
Tip
Use your own creativity and don’t be afraid to experiment by adding random effects to images or mixing and matching effects to give your photos a unique and attention-getting appearance. You can always undo or delete unwanted effects or use the Revert to Original command to return your photo to its original appearance.
Lightening or Darkening an Image
This section focuses on the six effects spheres located at the top of the Edit window when you click on the Effects tab. In the upper-left corner is the Lighten effect sphere. Immediately to the right of it is the Darken effect sphere.
The Lighten and Darken effect spheres allow you to adjust a photo’s exposure with a single click of the mouse. Exposure refers to a photo’s overall lightness and darkness.
Each time you click on the Lighten effect sphere, the exposure of the photo you’re editing lightens slightly. To make this effect more dramatic, click on the Lighten effect sphere multiple times in a row. This impacts everything in the photo. The first two or three times you click this effect sphere, the overall impact is subtle. However, after four to eight clicks, the colors in your image start to wash out and become severely distorted.
Use this effect to lighten an otherwise dark image slightly. If the image is extremely dark, you see more dramatic results if you utilize this effect in conjunction with the Shadows adjustment tool available as one of the Adjust settings (discussed in Chapter 10).
As with any of the effect spheres, after you click on it one or more times, the impact of the photo is immediately apparent, and your edits/enhancements are automatically saved as soon as you exit iPhoto 11’s Edit mode or begin editing another photo.
Offering the exact opposite effect as the Lighten effect sphere, the Darken effect sphere slightly darkens the overall exposure of the image you’re editing. The impact of this effect is subtle at first (when you click the sphere between one and three times), but its impact becomes increasingly more dramatic and apparent the more you click on it. Eventually, if you keep clicking this Darken effect sphere, your image will turn totally black.
Caution
Every time you alter an image, your changes impact the primary version of that image that’s stored in an Event. By extension, those changes immediately are incorporated into any Photo Projects (including Albums, slideshows, and greeting cards) in which that image also appears. If you don’t want the changes to impact all uses of that image, make a duplicate of the image first before you start adding effects. Use the Duplicate command under the Photos pull-down menu to create a duplicate (an exact copy) of the original image.

SHOW ME Media 8.1—Lightening or darkening a photo using iPhoto ’11
Access this video file through your registered Web Edition at http://www.quepublishing.com.
![]() LET ME TRY IT
LET ME TRY IT
Lightening or Darkening a Photo
To lighten or darken a photo with a few clicks of the mouse, follow these steps:
- Select and highlight the photo you want to edit. Double-click its thumbnail to display that photo in full size in the main image viewing area.
- Click the Edit command icon located in the lower-right corner of the screen.
- When the Edit window appears on the right side of the screen, click the Effects tab located at the top of the Edit window.
- To lighten a photo, click on the white Lighten sphere that’s located in the upper-left corner of the Effects window. You can click on this sphere multiple times until you achieve the designed impact on your image. The alternative (which gives you greater control to customize your image) is to click on the Adjust tab at the top of the Edit window and then use the Exposure, Contrast, Definition, Highlights, and Shadows sliders, for example, to adjust various aspects of your image’s lighting and color.
- To darken a photo, click on the black Darken sphere that’s located at the top of the Effects window (between the Lighten and Contrast) spheres. You can click on this sphere multiple times until you achieve the desired impact on your image.
Adjusting the Contrast in Your Photos
The Contrast effect sphere located in the upper-right corner is half white and half black. In photography, contrast refers to the difference between the light and dark areas of a photo.
On most photos, the impact of clicking the Contrast effect icon is subtle for the first few clicks, especially if you’ve already used the Enhance command under Quick Fixes (described in Chapter 7).
Each time you click on the Contrast icon, the difference between the light and dark aspects of your photo is intensified slightly. So theoretically, the colors in your photos should appear more vibrant, and the level of detail visible in your image should improve slightly.
Note
You have much greater control over a photo’s exposure, contrast, and color, for example, when you fully utilize the edit and enhancement commands offered under the Adjust tab of the Edit window.
Tinkering with a Photo’s Coloring
There are three main ways to adjust coloring in your photos using iPhoto:
• The easiest method is to use the Enhance command under Quick Fixes. This is considered a fully automated approach to adjusting or fixing colors that appear in your images. It’s covered within Chapter 7.
• A semi-automatic approach to color adjustment using iPhoto ’11 is to utilize the effect spheres under the Effects tab in the Edit window.
• The fully manual method of adjusting color in your images, and the option that gives you maximum customization ability and control, is to use the editing features offered under the Adjust tab of the Edit window. This is covered in Chapter 9.
This section focuses on taking the semi-automatic approach to adjusting the colors that appear in your photos. To do this, you can utilize the second row of effect spheres located under the Effects tab in the Edit window. These spheres are labeled Warmer, Cooler, and Saturate.
The Warmer and Cooler effect spheres have the opposite effect on one another When you click one or more times on the Warmer effect sphere, the tone of the colors in your image appears (as the name suggests) warmer. The reds and oranges, for example, become more vibrant, and the overall colorization looks more like the photo was taken on a bright and sunny day.
Note
When you use the Warmer and Cooler effect spheres, the greatest impact occurs on aspects of your photo that are lighter in color.
When you click on the Cooler effect sphere, other colors, such as the blues and grays in the photo, become more enhanced, making the image look more like it was shot outside on an overcast, cloudy, or murky day.
Because the Warmer and Cooler effect spheres are opposites of each other, if you click twice on the Warmer effect sphere and then click twice on the Cooler effect sphere, the image winds up looking exactly the same as when you started. As you’re editing a photo, you need to use only one of these effects based on the overall colorization of your photo and the visual effect you’re trying to achieve.
Once again, you’ll notice the impact on the image each time you click the Warmer or Cooler effect sphere is subtle. The more times you click on that effect sphere, the greater the impact is on the photo. At some point, your image will become too light and washed out, or too dark, and using the Warner or Cooler effect will cease to have any further impact on your image.
The Saturate effect sphere is used to enhance the overall vibrancy of the colors appearing in your photo. The impact, once again, is subtle when you click on this effect sphere between one and three times, but with more clicks, the impact on your photo becomes more dramatic. This effect brightens the bright colors in your image by removing or lightening some of the grays or darker colors in the image.
Easily Adding Special Effects to Your Pictures
Being able to manipulate the colors, as well as adjust the contrast and exposure of your photos, can have a positive and significant impact on their appearance. If you use these editing tools correctly, you can fix problems in a photo or give an image a more artistic appearance.
Going beyond basic photo editing, iPhoto ’11 allows you to add special effects to your images that have an instant and often dramatic impact on them. Located on the bottom of the Edit window when you click on the Effects tab are nine Effects thumbnail command icons.
Each of these Effects thumbnail command icons is labeled based on what type of effect it creates. Your options include the following:
• B&W—Transform a full-color image into B&W with a click of the mouse.
• Sepia—Give your images an “old-time photo” appearance using this special effect.
• Antique—Make your photos look like prints stored up in an attic for several decades when you add this aging special effect to them.
• Matte—Add a white, oval-shaped frame as a digital border around your image.
• Vignette—Add a black, oval-shaped frame as a digital border around your image.
• Edge Blur—Create an effect commonly used by professional photographers to enhance portraits. The outer edges of the photo are blurred (on purpose) to draw attention to the main subject of the photo.
• Fade—Use this effect to fade the color in an entire image.
• Boost—Use this effect to enhance the colors in a photo to make everything look brighter and more vibrant.
• None—Remove all the effects you’ve added in one click of the mouse and return the photo to its original appearance before you added any effects. Any other edits or enhancements, however, remain intact.
SHOW ME Media 8.2—View a sampling of the special effects you can add to your photos using iPhoto ’11
Access this video file through your registered Web Edition at http://www.quepublishing.com.
![]() LET ME TRY IT
LET ME TRY IT
Adding Special Effects to Your Photos
Adding special effects to your photos is easy. The trick is to do it tastefully. To add one or more special effects to your photos, such as the Vignette effect, follow these steps:
- Select and highlight the photo you want to edit. Double-click its thumbnail to display that photo in full size in the main image viewing area.
- Click the Edit command icon located in the lower-right corner of the screen.
- When the Edit window appears on the right side of the screen, click the Effects tab located at the top of the Edit window.
- Choose which effect you want to add to your photo and click its respective icon in the Edit window, such as Vignette, which adds a circular black border around your image.
- When it’s applicable, adjust the intensity of that effect. For example, with the Vignette effect, you can click on this effect icon up to 24 times to determine the size of the circular black border that appears around your image. As you do this, you will be able to preview the effect immediately in the main image viewing area. To remind yourself of how the image looked before you added the effect, press the Shift key.
Transforming a Color Image into B&W
With a single click of the mouse, you can transform a full-color image into black and white. Some photos actually become more visually striking or interesting when you remove the distraction of color and force the person viewing your images to really focus on the subject or what’s happening in a photo.
iPhoto ’11 offers the ability to use the B&W effect in conjunction with other visual effects. For example, you can use Lighten or Darken on a black-and-white image or adjust its contrast before or after it’s been transferred into black and white. You can also add a matte or vignette or blur the edges of that photo.
When you’re creating a slideshow, photo book, or traditional photo album or scrapbook, for example, mixing in a few black-and-white images with your full-color photos adds variety to the overall composition of your Photo Project. Depending on the subject, a single black-and-white photo that’s transformed into an 8" × 10" print (or larger) and then framed on a wall can also add to the décor of any room.
Tip
Sometimes a full-color outdoor image that looks dreary because it was shot on a dark, overcast, cloudy, or rainy day can be transformed into an extremely eye-catching image by converting it into black and white.
Making a Photo Look Old Using the Sepia Effect
The Sepia effect drains all the colors from an image and replaces them with shades of browns, tans, and whites, giving the photo an aged appearance. You can add to this overall effect by using the Edge Blur effect to help make a modern photo look older.
SHOW ME Media 8.3—Using the Sepia and Edge Blur effects to make your photos look old
Access this video file through your registered Web Edition at http://www.quepublishing.com.
![]() LET ME TRY IT
LET ME TRY IT
Using the Sepia and Edge Blur Effects
You can quickly transform any full-color photo you just shot into an image that looks as though it was taken decades ago. To achieve this visual effect, follow these steps:
- Select and highlight the photo you want to edit. Double-click on its thumbnail to display that photo in full size in the main image viewing area. For this example, a photo taken in 2010 at the Cheyenne Frontier Days Rodeo is being used. (The final result is shown in Figure 8.6.)
- Click on the Edit command icon located in the lower-right corner of the screen.
- When the Edit window appears on the right side of the screen, click on the Effects tab located at the top of the Edit window.
- Click on the Sepia thumbnail effect icon. The word On appears at the bottom of the icon. The colors in your image are replaced by shades of browns, tans, and whites.
- To enhance the aged look, click on the Edge Blur thumbnail command icon. This effect allows you to control its intensity, based on the number of times you click on the thumbnail command icon. With each click, the number displayed at the bottom of the thumbnail command icon increases by one, and the intensity of this visual effect increases in the image itself. Click on the Edge Blur icon four times to create the effect used in the example showcased in Figure 8.2.
Figure 8.2. Another example of how the Sepia and Edge Blur effects can be used together.
Instantly Aging an Image with the Antique Effect
The Antique effect works very much like the Sepia effect. Instead of removing the original colors in your image and replacing them with shades of browns, tans, and whites, however, the Antique effect dramatically dulls the existing colors in your photo and enhances the grays to give the photo a more subtle aged appearance.
Like several of the other effects you can add to your photos using iPhoto ’11, the Antique effect is customizable. You can determine how strong and visually striking you want the effect to be in your image based on the number of times you click on the Antique thumbnail command icon in the Edit window.
Clicking the Antique thumbnail command icon once only slightly dulls the colors in your image. Click on the icon three or more times, and the effect becomes that much more apparent.
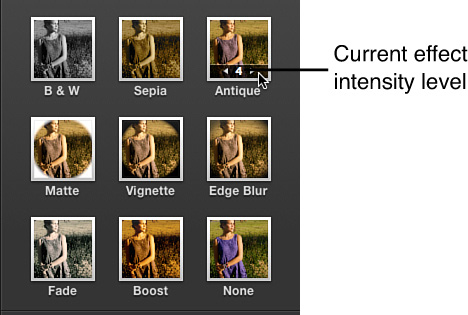
With each click, the number displayed at the bottom of the thumbnail command icon increases by one (see Figure 8.3). The available intensities are between one and nine for the Antique effect (and up to 24 for some other effects). After you’ve clicked on an adjustable effect multiple times, you can lessen its impact by clicking on the small left-pointing arrow that appears next to the number in the effect thumbnail command icon. Alternatively, you can increase the effect’s impact by clicking on the right-pointing arrow icon that appears on the opposite side of the number.
Figure 8.3. Some of the Effects in iPhoto ’11, such as Antique, Matte, Vignette, Edge Blur, Fade, and Boost, can be adjusted by clicking on that thumbnail command icon multiple times.
Note
How much of an effect you use and which effects you mix and match are a matter of personal preference based on the overall look for a photo you’re trying to achieve. Don’t be afraid to tap your creativity and experiment to create some dazzling effects.
Adding a Matte or Vignette to the Photo
When framing a traditional print, you have the option to add a single, double, or triple cardboard matte around that photo to make it look more impressive in the frame. Most traditional mattes are rectangular, square, circular, or oval shaped, and they come in a variety of colors.
Using iPhoto ’11, when you’re ready to print your images, you can easily add and customize digital mattes around your images (which replace the need for traditional cardboard mattes). These digital mattes are useful if you plan to showcase your images online or in a photo book, or even if you plan to create prints for framing but don’t want to use traditional cardboard mattes.
![]() To learn more about adding digital mattes and borders to your images, see Chapter 11, “Printing Photos Using Your Own Home Photo Printer.”
To learn more about adding digital mattes and borders to your images, see Chapter 11, “Printing Photos Using Your Own Home Photo Printer.”
The Matte and Vignette effects available under the Effects tab in the Edit window allow you to digitally add either an oval white matte or an oval black vignette around your image. When used correctly, these effects draw the viewers’ eyes to the center of your photo and force them to focus on the subject.
Both the Matte effect (shown in Figure 8.4) and Vignette effect (shown in Figure 8.5) are customizable, based on the number of times you click on the thumbnail command icon for that effect. Clicking it once creates a subtle oval around the image, like a border. Clicking the effect icon up to 24 times intensifies the look of these effects by increasing the amount of white or black you see, thus reducing the amount of the actual photo that’s visible.
Figure 8.4. The Matte effect after being clicked on three times.

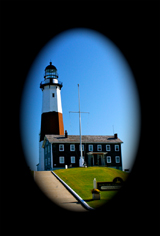
Figure 8.5. The Vignette effect after being clicked on 10 times.
Note
In Figure 8.4, the Matte effect thumbnail command icon was clicked on three times. In Figure 8.5, the Vignette effect thumbnail command icon was clicked on 10 times. Beyond the color of the oval around the image, you can easily see the difference varying the intensity of either effect makes.
Tip
You can easily create some unique and visually interesting effects by using the Matte and Vignette commands in conjunction with each other.
Drawing Focus to Your Subjects by Blurring the Image’s Edges
The Edge Blur effect is a common technique used in portraits to draw viewers’ attention to the main subject. This adjustable effect was demonstrated earlier in this chapter. Edge Blur can be adjusted based on the number of times you click on the Edge Blur effect thumbnail command icon (between 0 and 11).
When you click on this effect just once, the blurriness added to the image remains on the extreme outer edges of the photo and is very subtle. As you increase this effect’s intensity, the blurriness impacts a greater area around the outer edge of the image, causing more of that photo to appear out of focus.
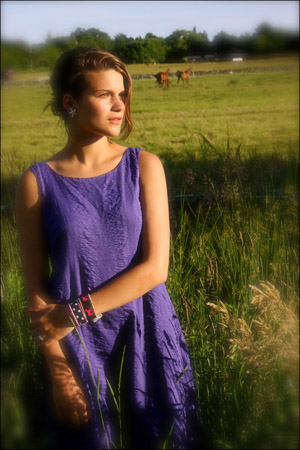
You can use the Edge Blur effect alone or in conjunction with other effects, such as Sepia, for example. Figure 8.6 shows how this effect can be used on a full-color image to blur part of the background yet still keep enough of the background intact so the people viewing the image can make out the setting where the photo was shot. A greater emphasis is also put on the subject. In this example, the Edge Blur effect was clicked on five times.
Figure 8.6. The Edge Blur effect used on a full-color photo to make some of the background appear out of focus yet still keep some of the background clear enough to make out where the photo was shot.
Fading or Boosting the Colors in Your Photos
The Fade and Boost effects available in iPhoto ’11 are also adjustable, up to a level of nine. As its name suggests, the Fade effect dulls the colors in an image and draws out the grays.
The Boost effect makes all the colors in your image appear more vibrant. Typically, you want or need to click on the Boost effect only between one and three times to really enhance an image’s color. However, you can create some dramatic visual effects if you click on this effect five or more times.
As with all the effects available, you can mix and match Fade or Boost with other effects and enhancement features to create truly one-of-a-kind images. Keep in mind, however, that Fade and Boost serve the exact opposite purpose and counteract each other. So, if you click the Fade effect thumbnail command icon twice and then click the Boost effect thumbnail command icon twice, the net effect is what your original image looked like before you started using these two effects.
Removing Special Effects You’ve Added
You already know that any time you use the Undo command, it allows you to take one step back and remove or undo the last thing you did in iPhoto ’11. Likewise, when you use the Revert to Original command, with one click of the mouse, all the edits and enhancements you made to a photo are deleted and removed, restoring that image to its original appearance.
The None effect thumbnail command icon under the Effects tab of the Edit pull-down menu allows you to remove all the effects you’ve added to a photo using any of the features under the Effects tab but leaves any other edits or enhancements you’ve already made to that photo intact.
