
13. Creating Photo Projects and Photo Gifts
Learn how to create Photo Projects, such as greeting cards, photo books, and calendars, using iPhoto ’11.
In addition to offering you the ability to order prints directly, iPhoto ’11 offers a handful of powerful design tools that allow you to drag and drop your photos into professionally designed templates and, in a matter of minutes, easily create greatlooking Photo Projects.
Currently, the Photo Projects you can create in iPhoto ’11 include photo books (an incredible-looking alternative to traditional photo albums or scrapbooks), greeting cards, holiday cards, note cards, and picture calendars. After designing your projects in iPhoto ’11, you can upload and order them without ever leaving this software. Plus, iPhoto ’11 allows you to organize and manage all your Photo Projects in one place.
When it comes to creating and ordering customized and great-looking Photo Projects, your options go beyond what’s available in iPhoto ’11. You can easily export your photos and use an independent online photo service (like the ones described in Chapter 12, “Creating Prints Using a Professional Photo Lab”), as well as online services such as CafePress (www.cafepress.com). There, you can choose from hundreds of additional products to customize, design, and order that showcase your photos.
The focus of this chapter is how to create personalized Photo Projects and unique photo gifts using the images you upload, edit, and enhance with iPhoto ’11.
Creating Photo Projects Using iPhoto ’11
In iPhoto ’11, the design tools and templates you need to create highly personalized photo books, greeting cards, and picture calendars are built into the software.
When you use these tools, it takes just minutes to choose a template design you like for a particular Photo Project, drag and drop your photos into that template, customize the colors and design elements of the template, add your own text (if applicable), and then order your Photo Project with a few mouse clicks.
![]() To learn more about creating an Apple ID account, see “Setting Up Your Apple ID Account” (Chapter 12).
To learn more about creating an Apple ID account, see “Setting Up Your Apple ID Account” (Chapter 12).
Tip
When Apple released the first version of iPhoto ’11 in October 2010, it didn’t include the capability to create customized picture calendars or holiday-themed greeting cards. This functionality was added to the software through a free update several weeks later. Over time, Apple may make additional Photo Projects available for iPhoto ’11. Be sure to periodically use the Check for Updates command (from the iPhoto pull-down menu) to determine whether a new iPhoto ’11 update has been released.
As you’re viewing your images from the Events, Photos, Faces, or Places viewing modes in iPhoto ’11, or viewing images in an Album or another folder, at any time you can click on the Create command icon located in the lower-right corner of the screen.
Figure 13.1 shows the Create command icon and the options available from it for creating personalized and customized Photo Projects using your photos.
Figure 13.1. The Photo Projects available when you click on the Create command icon.
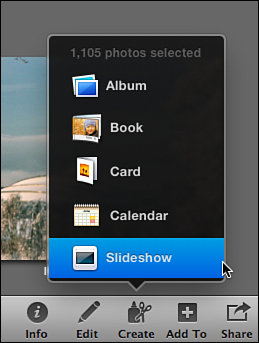
The Create command icon allows you to begin working on a new Photo Project, such as an Album, photo book, card, calendar, or slideshow. Select the Photo Project you want to begin working on.
Note
Albums are one way to organize and view photos in iPhoto ’11. The process of creating and using Albums is covered in Chapter 4, “Organizing Your Photos.” When you create an Album, it can include copies of photos stored in several different Events, making them easier to find, view, and work with.
![]() To learn more about creating slideshows, see Chapter 15, “Creating and Sharing Slideshows.”
To learn more about creating slideshows, see Chapter 15, “Creating and Sharing Slideshows.”
As you create Photo Projects, each of them is listed separately in iPhoto ’11’s Source list on the left side of the screen, so you can easily access that project at any time. (Double-click on the project name in the Source list to open it.) In the Source list, Photo Projects are sorted by project type, as well as the filename you assign to each project.
Caution
Even after a Photo Project has been created and saved, if you later edit or enhance an individual image used in that project, the project is automatically updated with the new version of the now-edited image. If you want to edit an image but keep the current version of that image intact in your existing Photo Projects, first use the Duplicate command to create a copy of the image before editing or enhancing it.
Publishing Full-Color, Professionally Bound Photo Books
For as long as photography has been in existence (since the nineteenth century), people have been creating traditional photo albums and scrapbooks with their prints as a means to collect, organize, showcase, and archive memories and be able to reminisce about later.
You can create a photo book to showcase photos from a recent vacation, party, or special event. You can also create a book that chronicles the first year of a baby’s life through pictures and captions. The possibilities are limited only by your own creativity and imagination. However, whatever you choose to be the focus of your photo book, chances are iPhoto ’11 has a perfect theme for it. Thus, it is easy to design your book and give it a professional yet unique and personalized look.
It took nearly 200 years for the traditional photo album concept to take a major technological advance forward. That advancement came with the introduction of digital printing and print-on-demand technology. Using this technology that’s readily available today, professionally bound, full-color photo books can easily and inexpensively be produced and printed, one copy at a time.
At a price starting around $20, your images can be printed and published in a professionally bound hard-cover, soft-cover, or wire-bound book, on glossy paper, and show up at your door looking like a book you purchased from a bookstore, except that it will contain your photos, captions, and customized design elements.
Photo books are a wonderful, extremely impressive, and easy-to-create alternative to traditional photo albums and scrapbooks. Plus, they take a lot less creativity and time to produce, thanks to the professionally designed templates that come with the iPhoto ’11 software.
After designing your photo book, you can easily preview the cover and its contents on your Mac’s screen, make whatever edits or adjustments you’d like, and then upload the photo book to Apple’s print-on-demand publishing system. This system allows your unique book to be printed, bound, published, and shipped to your door within a few days.

TELL ME MORE Media 13.1—Learn more about the Blurb photo book service and other options
To listen to a free audio recording about using Blurb.com to create your photo books, as opposed to iPhoto ’11, log on to http://www.quepublishing.com.
Choosing a Theme for Your Photo Book Using iPhoto ’11
The first step when it comes to creating a photo book is choosing a theme for it, and then customizing that theme. This will determine the appearance of your book, its trim size, and its cover type, for example.
![]() LET ME TRY IT
LET ME TRY IT
Choosing a Theme for Your Photo Book
To produce the most visually stunning photo book possible, choose a theme that best fits the story you’re trying to tell with your photos, and then customize the photo book. To choose a theme for a photo book, follow these steps:
- To begin creating a photo book, click and highlight either an Event folder in iPhoto or a particular Album that contains the images you want to include in the pages of your soon-to-be created hard-cover, soft-cover, or wire-bound book. You can also select images you’ve flagged from a variety of Events, for example.
- Click the Create command icon and select the Book option to open the Photo Book Creation (and theme selection) screen. This screen is much less confusing to look at if you view it in full-screen mode (see Figure 13.2).
Figure 13.2. The Photo Book Creation screen shown in full-screen mode. Choose your book’s theme, cover design, and trim size.
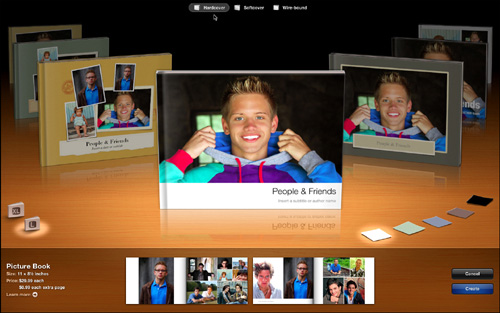
- In the center of the screen is a large preview area, which initially showcases what the cover and binding of your book will look like, even before your start customizing anything. Use the left- or right-arrow keys on your keyboard or the mouse to select which cover design template you want to use for your book, keeping in mind you can change the color scheme, cover photo, and text-based title.
- Using the photos in the Event folder or Album that you preselected, the iPhoto ’11 software automatically lays out and designs a sample photo book for you, placing the photos into your book sequentially, based on their date. You can, however, totally customize the photo order, layout of each page, and size that each photo will be displayed in your book.
- At the top of the Photo Book Creation screen, choose the type of binding and cover you want for your book project. Your options include Hardcover, Softcover, or Wire-bound. Place a check mark in the appropriate check box.
- Based on the cover and binding type you select, choose the trim size of your photo book. In the lower-left corner of the Photo Book Creation screen’s preview area are book icons with letters on their covers corresponding to Small (S), Medium (M), Large (L), and Extra Large (XL). However, not all trim size options are available for each cover and binding type, so choose from what’s available based on your personal preference.
- From the lower-right corner of the preview window, choose a color scheme for your photo book project. A selection of color swatches is displayed, based on which cover design template is selected.
- If you look to the extreme lower-left corner of the screen, shown in Figure 13.3, you’ll see details about your current photo book project, including the name of the cover template currently selected, trim size (displayed in inches), base price of the photo book (based on the number of pages it currently contains, taking into account all the photos you want to use and that iPhoto automatically placed in your book), and cost of adding additional pages.
Figure 13.3. View details about your photo book, including its price, in the lower-left corner of the Photo Book Creation screen.

- Located at the bottom center of the screen are thumbnails of your book’s internal layout (again, you can fully customize all aspects of each page’s layout). When you’re ready to start the customization process, click on the Create command icon located in the lower-right corner of the screen.
Customizing the Layout and Design of Your Photo Book
After you select your photo book’s theme, it’s time to begin the individual page layout process. You can allow iPhoto ’11 to handle most of this task for you and rely on the default selections to have your entire photo book completed and ready to order in a few minutes. Alternatively, you can tap your own creativity and customize every page to create a photo book that’s truly one of a kind and that does an amazing job showcasing your particular images.
![]() LET ME TRY IT
LET ME TRY IT
Customizing the Layout and Design of Your Photo Book
Follow these steps to customize the overall layout and design of your book, including how each individual page will look:
- After clicking the Create icon on the Photo Book Creation screen, you see a thumbnail layout of each page of your book in the preview area (see Figure 13.4).
Figure 13.4. See an overview of your entire book via page-by-page thumbnails.
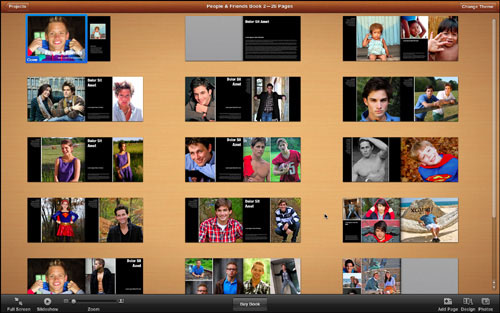
- Using the Zoom slider in the lower-left corner of the screen, you can make each thumbnail appear larger on the screen. Or you can double-click on any thumbnail page in the preview window to edit that page while seeing it in a larger two-page spread (see Figure 13.5).
Figure 13.5. Double-click on any page’s thumbnail to see and edit that page on the screen.
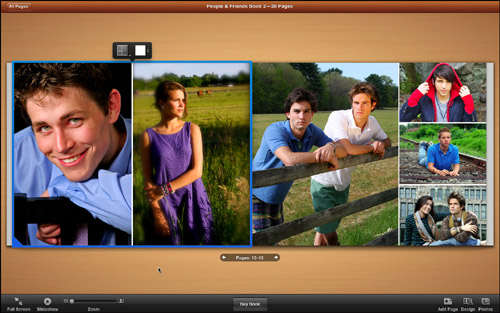
- While viewing a single two-page spread of your book, click and highlight one page at a time to edit. Above that page is a window containing two icons. The icon on the left allows you to select a new page design template for that specific page, as shown in Figure 13.6, and the icon on the right allows you to choose a new color scheme for that page.
Figure 13.6. You can change the layout or color scheme displayed on every page of your book as you customize it.
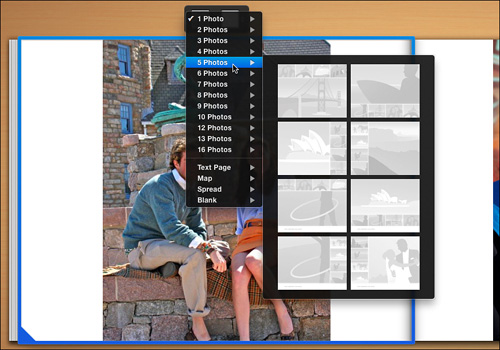
- When selecting a new page layout, choose how many photos you want to display on the page (the number you can include will vary based on the template you’ve selected) and/or choose between a Text Page, Map Page, Photo Spread Page, or Blank Page design. After you select any of these options, a new selection of available layout templates is made available to choose from.
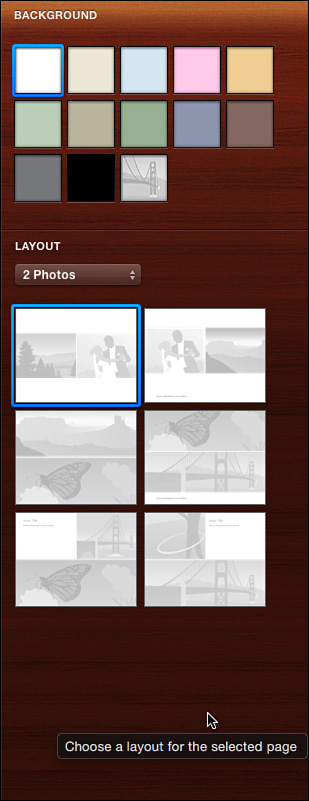
- View available layout templates as you edit your photo book by clicking on the Design command icon located in the lower-right corner of the screen. This opens a new window on the right side of the iPhoto ’11 screen that contains thumbnails for layouts and other design options (see Figure 13.7).
Figure 13.7. Click on the Design command icon to reveal your available templates and color schemes.
- Although iPhoto ’11 autoplaces the photos you’ve selected, you can override these placements and choose which photos you want to appear on which page. Plus, you can select your own template or color scheme for each page. When you click on the Photos command icon located in the lower-right corner of the screen, the entire right section of the screen is replaced by thumbnails of your selected photos, allowing you to simply drag and drop them into a template. Click on and select the photo thumbnail you want to add to your book, hold down the mouse button, and drag it to the appropriate location of the template in the preview window.
- At the top of this window, there’s a pull-down menu from which you can choose to display thumbnails of your photos. Alternatively, you can view just the placed photos (photos already included in your book), unplaced photos (preselected photos yet to be inserted into a page of your book), all preselected photos, or a variety of other options.
With the Photos command active and the thumbnails displayed on the right side of the screen, the photos that have already been used in your photo book have a small check mark in the lower-right corner of their thumbnails.
- You can click on the Clear Placed Photos icon below this thumbnail preview window to remove all the photos that iPhoto ’11 automatically placed in your book, allowing you to pick and choose the location, size, and placement of each photo. Alternatively, you can click on the Auto Flow icon located to the left of the Clear Placed Photos icon to have iPhoto ’11 automatically reinsert your photos into pages of the book.
Tip
You’ll probably find it easier to select your book’s theme and then use the Clear Placed Photos command so you can pick and choose the order in which your photos will appear in the book, as well as how each image will appear. Keep in mind that, for each page, you can choose the page’s layout, color scheme, and photo placement. Plus, you can customize the look of each photo on every page of your book by adding captions or special effects, zooming into a photo, or including a custom border.
- By picking and choosing your own page designs and photo placement, you can, for example, create a book that tells a chronological story using your images. Or, depending on which theme you’ve selected, you can cluster up to 16 similar images together on a page to create themed photo collages.
Tip
As you’re editing each page, you can double-click a photo in the preview window and select a border for that photo. When you double-click an image, a Zoom slider appears above the image in the preview window; plus, a new Design window appears on the right side of the screen. From this window, you can choose a custom border by clicking on a graphic icon representing that border. You can also add an effect to the photo (B&W, Sepia, or Antique), or click the Edit icon and go into iPhoto’s Edit mode. This can be done for each individual image in your book.
- After editing a single page, click the All Pages arrow icon located in the upper-left corner of the preview window to return to the thumbnail view of all pages in your book. During the design process, you can click the Add Page command icon located in the lower-right corner of the screen to add a single page to your book (you need to choose a layout and color scheme for that page and then drag and drop photos into it). Alternatively, you can delete a page of your book by selecting and highlighting the thumbnail for it and then pressing the Delete key on the keyboard.
Note
The minimum number of pages that can be featured in a photo book is 20. However, you can add as many pages as you’d like (for an additional fee) by clicking on the Add Page command icon located in the lower-right corner of the screen.
After you’ve completed the layout and design process for each page of your book, and you’re satisfied with the look of it based on the preview of the cover and each page you see on the screen, click on the Buy Book icon located at the bottom center of the screen.
If any errors exist in the book, such as blank text captions or unused slots for photos in a template, warning messages appear. Otherwise, the process for ordering the book continues.
The ordering process is virtually identical to ordering prints in iPhoto ’11, so see Chapter 12 for details on how to place your photo book order directly in iPhoto ’11, using your Apple ID account.
After you complete the design or ordering process, your photo book project is listed under the Projects heading in iPhoto’s Source list. You can always go back and edit it later or quickly order additional copies of your book. To delete the project altogether, highlight its listing on the Source list and press the Delete key on your keyboard. Or you can drag the listing to the Trash folder, also found on the Source list.

SHOW ME Media 13.2—Create a photo book in iPhoto ’11
Access this video file through your registered Web Edition at http://www.quepublishing.com.
![]() LET ME TRY IT
LET ME TRY IT
Creating a Photo Book in iPhoto ’11
If you want to create a professional-looking hard-cover, soft-cover, or wire-bound book to showcase your photos, follow these steps:
- Preselect an Event or Album folder or a collection of flagged photos you want to feature in your book.
- Click on the Create command icon and choose the Book option.
- Choose your photo book’s template, trim size, and color scheme; then click on the Create command icon.
- Use the layouts and options available from the Design command icon to customize each page of your book.
- Drag and drop the photos into your book from the window that appears when you click on the Photos command icon. You can view the progress you’re making in the preview area of the screen.
- When choosing the placement for your photos, have people’s faces and bodies or pictures showcasing motion pointing toward the center of the book, not toward the outer edges. This arrangement helps the pages of your book flow better from a visual standpoint.
- Customize or edit the appearance of each photo by adding a border or special effect, for example.
- Preview each page of your book and make any last-minute edits or customizations. You can add text-based captions, for example.
- Click on the Buy Book command to order your book.
- Follow the steps outlined in Chapter 12 for purchasing a Photo Project you create in iPhoto ’11.
Creating Your Own Custom-Imprinted Greeting or Holiday Cards
You can walk into any store that sells greeting cards and spend between $3 and $6 to purchase a generic, mass-produced card, which you can sign and send to the intended recipient. Or you can spend that same amount, invest about five minutes of your time, and create a customized greeting card using your own photos and message.
In iPhoto, you can order one or more copies of your custom greeting card and have it delivered within a few days. Whether you’re looking to say “Happy Birthday,” “Get Well Soon,” or “Happy Holidays,” the iPhoto ’11 software comes with a handful of greeting card templates that you can combine with your photos and message to create a card suitable for any occasion.
New to iPhoto ’11 is the capability to create and order Letterpress cards (priced at $2.99 each), which are classy looking and will definitely impress recipients. (See Chapter 2, “Upgrading to iPhoto ’11: What’s New and Noteworthy,” for a description of these cards.)
The process for creating greeting cards in iPhoto ’11 is similar to creating photo books, except less step intensive. Start by highlighting and selecting between one and four photos to be featured on the card’s cover or inside your card. Next, click the Create command icon located in the lower-right corner of the screen and choose the Card option.
The Card Template Selection screen is displayed. At the top of the screen, choose from the three main card formats: Letterpress, Folded, or Flat. The Letterpress option is shown in Figure 13.8. Based on your selection, templates are displayed in the main card preview area in the center of the screen. Use the left- or right-arrow keys on the keyboard or the mouse to scroll through the available template options.
Figure 13.8. Choose your card format from the Card Template Selection screen.
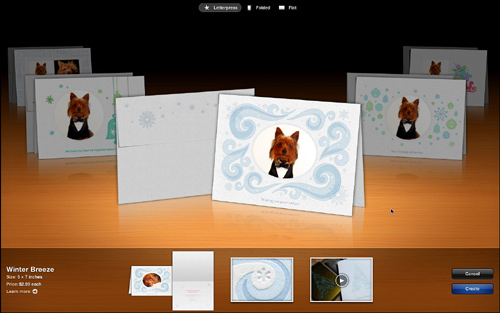
In the lower-left corner of the screen, information about each card template is displayed, including its name, size (in inches), and price. At the bottom center of the screen is a thumbnail image of what the card will look like, inside and outside, based on the card template selected. If you choose to design a Letterpress card, you can also watch a short video that describes how the Letterpress cards are created and what makes them unique.
In the main preview window, scroll through the available templates for each card type and choose one that can best conveys your message or sentiment. If you’re creating a folded or flat card, at the bottom-left corner of the preview window are icons allowing you to set the card’s orientation (horizontal or vertical). On the bottom-right corner of the preview window, you can choose a color scheme to use with the template.
Automatically inserted into the preview of each card template are the photos you preselected. However, you can easily change the appearance, order, or orientation of each photo after you confirm your template selection.
Note
For folded or flat cards, Apple offers quantity discounts when you order more than 25 of the same card. Quantity discounts are not currently available for Letterpress cards, which are priced at $2.99 each.
After choosing your template, click on the Create icon located in the lower-right corner of the screen. To exit this card creation mode, click the Cancel icon located to the immediate left of the Create icon.
The main preview area of the screen displays the entire front and inside of the card template you selected after you click on the Create icon. A Zoom slider is available in the lower-left corner of the screen. In the lower-right corner of the screen are two command icons: Design and Photos. Either opens an additional window on the right side of the iPhoto ’11 screen.
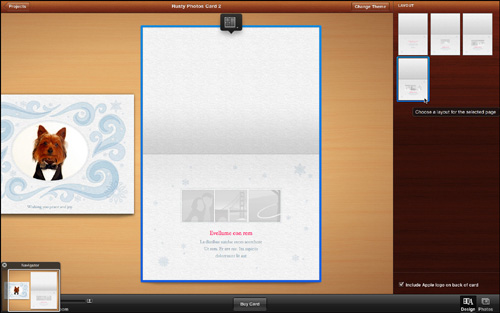
The Design command icon displays available templates for either the front or inside of the card, based on what’s highlighted and selected in the preview window. As you can see in Figure 13.9, you are able to select various templates that combine one or more photos with your customized text message. (For the inside of a card, you can either opt to display photos and text or just a text message.)
Figure 13.9. Choose a customizable layout for the front and/or inside of the card you’re creating.
Click the Photos command icon to open a window on the right side of the screen that contains thumbnails of the selected photos. You are able to drag and drop the photos from this window directly into the card template shown in the preview area. The Photos window is shown in Figure 13.10. As you can see, at the top of this window is a pull-down menu that allows you to determine what image thumbnails are displayed.
Figure 13.10. Drag and drop selected photos from the Photo window into the card template displayed in the preview area to the left.
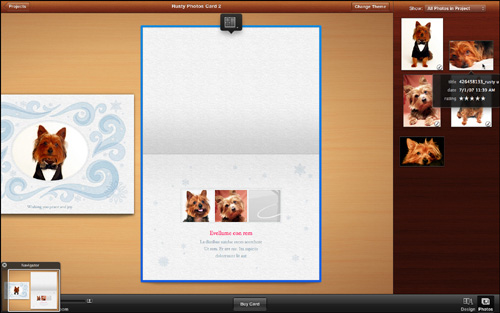
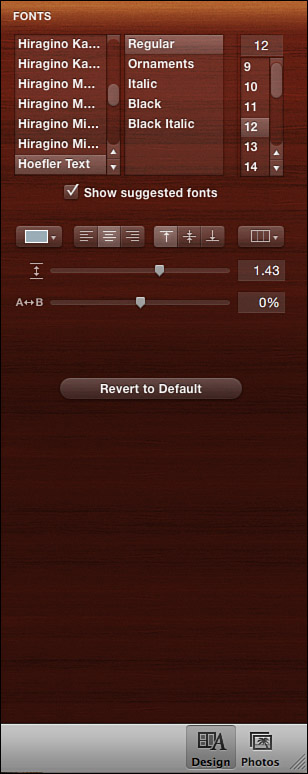
To further customize your card in the preview window, click on any text area of the template. If you’re in Design mode, the new window that appears on the right side of the screen allows you to choose a font, typestyle, font size, font color, text justification, and other formatting options related to the text that will appear on the cover or inside your card (see Figure 13.11). If you’ve clicked on the Photos icon, you can choose your font customization from the window that appears in the preview area, over the text field.
Figure 13.11. Customize the look of the text in your card.
At the same time you click on a text area of the card template, the text available for customization in the card is highlighted in blue in the preview window. Using the keyboard, enter your personalized message.
Tip
For ideas about what message text to include in your cards, visit any of these websites: www.greetingcardmessages.com, www.bestcardmessages.com, www.giftcardmessages.com, or www.poemsource.com.
When you click on any photo that appears in the card template you’re working with, you can edit that photo. As soon as you click on it, the photo is surrounded by a blue box. Above that box is a Zoom slider. After you zoom in or out, you can reposition the cursor (which is now shaped like a hand) in the blue box and reposition the zoomed photo.
After clicking on the Design icon, you can also edit the photo itself using options displayed on the right side of the screen. With one click of the mouse, you can add a B&W, Sepia, or Antique effect to that photo. Alternatively, you can click on the Edit Photo icon to access iPhoto ’11’s full arsenal of photo editing and enhancement tools.
When your card’s template, layout, text, and photos are customized and look the way you want them to on the preview screen, click on the Buy Card icon located at the bottom center of the screen to order one or more copies of this card.
The ordering process for greeting cards is almost identical to ordering prints or photo books. See Chapter 12 for details on how to complete this quick and straightforward procedure using your Apple ID. The cards you create and order will be printed within three business days and shipped to your door.
Tip
By mixing and matching templates, layouts, color schemes, your own photos, and your custom-written text messages, you can create one-of-a-kind cards that look as professional as greeting cards you’d buy at the store. Matching envelopes are provided with each card ordered.
Keeping Track of Important Dates with a Picture Calendar Featuring Your Images
In addition to enabling you to create professional-quality prints, photo books, and greeting cards, iPhoto ’11 includes the templates and tools necessary to create and order customized picture calendars (prices starting at $19.99 each).
Tip
Creating any Photo Project, including picture calendars, is easier in full-screen mode because the iPhoto screen is less cluttered.
To begin creating a picture calendar, preselect at least 13 photos you want to showcase in your calendar—at least one for each month of the year, plus a cover photo. (For each month, you can use multiple photos, if you choose, to create a photo collage.) Or you can easily add extra months to the calendar by adding extra pages (and photos) for an additional fee of $1.49 per month/page.
Next, click on the Create command icon and choose the Calendar option. The Calendar Theme selection page, shown in Figure 13.12 using full-screen mode, is displayed.
Figure 13.12. Choose a template for your photo calendar.

You can ultimately determine whether your calendar will automatically display all national holidays. From the pull-down menu, choose which country’s holidays you want inserted and printed in the calendar.
If you use iCal to keep track of anniversaries, birthdays, or your own special occasions, you can also choose to have events from your iCal calendar on your Mac imported and printed in your picture calendar. Plus, you can add birthdays and holidays stored in the Address Book application on your Mac.
For each page of the calendar, choose a template and color scheme. This process is the same as when you’re customizing a photo book or greeting card.
Tip
To save layout and design time, you can have iPhoto ’11 automatically place your photos into the picture calendar you design by clicking on the Autoflow icon in the Photos window (which you open by clicking the Photos command icon). Alternatively, you can manually place your photos in whatever order you want by using the template and layout you select.
When you’re done customizing each page of your picture calendar, click the Buy Calendar icon located at the bottom center of the screen. The ordering process for picture calendars is almost identical to ordering prints, photo books, or greeting cards.
SHOW ME Media 13.3—Create a picture calendar in iPhoto ’11
Access this video file through your registered Web Edition at http://www.quepublishing.com.
![]() LET ME TRY IT
LET ME TRY IT
Creating a Picture Calendar in iPhoto ’11
If you want to create a picture calendar to showcase your photos, follow these steps:
- Preselect an Event or Album folder or a collection of flagged photos you want to feature in your calendar. You must select at least 13 photos (one for the calendar cover and one for each month).
- Click on the Create command icon and choose the Calendar option.
- Choose your Calendar’s template and color scheme.
- Customize your calendar’s start month and date, length, and what holidays you want preprinted in it from the Calendar Customization window.
- Use the layouts and options available from the Design command icon to customize each page of your calendar. For example, you can choose to showcase a single photo or create a collage using up to four photos based on the layout template you select.
- Drag and drop the photos into your calendar from the window that appears when you click on the Photos command icon into the template displayed in the preview window.
- Customize or edit the appearance of each photo by adding a border or special effect, for example.
- Preview each page of your calendar and make any last-minute edits or customizations.
- Click on the Buy Calendar command to order your calendar.
- Follow the steps outlined in Chapter 12 for purchasing a Photo Project you create in iPhoto ’11.
Creating Photo Projects and Photo Gifts Outside iPhoto ’11
Although it’s very convenient to create and order Photo Projects in iPhoto ’11, you do have many other options. All the online-based photo processing services listed in Chapter 12, as well as numerous other companies, such as CafePress (www.cafepress.com), allow you to upload your images to their respective websites to design and order a vast selection of photo products and gifts that go well beyond just prints, greeting cards, photo books, and picture calendars.
These independent services offer different photo products and gift options at different prices. Plus, when it comes to prints, greeting cards, photo books, and picture calendars, they often offer different styles, designs, and templates than what’s available in iPhoto ’11.
For example, some companies specialize only in photo greeting cards, such as Cards Direct (www.cardsdirect.com/custom-photo-greeting-cards.aspx). This site offers hundreds of different card designs with various themes, as well as discounts for ordering cards in larger quantities.
Some companies, such as FotoFlõt (www.fotoflot.com), offer extremely unique ways to create and display enlargements of your photos, in this case by printing your images onto thin plastic sheets that don’t require a frame. FotoFlõts look extremely contemporary when hung on any wall, and the image will never tear or fade.
Short Run Posters (www.shortrunposters.com) is one example of a company that does nothing but offer extremely inexpensive poster-size enlargements of any photos you upload. Prices start at just $2 each for a single 18" × 24" poster.
A company called Wallzaz (www.wallzaz.com) creates inexpensive, large-size wall decals from your images that can be stuck on and easily removed from any wall.
To use most of these third-party companies, you need to export your photos from iPhoto and then use your Mac’s web browser (such as Safari) to visit the company’s website to create and order your photo products or gifts. In some cases, the companies have sites designed to work in conjunction with iPhoto ’11, so the export process isn’t necessary.
Consider using any of the third-party photo product companies if you’re looking for more variety and options, as well as innovative ideas for items you can create using your favorite images.
Tip
Many one-hour photo processing locations and professional photo labs also allow you to create and order a wide range of photo products and gifts, such as large canvas prints, photo T-shirts, Christmas tree ornaments, tote bags, magnets, buttons, coffee mugs, mouse pads, or even cozy woven blankets featuring your photos.