
6. Overcoming Common Mistakes and Mishaps
Discover quick tips for taking pictures in specific situations and overcoming common shooting mistakes and mishaps.
Even with the most advanced digital photography equipment in your hands, winding up with crystal-clear, well-lit, and visually impressive shots isn’t always a simple process. The “auto” shooting modes built into your digital camera are designed to make the picture-taking process easier and less technical, but they’re not foolproof.
In specific shooting situations (such as when minimal light is available or you can’t hold the camera steady), it’s easy to make common mistakes that lead to imperfect images. Although you can fix some of these problems using the editing and photo enhancement features built into iPhoto ’11 after the images are shot, it’s far less time consuming to avoid making the mistakes in the first place.
Before returning to all that can be done with your photos within iPhoto ’11, this chapter focuses on some of the most common problems amateur photographers encounter in everyday situations when trying to take photos and offers some easy-to-implement suggestions for overcoming these challenges.
Setting the Right Shooting Mode
Most digital cameras have at least a handful of built-in, preprogrammed shooting modes designed to make it easier to shoot crystal-clear photos in a variety of situations. One of the most common causes of photography shooting problems is simply that the photographer selects the wrong auto shooting mode for a particular situation.
Tip
On some point-and-shoot digital cameras, the various auto shooting modes are referred to as scene modes. You select them from onscreen menus as opposed to physically pushing buttons or rotating dials on the camera’s body.
Some of the most common shooting modes you’ll use in everyday situations when taking pictures include the following:
• Continuous Shooting mode—This feature allows you to hold down your camera’s shutter button to snap multiple photos in quick succession. On most low-cost and mid-priced digital cameras, this feature allows you to snap between three and eight shots per second. If you’re using the camera’s flash, however, this shooting cycle is slowed down because the flash needs time to recharge in between uses.
• Image Stabilization mode—This shooting mode can usually be used in conjunction with others and often requires you to activate it by adjusting a physical setting on your digital camera (as opposed to selecting an option from an onscreen menu). The purpose of this mode is to compensate for any motion of the camera as you’re taking pictures, whether it’s your unsteady hand, or you’re attempting to snap photos from a moving vehicle or while on a rocking boat, for example. If you’re on stable ground (not moving) and using a tripod to hold the camera steady, Image Stabilization is not needed. If you’re simply holding the camera, however, this feature helps to ensure your images turn out clear. Without this mode, even the slightest movement of the camera when you press the shutter button results in blurs. On point-and-shoot digital cameras, this feature can usually be identified because it’s depicted using an icon of a shaking hand. On Digital SLR cameras, there is a special Image Stabilization switch on the camera’s removable lenses; plus, the camera itself may have an Image Stabilization setting.
• Landscape mode—Although you can manually hold the camera horizontally to shoot a landscape photo, if you’re actually shooting a wide area, this shooting mode allows your camera to capture a greater depth of field, ensuring whatever is in your foreground and background stays in focus. If you snap a photo of someone standing in front of a tourist attraction or historic site that’s off in the distance, if you don’t use this mode, the person in the shot might stay in focus, but what’s in the background could be blurred (or vice versa). On most digital cameras, this shooting mode is depicted using a mountain range icon.
• Macro mode—When you want to shoot a small object extremely close up, you use the Macro shooting mode that’s built into your camera. With this shooting mode, your camera captures all the minute details of your tiny subject. The depth of field this shooting mode uses is very small. What you focus on will be clear in the photo, but everything, such as the background, will be blurry (see Figure 6.1). On most digital cameras, this shooting mode is depicted using a flower icon.
Figure 6.1. Using your camera’ s Macro shooting mode, you can capture small subjects in great detail and with tremendous clarity as long as you hold the camera steady.

• Panoramic mode—Depending on the camera, this mode can work in one of two ways. Either the camera allows you to take a single, extremely wide angle shot of a vast landscape, or the camera instructs you to take three or four shots of a wide area that overlap on the edges by about 30%. To do this, hold the camera stable. Starting to the extreme right of the area you want to shoot, take a shot and then rotate the camera slightly to the left and take an additional shot. Repeat this last step two or three times. The camera digitally connects the photos, creating a single panoramic image. When you use this technique, you wind up with vastly better results if you use a tripod. Also, do not alter the camera’s settings in between shots. This shooting mode typically does not work well with moving subjects.
• Portrait mode—When you use this shooting mode, which is ideal for single subjects, the camera’s autofocus feature focuses on your main subject, such as a person, but slightly blurs whatever is in the background. This is the setting to use when taking posed pictures of people. It can be used with or without your camera’s flash, depending on the situation. On most digital cameras, this shooting mode is depicted using an icon of person’s head or face.
• Sports/Action mode—This shooting mode forces your camera to use the fastest shutter speed possible to clearly capture a subject that’s in motion. This mode is great for shooting sports, moving wildlife, or anything else that involves you standing still while your subject moves as you’re shooting. On most digital cameras, this shooting mode is depicted using the icon of a person running. When shooting a moving subject, you can also pan the camera, as needed, to keep up with up with your “moving target.”
• Use Existing Light (a.k.a. Natural Light) mode—In some dimly lit situations, you wind up with better images if you avoid using the camera’s flash and utilize its Use Existing Light mode. After all, the flash built into most digital cameras has a very limited range and does not light up anything beyond that range. Or, if you’re shooting a subject that’s very close, the flash could emit too much light onto the subject, causing overexposure, red-eye, or unwanted shadows. This shooting mode allows your camera to fully utilize any available light and make the most of it. It requires the shutter speed to be set automatically to a very low setting. Thus, even the slightest camera movement results in blurry images. This shooting mode works best when using a tripod.
Avoiding Common Shooting Mistakes and Mishaps
This section focuses on overcoming some of the most common mistakes amateur photographers make in everyday shooting situations.
If your photos are not coming out as you envision they should, chances are the problem is a result of one of three issues:
• You’ve selected the wrong auto shooting mode for the situation.
• You haven’t evaluated the available light where you’re taking pictures and then properly positioned yourself and your subjects to best utilize that light.
• You’re not using the camera’s flash correctly, based on the situation.
Blurry Images
There are several reasons why you might end up with blurry images. Blurs typically occur when the camera isn’t held perfectly steady when you press the shutter button on your camera. Your camera becomes much more sensitive in low-light situations when the shutter speed of your camera is automatically slowed down to allow more light onto the camera’s image sensor.
The first thing to do if you’re noticing blurs in your photos is to ensure the camera’s Image Stabilization mode is activated. Beyond that, the blurs are most likely a result of one or more of four things happening:
- The subjects suddenly moved as the photo was being taken. Tell your subjects to be still or switch to your camera’s Sports/Action mode.
- You moved the camera as you pressed the shutter button to take a photo. Either take steps to hold the camera steadier or use a tripod.
- You did not allow the camera’s autofocus feature to kick in before snapping the photo. When you’re framing your shot, press the shutter button halfway down to allow your camera’s autofocus lens to find and fixate on your subjects. When this occurs (it takes a fraction of a second), fully press the camera’s shutter button to take the photo. If the camera doesn’t have time to focus on your intended subjects, the photo often turns out blurry.
- The camera’s autofocus sensors focused on the wrong object within the frame, not the intended subjects. One method to overcome this is explained in the next section of this chapter. For Digital SLR cameras, you can also manually override your camera’s settings. How you do this varies based on your Digital SLR camera’s make and model.
Tip
The easiest way to avoid blurry images is to use a tripod to hold your camera steady. Tripods come in all sizes and vary in price from under $20.00 to over $200.00. For a point-and-shoot camera, a small and portable tabletop tripod, such as the $19.95 Gorillapod Original from Joby (http://joby.com/store/gorillapod/original), is ideal in most shooting situations, especially while you’re on the go. An alternative is a more cumbersome full-size tripod or a monopod (available wherever photography equipment is sold).
Camera Autofocuses on the Wrong Objects
When you look through your camera’s viewfinder, you see built-in autofocus sensors when you press the shutter button halfway down. These sensors determine what the camera focuses on.
Your camera probably has multiple sensors. The number of sensors used to ensure an image turns out crystal clear depends on which auto shooting mode the camera is set to use. For example, in Portrait mode, the camera uses one or two of its sensors to focus on your subject’s face or body and allows some of the background to be blurry. However, in Landscape mode, more (or all) of the sensors are used to ensure everything you see within the frame turns out clear in your photos.
Make sure the appropriate sensors light up or flash when you press the camera’s shutter halfway down to activate the camera’s autofocus feature. The sensors should correspond directly to your main subject as you look through the viewfinder.
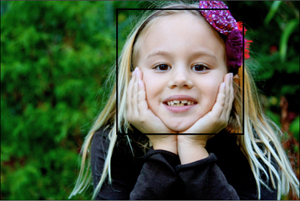
If you’re using a point-and-shoot camera with a display that acts as your viewfinder, a box or bracket appears around what the camera is autofocusing on (see Figure 6.2). Remember, whatever the camera’s autofocus sensors focus on is what appears the most in focus within your photos.
Figure 6.2. On a point-and-shoot camera, a box or bracket appears on the viewfinder screen indicating what the camera is autofocusing on.
Sometimes, if there’s an object in the foreground, that’s what your camera’s autofocus mode automatically fixates on, as opposed to the intended subject (see Figure 6.3). Here, the camera automatically focused on the plants, as opposed to the butterfly, which was the intended subject.
Figure 6.3. Sometimes, a camera’s autofocus mode focuses on something that’s not your intended subject. In this case, the camera automatically focused on the plants as opposed to the butterfly.
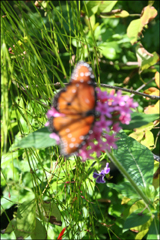
Figure 6.4, however, shows the same butterfly appearing blurry-free within the image, because with the photographer’s help, the camera’s autofocus sensors focused on the correct subject.
Figure 6.4. Sometimes, it’s up to the photographer to override the camera’s autofocus sensors so that the correct subject appears in focus.

When you notice the camera isn’t focusing on your intended subject, as you begin to frame your image, quickly zoom in on your subject and press and hold the camera’s shutter button halfway down. This forces the sensors to focus on your intended subject (as opposed to the camera making an educated guess).
Now, while still holding the shutter button halfway down, readjust the zoom and frame your image, allowing whatever objects in the foreground or background you want seen within the photo to be visible as you look through the viewfinder. As soon as your image is properly framed, fully press the shutter button to snap the photo with the image sensors still focused in on your primary subjects.
Color Problems Within Images
Chances are, if you’re looking at your images on your Mac’s screen using iPhoto ’11 and the colors simply don’t look right, this is caused by one of two problems. Either your camera’s white balance needs to be adjusted (something you can easily fix on all Digital SLR cameras), or your Mac’s screen needs to be calibrated.
Note
White balance refers to how your digital camera interprets solid white in an image and then adjusts all other colors accordingly. If what should be white in a photo appears to have a gray, tan, or blue hue, chances are your camera’s white balance needs to be adjusted. Some digital cameras require you to select an auto white balance setting based on the type of light you’re shooting in, such as bright sunlight, overcast skies, fluorescent (indoor) light, or when using a camera’s flash, for example. After you make this selection, the white balance is set automatically. Some digital cameras, including all Digital SLR cameras, allow you to adjust this setting manually as well. See your camera’s manual for details.
If you print out your images on a photo printer using iPhoto ’11 and the colors look wrong compared to what you see on the Mac’s screen, this could also be an issue with your printer (or its ink cartridges are running low or are clogged).
If you determine that your Mac’s screen needs calibration, you need to use a device, called a colorimeter, to fix this. A colorimeter is a light-sensitive device that’s used for measuring the color intensity of an object or color sample, based on the red, blue, and green components of light reflected from the object or sample, which in this case is your Mac’s screen.
The $99 Huey Pro from Pantone (www.pantone.com) is one example of a colorimeter that attaches to your iMac or MacBook’s screen. It automatically calibrates the screen using proprietary software that comes with the device. Several similar products are also available from Datacolor (http://spyder.datacolor.com/products.php).

SHOW ME Media 6.1—Using a colorimeter on your Mac’s screen
Access this video file through your registered Web Edition at http://www.quepublishing.com.
![]() LET ME TRY IT
LET ME TRY IT
Using the Pantone Huey Pro on Your Mac
To calibrate your Mac’s screen and adjust the colors you see using the Pantone Huey Pro, follow these steps:
- Install the Pantone Huey Pro software on your Mac and run the software.
- Attach the Huey colorimeter device to your Mac’s screen and connect the cable to your computer’s USB port.
- The included software (which is separate from iPhoto ’11) prompts you through the simple calibration process.
Tip
Chances are, your Mac’s screen needs to be calibrated only once in a great while, if ever. If you don’t want to invest in a colorimeter, simply schedule an appointment with an Apple Genius and bring your computer into any Apple Store. If your Mac is covered under Apple Care, the technician will calibrate your screen for you, if necessary. This is a service that some photography specialty stores also offer.
Chances are, if the color problems are being caused by your Digital SLR camera, fixing the issue is simply a matter of manually adjusting the white balance. Consult with the owner’s manual for your camera to obtain directions on how to do this because the process varies based on the camera’s make and model. If you’re using a point-and-shoot digital camera, you probably can’t manually adjust the white balance (beyond choosing the type of light available where you’re shooting).
Glare and Shadows
As you learned in the preceding chapter, glare is caused by unwanted light entering through the camera’s lens. It can wreak havoc on your photos. Meanwhile, light can also create ugly or unwanted shadows in your photos.
Once again, the quick fix is to position the primary light source behind you so that the light is shining on your subjects. Do not allow light to shine directly at your camera.
Pay attention to the origin of the light and position yourself and your subjects accordingly. If this isn’t possible, to add more light to subjects, use your camera’s flash, even in the daylight. Another option is to utilize a light reflector or diffuser to redirect light or make harsh light softer when it shines on your subjects.
Reflectors are flat, lightweight, portable pieces of camera gear covered with shiny silver or gold reflective material. You can use one or more reflectors to redirect light onto your subjects. If you use a gold-colored reflector, it adds a warm and rich glow to images. However, using a silver colored reflector will offer a brighter and whiter effect.
Tip
You can purchase reflectors or diffusers from photography specialty stores or online. A professional-quality deflector costs between $10 and $100 (depending on its size and shape). Diffusers, which attach to your camera’s flash, are priced starting at less than $20. Two online sources for reflectors and diffusers are Adorama (www.adorama.com) and Westcott (http://fjwestcott.com/products/reflectors/index.cfm).
As its name suggests, a light diffuser acts as a filter for hard light and makes it softer when it shines on your subjects. A diffuser can also be used to eliminate unwanted shadows. There are two types of diffusers. One looks like a reflector, but it’s made using a semitransparent, thin white material that softens direct light as it shines through the light. You use this type of diffuser by positioning and holding it between the primary light source (such as the sun) and your subjects.
The second type of diffuser is used with your camera’s built-in or external flash. It’s used to soften the harsh light that a flash emits and helps reduce unwanted shadows and red-eye. It also helps keep photos from being overexposed or washed out as a result of the flash.
Many different types of diffusers can be used in conjunction with a camera’s flash. For a Digital SLR camera with a built-in, pop-up flash, one of the most basic and least expensive diffusers available is the Puffer Pop-Up Flash Diffuser from Gary Fong ($19.99, www.garyfongestore.com/puffer-pop-up-flash-diffuser.html). For such a basic (and inexpensive) photo accessory, it works extremely well at dramatically improving photos taken using a Digital SLR camera’s pop-up flash.
For most point-and-shoot digital cameras, the Delta Point and Shoot Diffuser ($16.15, www.garyfongestore.com/flash-accessories/delta-point-and-shoot-diffuser.html) provides a simple solution to many problems, such as red-eye, overexposure, or shadows, caused by the flash.
Tip
There is another way to reduce unwanted light from entering through the camera’s lens that you notice is causing glares: Hold your hand over the top of the lens to block the incoming sun. Just make sure your hand doesn’t get into the shot itself or block your camera’s flash. On a Digital SLR camera, you can use an optional lens hood accessory, which attaches to the front end of the lens.
Shooting Through Glass or in Front of It
One problem many vacationers encounter when taking pictures while participating in tours or visiting tourist attractions is the need to take pictures through glass. Perhaps you’re riding on a tour bus and want to take a photo of a historic site or landmark as you’re passing by. Maybe you’re visiting an aquarium and want to take photos of the exotic tropical fish or there’s something behind a glassed-in exhibit within a museum that you want to photograph (assuming the museum allows photographs to be taken).
When set in auto mode, your camera usually wants to use the flash when you attempt to take photos through glass. In this situation, override your camera and turn off the flash altogether. Take the photo using the Use Existing Light (or Natural Light) mode. If your point-and-shoot camera has a built-in shooting mode for shooting through glass, use it. However, if you can, avoid shooting through glass altogether—for example, by opening the car or tour bus window.
With the flash turned off, follow these steps for taking pictures through glass:
- Make sure the glass you’re shooting through is clean. Get rid of fingerprints, dirt, or smudges.
- Hold the camera up against the glass. Do not allow any light to shine between the camera’s lens and the glass. If any light seeps between the camera and the glass, it causes unwanted glare or reflections.
- Keep the camera very still as you take your photo.
By following these steps, you should be able to take clear photos through glass, like the one depicted in Figure 6.5, which was taken while touring the old Mission Control at Johnson Space Center at NASA Space Center in Houston.
Figure 6.5. This clear shot of the old Mission Control was taken through glass during a tour of Johnson Space Center at NASA Space Center in Houston.

If the flash goes off when you’re attempting to shoot a photo through glass, what you wind up with is unwanted glare in the image. Figure 6.6 shows glare caused by the flash in the upper-left portion of the image (also a shot of the old Mission Control within Johnson Space Center at NASA Space Center in Houston). As you can see, using the flash also washed out the entire image.
Figure 6.6. Avoid using the camera’s flash when shooting through glass or when your subject is in front of glass (or a mirror).

This same effect happens if you position your subject directly in front of glass, such as a mirror or window, and you use the flash when taking a photo. This is one problem that’s very hard (often impossible) to fix, after a photo is shot, using iPhoto ’11 or other photo editing software.
Red-Eye
Red-eye occurs when photos are taken in low-light situations and the camera’s flash is pointed directly into the subjects’ eyes. The light enters the subject’s pupils and reflects the blood vessels there, which turns the eyes red. Instead of appearing as their natural eye color, your subjects’ eyes appear bright red—giving them a devil-like quality.
Red-eye can occur with any living subject, but it tends to be worse when you take pictures of people with blue, green, or hazel eyes.
After the fact, you can use iPhoto ’11 to quickly fix red-eye with a few clicks of the mouse. However, there are a few steps you can take to eliminate the problem while you’re shooting.
![]() To discover how to use iPhoto ’11’s Fix Red-Eye feature, see Chapter 7, “Using iPhoto ’11’s Simple Photo Editing Features.”
To discover how to use iPhoto ’11’s Fix Red-Eye feature, see Chapter 7, “Using iPhoto ’11’s Simple Photo Editing Features.”
If you’re using a point-and-shoot camera with a built-in flash, that flash points straight outward (toward your subject) and isn’t adjustable in any way. You can place a flash diffuser over the flash itself, however. You can also use your camera’s built-in red-eye reduction mode, if applicable. (This feature is built into many digital cameras.)
As you preview your images while you’re shooting, if you notice red-eye is occurring, use these techniques:
• Adjust the flash’s intensity (if you’re using a Digital SLR camera that has an external flash unit or an adjustable built-in flash unit).
• Adjust the flash’s direction and try bouncing the flash’s light off the ceiling or a wall, or angle the flash so it’s not directly pointed at your subject. This technique isn’t possible with a point-and-shoot camera or Digital SLR with a built-in flash that shines forward, directly at your subject.
• Attach a flash diffuser to your camera’s flash. This very inexpensive accessory attaches in front of the flash and deflects the harsh light yet still lights up the subject.
• If possible, change the overall lighting situation in the room. Making it brighter reduces the red-eye effect.
• Try shooting without a flash using your camera’s Use Existing Light (or Natural Light) mode.
• Move farther away from your subjects and utilize the camera’s zoom, if necessary, to take your shot.
• Use your camera’s red-eye reduction mode when shooting.
• Have your subject not look directly at the camera. Sometimes, having your subject stare off into the distance creates an intriguing effect.
SHOW ME Media 6.2—Preview how to fix red-eye using iPhoto ’11
Access this video file through your registered Web Edition at http://www.quepublishing.com.
![]() LET ME TRY IT
LET ME TRY IT
Fixing Red-Eye Using iPhoto ’11
When you load your images into iPhoto ’11 and click on the Edit command icon, you have access to the software’s tool for quickly fixing red-eye. Follow these steps to use it:
- Select the photo you want to fix and display it within iPhoto ’11’s image viewing area.
- Click the Edit command key in the bottom-right corner of the screen.
- Click on the Fix Red-Eye icon that appears on the right side of the screen under the Quick Fixes tab.
- Using the mouse, if it’s not already checked, place a check mark in the Auto Fix Red-Eye box. This step often automatically fixes the red-eye within the image. If this doesn’t work, proceed to step 5.
- Place the cursor on the image, near your subject’s eyes. The cursor will look like a target. Use the Size slider on the right to adjust the size of the target icon, based on the size of your subject’s eyeballs. Place the target over each eye in the photo, as necessary, and click the mouse. This technique fixes the red-eye. Repeat this process in all eyes impacted by red-eye.
Specks or Dots Appear in Your Photos
The tiniest piece of dust, sand, dirt, or a water drop, for example, that gets stuck on your lens causes magnified specks or dots to appear within your photos.
The quick and easy way to avoid this situation is to carefully clean your lens using a lens cleaning solution and a microfiber lens cleaning cloth (available from eyeglass stores or photography specialty stores). To remove dirt or dust from the lens, you can also use a can of compressed air or even a clean make-up (or lens cleaning) brush with very soft bristles.

TELL ME MORE Media 6.3—Keeping your camera and lens clean
To listen to a free audio recording about keeping your camera and lens clean, log on to http://www.quepublishing.com.
Caution
Walking around all day with your camera turned on and/or the lens cap removed (which leaves the lens fully exposed) increases your chances of the lens getting dirty or, even worse, scratched. Until you’re ready to shoot, keep the lens cap on the lens. If you’re using a point-and-shoot digital camera, turning off the camera automatically causes the lens door to close and protect the lens. Wind can blow dirt or dust onto your lens, and a light rain can often result in water drops sticking to the front of the lens.
If you’re using a Digital SLR camera, each time you switch lenses, you leave the camera’s sensor exposed. One single dust speck that lands on the sensor will cause specks or dots to appear in all your images. The mid- to high-end Digital SLR cameras have autosensor cleaners that help to remove unwanted dirt each time the camera is turned on or off. However, you may occasionally need to clean the camera’s sensor using a camera cleaning kit. (Alternatively, you can take your camera into a photography specialty shop and have it professionally cleaned.)
Usually, you can use a can of compressed air or a soft brush with a blower attached (which comes with most camera cleaning kits) to remove unwanted dirt from a camera’s sensor or its lens.
![]() Thankfully, you can remove some unwanted dots or specks that wind up in your photos during the editing process by using iPhoto ’11’s Retouch tool. See Chapter 7, “Using iPhoto ’11’s Simple Photo Editing Features.”
Thankfully, you can remove some unwanted dots or specks that wind up in your photos during the editing process by using iPhoto ’11’s Retouch tool. See Chapter 7, “Using iPhoto ’11’s Simple Photo Editing Features.”