
9. Advanced Photo Editing with iPhoto ’11
Learn to enhance your photos using iPhoto ’11’s Adjust editing tools
Thus far, you’ve learned easy ways to edit your photos using the Quick Fixes tools built into iPhoto ’11 (see Chapter 7, “Using iPhoto ’11’s Simple Photo Editing Features”) and discovered how to add special effects to your favorite photos (in Chapter 8, “Adding Effects to Your Images”).
Now, if you’re willing to invest at least a few minutes extra to manually edit each of your images (or at least your favorites), iPhoto ’11 includes a handful of manually controlled sliders and advanced editing tools that allow you to enhance your images by fine-tuning specific elements of each photo, such as its exposure, contrast, saturation, clarity, and colorization.
This chapter focuses on the more advanced editing tools available under the Adjust tab within iPhoto ’11’s Edit window. For the most part, you use these tools to manually edit specific aspects of your photos, using a series of mouse-controlled sliders.
As you look at your images after they’ve been imported into iPhoto ’11, if an image appears overexposed, underexposed, or a little bit blurry, or the coloring isn’t perfect, for example, don’t give up hope and simply delete that image. Instead, invest some time and use iPhoto ’11’s various editing and enhancement tools to see whether you can salvage the photo. More often than not, you’ll be pleasantly surprised by the results and how easily you can fix what you thought were poor images.
Note
The tools available under the Adjust tab are more advanced than those offered under Quick Fixes; they offer you the ability to manually alter and improve various aspects of your photos.
Discovering the Edit Window’s Adjust Options
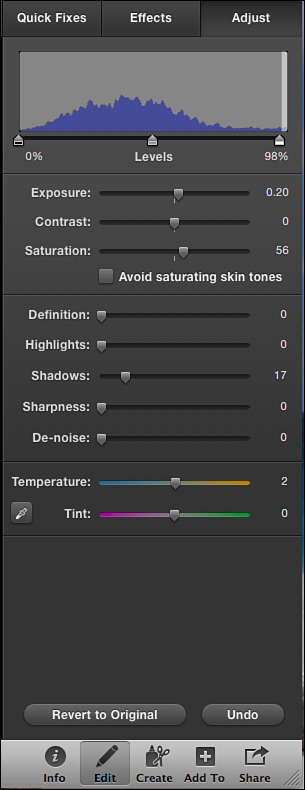
The rightmost tab located at the top of the Edit window is labeled Adjust. It’s from this window that you can gain access to a handful of controls and tools for manually adjusting the exposure, contrast, clarity, saturation, and other color-related aspects of your photos.
Located near the top of the Adjust window is a three-color histogram, with three sliders directly beneath it. Below the histogram are three standalone sliders, labeled Exposure, Contrast, and Saturation.
Moving downward within the Adjust window, you’ll find five additional sliders, labeled Definition, Highlights, Shadows, Sharpness, and De-Noise. Finally, beneath those are two more sliders, labeled Temperature and Tint, along with an eye-dropper tool.
Each of these sliders can be manually adjusted using the mouse. The default position for the top three sliders (Exposure, Contrast, and Saturation) is the middle. If you look at the numbers to the right of each slider, they say 0, 0, and 50, respectively. All the other sliders in the Adjust window are in their default 0 position.
However, if before you access the Adjust window, you used certain editing tools under the Quick Fixes or Effects windows, some of the Adjust settings may already be altered. For example, if you click on the Enhance icon under the Quick Fixes tab in the Edit window, this command causes iPhoto ’11 to automatically adjust a handful of settings related to contrast, exposure, saturation, and other aspects of color. Thus, when you return to the Adjust window after using the Enhance command, some of the settings are already altered.
Unlike the editing and photo enhancement adjustments you make using the Quick Fixes and Effects tabs, all the adjustments you can make to your photos using the tools in the Adjust window are made manually by moving the various sliders either to the left or right to achieve the desired results.
Note
Sometimes, the problems you wind up with in photos are caused by setting your camera to the wrong “auto” shooting mode when shooting. Depending on the problem, chances are you can compensate for the mistake you made while shooting and fix it using iPhoto ’11 after the fact.
Figure 9.1 shows what the Edit window looks like when you click on the Adjust tab. In this case, in addition to the Levels histogram, what you see are 10 sliders for manually adjusting various aspects of your photos.
Figure 9.1. The Edit window looks like this when you click on the Adjust tab at the top.
Understanding How the Levels Histogram Works
Fixing color within an image, regardless of what photo editing software you use, can be a tricky endeavor. iPhoto’s Enhance command takes much of this guesswork away from you by automatically analyzing and fixing color, exposure, tonal, and contrast issues in your photos. This tool isn’t foolproof, however.
Even after you use the Enhance command, in some situations when you’re viewing your images as you’re editing them, you’ll want to go in and manually adjust one or more settings using the offerings in the Adjust palette.
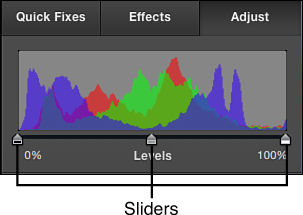
The Levels histogram is a graphic representation of the tonal range within a photo. When it comes to digital photography, an individual color can be displayed in any one of 256 levels of brightness. Zero represents pure blackness, and 255 represents solid, bright white.
The Levels histogram you can view in iPhoto ’11 is a graphic representation of how your colors are distributed in a photo. The left side of the graph represents black, and the extreme right side of the graph represents white. Every other color that appears in your photos falls between one of these two points. Instead of dealing with numbers (0 to 255), iPhoto ’11 uses a 0% to 100% measurement within its Levels histogram.
As you look at the Levels histogram, if none of the red, green, or blue measurements touch the left side of the graph, there is no black whatsoever in your image. Likewise, if none of the red, green, or blue measurements touch the right side of the graph, there is no white whatsoever within that image.
When the three colors of the Levels histogram—blue, green, and red—are spread out across the entire graph, that’s a good indication that the image you’re looking at and editing is well exposed and has good contrast. These three colors represent the individual color channels of red, green, and blue (RGB) that make up a digital image.
If the Levels histogram bars are crammed together on one side, this is an indication that the image is either overexposed (too light) or underexposed (too dark) and that the definition in your photo isn’t as sharp and detailed as it could or should be.
Note
The Levels histogram is a graphic representation of the tonal range within your photo. The blue, red, and green in the histogram represent the highlights, midtones, and shadows, respectively, in your image and can be adjusted independently using the three sliders on the bottom of the histogram.
Directly below the Levels histogram are three sliders: one on the left, one in the middle, and one on the right (see Figure 9.2). These sliders allow you to manually and separately adjust a photo’s highlights, midtones, and shadows.
Figure 9.2. The histogram is a graphic representation of the tonal range within your photo.
Tip
Learning to read and use the histogram is a skill unto itself, and not one you need to master to expertly edit your photos using iPhoto ’11. Basically, you can use this graphic depiction to quickly determine whether you’re losing detail in your photo because it’s overexposed or underexposed. Ideally, the three colors in the histogram graph should be centered and peak toward the center of the graph but appear very low along the left and right edges.
Use the mouse to adjust the three sliders at the bottom of the Levels histogram. The leftmost slider can be moved to the right, from 0% (the leftmost setting) up to the percentage point where the middle slider is set. The middle slider can be moved left or right, between 0% and 100%. The slider on the bottom right of the histogram can be moved to the left, from 100% down to wherever the middle slider is set.
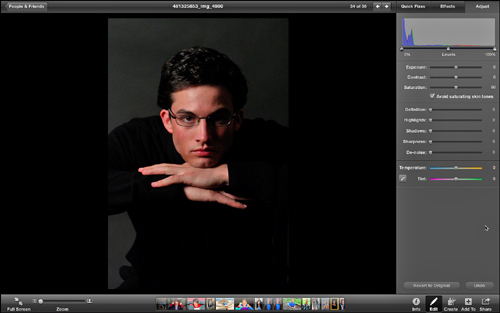
Figure 9.3 showcases a photo that’s very dark. The background appears entirely black, the model is wearing black, and he’s sitting on a black chair. When you look at the Levels histogram, the red, green, and blue channels are all clustered around the 0% to 13% area (on the extreme left).
Figure 9.3. A dark image showcasing a model wearing black, sitting in a black chair, in front of what appears to be a black background.
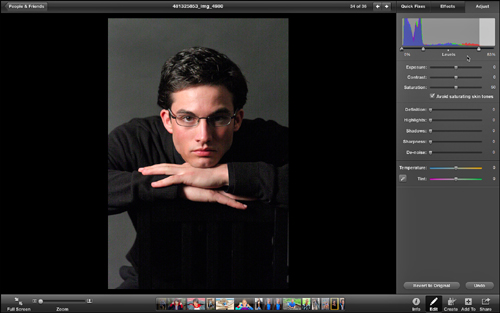
You can brighten up this photo a bit and showcase more detail by moving the middle slider under the Levels histogram to the left—in this case, to where the red, green, and blue levels stop peaking (around the 20% mark). You can also move the extreme right slider left, to where the red, green, and blue levels stop registering on the histogram (around the 83% mark).
When you look at the photo after these modifications to the levels within the histogram are made (as shown in Figure 9.4), you can see more detail in the photo itself. The background appears gray, and the shadows in the image are less harsh, especially on the left side (the well-lit side) of the model’s face.
Figure 9.4. By adjusting the sliders under the Levels histogram, you can lighten up parts of the image to enhance the detail. The background, for example, now appears gray, and the shadows on the left side of the model’s face are less intense.
Tip
Apple’s support website offers an online tutorial for understanding the fine nuances of how the Levels histogram works and why you might want to use it, as opposed to the various other sliders under the Adjust tab. Visit http://support.apple.com/kb/HT1946. Most photographers do not ever need to use this tool to edit their images and achieve professional-quality results, however.
Manually Fixing Your Photos Using the Adjust Sliders
Below the Levels histogram are a total of 10 sliders that you can use to manually adjust various settings within your photos. Depending on the problems with your photo and what you’re trying to fix, or the visual effect you’re trying to achieve, you can use combinations of these sliders to achieve the desired result. You will never need to use all these sliders to fix a single image.
Often, you’ll discover that a minor adjustment to just one or two of the sliders in the Adjust window, combined with a few of iPhoto’s other editing tools, will help you fix your images quickly and without a lot of tinkering.
Tip
You’ll have a much easier time using these sliders to fine-tune your edits after you’ve used the automated editing tools under the Quick Fixes tab in the Edit window. Try using the Enhance command first and allow iPhoto ’11 to analyze and fix your image as its sees fit; then use the sliders in the Adjust window to fine-tune the results and make them perfect. Especially for amateur photographers, it’s much more difficult and time consuming to edit an image using just the manual Adjust settings.

SHOW ME Media 9.1—Use the Shadows slider and other editing tools to quickly improve a dark (underexposed) image
Access this video file through your registered Web Edition at http://www.quepublishing.com.
![]() LET ME TRY IT
LET ME TRY IT
Using iPhoto ’11’s Shadows Tool and Other Editing Tools to Quickly Fix an Underexposed Image
If you’re editing a photo that’s underexposed, and you want to brighten it and bring out more of the color and detail, following these steps will help you enhance almost any dark photo:
- Start by clicking the Enhance tool (under the Quick Fixes tab of the Edit window). Allow iPhoto ’11 to automatically make adjustments to the image you’re editing.
- Click the Effects tab at the top of the Edit window and use the Boost command between one and three times to enhance the colors in your image. This makes all the colors look more vibrant.
- Access the Adjust window and move the Shadows slider slightly to the right. The Shadows slider allows you to reduce the dark shadows within an image.
- If necessary, use the Highlights slider to regain some of the minute detail in the photo you might have lost by lightening the shadows.
Manually Fixing the Exposure of Your Photos
With a quick slide of the mouse (hold down the mouse button when moving the slider to the left or right), you can adjust a photo’s overall exposure using the slider labeled Exposure.
To lighten an image’s exposure, move the slider to the right. To darken the image, move the slider to the left. This slider serves the same purpose as the Lighten and Darken spheres found under the Effects tab in the Edit window, except that the slider option allows you to be more precise when manually making exposure adjustments.
Exposure refers to the amount of light that’s allowed to reach your digital camera’s image sensor when a photograph is being taken. Thus, it determines the overall lightness or darkness. Using iPhoto, you can alter this setting after the fact as you’re editing your images to make them lighter or darker.
Several other editing features offered by iPhoto ’11 allow you to control the lightness or darkness within a photo, but each modifies your image in a slightly different way. The difference between adjusting your photo’s Exposure and Contrast or Shadows, for example, might be subtle. Thus, it becomes a matter of personal taste when it comes to choosing which editing tool to use.
Adjusting the Contrast in Your Images
Located below the Exposure slider is the Contrast slider. Both sliders work the same way—by holding down the mouse button and moving the slider to the left or right to achieve the desired result.
Simply put, contrast is the amount of difference between light and dark colors within your image. Colors with opposite characteristics tend to contrast strongly when placed together within an image. You’ll discover that each color highlights the qualities of the others, thus allowing all the colors within an image to stand out more dramatically.
Contrast can also be applied to black-and-white photos because the shades of grays, for example, can be adjusted. In iPhoto ’11, you can adjust a photo’s contrast automatically using the Enhance command, semi-automatically using the Contrast sphere (under the Effects tab in the Edit window), or manually using the Contrast slider in the Adjust window.
Fine-Tuning an Image’s Saturation
Like the Exposure and Contrast sliders, the Saturation slider in the Adjust window can be moved to the left or right. Saturation determines the richness of colors within your image. Once again, when you use the Enhance command, iPhoto ’11 automatically adjusts an image’s saturation. Likewise, you can semi-automatically make adjustments to a photo’s saturation using the Saturation sphere (under the Effects tab in the Edit window).
Your third option for adjusting saturation is to use the slider, which gives you the maximum level of control over this setting as you’re editing a digital photo. When you move this slider to the extreme left, for example, your photo becomes black and white. All the colors are drained out of the image. As you move the slider to the right, the colors become much more vibrant.
Caution
Located directly below the Saturation slider is a check box labeled Avoid Saturating Skin Tones. When you’re using the Saturation slider to adjust colors in photos that contain people, place a check mark within this check box to avoid changing the skin tones of the people in your photos. If you don’t add the check mark here, when you move the Saturation slider to the right, the skin tone of your subjects begin to look bright red or orange, taking on a very unnatural quality.
Altering the Definition of an Image
The Definition slider allows you to tinker with the clarity of a photo by making minor adjustments to the contrast and by simultaneously eliminating haze. Using this feature can help bring out subtle detail within a photo.
Note
If you’ve already used the Enhance command, chances are you won’t need to manually adjust this Definition setting (or most of the other settings within the Adjust window) when editing your photos.
Using the Highlights Slider to Improve a Photo’s Clarity
Using the Highlights slider increases or reduces the brightness of the highlights within an image as you’re editing it. This feature, when used in conjunction with the Shadows slider, can help enhance the detail within an image. When using this feature, it impacts your entire image. Look at several areas of the photo to make sure it has the desired impact. This tool is useful for enhancing the color in an otherwise dull or washed-out sky, for example.
Using the Shadows Tool to Brighten an Image
Almost every image contains shadows. Sometimes they’re very subtle and barely perceptible to the human eye. Other times, the shadows are much more obvious or even distracting within a photo and can ruin an otherwise perfect image.
The Shadows slider is one that you’ll probably use frequently when editing photos because it allows you to brighten shadowy areas of images while improving their detail. Even if you use the Enhance command to automatically edit your images, you can often brighten a photo and bring out more detail in it by manually moving the Shadow slider to the right. Often, you need to make only a very small adjustment.
Eliminating Blurriness with the Sharpness Tool
The Sharpness slider can be used to enhance the detail you see within an image, or it can be used to soften an image to give it a more artistic quality. For example, when editing portraits of people, you can use this tool to soften a photo, which can reduce the appearance of wrinkles and blemishes on someone’s face, plus soften harsh lighting.
Likewise, if a photo is slightly blurry or out of focus, the Sharpness slider can help smooth out the blurriness and add more crispness or clarity to an image. Don’t expect miraculous results if you’re trying to repair a very out-of-focus or blurry image. The Sharpness tool is better for making minor adjustments.
Using De-Noise to Clean Up an Image’s Clarity
To fix visual problems in an image, such as pixelation, graininess, or minor distortion, which can be a result of low light or caused by zooming in too much on a lower-resolution digital image, you can use the De-Noise tool to somewhat smooth out pixelation or graininess problems.
SHOW ME Media 9.2—Use the Sharpness and De-Noise sliders to better focus an image and make it clearer
Access this video file through your registered Web Edition at http://www.quepublishing.com.
![]() LET ME TRY IT
LET ME TRY IT
Using iPhoto ’11’s Sharpness and De-Noise Sliders
If you’re editing an image that appears blurry or grainy, for example, the Sharpness and De-Noise sliders available in the Adjust window can be useful tools. Follow these steps to use them, either separately or together:
- Start by clicking on the Enhance tool (under the Quick Fixes tab of the Edit window). Allow iPhoto ’11 to automatically make adjustments to your image.
- To improve the sharpness of an image, click the Adjust tab at the top of the Edit window and move the cursor down to the Sharpness slider.
- Move the Sharpness slider to the left or right to decrease or increase the intensity of this tool and its impact on your photo. If a photo is slightly blurry, moving the image slider to the right will sharpen the image. The effect is subtle and won’t fix a dramatically out of focus image. But, if an image has a slight blur you want to fix, this tool is ideal.
- Further smooth out an image and improve its clarity by using the De-Noise slider (which is ideal for reducing or removing pixelation or graininess within a photo). Keep the adjustments you make using this slider subtle; otherwise, the result may look unnatural when you view, share, or print the edited image. This tool works best when a photo was taken in a low-light situation.
Adjusting a Photo’s Temperature and Tint with the Sliders
The Temperature and Tint sliders are used in conjunction with each other to manually adjust color within a photo, making them warmer or cooler, based on which way you move each slider.
The Temperature slider controls the blues and yellows in a photo and allows you to control the intensity of the colors in this range within your images. The Tint slider controls the intensity of the colors within the reds and greens range.
With the Temperature slider, moving it to the left brings up or intensifies cooler tones, whereas moving it to the right enhances the warmer tones in an image. The Temperature slider can also be used to correct white balance issues or to compensate for colors being washed out as a result of a photo being shot in a specific type of artificial light, such as harsh fluorescent lighting.
Caution
If your Mac’s screen isn’t properly calibrated in terms of how it displays colors, when you start tinkering with color adjustments in your images, you could distort the colors more, as opposed to fixing them. See Chapter 6 for more information about calibrating your Mac’s screen.
These two sliders offer manual control over the coloring in your images. You can also use the semi-automatic approach to fixing an image’s temperature by using the Warmer and Cooler spheres under the Effects tab, or allow iPhoto ’11 to automatically adjust these settings by using the Enhance command (under the Quick Fixes tab).
Using the Eye-Dropper Tool to Fix Temperature and Tint
Located directly to the left of the Tint slider is an eye-dropper icon that allows you to automatically adjust an image’s tint and temperature. To do so, you select something white or gray within the image itself and then allow iPhoto ’11 to adjust the rest of the colors in the image accordingly.
SHOW ME Media 9.3—How to use the eye-dropper to fix a photo’s temperature and tint
Access this video file through your registered Web Edition at http://www.quepublishing.com.
![]() LET ME TRY IT
LET ME TRY IT
Using the Eye-Dropper Tool Manually
When you click on the eye-dropper icon once, you can quickly and automatically adjust the tint and temperature. Follow these steps:
- Click the eye-dropper icon once.
- Move the cursor into the main image viewing area. The cursor takes on a plus-sign (+) shape.
- Place this cursor somewhere on your photo where a solid white or neutral gray color is displayed and click the mouse. The entire photo is automatically and instantly adjusted. You may want or need to use the Zoom feature to get a closer look at a specific area of your photo.
- To see what the image looked like before doing this, press and hold down the Shift key on the keyboard.
- Your edits are saved automatically when you leave the Editing mode of iPhoto ’11 or begin to edit another photo. Remember, your edits impact the primary photo you’re editing that’s saved within an Event but also instantly alter other versions of that same photo used in Albums, slideshows, greeting cards, or other Photo Projects. (To prevent your edits from impacting other versions of the photo, use the Duplicate command first and make your desired edits to the copied image instead of the original.)
Tip
After making edits using any of the Adjust sliders, if you don’t like the result, you can always click on the Undo or Revert to Original command icons at the bottom of the Edit window. Alternatively, you can use the Undo or Revert to Original pull-down menu commands or their respective keyboard shortcuts. With this freedom, you don’t ever have to worry about permanently messing up an image. Go ahead and experiment using the various editing tools in the Adjust window and try combining them with editing and enhancement tools under the Quick Fixes and Effects tabs.