
11. Printing Photos Using Your Own Home Photo Printer
Discover how to create professional-quality prints from your images using iPhoto ’11 and your home photo printer.
If you want to create professional-quality prints to frame, insert into a traditional photo album or scrapbook, or hand out to friends and loved ones, you have several options with iPhoto ’11.
You can use the Order Prints feature built into the software, upload your images to Apple’s photo lab, and then have the prints shipped to your door in a matter of days. This can be done without leaving the iPhoto application.
Alternatively, you can upload your images to an online photo service that’s not affiliated with Apple and order prints from that service to be shipped to your door.
Another option is to export your favorite images; save them on a CD, DVD, or flash drive; and then take the digital files to a local one-hour photo processor or professional photo lab to have prints created while you wait.
To learn more about ordering prints in iPhoto ’11 or using another online-based photo service, see Chapter 12, “Creating Prints Using a Professional Photo Lab.”
In terms of convenience, flexibility, and the opportunity to save money, you have the ability to print your photos from iPhoto ’11 directly to a home photo printer connected to your Mac via a USB cable or wireless (Bluetooth or Wi-Fi) connection.
Home photo printers from companies such as Canon, Epson, HP, and Kodak have recently dropped in price, yet their features and capabilities now rival what a professional photo lab is able to achieve when it comes to generating prints from your digital photos in a wide range of sizes.
This chapter provides the information you need to create awesome-looking prints in iPhoto ’11 using a home photo printer.
What You Should Know About Photo Printers
If you visit any computer store, office supply superstore, or consumer electronics retailer that sells computer equipment, you’ll see three main types of printers for sale—laser printers, inkjet printers, and photo printers—in addition to all-in-one or multifunction printers.
To create professional-quality prints, like what you’d receive by having your prints created at a photo lab, you should use a photo printer (not a standard color inkjet printer or color laser printer), along with the appropriate type of ink and high-quality photo paper.
Photo printers range in price from around $50 to $400 and are manufactured and sold by well-known companies, including the following:
• Canon—www.canon.com
• Epson—www.epson.com
• HP—www.hp.com
• Kodak—www.kodak.com
When it comes to photo printers for home use, some models are compact and designed exclusively for printing 4" × 6" and/or 5" × 7" size prints. Others are full size, can create prints up to 8.5" × 11", and can also serve as a traditional inkjet printer. More costly, wide-carriage photo printers are available from companies such as Epson; they allow for poster-size prints to be created (up to 13" × 19").
As you begin shopping for a photo printer, you’ll notice that each manufacturer offers a handful, sometimes dozens, of different models, each offering slightly different features. For example, some all-in-one printers print photos but serve as a traditional inkjet printer, as well as a flatbed scanner, fax machine, and photocopier.
What to Consider Before Buying a Photo Printer
When shopping for a photo printer, begin by asking yourself if you need just a photo printer or you want the printer to handle traditional printing and/or other functions as well. If your plan is to create all your prints from home using a photo printer, think about what size prints you’ll most often want and need. A compact photo printer allows you to create prints only up to 5" × 7", but a full-size photo printer allows you to create any size print up to 8.5" × 11".
Next, think about the printer’s cost. Don’t just look at its price tag, however. The big cost associated with photo printers is the price of the ink.
Depending on the printer, it may require a black ink cartridge plus a separate multicolor ink cartridge (sold separately). Or the printer could require up to seven different colored ink cartridges, each sold separately. Determine how much the ink cartridges cost and, on average, how many 5" × 7" prints, for example, you can expect to be able to create with each set of cartridges.
Calculate the average cost per photo (based on a standard, full-color, 5" × 7" print). This is often listed as part of the printer’s technical specifications or features.
Caution
Don’t be fooled by low printer prices! You may find an amazing photo printer on sale for under $75. However, that printer might require ink cartridges that sell for $15 to $25 each, and to keep the printer operational, you may need black and multicolor ink cartridges (or up to seven different colored ink cartridges). In other words, the amount of money you spend on ink cartridges to keep your photo printer operational could quickly become significant, especially if the ink capacity of each cartridge is small, and you don’t get more than 50 to 75 5" × 7" prints from each set.
Tip
To save a fortune on ink, shop online for compatible ink cartridges for your photo printer. Visit a price comparison website, such as Nextag.com (www.nextag.com), and in the Search field, type in the exact make and model of your photo printer, followed by the words ink cartridges or replacement ink cartridges. A handful of companies that sell genuine, name-brand ink, as well as compatible ink cartridges for your printer, are displayed. Shop from an online merchant that offers the best prices but that also has the highest customer feedback ratings and lowest shipping fees.

TELL ME MORE Media 11.1—What you should know about photo printer ink that could save you money
To listen to a free audio recording about some of the ways you can save money buying ink for your photo printer, log on to http://www.quepublishing.com.
Choosing the Right Photo Paper to Meet Your Needs
In addition to starting with a good-quality photo printer and using quality ink in that printer, if you want to wind up with professional-quality prints from your photos without going to a photo lab, you need to invest in high-quality photo paper.
Photo paper comes in different qualities and is rated using a star system. In general, always use four- or five-star photo paper when creating prints that you want to dry quickly as they come out of the printer and showcase the vibrant colors in your photos. Higher-quality photo paper won’t fade after a few months or even many years.
Along with the photo paper’s quality, you must choose the paper’s finish. Most photo paper manufacturers offer a standard matte, semi-gloss, and high-gloss finish. A few also offer a finish called Luster; this is what many professional photographers use when creating wedding albums or portraits for their clients.
Each photo paper finish gives your prints a slightly different appearance. The finish you select is a matter of personal preference. Here’s what you need to know about each finish type:
• Matte—Prints created on photo paper with a matte finish have no shine and don’t reflect light. This finish is particularly useful if you’ll be framing your images behind glass. The colors in your prints, however, may seem less vibrant because there is no glossy finish to reflect the light.
• Semi-gloss (soft gloss)—Prints created on photo paper with a semi-gloss or soft gloss finish have a small amount of shininess to them. Because they reflect light, colors often appear more vibrant. This type of print is best suited for inclusion in a traditional photo album or scrapbook.
• High gloss—Prints created using a high-gloss paper finish appear very shiny, almost as if the ink is still wet (even long after it’s dry). Colors appear bright and vibrant, but the glare caused by direct light could be distracting when viewing the photos, especially through a plastic or glass frame.
• Luster—This rich and classy finish is ideal for portraits and photos that will be presented in a fancy album. Photos look as if they have a satin-like finish. Luster photo paper is often used by professional photographers. It’s more expensive and often difficult to find unless you buy it from a photography specialty store. The results, however, tend to be worth the extra expense if you’re looking to create quality prints.
Tip
All the printer manufacturers sell their own brand-name photo paper. However, despite what the printer companies want you to believe, all photo paper works in all photo printers as long as the paper size is appropriate for that printer. So, if you have an Epson printer, you can buy and use Epson, HP, Canon, Kodak, Office Max, or any other brand of photo paper. You can determine the paper’s quality by the industry-standard star rating and the paper’s finish. Always shop for the best deals. Office supply superstores, for example, often run buy-one-get-one-free promotions or other sales on certain brand names of photo papers.
Using iPhoto ’11’s Print Function
When your photo printer is set up and connected to your Mac, loaded with ink, and has the appropriate size photo paper inserted in the paper tray, start by running a printer check to ensure everything is working properly.
Tip
If there are long stretches of weeks or months in between uses of your photo printer, you can preserve the life of your ink cartridges, prevent them from drying out, and avoid the printer’s print heads from getting clogged if you remove the ink cartridges from the printer, wrap them in airtight plastic wrap, and store them in a cool, dry place until they’re needed again.
If your printer is connected to your Mac, turned on, and its “Ready” light (or equivalent) is lit, you’re ready to start creating prints using iPhoto.
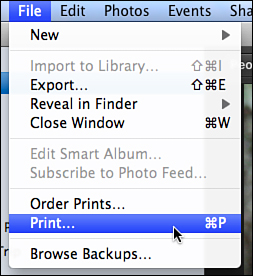
First, select and highlight the image you want to print in iPhoto ’11. Next, select the Print command from the File pull-down menu (see Figure 11.1).
Figure 11.1. The Print command is available from the File pull-down menu or by pressing Command + P on the keyboard.
Tip
With an image’s thumbnail highlighted and selected, or when viewing an image in iPhoto’s main image viewing area, you can also use the keyboard shortcut Command + P to execute the Print command.
iPhoto’s Print Settings window, shown in Figure 11.2, is displayed after you execute the Print command. It’s from this window that you can adjust various settings based on the size print you want to create.
Figure 11.2. This Print Settings window shows all the default settings.
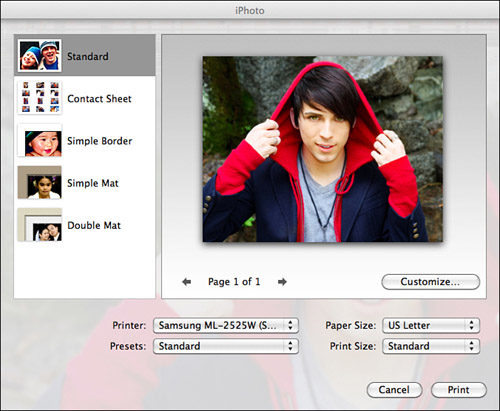
On the left side of the Print Settings window is the Themes section. With a single click of the mouse, choose the Theme thumbnail that corresponds to the type of print you want to create. Regardless of which theme you select, click the Customize icon to adjust the various settings associated with each theme.
Your theme options (from top to bottom) include the following:
• Standard—Create a print on standard photo paper.
• Contact Sheet—Print thumbnails of multiple images on a single sheet of photo paper. You can determine the size of the thumbnails and choose whether to print their respective filenames below each thumbnail.
• Simple Border—This feature automatically creates a single, thick border around the image when it’s printed.
• Simple Mat—This feature automatically creates a single mat around an image. You can choose the mat’s color and style by selecting this theme and then clicking on the Customize icon and using the various Print command icons displayed at the bottom-right corner of the screen.
• Double Mat—This feature automatically creates a digital double mat around the photo. You can select the color and style of each mat by clicking on the Customize icon after choosing this theme and then using the various Print command icons displayed at the bottom-right corner of the screen.
Toward the bottom of the Print window, there are four pull-down menus, labeled Printer, Presets, Paper Size, and Print Size. Here’s an explanation of what each setting does:
• Printer—If you have multiple printers connected to or accessible from your Mac, you need to select your Photo Printer from the pull-down list. All the printers available to your Mac are displayed here.
• Presets—If you have custom printer settings that you want to refer back to and use often, you can save them and then call upon them again later by using this setting.
• Paper Size—Photo paper comes in a wide range of sizes based on standard-size prints. For example, you can use 4" × 6", 5" × 7", or 8.5" × 11" photo paper. Select the appropriate size photo paper based on what’s currently loaded in your printer. If you have a compact photo printer, your options in terms of paper size are more limited.
• Print Size—In addition to choosing the paper size, you must select the print size you want to create. If you have 8.5" × 11" photo paper installed in your printer, you can choose to use only a fraction of that paper and create a smaller 4" × 6" or 5" × 7" print, or you can fit multiple prints on a single page, for example.
Tip
When selecting a standard paper size for prints, such as 4" × 6" or 5" × 7", you have the option to print your photos with or without a thin white border. If you choose a borderless print, the image is printed right up to the extreme edges of the photo paper. When you use a professional photo lab, however, most add a thin white border around your prints, which you can do as well on your photo printer at home.
Caution
The print size you select must be the same size as or smaller than the paper size inserted into your printer.
After you adjust the settings in the Print Settings window, click the Print icon located in the lower-right corner of the window to send your image to the photo printer and create your print. Or, to exit this window without printing your image, click on the Cancel icon located to the immediate left of the Print icon.
Before clicking Print, however, you can further customize your printing options (or customize a particular print theme) by clicking on the Customize icon located below and to the right of the image preview area.

SHOW ME Media 11.2 The print themes and how they differ
Access this video file through your registered Web Edition at http://www.quepublishing.com.
![]() LET ME TRY IT
LET ME TRY IT
Creating a Contact Sheet
A Contact Sheet is a great way to print a many thumbnails of images on a single page to use them for reference. To create a Contact Sheet, follow these steps:
- Select and highlight a photos you want to print (or select an entire Event or Album).
- Access the Print command from the File pull-down menu or press Command + P on the keyboard. The Print Settings window appears.
- Choose the Contact Sheet setting from the left side of the Print Settings window and then click on the Customize icon to see how you can customize that theme.
- Using the Columns slider found at the bottom-center of the screen, choose how many columns of thumbnails you want to appear on each page. The more columns you choose (between one and 10), the smaller the image thumbnails will appear on the page. For easy viewing, choose three or four columns.
- Using the command icons in the lower-right corner of the screen, you can adjust the background color by clicking on the Background icon.
- Click on the Print command to print your Contact Sheet.
Customizing Your Print Job
Depending on which print theme you select, the options available to you when you click on the Customize button vary. Starting with the Standard theme, as soon as you click on the Customize icon, the entire iPhoto ’11 screen changes.
In the bottom-right corner of the screen, there are Cancel and Print command icons. Immediately below them are seven new command icons, labeled Print Settings, Themes, Background, Borders, Layout, Adjust, and Settings. In the middle of the screen is a large print preview area (which showcases what your print will look like before you actually print it).
By selecting the Standard theme, for example, you can use the various command icons that appear at the bottom-right corner of the screen to change the background color, border, and layout.
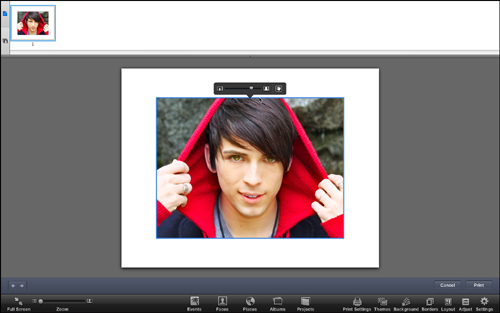
To zoom in or out and reposition a photo to change how it will appear when it’s printed, click on the actual image in the preview area. A frame appears around the image, and a Zoom slider appears in the image preview viewing area.
Use this Zoom slider to zoom the photo in or out. Click on the hand icon once, move the cursor over the preview image, and hold down the mouse button to move the image around in the frame after you’ve zoomed in or out to reposition it.
Shown in full-screen mode, Figure 11.3 shows how you can zoom in on an image in the preview window and then preposition it in the frame before printing.
Figure 11.3. Click on the image in the preview window to zoom in or out and preposition it in the frame before printing.
The Print Command Icons and What They Do
When you click on the Customize icon in the Print Settings window, the Cancel and Print command icons appear in the lower-right corner of the screen. Below them are seven additional command icons, which are described in this section. Figure 11.4 shows what these command icons look like.
Figure 11.4. The command icons found in the lower-right corner when you click on the Customize icon from the Print Settings window.

Print Settings
Click on the Print Settings command icon to quickly return to the Print Settings window.
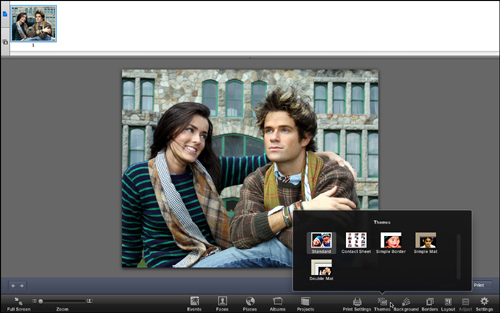
Themes
When you click on the Themes command icon, a new window appears (see Figure 11.5). The Themes window allows you to quickly switch print themes without returning to the Print Settings window. In this example, it’s shown in full-screen mode.
Figure 11.5. Quickly switch between print themes by clicking on the Themes command icon.
Background
Depending on which print theme you selected, you are able to choose from several different colors for your background. Your choices can be previewed in the image preview area before you click the Print icon to create your print. Use the mouse to click on the background color of your choice.
Borders
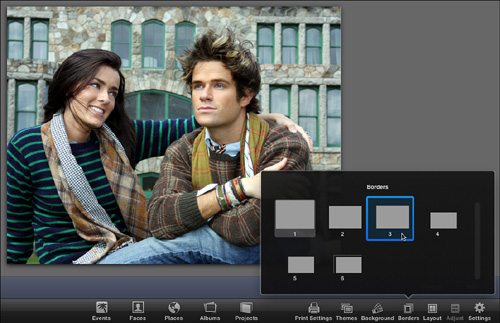
Again, depending on which print theme you select, you are able to choose from a variety of different border styles prior to printing. The border you select appears in the image preview window.
Figure 11.6 shows the available border choices if you select to create a print using the Standard print theme.
Figure 11.6. You can add a custom border to your image before printing it.
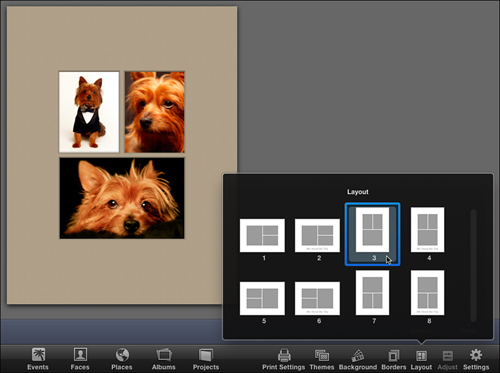
Layout
Click on the Layout command icon to choose from a variety of different print layouts. Your options vary based on which print theme you selected. If you have multiple images preselected and highlighted, you are able to choose extra layouts that can accommodate between two and four images per page, allowing you to quickly create eye-catching photo collages.
Tip
By adding a line or two of text to a layout, you can create professional-looking actor or model headshots, for example, or simply add a text-based caption to your print. Use the Settings command icon to choose a font, font size, and typestyle (bold, italic, and so on).
Figure 11.7 shows an example of a three-image collage created by prehighlighting and selecting three images from an Event, accessing the Print window, choosing the Simple Mat theme, and then selecting a three-image photo collage layout from the choices offered by clicking on the Layout command icon.
Figure 11.7. Create a multiphoto collage with ease using the options available from the Layout command icon.
SHOW ME Media 11.3—Create and print a multiphoto collage
Access this video file through your registered Web Edition at http://www.quepublishing.com.
Creating and Printing a Multiphoto Collage
Instead of printing a single image, you can quickly create and print a multi-image collage and customize its layout and appearance in iPhoto. Follow these steps to create your own photo collage:
- Select and highlight between two and four photos you want to appear in your collage. For this example, go with three images.
- Access the Print command from the File pull-down menu or press Command + P on the keyboard. The Print Setting window appears.
- Choose the Simple Border, Simple Mat, or Double Mat theme from the left side of the Print Settings window and then click on the Customize icon. For this example, choose the Simple Mat option.
- Click on the Background command icon to select the color of your mat. Go with black for this example.
- Click on the Layout command icon and choose the three-image setting. Choose one of the templates that appears.
- Click on each image in the preview window to use the zoom in/out feature and adjust its position in the frame. You can also move photos into different positions by dragging and dropping them using the mouse.
- Add a text-based caption if the template you selected calls for one.
- When the collage is fully customized and laid out the way you like it, click on the Print icon to send your creation to your photo printer and create a print. You can preview it first in the Prints Settings window, however.
Adjust
While looking at a photo in the preview area of iPhoto’s Print screen, you can click on that preview image to zoom in or out, reposition it in the frame, and edit the image using the features available from the Adjust command icon.
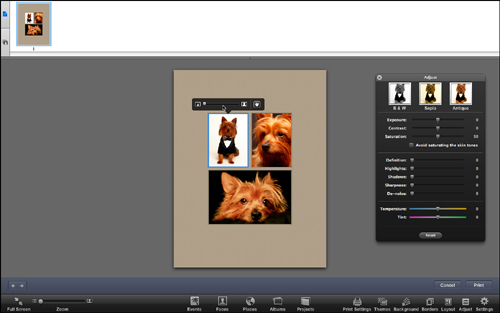
When you click on this icon (an image must be selected and highlighted in the print image preview area), the Adjust window appears, allowing you to quickly add special effects to an image (B&W, Sepia, or Antique) or adjust the image’s Exposure, Contrast, or Saturation settings. Using sliders in the Adjust window, you can also fine-tune the image’s Definition, Highlights, Shadows, Sharpness, De-noise, Temperature, and Tint settings.
Figure 11.8 shows what the Adjust window looks like, plus showcases the Zoom slider and hand-shaped repositioning icon that appears in the image preview area when you click on the image being previewed.
Figure 11.8. The Adjust window allows you to customize and edit a photo while in iPhoto ’11’s print preview mode.
![]() To discover how to use the features and functions offered in the Adjust window, see Chapter 8, “Adding Effects to Your Images,” and Chapter 9, “Advanced Photo Editing with iPhoto ’11.”
To discover how to use the features and functions offered in the Adjust window, see Chapter 8, “Adding Effects to Your Images,” and Chapter 9, “Advanced Photo Editing with iPhoto ’11.”
Settings
If you’ve chosen to add a text-based caption to your photos before printing them, the options available when you click on the Settings command icon allow you to adjust the font, typestyle, and font size that’s displayed. You can also adjust the font if the filename will appear under a thumbnail in a Contact Sheet.
From this Settings window, shown in Figure 11.9, you can also set the Photos Per Page option, allowing a single photo to be printed per page or multiple (different) photos to be printed per page (which can save on photo paper). You can even select to print multiple copies of the same photo on a page (space permitting).
Figure 11.9. The Settings window.
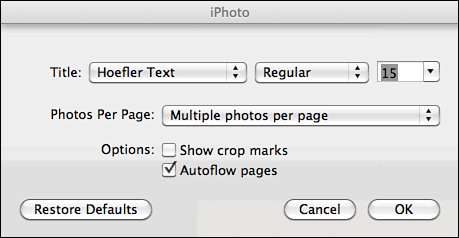
As you print your photos, you can also opt to display crop marks around the prints and choose to autoflow pages. With this feature, if you’re working with multiple prints that will take up multiple pages, iPhoto ’11 automatically places them, or in the case of a Contact Sheet or multiphoto collage, iPhoto ’11 determines their positions on the page.
Tip
When you look at your prints, if the colors don’t look right, based on what you see on your screen, either the Mac’s screen could require calibration, or one of the ink cartridges or print heads in your printer could be clogged. Run the printer diagnostics software that came with the printer to correct any printer-related issues.