
5. Taking Professional-Quality Photos
Learn basic picture-taking techniques that pros use to help you shoot professional-quality photos with any digital camera.
iPhoto ’11 is an incredible tool for handling almost every aspect of digital photography, except for one key thing...actually taking pictures. This chapter offers a handful of techniques to help you quickly and easily improve your picture-taking abilities using any digital camera.
Later, you’ll want to apply some of these techniques related to photo composition when cropping and editing photos you’ve already taken.
Of course, if you do happen to make a minor mistake while shooting, the editing and photo enhancement tools built into iPhoto ’11 can help you fix them after the fact.
Most point-and-shoot digital cameras allow you to set the resolution you want to shoot in. As a general rule, shoot in the highest resolution available to your camera. This gives you the most flexibility later when you’re ready to edit your images and make large-size prints, for example. Keep in mind, the higher the image resolution, the larger the image file will be and the more storage space it will require on your computer’s hard drive.
![]() To learn how to avoid making some of the most common mistakes while actually taking pictures, see Chapter 6, “Overcoming Common Mistakes and Mishaps.”
To learn how to avoid making some of the most common mistakes while actually taking pictures, see Chapter 6, “Overcoming Common Mistakes and Mishaps.”
A Good Photographer Is Always Prepared
Many of the most basic point-and-shoot digital cameras available today (including those built into cell phones) are compact, easy to use, and chock full of features designed to make taking quality pictures in virtually any situation a straightforward process. With this fact in mind, however, as the photographer, you still need to make some important decisions when snapping photos.
Regardless of what you’re photographing, if you want to improve your picture-taking skills, be prepared to follow these 10 basic steps to help you get started:
• Learn how to use your camera—Every camera has its own combination of dials, buttons, menus, shooting modes, and features. Invest the time to get to know your camera. This way, when you’re actually taking pictures, you don’t have to fumble around looking for the right button, dial, or menu option or miss out on photo opportunities because you needed to consult with the owner’s manual to figure out how to turn the flash on or off, for example.
Tip
As you practice using your camera, get into the habit of turning it on and off quickly, removing the lens cap (if applicable), and setting the menu options to their appropriate settings for the types of photos you’ll be taking. In general, when you’re not taking pictures, you should protect your camera lens by keeping the lens cap on, plus preserve battery life by turning off the power when it’s not being used.
• Be prepared with the batteries and memory cards you’ll need—One of the biggest mistakes amateur photographers make is forgetting to charge their camera’s battery or transfer older images from their camera’s memory card to their computer before setting out to take more pictures. Especially if you’re taking vacation photos or shooting some type of party or event that happens only once, it’s essential for you to be prepared with multiple fully charged camera batteries on hand, plus at least one extra (empty) memory card.
• Make sure the lens is clean—Have a microfiber cleaning cloth on hand to remove dust, dirt, water drops, fingerprints, or smudges that appear on the lens. A dirty lens results in poor-quality photos.
• Evaluate the setting and your subjects—After you decide who or what you want to shoot, figure out the best way to position your subjects in whatever setting you’re in, taking into account the foreground, background, and available lighting.
• Pay attention to available lighting—Don’t shoot directly into oncoming light (unless you’re shooting a sunset). As a general rule, the main light source for your photos should be behind you (the photographer) and shining onto your subjects.
• Choose an interesting shooting angle—The most interesting photos are not always shot with the photographer simply facing his or her subject head on. You can often create visually impressive effects by positioning yourself at an angle from your subject—either to the left or right. Sometimes you can also create very interesting effects by crouching down and shooting upward toward a subject, or positioning yourself above a subject and shooting at a downward angle (as shown in Figure 5.1).
Figure 5.1. Sometimes you can create interesting photos by shooting downward, toward your subject from above.

• Think about your shot’s composition—One thing that sets professional photographers apart from amateurs is their ability to properly frame images as they’re shooting, while taking into account the “Rule of Thirds”; highlighting the subject; and fully utilizing the foreground, background, and available lighting in their shots. You learn more about what photo composition is and how to utilize it later in this chapter.
• Hold the camera very still—As you press your camera’s shutter button to take a photo, to avoid blurry or out-of-focus images, hold your camera steady, even if it has image stabilization built in. This is particularly important when shooting in low-light situations. Regardless of what type of camera you’re using, try to brace your entire body against something stable, such as a wall or tree; hold the camera with both hands (making sure your fingers are not blocking the lens or flash); and hold your breath for a few moments as you snap each photo. In some situations (especially when there is minimal light), using a tripod is necessary to keep the camera perfectly still when shooting.
• Understand that timing is essential—Even if you’re taking posed photos of your kids, friends, pets, or family members and have time to carefully plan out your shots, knowing exactly when to press your camera’s shutter button is essential. Timing becomes even more important when shooting subjects that are in motion or visuals that occur in real-time, such as a child blowing out the candles on a birthday cake or hitting a home run during a Little League game.
• Tap your creativity—Photography is both a skill and an art form. Essential skills include knowing how to operate your camera and frame your images. However, your ability to tap your own creativity to create photographic art each time you snap a photo will ultimately play a major role when it comes to improving the overall quality of your photos.
![]() To discover how to edit and enhance your photos using iPhoto ’11, see Chapter 7, “Using iPhoto ’11’s Simple Photo Editing Features,” and Chapter 9, “Advanced Photo Editing with iPhoto ’11.”
To discover how to edit and enhance your photos using iPhoto ’11, see Chapter 7, “Using iPhoto ’11’s Simple Photo Editing Features,” and Chapter 9, “Advanced Photo Editing with iPhoto ’11.”
Taking Advantage of Your Camera’s Auto Shooting Modes
Every digital camera has a selection of “auto” shooting modes. Each is designed to take the guesswork out of picture taking but is designed to be used in a particular shooting situation.
When you set your camera to shoot in an auto mode, all the technical camera settings are automatically adjusted on your behalf. As a result, your only job as the photographer is to look through the viewfinder (or at the viewfinder display on the camera), compose and frame your shot, and press the shutter button to snap the photo.
Depending on your camera’s make and model, it might just have a few different auto shooting modes for taking close-ups, landscape shots, action shots, portraits (shown in Figure 5.2), or shots without using the camera’s flash. Most digital cameras also have an image stabilizer feature that automatically compensates for camera movement as you’re snapping photos.
Figure 5.2. Whenever you’re shooting a portrait, for example, select the appropriate shooting mode that’s built into your camera.

Tip
Some cameras have very specific modes. For example, you might find one mode available for shooting portraits indoors and another for shooting portraits outdoors. Your camera may also have additional modes for shooting in specific types of weather, such as bright and sunny skies versus cloudy or overcast conditions.
Tip
Even with a camera’s image stabilizer feature turned on, you should still hold your camera as steady as possible when taking pictures. Camera movement as you’re pressing the shutter button results in blurry or out-of-focus pictures.
Choosing the Right Shooting Mode for the Situation
Even less-expensive point-and-shoot digital cameras often offer a dozen or more shooting modes for taking pictures in a wide range of situations. For example, they allow you to shoot through glass, take pictures of fireworks, or capture large areas by shooting multiple photos that automatically are transformed into a single panoramic shot.
Many of the newer digital cameras have not only built-in face detection, which is a handy feature for taking well-focused shots of people, but also built-in smile detection, which analyzes each person’s face and determines whether he or she is looking at the camera and smiling before the camera lets you snap the photo.
Depending on your camera’s make and model, you adjust the shooting mode either by physically pressing or rotating a button or dial on your camera or by accessing the camera’s onscreen menu options.
Tip
To ensure that your pictures turn out clear, well lit, and blurry free, you need to select the proper auto shooting mode based on the situation in which you’re shooting. Get to know what shooting modes are available using your particular camera so you don’t have to waste a lot of time figuring out the most suitable mode each time you snap a photo.
All Digital SLR and many point-and-shoot digital cameras also have manual or semi-automatic shooting modes. They require a more advanced understanding of the technical aspects of photography, such as how to set the proper shutter speed, aperture, ISO, and white balance. For the vast majority of pictures you’ll be taking as an amateur photographer, the various auto shooting modes built into your digital camera are more than adequate.
Dealing with Shutter Lag
One of the biggest drawbacks to almost all point-and-shoot digital cameras and the less-expensive Digital SLR cameras is that they have a shutter lag. This means that there’s a slight delay between the time you press the camera’s shutter button to snap a photo and when the photo is actually shot.
If you happen to be shooting a moving subject, such as your child playing a sport, not properly compensating for your camera’s shutter lag could result in your constantly taking photos a second or two too late, and not capturing those important moments.
Although you can’t avoid shutter lag in less-expensive digital cameras, you can learn to compensate for it by following these steps:
- Practice using your camera to become familiar with how long the shutter lag is on your camera.
- Prefocus on what you want to shoot. This means choosing and/or zooming in on your subject, and then pressing the camera’s shutter button halfway down to activate the camera’s autofocus sensors so they’re focused on that subject, but not yet actually shooting the photo.
- Anticipate the action. If you know you want to take a very specific shot and timing is important, learn to press the shutter button in advance of the action taking place.
- Take advantage of your camera’s continuous shooting mode when you absolutely must capture something that’s time sensitive. (This is a feature built into almost all digital cameras these days.) The continuous shooting mode allows you to press and hold down the camera’s shutter button so that you can snap multiple photos in quick succession. Depending on the make and model of your digital camera, you might be able to capture 3, 5, 8, or even 10 frames per second using this shooting mode.
- Make sure the camera battery is fully charged, and for time-sensitive photos, try to avoid using the flash, which often slows down a camera’s shutter lag.
- When purchasing a memory card for your camera, choose one with the fastest read/write speed possible (600x or 90MBps, for example). Check the technical specifications of your camera to determine its speed when saving images, and then purchase a memory card that operates as close to that speed as possible.
The Basics of Photo Composition
The difference between a truly masterful photograph and a generic snapshot is often a result of how the photographer framed an image and used basic photo composition principles in conjunction with his or her own creativity to choose the right setting, light, background, foreground, and, of course, the perfect subject. A photographer’s timing is also essential, because a fraction of a second can mean the difference between capturing a perfect smile on someone’s face and that same person looking away from the camera or blinking, for example.
To help you take the best possible shot each and every time, follow these steps:
• Choose your subject—Figure out what you want the primary focus of your photo to be, whether it’s a person, an object, or a particular piece of scenery in a landscape shot. When people look at your photo later, what do you want their eyes to focus on and pay the most attention to?
• Be creative when selecting your subject—Determine the best way to shoot your subject to make the photo visually interesting. For example, if you’re shooting a person, do you want to take a close-up of his or her face, a mid-range shot (from the waist up), a full body shot, or an extreme close-up (which might mean zooming in and focusing on the subject’s eyes, while cutting the top of his or her head out of the photo). As the photographer, you can also choose the best shooting angle from which to capture your subjects.
• Frame your subject—Determine where you want the subject to appear within the overall frame of the image. As you learn in the next section, when you apply the “Rule of Thirds,” the subject should not always be in the center of the frame. Also, you can choose to shoot while holding the camera horizontally (landscape mode) or vertically (portrait mode), which dramatically alters the appearance of the shot and helps determine how much foreground or background appears within a photo. If you’re taking vacation photos of your loved ones in front of a famous tourist attraction, for example, shooting images in landscape mode makes sense because you capture more background. If you want the focus of your photo to be on the subject, and the background isn’t as relevant, using your camera lens’s zoom and shooting in portrait mode usually work best.
• Choose the most appropriate shooting mode—Selecting the right shooting mode helps to ensure the best possible outcome from a technical standpoint. Selecting the wrong mode for the situation, however, could result in light issues (overexposed or underexposed images), blurry images, or poor detail.
• Take multiple photos of the same thing—Especially when snapping photos of people or objects in motion, timing plays an important role when capturing your subject. By taking multiple shots back to back, you can capture the same subjects and setting, but over a several-second period. During that time, someone can change body position, change facial expression, or blink. As you take multiple shots, consider quickly switching between portrait and landscape mode (by rotating your camera) and utilizing the camera lens’s zoom either more or less. You can also adjust your shooting angle slightly to reposition your subject within the frame, without you (the photographer) or your subject having to change where you’re physically standing. Alternatively, you can move your position and alter your shooting perspective. (As the photographer, you’ll quickly discover that even slight movements on your part make a huge difference in photos.) Also, taking multiple photos in quick succession increases the likelihood of capturing at least one perfect shot.
• When shooting, keep your camera very still—Use a tripod when possible. The slightest camera movement could result in a blurry image, even if your camera or its lens has a built-in image stabilization feature. Keeping your camera steady when shooting is even more important in low-light situations.
Tip
As you’re taking pictures, periodically preview them in Preview mode on your camera’s built-in display. Make sure the shots are in focus and see how they look. You can always make adjustments to your shooting technique as you go, as long as you know what you need to change or fix. If you wait until you return home to transfer your photos onto your Mac before previewing them, you miss the chance to retake photos and fix minor problems while you’re still out shooting.
Caution
Refrain from deleting photos while you’re out shooting. The image quality of the display built into your camera is vastly inferior to the resolution of your computer screen or what an image will look like when it’s printed. Chances are, you have space for thousands of photos on your camera’s memory card, so keep shooting. Wait to delete any images until after you’ve transferred them into iPhoto and viewed them on the computer’s screen. Using iPhoto’s editing and enhancement tools, you often are able to fix problems with photos. When you see the photo, in full size, on your computer screen, it may be much better quality than you initially thought.
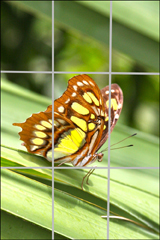
Using the “Rule of Thirds” When Shooting and Framing Your Shots
One of the most useful shooting strategies when taking any type of picture is to incorporate the “Rule of Thirds” when looking through your camera’s viewfinder and framing your images before you press the camera’s shutter button.
The “Rule of Thirds” is actually simple, but when you apply it, you’ll immediately notice that your photos become much more visually interesting. It’s a common habit for amateur photographers to look through their camera’s viewfinder at their subject when taking a photo, position the subject in the center of the frame, and then snap the photo.
The “Rule of Thirds” encourages you to position your subjects elsewhere in the frame and to fully utilize the foreground and background. To use the “Rule of Thirds,” simply imagine a tic-tac-toe board being placed over your image as you look through the viewfinder. Thus, the single frame is now divided into nine boxes.
Some digital cameras allow you to display a “Rule of Thirds” grid in your viewfinder, without it appearing in your actual photos. However, on most cameras, this isn’t an option, so you need to use your imagination while you’re framing your shots. In your mind’s eye, overlay the tic-tac-toe board (a.k.a., the “Rule of Thirds” grid), like the one shown in Figure 5.3.
Figure 5.3. Most amateur photographers position their subject directly in the center of the frame, as shown here. This is usually a visually boring approach to photography.
Out of habit, you’d probably position your subject in the center of the middle box because that’s where your eyes instinctively look. If you pay attention to the lines used to create the “Rule of Thirds” grid, however, you’ll notice that within the frame, the lines intersect in four spots near the center of the image (shown in Figure 5.3).
If you adjust the positioning of your subject ever so slightly so that the main focus of your image appears centered around one of the intersection points (that is, the subject is no longer centered within the frame), the image becomes much more visually interesting.
You can also be creative and position your subject along one of the imaginary horizontal or vertical lines of the “Rule of Thirds” grid. The goal is to avoid placing your subject in the center of the frame, but to set a scene by showcasing your subject and the foreground and/or background in a visually interesting way.
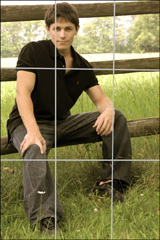
Figure 5.4 showcases a common placement for a subject within a photo, taking the “Rule of Thirds” into account. Notice in this example where the subject is positioned in reference to the gridline’s intersection points.
Figure 5.4. In this photo, the main subject is positioned off-center, so it’s placed at of the intersection points of the “Rule of Thirds” grid.
Tip
As you place your subject in the frame, pay attention to which way the subject is facing. When shooting a person or animal, for example, the direction of the body as well as the direction the eyes are looking is important.
Tip
When you are trying to demonstrate movement or motion in your photos, that motion should always be headed into the frame, not out of it. Thus, the person viewing the photo can see where the subject is coming from and imagine where it’s headed.
Prefocusing on Your Subjects
As you’re taking pictures, begin by looking at your subject through the camera’s viewfinder; then center the subject in the frame. Next, press and hold the camera’s shutter button halfway down so the camera uses its autofocus mode to focus on your main subject. Now, move the camera slightly (or adjust the zoom lens) and reposition the main subject within the frame using the “Rule of Thirds.” Determine where in the frame your subject is most visually appealing.
Next, fully press the camera’s shutter button and take the photo. This ensures that regardless of where your subject is within the frame, the camera autofocuses on the subject, not on anything in the foreground or background.
Tip
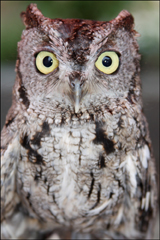
When shooting close-ups of people, prefocus on the middle of their face. However, when shooting animals, make sure you focus specifically on their eyes. If your camera has a face-detection feature, this step isn’t necessary when shooting people, but you’ll want to deactivate it when shooting animals. While people can show emotions with all of their facial expressions, including their smile, animals are most expressive with their eyes.

SHOW ME Media 5.1—Take the “Rule of Thirds” into account whenever you shoot
Access this video file through your registered Web Edition at http://www.quepublishing.com.
![]() LET ME TRY IT
LET ME TRY IT
Using the “Rule of Thirds”
When looking through your camera’s viewfinder to frame your images as you’re about to snap photos, take the “Rule of Thirds” into account. Follow these steps:
- Adjust your camera to the appropriate shooting mode based on the situation.
- Look at your subject through the camera’s viewfinder and center the subject in the frame. Next, press the camera’s shutter halfway down so the camera focuses on your subject.
- Reposition the subject in the frame using the “Rule of Thirds” and determine where in the frame your subject is most visually appealing. Next, fully press the camera’s shutter button to snap the photo. This ensures that regardless of where your subject is in the frame, the camera autofocuses on the subject, not on anything else in the foreground or background.
- Experiment by taking the same basic shot but repositioning your subject along a different intersection point on the “Rule of Thirds” grid to see how it impacts the overall visual appeal of the image.
- Pay attention to the direction your subject is facing, the direction his or her eyes are pointing, and if applicable, the direction the subject is moving.
Tip
Using the Cropping tool within iPhoto, you can often reframe your images after they’re shot and still take the “Rule of Thirds” into account. Chapter 7, “Using iPhoto ’11’s Simple Photo Editing Features,” explains how to use the Cropping feature in iPhoto ’11.
Choosing the Best Subjects, Foreground, and Background When Taking Pictures
The real world is three dimensional. However, when you take a photograph, you’re capturing a piece of the multidimensional world using a two-dimensional medium.
The trick to adding a sense of depth in your photos is to pay careful attention to the foreground and background, as well as the primary subject within your photos. When it’s applicable, include your surroundings in creative ways. Sometimes, by capturing something in the foreground (in front of the image’s subject) and/or in the background, you can give your photo a true multidimensional feel.
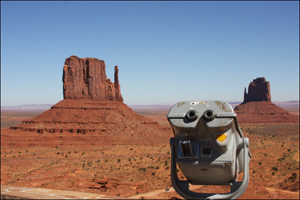
Figure 5.5 provides an example of how you can frame your image with something from your surroundings in your photo’s foreground, plus showcase an interesting background to add a sense of depth to the image.
Figure 5.5. You can position objects in front of or behind your subjects to create a sense of depth in your photos. In this case, the main subject is the background, and the object in the foreground was used to make the photo more interesting visually.
When using this technique, make sure your camera focuses on the subject—not the foreground or background. To avoid having your camera autofocus on the wrong thing in a photo, read your camera’s manual and become familiar with its autofocus operation.
On most digital cameras, you should start off by focusing only on your subject at first. Press the camera’s shutter button down halfway so that the camera’s autofocus feature kicks in and focuses on your intended subject. Next, zoom out or reposition your subject to include the foreground and/or background (while keeping the shutter button halfway pressed down).
On many cameras, when you take your image, your intended subject is in focus, while the foreground or background is visible but most likely slightly out of focus.
Keep in mind that you don’t necessarily need to have people in your photo for this technique to work. As you’re taking your photos, think about how you can frame your images using the landscape or objects around you, paying attention to what’s in front of your subject, the subject itself, and what’s behind the subject.
Combine this technique with the “Rule of Thirds” and try experimenting by shooting from a few different angles or perspectives. You’ll quickly discover your photos adopt a more professional quality.
How Light Impacts Your Photos
When you’re shooting photos outside on a sunny day, the sun itself can be a help or a hindrance. As a general rule, you never want to point the camera toward the sun when taking a photo. This causes glare and reflections that can wreck your images. If the sun is behind the subject (facing the photographer), this is generally a no-no because it causes your subject to appear as a dark silhouette.
Tip
If you’re shooting a subject in front of a sunset, for example, or there is too much light behind and not enough in front of your subject (which causes your subject to appear as a dark silhouette), try standing within a few feet of your subject and using the camera’s flash, even in daylight or during a sunset. This technique lights up the subject but also helps you capture what’s in the background. If your camera has a “slow/synchro” flash mode, you should use it in this situation. This technique is referred to as using a “fill flash.”
When the sun or primary light source is to your back (and shining on your subjects), it lights up the people or objects you’re photographing. What you need to be on the lookout for are unwanted shadows caused by the light. Make sure shadows do not appear within your photos in a distracting way.
During daylight hours, when you point the camera toward the sun, you almost always see flares, glare, or reflections in your photos (as shown in Figure 5.6). To get rid of them, you can simply alter your position and/or change the position of your subjects. Sometimes, even the slightest change in position creates a totally different visual within your camera’s viewfinder.
Figure 5.6. If the main light source where you’re shooting is in front of the camera (shining into the lens) as opposed to shining onto the subject, unwanted glare, flares, or reflections appear in your photos.
To reduce glare and reflections, you can sometimes place your hand just above the camera’s lens to block the direct light from shining into the lens. However, make sure you don’t cover up the lens; otherwise, you wind up with a photo of your hand, as opposed to the intended subject. You can also use an optional lens hood, which attaches to the front of your camera’s lens if you’re shooting with a Digital SLR camera.
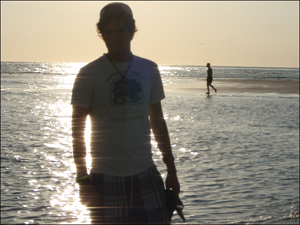
On occasion, however, having a glare appear in your photo can add an artistic element to it, as you can see in Figure 5.7. Here, the sun was pointing toward the camera’s lens, but in a controlled way, because trees partially blocked the incoming light.
Figure 5.7. Sometimes, glare from the sun can be used to add an artistic element to your images.

SHOW ME Media 5.2—Working with sunlight when taking pictures outdoors
Access this video file through your registered Web Edition at http://www.quepublishing.com.
![]() LET ME TRY IT
LET ME TRY IT
Positioning Your Subject Based on the Sun’s Position
To avoid unwanted glare, flares, and reflections in your photos, follow these steps:
- Look around your surroundings and determine your main source of light.
- Make sure the light is positioned in front of your subject and behind you, the photographer.
- If you can’t control the light in the background, you can add more light on your subject by using the camera’s flash, even in daylight shooting situations. You would do this, for example, if your subject is standing outside under the shade from a tree but is otherwise surrounded by daylight. Or, perhaps your subject is standing in front of a gorgeous sunset, but there is little light in front of your subject to light up his or her face.
Planning Your Shots
Whether you’re shooting photos of kids at play, taking pictures during a vacation, capturing exciting happenings at a party you’re attending, taking a family portrait to use within a holiday card, or capturing spontaneous moments with friends to share on your Facebook page, you should perfect your ability to take both posed and candid photos of people in a wide range of indoor and outdoor situations.
Posed Photos
Posed photos are great because you can tell your subjects where to stand and what facial expressions to have. You can decide when and where the photo will be taken, and if necessary, you can often adjust the lighting situation as well as the angle from which you’re shooting.
When taking posed shots, as shown in Figure 5.8, you also can carefully select each image’s foreground and background. Plus, you have the luxury of taking multiple shots to ensure that you capture the perfect image—with everyone looking at the camera and smiling.
Figure 5.8. A posed shot gives you maximum control over your subjects, surroundings, and lighting.
As you’ll discover, if you’re trying to shoot a large group, getting all the subjects to look at the camera at the same time and smile is a challenge, especially if there are young kids in the group. In these situations, be patient and plan on investing a few extra minutes to take a bunch of photos in succession (safety shots) to ensure that you capture the perfect posed image.
Tip
If you’re using a flash and you’re worried about people closing their eyes when the flash goes off, one trick for reducing this problem is to ask all the subjects to close their eyes at the start. Tell them that when you count to three, you want them to open their eyes at the same time. Get ready to snap the photo and begin counting. When you say “Three,” wait a second for all the subjects to open their eyes and then snap the photo.
Tip
When you’re taking posed photos, having your subjects looking toward the camera and smiling is one traditional way to go. Occasionally, however, having your subjects not look directly into the camera makes for a more interesting photo, especially if you can capture your subjects looking at something in the distance that can’t been seen in the image itself. This pose can create a bit of mystery for the people later looking at the photo.
Candid Photos
In addition to taking plenty of posed photos, you’ll discover that if you’re creating a traditional photo album or scrapbook, photo book, or digital slideshow, it will be much more interesting to look at later if you also incorporate lots of candid photos in your Photo Project.
The key to taking candid photos is to capture spontaneity. Shoot photos of people laughing, talking, interacting with one another, or just acting silly. Be ready to snap photos quickly of people reacting to various things they experience or when something unexpected or funny happens.
Tip
When taking candid photos, you (the photographer) should be as inconspicuous as possible. People sometimes get nervous or distracted around a camera. Your goal is to capture people being themselves. Try standing at a distance from your subjects and using a zoom lens to add space between you and them, allowing you to stay out of the way.
Often, those spontaneous moments are what you’ll remember the most and make for the best pictures because you capture people’s true expressions and emotions, as opposed to fake or forced smiles.
The trick to taking spontaneous or candid photos is to be very observant of what’s happening around you and to always have your camera on hand and ready to shoot. (Keeping your camera in Auto mode, for example, will speed up the time it takes to prepare a shot and shoot it.)

TELL ME MORE Media 5.3—Anticipate what’s about to happen
To listen to a free audio recording about preparing your shots, log on to http://www.quepublishing.com.
Taking Advantage of Your Camera’s Zoom
You might find that incorporating a lot of background into an image as you shoot your subject helps to tell a story or set the scene. In these situations, take less advantage of your zoom lens and show more of the surroundings.
Although you can use a wide-angle shot to set the scene, there are certainly times when zooming in on your subject pays off and allows you to capture something very special.
One issue to be mindful of as you use the zoom is that you don’t always want to crop out too much background. You could wind up focusing only on the subject, preventing the location where the photo was taken from being visually represented within the image.
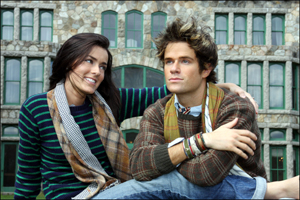
As you can see in Figure 5.9, the background in this shot is essential. However, when you look at Figure 5.10, you can see that sometimes the background isn’t important at all, and it is just the main subject you want to focus on in your photo.
Figure 5.9. Sometimes, the background in a photo is most important.

Figure 5.10. When you’re shooting close-ups, it’s the subject that communicates in your photo, and an interesting background is not always necessary.
If you’re going to utilize the zoom and take ultra–close-up pictures, also take a few wider-angle images to set the scene and allow you to remember where you’ve been.