
10. Exporting Your Images
Learn how to export your digital images from iPhoto ’11 so they can be shared or used with other applications.
In Chapter 3, “Loading Your Digital Images into iPhoto ’11,” the focus is on how to import or load your images into iPhoto ’11 (directly from your digital camera or from another source) so that you can fully utilize all the features and functions of the program. Using iPhoto ’11, you can handle such tasks as organizing, viewing, editing, enhancing, printing, sharing, and archiving your digital photos.
After you’ve organized, viewed, edited, and enhanced your photos, for example, you might want or need to export them from iPhoto ’11 so that they can be used with other applications or shared in ways that can’t be achieved in this program.
![]() Exporting photos from iPhoto ’11 is an entirely different process than importing your digital images into the software. To learn how to import your photos into iPhoto ’11, see Chapter 3, “Loading Your Digital Images into iPhoto ’11.”
Exporting photos from iPhoto ’11 is an entirely different process than importing your digital images into the software. To learn how to import your photos into iPhoto ’11, see Chapter 3, “Loading Your Digital Images into iPhoto ’11.”
For example, you might want to add one or more of your photos into a document you’re creating using Microsoft Word, or maybe one of your photos would make a perfect addition to a PowerPoint presentation you’re creating.
You might also want to utilize the photo editing tools of another application, such as Photoshop Elements 9, Photoshop CS5, or Portrait Professional 10, to alter or manipulate your images in ways that iPhoto ’11 doesn’t have the tools to handle. This might include removing or replacing an entire background in a photo or adjusting specific elements of a photo, such as contrast, saturation, or exposure in only part of the image (not the entire image). These are some of the more specialized editing functions iPhoto ’11 wasn’t designed to handle.
Exporting your images from iPhoto is also necessary if you want to use third-party online photo services, professional photo labs (to create prints), or services for creating Photo Projects that aren’t supported in iPhoto ’11.
Tip
Although iPhoto ’11 makes it easy to create and order professional-quality photo prints in a variety of popular sizes, you must wait several days to receive those prints after they’re created and shipped from the lab. An often less-costly and faster alternative is to export your photos to a disc or flash drive and then take the digital files to a local one-hour photo processor (in a pharmacy, such as CVS or Walgreens) or a professional photo lab in your area to have prints created (often while you wait). How to do this is the focus of Chapter 12, “Creating Prints Using a Professional Photo Lab.”
Although the capability to create photo books is built into iPhoto ’11, for example, you must use Apple’s own photo book printing services and the templates built into the software to design, lay out, and then order your photo books. However, by exporting your images from iPhoto ’11, you’re free to use other photo book publishing services, such as Blurb.com, that offer entirely different book designs and templates, along with potentially more competitive pricing. You can also order photo gifts, such as mouse pads, coffee mugs, and poster-size enlargements on canvas, that feature your photos but that can’t be created and ordered directly from iPhoto ’11.
Also, to be able to share your photos online, using services aside from Facebook, Flickr.com, and MobileMe, you first need to export your images from iPhoto ’11 before uploading them to such services. This includes online-based remote backup and photo archiving services, which are discussed in Chapter 19, “Photo Backup Solutions.”
Note
When you export a photo from iPhoto ’11, you automatically create a copy of that image. The original image remains intact in its proper Event folder.
The main focus of this chapter is on how to export photos from iPhoto ’11 and make sure that when you do this, you export the image in the most suitable file format and file size for whatever reason you’ll be using the photo. If you plan to display your exported image on the Web, the file format and file size you choose when exporting the images from iPhoto ’11 are different than if you plan to create a poster-size enlargement of that image using a professional photo lab.
Your Exporting Options
In iPhoto ’11, you have the option to export one photo at a time; pick and choose multiple photos and export them simultaneously; or export all the photos in a particular Event, Album, or folder.
After you decide which photos you want to export, go to the File pull-down menu at the top of the screen and select the Export command (see Figure 10.1). This opens a separate Export window in the center of the main image viewing area of iPhoto ’11 (see Figure 10.2).
Figure 10.1. Choose the Export command from the File pull-down menu at the top of the iPhoto ’11 screen.
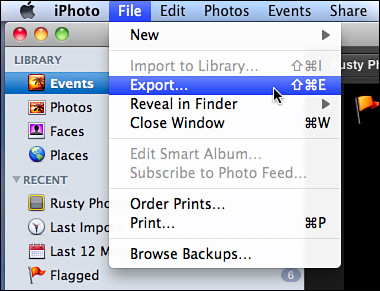
Figure 10.2. The Export window with the default File Export tab highlighted.

From this Export window, you need to adjust a variety of settings to customize the way your images are exported based on how they’ll ultimately be used. You also need to select where they’ll be exported, such as the following:
• A specific directory or subdirectory on your Mac’s primary hard drive (for example, the Pictures folder)
• A specific directory on an external hard drive that’s connected to your Mac or a portable flash drive (thumb drive)
• To a CD or DVD
The options and decisions you need to make when exporting photos from iPhoto ’11 using the Export window are explained later in this chapter.

TELL ME MORE Media 10.1—Learn some money-saving reasons why you should export images from iPhoto ’11
To listen to a free audio recording about the benefits of exporting your images to use them with various online-based photo services, as well as local photo labs, log on to http://www.quepublishing.com.
Exporting Individual Photos
In iPhoto ’11, you can simultaneously export a single image; groups of images; or the contents of an entire Event, Album, or folder. When you’re exporting a single image, the version of that image containing any edits or enhancements you’ve made to it is what gets exported.
![]() To learn how to export multiple images simultaneously, see the “Show Me” and “Let Me Try It” elements in the “iPhoto ’11’s Export Window” section of this chapter.
To learn how to export multiple images simultaneously, see the “Show Me” and “Let Me Try It” elements in the “iPhoto ’11’s Export Window” section of this chapter.
Tip
If you want to export an original image, without any enhancements or edits, first use the Duplicate command to create a copy of the image. Then use the Revert to Original command to restore that copy to the image’s original appearance.
After an image is exported, a copy of it appears in the format and image size you selected in the directory of the hard drive (or other media) you chose. The image also remains intact within iPhoto ’11 (within in its original Event folder).
Tip
Be sure to review the “iPhoto ’11’s Export Window” section of this chapter for details about how to set each of the options appearing in the Export window.

SHOW ME Media 10.2—Export a single photo from iPhoto ’11 using the Export command and options available from the Export window
Access this video file through your registered Web Edition at http://www.quepublishing.com.
![]() LET ME TRY IT
LET ME TRY IT
Exporting a Single Photo
To export a single image from iPhoto ’11 to a specific destination on your Mac’s hard drive, an external hard drive, or a flash drive, for example, follow these steps:
- Choose the photo you want to export. From the Event, Photos, Faces, or Places viewing mode, highlight and select that photo. You can also double-click on the thumbnail to view the full-size version of the image in the main image viewing area, but this isn’t necessary.
- Select the Export command from the File pull-down menu.
- When the Export window appears, make sure the File Export tab at the top of the window is highlighted; then choose the file format (Kind) and image quality you want. Also, adjust the other options available from this window if they’re appropriate to your needs. Otherwise, leave the default settings intact.
- Click the Export icon in the lower-right corner of the Export window when you’re ready to continue.
- From the finder window that appears, select the destination to which you want the exported image saved. Make sure you select the appropriate hard drive, as well as a specific directory or subdirectory.
- Click the OK icon to complete the export process. Your image is exported, and a copy of it, in the format and image quality you selected, is saved on the drive and in the directory you selected. The original image remains in iPhoto ’11, stored in its proper Event folder.
Exporting Entire Events
Sometimes you might want to export the entire contents of an Event folder, Album, or another type of folder. When you export an entire Event folder, for example, all the images in that folder are exported to a specific location on your Mac’s hard drive (or another destination that you select).
Caution
When you export your images from an entire Event, Album, or folder into a directory on your Mac’s primary hard drive, in essence you create a copy of each image onto the same drive. Storing the same photo twice on a hard drive (the exported version and the version that remains in iPhoto ’11) takes up a lot of storage space. So, if your Mac’s hard drive space is limited, consider exporting the images to an external hard drive or another destination.
SHOW ME Media 10.3—Export an entire Event or Album folder (all the images stored in that folder) from iPhoto ’11 using the Export command and options available from the Export window
Access this video file through your registered Web Edition at http://www.quepublishing.com.
![]() LET ME TRY IT
LET ME TRY IT
Exporting an Entire Event Folder or Album
To export all the images stored in a specific Event folder or Album from iPhoto ’11 to a specific destination on your Mac’s hard drive, an external hard drive, or a flash drive, for example, follow these steps:
- Choose and highlight the Event or Album you want to export. All the images in that folder will be exported simultaneously. When an Event folder is highlighted and selected, it is surrounded by a yellow border. When you highlight and select a Faces folder, it is surrounded by a blue border.
- Select the Export command from the File pull-down menu.
- When the Export window appears, make sure the File Export tab at the top of the window is highlighted; then choose the file format (Kind) and image quality you want (refer to Figure 10.2). Adjust the other options available in this window if they’re appropriate to your needs. Otherwise, leave the default settings intact.
- Click the Export icon in the lower-right corner of the Export window when you’re ready to continue.
- Select the destination where you want the exported images to be saved. Make sure you select the appropriate hard drive, as well as a specific directory or subdirectory.
- Click the OK icon to complete the export process. Your images are exported, and a copy of each, in the format and image quality you selected, is saved on the drive and in the directory you chose. The original images remain in iPhoto ’11 stored in their proper Event folders.
Exporting to a Web Page
You can instantly create an online photo gallery using just the images you select with the Export to Web Page option available from the Export window. The result of using this feature is basic HTML web pages, which you can upload and ultimately publish via your own website hosting service.
Note
HTML (which is an acronym for Hypertext Markup Language) is a primary programming language used to create websites. When you create a web page using iPhoto ’11 to showcase your photos online, all of the programming is done for you. You simply need to copy the relevant HTML files to the appropriate location(s) on your website hosting service to make the page pages available to the web surfing public.
This option is best used if you already host or maintain your own website. Using other features of iPhoto (described in Chapter 14, “Emailing or Publishing Your Photos Online,” Chapter 16, “Using Apple’s MobileMe with iPhoto ’11,” and Chapter 17, “More Ways to Share Your Photos”), you can create photo-intensive web pages or online galleries to be displayed on Facebook, MobileMe, or Flickr.com without having to manually export your photos.
After selecting and highlighting the photos you want to export to a web page, select the Export command from the File pull-down menu. When the Export window appears, click on the Web Page tab at the top of the window (it’s to the right of File Export).
As you can see in Figure 10.3, the content of the Export window totally changes and is now divided into three sections, giving you a new set of options for exporting your photos and having iPhoto create customized HTML website pages using your images.
Figure 10.3. The Web Page Export window is divided into three sections: Page, Thumbnail, and Image.
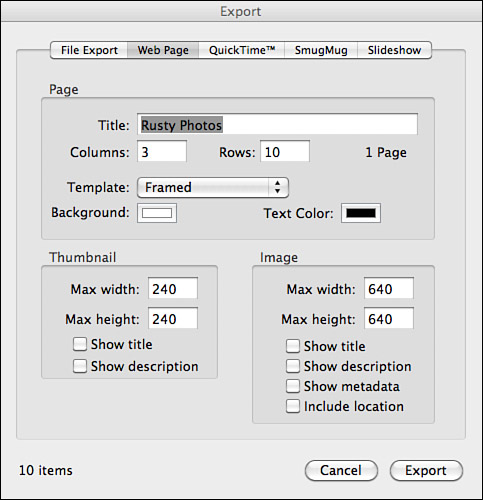
Under the Page section of the Web Page Export window, using the keyboard, enter the title of the web page you want to create. Next, decide how many rows and columns you want on the page to display your photos.
The number of photos you’re exporting, combined with the number of rows and columns you want on the page, determines the number of web pages needed to showcase the photos. This number is automatically displayed to the right of the Rows field in the Page section in the Web Page Export window.
From the Template field located under the Column field in the Page section of the Web Page Export window, you can choose to have the photos on your soon-to-be-created web page displayed in a frame or plain. This is a decision made based on your personal taste, as is the color of the background and color of the text that will be displayed on the web page.
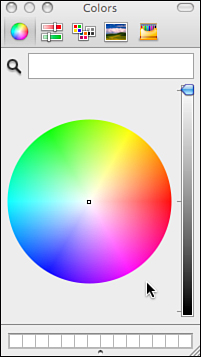
To choose the color of the web page’s background or text, click on the color sample next to the Background or Text Color label, and select your colors via the Colors window that appears (see Figure 10.4).
Figure 10.4. The Colors window allows you to select the background color and text color to be displayed in the web page you’re creating.
From the Thumbnail region of the Web Page Export window (in the lower-left corner of the window), set the maximum size of each image thumbnail to be displayed on the web page and determine if the picture’s filename and/or description will also be displayed below each thumbnail.
Later, when people are visiting the web page you’re now creating, they will click on the thumbnail to see a larger version of the photo in their web browser. Keep in mind that the larger you display each thumbnail on the page, the more detail visitors to this web page will be able to see without actually opening the image. The default selection is 240 × 240 pixels.
Keep in mind, however, that larger image sizes utilize larger file sizes, which translates to longer downloading time, particularly for someone with a slow Internet connection.
To the right of the Thumbnail region of the Web Page Export window is the Image area. From here, you can determine the maximum width and height of an image to be displayed after visitors click on the thumbnail to see a larger version of the photo in their web browser.
By placing check marks in the appropriate check boxes, you can also decide what text-based information pertaining to each photo will be displayed when the people visiting your web page click on that image. Your options include having the title, description, metadata (keywords), or location displayed below the image.
In the lower-left corner of the Web Page Export window, the total number of images you selected to be exported and published as part of the web page is displayed.
After all the web page settings have been adjusted and customized, click on the Export icon located in the lower-right corner of the Web Page Export window to begin the export and web page creation process. A Finder window appears, allowing you to determine where the exported web page and image files will be saved. Choose the destination location, including the directory and subdirectory, as appropriate.
The Web Page export process could take several minutes, based on the number of photos being exported. When the process is done, the Web Page’s HTML files are stored at the destination you selected in several subdirectories created by iPhoto ’11. The software separates the main HTML pages with their required images, thumbnails, and resources (placed in separate directories), all of which are now ready to transfer and publish on your website hosting service.
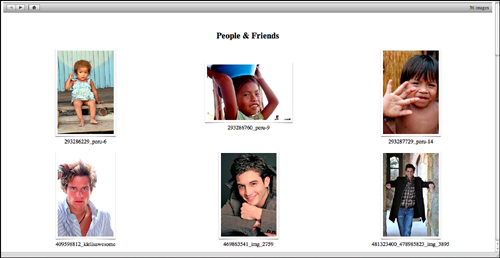
Figure 10.5 shows an example of what your online web gallery could look like using the Web Page Export feature of iPhoto ’11.
Figure 10.5. A sample online photo gallery created using iPhoto’s Web Page Export options.
Exporting to QuickTime
The Export to QuickTime feature of iPhoto ’11 allows you to create no-frills slideshows in QuickTime format that can be incorporated into a website or blog, for example, to showcase your photos. Keep in mind that you can create much more elaborate slideshows in iPhoto ’11 by clicking on the Create command icon and selecting the Slideshow option.
![]() To learn more about creating slideshows using iPhoto ’11’s impressive Slideshow feature, see Chapter 15, “Creating and Sharing Slideshows.”
To learn more about creating slideshows using iPhoto ’11’s impressive Slideshow feature, see Chapter 15, “Creating and Sharing Slideshows.”
To use the Export to QuickTime feature, select a group of photos or an entire Event, Album, or folder to be exported using the Export command under the File pull-down menu. When the Export window appears, click on the QuickTime tab located in the top center of the window.
Once again, the entire contents of the Export window change, giving you a new set of options for customizing the QuickTime animated slideshow movie you want to create using your photos. Figure 10.6 shows what the QuickTime Export window looks like.
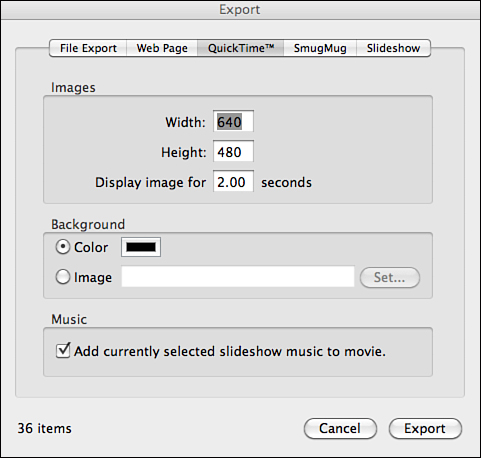
Figure 10.6. The QuickTime Export window.
Creating a QuickTime Movie with Your Images
Follow these steps to create a QuickTime movie using your images:
- Select and highlight an Event folder or Album that contains the images you want to create into a QuickTime movie.
- Access the File pull-down menu and select the Export command.
- When the Export window appears on the screen, click on the QuickTime tab at the top-center of the window.
- Under the Images heading, choose the display size (in pixels) for each image. The default setting is 640 × 480 pixels. However, if you’re creating an animated photo sequence you want to add into a website or blog, you might want to create a much smaller movie window.
- After setting the window size, choose the amount of time (in seconds) you want each photo to be displayed. The default option is two seconds. If you choose anything shorter, the photos will not be clearly visible when people watch your QuickTime movie because the photos will literally flash on the screen and disappear too quickly.
- From the Background section of the QuickTime Export window, select the background color for the entire “movie” you’re creating or select a separate background color for each individual image as it’s displayed.
- Toward the bottom of the QuickTime Export window, choose whether to add music to your “movie” by placing a check mark in the appropriate check box.
Tip
When you add a check mark next to the Add Currently Selected Slideshow Music to Movie check box, the music selection is the default music file from the Create Slideshow feature of iPhoto ’11. You must access the Slideshow creation tools to change the default setting to any other music you choose, such as a music file stored on your Mac’s hard drive (in your iTunes library).
- In the lower-left corner of this window, the total number of images to be exported and included in the QuickTime movie is displayed. After you customize all the options available from this window, click on the Export icon to continue the export and QuickTime file creation process.
- When the Finder window appears, choose the destination where you want the relevant QuickTime file exported and saved. Click on the OK icon to continue. The exporting process could take several minutes, based on the number of photos being exported and the size of the “movie” file being created.
Exporting a Slideshow
If you’ve already created a slideshow using iPhoto ’11, you can export that entire slideshow file so it can be published online, shared via email, or viewed using other applications, for example.
![]() LET ME TRY IT
LET ME TRY IT
Exporting a Slideshow
Follow these steps to export a Slideshow you’ve already created using iPhoto ’11:
- From the Source list, select and highlight the slideshow you want to export, or choose a group of photos (or an entire event) you want to create into a slideshow and then select the Export command from the File pull-down menu.
- When the Export window appears, click on the Slideshow tab located on the top-right corner of this window. Once again, the content of the Export window changes. What you see now is a screen that allows you to decide in what format the slideshow should be exported, based on how it will be displayed and on what type of device.
- Your slideshow export options include Mobile (480 × 300 resolution), Medium (640 × 400 resolution), Large (864 × 540 resolution), or Display (1280 × 800 resolution). By placing a check mark next to the appropriate check box, shown in Figure 10.7, you can also automatically send a copy of your exported slideshow to iTunes so that it can become part of your iTunes library; viewed in iTunes; or easily transferred to your iPod, iPhone, or iPad.
Figure 10.7. The Slideshow Export window offers a chart to help you choose the best file size, based on what device or screen size will be used to view the slideshow.
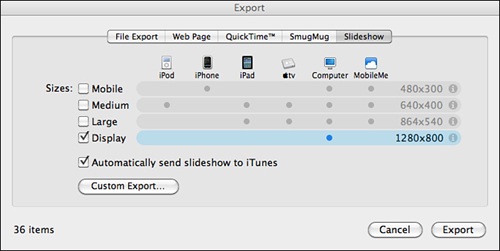
- When you click on the Custom Export icon in the lower-left corner of the Slideshow Export window, a Finder screen appears allowing you to determine where the exported slideshow file will be saved. Plus, you can determine in what file format the slideshow will be exported. Your choices include the following:
• Movie to 3G
• Movie to Apple TV
• Movie to iPhone (cellular)
• Movie to iPod
• Movie to MPEG-4
• Movie to QuickTime
By clicking on the Options icon located next to the Export format field, you can fine-tune and customize the adjustments for each format setting, based on how you’ll be viewing and/or sharing the exported slideshow. The options you pick determine the file size and the resolution in which the slideshow can ultimately be viewed. Unless you understand the specifics of these options, stick with the default settings and simply choose what device you’ll be using to view the slideshow, such as your Mac’s display or your iPhone or iPod.
What You Need to Know Before You Export
Before exporting an image, think about what that digital file will be used for. If it will be transformed into a print, stick with a higher resolution and larger file size. However, if the image will be viewed online or on an iPhoto or iPod screen, for example, using a lower resolution and smaller file size is more efficient.
From the Export window, you are able to select the file format and file size for the images you export.
Choosing the Right File Format
When exporting images, you can choose to export each image and retain the original format in which it was shot. You can also opt to keep it in its current format if the format has since been altered or change its format altogether to .JPEG, .TIFF, or .PNG. Here’s a brief description of each file format:
• .JPEG—This popular digital image compression format allows you to modify resolution to reduce file size. On almost all digital cameras, the default setting is to shoot in .JPEG (also referred to as .JPG) format. This type of file is manageable in size and can easily be emailed, printed, or imported into another application (such as Microsoft Word). When you need to shrink an image down to a smaller file size, this is a great format to use because it preserves as much detail as possible, and you can adjust the balance between image quality and file size based on your needs. When you use this image format, your photo will lose some detail and resolution because data compression is being used. If you have a high-resolution image that you want to keep as detailed as possible (if file size does not matter), go with the .TIFF format.
• .TIFF—This file format is much less flexible when it comes to file size compression. Thus, .TIFF file sizes tend to be larger and are not as widely supported as .JPEG images in web browsers and by other applications. When image quality is of utmost importance and file size doesn’t matter, go with the .TIFF format. When dealing with this format, you never have to worry about a loss of resolution or detail as you import and export .TIFF image files between applications.
• .PNG—This file format has become much more popular in recent years. It’s also wildly compatible with many types of applications and web browsers and is an open-source standard. PNG is an acronym for Portable Network Graphics. When dealing with this format, you never have to worry about a loss of resolution or detail. A full explanation of this file format and why it’s useful can be found at www.libpng.org/pub/png/pngintro.html.
Note
If you imported a photo that was shot in RAW format (an option available on higher-end Digital SLR cameras), but you edit that photo using iPhoto ’11, the file format is converted to .JPEG. Thus, when you export the edited photo, choosing to export it in its original format returns it back to RAW format.
Selecting the Appropriate Image Quality
When exporting an image using .JPEG format, you can choose the export quality, which directly impacts file size. Your choices in iPhoto ’11 are Low, Medium, High, and Maximum. For online use only, go with the Low or Medium settings because this creates small and easily manageable file sizes. The quality of the image will be lower, but for online viewing, this probably won’t be noticeable.
If you’re creating prints from the digital file, for example, the High or Maximum Quality setting should be used. For 8" × 10", 8.5" × 11", or poster-size (or larger) prints, go with the Maximum Quality setting.
Understanding That File Size Does Matter
Regardless of which file format you choose to export your images, you can adjust the size of the file from the Export window. Choose the Small option for emailing images or to display them on the Web. However, if you try to print a photo exported in a Small file size, the print’s quality will be very poor.
The Medium quality allows for more detail and a better-quality image to be displayed on the Web or in an email, for example, but it’s better used by people with a high-speed Internet connection because the file sizes are larger. The Medium size is better suited for online or onscreen viewing, but not adequate for printing.
The Large file size is ideal for printing standard size photos (4" × 6" or 5" × 7" prints) or for viewing the images on a computer screen or online if you have a fast Internet connection.
Use the Optimized size for creating large-size prints or for publishing your photos. This option does compress the file size a bit, so there may be some loss in resolution and detail.
The Actual Size/Full Size setting is best for printing, viewing, and publishing. The file size associated with these exported images is larger, so they take a bit longer to upload or download. No compression is used, however. So, whatever image size and resolution the photo was shot in is how it remains. Images shot with a 12MP (megapixel) resolution digital camera are significantly larger than images shot with a 5MP camera.
Keeping Your Filenames Straight
During the export process, you have the option to rename an image file for the version of the image that’s being exported. The original image that stays in iPhoto ’11 retains its original filename, but the new image file that’s created and saved on your Mac’s hard drive (or another destination) will contain the new filename if you provide one.
If you don’t change the filename when you have access to the Finder window and you’re selecting the image’s destination, it retains its current filename. When exporting groups of images or an entire Event, Album, or folder, you can set a base or prefix filename and then for each image have iPhoto ’11 add a sequential number to each image’s filename.
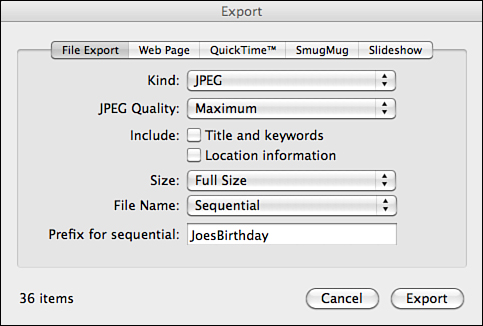
So, if all the images are of Joe’s birthday party, you can set iPhoto ’11 to export all the images and use the filename prefix JoesBirthday, but each will have a unique (and sequential) number, such as JoesBirthday1.jpg, JoesBirthday2.jpg, JoesBirthday3.jpg, and so on. To utilize this feature, in the File Export window, for the File Name field option, select Sequential. Below that, in the Prefix for Sequential field, type the prefix for the filename, which for this example is JoesBirthday (see Figure 10.8).
Figure 10.8. When exporting multiple images simultaneously, you can use the Sequential File Name option.
You also have the option to export groups of files and have them all use the existing name of the Album or folder, followed by a sequential number for the filename. To use this feature, select the Album Name with Number option from the File Name pull-down menu that appears in the File Export window.
Tip
Especially if you’re dealing with a large collection of image files, you’re better off custom-naming your photos as you export them. This makes them easier to identify and find later.
iPhoto ’11’s Export Window
As you’ve already discovered, the Export window, which is accessible from the File pull-down menu and by choosing the Export command, allows you to customize the file settings related to an image before it gets exported from iPhoto ’11.
Most of the time, you can rely on the default settings in this window; they’ve been chosen because they address the typical needs of amateur photographers. However, customizing these settings based on your specific needs for the image files after they are exported is a worthwhile endeavor.
Depending on how the image will be used and what you’re exporting from iPhoto ’11, as soon as the Export window appears, click on the appropriate tab displayed at the top of this window. Your options include File Export, Web Page, QuickTime, and Slideshow.
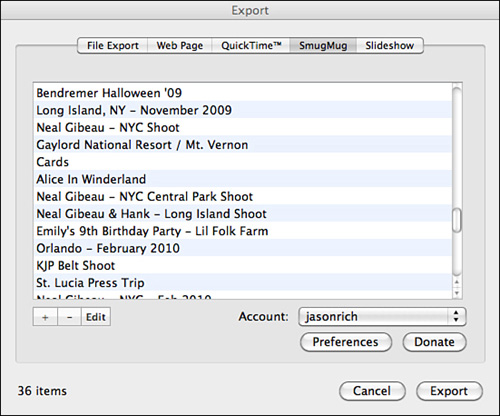
If, however, you use another photo editing software package or online photo service that’s designed to be fully compatible with iPhoto ’11, such as the SmugMug online service (www.SmugMug.com), you may have the option to install a plug-in into iPhoto ’11 that allows you to easily export and upload your images directly to the third-party service without leaving iPhoto ’11.
When you install the free SmugMug.com plug-in, for example, a new tab permanently appears at the top of the Export window (see Figure 10.9). This is a feature that Apple doesn’t support or endorse, but that makes it more convenient to export, upload, and publish your images to online services that iPhoto ’11 doesn’t support by default.
Figure 10.9. The free SmugMug.com plug-in has been installed, allowing you to export and upload your images from iPhoto ’11 directly to the SmugMug service without leaving iPhoto ’11.
Note
Other third-party websites or software packages may also offer plug-ins for exporting images from iPhoto ’11. In this case, additional tabs appear at the top of the iPhoto ’11’s Export window.
![]() To learn more about exporting, uploading, and publishing your photos to often-free, online-based photo services, other than Flickr.com or Apple’s fee-based MobileMe service, see Chapter 16, “Using Apple’s MobileMe with iPhoto ’11.”
To learn more about exporting, uploading, and publishing your photos to often-free, online-based photo services, other than Flickr.com or Apple’s fee-based MobileMe service, see Chapter 16, “Using Apple’s MobileMe with iPhoto ’11.”
SHOW ME Media 10.4—Export multiple photos from iPhoto ’11 using the Export command and options available from the Export window
Access this video file through your registered Web edition at http://www.quepublishing.com.
![]() LET ME TRY IT
LET ME TRY IT
Exporting Multiple Photos
To export multiple images simultaneously from iPhoto ’11 to a specific destination on your Mac’s hard drive, an external hard drive, or a flash drive, for example, follow these steps:
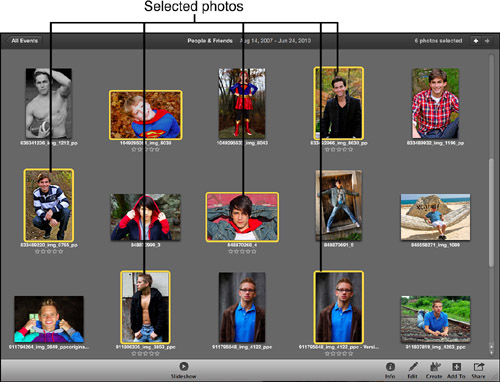
- Choose the photos you want to export. From the Event, Photos, Faces, or Places viewing mode, highlight and select those photo thumbnails. If they’re not located next each other, hold down the Command key as you select and highlight each image to highlight and select several image thumbnails simultaneously. Figure 10.10 shows several images in an Event highlighted and selected. The highlighted and selected images are surrounded by a yellow border. You can also create a separate Album that contains all the photos you want to export if the images are currently in separate Event folders and you don’t want to repeat this process multiple times in each Event folder.
Figure 10.10. Multiple images selected in an Event are about to be exported.
- Select the Export command from the File pull-down menu.
- When the Export window appears, make sure the File Export tab at the top of the window is highlighted. Then choose the file format (Kind) and image quality you want and adjust the other options available from this window if they’re appropriate to your needs. All the photos you’re exporting simultaneously are exported using the same file format and file size that you select here. Each retains its current filename, unless you manually change it.
- Click the Export icon in the lower-right corner of the Export window when you’re ready to continue.
- From the Finder window that appears, select the destination where you want the exported images to be saved. Make sure you select the appropriate hard drive, as well as a specific directory or subdirectory.
- Click the OK icon to complete the export process. Your images are exported, and copies of it, in the format and image quality you selected, are saved on the drive and in the directory you selected. The original images remain in iPhoto ’11, stored in their proper Event folders.