
4. Organizing Your Photos
Discover how to organize your images using the various features built into iPhoto ’11.
On the left side of the iPhoto ’11 main screen is the Source list. From here, you have access to images stored in iPhoto and can choose which photos to view, edit, or print at any given time. You can also use the options available in the Source list, as well as the program’s pull-down menus, to organize your images.
When you first start using iPhoto, the concept of organizing all your digital images might not seem important. However, after you amass a collection of hundreds, thousands, or even tens of thousands of unique images, you’ll discover a need to keep your images well organized within properly labeled Events and Albums so that you can easily refer back to and find particular images later.
This chapter focuses on organizing all your digital photos using iPhoto ’11, whether they’re stored on your Mac’s internal hard drive, an external hard drive, or any of the online-based photo storage services with which iPhoto ’11 is compatible (including MobileMe, Flickr.com, and Facebook).
Because this chapter emphasizes the tools available from iPhoto’s Source list, displayed on the left side of the main screen, you also learn how to keep your various Photo Projects created using iPhoto organized, properly labeled, and easily accessible.
In addition to explaining how to organize and sort your digital images, this chapter describes how to search for images based on their filename/title, date, keywords, location, rating, tags, or people who appear within them.
Finally, this chapter discusses how to delete individual images or entire collections or groups of images (stored within Events or Albums).
iPhoto ’11’s Source List
When using iPhoto, you can find the majority of the commands for accessing and using the program’s many features in one of four main areas: at the top of the screen in the form of pull-down menus, at the bottom of the screen in the form of command icons, on the left side of the screen in the form of functions and features available from the Source list, and occasionally on the right side of the screen (when certain program windows, such as Info, are open).
Unless you’re using iPhoto ’11’s new full-screen viewing mode, on the left side of the screen, the Source list is displayed (see Figure 4.1). What appears within the list changes based on how you use iPhoto.
Figure 4.1. iPhoto ’11’s Source list.
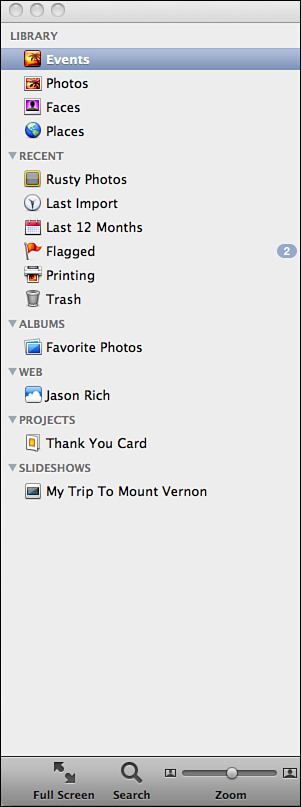
The options available from the Source list allow you not only to organize and quickly access images stored in iPhoto ’11, but also easily access images iPhoto ’11 uploaded and published to certain online services, including MobileMe, Flickr.com, and Facebook. If applicable, these web sources are listed under the Web heading in the Source list.
As you know, iPhoto ’11 also allows you to create a wide range of Photo Projects using your photos combined with templates and features built into the program. For example, you can create impressive animated slideshows, design professional-quality photo greeting cards, publish fully customized photo books, and group together images into virtual Albums.
All the Photo Projects you create can be accessed with a click of the mouse from the Source list. They’re available under headings displayed based on the Photo Projects you create, including Projects and Slideshows, for example.
The Library
The Library section of the Source list gives you instant access to various options used to view and organize your images. Keep in mind that iPhoto ’11 always showcases thumbnail versions of your images to help you view and organize them. You can adjust the size of the thumbnails being displayed using the Zoom slider located in the lower-left corner of the screen.
Events
When you click and highlight the Events heading at the top of the Source list, each Event folder containing your images is displayed in the main image viewing area of the screen.
Every time you import new images into iPhoto ’11 from your digital camera or another source, a new Event folder is created that contains those images. By default, Events are labeled and sorted based on date.
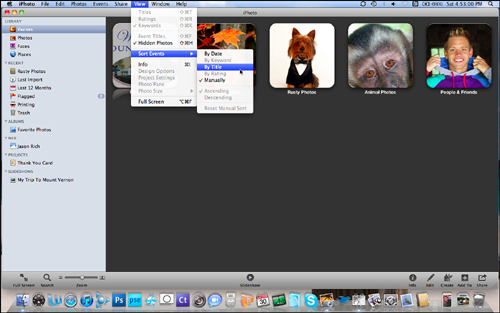
You can easily change the name of each Event folder and then organize your folders on the screen alphabetically, by keyword, title, rating, or manually using the commands under the View pull-down menu when the Events screen is displayed (see Figure 4.2).
Figure 4.2. You can reorganize how Event folders are displayed on the screen using the commands found under the View pull-down menu.
Every individual photo you import into iPhoto ’11 must have a permanent home within a single Event folder. That same image, however, can be utilized and showcased in any number of separate Albums or Photo Projects, for example, but it can be stored in only one Event folder.
Tip
If you want the same image to appear in multiple Event folders, you must copy and rename that photo. For example, if you alter a full-color image into black and white, or you edit an image but also want to retain the original version, this is possible as long as you assign different filenames to each version of the photo.
Events can be organized in many different ways, based on your personal preference. Again, by default, whenever you import new images into iPhoto, a new Event folder is created using the current date as the Event folder name. Thus, even if you change the names of your Event folders, iPhoto ’11 automatically sorts and organizes your photos based on date. There are many other ways, however, to sort your images.
When the Events option is highlighted on the Source list, and your Event folder thumbnails are displayed in the main image viewing area of iPhoto, use the commands under the Events pull-down menu to perform a variety of functions to help you better organize and manage your photos.
From the Events pull-down menu, you can choose the following:
• Create Event—You use this option to create a new Event folder when new images are imported into iPhoto ’11.
• Create Event from Flagged Photos—If you flag photos from other Event folders, you use this command to transfer those selected images into a newly created Event folder (keeping in mind that each image can be stored within only one Event folder).
• Merge Events—You can combine the contents of multiple, currently separate Event folders into a single folder by using this command. To use this command, select and highlight two or more Event folders and click on this command, or drag and drop one folder on top of the other. You can then rename the newly merged Event folder.
• Make Key Photo—By default, iPhoto ’11 displays a random thumbnail of an image stored within each Event folder. Using this command, you can choose to have a single photo of your choice always used as the thumbnail image that’s displayed to represent that particular folder.
• Add Flagged Photos to Selected Event—If you flag individual images currently located in other Event folders, you can transfer them into another pre-existing Event folder by using this command.
• Autosplit Selected Elements—In situations in which you have an existing Event that contains lots of photos, you can it divide into multiple separate Events automatically, based on the dates. Photos shot on the same day or within a time period can be split into their own Event folders.
Tip
If you want to split an Event containing photos all taken on the same day, you can use the Autosplit Selected Elements feature to automatically divide the photos based on a specific time increment. To do this, go to the iPhoto pull-down menu and select Preferences. From the General Preferences window that appears, it’s possible to autosplit events based on the options One Event Per Day, One Event Per Week, Two-Hour Gaps, or Eight-Hour Gaps.
Photos
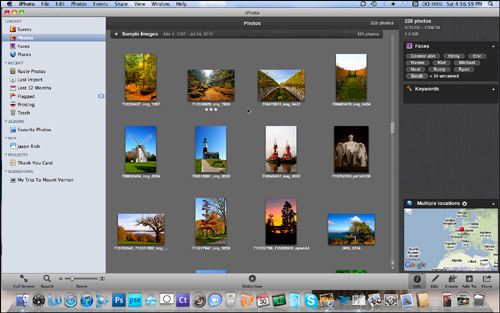
Under the Source list on the left-side of the iPhoto ’11 screen, when you click on the Photos option, within the main image viewing area of iPhoto, thumbnails of all of your stored images are displayed. A divider bar, shown in Figure 4.3, is displayed as you scroll downward, to visually separate the Events where images are stored.
Figure 4.3. When you view all your photos in the Photos mode, a divider appears to visually tell you when you’re viewing images in different Event folders.
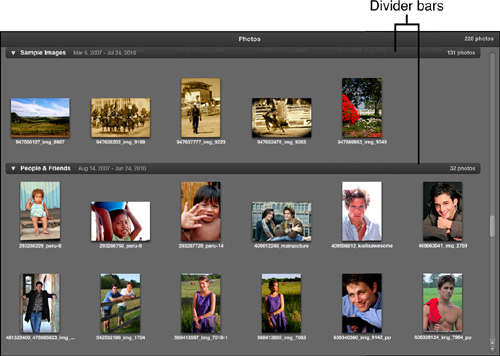
As part of the divider bar, the Event folder’s name, date range of the images contained within it, and the total number of photos within the Event folder are displayed.
By adjusting the Zoom slider (in the lower-left corner of the screen), you can make the thumbnails of your images appear larger or smaller on the screen. The smaller the thumbnail size, the more images you are able to see at once on the screen. Use the scrollbar on the extreme right side of the iPhoto screen (or your mouse’s scroll ball) to scroll downward and view all your images.
When in this Photos viewing mode, use the commands found under the Photos pull-down menu to help you organize and sort your images. For example, you can manually change the dates associated with your images, rotate images, or display them in order based on rating (as opposed to date). From this pull-down menu, you can also duplicate or delete images or revert them to their original appearance after they’ve somehow been edited, enhanced, or altered.
As you view your images in the Photos mode, you can also control how much information pertaining to each image is displayed on the screen, in addition to its thumbnail. This is done from the View pull-down menu. For example, in addition to each thumbnail, you can view each image’s filename/title, rating, and related keywords. You can also sort the images based on a wide range of criteria offered by the Sort Photos command (also located under the View pull-down menu).
When you have the View image filename and ratings options selected, as you’re viewing your images in the main viewing area of iPhoto, you can move the mouse cursor over any individual image to add a rating or click on the filename itself to manually change it.
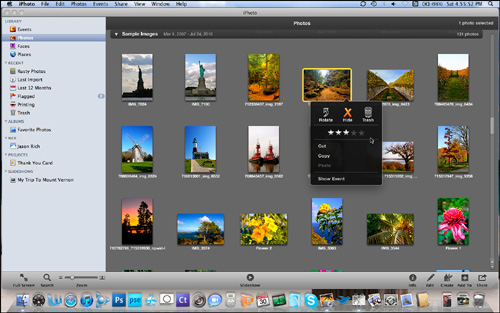
By placing the mouse cursor on a specific thumbnail, a small circle with an arrow pointing downward appears in the lower-right corner of that thumbnail. Click on this icon to access a new window that allows you to quickly rotate an image, hide the image, delete the image, or add a star-based rating. You also can cut, copy, or paste the image and show the images just within the Event folder where it’s stored (see Figure 4.4).
Figure 4.4. In the Photos view, you can perform some editing, organizational, and sorting tasks related to individual images.
As you’re looking at thumbnails for all your images currently stored within iPhoto, view details about specific images by clicking on the Info command icon located in the lower-right corner of the screen. This Info screen displays information about the entire Event folder, unless a specific image is selected and highlighted, in which case the Info window displays details about that particular image on the right side of the screen.
After you click the Info icon while in Photos viewing mode, the iPhoto screen is divided into three main sections (see Figure 4.5). On the left is the Source list. In the middle of the screen is the image viewing area, and on the right is the Info window.
Figure 4.5. When you use the Photos viewing mode, if you click on the Info icon, the screen is divided into three main sections.
When the Info window is open, it is possible to add information about a particular photo by selecting/highlighting that photo. To do this, place the mouse on the photo and click once. A yellow border appears around the image’s thumbnail.
Double-click on the image within Photos mode to view the image in full size. To return to the thumbnail view in Photos mode, click the Photos arrow icon displayed in the upper-left corner above the photo. You can also view an individual image even in a large size by entering into full-screen mode.
When an image is highlighted (even if you’re just looking at its thumbnail in the Photos viewing mode), you can move over to the Info window and add information, such as a description, keywords, or Faces tags.

SHOW ME Media 4.1—View all your iPhoto images using the Photos viewing mode and discover how it differs from viewing Events
Access this video file through your registered Web Edition at http://www.quepublishing.com.
![]() LET ME TRY IT
LET ME TRY IT
Viewing All Images in iPhoto ’11 Using the Photos Viewing Mode
The Photos viewing mode is a great way to quickly view thumbnails for all your images stored within iPhoto ’11. To use this feature, follow these steps:
- Click on the Photos command under the Source list on the left side of the iPhoto screen.
- Within the main image viewing area, thumbnails for all your images appear. Use the scrollbar on the extreme right side of the screen to make your way downward and see all your images, or use the scroll ball of your mouse.
- Although all your images are displayed in thumbnail form when you select the Photos option, you can tell in which Event folder each is stored because iPhoto displays dividers. To quickly select all images within a particular Event, click the mouse on the divider bar for that Event. To hide the thumbnails within a particular Event folder, click on the small arrow icon located on the extreme left side of the divider bar for that Event. When the arrow icon points to the right, the thumbnail images are hidden from view. When the arrow icon points downward, the thumbnails for the images associated with that Event folder are displayed.
- In addition to viewing the thumbnails for your images using the Photos view mode, display each image’s filename (title), rating, or related keywords, based on the options you choose from the View pull-down menu.
Faces
The Faces function built into iPhoto ’11 allows you to sort and organize your photo library based on who actually appears within each of your photos—both in solo and group shots.
So, even if you have thousands of photos stored within iPhoto, you can quickly perform a search for all photos featuring a particular person and see thumbnails of those images within seconds.
Initially, you need to identify and tag the various people appearing in photos you shoot. However, the cutting-edge programming used in the Faces feature allows the software to eventually learn to identify and tag recurring people automatically.
Faces utilizes the face-recognition functionality that was originally added to iPhoto ’09. In this latest edition of iPhoto, this functionality has been enhanced a bit to improve accuracy and make it even easier to organize photos based on who appears within them.
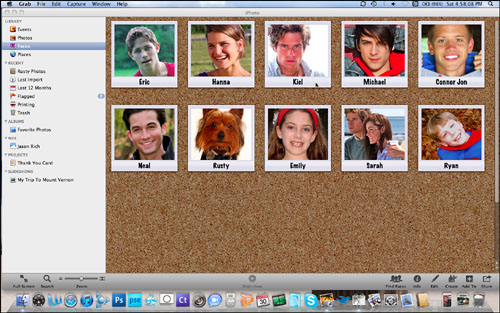
When you select the Faces option from the Source list, the iPhoto image viewing area displays a virtual corkboard with square thumbnails featuring images of people’s faces (see Figure 4.6). Each thumbnail represents one person that iPhoto has been able to identify in your digital photo collection.
Figure 4.6. Faces uses face-recognition capabilities to automatically sort your images based on who appears within them.
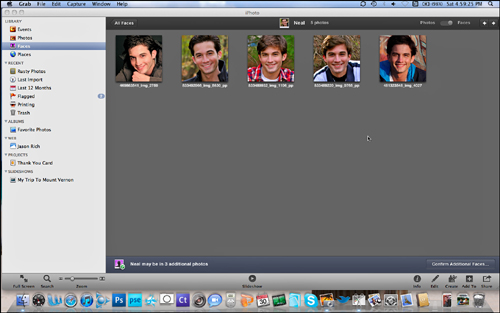
When you double-click on a thumbnail, you see thumbnails of all photos stored in iPhoto that feature that particular person. From this screen, shown in Figure 4.7, you have several command icons available. For example, in the upper-right corner of the display, you can use the slider to select to view thumbnails that showcase each entire image featuring that person, or you can have the thumbnails zoom in on just the person’s face.
Figure 4.7. You can get a close-up look at all photos of a particular person that you have stored within iPhoto ’11.
The Faces functionality isn’t always 100% accurate. Sometimes, iPhoto is not sure of someone’s identity but makes an educated guess and classifies the person in that photo as an “Unconfirmed Face” at the bottom of the display. You then have the opportunity to confirm that person’s identity, after which his or her photos are grouped together with other images that person appears in.
Tip
Occasionally, iPhoto ’11 will wrongly identify someone in a photo. When this happens, you can quickly fix the misidentification by highlighting and selecting the photo to view it. Next, click on the Info command, and then on the Faces label within the Info window. Place the cursor over the person’s face in the photo. Double-click on the person’s name under the Faces box that appears in the photo, and manually type the subject’s correct name.
Every time someone new appears in one or more of your photos, if you want Faces to be able to sort your images based on who appears within them, you need to tag each new person after his or her photo has been imported into iPhoto ’11.
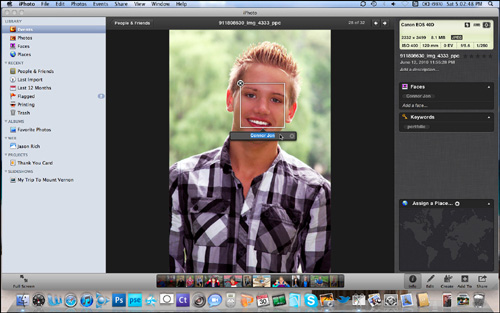
To tag someone using the Faces feature, double-click on that photo’s icon so it appears enlarged in iPhoto’s image viewing area. Glide the cursor over each person’s face until a white box appears. Click the mouse once and then enter the person’s name in the field that appears below the white box (see Figure 4.8).
Figure 4.8. You need to tag each person at least a few times in your photos to help iPhoto’s face-recognition function learn to identify that person accurately in the future.
You can also add face tags by clicking the Info command icon when an image is open, move the cursor to the Faces area within this window, and then click on the Add a Face option.
After you have manually added face tags to the same person in several different photos, iPhoto will begin to automatically recognize that person in the future. At that point, manually adding the face tags for recurring people is not necessary.
Although Faces groups together photos featuring individual people and allows you to view those photos simultaneously, the actual location where these photos are stored remains within the original Event folder, unless you manually move them.
Note
Faces, which sorts photos based on the individual people featured within them, is just one of the ways iPhoto ’11 allows you to sort, organize, locate, and view your images.
Note
If you plan to use Faces to help you identify people in photos quickly and want the ability to find images using people’s names with the Search feature, you should make sure that the people who appear within each of your photos are properly tagged.
![]() LET ME TRY IT
LET ME TRY IT
Manually Adding a Face Tag to an Image
Each time a new person appears in one of your photos, you’ll need to identify him or her so that iPhoto ’11 can use its face-recognition technology to automatically identify that person in the future. Here’s how:
- Highlight and select the photo.
- Click on the Info command icon.
- Within the Info window, click on the Faces heading and then on the “Add A Face” option.
- Move the cursor into the image viewing area and place the white Faces box that appears around the subject’s face.
- Click on the “Click To Name” field below the white Faces boxes and manually type the subject’s name.
- You may need to identify the same person in a few different photos before iPhoto ’11 automatically and consistently is able to identify them accurately as you import new photos.
Places
From the Source list on the iPhoto ’11 screen, when you click on the Places option, which is located under the Library heading, you discover that the familiar thumbnails of images you’re accustomed to seeing in the image viewing area of iPhoto are replaced by a map (see Figure 4.9).
Figure 4.9. Using the Places feature, you can view maps and see exactly where your photos were shot.
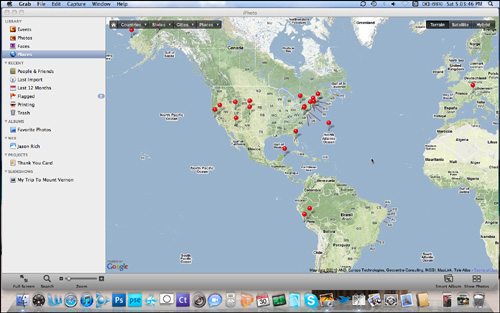
By clicking the options in the upper-left corner of the map screen, you can see a pull-down list of all the countries, states, cities, and places where you have taken photos.
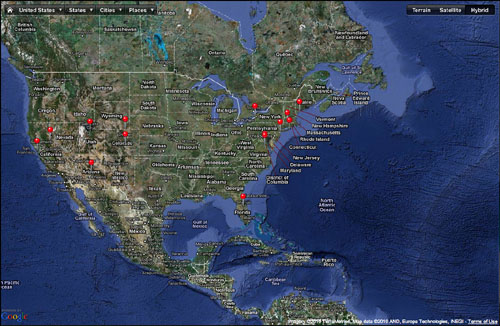
In the upper-right corner of the iPhoto’s map screen, you can choose to view a Terrain Map (shown in Figure 4.10), Satellite Map, or Hybrid Map (shown in Figure 4.11), just as you can when using the popular Google Maps website online (http://maps.google.com).
Figure 4.10. The Terrain Map viewing mode using iPhoto’s Places feature.
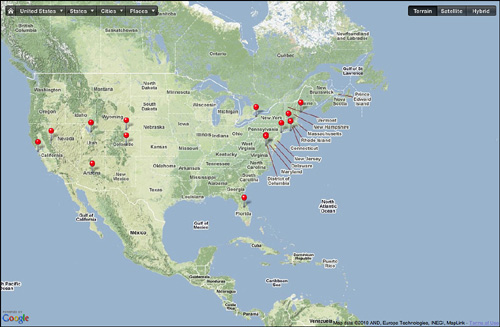
Figure 4.11. The Hybrid Map viewing mode using iPhoto’s Places feature.
Tip
While in the Map viewing mode, use the Zoom slider, located in the lower-left corner of the screen, to zoom in or out of the map display to see more or less detail.
iPhoto ’11 works seamlessly with Google Maps, as well as the geo-tagging capabilities of your digital camera or camera’s memory card. Thus, where photos were taken (geographically) is another way you can sort, organize, and view your images.
If your digital camera or camera’s memory card does not support geo-tagging, which automatically records the GPS coordinates where each photo is shot, you can manually associate a location for each image in iPhoto.
To manually add geo-tagging information to a photo, highlight and select a photo and click on the Info command icon. In the lower-right corner of the Information window, click on the Assign a Place option and manually type the location where the photo was taken. You can enter the country, state, or city, for example. The location you enter is automatically located and displayed on the map within iPhoto.
You also can quickly and manually geo-tag all photos stored within a specific Event by highlighting that Event, clicking on the Info icon, and then clicking on the Assign a Place field in the Info window. The location you enter once is applied to all photos within that particular Event.
Note
Keep in mind, just because iPhoto ’11 has the capability to sort your images based on location where each was shot, if you don’t have geo-tagging capabilities built into your photo equipment and you don’t want to manually enter this information, it is not a requirement that you utilize this feature to sort your photos.
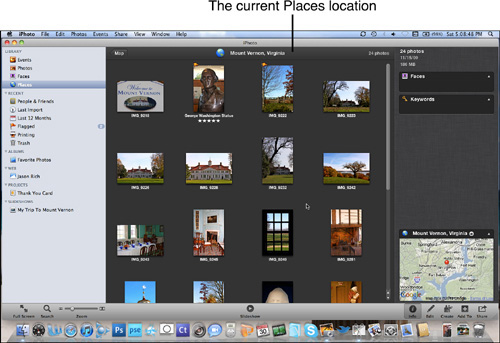
As you’re looking at the Map view while in Places mode, notice the red pushpins on the map that represent specific locations where you’ve taken photos. Click on any red pushpin to reveal a tag where one or more images were shot. Now, click on the small right-pointing arrow icon to reveal an image thumbnail viewing screen that shows all images taken at that location (see Figure 4.12). If you have the Info window open as well, a small map of that location is also displayed on the iPhoto ’11 screen.
Figure 4.12. iPhoto ’11’s Places feature allows you to sort your images based on where (geographically) your photos were taken.
![]() LET ME TRY IT
LET ME TRY IT
Manually Adding a Place (Geo-Tag) to a Photo
If your digital camera or memory card doesn’t automatically geo-tag your images, you can manually associate a geographic location with any of your photos. Here’s how:
- Highlight and select a photo to which you want to add a Places tag.
- Click on the Info command icon.
- Near the bottom of the Info window, click on the “Assign A Place” heading.
- When the field becomes blank, manually type the Places information you want to associate with this photo. You can be very specific by including the Country, State, and City, or just one of these geographic references.
- If you click on the small right-pointing arrow icon next to the “Assign A Place” field, Google Maps will open within iPhoto ’11 and allow you to pinpoint the location the photo was taken on an actual map.
The Inside Scoop on Albums
Albums are like Events; however, you can create them from scratch by picking and choosing any photographs stored within iPhoto. You can custom name an album (giving it a unique title) and then assign a description, date, and keywords to it. Keep in mind, each of your images is stored in one specific Event folder. However, that same photo can appear in an unlimited number of Albums.
Albums can be created to group together photos you select by subject matter, location, date, or whatever criteria you decide are relevant. You can also include the same image in multiple Albums.
There are several reasons why creating Albums (in addition to Events) is beneficial. For example, as you’re going through your images, you might want to gather together specific photos from a handful of past vacations so you can create a montage slideshow or photo book. Currently, these photos may be stored in separate Events.
Albums you create are displayed under the Albums heading on the Source list. You can create an unlimited number of albums. If you’re familiar with creating Playlists using your favorite songs within iTunes, Albums work in a very similar way.
Creating a New Album
To create a new Album, select at least one photo to start with, click on the Create command icon located in the lower-right corner of the screen, and choose the Album option.
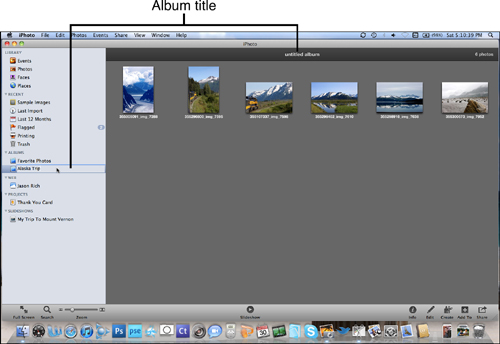
The main image viewing area of iPhoto is replaced by thumbnails for the images you selected. At the top of this screen is the title “Untitled Album.” At the same time, within the Source list, under the Albums heading, the Untitled Album is listed, and you are given the opportunity to type in an original title or name for your newly created Album (see Figure 4.13). This title is immediately reflected at the top of the screen. At any time, you can edit or rename an Album.
Figure 4.13. As soon as you create a new Album, you can give it a customized name.
Adding Images to an Album
At any time, you can add images to an Album by accessing their respective Events, highlighting and selecting the images you want to add, and then dragging those thumbnails to the left onto the Album name located on the Source list. When you do this, the images remain in their original Event, but a copy now also appears in your Album.
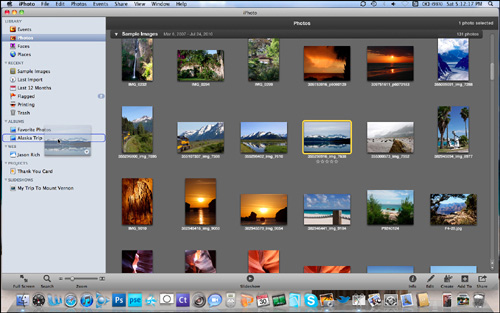
An alternative method for adding photos to an Album is to access the Photos option on the Source list, which reveals thumbnails of all images stored within iPhoto. You can then drag and drop any images you want from the main image viewing area to the Album title listed in the Source list (see Figure 4.14).
Figure 4.14. Drag and drop new images into an Album from the Events or Photos view modes.
A third way to add photos to an existing album is to highlight and select one or more images at a time, click on the Add To command icon located in the lower-right corner of the screen, and then choose the Album option.
You can change the order in which images appear within an Album by using the commands available from the View pull-down menu’s Sort Photos option. Virtually all the same commands and controls you have over images appearing in an Event are also available when viewing and organizing images with Albums.
For example, with a specific Album selected and highlighted on the Source list (with the thumbnails for the images it contains being displayed on the main viewing image viewing area), you can click on the Info command icon and associate a description, Faces, keywords, or geo-tags to that Album as a whole. Alternatively, you can select and view a single image, click on the Info command icon, and alter information associated with that particular image.
While viewing images within an Album, you can also edit or enhance them by clicking on the Edit command icon located in the lower-right corner of the screen.
![]() To learn more about editing and enhancing photos within Albums or Events, see Chapter 7, “Using iPhoto ’11’s Simple Photo Editing Features,” Chapter 8, “Adding Effects to Your Images,” and Chapter 9, “Advanced Photo Editing with iPhoto ’11.”
To learn more about editing and enhancing photos within Albums or Events, see Chapter 7, “Using iPhoto ’11’s Simple Photo Editing Features,” Chapter 8, “Adding Effects to Your Images,” and Chapter 9, “Advanced Photo Editing with iPhoto ’11.”
Tip
To delete an Album, highlight it on the Source list and press the Delete key on your keyboard. Alternatively, you can highlight and select a specific Album and use the Delete Album command near the bottom of the Photos pull-down menu.
Working with Smart Albums
In addition to creating and working with regular Albums within iPhoto, you can set up iPhoto to autocreate customized Smart Albums for you. These albums automatically gather new photos and add them based on specific criteria you specify in advance.
A Smart Album can be created from all images that are shot at a certain location, shot with a particular camera, have a specific rating, or have a specific keyword or Faces tag associated with them, for example.
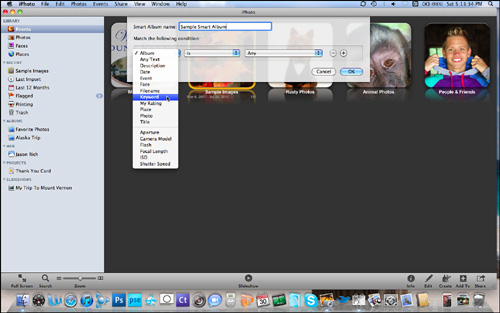
To create a Smart Album, access the File pull-down menu, highlight New, and select the Smart Album option. A new Smart Album creation window, shown in Figure 4.15, appears, allowing you to custom set the criteria to determine what images iPhoto should include within this album now and in the future as new images are imported.
Figure 4.15. When creating a Smart Album, you can determine the exact criteria iPhoto will use to gather images for that album now and in the future as new images are imported.
From the Smart Album creation window, enter the name for the album as prompted. To customize the album’s image selection criteria, use the pull-down menu options under the Match the Following Condition heading displayed in this window. You can add as many conditions as you’d like, one at a time.
To create a condition for importing specific types of images into your Smart Album, first choose an option from the leftmost pull-down option (see Figure 4.15). These options include the following choices: Album, Any Text, Description, Date, Event, Face, Filename, Keyword, My Rating, Place, Photo, Title, Aperture, Camera Model, Flash, Focal Length, ISO, and Shutter Speed.
From the middle pull-down menu, choose one of the listed options. Your choices vary, based on the option you selected from the leftmost pull-down menu.
From the rightmost pull-down menu, if applicable, select the Any option to pull relevant images from any or all of your Events, Albums, or Photo Projects. Alternatively, choose the name of a specific Event, Album, or Photo Project that’s listed. In some cases, a specific field (such as a date or keyword field) for typing relevant information is provided instead of a third pull-down menu.
To add another set of criteria for gathering photos for the same Smart Album, click on the plus sign icon located next to the pull-down menus and choose your additional criteria. Or click on the OK button located in the lower-right corner of the window.
After you set all the conditions for gathering images for this new Smart Album, the album is listed under the Albums heading in the Source list; however, it has a purple icon next to it (instead of a blue one) to signify that it’s a Smart Album, as opposed to a regular Album. After the Smart Album is created, iPhoto automatically collects the appropriate images and adds them to the Smart Album. In the future, as you import new photos that match the criteria you specified, iPhoto will automatically import those photos into the Smart Album as well.
SHOW ME Media 4.2—More information about Smart Albums and how to use them
Access this video file through your registered Web Edition at http://www.quepublishing.com.
![]() LET ME TRY IT
LET ME TRY IT
Setting Criteria for a Smart Album
To create a Smart Album and select specific criteria for it, follow these steps:
- Access the File pull-down menu.
- Highlight the New option and select Smart Album.
- When the Smart Album creation window appears, type in a filename for that album.
- Use the pull-down menus to select specific criteria for that Smart Album. For example, if you want to gather photos in a Smart Album that have the keyword flower associated with them, from the first pull-down menu, select the Keyword option.
- From the middle pull-down menu, select Contains, and in the blank field that appears to the right, type flower.
- If, however, you want to gather only flower-related images shot after a specific date, click the plus sign icon and add a second set of criteria.
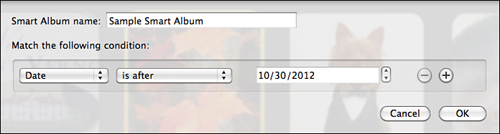
- This time, choose Date from the first pull-down menu. From the middle pull-down menu, select Is After, and in the Date field that appears, enter a specific date (see Figure 4.16). Click on the OK icon to finalize these selections.
Figure 4.16. You can set several different criteria for gathering photos in a Smart Album, such as keywords associated with an image or the date the images were shot.
What Else You’ll Find Under the Source List
In addition to the options for finding, sorting, and viewing images under the Library section of the Source list is another section called Recent. The options under this heading allow you to look back at Events, Albums, Photo Projects, and images you’ve viewed or utilized recently.
Recent
The first listing under the Recent heading on the Source list is always the name of the last Event you opened and accessed in iPhoto ’11. If you refer to Figure 4.1, note that the last Event I opened was called Rusty Photos. When you click on this selection from the Source list, that Event folder opens and you see thumbnails of images from that Event in the main image viewing area.
Last Import
The second listing under Recent is the Last Import option. When you click on this option, you see thumbnails of the last images you imported into iPhoto.
Last 12 Months
When you click on the third option under the Recent heading, called Last 12 Months, thumbnails of all images imported into iPhoto in the past 12-month period are displayed in the main image viewing area. You can select any of these images for editing, drag and drop them into Albums, or adjust any settings for these images in the Info window.
Flagged
Within iPhoto, flagging is a way to temporarily mark images so that you can quickly separate them, find them, and do something specific with them. For example, if there are 10 images scattered through several Events that you want to include within an Album or that you want to add to a slideshow or create prints from, you can flag each of those images.
To flag an image, place the cursor over its thumbnail in Events, Photos, Faces, or Places mode. In the upper-left corner of the thumbnail, a grayscale flag icon appears. Click on that Flag icon. You know the image is flagged when an orange Flag icon appears in the upper-right corner of its thumbnail (see Figure 4.17). To unflag an image, simply click on the orange Flag icon again.
Figure 4.17. You know an image has been flagged because a small orange Flag icon appears in the upper-left corner of the thumbnail.

Another way to flag a photo is to highlight and select it (so a yellow border appears around it) when viewing the thumbnail or the full-size image and then choose the Flag Photo command under the Photos pull-down menu. The keyboard shortcut is to press Command + period (.).
Each time an image is flagged, the number of flagged images displayed next to the Flagged option on the Source list increases. At any time, when you highlight and select the Flagged option from the Source list, thumbnails of all currently flagged photos are displayed.
Note
Flagging is a way to temporarily mark one or more images that you can then quickly gather together for a specific purpose, such as placing them in a new Album, creating prints from them, or incorporating those selected (flagged) photos into a slideshow.
Printing
When you print anything from within iPhoto, whether it’s an individual photo or a Photo Project, that print job is saved and accessible from the Printing option on the Source list.
![]() To learn more about printing photos using your own photo printer, see Chapter 11, “Printing Photos Using Your Own Home Photo Printer.”
To learn more about printing photos using your own photo printer, see Chapter 11, “Printing Photos Using Your Own Home Photo Printer.”
Trash
The Trash icon is used much the same as the Trash icon found on the Mac’s Dock for deleting files, except that this option is for deleting photos, Events, Albums, and Photo Projects within iPhoto. See the “Deleting Images” section later in this chapter for more information about deleting items from iPhoto ’11.
Accessing Photos That iPhoto ’11 Transferred to the Web
If you’ve used iPhoto to publish photos online to an Album or Gallery on Apple’s MobileMe, or you’ve uploaded photos to Flickr.com or Facebook, you can access those web-based accounts instantly in iPhoto ’11 by clicking on one of the headings under the Web option on the Source list. These options appear only after you’ve uploaded images to MobileMe, Flickr.com, or Facebook.
![]() To learn more about publishing and sharing photos online, see Chapter 14, “Emailing or Publishing Your Photos Online,” and Chapter 16, “Using Apple’s MobileMe with iPhoto ’11.”
To learn more about publishing and sharing photos online, see Chapter 14, “Emailing or Publishing Your Photos Online,” and Chapter 16, “Using Apple’s MobileMe with iPhoto ’11.”
Tip
You can quickly delete a Photo Project by highlighting it on the Source list. Click on it once using the mouse. You know it’s highlighted when it is emphasized visually with a blue bar. When it’s highlighted, press the Delete key on your keyboard or select the Delete option from the Photos pull-down menu.
Deleting Images
When it comes to deleting images, Events, Albums, or Photo Projects within iPhoto ’11, the Trash feature works just like the Trash feature of the Mac OS X operating system, although the items moved to the Trash in iPhoto are kept within iPhoto’s own Trash folder until you permanently delete the Trash’s contents.
Caution
To permanently delete the Trash in iPhoto, choose the Empty iPhoto Trash command under the iPhoto pull-down menu. When you do this, those files are deleted forever. Until you execute the Empty iPhoto Trash command, however, you can recover items placed in the Trash and move them back into iPhoto.
When you click on the Trash command on the Source list, the contents of iPhoto’s Trash folder are displayed within the main image viewing area. As long as deleted items can still be displayed within the Trash folder, you can drag and drop or cut and paste images from the Trash folder and move them back into their original locations or create new Events or Albums with them.
To delete an image, highlight and select one or more image thumbnails, and press the Delete key on your keyboard or drag it to the Trash option displayed on the Source list. This method also works with Events or Albums, as well as Photo Projects or slideshow files.
Tip
Before executing the Empty iPhoto Trash command, which permanently erases anything found in iPhoto’s Trash folder, check the folder to make sure you didn’t accidentally delete a file, project, or image you want to keep.
Note
The Trash folder used by the Mac OS X operating system and by all your other programs is separate from the iPhoto Trash folder. Thus, even if you empty the Mac’s regular Trash folder, it does not impact the iPhoto Trash folder, which you must empty separately.
