5. Drawing with Pen and Pencil
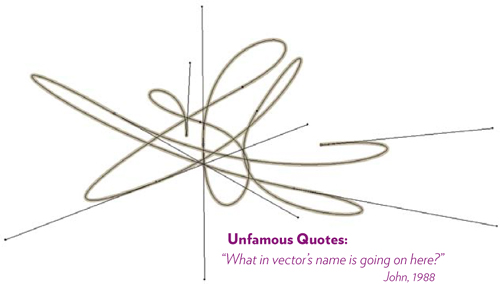
The image below is pretty much what my first Pen tool drawing in Illustrator looked like. I was convinced that nothing useful could possibly be done with that crazy thing.
But the Pen tool is Illustrator’s primary tool, so you really need to master it. The truth is, you just need to understand a few basic concepts about vector paths and how to manipulate them.
This chapter is filled with Pen (and Pencil) tool tasks that will reveal vector truths and make known the vector path to tranquility and artiness.
Pen tool basic training 
The Pen tool draws a path between clicks. It’s that simple. If you just click here and click there, you create a path made of straight lines. You can actually create a drawing with simple clicks and straight lines, no curves necessary (below). However, curves add flexibility and accuracy, and are far more efficient (fewer anchor points) than simulating a curve with tiny straight lines.
Even if you’ve never drawn with the Pen tool before, by the time you complete the following tasks, you will have begun your new journey as a Master of Paths and Points.
NOTE: We suggest you re-read pages 28–29 to refresh your mind about paths, segments, and points before you begin working with the Pen!
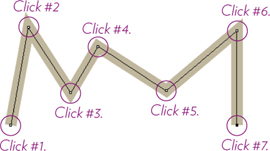
Task 1 Draw an open path made of straight segments
Choose the Pen tool from the Tools panel, then use the stroke controls in the Control panel to assign a stroke color and size. Below, I used a 14-point stroke and a tan color from the Stroke Color pop-up panel.
1 Click anywhere in a document.
An anchor point (the small square shown to the left) appears at the point of your click. When an anchor point is selected, it is colored; when an anchor point is not selected, it is white (as shown below).
![]()
2 Click semi-randomly in your document, similar to the pattern below. Each time you click, the path extends to that click.
Each time you click, you create a corner point.
3 To release the Pen tool from the path, hold down the Command key (PC: Control key) and click anywhere except on the path.
Or choose another tool in the Tools panel.
Task 2 Draw a closed path with curved and straight segments
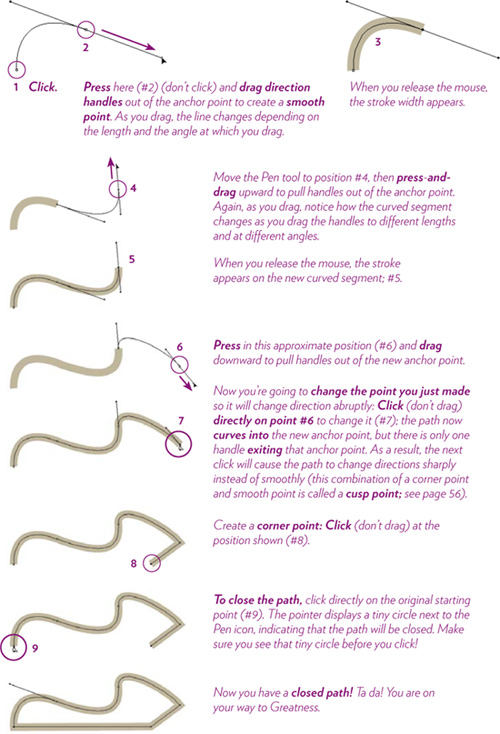
Chose the Pen tool from the Tools panel, then follow the captions.
Reminder
Single-click to create a corner point with no direction handles. Press-and-drag to create a smooth point with two direction handles.
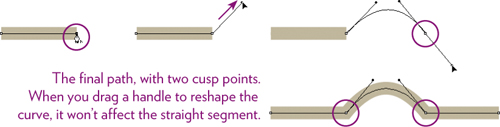
Task 3 Create a curve in a straight segment with cusp points
A cusp point is an anchor point that is a combination of a smooth point and a corner point; that is, it can create a sharp point with either one straight segment and one curved, or with two curved segments. A direction handle appears only toward a curved segment. Also see page 58.
1 Draw a straight path segment (below, left).
2 Hover the Pen tool over the end point, and you see the pointer change to the “Convert Anchor Point” icon (it has a tiny caret symbol, shown below, left).
3 Single-click directly on the end point, and drag a handle out of the point, angled in the direction you want the path to follow (below, center).
4 Position the Pen tool where you want to place the next anchor point (below, right), then click.
Essential tasks with the Pen tool
Now that you’re comfortable creating a basic path (right?), learn these essential techniques to make the path do just what you need it to do.
Task 4 Reshape a path
The black Selection tool selects the object as one big piece to move it, as you learned in Chapters 3 and 4. But to reshape an object, which is a fundamental task in Illustrator, you’ll use the white Direct Selection tool.
1 If you don’t have either of the paths you created on the previous pages, create a new path now.
2 Choose the white Direct Selection tool.
3 Click on a smooth point to get its handles, then drag a handle to reshape the curved segments on both sides of the anchor point.
4 Click on a cusp point to get its handle, then drag that handle to reshape just the curved segment.
5 Click on a corner point (or any point) and drag to reposition the point and the segments on both sides of the point.
Task 5 Add points to a path
After you create a path, you may find that you need to add more anchor points to it so you can make certain modifications.
1 Select the Pen tool and draw a simple open path, as in Task 1.
2 Hover the pointer over any part of a path segment.
The Pen pointer changes to include a plus sign (below, left), a visual clue that a new anchor point will be added at that point when you click.
3 Click the path with the Pen tool (below, left) to add the point. Click on a straight segment and you get a corner point; click on a curved segment and you get a smooth point.
4 Now you can choose the white Direct Selection tool and drag the new anchor point into another position.

Task 6 Delete points from a path
1 Hover the Pen tool over an anchor point.
The Pen tool icon displays a tiny minus sign (below, left), a visual clue that the anchor point will be deleted when you click it.
2 Click the anchor point. The point is deleted and the path is redrawn.

Note
Hidden under the Pen tool in the Tools panel are the “Add Anchor Point Tool” and the “Delete Anchor Point Tool.” The Pen tool is smart enough to know which of these tools to automatically switch to when it hovers over a path (to add a point) or an anchor (to delete a point).
As you create art or do other tasks with the Pen tool, you will often find yourself needing to convert one type of point into another. Fortunately, this essential operation is easy to do.
Task 7 Convert a point to another type of point
If you are in the process of drawing the path
1 Create a short path with several corner points and curve points.
2 Hover the Pen tool over a point (not the end point), and hold down the Option key (PC: Alt key). The pointer changes into the “Convert Anchor Point” icon (below, left).
3 Corner point to curved point: Press-and-drag in the direction in which the path was first drawn to pull handles out of the point. As you drag, the length and angle of the handles determines the shape of the line segments on each side of the anchor point (below, center).
4 Curved point to corner point: Click.
If you just drew a curved point and you want it to be a corner point, click on it. The path will redraw (below, right), then you can carry on from the end of the path to continue drawing.
![]()
If you have already created the path and released the Pen tool (as in Task 1.3)
1 First select the path with either Selection tool (black or white).
2 From the Tools panel, choose the “Convert Anchor Point Tool” (it’s with the other hidden Pen tools).
3 Position the pointer over the point you want to convert.
Corner point to curved point: Press-and-drag in the direction in which the path was first drawn.
Curved point to corner point: Click.
Tip
While you’re using the Pen tools, tear off a floating panel of all the tools so they are easily accessible—see page 16.
If you only learn to create corner point and curve points, you will get frustrated when working on a project. Cusp points (a combination of sharp corners and curves) are fundamental to the drawing process, so spend a few minutes to learn how to convert other points to cusps (in addition to Task 3, in which you create cusp points as you draw).
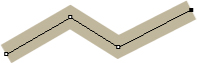
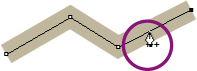
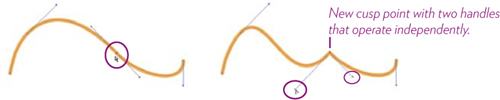
Task 8 Convert a smooth point into a cusp point that connects two curved segments with a sharp point
The advantage of this kind of point is that the handles on the cusp point allow you to adjust just one segment of the curve at a time, each independent of the other.
1 Create a path with a few curve points in it.
2 With the white Direct Selection tool, click on a curve point to select it and display its handles (below, left).
3 Choose the “Convert Anchor Point Tool” from the Tools panel (it’s with the other hidden Pen tools), and drag one of the direction points on the end of a handle in any direction (below, right).
4 Now that the point is converted, you can use the white Direct Selection tool to drag either handle independently.
Task 9 Convert a point into a cusp point connecting a straight segment with a curved segment
If you are in the process of drawing the path
1 With the Pen tool, hover over the point and hold down the Option key (PC: Alt key) to get the “Convert Anchor Point” tool.
2 Press-and-drag on the point to pull out handles. Now, keep the Option/Alt key down so you still have the “Convert Anchor Point” tool, and drag one of the handles back into the point.
3 Let go of the Option/Alt key and continue drawing from the end point.
If you have already created the path and released the Pen tool
1 With the white Direct Selection tool, click on the point to select it and display its handles.
2 Drag one of the handles all the way back into the point.
Task 10 Reposition an anchor point as you draw
1 Draw a straight path segment (below, left).
2 Press (don’t click) to create an end point, plus hold down the Spacebar, then drag the end point to another position (below). As long as you hold down the Spacebar, you can drag the anchor to other positions.
3 When the end point is in the position you want it, let go of the Spacebar and continue drawing.

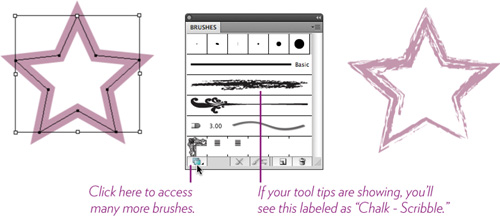
Task 11 Assign a brush stroke to a path
This technique works no matter which tool you use to draw a path—the Pen tool, Pencil tool, or the various Shape tools.
1 Create a path of any sort (below, left). Make sure it is selected.
2 Open the Brushes panel: Choose Window > Brushes (below, center).
3 Click the “Chalk-Scribble” thumbnail, shown below.
There are other great brush libraries to choose from: Click the Brush Libraries Menu button in the bottom-left corner of the Brushes panel, then choose a library from the list. See Chapter 6 for more details.
Drawing with the Pencil tool 
Drawing with the Pencil tool is similar to drawing with a real pencil, with the advantage of being able to add degrees of smoothing to strokes. It also has the disadvantage of being pretty dang unpredictable, so it’s not our favorite drawing tool. But when you need a slightly primitive, hand-drawn effect or handlettering, the Pencil tool is fast and easy.
The Pencil tool automatically adds anchor points as determined by the settings in the “Pencil Tool Options” dialog box, so review this box before drawing.
Task 12 Set your Pencil tool options
1 Double-click the Pencil tool icon in the Tools panel to open the options.
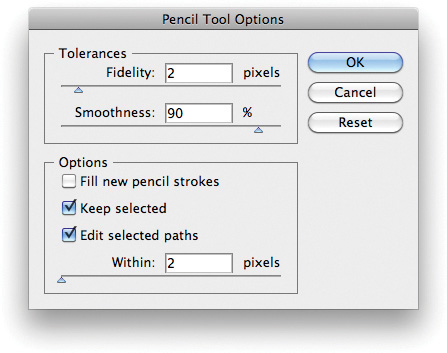
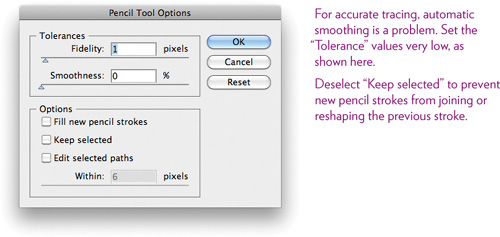
2 Adjust the “Tolerances” settings:
Fidelity determines how far the pencil moves before adding an anchor point. A higher value creates a smoother, less complex path.
Smoothness controls the amount of automatic smoothing applied to a stroke. A higher value creates more smoothing.
3 Choose the items you want to activate in the “Options” section:
Fill new pencil strokes: When this item is selected, paths are filled with the current fill color as you draw them. This doesn’t mean only closed paths: It draws an imaginary line from end point to end point and fills any spaces with the currently chosen fill color. Try it to see what I mean.
Keep selected: When you finish drawing a path, the path stays selected so you can modify it.
Edit selected paths: This determines how close your mouse or stylus must be to a path in order to edit the path with the Pencil tool (see the following page). Set the distance you prefer with the slider.
4 Click OK.
Task 13 Draw a star with the Pencil tool
1 Select the Pencil tool, then press-and-drag to draw a crude star.
When you get close to the original start point, hold down the Command key (PC: Control key) and the path will automatically close as soon as you release the mouse or stylus.
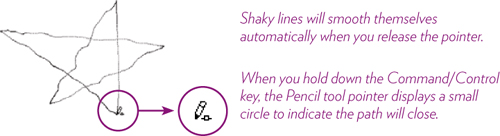
When you release the pointer, the path closes, and the stroke is considerably smoother (below) than the original path (above) led you to believe (assuming you changed the options as shown on the previous page).
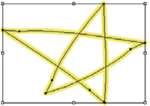
2 Now use the Pencil tool to modify the path. This seems kind of weird, but it actually works.
With the white Direct Selection tool, select the star path.
With the Pencil tool, draw a revised path on one of the star arms (as in the example below, left)—start and end the drag on top of an existing path. When you release the mouse or stylus, the path is redrawn and smoothness is applied again (below, center).
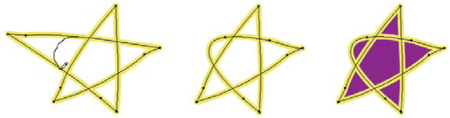
3 Change the stroke width, and the caps and joins: Open the Stroke panel and experiment (see pages 64–66). Turn the stroke into a dashed line, or apply a different stroke profile.
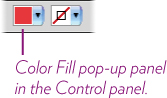
Also add a color fill: In the Control panel, click the Fill Color pop-up menu (see page 40) and choose a color swatch.
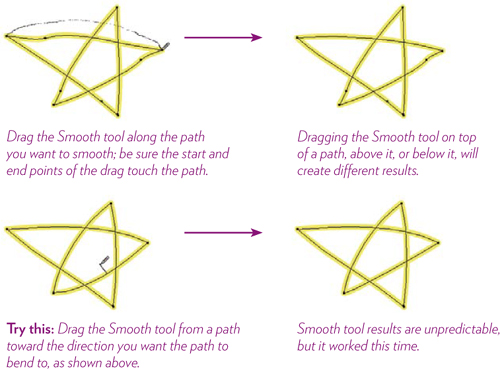
Task 14 Smooth the path 
The Smooth tool makes paths smoother. The degree to which it smooths is determined by settings in the “Smooth Tool Options” dialog box, which are the same as the “Tolerances” settings as explained on page 61.
1 Double-click the Pencil tool or the Smooth tool to get the options.
2 In the “Tolerances” settings, higher values result in smoother paths. Try different settings as you experiment with Steps 3 and 4.
3 Create a path. It can be a path created with the Pen tool or the Pencil tool, but Pencil tool paths are more likely to need smoothing.
4 Drag the Smooth tool along a path you want to smooth. The drag doesn’t have to be exactly on top of the path, as shown below.
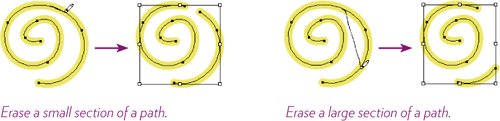
Task 15 Erase bits of a path 
Drag the Path Eraser tool (find it under the Pencil tool) along a path (below, left), or from one section of a path to another (below, right).
Customize strokes with the Stroke panel
The Stroke panel provides essential controls and options for customizing strokes on both closed and open paths.
Task 16 Use the Stroke panel to customize paths
1 To open the Strokes panel, do one of the following:
• Click the word “Stroke” in the Control panel.
• Choose Window > Stroke.

• If the Stroke panel is docked in the vertical dock on the side of your workspace (with other panels), click its icon.

2 Draw an open path, similar to the one below. Select the path, and use the Stroke panel to make the settings in the following steps.
3 Select a stroke “Weight”: Choose a line thickness from the “Weight” pop-up menu, or type a number in the value field.
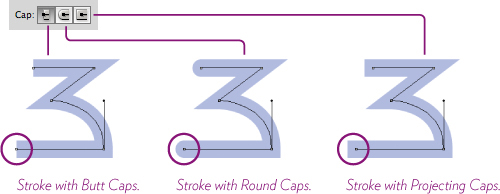
4 Choose a “Cap” style: This setting determines how the end point of a stroke is drawn. The buttons, left to right, are “Butt Cap,” “Round Cap,” and “Projecting Cap.”
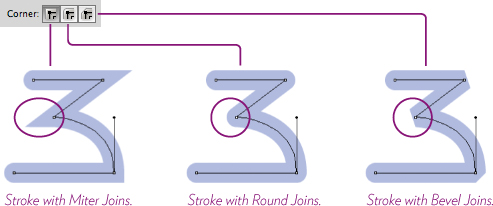
5 Choose a “Corner” style: This setting affects the appearance of the stroke where two path segments join. The buttons, left to right are “Miter Join,” “Round Join,” and “Bevel Join.” Try all three.
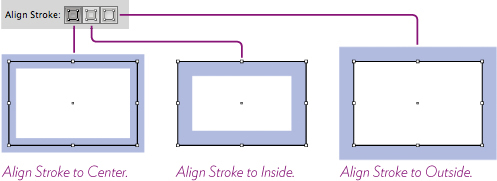
6 Change the stroke alignment of a closed path: Use the Rectangle tool to draw a closed path, then click the “Align Stroke” buttons to change how the stroke is applied to the shape’s path. As you see below, the alignment you choose actually changes the size of the shape.
7 Change a solid stroke to a “Dashed Line”: Select a closed or open path, then check the “Dashed Line” box.

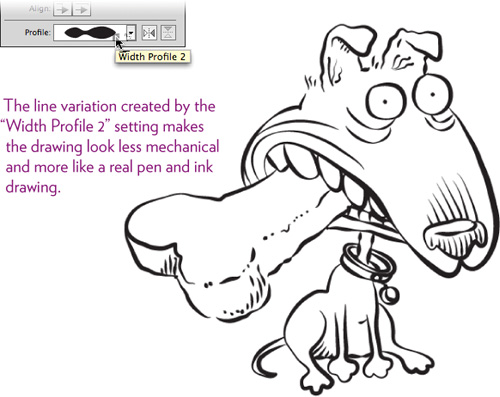
Try different “dash” and “gap” values. Also experiment with different Cap styles, explained on the opposite page. And then choose a different “Profile” for the line, as shown on the next page! Oh my!

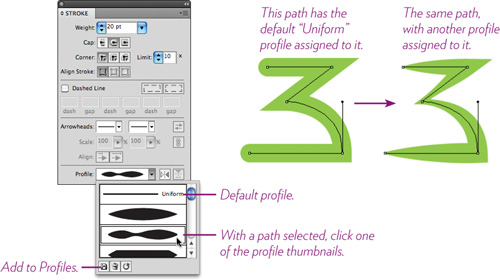
8 Apply a different “Profile,” which changes the shape of a stroke: Select a path, and make sure it’s got a nice, fat stroke on it. Click the “Profile” pop-up menu to display a scrolling list of profile thumbnails to choose from. Experiment with selecting different profiles.
Task 17 Create a custom stroke profile
Omigosh, you can even customize a stroke, then save it as a profile to be used later! The possibilities are truly infinite.
1 Draw a path and modify it with the Width tool (see page 47).
![]()
2 While that stroke is selected, click the Add to Profiles button in the bottom-left corner of the Profile scrolling list (called out, above-left).
3 Name the profile, then click OK.
4 The new profile now appears in the pop-up menu and can be applied to strokes at any time.

Try this!
The Pen tool is the heart and soul of Illustrator. Because of its importance, we’ve added extra practice sessions so you can really become comfortable with it. We guarantee (pretty much) that if you do all the tasks in this chapter, plus these additional exercises, you will feel amazingly competent with the Pen tool, and thus amazingly competent in Illustrator.
These tasks involve tracing over an existing image, in this case, letters. Not only will this process confirm your expertise with the Pen tool, but you’ll learn a valuable technique (tracing) that you can apply to many projects.
Task 18 Create a layer for tracing
1 Choose the Text tool.
2 In the Control panel, set the character to “Times New Roman,” the style to “Bold,” and the size to 300 points.
![]()
3 Click on an artboard and type the letter O.
4 Change the letter’s fill color to light gray: Select the O, click the Fill Color pop-up panel in the Control panel, and choose a light-gray color swatch (see page 40).
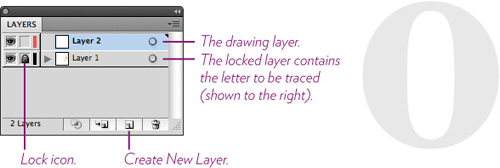
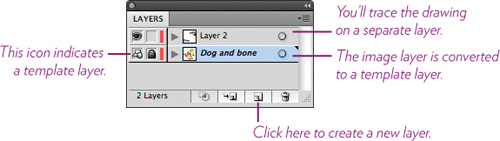
5 Open the Layers panel (Window > Layers) and lock the layer that contains the letter O: Click the box to the left of the layer name to put a lock icon in it, as shown below. This is your template.
6 Create a new drawing layer on top of the existing layer: Click the Create New Layer icon at the bottom of the Layers panel.
Select this new layer (if it isn’t already), and carry on with the next Task.
Task 19 Trace the letter O with the Pen tool
We’re starting with the letter O because (ideally) a circular shape like this should have only four points, one on each extremity. As you trace over the letter and try to make the strokes line up exactly, you will get a good feel for how to adjust the points as you draw.
1 Choose the Pen tool, then set these options in the Control panel: a Fill Color of None, a colored stroke (your choice), a 1-point weight, a “Uniform” profile, and the “Basic” brush definition, as shown below.
![]()
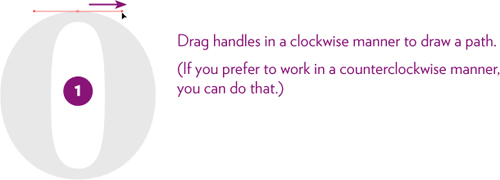
2 Position the Pen tool at the top-center of the shape.
Press (don’t click) to create an anchor point, and continue to press as you drag handles out of the anchor point, to the right (as shown below). Hold down the Shift key to keep the handles perfectly horizontal.
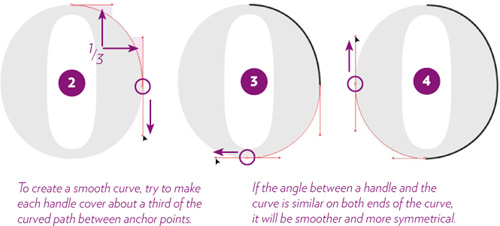
When the right handle is the length of about a third of the way to the midpoint on the side of the O, let go.
3 Position the Pen tool at midpoint on the right side of the shape (circled in #2 on the opposite page), then press-and-drag handles out of the anchor point. Hold down the Shift key to keep the handles perfectly vertical as you drag to match the shape of the O.
4 Click at the midpoint of the bottom side and Shift-drag handles out of the anchor point, until the path matches the O shape (#3 on the opposite page).
5 Click at the midpoint of the left side, then Shift-drag handles out until the path matches the O shape (#4 on the opposite page).
6 Position the Pen tool over the original start point. A small circle appears next to the Pen tool cursor (below, left) to let you know if you click there, it will close the path.
7 Press-and-drag handles out of the final anchor until the path matches the O shape (below, center). If necessary, use the techniques you learned in this chapter to adjust the shape.
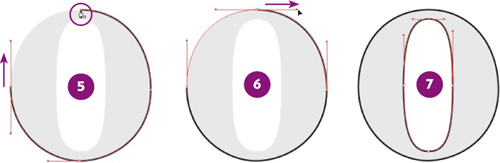
8 Repeat Steps 2–5 for the inner circle. The result should look like the letter shown above, right.
9 Hide the O layer to see how lovely your traced letterform is: Click the eyeball icon for that layer in the Layers panel.
10 Convert the two shapes into a compound path (page 51) or the letter won’t have a hole in the middle: Select both shapes, then choose Object > Compound Path > Make.
11 Go to the Control panel and choose a color from the Color Fill pop-up panel. Et voilà!

And try this!
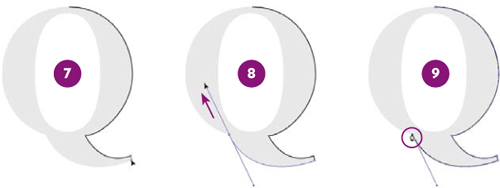
In this exercise, draw the letter Q. Instead of being made up completely of curves, it includes a couple of corner points and cusp points. Bwahahaha.
Task 20 Trace the letter Q with the Pen tool
Follow the steps in Task 18 on page 67 to set up a locked layer for tracing, but type a giant letter Q instead of O. Follow the steps in Task 19.1 to set the options for the Pen tool.
1 Position the Pen tool at the top-center of the shape. Press (don’t click) to create an anchor point, and continue to press as you drag handles out of the anchor point, to the right (as shown below). Hold down the Shift key to keep the handles perfectly horizontal.
2 Position the Pen tool at the midpoint of the right side of the shape (circled, below-center), then press-and-drag handles out of the anchor point until the path matches the Q shape.
3 Place the Pen tool at the position shown in #3, then press-and-drag handles out of the anchor point until the path matches the shape.
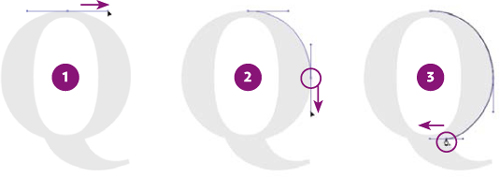
4 Hover the Pen tool over the point you just made; a tiny caret symbol appears next to the pen, indicating it is going to change the identity of that point. Single-click directly on that point you just made; the outgoing handle disappears (#4, below). This is now a cusp point.
5 Press-and-drag to set a point at the end of the tail shape, shaping the path to match the Q shape.
6 As in Step 4, click the anchor point to remove the outgoing handle.

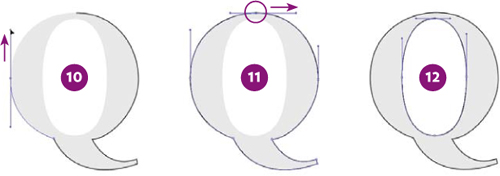
7 Click the bottom corner of the tail—don’t drag. The next path needs to come abruptly (not smoothly) out of that anchor point.
8 Press-and-drag to set a point at the left side of the tail where it meets the oval shape of the letter, shaping the path to match the tail (#8).
9 Click the anchor point just created, to remove the handle coming out of it and force the next path to exit the anchor point abruptly.
10 Position the Pen tool at the midway point of the Q’s left side, then press-and-drag upward (hold down the Shift key) to bring handles out of the anchor point; shape the curve to match the Q (#10).
11 Position the Pen tool over the original start point, then press-and-drag handles out of the anchor point until the path matches the Q shape. This closes the path. Ta da!
12 Use the Pen tool to draw the inside oval shape, as you did on page 69.
13 Select both shapes, then choose Object > Compound Path > Make (if you don’t, your Q won’t have a hole in the middle).
14 Select the compound path, go to the Control panel, and choose a color from the Color Fill pop-up panel. Hey, now try an S!
Tip
Every now and then, remember to hide the Q layer (click its eyeball icon in the Layers panel) so you can see how your shape is progressing.
And try this too!
This exercise will make you more familiar with the Pencil tool and with tracing templates—and it’s a little more fun than tracing a Q. This task uses the Pencil tool, and you will learn that the secret to Pencil tool success is in Task 22.
A tracing template fades out the image that’s on it so you can trace over it. You can only put raster images on a tracing template, so you’ll need a raster image of some sort to trace from—something you’ve scanned or drawn on paper or borrowed from the web just to use as an exercise. Maybe a big bug or a flower.
Task 21 Prepare to trace from a template
1 Place an image in an Illustrator document: Locate any raster image file (JPEG or TIFF is best) on your computer and drag it into an open document window. Or choose File > Place... to find and place a file in your open Illustrator document.
2 Open the Layers panel: Choose Window > Layers. You’ll see that the placed image is on its own layer in the Layers panel.
3 Open the “Layer Options” dialog box: In the Layers panel, double-click the layer that contains the placed image. You’ll get this dialog box:
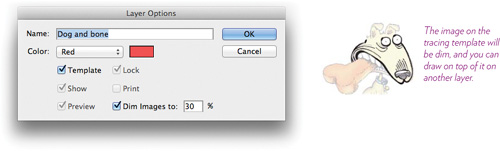
4 In the “Layer Options,” click the “Template” box.
By default, the “Dim Images” value is set to 50%, but we prefer a setting between 20 and 30%.
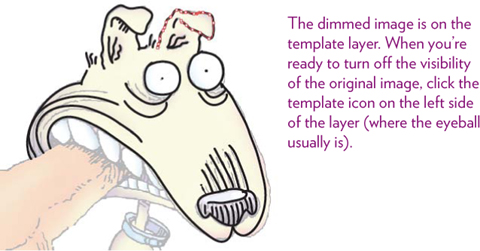
Click OK. The layer is now a template layer and the image is dimmed.
5 Create a new layer above the template layer to draw on: Click the Create New Layer icon at the bottom of the Layers panel (shown below).
Task 22 Get your Pencil tool ready
1 Set some defaults before you start to draw: Double-click the Pencil tool in the Tools panel to open the “Pencil Tool Options.”
Copy the settings you see here.
2 Now open the Stroke panel (choose Window > Stroke, or click the word “Stroke” in the Control panel) to set some stroke defaults.
Choose a stroke weight of 3 points, a “Round Cap,” and set the “Corner” option to “Round Join.”

Now you’re ready to start tracing your image!
Task 23 Trace the template image
1 Choose the Pencil tool. On the new layer you created, start tracing the image that you can see from the dim template layer.
2 Select all the paths in the drawing (Select > All).
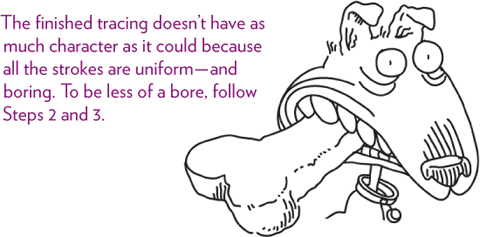
3 Assign a different stroke profile: Open the Stroke panel, then from the “Profile” pop-up menu shown below, choose a preset profile (other than the default “Uniform” profile). (See page 66 for details about stroke profiles.)
4 For a final refinement, I chose certain strokes and assigned another profile to them. I also modified a few strokes that seemed too thin by thickening them with the Width tool (see Chapter 7 for information about the amazing Width tool).