
9. Fine-Tuning
In This Chapter
Chapter 7, “Basic Editing,” got you started cutting in earnest, getting your footage into the Timeline and creating a rough cut of your movie. However, that’s only the beginning of your editing work. In fact, it might be said that the rough cut, which was 80 percent of the work, likely took only 20 percent of the overall editing time. Put another way, the last 20 percent—the finessing, perfecting, and finalizing of your edits—is likely to take 80 percent of your time.
But what exactly does fine-tuning consist of? Much of the process is about tightening edits and finding the absolute best place for each cut. Often that requires offsetting audio and video edits and finding other ways to “hide” the edits so the audience doesn’t notice them. Sometimes it means removing or rearranging shots or even whole scenes to find alternative ways to tell your story.
Adjusting Edits
In terms of the practical nuts and bolts, a large part of fine-tuning takes the form of trimming. Trimming is an editing term for two main techniques: rippling and rolling. Both of these techniques, as well as other fine-tuning tricks and techniques based on those two primary concepts, will be discussed in detail in this chapter. Fundamentally, trimming is the act of adjusting the individual edits in your project.
An edit is a deceptively simple thing: a juxtaposition of two shots. But in its way, an edit is a violent act. Every time you cut, you sever the viewer’s train of thought, forcing her brain to change gears and absorb new information from a different perspective. Because of this, each edit is an opportunity for your audience to disengage from the story you are telling.
If an edit is too disruptive to the flow of information, your viewer’s brain might switch to an entirely new train of thought. Suddenly, she’s aware that the room is chilly or that she’s hungry or has to pee. (It happens to all of us.) She might wonder if something more interesting is playing on a different channel. In that instant, on that one cut that lingered a few frames too long, you lost her. And all the work you put into the rest of the program will have gone to waste.
It could be said that the editor’s primary job is to overcome these obstacles and keep viewers engrossed in the story. And in order to succeed at that job, you must make every edit perfect (or at least as perfect as the footage allows).
You can adjust edits in three basic ways:
• You can shorten or lengthen the outgoing clip (the clip to the left of the edit point).
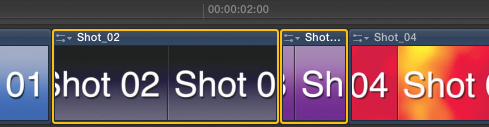
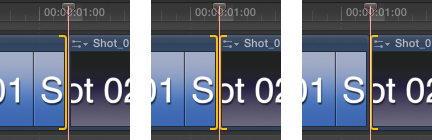
You can’t add more frames to an edit if no extra frames exist in the source footage ![]() .
.
![]() To trim an edit, there must be additional, unused frames in the source footage, illustrated here as the dimmed frames to the left of the edit.
To trim an edit, there must be additional, unused frames in the source footage, illustrated here as the dimmed frames to the left of the edit.
• You can shorten or lengthen the incoming clip (the clip on the right side of the edit).
• You can change both sides of the edit at the same time, shortening one while simultaneously lengthening the other by the same number of frames.
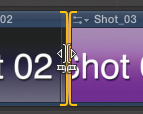
The first two ways are called rippling, because changing the duration of either clip has a ripple effect on all the other edits in the movie. When you ripple an edit, by definition you make the overall movie longer or shorter.
Rippling is commonly used to fix the timing of a bad edit. For example, if you have a cut that shows a door closing in the outgoing shot and then it closes again in the incoming shot, one of the two shots must be shortened.
The third trimming method is called rolling. In this case, the change you make is limited to the two clips on either side of the edit at hand, and the rest of the project remains unaffected.
Rolling will never fix bad timing. In the previous example, you could roll the edit in either direction, but the door is still going to close twice.
However, once you’ve fixed the timing of the edit by rippling, you can then roll the edit to select precisely where the cut should occur: Do you want the cut to happen before the door closes or after it’s already closed? Or do you want the edit to land on the exact frame where the door hits the jamb? By rolling the edit, you can experiment and find the timing that feels just right.
Because of this, you typically ripple before you roll, fixing timing by rippling, and then roll the edit to its optimal location in time.
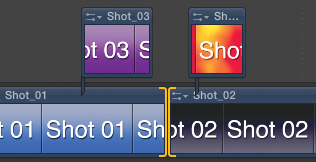
Rippling Edits
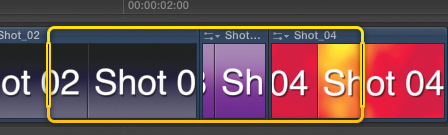
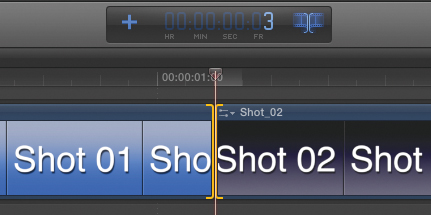
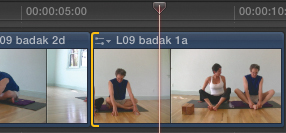
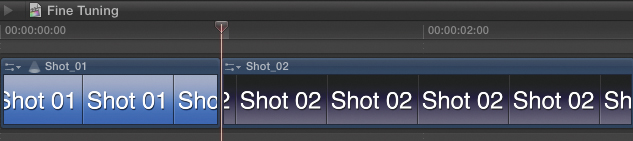
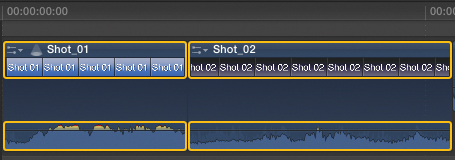
In Final Cut Pro, rippling edits is simple and intuitive. Whenever you drag the edge of a clip that abuts another, the edit (and subsequently the entire sequence) is automatically rippled ![]() .
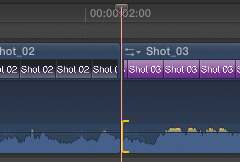
.
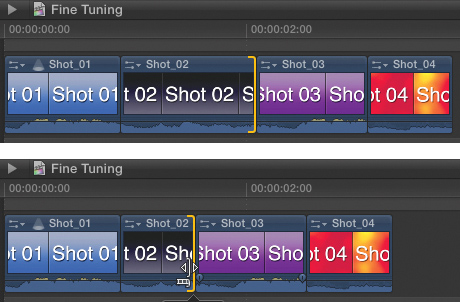
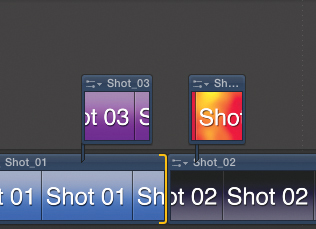
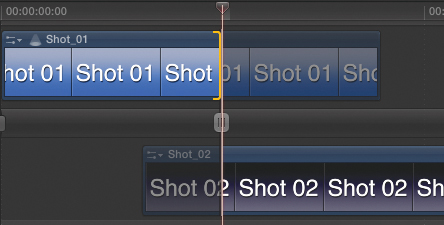
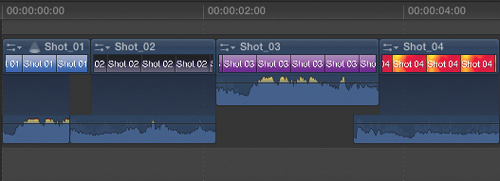
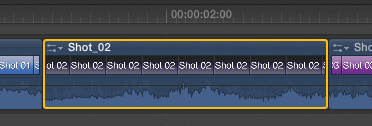
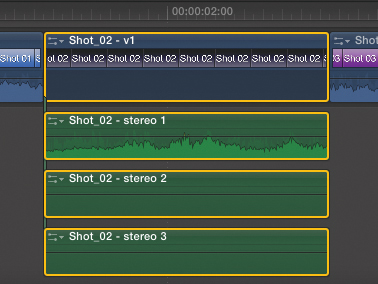
![]() The bottom image shows that Shot_02 has been rippled to make it (and the whole movie) shorter.
The bottom image shows that Shot_02 has been rippled to make it (and the whole movie) shorter.
Whenever you position the Selection (Arrow) tool over an edit point, the Ripple pointer appears.
If you position the mouse over the left side of the edit, the pointer turns into the Ripple Outgoing tool (pointing left) ![]() .
.

![]() The Ripple Outgoing tool
The Ripple Outgoing tool
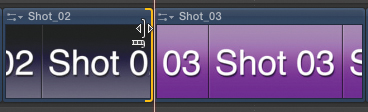
If you position the mouse over the right side of the edit, the pointer turns into the Ripple incoming tool (pointing right) ![]() .
.

![]() The Ripple Incoming tool
The Ripple Incoming tool
This pointer change helps indicate what will happen if you click and drag. You click the left side to shorten or lengthen the outgoing clip. You click the right side to shorten or lengthen the incoming clip.
In either case, as you change the duration of one clip, the rest of the clips in the project automatically move along in sync.
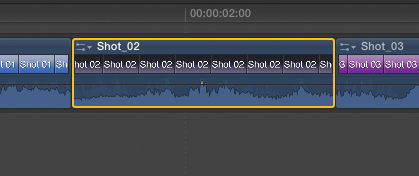
To ripple the outgoing clip
1. In the Timeline, position the pointer over the left side of an edit point.
The pointer changes into the Ripple Outgoing tool ![]() .
.
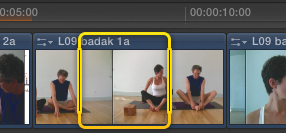
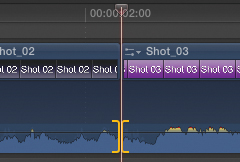
![]() Position your pointer over the left side of the edit.
Position your pointer over the left side of the edit.
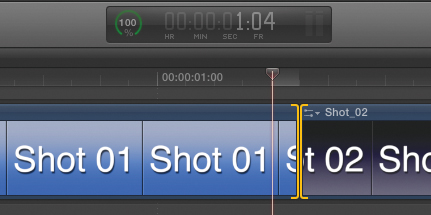
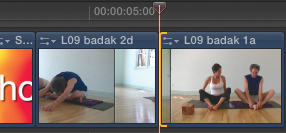
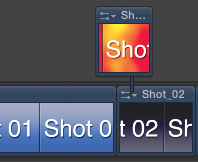
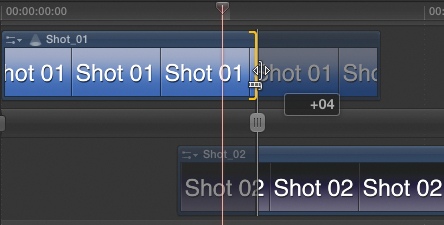
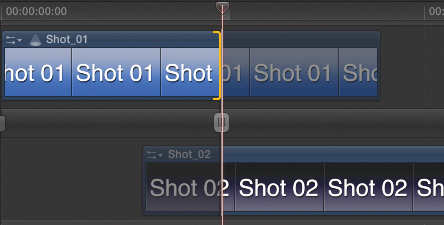
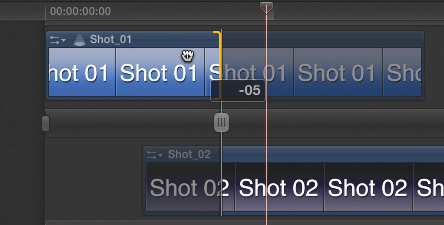
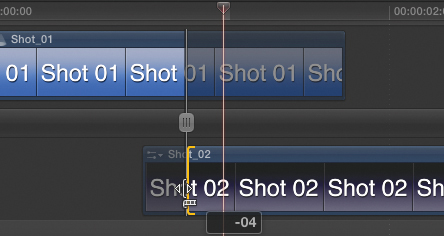
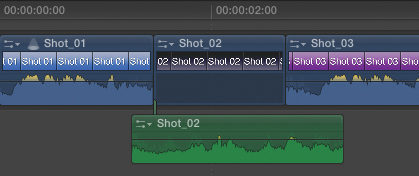
2. Drag the edge of the edit to the left to shorten the clip ![]() , or drag to the right to lengthen the clip.
, or drag to the right to lengthen the clip.
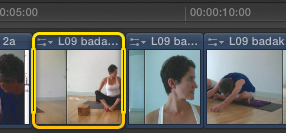
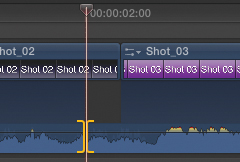
![]() Drag the left side of the edit to ripple the outgoing clip. In this case, the clip was rippled to the left, shortening Shot_02.
Drag the left side of the edit to ripple the outgoing clip. In this case, the clip was rippled to the left, shortening Shot_02.
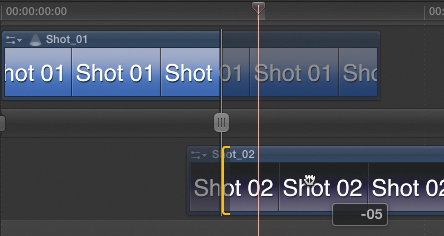
As you drag, an Info window appears to show you how many frames you are rippling ![]() .
.
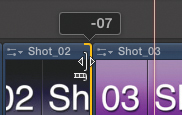
![]() An Info window shows how many frames are being trimmed.
An Info window shows how many frames are being trimmed.
When you release the mouse, the clip’s duration has changed, with no gap left in the Timeline.
To ripple the incoming clip
1. In the Timeline, position the pointer over the right side of an edit point.
The pointer changes into the Ripple Incoming tool ![]() .
.
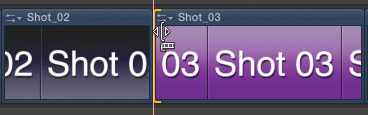
![]() Position your pointer over the right side of the edit.
Position your pointer over the right side of the edit.
2. Drag the edge of the edit to the right to shorten the clip, and drag to the left to lengthen the clip.
As you drag, an Info window appears to show you how many frames you are rippling ![]() .
.
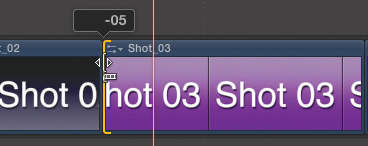
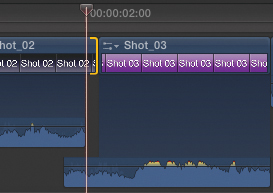
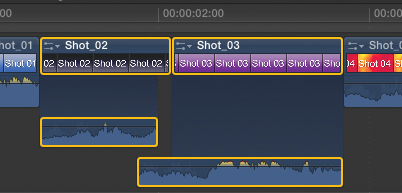
![]() Drag the right side of the edit to ripple the incoming clip. In this example, the clip was trimmed to the left, lengthening Shot_03.
Drag the right side of the edit to ripple the incoming clip. In this example, the clip was trimmed to the left, lengthening Shot_03.
Note that if you ripple a clip all the way to the last frame available in the source footage, the clip edge turns red ![]() . This indicates that the clip cannot be trimmed any further in that direction.
. This indicates that the clip cannot be trimmed any further in that direction.
![]() If you ripple to the last frame of the source media, the edge of the clip turns red.
If you ripple to the last frame of the source media, the edge of the clip turns red.
Viewing Detailed Trimming Feedback
As you drag to ripple an edit, it can be difficult to know exactly which frame you should choose for the new edit point. As you drag, Final Cut Pro displays the frame you’re dragging in the Viewer ![]() .
.
![]() The Viewer shows the changing frame as you trim.
The Viewer shows the changing frame as you trim.
This is helpful, but often you’re trying to match the action on both sides of the edit, so it’s essential to see the frame from the adjacent clip that you’re trying to match.
Fortunately, you can instruct Final Cut Pro to display a two-up preview of the frames on either side of the edit ![]() .
.

![]() Detailed trimming feedback allows you to compare the incoming and outgoing frames.
Detailed trimming feedback allows you to compare the incoming and outgoing frames.
If you’re dragging the edge of the outgoing clip, the frame on the left changes to show the new frame you’re choosing, and the frame on the right displays the first frame of the incoming clip.
Note the right side doesn’t change, because when rippling, you modify only one clip.
If you’re dragging the edge of the incoming clip, the frame on the right side updates, and the one on the left shows the last frame of the outgoing clip.
To enable two-up trimming preview
1. Choose Final Cut Pro > Preferences, or press Command-, (comma).
The Preferences window opens.
2. Click the Editing icon to open the Editing pane.
3. In the Timeline section, select the “Show detailed trimming feedback” checkbox ![]() .
.
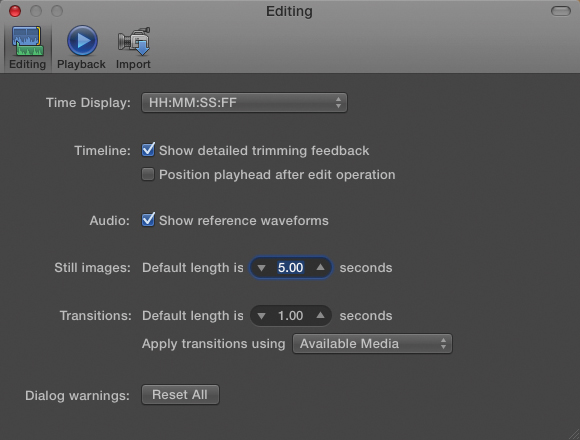
![]() Enable “Show detailed trimming feedback” in the Editing pane of Final Cut Pro Preferences.
Enable “Show detailed trimming feedback” in the Editing pane of Final Cut Pro Preferences.
The two-up display is now enabled.
Rolling Edits
Once the timing of your edit is just right, you can finesse exactly where it should occur in time by rolling the edit.
One of the tricks editors use to keep audiences engaged across edit points is to cut in the middle of an action. That way, the viewer’s brain is too busy following the movement of the action to notice the cut. If you cut from one static shot to another static shot, the cut is the only change, and thus it draws the viewer’s attention. But if there is movement within the frame, the attention is pulled there, and the cut can sneak by unnoticed.
For example, if two on-screen people are about to shake hands and you want to cut from a wide shot to a close-up, the best place to hide the edit would be just as their arms are reaching toward each other but before the hands are grasped.
The viewers’ eyes will track the movement of the moving arms, and as long as that movement is smooth and consistent in both sides of the edit, the cut will go unseen.
Every edit is unique, so you will likely need to experiment a bit to find exactly the right moment to make the cut.
The beautiful thing about rolling edits is that once you get the timing of the edit correct, you can roll the edit to any frame at all, and the timing will always look right.
Think about it: If the action of the handshake takes 50 frames to complete and the hands grasp on frame 30, as long as they grasp on frame 30 in both the outgoing wide shot and the incoming close-up, you can move the actual cut point to frame 10, frame 20, or frame 43, and the action will still appear smooth and the edit will be disguised.
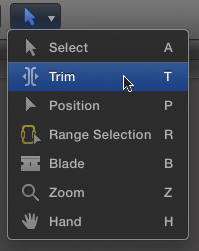
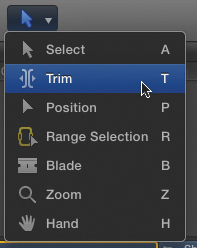
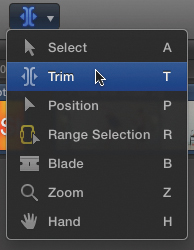
In Final Cut Pro, you use the Trim tool to select an edit as a roll. However, as you’ll see in the next few pages, once that edit is selected, you have a variety of ways to actually perform the edit.
To roll an edit
1. Click the Tool pop-up menu in the toolbar, and choose the Trim tool or press T ![]() .
.
![]() Select the Trim tool from the Tool pop-up in the toolbar.
Select the Trim tool from the Tool pop-up in the toolbar.
Your pointer turns into the Trim tool.
While the Trim tool is required to perform a roll edit, you can also make ripple edits with that tool.
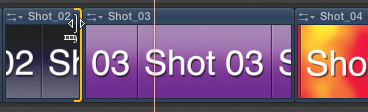
2. Position the pointer over the center of the edit point until it changes to the Roll pointer ![]() .
.
![]() Position the pointer over the middle of an edit to access the Roll pointer.
Position the pointer over the middle of an edit to access the Roll pointer.
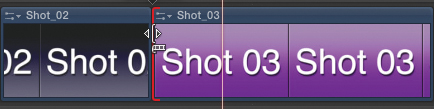
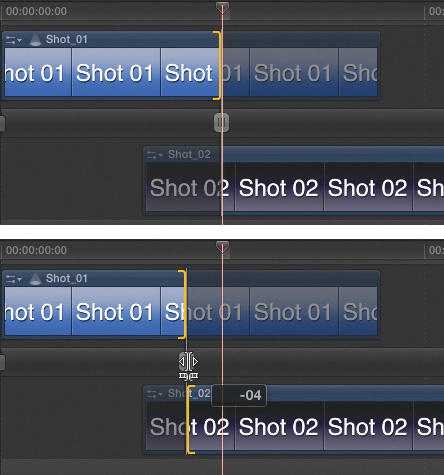
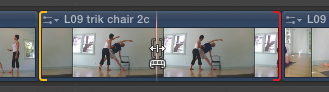
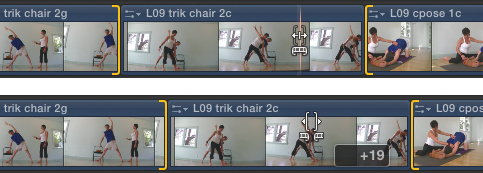
3. Drag the edit to the left to shorten the outgoing clip and lengthen the incoming clip, or drag to the right to shorten the incoming clip and lengthen the outgoing clip ![]() .
.
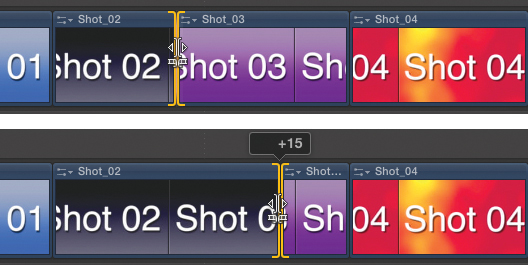
![]() Rolling an edit moves the edit without disturbing the rest of the project. The bottom image shows the edit after it’s been rolled to the right by 15 frames.
Rolling an edit moves the edit without disturbing the rest of the project. The bottom image shows the edit after it’s been rolled to the right by 15 frames.
The edit point is rolled to the new frame.
Previewing Edits
As you trim your edits, it’s very important to watch the results of your work in real time. While it may seem like you can judge the best edit point by looking at the individual frames that represent the actual edit, remember that your audience is only going to see it breezing by at full speed. To be an effective editor, you need to think like one of those viewers.
For that reason, it’s critical to make your editing decisions while the video is playing whenever possible. At the very least, get used to reviewing your edit every time you make a trimming adjustment.
Fortunately, Final Cut Pro has nearly ten different ways to play your movie, each one tailored for a specific situation. At least three of them are particularly helpful when trimming:
• Play Around backs up a few seconds before the current playhead position and plays for a few seconds after. You can customize the pre-roll and post-roll settings.
• Play Selection plays from the beginning to the end of a selected object. Use this method to watch a specific clip or a selected range of time.
• Play to End plays from the current playhead position to the end of a selected clip or range. This allows you to see how a clip or section ends without having to sit through the entire clip or range.
Also, turning on the Loop Playback setting can be helpful in conjunction with these commands, enabling you to repeat playback of a limited range of your project while you continue trimming.
To play around an edit
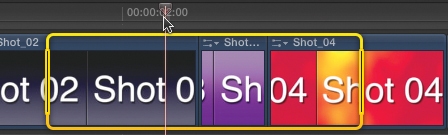
1. Position the playhead on or around the edit you want to preview ![]() .
.
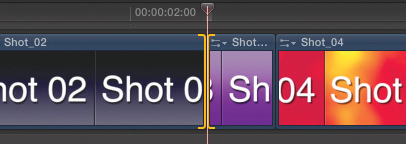
![]() Position the playhead at the edit.
Position the playhead at the edit.
2. Choose View > Playback > Play Around, or press Shift-/ (forward slash) ![]() .
.

![]() Choose Play Around from the Playback section of the View menu.
Choose Play Around from the Playback section of the View menu.
The playhead backs up by the pre-roll amount, plays across the edit, and stops after the post-roll amount.
Note that by default pre-roll and post-roll are both set to two seconds.
To customize the pre-roll and post-roll durations
1. Choose Final Cut Pro > Preferences, or press Command-, (comma).
2. Click the Playback button to switch to the Playback pane ![]() .
.
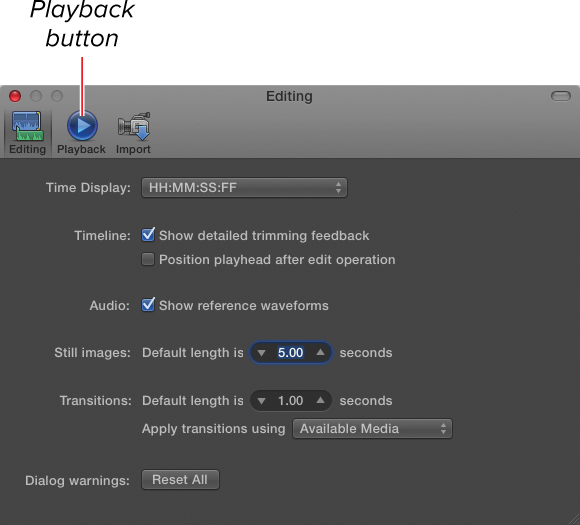
![]() Open the Preferences window, and click the Playback button.
Open the Preferences window, and click the Playback button.
The Playback pane opens ![]() .
.
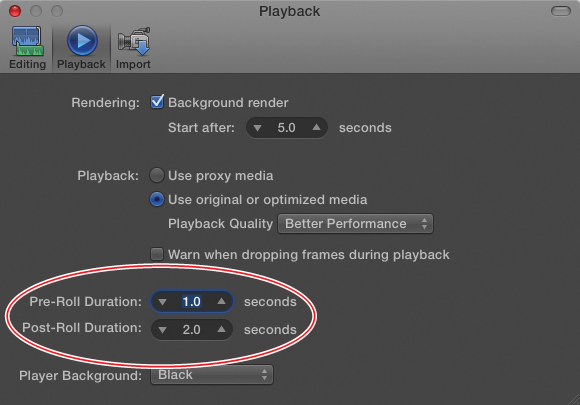
![]() Customize the Pre-Roll Duration and Post-Roll Duration settings as needed.
Customize the Pre-Roll Duration and Post-Roll Duration settings as needed.
3. Adjust the Pre-Roll Duration and Post-Roll Duration settings to the duration of your choice, and close the Preferences window.
In general, projects with more frequent cuts will benefit from shorter pre- and post-roll values. Projects with longer scenes and fewer cuts benefit from a longer pre-roll duration.
To play a selection
1. Select a clip, a group of clips, or a range selection ![]() .
.
![]() Select the clips or range you want to preview.
Select the clips or range you want to preview.
2. Choose View > Playback > Play Selection, or press / (forward slash).
The playhead backs up to the beginning of the selected area and plays until it reaches the end of the selection.
To play from the current frame to the end of the selection
1. Select a clip, a group of clips, or a range selection (using the Range Select tool) ![]() .
.
![]() Select the range you want to preview.
Select the range you want to preview.
2. Position your playhead at the frame where you want to begin playback ![]() .
.
![]() Position the playhead where you want to begin playing back.
Position the playhead where you want to begin playing back.
3. Choose View > Playback > Play to End, or press Control-Shift-O.
The project plays from the current position to the last frame of the selection.
To enable loop playback
• Click the loop playback in the Viewer, or press Command-L ![]() .
.
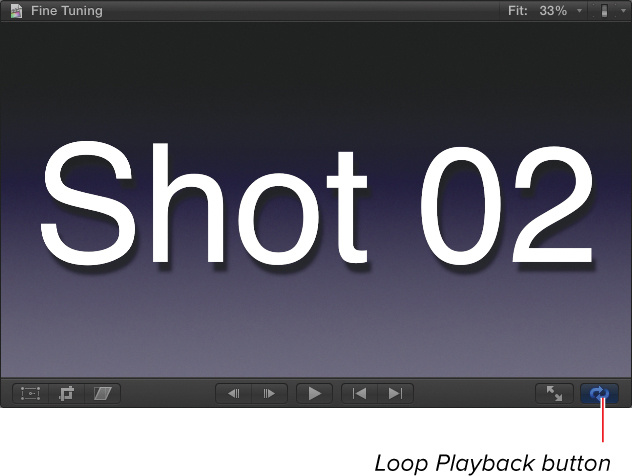
![]() Click the Loop Playback button in the Viewer.
Click the Loop Playback button in the Viewer.
Trimming from the Keyboard
Although dragging edits to trim them allows you to “feel” how far you should move them, it’s woefully imprecise and slow. When you get in the habit of trimming every one of the many edits in your program, you’re likely to seek out quicker and more precise trimming methods.
In Final Cut Pro, this means you need to learn at least some of the many trim-related commands you can employ by pressing a single key or simple key combination on the keyboard.
Precise Trimming
Perhaps the most essential and useful of these keyboard shortcuts are the ones that allow you to trim an edit (in any of the three modes) one frame at a time. This way, you can trim with extreme precision and effectiveness.
To trim one frame at a time
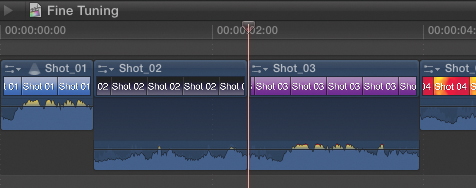
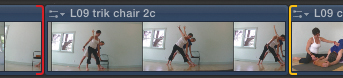
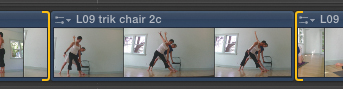
1. Click the left side of an edit point to ripple the outgoing clip, click the right side of an edit to ripple the incoming clip, or use the Trim tool to select the middle of the edit point as a roll ![]() .
.
![]() Select the edit as a ripple outgoing (left), roll (middle), or ripple incoming (right).
Select the edit as a ripple outgoing (left), roll (middle), or ripple incoming (right).
The edit is highlighted in yellow to indicate which edit type is selected.
2. Press , (comma) to ripple to the left by one frame and . (period) to ripple to the right by one frame.
3. Press Shift-? to play around with the edit and see the results of your work.
4. Repeat steps 2 and 3 until you are satisfied with the resulting edit.
Press Shift-, (comma) to ripple left by five frames at a time, or press Shift-. (period) to ripple right by five frames at a time.
Numerical Trimming
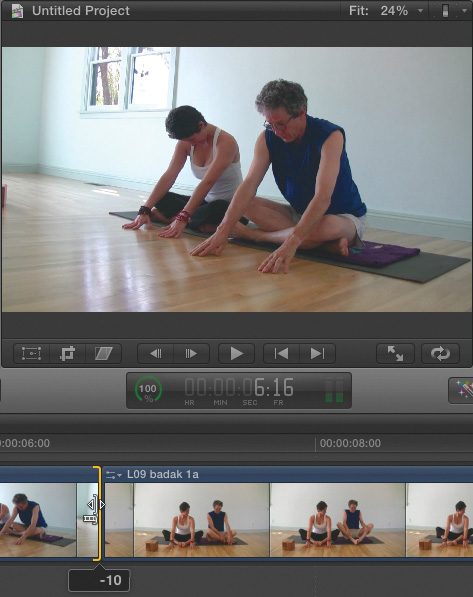
As you become more experienced as an editor, more and more you’ll find yourself predicting exactly how many frames you want to trim just by looking at your movie. You’ll watch a particular edit and guess that it should be rippled by precisely three frames.
When you get to that stage, you’ll appreciate that Final Cut Pro will allow you to perform an edit by simply typing the number of frames you want to trim.
To perform a trim by a specific number of frames
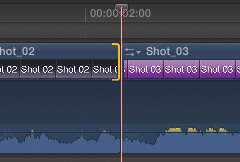
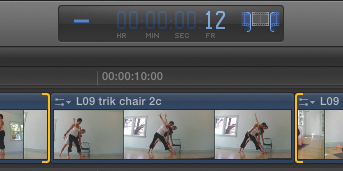
1. Select the edit as a ripple outgoing, ripple incoming, or roll ![]() .
.

![]() Select the edit. In this example, it’s selected as a roll.
Select the edit. In this example, it’s selected as a roll.
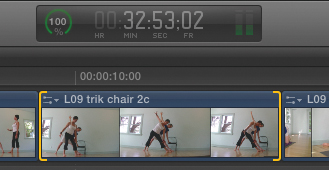
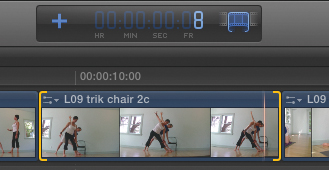
2. Press + or – (minus), and type the number of frames you want to trim ![]() .
.
![]() Enter they number of frames preceded by a + (plus) or – (minus).
Enter they number of frames preceded by a + (plus) or – (minus).
The Current Frame indicator changes to show the trim amount.
3. Press Enter (or Return) to perform the edit ![]() .
.
![]() The edit is moved by the specified number of frames.
The edit is moved by the specified number of frames.
4. Press Shift-? to play around the edit and check your work.
5. Repeat steps 2–4 until you are satisfied with the edit.
Selecting Edits
Once you get in the habit of making your trims from the keyboard, you’ll likely find that you want to be able to select the edit from the keyboard as well.
This way, you can trim the outgoing clip and the incoming clip and trim as a roll, all without ever needing your mouse.
To select an edit from the keyboard
1. Position the playhead directly over the edit you want to select ![]() .
.

![]() Position the playhead over the edit you want to select.
Position the playhead over the edit you want to select.
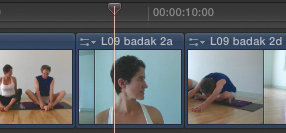
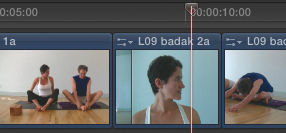
Pressing the Up Arrow key will automatically move the playhead directly to the previous edit, and pressing the Down Arrow key will move it to the next edit.
2. Do one of the following:
• To select the left edge of the edit (ripple outgoing), press [ (Left Bracket) ![]() .
.

![]() Press [ (Left Bracket) to select the edit as a ripple outgoing.
Press [ (Left Bracket) to select the edit as a ripple outgoing.
• To select the right edge of the edit (ripple incoming), press ] (Right Bracket) ![]() .
.

![]() Press [ (Left Bracket) to select the edit as a ripple outgoing.
Press [ (Left Bracket) to select the edit as a ripple outgoing.
• To select both edges (roll), press (Backslash) ![]() .
.
![]() Press (Backslash) to select the edit as a roll.
Press (Backslash) to select the edit as a roll.
One-Click Edits
Performing a one-click edit means you can play the project back and, when you find the frame where you’d like the edit to occur, perform the edit in a single step.
This has the benefit of being quick and easy, plus it allows you to make editing decisions while the video is playing back. Final Cut Pro has four one-step trimming commands, and each of them works slightly differently:
• Extend Edit moves the selected edit to the playhead position. It works on both ripple and roll edits. The playhead point can be located to the left or the right of the current edit.
• Trim Start moves the In point of the current clip (the clip under the playhead) to the playhead position. Trim Start always ripples (rather than rolls) the edit. The new edit must always move to the right of the existing edit position (making the resulting clip shorter).
• Trim End moves the Out point of the current clip (the clip under the playhead) to the playhead position. Trim End always ripples (rather than rolls) the edit. The new edit must always move to the left of the existing edit (making the resulting clip shorter).
• Trim to Selection moves both the In and Out points of a clip to a manually selected subrange within that clip. Trim to Selection always makes the resulting clip shorter.
To move an edit to the playhead position
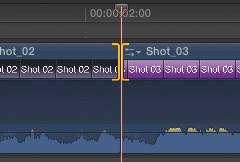
1. Select the edit you want to modify as a ripple outgoing, ripple incoming, or roll ![]() .
.
![]() Select the edit. In this example it’s selected as a ripple incoming.
Select the edit. In this example it’s selected as a ripple incoming.
2. Play the project.
3. When you find the frame where you want the edit to move, press Shift-X or choose Edit > Extend Edit ![]() .
.
![]() Extend the edit to move the edit to the playhead position.
Extend the edit to move the edit to the playhead position.
The edit is rippled or rolled to the current playhead position.
You do not need to stop playback in order to perform this command. Also, you can extend an edit in either direction (left or right) from the current edit.
To trim the start of a clip to the playhead position
1. Play the portion of the project that includes the clip you want to shorten.
2. When you find the frame where you want to move the In point, press Option-[ (Left Bracket) or choose Edit > Trim Start ![]() .
.
![]() When your playhead is over the frame to which you want to move the In point, press Option-[.
When your playhead is over the frame to which you want to move the In point, press Option-[.
The clip under the playhead’s In point moves to the current playhead position, and the clip is shortened ![]() .
.

![]() The In point is moved to the current playhead position, trimming the clip.
The In point is moved to the current playhead position, trimming the clip.
To trim the end of a clip to the playhead position
1. Play the portion of the project that includes the clip you want to shorten.
2. When you find the frame where you want to move the Out point, press Option-[ (Right Bracket) or choose Edit > Trim End ![]() .
.
![]() When your playhead is over the frame to which you want to move the Out point, press Option-].
When your playhead is over the frame to which you want to move the Out point, press Option-].
The clip under the playhead’s Out point jumps to the current playhead position, and the clip is shortened ![]() .
.

![]() When your playhead is over the frame to which you want to move the In point, press Option-[.
When your playhead is over the frame to which you want to move the In point, press Option-[.
Often this command is best used when playing the project in reverse (backward). To play backward, press J.
To trim both the start and the end of a clip to a selected range
1. Play the portion of the project that includes the clip you want to shorten.
2. Press I to set the In point and press O to set the Out point to mark the range of the clip you want to keep ![]() .
.
![]() Set the In and Out points to mark the range you want to keep.
Set the In and Out points to mark the range you want to keep.
Note the range must be shorter than the existing clip’s duration.
3. Press Option- (Backslash), or choose Edit > Trim to Selection.
The clip is trimmed to align with the selected range ![]() .
.
![]() Press Option- to trim the clip to the selection. The areas before and after the marked selection are deleted.
Press Option- to trim the clip to the selection. The areas before and after the marked selection are deleted.
Any clips connected to the clips being trimmed will remain connected. If two connected clips overlap because of the trimming action, they will move out of the way accordingly ![]() .
.
![]() Connected clips automatically move out of the way when trimming makes them overlap.
Connected clips automatically move out of the way when trimming makes them overlap.
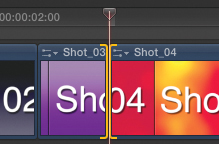
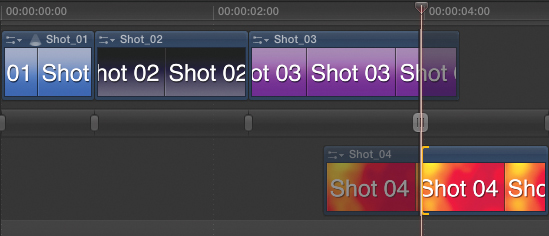
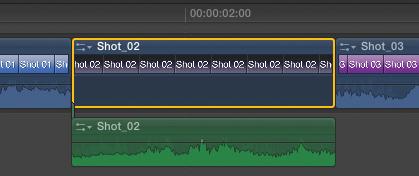
If an edit is rolled over the connection point, the connection line will be moved from one clip to the other ![]() .
.

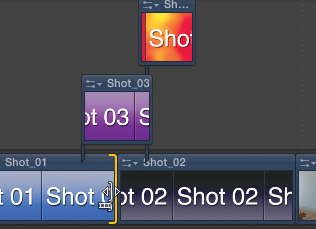
![]() Rolling under a connected clip can move the connection line from one clip to another. Here, the connection originally on Shot_02 gets moved to Shot_01.
Rolling under a connected clip can move the connection line from one clip to another. Here, the connection originally on Shot_02 gets moved to Shot_01.
If you ripple an incoming clip’s edge beyond a connection point, the connection line moves along with the edit point ![]() .
.
![]() In some cases, the connection point will be moved as a clip is trimmed.
In some cases, the connection point will be moved as a clip is trimmed.
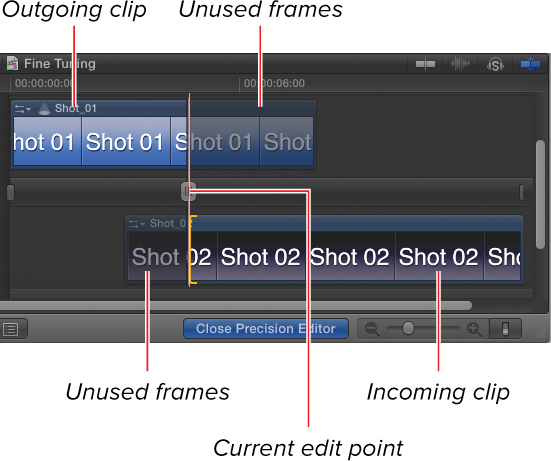
Using the Precision Editor
Final Cut Pro allows you to see how the two clips at an edit point overlap. Using the Precision Editor, the Timeline converts to a special view where you can quickly see the frames beyond the Out point of the outgoing clip (in the upper bar) and the frames before the In point of the incoming clip (in the lower bar).
You can also see any markers in those unused frames that would not have been visible in the regular Timeline view.
This can be very helpful when you’re trying to decide which side of an edit to adjust. For example, imagine that you’re cutting between a medium shot of a woman reaching into a drawer and a close-up of her hand grasping a knife.
In the Precision Editor, you would be able to quickly see that a few frames after the current edit point (in the medium shot) her body obscures the action. This can guide you to move the edit so it occurs earlier and uses more frames of the close-up.
In the Precision Editor, you can perform any of the three trimming actions: ripple outgoing, ripple incoming, and roll.
To open the Precision Editor
• Do one of the following:
• Double-click an edit point.
• Select either edge of an edit point, and Choose Clip > Show Precision Editor (or press Control-E).
The Precision Editor opens ![]() .
.
![]() Double-click any edit to open the Precision Editor.
Double-click any edit to open the Precision Editor.
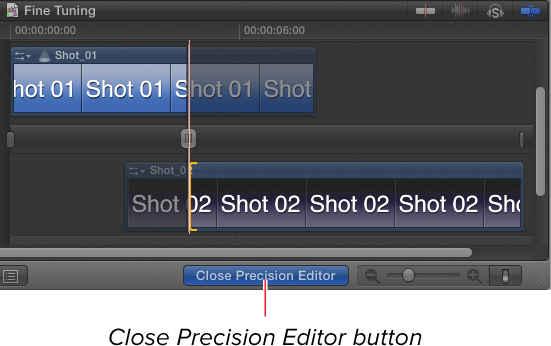
To close the Precision Editor
• Do one of the following:
• Click the Close Precision Editor button ![]() .
.
![]() Click the Close Precision Editor button to close the Precision Editor.
Click the Close Precision Editor button to close the Precision Editor.
• Choose Clip > Hide Precision Editor (or press Control-E).
• Double click the grey trim handle located on the center strip between the two shots.
• Press Escape or Enter.
The Precision Editor collapses, and the Timeline returns to its regular view ![]() .
.
![]() The Precision Editor closes, and the regular Timeline view returns.
The Precision Editor closes, and the regular Timeline view returns.
Trimming in the Precision Editor
There are two ways to ripple a clip in the Precision Editor. You can drag the edge of the clip on either side, just like you would in the regular Timeline view, or you can drag the clip itself, aligning a different frame to the edit point.
Whether you are rippling or rolling, you can also select the edit and use keyboard shortcuts to trim the edit, as described in the “Trimming from the Keyboard” section.
To ripple the outgoing clip in the Precision Editor
• Do one of the following:
• Drag the right edge of the clip to the left to shorten the clip or to the right to lengthen the clip ![]() .
.

![]() Ripple the outgoing clip by dragging the right edge (Out point) of the clip left or right. In this example, the outgoing clip has been rippled four frames to the right.
Ripple the outgoing clip by dragging the right edge (Out point) of the clip left or right. In this example, the outgoing clip has been rippled four frames to the right.
• Drag the body of the clip to the right to shorten the clip or to the left to lengthen the clip ![]() .
.
![]() Alternatively, drag the body of the outgoing clip to ripple it. In this example, the outgoing clip has been rippled five frames to the left.
Alternatively, drag the body of the outgoing clip to ripple it. In this example, the outgoing clip has been rippled five frames to the left.
• Click to select the right edge of the clip, and press , (comma) to shorten the clip or . (period) to lengthen the clip.
To ripple the incoming clip in the Precision Editor
• Do one of the following:
• Drag the left edge of the clip to the right to shorten the clip or to the left to lengthen the clip ![]() .
.

![]() Drag the In point of the Incoming clip to ripple it. In this example, the incoming clip has been rippled four frames to the left.
Drag the In point of the Incoming clip to ripple it. In this example, the incoming clip has been rippled four frames to the left.
• Drag the body of the clip to the left to shorten the clip or to the right to lengthen the clip ![]() .
.
![]() Alternatively, drag the body of the incoming clip to ripple it. In this example, the incoming clip has been rippled five frames to the left.
Alternatively, drag the body of the incoming clip to ripple it. In this example, the incoming clip has been rippled five frames to the left.
• Click to select the left edge of the clip, and press , (comma) to lengthen the clip or . (period) to shorten the clip.
To roll an edit in the Precision Editor
• Do one of the following:
• Drag the gray trim handle to the left to shorten the outgoing clip and lengthen the incoming clip ![]() .
.
![]() To roll the edit, grab the gray trim handle to the left or right. In this example, the edit has been rolled four frames to the left.
To roll the edit, grab the gray trim handle to the left or right. In this example, the edit has been rolled four frames to the left.
• Drag the gray trim handle between the two clips to the right to lengthen the outgoing clip and shorten the incoming clip.
• Click the gray trim handle, and press , (comma) to roll the edit to the left or . (period) to roll the edit to the right.
Don’t forget to play around with the edit as you trim to check your work and decide on the best final edit position.
Jumping Between Edits
Many editors choose to do a “trimming pass” where they walk through each of the edits in the project and fine-tune them using the various trim tools.
If you want to work this way and finesse one edit after another without having to close and reopen the Precision Editor each time, you can navigate from one edit point to another within the Precision Editor.
To navigate between edits in the Precision Editor
• Do one of the following:
• Press the Up Arrow key to open the previous edit, or press the Down Arrow key to open the next edit.
• Click an edit point indicator in the middle bar ![]() .
.
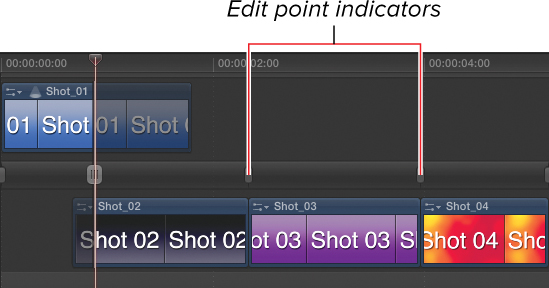
![]() To switch to a new edit in the Precision Editor, click one of the edit point indicators.
To switch to a new edit in the Precision Editor, click one of the edit point indicators.
The window rearranges so the newly chosen edit is active ![]() .
.
![]() The Precision Editor switches to show the new edit.
The Precision Editor switches to show the new edit.
The outgoing clip appears on the upper bar, and the incoming clip appears on the lower bar.
Expanding Clips
Final Cut Pro does everything it can to keep your Timeline organized for you and to prevent audio and video from ever moving out of alignment with each other. But there are frequent occasions when you want to deliberately manipulate the audio and video components of an edit separately.
For example, if you want the audio from one clip to overlap the audio from an adjacent clip or if you want the video from one shot to play over the audio from an adjacent shot, you need to be able to trim the audio edit points separately from the video edit points ![]() .
.
![]() Split edits allow you to adjust your audio edits separately from your video edits.
Split edits allow you to adjust your audio edits separately from your video edits.
Edits where the audio and video cut at different points in time are called split edits. One way to create such split edits is to expand the clips. Expanding divides the audio and video elements into separate bars in the Timeline. That way, you can establish different edit points for each.
Note you cannot move expanded audio and video components separately. To move audio separately from video, see “Detaching Audio” later in the chapter.
To expand a clip
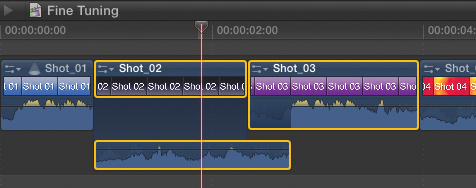
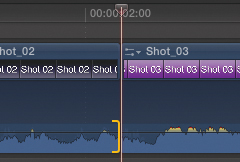
1. Select one or more clips ![]() .
.
![]() Select the clips you want to expand.
Select the clips you want to expand.
The clips are highlighted in yellow.
2. Do one of the following:
• Double-click the audio waveforms ![]() .
.

![]() Double-click the audio waveforms to expand the audio.
Double-click the audio waveforms to expand the audio.
• Choose Clip Expand Audio/Video, or press Control-S.
The clips are divided into two bars: one for the video and one for the audio.
Note that Clip Appearance must be set to a view option that displays both audio and video.
You can also instruct Final Cut Pro to expand all clips at once or to expand only clips that currently have overlapping audio and video.
To expand all clips
• Choose View > Expand Audio/Video Clips > For All.
All eligible clips expand.
Selecting Split Edits
Just as you learned to select edits from the keyboard in the “Selecting Edits” section when your clips are expanded, you can select just the video or just the audio edits directly from the keyboard as well.
To select a video-only edit from the keyboard
1. Position the playhead directly over the edit you want to select ![]() .
.
![]() Position the playhead precisely over the edit.
Position the playhead precisely over the edit.
Pressing the Up Arrow key automatically moves the playhead directly to the previous edit. Pressing the Down Arrow key moves it to the next edit.
2. Do one of the following:
• To select the left edge of the video edit (ripple outgoing), press [ (Left Bracket) ![]() .
.
![]() Press [ (Left Bracket) to select a video-only ripple outgoing edit.
Press [ (Left Bracket) to select a video-only ripple outgoing edit.
• To select the right edge of the video edit (ripple incoming), press ] (Right Bracket) ![]() .
.

![]() Press ] (Right Bracket) to select a video-only ripple incoming edit.
Press ] (Right Bracket) to select a video-only ripple incoming edit.
• To select both edges of the video clips (roll), press (Backslash) ![]() .
.
![]() Press (Backslash) to select a video-only roll edit.
Press (Backslash) to select a video-only roll edit.
To select an audio-only edit from the keyboard
1. Position the playhead directly over the edit you want to select.
Pressing the Up Arrow key automatically moves the playhead directly to the previous edit. Pressing the Down Arrow key moves it to the next edit.
2. Do one of the following:
• To select the left edge of the audio edit (ripple outgoing), press Shift-[ ![]() .
.
![]() Press Shift-[ to select an audio-only ripple outgoing edit.
Press Shift-[ to select an audio-only ripple outgoing edit.
• To select the right edge of the audio edit (ripple incoming), press Shift-] ![]() .
.
![]() Press Shift-] to select an audio-only ripple incoming edit.
Press Shift-] to select an audio-only ripple incoming edit.
• To select both edges of the audio clips (roll), press Shift- (Backslash) ![]() .
.
![]() Press Shift- to select an audio-only roll edit.
Press Shift- to select an audio-only roll edit.
Once the edit is selected in your preferred manner, you can trim it using keyboard shortcuts or by dragging the selected clip edge.
Editing Expanded Clips
Once you’ve expanded your clips, you can begin trimming the audio and video elements independently.
All the same trimming tools and rules discussed earlier in this chapter apply, only now you can perform those trims to just the audio or just the video.
To edit expanded clips
1. Select one of the following types of edit:
• Video ripple outgoing
• Audio ripple outgoing
• Video ripple incoming
• Audio ripple incoming
• Video roll
• Audio roll
2. Drag the clip edge or use keyboard shortcuts to add or remove frames from the selected edit ![]() .
.
![]() Drag or use keyboard shortcuts to trim the split edit.
Drag or use keyboard shortcuts to trim the split edit.
Any time you ripple an edit that causes the audio clips to overlap, the clips are automatically moved onto additional tracks to make room ![]() .
.
![]() Any trim that creates an overlap automatically adds tracks to accommodate the overlapping tracks.
Any trim that creates an overlap automatically adds tracks to accommodate the overlapping tracks.
Collapsing Expanded Clips
Expanding is temporary. Once you change the audio and video edits to your liking, you can collapse the clips again to keep the Timeline tidy and uncluttered.
Collapsing an expanded clip does not change the overlapping edits you may have created; rather, it simplifies the appearance of those overlaps in the Timeline. Clips can be expanded or collapsed repeatedly as needed.
To collapse an expanded clip
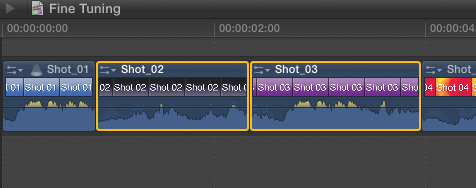
1. Select the expanded clip (or clips) you want to collapse ![]() .
.
![]() Select the expanded clips you want to collapse.
Select the expanded clips you want to collapse.
2. Do one of the following:
• Double-click the audio area of the clip.
• Choose Clip Collapse Audio/Video, or press Control-S ![]() .
.

![]() Double-click the audio to collapse the clips.
Double-click the audio to collapse the clips.
The selected clips are collapsed, and any overlapping audio is displayed in the audio section of the Timeline clips.
You can also collapse all expanded clips in the project. This saves you the trouble of selecting specific clips individually.
To collapse all expanded clips
• Choose View > Collapse All Clips.
All expanded clips in the project are collapsed.
Once clips have been collapsed, it can be difficult to detect which edits are split and which are straight (that is, edits in which the audio and video cut at the same time) ![]() .
.
![]() It can be hard to tell which collapsed clips have overlapping audio. In this example, the end of the first clip indicates a split (the dimmed audio), but there are other splits that are not so obvious.
It can be hard to tell which collapsed clips have overlapping audio. In this example, the end of the first clip indicates a split (the dimmed audio), but there are other splits that are not so obvious.
To address this, Final Cut Pro contains an additional command that expands only those edits that are split.
To expand clips with overlapping audio and video
• Choose View > Expand Audio/Video Clips > For Splits.
Any clips containing overlapping audio and video are expanded ![]() .
.
![]() Expanding clips using For Splits expands only those clips with offset audio edits. Here, the first, second, and fourth clips all contained splits.
Expanding clips using For Splits expands only those clips with offset audio edits. Here, the first, second, and fourth clips all contained splits.
Note this command will have no effect unless you have previously expanded and overlapped some clips manually.
Clearing Split Edits
There may come a time when you want to remove a split edit and reset the audio and video to cut at the same exact time (called a straight cut).
Although you can do this manually by trimming the individual audio clips and realigning them with the video edit point, Final Cut Pro also has a command specifically for this purpose.
To clear an audio/video split
1. Select one or both of the clips that contain a split edit ![]() .
.
![]() Select a clip with an offset or overlapping audio edit.
Select a clip with an offset or overlapping audio edit.
Note it doesn’t matter whether the selected clips are expanded or collapsed.
2. Choose Clip > Clear Audio Video Split ![]() .
.
![]() Choose Clear Audio Video Split to reset the audio edit to match the video edit.
Choose Clear Audio Video Split to reset the audio edit to match the video edit.
The audio edit is realigned with the corresponding video edit, removing any overlapping audio.
Detaching Audio
While expanding clips allows you to trim the audio and video elements of a clip separately, sometimes you may want to treat the audio and video portions of a clip as completely separate objects.
For example, you might want to use the audio from one of them in place of the audio from a different shot. This is done frequently in dialogue scenes, where you might need to “steal” the audio from a close-up of an actor to use during another shot where you can’t see the actor’s lips. Or sometimes you might even use the audio from one take of a scene to use with a different take of the same scene. Just be sure the lips match when you play it back!
Detaching audio takes the audio component of your A/V clip and turns it into a connected clip ![]() .
.
![]() Detached audio is no different from any other connected clip.
Detached audio is no different from any other connected clip.
From that point on, you can move it or edit it in any way that you might modify any other connected clip.
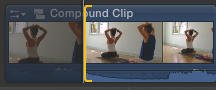
Note there is no way to reattach the audio component once it has been detached, though the pieces can be combined into a compound clip. See Chapter 16, “Compound Clips.”
To detach audio
1. Select a clip (or clips) in the Timeline ![]() .
.
![]() Select the clip you want to detach.
Select the clip you want to detach.
2. Choose Clip > Detach Audio, or press Control-Shift-S ![]() .
.
![]() Press Control-Shift-S to detach the audio.
Press Control-Shift-S to detach the audio.
The audio is extracted from the clip and added to the project as a connected clip aligned to the first frame of the corresponding video clip.
Separating Audio Channels
If you have a clip with multiple audio channels and you want to manipulate those channels independently, you must first break apart the clip. (To learn more about audio channels, see Audio Pan Settings in Chapter 11, “Audio Editing.”)
Breaking apart an A/V clip works just like detaching audio, except that each of the individual audio channels is turned into a separate connected clip.
Once a clip has been broken apart into its individual channels, you can set the audio levels of each channel differently. (For more on adjusting audio levels, see Audio Levels in Chapter 11, “Audio Editing.”)
You can also move or trim the individual channels independently, but be careful that you don’t accidentally knock them out of sync. Final Cut Pro has no out-of-sync indicators to warn you that this is happening.
Note the Break Apart command is also used to separate the individual components of secondary storylines and compound clips. For more, see the “Secondary Storylines” section in Chapter 8, “Editing Tools” or Chapter 16, “Compound Clips.”
To break apart a clip
1. Select a clip (or clips) in the Timeline ![]() .
.
![]() Select the clip you want to break apart.
Select the clip you want to break apart.
2. Choose Clip > Break Apart Clip Items.
The individual channels are each broken out into their own clips in the Timeline ![]() .
.
![]() Once broken apart, each of the individual channels are separated into their own clips in the Timeline.
Once broken apart, each of the individual channels are separated into their own clips in the Timeline.
Note once a clip has been broken apart, it cannot be collapsed back into a single clip, although it can be made into a compound clip. See Chapter 16, “Compound Clips.”
Slipping Clips
If you want to adjust the timing of a single clip without disturbing the timing of any of the adjacent clips, you can slip the clip.
Slipping a clip ripples both its In point and its Out point simultaneously by the same number of frames. The result is that the clip’s duration doesn’t change, and its position doesn’t change, but the frames included in the shot do change.
For example, if you had a five-second shot of a bird flying across the screen, you could slip the clip so the shot begins before the bird enters the frame, slip it so the shot begins with the bird midway through the frame, or even slip it so the bird has already left the frame before the shot began (though I’m not sure why you’d want to do that). In all three cases, the duration of the shot remains unchanged, but you’re able to show a different portion of the action.
Slipping is most commonly done near the end of the editing process when the overall timing of the movie is set and you want your edit to be minimally disruptive to the surrounding clips.
To slip a clip
1. Select the Trim tool from the Tools popup in the toolbar, or press T ![]() .
.
![]() Select the Trim tool from the Tools pop-up menu in the toolbar.
Select the Trim tool from the Tools pop-up menu in the toolbar.
2. Drag the clip’s filmstrip in the Timeline with the Trim tool. Drag right to select earlier frames, and drag left to select later frames ![]() .
.

![]() Use the Trim tool to slip a clip by dragging the clip in the Timeline.
Use the Trim tool to slip a clip by dragging the clip in the Timeline.
As you drag with the Trim tool, both edges of the clip light up yellow, and the thumbnails move to display the new frames.
When you reach the end of the source media, the edge of the clip turns red ![]() .
.
![]() If you reach the end of the available media, the edge of the clip turns red.
If you reach the end of the available media, the edge of the clip turns red.
Slipping from the Keyboard
Just as with rippling and rolling, you can slip a clip from the keyboard, slipping one frame at a time or typing a specific number of frames to slip all at once. This allows for more precise edits than dragging usually does.
To slip one frame at a time
1. Select the Trim tool from the Tools popup menu in the toolbar.
2. Click a clip to select it for slipping ![]() .
.

![]() Click a clip with the Trim tool to select it for slipping.
Click a clip with the Trim tool to select it for slipping.
The In point and Out point of the clip are highlighted in yellow.
3. Press , (comma) to slip to the left or . (period) to slip to the right.
The clip is slipped one frame at a time.
To slip by a specific number of frames
1. Select the Trim tool from the Tools popup menu in the toolbar.
2. Click a clip to select it for slipping ![]() .
.
![]() Select a clip for numerical slipping by clicking it with the Trim tool.
Select a clip for numerical slipping by clicking it with the Trim tool.
The In point and Out point of the clip are highlighted in yellow.
3. Press + (plus) or – (minus), and type the number of frames you want to trim ![]() .
.
![]() Type the number of frames by which you want to slip the clip.
Type the number of frames by which you want to slip the clip.
The Current Frame indicator changes to a slip indicator.
4. Press Enter (or Return) to perform the edit.
The clip is slipped by the specified number of frames.
If the “Show detailed trimming feedback” setting in the Editing pane of the Preferences window is enabled, the Viewer shows the new last frame of the previous clip and the new first frame of the following clip—these are the two frames that change when you slide a clip. To learn how to enable that setting, see “Viewing Detailed Trimming Feedback.”
Sliding Clips
Another way to move a clip that’s similar to slipping a clip is called sliding. Sliding moves a clip to a new position in the Timeline by shortening or lengthening the clips on either side of it.
Whereas slipping ripples the In point and Out point of a single clip, sliding ripples the Out point of the clip prior to the selected clip and ripples the In point of the clip after it. The clip itself remains unchanged.
The result is that the clip is repositioned in the Timeline.
Like slipping, sliding is most frequently done near the end of the editing process when you want to prevent the changes you make from impacting the rest of the project.
Note that sliding will never completely delete either of the adjacent clips. If you slide a clip all the way to the end of one of the adjacent clip edges, a (useless) single frame will be left. You must then zoom in and manually delete that one frame.
To slide a clip
1. Select the Trim tool from the Tools popup in the toolbar, or press T ![]() .
.
![]() Select the Trim tool from the Tools pop-up menu in the toolbar.
Select the Trim tool from the Tools pop-up menu in the toolbar.
2. Option-drag the thumbnails on a clip in the Timeline with the Trim tool ![]() . Drag left to slide the clip left or right to slide the clip right.
. Drag left to slide the clip left or right to slide the clip right.
![]() Option-drag the clip to Slide it.
Option-drag the clip to Slide it.
As you drag with the Trim tool, the adjacent clip edges light up yellow.
When you reach the end of the clip’s source media, the edge of that clip turns red ![]() .
.
![]() If you run out of available media, the edge of the clip turns red.
If you run out of available media, the edge of the clip turns red.
Sliding from the Keyboard
Just as with slipping clips, you can also slide a clip from the keyboard, either by sliding one frame at a time or by typing a specific number of frames to slide all at once. This allows for more precise edits than dragging usually does.
To slide one frame at a time
1. Select the Trim tool from the Tools pop-up menu in the toolbar.
2. Option-click a clip to select it for sliding ![]() .
.
![]() Option-click a clip with the Trim tool to select it for sliding.
Option-click a clip with the Trim tool to select it for sliding.
The edits on either side of the selected clip are highlighted in yellow.
3. Press , (comma) to slide to the left or . (period) to slide to the right.
The clip slides one frame at a time.
To slide by a specific number of frames
1. Select the Trim tool from the Tools popup menu in the toolbar.
2. Option-click the clip to select it for sliding ![]() .
.

![]() Option-click the clip with the Trim tool to select it for sliding.
Option-click the clip with the Trim tool to select it for sliding.
The edits on either side of the selected clip are highlighted in yellow.
3. Press + (plus) or – (minus), and type the number of frames you want to trim ![]() .
.
![]() Type the number of frames by which you want to slide the clip.
Type the number of frames by which you want to slide the clip.
The Current Frame indicator changes to a slide indicator.
4. Press Enter or Return to perform the edit.