
16. Compound Clips
In This Chapter
Viewing and Editing the Contents of a Compound Clip
Advanced Uses for Compound Clips
Final Cut Pro puts great emphasis on keeping the interface clean and simplified and on trying to keep your workflow similarly streamlined. As you build bigger and more complex projects, you can take advantage of compound clips to keep your Timeline from becoming unwieldy. As you’ll see in the coming pages, compound clips offer a variety of other benefits as well.
Using Compound Clips
A compound clip is simply a single clip object that represents multiple items ![]() .
.

![]() The three selected clips in the top image are replaced by the single compound clip in the bottom.
The three selected clips in the top image are replaced by the single compound clip in the bottom.
Note that previous versions of FCP referred to this as a sub-sequence or a nested sequence, and the command used to create such an object was Nest Items.
Here are some common examples of compound clips:
• A foreign-language interview with connected subtitles ![]()

![]() An interview with connected subtitles is a good candidate to be turned into a compound clip.
An interview with connected subtitles is a good candidate to be turned into a compound clip.
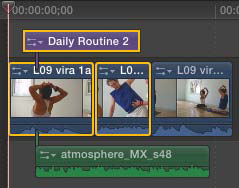
• A group of clips arranged into a split screen that you want to edit as if it were a single item ![]()
![]() By combining the two video clips, title, and background generator into a compound clip, you can adjust the whole group as a single object.
By combining the two video clips, title, and background generator into a compound clip, you can adjust the whole group as a single object.
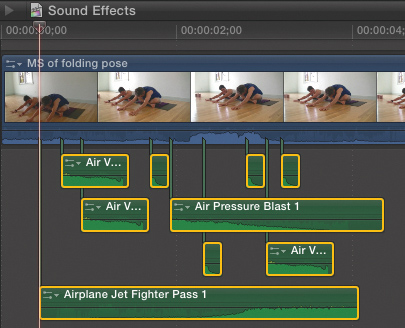
• A collection of overlapping sound effects whose levels you want to adjust all at once ![]()
![]() By combining all of the sound effects in the top image into one compound clip (as shown in the bottom image), you can move the group all at once and adjust a single level that makes the entire group louder or quieter.
By combining all of the sound effects in the top image into one compound clip (as shown in the bottom image), you can move the group all at once and adjust a single level that makes the entire group louder or quieter.
Once you convert the group of objects into a single compound clip, you can edit the new clip as if it were a single piece of media.
At any point you can delve inside the compound clip and modify its contents or break apart the compound clip, replacing it with the individual clips it comprises.
As the previous examples imply, compound clips can be used for a variety of purposes, including reducing visual clutter on the screen, allowing you to modify multiple objects at once, and overriding the order in which certain effects are rendered.
This chapter will describe each of these workflows and how using compound clips can improve your efficiency and effectiveness as an editor.
Making Compound Clips
Any collection of clips, either in the Timeline or in the Event Browser, can be made into a compound clip. In either case, the result is a new project-like object that can be edited as if it were a single clip.
Making Compound Clips in the Timeline
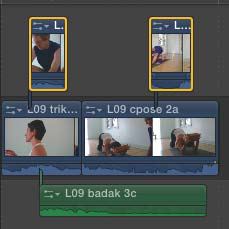
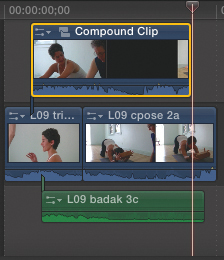
When made into a compound clip, clips in the Timeline will retain their relative positions, as well as any effects that may be applied to them. If there are gaps in your selection, those gaps will appear in the compound clip ![]() .
.


![]() The three clips in the top image are replaced by the single compound clip in the bottom.
The three clips in the top image are replaced by the single compound clip in the bottom.
The compound clip will replace the individual items in the Timeline.
With rare exceptions, a project will look identical playing in the Viewer before and after creating a compound clip. Only the representation of the clips in the Timeline changes.
You can create a compound clip that contains other compound clips! Just don’t try to make a compound clip that contains itself!
To create a compound clip in the Timeline
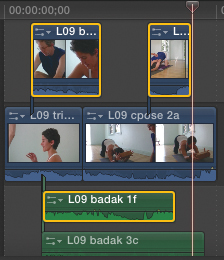
1. Select the clips you want to combine ![]() .
.
![]() You must select whole clips, but the clips don’t have to be adjacent to each other.
You must select whole clips, but the clips don’t have to be adjacent to each other.
2. Choose File > New Compound Clip, or press Option-G.
The clips are replaced by a single compound clip ![]() .
.
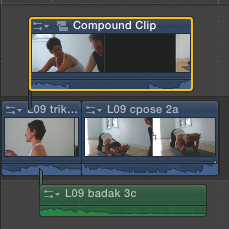
![]() The newly created compound clip shows thumbnails that represent the combined contents.
The newly created compound clip shows thumbnails that represent the combined contents.
Making Compound Clips in the Event Browser
Unlike what happens in the Timeline, a compound clip in the Event Browser does not replace the clips selected when it was created. The compound clip you create in the Event Browser contains copies of those individual clips.
Compound clips created in the Event Browser contain the selected objects arranged in the order in which they were sorted when the compound clip was created ![]()
![]() . With the Event Browser in Filmstrip view, clips will be arranged in the order in which they are selected.
. With the Event Browser in Filmstrip view, clips will be arranged in the order in which they are selected.
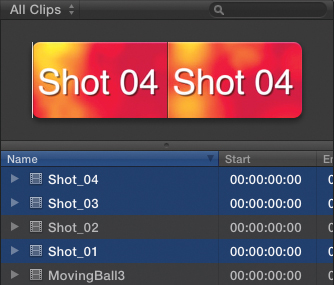
![]() In this example, the Event Browser is set to sort in reverse alphabetical order.
In this example, the Event Browser is set to sort in reverse alphabetical order.
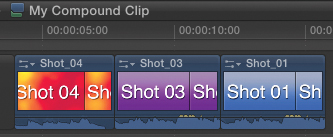
![]() The compound clip contains the clips in the order in which they were sorted in the Event Browser when the compound clip was created.
The compound clip contains the clips in the order in which they were sorted in the Event Browser when the compound clip was created.
To create a compound clip in the Event Browser
1. Select the clips you want to combine ![]() .
.
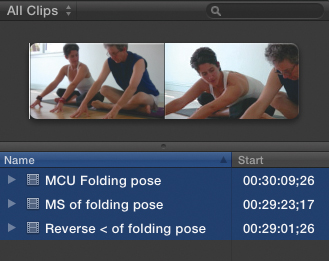
![]() Make a compound clip out of related shots, either as a quick rough edit or as a collection of shots to watch all at once.
Make a compound clip out of related shots, either as a quick rough edit or as a collection of shots to watch all at once.
2. Choose File > New Compound Clip, or press Option-G.
The Compound Clip sheet opens.
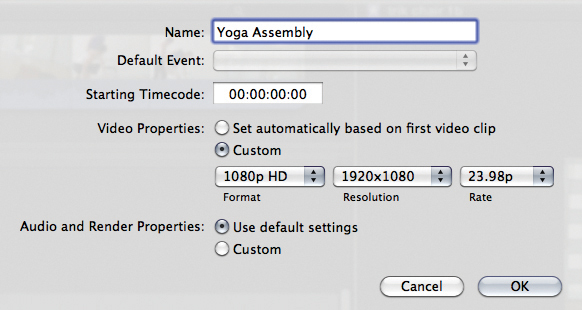
3. Name the compound clip, and set the starting timecode, Video Properties and Audio and Render properties settings ![]() .
.
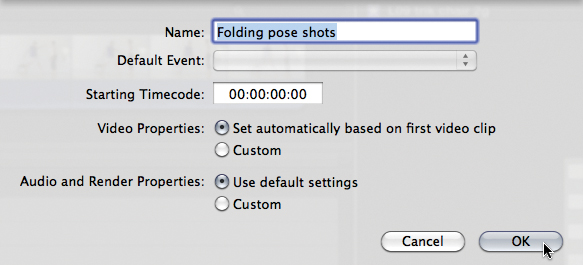
![]() Name the compound clip something that’ll help you remember what’s inside.
Name the compound clip something that’ll help you remember what’s inside.
4. Click OK.
A new compound clip is added to the current event in the Event Browser ![]() .
.
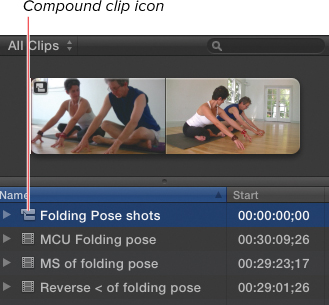
![]() The compound clip appears in the browser beside the other shots. Note the custom icon.
The compound clip appears in the browser beside the other shots. Note the custom icon.
Custom Compound Clip Settings
Compound clips are no different from other projects, and all projects have properties that determine the frame size, frame rate, and so on. (For more about Project Properties, see “Changing Project Properties” in Chapter 5, “Projects.”)
When creating a compound clip in the Event Browser, you have the option of matching the project properties for the compound clip to those of the first clip in the selection. This is almost always what you want, since it’s desirable to have your project settings match your clip settings. However, you can manually create different properties if you need to do so.
The most likely reason to customize these settings would be if the first clip in your selection was not similar to the rest of the footage you planned to use. For example, the first item in the selection might be 720p, while the rest of your footage is 1080i. Or the first item in the selection might be a still image of a custom size. If you based the compound clip’s properties on that still image, all the other video clips you add might appear stretched or distorted.
To customize compound clip settings
1. Select items in the Event Browser, and choose File > New Compound Clip ![]() .
.
![]() When combining clips with different settings, you may want to customize the compound clip settings. Note that the first clip in this example is a graphic.
When combining clips with different settings, you may want to customize the compound clip settings. Note that the first clip in this example is a graphic.
The Compound Clip sheet appears.
2. In the Video Properties setting, click Custom ![]() .
.
![]() When you click Custom, three pop-up menus appear.
When you click Custom, three pop-up menus appear.
The Custom Video Properties settings appear.
3. Select a preset from the Format pop-up menu ![]() .
.
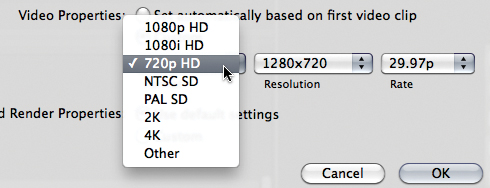
![]() The Format pop-up menu contains presets. Choosing one automatically sets the other two pop-up menus.
The Format pop-up menu contains presets. Choosing one automatically sets the other two pop-up menus.
The Resolution and Rate pop-ups change automatically based on the format you select.
4. To override the format presets, set a specific frame size and frame rate from the individual pop-up menus.
5. In the Audio and Render Properties setting, click Custom.
The Custom Audio and Render Properties settings appear ![]() .
.
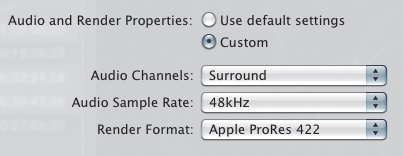
![]() Audio and Render settings become customizable when you enable the Custom choice.
Audio and Render settings become customizable when you enable the Custom choice.
6. Select an Audio Channels, Audio Sample Rate, and Render Format setting from each of the corresponding pop-up menus.
7. Name the compound clip, and click OK ![]() .
.
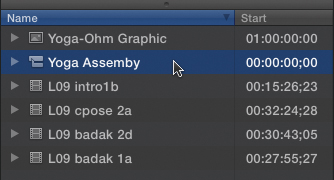
![]() When you create a compound clip in the Event Browser, the new item appears beside the other items.
When you create a compound clip in the Event Browser, the new item appears beside the other items.
The custom compound clip is created and appears in the Event Browser.
Viewing and Editing the Contents of a Compound Clip
Creating compound clips is nondestructive, so you can always go back and edit the individual components of the compound clip or even break apart the compound clip into its constituent parts, restoring the original clip layout in the Timeline.
Because compound clips are essentially projects, FCP displays their contents in a Timeline.
There, you can edit the contents of the compound clip just like any other project. You can add and delete clips, trim edit points, and apply effects, transitions, titles, audio clips, and so on.
Any changes you make inside the compound clip are automatically reflected in the parent project (the project that contains the compound clip object).
Let’s be clear: Changes you make to compound clips located in the Timeline will not be reflected in the parent compound clip (if one exists) in the Event Browser.
To view and edit the contents of a compound clip
1. Do one of the following:
• Double-click the filmstrip area of your compound clip in the Timeline.
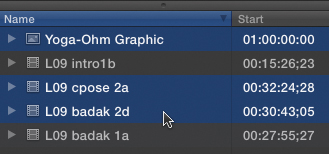
• Click the Compound Clip icon ![]() .
.
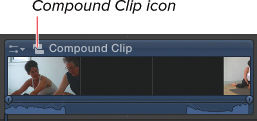
![]() Click the Compound Clip icon (to the left of the clip name) to open it into its own Timeline.
Click the Compound Clip icon (to the left of the clip name) to open it into its own Timeline.
• Select the compound clip, and choose Clip > Open In Timeline.
A new Timeline opens displaying the contents of the compound clip ![]() .
.
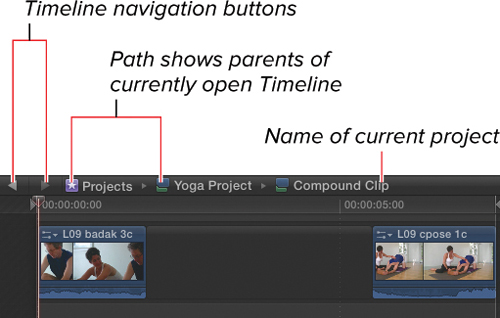
![]() When viewed in its own Timeline, a compound clip looks and acts just like any other project. The path at the top of the Timeline shows the project that contained the compound clip.
When viewed in its own Timeline, a compound clip looks and acts just like any other project. The path at the top of the Timeline shows the project that contained the compound clip.
2. Make any edits to the project in the Timeline ![]() .
.
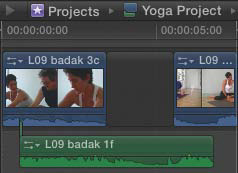
![]() In this example, the first clip is lengthened, and an audio clip has been attached.
In this example, the first clip is lengthened, and an audio clip has been attached.
3. Click the Timeline History Back button (see again ![]() ), or press Command-[.
), or press Command-[.
The previously open Timeline reappears ![]() .
.
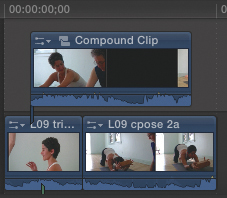
![]() The changes made inside the compound clip Timeline are automatically reflected in the parent project.
The changes made inside the compound clip Timeline are automatically reflected in the parent project.
4. Play around the compound clip.
The changes you made in step 2 are automatically updated in the parent project.
Note that you can also use these same steps to view and edit the contents of a compound clip created in the Event Browser. However, step 3 will simply reveal the previously open Timeline, which will not necessarily contain the compound clip you just edited.
Breaking Apart Compound Clips
For compound clips used in a project, you can, at any point, revert the clip to its constituent parts in the Timeline. Any effects or modifications made to the compound clip as a whole will be lost.
To break apart a compound clip
1. Select the compound clip in the Timeline.
2. Choose Clip > Break Apart Clip Items, or press Shift-Command-G ![]() .
.
![]() To break apart a compound clip, select it and press Shift-Command-G.
To break apart a compound clip, select it and press Shift-Command-G.
The compound clip is replaced by the individual clips that it comprised ![]() .
.
![]() The compound clip is replaced by the items that were inside it. In this example, the audio in the parent project was moved out of the way to make room for the audio added inside the compound clip.
The compound clip is replaced by the items that were inside it. In this example, the audio in the parent project was moved out of the way to make room for the audio added inside the compound clip.
Editing with Compound Clips
The primary use for creating compound clips is to treat the group of clips they represent as a single unit. You can edit, move, trim, apply effects to, and do anything else to a compound clip that you might do to an individual media clip.
The most basic thing you can do to a compound clip is to edit it in a project just like any other piece of source footage. This includes adding it to a Timeline, moving it around in a Timeline, and even trimming it in the Timeline.
To edit with a compound clip
• Select the compound clip in the Timeline, and move or trim it ![]() .
.
![]() You can pretty much forget that a compound clip contains multiple items and treat it just like a regular clip if you want.
You can pretty much forget that a compound clip contains multiple items and treat it just like a regular clip if you want.
The compound clip behaves like any other piece of source footage.
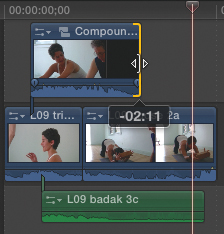
One important limitation to understand is that the duration of a compound clip is limited by the number of frames within it: You can shorten the compound clip in the parent project, but you cannot lengthen it without first adding additional frames inside the compound clip ![]() .
.
![]() You can shorten a compound clip in the parent project, but you can’t lengthen it without first going inside and adding frames.
You can shorten a compound clip in the parent project, but you can’t lengthen it without first going inside and adding frames.
Also, if you do change the duration of the items within a compound clip, the parent project will not automatically update to reflect that duration change. If you remove frames, black frames will be played where no media exists. If you add frames, you must manually extend the compound clip in the parent project to see those added frames. This is clarified further in the following two tasks.
To lengthen a compound clip
1. Select the compound clip in the parent project and press Control-D to display the duration in the Current Frame indicator ![]() .
.
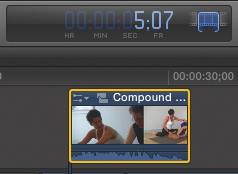
![]() In this example, the compound clip is five seconds and seven frames long.
In this example, the compound clip is five seconds and seven frames long.
Once the Duration field is showing in the Current Time indicator, you can type a new number to change the duration.
2. Double-click the compound clip to open it into its own Timeline.
3. Trim one or more of the clips to add frames to any of the edits in the compound clip ![]() .
.
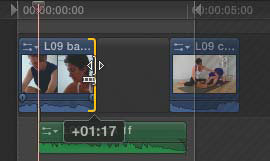
![]() As the first clip is lengthened by 1:17, the overall duration of the project is lengthened, but the hash marks indicate the locked duration based on what was set in the parent project, so those frames at the end will not be seen.
As the first clip is lengthened by 1:17, the overall duration of the project is lengthened, but the hash marks indicate the locked duration based on what was set in the parent project, so those frames at the end will not be seen.
Frames are added, increasing the total duration of the compound clip.
The hash marks indicate the section of the compound clip that is in use in the parent project.
4. Click the Timeline History Back button to navigate back to the parent project ![]() .
.
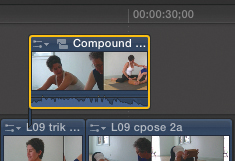
![]() In the parent project, the overall clip remains the same length.
In the parent project, the overall clip remains the same length.
The parent project is opened, and the compound clip still retains its original duration. The added frames are not visible in the parent project.
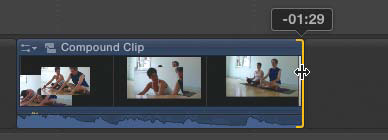
5. Ripple the right edge of the compound clip ![]() .
.
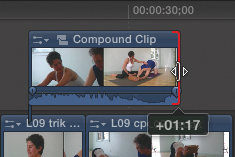
![]() Because new footage was added inside the compound clip, you can now ripple it to make it longer. The clip maxes out (as indicated by the red trim edge) after adding 1:17 frames.
Because new footage was added inside the compound clip, you can now ripple it to make it longer. The clip maxes out (as indicated by the red trim edge) after adding 1:17 frames.
Additional frames are available for trimming, allowing you to incorporate the added frames.
To shorten a compound clip
• Ripple the edge of the compound clip in the parent project ![]() .
.
![]() To shorten a Compound clip, just trim it in the parent project.
To shorten a Compound clip, just trim it in the parent project.
As you can see, shortening a compound clip is far easier than lengthening one!
However, it’s important to understand that if you do shorten the duration of the contents of the compound clip, you must manually update the object in the parent project to avoid seeing black frames.
To update a compound clip’s duration after removing frames from within it
1. Select the compound clip in the parent project and press Control-D to observe its duration in the Current Frame indicator ![]() .
.
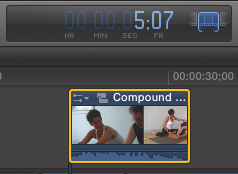
![]() In this case, the compound clip begins with a duration of five seconds and seven frames.
In this case, the compound clip begins with a duration of five seconds and seven frames.
2. Double-click the compound clip to open it into its own Timeline.
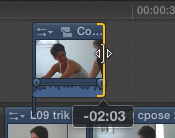
3. Trim one or more of the clips to remove frames from any of the edits in the compound clip ![]() .
.
![]() One of the clips within the compound clip is trimmed by 1:07.
One of the clips within the compound clip is trimmed by 1:07.
The frames are removed, shortening the duration of the compound clip.
4. Click the Timeline History Back button, or press Command-[.
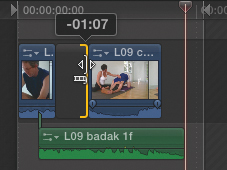
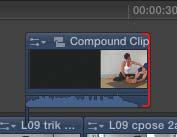
The Timeline shows the parent project. The duration of the compound clip has not changed ![]() .
.
![]() Back in the parent project, the duration is still 5:07, and the end of the clip shows black frames.
Back in the parent project, the duration is still 5:07, and the end of the clip shows black frames.
5. Play over the compound clip.
Black frames appear at the end of the compound clip.
6. Ripple the right edge of the compound clip ![]() .
.

![]() Once you ripple the clip to be shorter than the new number of frames inside the compound clip, that shorter length becomes the maximum length of the clip in the parent project.
Once you ripple the clip to be shorter than the new number of frames inside the compound clip, that shorter length becomes the maximum length of the clip in the parent project.
Once you modify the duration of the compound clip, its duration will be limited by the total number of frames inside.
Advanced Uses for Compound Clips
This idea of treating a compound clip like an individual piece of footage can be exploited in a variety of other powerful ways and allow you to accomplish tasks that would otherwise be impossible or at least very tedious.
Applying an Effect to Multiple Clips
For example, if you wanted to apply an Aged Film effect to a group of three clips, you could select all three clips in the Timeline and double-click the effect ![]() .
.
![]() The effect is applied separately to each of the three clips. To make changes, you’d have to open all three clips’ Info windows and make the changes three times.
The effect is applied separately to each of the three clips. To make changes, you’d have to open all three clips’ Info windows and make the changes three times.
However, if you then wanted to modify the settings of that filter, you would have to select each affected clip individually and match the settings for each of the clips.
If, instead, before applying the filter, you made a compound clip out of the three clips, you would have only one set of controls that would apply to all three clips ![]() .
.
![]() By combining the clips into a single compound clip, changes made once will update all the clips at once.
By combining the clips into a single compound clip, changes made once will update all the clips at once.
That way, you can continue to experiment with different settings with the confidence that the all three clips will always have identical settings applied.
To take it a step even further, if you wanted to keyframe that Aged Film filter so the amount of grain increased gradually over the course of the three shots, it would be extremely difficult to do manually, because you’d have to make sure the setting at the end of the first clip matched the setting at the beginning of the second clip, and so on ![]() .
.
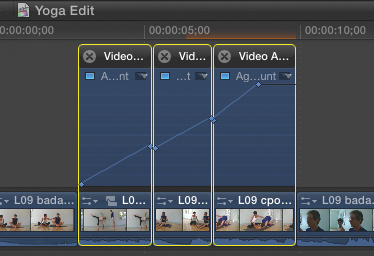
![]() Trying to perform an animated effect across multiple clips is especially challenging.
Trying to perform an animated effect across multiple clips is especially challenging.
If you ever wanted to trim one of the edits, you’d have to go back and redo all the filter settings on multiple clips.
If, however, you applied a single Aged Film filter to a compound clip, you could keyframe right across the clip boundaries, creating a smooth gradual effect ![]() .
.
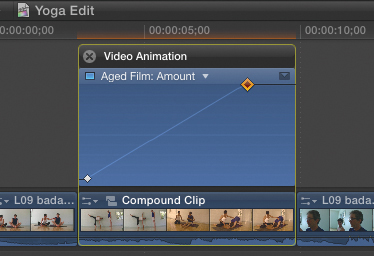
![]() Animating a single clip, on the other hand, is relatively simple.
Animating a single clip, on the other hand, is relatively simple.
For more on applying effects, see “To apply an effect” in Chapter 14, “Video Effects.” For more on keyframing, see Chapter 21, “Animating Effects.”
To apply a single effect to a group of clips
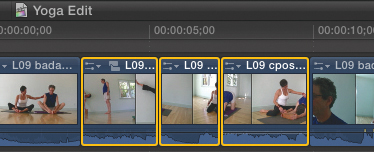
1. Select the group of clips in the Timeline to which you want to apply the effect ![]() .
.
![]() Select the clips to which you want to apply the effect.
Select the clips to which you want to apply the effect.
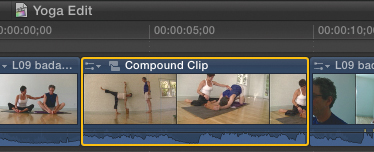
2. Press Option-G to create a compound clip ![]() .
.

![]() Press Option-G to convert the clips into a compound clip.
Press Option-G to convert the clips into a compound clip.
The clips are replaced by a single compound clip.
3. Select the compound clip in the Timeline.
4. Press Command-5 to open the Effects Browser ![]() .
.

![]() Open the Effects Browser.
Open the Effects Browser.
5. Double-click the effect of your choice to apply it to the compound clip ![]() .
.

![]() The orange render bar in the time ruler indicates that the effect has been applied to the compound clip.
The orange render bar in the time ruler indicates that the effect has been applied to the compound clip.
The effect is applied to the compound clip.
Applying Complex Transformations
Another way you can take advantage of compound clips to perform a task that would be otherwise impossible (or at least very difficult) is to transform a group of clips as a single object.
Because the compound clip acts as a single entity, you can scale, rotate, move, and perform other transformations to the group of items all at once.
To transform a group of objects as one
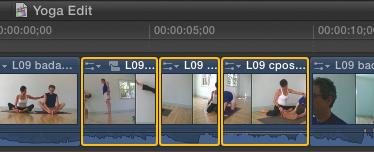
1. Arrange multiple clips into a composition ![]() .
.
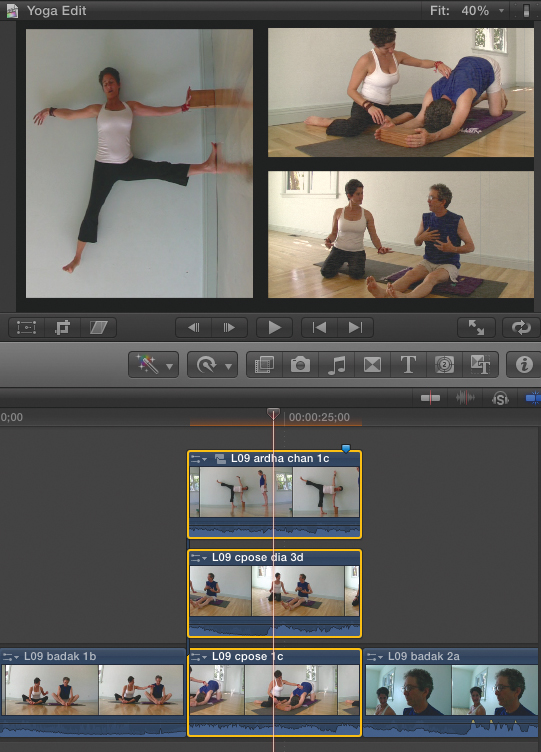
![]() Three clips are arranged into a split-screen composition. For the clips to all appear on-screen at once, they must overlap the same frames in the Timeline, as shown.
Three clips are arranged into a split-screen composition. For the clips to all appear on-screen at once, they must overlap the same frames in the Timeline, as shown.
2. Select the group of clips in the Timeline, and choose File > New Compound Clip or press Option-G.
A single Compound Clip object replaces the clips ![]() .
.
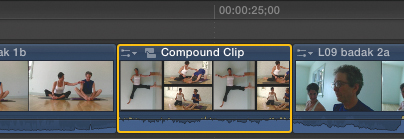
![]() The group is flattened into a compound clip, but the composition remains the same. The thumbnails for the compound clip show the composition.
The group is flattened into a compound clip, but the composition remains the same. The thumbnails for the compound clip show the composition.
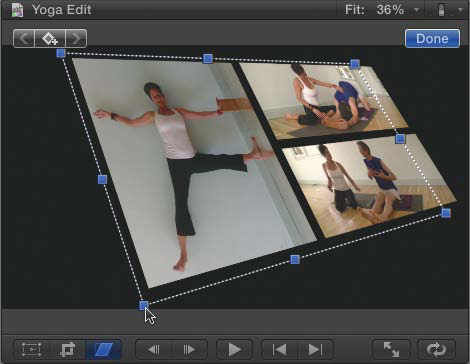
3. Select the compound clip, and click the Apply Transformations button, Crop button, or Distort button.
4. Apply the desired transformations to the compound clip ![]() .
.
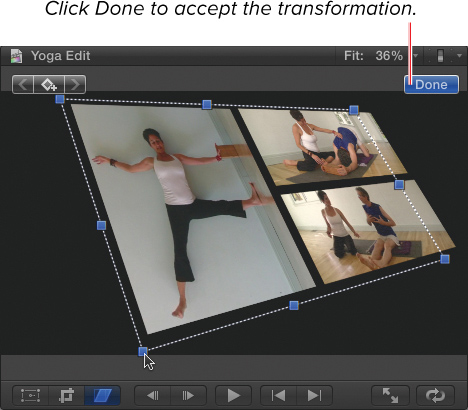
![]() Now you can manipulate the group of objects as if it were a single object. In this example, the group of clips has been distorted to simulate a 3D look. Doing this with the three individual clips would have been possible but hardly worth the effort.
Now you can manipulate the group of objects as if it were a single object. In this example, the group of clips has been distorted to simulate a 3D look. Doing this with the three individual clips would have been possible but hardly worth the effort.
5. Click Done to close the Transformation window.
Adjusting Audio Levels for Multiple Clips
One benefit of compound clips specific to audio clips is the ability to modify the audio level of multiple clips simultaneously; you can even fade the group of clips in and out as a single object.
To treat a group of audio clips as a single item
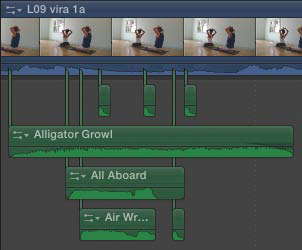
1. Select the group of connected audio clips in the Timeline ![]() .
.
![]() When you build a complex sound effect, it may include many separate audio clips.
When you build a complex sound effect, it may include many separate audio clips.
2. Choose File > Create New Compound Clip, or press Option-G.
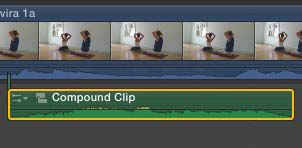
A single compound clip replaces the group of clips in the Timeline ![]() .
.
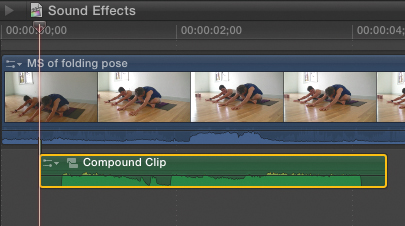
![]() By combining the separate elements into a single compound clip, you can manipulate the group of sound effects as if they were a single item.
By combining the separate elements into a single compound clip, you can manipulate the group of sound effects as if they were a single item.
3. Modify the audio levels and fade settings of the compound clip ![]() .
.
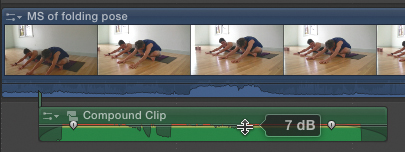
![]() Level and fade adjustments apply to the combined result of all the individual items.
Level and fade adjustments apply to the combined result of all the individual items.
The changes are applied to the group of clips.
Remember, you can still make changes to the levels of the individual audio elements. The results will be the combination of the level set inside the compound clip Timeline and the settings applied to the compound clip itself.
For more about modifying audio levels, applying fades and other audio effects, see Chapter 12, “Audio Effects.”
Controlling Render Order
Another benefit of compound clips is that they allow you to override the order in which certain effects are rendered.
Ordinarily, filters are applied to a clip first, and transformation effects are applied second. This means the transformation is being applied to the filtered clip ![]() .
.
![]() You can identify the order in which effects are rendered by observing their arrangement in the video pane of the Info window.
You can identify the order in which effects are rendered by observing their arrangement in the video pane of the Info window.
The order in which effects are rendered is easy to remember because the controls appear in the Inspector in the order in which they are applied.
So, for example, if you apply a Blur filter to a clip and crop the edge of that clip, the blur effect is cut off abruptly at the edge of where the crop has been applied ![]() .
.

![]() Because transformations are applied after filters, this image shows the blur effect being abruptly cropped.
Because transformations are applied after filters, this image shows the blur effect being abruptly cropped.
If you wanted the blur to affect the cropped edge, you would need the cropping to happen first and the blurring to happen second.
That means you must crop the clip first and then apply the blur effect to the cropped image. This can be accomplished only using compound clips.
To override the default order of render operations
1. Apply the desired transformation to the clip ![]() .
.
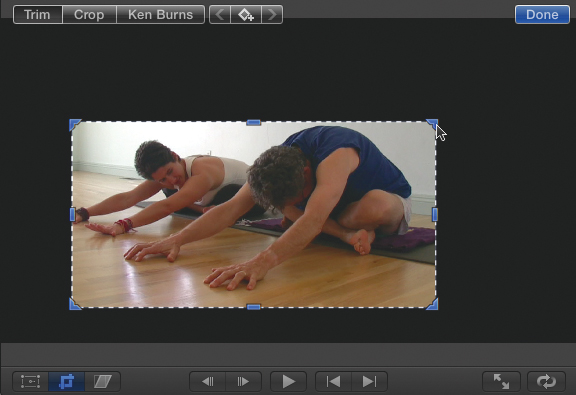
![]() In this example, the clip is cropped to show just the two yogis.
In this example, the clip is cropped to show just the two yogis.
2. Select the clip in the Timeline, and choose File > New Compound Clip (or press Option-G).
The clip is converted into a compound clip ![]() .
.
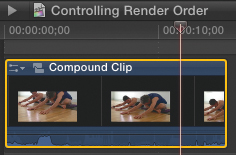
![]() In the Timeline, convert the cropped clip into a compound clip.
In the Timeline, convert the cropped clip into a compound clip.
3. Double-click the effect in the Effects Browser to apply it to the compound clip.
The filter is applied to the transformed version of the clip ![]() .
.

![]() The blur effect is applied to the precropped clip. Both the active pixels and the black ones are blurred, creating this nice, soft-edged blur.
The blur effect is applied to the precropped clip. Both the active pixels and the black ones are blurred, creating this nice, soft-edged blur.
This concept can be employed in a variety of similar cases where you want to override the default order of operations.
Another example would be if you wanted to create an effect where an object was scaled around one anchor point and rotated around a different anchor point. You could apply the scale to the individual clip and the rotation to a compound clip containing the individual clip. The possibilities are limitless!