
14. Maps
In This Chapter
![]() You can use Maps to find locations and businesses, mark spots on a map, find your current location, get directions, and show traffic conditions.
You can use Maps to find locations and businesses, mark spots on a map, find your current location, get directions, and show traffic conditions.
Maps needs an Internet connection (Wi-Fi or cellular signal) to download its cartographic and point-of-interest data, so don’t rely on it for emergency directions or wilderness hikes.
Maps uses Location Services for many of its features. To enable Location Services, tap Settings > Location Services, turn on Location Services, and then turn on Maps. For details, see “Using Location Services” in Chapter 3. To disallow the use of Location Services by children and guests, tap Settings > General > Restrictions > Location.
Finding a Location
You can search for bodies of water, geographic features, latitude–longitude coordinates, continents, countries, regions, provinces, states, cities, towns, neighborhoods, street addresses, postal or ZIP codes, roads, intersections, airports (names or three-letter codes), landmarks, parks, schools, businesses, and other points of interest. Partial words and misspellings sometimes work.
To find a location:
1. Tap the Search button at the top of the Maps screen.
2. To search for a local, nonspecific location, such as coffee shop or movies, scroll and zoom the map to narrow the area of interest, or tap ![]() to zoom to your current location.
to zoom to your current location.
3. Tap the Search or Address field; type a location; tap Search on the keyboard; and if Maps opens a Did You Mean window, tap one of the listed locations.
or
Tap ![]() to find a previously bookmarked place, a recently found location, or a contact.
to find a previously bookmarked place, a recently found location, or a contact.
Maps drops a pushpin on the map location or several pushpins on multiple matching locations ![]() .
.

![]() If Maps drop multiple pushpins on the map, a bar appears over the best match. Tap
If Maps drop multiple pushpins on the map, a bar appears over the best match. Tap ![]() in the Search or Address field to see a list of matches.
in the Search or Address field to see a list of matches.
4. To get more information about a location, tap its pushpin and then tap ![]()
![]() .
.
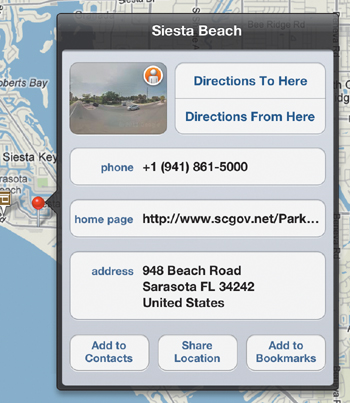
![]() In the Info window, you can touch and hold textual information to copy it.
In the Info window, you can touch and hold textual information to copy it.
Use the Info window to show Street View (see the nearby sidebar), get directions, get the phone number, make a FaceTime call, visit the Web site, see the full address, add the location to Contacts, share (tweet, text, or email) the location, or bookmark the location. Available information varies by location.
5. To change the map view, tap or drag the bottom-right corner of the screen (the “page curl”) and then tap a view ![]() .
.
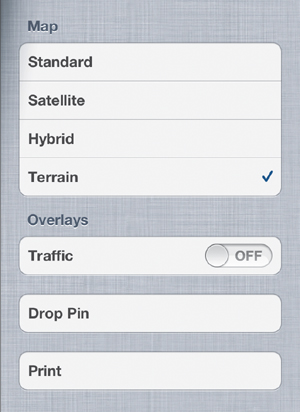
![]() The available map views are Standard (traditional cartography), Satellite (orbital photos), Hybrid (place and street names overlaid on satellite photos), and Terrain (shaded elevations).
The available map views are Standard (traditional cartography), Satellite (orbital photos), Hybrid (place and street names overlaid on satellite photos), and Terrain (shaded elevations).
You can also print your map from this screen. For details, see “Printing from Your iPad” in Chapter 2.
To mark a specific spot on the map, touch and hold the spot to drop a pushpin on it. If you miss slightly, press and drag the pin to the right place. To drop a pin in the middle of the current map view, tap the bottom-right corner of the screen and then tap Drop Pin ![]() . To remove a dropped pin, tap it, tap
. To remove a dropped pin, tap it, tap ![]() , and then tap Remove Pin.
, and then tap Remove Pin.
Street View ![]() shows ground-level photos merged into a 360-degree panoramic view. If this feature is available for a location, the Street View icon
shows ground-level photos merged into a 360-degree panoramic view. If this feature is available for a location, the Street View icon ![]() appears on the pushpin’s pop-up bar
appears on the pushpin’s pop-up bar ![]() and Info window
and Info window ![]() .
.
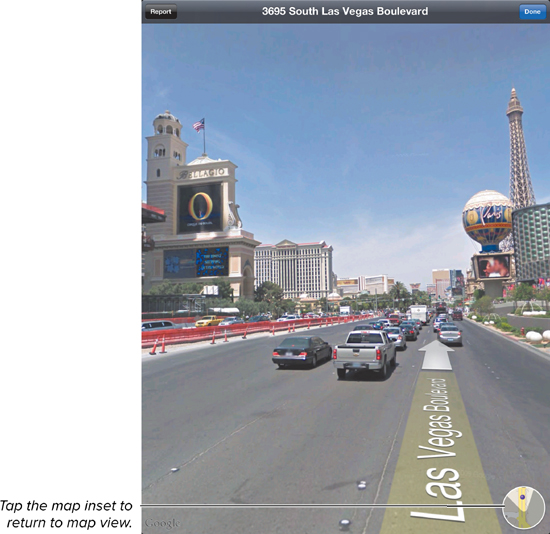
![]() Street View.
Street View.
• Flick or drag to pan the view.
• Pinch or double-tap to zoom.
• Tap the screen to show or hide the location and toolbar controls.
• Tap an arrow to move down a street.
Getting Directions
Maps can get you from Point A to Point B whether you’re driving, walking, or taking public transportation.
To get directions:
1. Tap the Directions button at the top of the Maps screen.
2. In the Start and End fields, enter your origin and destination.
Specify street addresses or locations as described in “To find a location” earlier in this chapter. You can tap ![]() to use your current location; use a dropped pin; or choose a location from your list of bookmarks, recent locations, or contacts.
to use your current location; use a dropped pin; or choose a location from your list of bookmarks, recent locations, or contacts.
Maps calculates the route’s step-by-step directions (including alternative routes, if available) and displays travel time for walking and driving routes in a blue toolbar at the bottom of the screen ![]() .
.
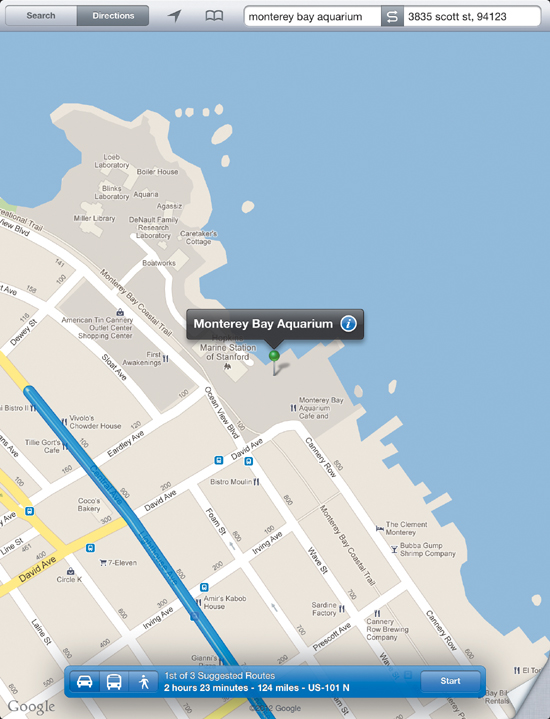
![]() Maps shows the approximate travel time for your trip.
Maps shows the approximate travel time for your trip.
3. To drive, tap ![]() ; to take public transit (bus, train, or ferry), tap
; to take public transit (bus, train, or ferry), tap ![]() ; or to walk, tap
; or to walk, tap ![]() .
.
Depending on the route, not every mode of transportation may be available. If you choose public transit, tap ![]() to schedule your trip.
to schedule your trip.
4. To view directions one step at a time, tap Start and then tap ![]() or
or ![]() to see the previous or next leg of the trip.
to see the previous or next leg of the trip.
or
To view all the directions in a list, tap Start and then tap ![]()
![]() .
.

![]() Tap any item in the Directions list to see a map showing that leg of the trip. To hide the list, tap the button in the top-left corner.
Tap any item in the Directions list to see a map showing that leg of the trip. To hide the list, tap the button in the top-left corner.
5. If alternative routes appear on the map, you can tap the one that you want to use.
The top item in the Directions list indicates your chosen route ![]() . To view or choose another route, hide the Directions list. You may have to scroll or zoom the map to see the other routes, which are shown in light blue and labeled Route 1, Route 2, and so on.
. To view or choose another route, hide the Directions list. You may have to scroll or zoom the map to see the other routes, which are shown in light blue and labeled Route 1, Route 2, and so on.
6. To see current traffic conditions along the route (where available), tap the bottom-right corner of the screen and then turn on Traffic.
Streets and highways are color-coded to indicate the flow of traffic: green = fast, yellow = slow, red = stop-and-go, and gray = no data.