
3. Online and Wireless Connections
In This Chapter
Using Virtual Private Networks
Every iPad can access the Internet over a Wi-Fi connection. You can jump online from a wireless network at home, work, or school, or from a public Wi-Fi hotspot at a library, café, or airport.
The costlier Wi-Fi+4G iPads (or Wi-Fi+3G, for older models) can also connect to the Internet through a cellular network—the same network that you use to make mobile phone calls. In the United States, for example, you can use AT&T or Verizon cellular service, depending on which 4G/3G iPad model you bought.
Unlike Wi-Fi, 4G/3G doesn’t anchor you to a stationary network. You can use the Internet anywhere you can make a mobile phone call (including a moving vehicle). When you have a choice, stick with Wi-Fi; it’s likely to be faster and doesn’t incur carrier charges against your data plan’s monthly limit.
This chapter also covers the iPad’s other wireless features: hotspots, Bluetooth, VPNs (virtual private networks), and more.
Making Wi-Fi Connections
Wi-Fi—also known by its less-catchy technical name, IEEE 802.11—is the same technology that laptop computers and handheld gadgets use to get online at high speed. After your iPad is connected to a Wi-Fi network, you can browse the Web, send and receive email, view maps, and do other tasks that require an Internet connection. Wi-Fi also lets you interact with other devices and computers on the same network. You can control iTunes music playback on your computer, control movie playback on an Apple TV, or play a game against another iPad user, for example.
When your iPad needs an Internet connection, such as when you browse to a Web site in Safari, it automatically scans for active Wi-Fi networks within range and then pops open a box listing them ![]() . Tap the name of a network that you want to join. If the network is secured, type its password and then tap Join. When your iPad is joined to a Wi-Fi network, the Wi-Fi icon
. Tap the name of a network that you want to join. If the network is secured, type its password and then tap Join. When your iPad is joined to a Wi-Fi network, the Wi-Fi icon ![]() in the status bar at the top of the screen shows the signal strength. The more bars, the stronger the signal.
in the status bar at the top of the screen shows the signal strength. The more bars, the stronger the signal.

![]() Available Wi-Fi networks.
Available Wi-Fi networks.
If you join a public, unsecured Wi-Fi network, it’s easy for the network owner or nearby intruders to collect the unencrypted data (passwords, credit-card numbers, Web addresses, and so on) flowing between your iPad and the wireless router. Don’t shop, bank, or pay bills on such networks. If you have no choice, use a VPN service like WiTopia (https://www.witopia.net).
You can also connect to a Wi-Fi network manually (and view or change network settings) by tapping Settings > Wi-Fi. A manual connection is necessary to join a closed network—one whose security-minded owner has hidden the network name so that it isn’t shown in the list of scanned networks ![]() .
.
Some wireless networks use MAC address filtering to restrict access to preapproved computers, devices, and other hardware. To find your iPad’s MAC address, tap Settings > General > About > Wi-Fi Address.
After you join a Wi-Fi network, your iPad automatically reconnects to it whenever the network is in range. If more than one previously used network is in range, your iPad rejoins the one last used. You can make your iPad “forget” specific networks (and their passwords) so that it doesn’t join them automatically.
To turn Wi-Fi on or off
1. Tap Settings > Wi-Fi.
2. Tap the toggle switch to turn Wi-Fi on or off.
To join a Wi-Fi network manually
1. Tap Settings > Wi-Fi ![]() .
.

![]() The Wi-Fi Networks screen is the gateway to Wi-Fi connections, options, and technical information.
The Wi-Fi Networks screen is the gateway to Wi-Fi connections, options, and technical information.
2. Tap the name of a network that you want to join.
3. If the network is secured, type its password and then tap Join.
To always join new Wi-Fi networks manually
1. Tap Settings > Wi-Fi.
2. Turn off Ask to Join Networks ![]() .
.
Turning off this setting suppresses the Select a Wireless Network pop-up box ![]() , if it’s bugging you.
, if it’s bugging you.
To forget a network so that your iPad doesn’t join it automatically
1. Tap Settings > Wi-Fi.
2. Tap ![]() next to the target network.
next to the target network.
3. Tap Forget This Network ![]() .
.
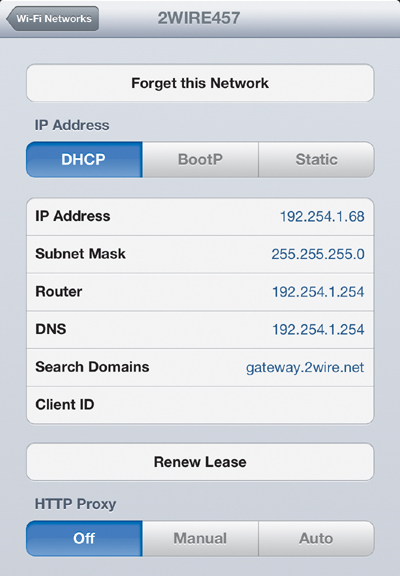
![]() This screen also lets you adjust advanced network settings. You can set an HTTP proxy, define static network settings, turn on BootP, or renew the settings from a DHCP server.
This screen also lets you adjust advanced network settings. You can set an HTTP proxy, define static network settings, turn on BootP, or renew the settings from a DHCP server.
To clear all your current network settings (including saved networks, Wi-Fi passwords, and VPN settings), tap Settings > General > Reset > Reset Network Settings.
To join a closed (hidden) Wi-Fi network
1. Tap Settings > Wi-Fi > Other.
2. Enter the network name, security (encryption) type, and (if required) password ![]() .
.
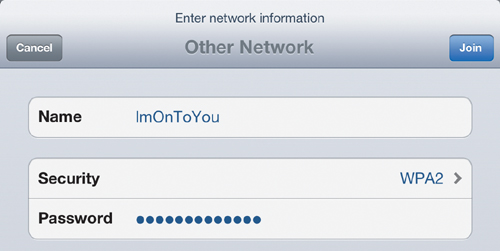
![]() Before you can join a closed network, the network’s owner or administrator must tell you its settings.
Before you can join a closed network, the network’s owner or administrator must tell you its settings.
3. Tap Join.
If you don’t have a 4G/3G iPad, you can still connect to a cellular network over Wi-Fi by using a mobile hotspot. This pocket-size gadget offers always-on broadband connections, can connect multiple devices at the same time (like your iPad, mobile phone, and laptop), and isn’t necessarily tied to one carrier. Sadly, mobile hotspots are expensive, both to buy and to use. For examples, see the Novatel MiFi (http://nvtl.com) or Sierra Wireless AirCard (http://www.sierrawireless.com).
If an airplane’s cabin crew asks you to turn off electronic devices to avoid interfering with the flight instruments, tap Settings > Airplane Mode > On ![]() to suppress your iPad’s Wi-Fi, cellular, Bluetooth, and GPS signals. You can still listen to music, watch videos, read books, type notes, and do other non-Internet things.
to suppress your iPad’s Wi-Fi, cellular, Bluetooth, and GPS signals. You can still listen to music, watch videos, read books, type notes, and do other non-Internet things.
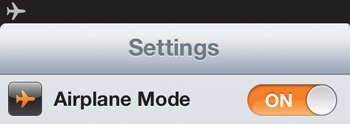
![]() Activating airplane mode.
Activating airplane mode.
When airplane mode is on, ![]() appears in the status bar at the top of the screen.
appears in the status bar at the top of the screen.
Making Cellular Connections
If you have a 4G/3G iPad, you don’t need a Wi-Fi hotspot to connect to the Internet. You can connect wherever your chosen carrier provides cellular network coverage. Before you can start using a cellular network, you must sign up for a prepaid data plan.
Deciding on a plan
Plans vary by carrier and country, and they change over time. In the United States, for example, the available iPad carriers are AT&T and Verizon; in Canada, they’re Bell, Rogers, and Telus. You choose a plan when you set up a new carrier account on your iPad, but you may want to research plans and terms beforehand on the carrier’s Web site and search the Web for service reviews by other users.
When you choose a plan, note the following:
• The plan’s monthly fee ![]() .
.
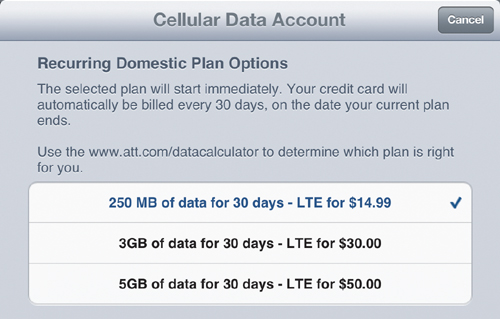
![]() Sample data plans and fees for AT&T in the United States.
Sample data plans and fees for AT&T in the United States.
• The plan’s monthly data limit (250 MB, 2 GB, 3 GB, 5 GB, 10 GB, or whatever). Limits apply to data coming to and going from your iPad. Some carrier Web sites offer a data calculator to help you estimate your data use based on your typical online activities.
• What happens if you exceed the limit. Some plans labeled Unlimited actually impose very large limits rather than being truly unlimited.
• The type of network, and its upload and download speeds.
• Whether you can cancel at any time.
• Whether the plan renews automatically, charging your credit card every month until you remember to cancel manually.
• Whether the plan also provides free, unlimited access to the carrier’s public Wi-Fi hotspots, if applicable. AT&T, for example, provides Wi-Fi hotspots in McDonald’s restaurants, Starbucks coffee shops, and major airports.
• Whether you can add the plan to your overall bill, if you already have an account with the carrier.
You can’t use a cellular data plan to make ordinary phone calls, as you would with an iPhone, but you can make calls with VoIP (voice over IP) apps like Skype.
A SIM card ![]() in some 4G/3G iPad models is used for cellular data. In the United States, for example, cellular service from AT&T requires a SIM card. (Verizon iPads don’t use one.)
in some 4G/3G iPad models is used for cellular data. In the United States, for example, cellular service from AT&T requires a SIM card. (Verizon iPads don’t use one.)
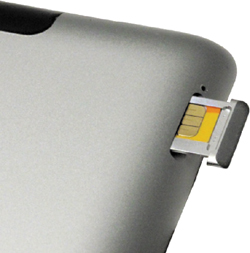
![]() SIM card.
SIM card.
Signing up for a plan
You can sign up directly from your iPad. The account sign-up process is managed by the carrier, not Apple. Your carrier account is a new account, separate from any of your other wireless, iTunes, or Apple accounts.
To set up a new cellular data account
1. Tap Settings > Cellular Data ![]() .
.

![]() The Cellular Data screen lets you activate, view, or change your cellular data account and control cellular network access.
The Cellular Data screen lets you activate, view, or change your cellular data account and control cellular network access.
2. Turn on Cellular Data.
(If Cellular Data is turned off, all data services use only Wi-Fi.)
3. Tap View Account and then follow the onscreen instructions ![]() .
.
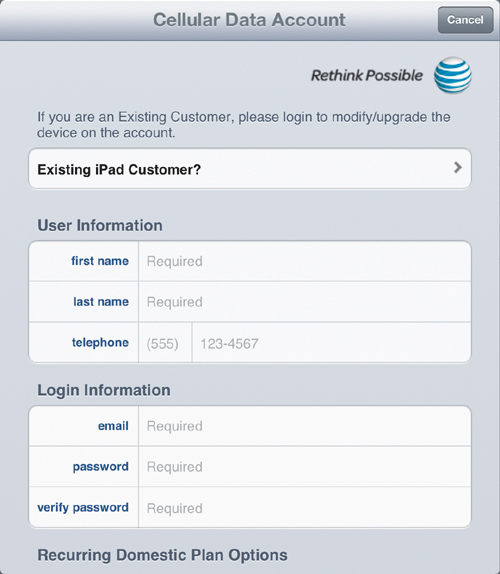
![]() Scroll to enter user and login information, choose a data plan, enter credit-card and billing information, and agree to terms of service.
Scroll to enter user and login information, choose a data plan, enter credit-card and billing information, and agree to terms of service.
After you submit your information, your carrier processes it and, if all goes well, activates your data plan. You can access the Internet anywhere you have cellular reception ![]() . In an area where both Wi-Fi and cellular work, Wi-Fi prevails. Wi-Fi doesn’t count toward the data limit even if cellular service is active.
. In an area where both Wi-Fi and cellular work, Wi-Fi prevails. Wi-Fi doesn’t count toward the data limit even if cellular service is active.
![]() When you’re using your cellular network, the status bar at the top of the screen shows the signal strength (more bars = stronger signal) and network/carrier.
When you’re using your cellular network, the status bar at the top of the screen shows the signal strength (more bars = stronger signal) and network/carrier.
No Service means that you’re out of network range (or you’ve forgotten to activate cellular data by tapping Settings > Cellular Data > On). To troubleshoot a cellular data connection, see http://support.apple.com/kb/TS3780.
Transferring a data plan
If you need to transfer your cellular data plan to a new iPad, it may be as easy as moving the SIM card from your old iPad to your new one (see the sidebar “SIM Cards” earlier in this chapter). If your plan doesn’t use a SIM card, contact your carrier, and explain that you need to transfer service to a new iPad. After the carrier transfers your service, on the new iPad, tap Settings > General > Reset > Reset Subscriber Service > Reprovision Account. Restart your iPad if the plan doesn’t autoactivate within 2 minutes.
Some carriers let you lock down the SIM card by adding a PIN code to it so that others can’t use it. Tap Settings > Cellular Data > SIM PIN (if it appears) and then pick a number. If the SIM already has a PIN, contact your carrier.
Monitoring data use
If you’re on a limited monthly data plan, the iPad displays pop-up warnings as you approach the limit. You can also view your data use at any time and see how many days are left in the billing period.
To view your cellular data use
• Tap Settings > Cellular Data > Usage ![]() .
.
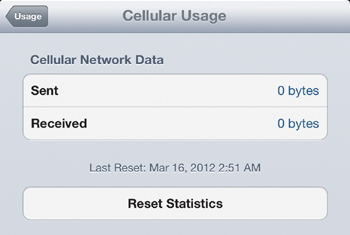
![]() The Cellular Usage screen shows data downloaded (received) and uploaded (sent). To restart the counts from zero, tap Reset Statistics.
The Cellular Usage screen shows data downloaded (received) and uploaded (sent). To restart the counts from zero, tap Reset Statistics.
Changing or canceling data plans
You can upgrade or downgrade to another plan, add a block of extra gigabytes to your existing plan, cancel your plan, or change your credit-card number. If you plan to travel, some carriers offer international plans.
To change or cancel your data plan
1. Tap Settings > Cellular Data > View Account.
2. Sign in with the same email address and password that you used when you originally set up the account.
3. Tap Add Data or Change Plan.
Using Personal Hotspot
On 4G models of iPad 3 or later, you can use the Personal Hotspot feature to share your iPad’s Internet connection with other people and devices at the same time—mobile phones, laptops, iPhones, iPods, or other Internet-enabled devices. Personal Hotspot can also share an Internet connection with a computer connected to your iPad via Bluetooth or USB (a practice also known as tethering). For service details, contact your carrier, and expect to pay extra.
To share an Internet connection, make sure that you’re connected to a cellular network and then tap Settings > General > Network > Set Up Personal Hotspot (if it appears). After you set up your account, tap Settings > Personal Hotspot > On. You can set a password (at least eight characters) and decide how other devices (up to five) connect to your hotspot:
• Wi-Fi. On the device or computer, choose your iPad from the list of available Wi-Fi networks.
• Bluetooth. On your iPad, tap Settings > General > Bluetooth > On. Follow the instructions that came with the device to pair it with your iPad.
• USB. Connect the computer to your iPad by using the dock connector–to–USB cable. In the computer’s Network preferences or control panel, choose your iPad and then configure the network settings.
The name of your hotspot is the name of your iPad (tap Settings > General > About > Name). When Personal Hotspot is on, ![]() appears in the status bar at the top of the screen. When a device is connected, a blue bar appears on the hotspot screen, listing the number of connected devices.
appears in the status bar at the top of the screen. When a device is connected, a blue bar appears on the hotspot screen, listing the number of connected devices.
An active personal hotspot drains your battery fast and can easily blow through your data plan’s use limit. To check use, tap Settings > Cellular Data > Usage.
Using Virtual Private Networks
A virtual private network (VPN) lets you connect from your iPad to an organization’s network securely and privately by using the Internet as a conduit. VPN works over both Wi-Fi and cellular data network connections.
To add a new VPN configuration:
1. Tap Settings > General > Network > VPN.
2. Turn on VPN.
3. Tap Add VPN Configuration.
4. Configure the VPN connection based on information you get from your network administrator or your organization’s IT department ![]() .
.
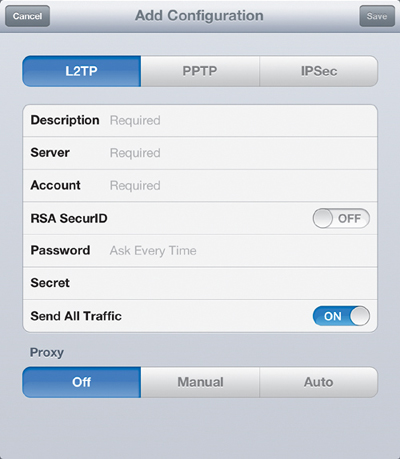
![]() If you’ve set up a VPN on your computer, you may be able to use the same VPN settings for your iPad.
If you’ve set up a VPN on your computer, you may be able to use the same VPN settings for your iPad.
You can add multiple VPN configurations and switch among them on the VPN screen. When a VPN connection is active, ![]() appears in the status bar at the top of the screen. When you’re not using VPN, turn it off to conserve power (tap Settings > General > Network > VPN > Off).
appears in the status bar at the top of the screen. When you’re not using VPN, turn it off to conserve power (tap Settings > General > Network > VPN > Off).
Using Bluetooth Devices
Bluetooth is a wireless technology that provides short-range (up to 33 feet) radio links between an iPad and external keyboards, headphones, speakers, or other Bluetooth-equipped devices. It eliminates cable clutter while simplifying communications, sharing, and data synchronization between devices. Bluetooth doesn’t need a line-of-sight connection, so you can, say, use a hands-free headset to listen to music playing on the iPad in your backpack.
A passkey (or personal identification number [PIN]) is a number that associates your iPad with a Bluetooth device. For security, many Bluetooth devices make you use a passkey to ensure that your iPad is connecting to your device and not someone else’s nearby. Check the device’s manual for a passkey.
Before you can use a Bluetooth device, you must make it discoverable and then pair it with your iPad; the device will come with instructions. Pairing (or passkey exchange) gets the iPad to positively identify the device that you want to connect to. After it’s paired, the device autoconnects whenever it’s within range of your iPad.
You can pair your iPad with multiple devices at the same time—say, a headset and a keyboard—if all the devices are different types. (You can’t pair two keyboards simultaneously, for example.) If you want to use a different device of the same type, you must unpair the first device.
To pair a Bluetooth device with an iPad
1. Follow the instructions that came with the device to make it discoverable.
2. Tap Settings > General > Bluetooth > On.
When you turn on Bluetooth, the iPad finds nearby discoverable devices and displays them in the Devices list.
3. Tap the device in the Devices list and then type the requested passkey to complete the pairing ![]() .
.
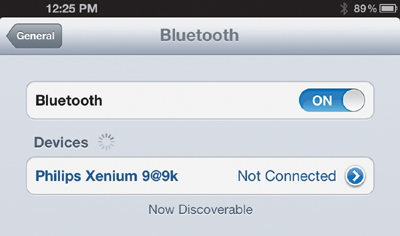
![]() To confirm the pairing, the iPad displays the device’s name in the Bluetooth screen.
To confirm the pairing, the iPad displays the device’s name in the Bluetooth screen.
Check the device’s manual for the passkey.
Some Bluetooth audio devices come with a small separate transceiver that plugs into the iPad’s headphone jack. If you have one of these transceivers, you don’t need to turn on Bluetooth; the plug-in takes care of the connection.
To unpair a device from an iPad
1. Tap Settings > General > Bluetooth,
2. Tap ![]() next to the device name.
next to the device name.
3. Tap Forget This Device.
When a Bluetooth device is connected, the Bluetooth icon ![]() appears in the status bar at the top of the screen. The icon’s color reflects its status. A white icon means that Bluetooth is on and paired with a device. A gray icon means that Bluetooth is on and paired with a device, but the device is out of range or turned off.
appears in the status bar at the top of the screen. The icon’s color reflects its status. A white icon means that Bluetooth is on and paired with a device. A gray icon means that Bluetooth is on and paired with a device, but the device is out of range or turned off.
Streaming with AirPlay
The iPad can stream music, photos, videos, or compatible apps to external speakers or displays via AirPlay, Apple’s wireless file-streaming technology. You can stream to any AirPlay-compatible device on the same Wi-Fi network as your iPad. You can also use AirPlay to stream audio to an Apple AirPort base station (wireless router).
To stream content to an AirPlay-equipped device
1. Start the music, slideshow, or video.
2. Tap ![]() on the iPad’s screen.
on the iPad’s screen.
3. Choose the AirPlay device (such as Apple TV).
After streaming starts on the device ![]() , you can switch away from the iPad app that’s playing the content.
, you can switch away from the iPad app that’s playing the content.
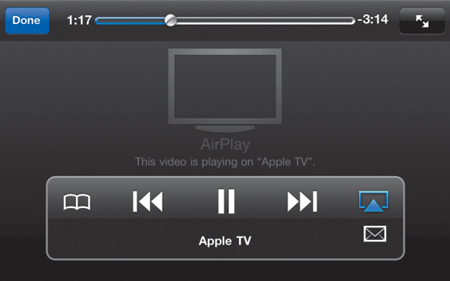
![]() AirPlay wirelessly streams files to AirPlay-compatible audio and video devices like Apple TV.
AirPlay wirelessly streams files to AirPlay-compatible audio and video devices like Apple TV.
To use the AirPlay playback controls
1. Double-click the Home button to show the multitasking bar at the bottom of the screen.
2. Flick left to right to access the playback controls (play, pause, volume, and so on).
To switch playback to the iPad
1. Tap ![]() .
.
2. Choose iPad.
All audio and video output return to the iPad.
Screen Mirroring
The iPad 2 or later can mirror (duplicate) whatever is on its screen—videos, apps, games, photos, presentations, Web sites, anything—to a high-definition TV (HDTV), digital projector, or other display. All you need is an Apple Digital AV Adapter ![]() . Plug it in to your iPad and then connect it to an HDMI cable from the TV or display; mirroring is enabled automatically
. Plug it in to your iPad and then connect it to an HDMI cable from the TV or display; mirroring is enabled automatically ![]() . (Don’t forget to change the TV’s input source to HDMI.) If you own an Apple TV, you can mirror the iPad screen over Wi-Fi.
. (Don’t forget to change the TV’s input source to HDMI.) If you own an Apple TV, you can mirror the iPad screen over Wi-Fi.

![]() The Apple Digital AV Adapter is a simple, portable tool that mirrors what’s on your iPad screen to an HDTV or HDMI-compatible display. (For an older VGA display, use the Apple VGA Adapter.)
The Apple Digital AV Adapter is a simple, portable tool that mirrors what’s on your iPad screen to an HDTV or HDMI-compatible display. (For an older VGA display, use the Apple VGA Adapter.)
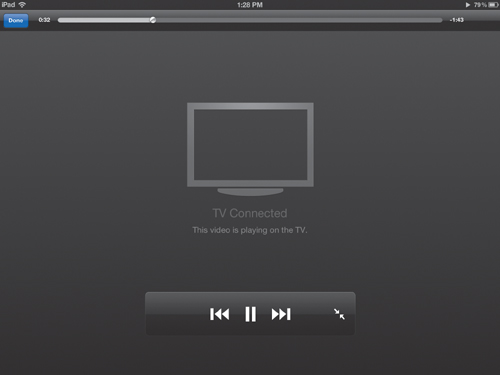
![]() You can control playback by using the controls on the iPad’s screen.
You can control playback by using the controls on the iPad’s screen.
Using Location Services
Location Services lets apps use your physical whereabouts via the iPad’s built-in positioning service. Built-in apps such as Reminders, Maps, Safari, and Camera use Location Services, as do many third-party apps—particularly weather, travel, search, movie-time, real-estate, and social-networking apps.
Location Services determines your approximate location by using the iPad’s built-in digital compass and data from nearby Wi-Fi hotspots. On 4G/3G models, it also uses Assisted GPS (Global Positioning System satellites) and data from cellular networks (cell towers).
The first time an app makes a request to use Location Services, your iPad pops open a location warning for that app ![]() . To let the app locate you, tap OK; otherwise, tap Don’t Allow. Your response sticks, and the request isn’t shown again (unless you later reset all location warnings by tapping Settings > General > Reset > Reset Location Warnings).
. To let the app locate you, tap OK; otherwise, tap Don’t Allow. Your response sticks, and the request isn’t shown again (unless you later reset all location warnings by tapping Settings > General > Reset > Reset Location Warnings).
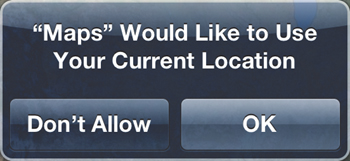
![]() No matter which option you choose here, you can change it in the Locations Services screen.
No matter which option you choose here, you can change it in the Locations Services screen.
Location Services does its best to locate you by combining compass, Wi-Fi, cellular, and GPS data. Depending on data quality and other factors (such as interference from your surroundings), your location may be unavailable or inaccurate. Apps that show your location onscreen, including Maps, indicate your current approximate location with a blue dot. A blue circle around the dot, if present, indicates how precisely your location can be determined. The smaller the circle, the greater the precision ![]() .
.

![]() The circle around your current location indicates how accurately Location Services can determine your position. The circle can grow or shrink over time or as you walk or drive around.
The circle around your current location indicates how accurately Location Services can determine your position. The circle can grow or shrink over time or as you walk or drive around.
If you don’t want to be found, or if you want to conserve battery power, you can turn off Location Services or disable it for specific apps. To do so, tap Settings > Location Services and then tap the appropriate toggle switch or switches ![]() . An app won’t appear in the Location Services list until it makes its first location request
. An app won’t appear in the Location Services list until it makes its first location request ![]() .
.

![]() You can turn Location Services off for some or for all apps and services. If you turn off Location Services, you’re prompted to turn it on again the next time an app or service tries to use it.
You can turn Location Services off for some or for all apps and services. If you turn off Location Services, you’re prompted to turn it on again the next time an app or service tries to use it.
When an app is using Location Services, ![]() appears in the status bar at the top of the screen. To hide this icon (or to set other options), tap Settings > Location Services > System Services.
appears in the status bar at the top of the screen. To hide this icon (or to set other options), tap Settings > Location Services > System Services.