
19. Photos
In This Chapter
![]() Photos is the central app for viewing and managing photos that you’ve taken with your iPad’s camera (iPad 2 or later); imported from your digital camera; synced with your computer; or saved from email, text messages, or the Web. The iPad can display photos and graphics in most popular image formats, including JPEG, PNG, TIFF, GIF, and RAW. You can also use Photos to view and manage videos that you take with the built-in camera or import from a digital camera or other iDevice.
Photos is the central app for viewing and managing photos that you’ve taken with your iPad’s camera (iPad 2 or later); imported from your digital camera; synced with your computer; or saved from email, text messages, or the Web. The iPad can display photos and graphics in most popular image formats, including JPEG, PNG, TIFF, GIF, and RAW. You can also use Photos to view and manage videos that you take with the built-in camera or import from a digital camera or other iDevice.
Getting Photos onto Your iPad
You can get pictures onto your iPad in the following ways.
Built-in camera. Photos and videos taken with Camera (see Chapter 7), as well as photos taken with Photo Booth (see Chapter 18), appear automatically in Camera Roll. To view your Camera Roll album, tap Photos > Camera Roll.
Saved photos. To save a photo from an email, text message, or Web page, touch and hold the image and then tap Save Image in the pop-up menu. The photo is stored in Camera Roll. If an email has multiple photos attached to it, tap ![]() to save them all
to save them all ![]() .
.
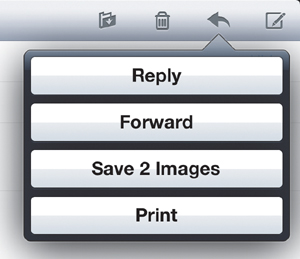
![]() If an email has multiple images attached, Mail lets you save them all at the same time.
If an email has multiple images attached, Mail lets you save them all at the same time.
Screen shots. To capture an image of whatever is on your iPad’s screen (like the figures in this book), press and release the Sleep/Wake button and the Home button at the same time. The shot lands in Camera Roll.
Photo Stream. You can use iCloud to automatically download to your iPad copies of photos synced from your computer or from another iDevice. Tap Settings > Photos > Photo Stream (or Settings > iCloud > Photo Stream). For details, see “Using iCloud” in Chapter 4.
Apple iPad Camera Connection Kit. This kit, available separately at http://store.apple.com, contains two adapters for the iPad’s dock connector ![]() . One adapter is a port for your camera’s USB cable, and the other has a slot for a Secure Digital (SD) memory card. After you plug in an adapter and insert a memory card or connect your camera, open Photos (if it doesn’t open automatically). Tap Import All to get all the photos, or tap individual photos to select them before you tap Import. Photos then gives you the option to delete the photos on your camera or memory card after you import them. To see the imported photos, tap Photos > Last Import. You can sync the photos back to your computer by choosing the Import command in Adobe Photoshop Elements, iPhoto, or whatever photo-editing software you use.
. One adapter is a port for your camera’s USB cable, and the other has a slot for a Secure Digital (SD) memory card. After you plug in an adapter and insert a memory card or connect your camera, open Photos (if it doesn’t open automatically). Tap Import All to get all the photos, or tap individual photos to select them before you tap Import. Photos then gives you the option to delete the photos on your camera or memory card after you import them. To see the imported photos, tap Photos > Last Import. You can sync the photos back to your computer by choosing the Import command in Adobe Photoshop Elements, iPhoto, or whatever photo-editing software you use.

![]() The Apple iPad Camera Connection Kit. You can use these adapters to suck photos into your iPad from an SD card or directly from your camera via USB cable.
The Apple iPad Camera Connection Kit. You can use these adapters to suck photos into your iPad from an SD card or directly from your camera via USB cable.
iTunes sync. Connect your iPad to your computer via USB cable or Wi-Fi Sync, click your iPad in the iTunes sidebar (on the left side), click the Photos tab, and then set Sync Photos options. When you’re done, click Apply or Sync. You can sync from a photo-organizer program like Photoshop Elements or iPhoto or from a folder such as My Pictures (Windows), Photos (Mac), or the folder of your choice. For details, see “Syncing with iTunes” in Chapter 4.
You can sync only one computer’s photo library to your iPad. If you sync photos from a second computer, iTunes erases all the photos from the first one.
Finding Photos on Your iPad
Photos organizes your photo collection into groups. Tap one of the buttons at the top of the screen to see your photos sorted in different views, including these.
Photos. Tapping Photos displays thumbnails of all your pictures in one place, including photos that you didn’t group into albums before you imported them ![]() . To share, copy, or delete selected photos or to add them to an album, tap
. To share, copy, or delete selected photos or to add them to an album, tap ![]() .
.

![]() Photos view works best if you don’t have a huge number of photos on your iPad.
Photos view works best if you don’t have a huge number of photos on your iPad.
Photo Stream. Tapping Photo Stream displays photos that iCloud automatically sent to your iPad over the Internet (see “Using iCloud” in Chapter 4). To share, copy, or delete selected photos, or to save them to an album before they’re rotated out by new photos, tap ![]() .
.
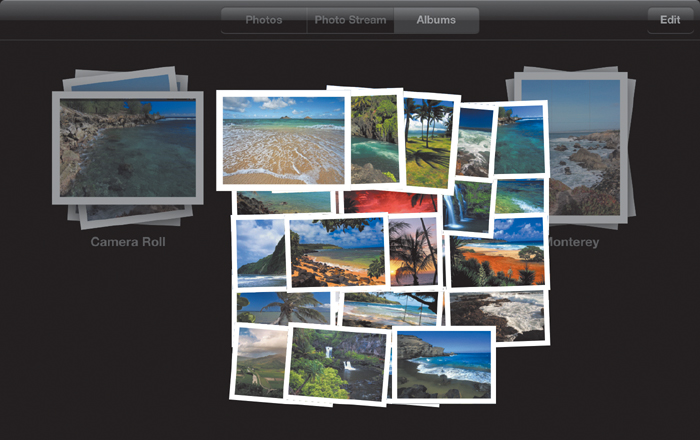
Albums. Tapping Albums displays the Camera Roll album and synced photos grouped under the same album names as in your photo program (iPhoto, Photoshop Elements, or whatever) ![]() . You can also create albums directly in Albums view; see the next section for details.
. You can also create albums directly in Albums view; see the next section for details.

![]() In Albums view, your picture sets look like stacks of loose photographs.
In Albums view, your picture sets look like stacks of loose photographs.
Other views. If you sync your photos from iPhoto ’09 or later on the Mac, you may see more buttons at the top of the screen, including Events (time-stamp groupings), Faces (facial-recognition groupings), and Places (geolocation groupings). Places also shows geotagged photos taken with a GPS-enabled camera.
Working with Albums
Here are some tips for working with albums:
• To rearrange albums, touch and hold an album and then drag it.
• To see thumbnail images of all the photos in an album, tap the album.
• To see a quick preview of an album’s photos, spread and then pinch your fingers on the album ![]() .
.
![]() Spread your fingers slowly to view a clump of an album’s photos without fully opening the album.
Spread your fingers slowly to view a clump of an album’s photos without fully opening the album.
• To create an album, tap Edit > New Album, type an album name, and then tap Save. On the screen of photos that appears, tap to select the photos that you want to add to the new album and then tap Done.
• To rename an album, tap Edit and then tap the album name.
• To close an album, tap Albums or pinch the screen.
• To delete an album (but not its photos), tap Edit and then tap ![]() on the album.
on the album.
• To remove photos from an album (but not delete the photos), tap the album, tap ![]() , tap to select the photos, and then tap Remove.
, tap to select the photos, and then tap Remove.
• To add photos from Photos view to a new or existing album, tap the Photos button, tap ![]() , tap to select the photos, and then tap Add To.
, tap to select the photos, and then tap Add To.
Some of these tips don’t apply to albums synced from your computer. To manage synced albums, connect your iPad to your computer, open iTunes, click your iPad in the iTunes sidebar, and then click the Photos tab.
Viewing Photos
To view a photo (or video), tap one of the buttons at the top of the screen (Photos or Albums, for example) and then tap or spread an image’s thumbnail to view it full-screen ![]() . Rotate your iPad to make a horizontal or vertical photo fill the screen’s width or height.
. Rotate your iPad to make a horizontal or vertical photo fill the screen’s width or height.

![]() A full-screen photo, with controls showing.
A full-screen photo, with controls showing.
You can do any of the following things:
• To show or hide the controls, tap the screen.
• To scroll through photos, flick left or right.
• To zoom a photo, double-tap, pinch, or spread.
• To pan a zoomed photo, drag or flick.
• To play a video, tap ![]() .
.
• To edit a photo or trim a video, tap Edit. (For details, see “Using Photo and Video Tools” in Chapter 7.)
• Tap ![]() to email a photo, assign it to one of your contacts, set it as wallpaper, tweet it to followers, print it, or copy it.
to email a photo, assign it to one of your contacts, set it as wallpaper, tweet it to followers, print it, or copy it.
A quicker way to copy a photo: Touch and hold the photo and then tap Copy in the pop-up menu. You can paste a copied photo (or video) into an email or text message.
• To delete a photo, tap ![]() . To delete photos from synced albums, connect your iPad to your computer, open iTunes, click your iPad in the iTunes sidebar, and then click the Photos tab.
. To delete photos from synced albums, connect your iPad to your computer, open iTunes, click your iPad in the iTunes sidebar, and then click the Photos tab.
Viewing a slideshow
A photo slideshow scrolls your photos automatically, with no need for you to tap and drag.
To set the timing and order of slides
• Tap Settings > Photos.
To run a slideshow
1. Switch to the Photos app.
2. Open an album, or go to Photos or Photo Stream view.
3. Tap the Slideshow button.
4. Select the transition and music options.
5. Tap Start Slideshow.
To stop a slideshow
• Tap the screen.
You can also stream a slideshow or video to a high-definition TV set (HDTV) via AirPlay. To do so, tap ![]() , if it appears. For details, see “Streaming with AirPlay” and “Screen Mirroring” in Chapter 3.
, if it appears. For details, see “Streaming with AirPlay” and “Screen Mirroring” in Chapter 3.
Displaying photos with Picture Frame
The iPad resembles a digital picture frame, and indeed, you can turn it into one by making the Lock screen display your photo collection—typically, while you recharge your iPad from a power outlet. You can display a slideshow of all your photos or of selected albums.
To set up Picture Frame
1. Tap Settings > Picture Frame.
2. Select transition, timing, and other options.
To start Picture Frame
1. Press the Sleep/Wake button to lock your iPad.
2. Press Sleep/Wake again to display the Lock screen.
3. Tap ![]() .
.
If ![]() doesn’t appear on the Lock screen, tap Settings > General > Passcode Lock > Picture Frame > On.
doesn’t appear on the Lock screen, tap Settings > General > Passcode Lock > Picture Frame > On.
To pause Picture Frame
• Tap the screen.
To stop Picture Frame
1. Tap the screen.
2. Tap ![]() .
.