
1. Getting Started
In This Chapter
You’ve seen the TV ads in which happy, purposeful people use iPads to type messages, watch movies, play games, video-chat with grandchildren, and surf the Web from hammocks. On the cutting-room floor, however, is the footage where those actors actually learned how to do all that stuff. Despite its clean lines and compact size, the iPad is a true computer running complex programs on a modern operating system. Happily, Apple’s engineers have painted a pretty face on all the gee-whizzery. The iPad’s consistent, simple design lets you wield a lot of power with only a little learning. Even complete beginners can’t easily shoot themselves in the foot. This chapter gets you up and running.
Hardware and Specifications
The iPad’s physical controls and ports (![]() and
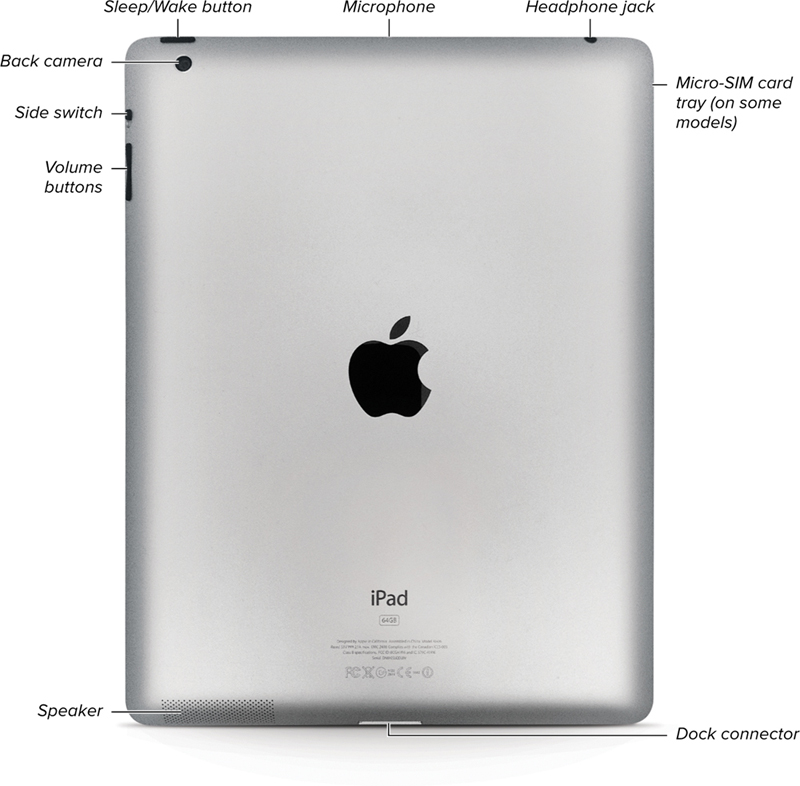
and ![]() ) are covered in detail later in this chapter and beyond. You can refer to these figures to jog your memory. Some 4G/3G models (for connecting to cellular networks) have a micro-SIM card slot on the left edge. The iPad 1 has no front and back cameras.
) are covered in detail later in this chapter and beyond. You can refer to these figures to jog your memory. Some 4G/3G models (for connecting to cellular networks) have a micro-SIM card slot on the left edge. The iPad 1 has no front and back cameras.
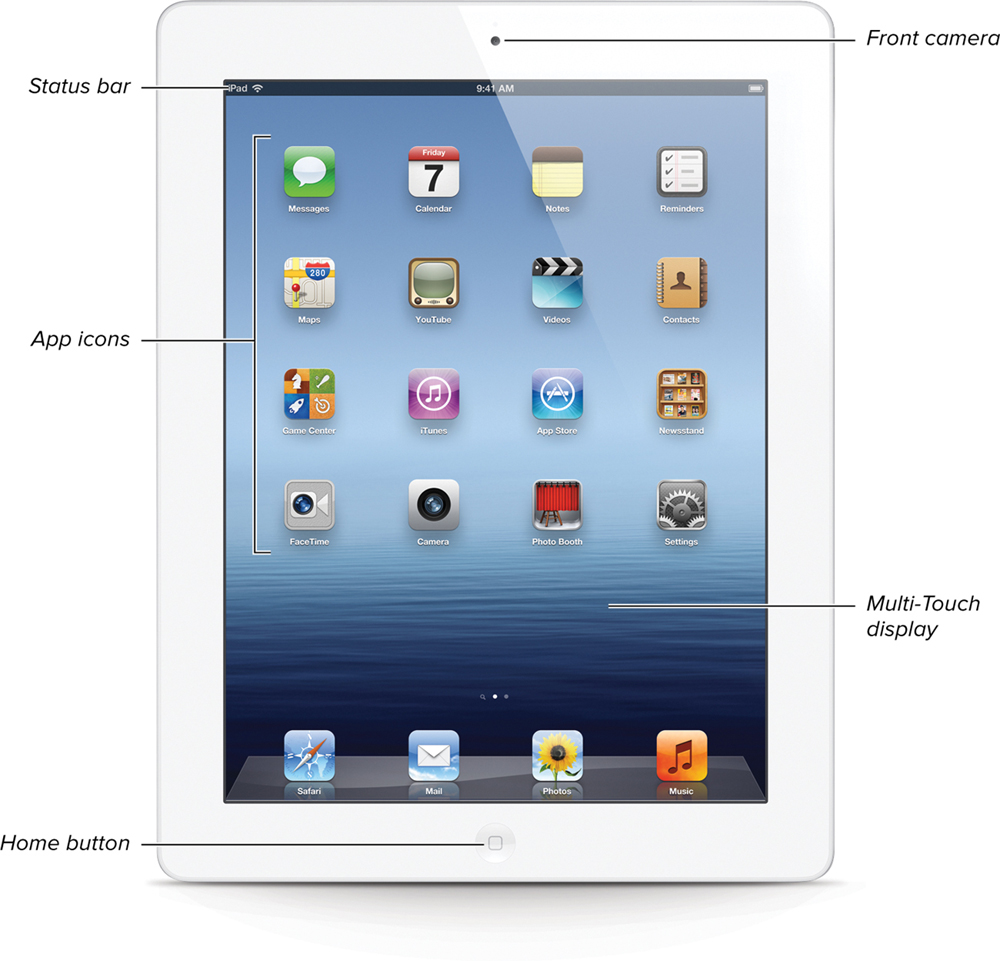
![]() The iPad’s front controls.
The iPad’s front controls.
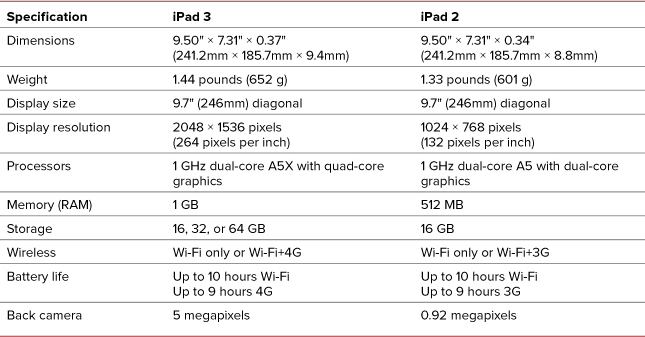
At this writing, Apple sells the iPad 2 (discounted from its original list price) and the iPad 3 (which Apple calls the “new iPad” or “third-generation iPad”). Table 1.1 lists some key specifications for these models. For a complete list, see http://support.apple.com/kb/SP647.
Table 1.1. iPad Specifications
The iPad also comes with:
• A 10W USB power adapter, used to provide power and charge the battery. (Don’t use a different power adapter to charge your iPad.)
• A dock connector–to–USB cable, used to connect your iPad to the 10W USB power adapter or to your computer to sync with iTunes.
The iPad’s operating system, called iOS, is the same OS that also runs the iPhone, iPod touch, and Apple TV.
Powering On and Off
Putting an iPad to sleep locks it in standby mode: The screen turns off and doesn’t respond to taps, but audio keeps playing, and the volume buttons still work. The battery drains slowly but noticeably. A sleeping iPad wakes instantly to where you left off. You may also need to wake your iPad if you leave it untended for a few minutes, because it goes to sleep by itself to save power.
Powering off an iPad shuts it down: No power is used, though the battery still drains imperceptibly over days or weeks. A powered-off iPad takes a minute to power on and show the Home screen.
To put your iPad to sleep:
• Press the Sleep/Wake button ![]() .
.
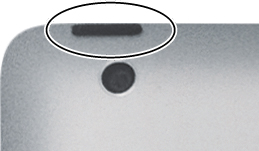
![]() Use the Sleep/Wake button at the iPad’s top edge to blank the screen and save power.
Use the Sleep/Wake button at the iPad’s top edge to blank the screen and save power.
To wake your iPad:
• Press the Home button or the Sleep/Wake button and then drag the slider ![]() .
.
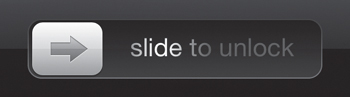
![]() The iPad locks itself because, as with any touchscreen device, an unintended tap on the screen while it’s in your bag or backpack can launch a program and drain the battery.
The iPad locks itself because, as with any touchscreen device, an unintended tap on the screen while it’s in your bag or backpack can launch a program and drain the battery.
To adjust how long your iPad screen stays on before it turns itself off (and displays the Lock screen when you wake it up), tap Settings > General > Auto-Lock.
To power off your iPad
• Press and hold the Sleep/Wake button for a few seconds until a red slider appears and then drag the slider.
To power on your iPad
• Press and hold the Sleep/Wake button until the Apple logo appears.
To set a security passcode that you must enter each time you wake or power on your iPad, see “Securing Your iPad” later in this chapter.
Using the Home Button
The only physical control on the front of the iPad is the Home button ![]() . It’s the round, indented switch at the bottom center of the iPad frame (called the bezel). The Home button handles a few tasks. Most important, it always zips you straight to the Home screen—the iPad’s main screen, where you find all your apps (programs).
. It’s the round, indented switch at the bottom center of the iPad frame (called the bezel). The Home button handles a few tasks. Most important, it always zips you straight to the Home screen—the iPad’s main screen, where you find all your apps (programs).
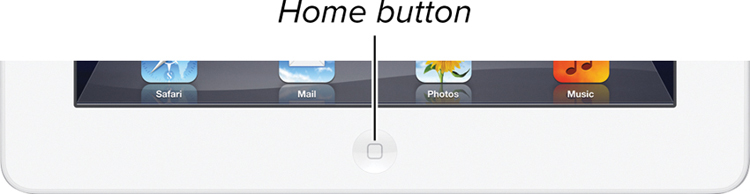
![]() You’ll probably use the Home button more than any other iPad switch.
You’ll probably use the Home button more than any other iPad switch.
Because the iPad displays only one app at a time, you can use the Home button to switch among apps. If you’re browsing the Web in Safari, for example, when your iPad chimes an incoming-email alert, press the Home button to close Safari and go back to the Home screen, where you can tap the Mail icon to read your email.
Pressing Home always saves your work in progress automatically. (Unlike Windows and OS X programs, iPad apps have no manual Save command.) If you’re typing a list in the Notes app and then press Home, you can return to Notes at any time, exactly as you left off.
Double-clicking the Home button lets you switch among your active apps quickly. For details, see “Opening and Switching Apps” later in this chapter.
Using Multitouch Gestures
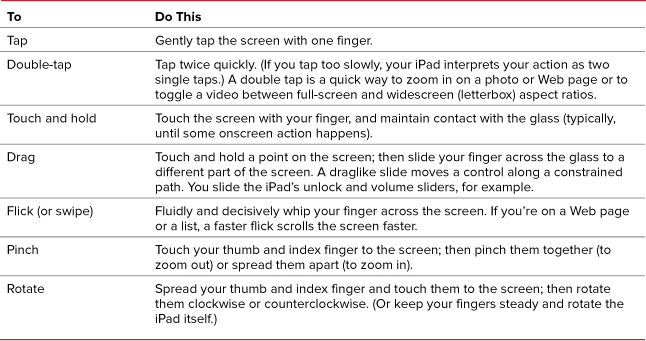
The iPad is designed for your fingertips. You interact with the software on the screen by performing the multitouch gestures described in Table 1.2. If you’ve used a computer mouse, learning these gestures will be easy because tapping and dragging correspond to similar mouse actions. Unfamiliar motions like flicking and pinching quickly become natural.
Table 1.2. Multitouch Gestures
If you have vision, hearing, or mobility problems, tap Settings > General > Accessibility to make your iPad easier to use.
The iPad’s capacitive screen contains a dense grid of touch sensors that responds to the electric field of your fingers. The screen won’t respond to a stylus (and you can’t wear gloves). Increasing finger pressure on a capacitive screen, as opposed to a resistive screen, won’t increase responsiveness.
Feel free to use two hands. You can use both hands to type on the iPad’s onscreen keyboard, for example. In some apps (such as Apple’s iWork apps), you can touch and hold an item with one hand and then use your other hand to tap other items to select them all as a group. If you’re having trouble with a gesture, make sure that you’re not touching the screen’s edge with a stray thumb or finger (of either hand).
Some apps, such as Contacts, use index lists (A, B, C,...) along an edge to help you navigate quickly. To scroll though an a index, drag your finger along it, or tap a letter to jump to items starting with that letter. Tap an item to open it. In some apps, a back button in the top-left corner takes you back to the index.
Setting Up Your iPad
The first thing to do with a new, out-of-the-box iPad is set it up. To do so, you need a nearby wireless Internet connection. (Don’t wander away from the Wi-Fi signal with your iPad during setup.) Your iPad will also need a significant battery charge if the battery drained while sitting in the cargo container or on the store shelf; see “Charging the Battery” later in this chapter.
You don’t need a computer and iTunes to set up your iPad, as you did with iOS 4 or earlier. If you do use iTunes, you’ll need to connect your iPad to a Mac or Windows PC running iTunes via the USB cable that came with your iPad. The Setup Assistant will offer you iTunes-specific sync and backup options. See also “Syncing with iTunes” in Chapter 4.
To set up your new iPad, turn it on and then follow the onscreen instructions. The Setup Assistant steps you through the setup process. Along the way, you’re asked to:
• Choose your preferred language for the iPad’s screens, keyboard, and interface.
• Pick your country or region.
• Turn on Location Services ![]() . For details, see “Location Services” in Chapter 3.
. For details, see “Location Services” in Chapter 3.
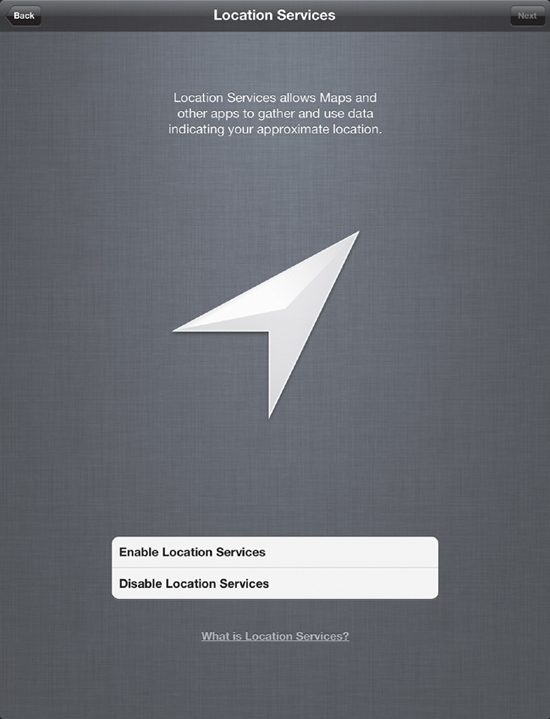
![]() Location Services lets built-in apps such as Maps and Safari and third-party apps such as weather apps use your physical whereabouts via the iPad’s built-in positioning service.
Location Services lets built-in apps such as Maps and Safari and third-party apps such as weather apps use your physical whereabouts via the iPad’s built-in positioning service.
• Connect to a Wi-Fi network. A secured home network is safer than a public network at a café or library, where miscreant geeks can sniff out your passwords and personal information as you type. For details, see “Making Wi-Fi Connections” in Chapter 3.
• Choose whether to set up your device as a new iPad or restore it from an iCloud or iTunes backup. (For backups, see the iCloud and iTunes sections in Chapter 4.)
• Sign in with or create an Apple ID ![]() .
.
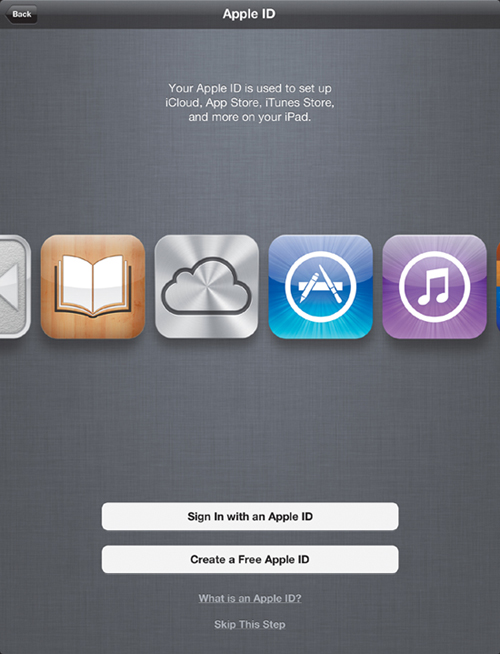
![]() Your Apple ID is a unique online user name and password that lets you use iCloud, FaceTime, Game Center, Apple online stores, Find My iPad, and other Apple apps and services.
Your Apple ID is a unique online user name and password that lets you use iCloud, FaceTime, Game Center, Apple online stores, Find My iPad, and other Apple apps and services.
• Set up iCloud ![]() . For details, see “Using iCloud” in Chapter 4.
. For details, see “Using iCloud” in Chapter 4.
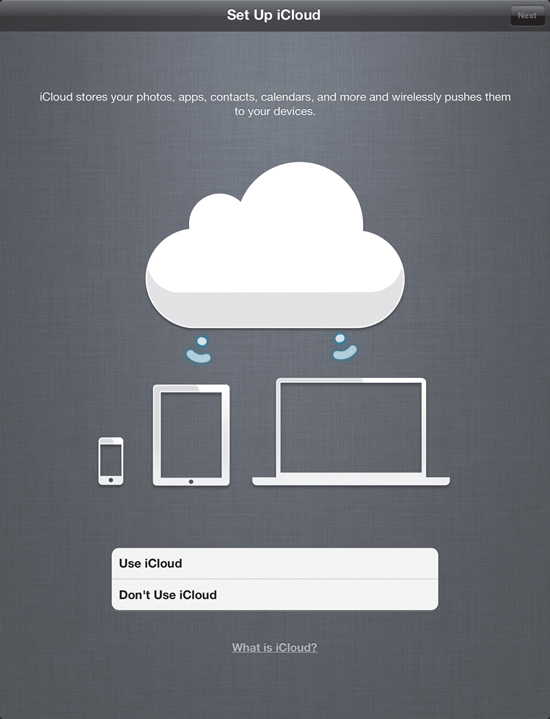
![]() Apple’s free iCloud service lets you automatically sync contacts, calendars, email, photos, and documents across your Mac, Windows PC, iPad, and other iDevices (if you own more than one). You can also use iCloud to back up your apps, settings, and content to Apple’s online servers, and restore your iPad from this backup.
Apple’s free iCloud service lets you automatically sync contacts, calendars, email, photos, and documents across your Mac, Windows PC, iPad, and other iDevices (if you own more than one). You can also use iCloud to back up your apps, settings, and content to Apple’s online servers, and restore your iPad from this backup.
• Use dictation, which converts what you say to text when you tap the microphone button on the keyboard (in any app that uses a keyboard). For details, see “Using the Onscreen Keyboard” in Chapter 2.
• Send daily diagnostics and use data to Apple. (Don’t bother; save the bandwidth.)
• Register your iPad with Apple, if you want to. (It’s unnecessary.)
• Agree to terms and conditions for using iPad, iCloud, and other services.
When you’re done, tap Start Using iPad to go to the Home screen, where you can see all the iPad’s built-in apps: Safari, Mail, Calendar, Notes, Maps, and more.
If you change your mind or skip a step during setup, you can change the setup options later by using the Settings app. To toggle Location Services, for example, tap Settings > Location Services. To sign in to, change, or create an Apple ID, tap Settings > Store. To change iCloud settings, tap Settings > iCloud. To set up Internet-based mail and other accounts, tap Settings > Mail, Contacts, Calendars.
Navigating the Home Screen
After you unlock your iPad, the Home screen appears, displaying icons for your applications, or apps ![]() . The iPad comes with several built-in apps (Safari, Mail, and Settings, for example), and you can download more from the App Store, Apple’s online store for iOS applications. If you install lots of apps, new Home screens sprout automatically to display them.
. The iPad comes with several built-in apps (Safari, Mail, and Settings, for example), and you can download more from the App Store, Apple’s online store for iOS applications. If you install lots of apps, new Home screens sprout automatically to display them.
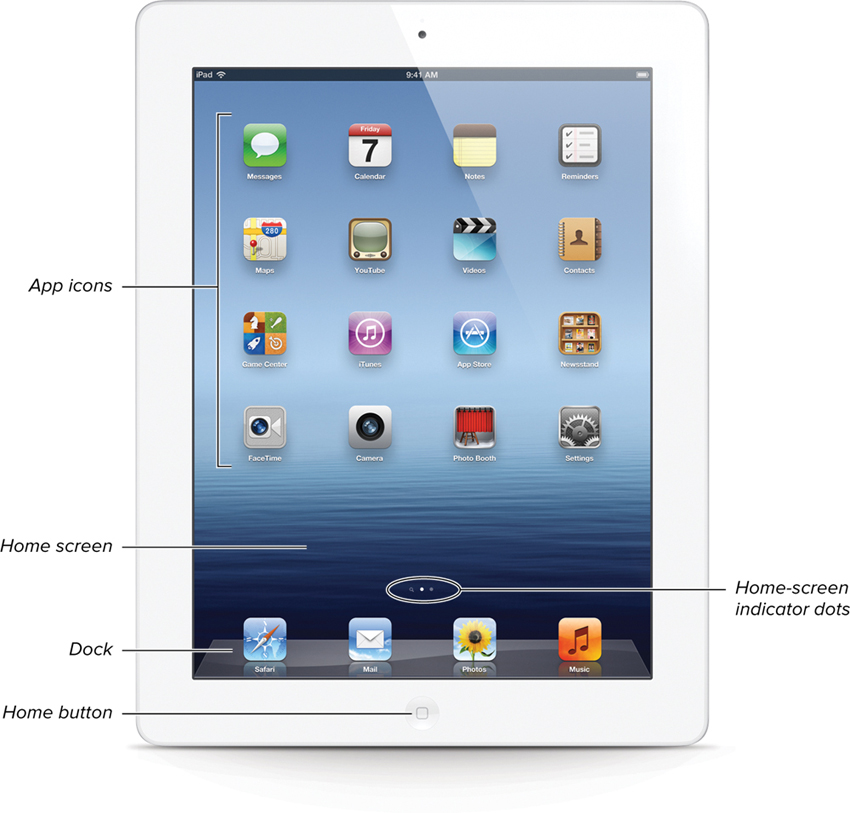
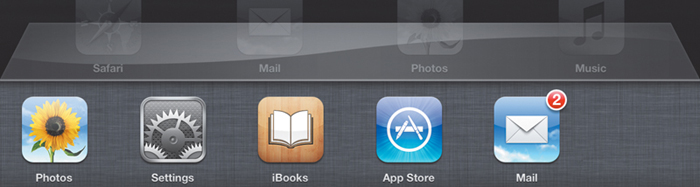
![]() The Home screen.
The Home screen.
Put your most frequently used apps in the dock, which is visible at the bottom of every Home screen and holds up to six icons. The row of small dots above the dock indicates how many screens you have and which one you’re on. (You can create up to 11 Home screens.) You can customize the layout of app icons on the Home screen and in the dock.
To show the Home screen
• Press the Home button.
or
Use four or five fingers to pinch to the Home screen.
To toggle the multitouch gesture for the Home screen, tap Settings > General > Multitasking Gestures.
To switch Home screens
• Flick left or right.
or
Tap to the left or right of the dots above the dock.
or
To go to the first Home screen, press the Home button.
To rearrange Home-screen icons
1. Touch and hold any app icon for a few seconds until all the icons wiggle.
2. Drag icons to new locations within a screen or off the edge of one screen and onto the next.
3. Press the Home button to stop the wiggling and save your arrangement.
You can also rearrange Home-screen icons (as well as the order of the screens) in iTunes on your computer. To do so, connect your iPad to your computer via USB cable, open iTunes on your computer, select your iPad in the iTunes sidebar, and then click the Apps tab.
Viewing the Status Bar
The status bar is the narrow strip that runs along the top of the Home screen, the Lock screen, and many application screens ![]() .
.
![]() A glance at the status bar can tell you whether all is well with your iPad.
A glance at the status bar can tell you whether all is well with your iPad.
The time of day appears in the center of the status bar (unless it’s replaced by the screen-lock icon). By default, the time and time zone are set automatically, based on your Internet connection. By tapping Settings > General > Date & Time ![]() , you can switch between the 12-hour (AM/PM) or 24-hour clock. If you’re traveling, you can choose a time zone and set your iPad’s date and time manually.
, you can switch between the 12-hour (AM/PM) or 24-hour clock. If you’re traveling, you can choose a time zone and set your iPad’s date and time manually.
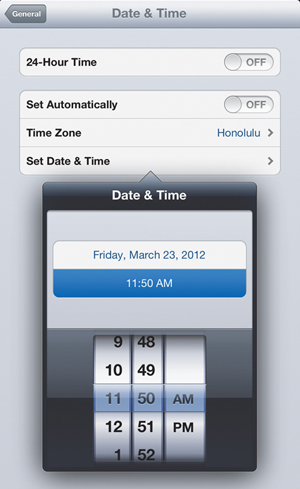
![]() The Date & Time screen.
The Date & Time screen.
The status bar shows the current time and displays icons that indicate the current state of your iPad, including the following:
![]() Airplane mode is on
Airplane mode is on
![]() Cellular network availability, including icons for 3G, 4G, LTE, E (for EDGE), and O (for GPRS)
Cellular network availability, including icons for 3G, 4G, LTE, E (for EDGE), and O (for GPRS)
![]() Wi-Fi network connectivity and signal strength
Wi-Fi network connectivity and signal strength
![]() Personal hotspot provided
Personal hotspot provided
![]() iTunes sync in progress
iTunes sync in progress
![]() Network or other activity
Network or other activity
![]() VPN network connectivity
VPN network connectivity
![]() iPad is screen-locked (replaces clock)
iPad is screen-locked (replaces clock)
![]() Screen orientation is locked
Screen orientation is locked
![]() Location Services is in use
Location Services is in use
![]() Music, audiobook, or other media is playing
Music, audiobook, or other media is playing
![]() Bluetooth is turned on and paired with a device
Bluetooth is turned on and paired with a device
![]() Battery level or charging status
Battery level or charging status
Keep your iPad’s time accurate; apps use it to time-stamp files and messages, schedule tasks, and record events.
Creating Home-Screen Folders
If too many icons are crowding your Home screens, you can group them into folders rather than drag them around to different screens. Each folder can hold up to 20 icons. It’s a common practice to create multiple folders, each holding similar types of apps (games, music, travel, and so on). Folders save a lot of screen space and reduce excessive screen-switching.
To create a folder
1. Touch and hold an icon until it wiggles; then drag it on top of an icon that you want to store in the same folder.
The iPad creates a new folder containing the two icons ![]() .
.
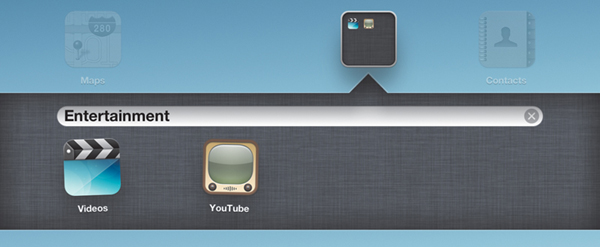
![]() The iPad automatically names a new folder based on the icons that you use to create it.
The iPad automatically names a new folder based on the icons that you use to create it.
2. Accept the default folder name, or tap the name field to type a new name.
The onscreen keyboard appears when you tap the name.
3. Tap outside the folder to close it ![]() .
.
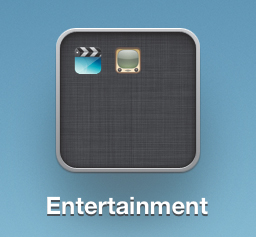
![]() A folder appears on the Home screen as a black box containing tiny icons.
A folder appears on the Home screen as a black box containing tiny icons.
To open a folder
• Tap the folder; then tap an app icon in the folder to open that app.
If you have lots of folders and forget where you put an app, flick left to right as far as you can go (to the Spotlight search screen) and then search for the app.
To close a folder
• Tap outside the folder, or press the Home button.
To add an icon to a folder
1. Touch and hold the icon until it wiggles; then drag it on top of the folder.
2. If you like, drag other icons to the folder (or to other folders), or drag icons within a folder to rearrange them.
3. When you’re done, press the Home button to stop the wiggling and save your arrangement.
To remove an icon from a folder
1. Tap the folder to open it.
2. Touch and hold the icon until it wiggles.
3. Drag the icon out of the folder.
To delete a folder
1. Tap the folder to open it.
2. Touch and hold any icon until it wiggles.
3. Drag all the icons out of the folder.
The folder disappears when you remove the last icon.
To rename a folder
1. Tap the folder to open it.
2. Touch and hold any icon until it wiggles.
3. Tap the name field.
4. Type a new name when the onscreen keyboard appears.
You can reset the Home screen to its original layout to remove any folders that you’ve created (and apply the Home screen’s default wallpaper). To do so, tap Settings > General > Reset > Reset Home Screen Layout.
Opening and Switching Apps
The iPad displays only one app at a time, full-screen. You can’t have, say, Safari on one side of the screen and Mail on the other, as you can in Windows or OS X. Fortunately, the iPad supports multitasking—which lets multiple apps run in the background at the same time—and you can quickly open, switch among, and close apps.
Most apps are effectively frozen when you switch away from them, but certain apps (such as Music and Mail) continue working in the background. Switching back to an app lets you resume where you left off.
To open an app
• Tap its icon.
To switch to an app
• Press the Home button and then tap the app’s icon on the Home screen. (You can also pinch with four or five fingers to go to the Home screen.)
or
Double-click the Home button to show the multitasking bar at the bottom of the screen; then tap the app’s icon ![]() . You may have to flick left to find it. (You can also show or hide the multitasking bar by flicking up or down with four or five fingers.)
. You may have to flick left to find it. (You can also show or hide the multitasking bar by flicking up or down with four or five fingers.)
![]() The Home screen scrolls up to reveal the multitasking bar, which lists your recently used apps.
The Home screen scrolls up to reveal the multitasking bar, which lists your recently used apps.
or
Flick left or right with four or five fingers to switch to the next or previous app.
Some apps try to get your attention by displaying an alert badge—a number in a little red circle superimposed on the app’s Home-screen icon ![]() . The number is the count of new, unread, or unattended items for that app. Mail shows the number of incoming mail messages, for example; App Store shows the number of apps that need to be updated; and Newsstand shows the number of new issues.
. The number is the count of new, unread, or unattended items for that app. Mail shows the number of incoming mail messages, for example; App Store shows the number of apps that need to be updated; and Newsstand shows the number of new issues.
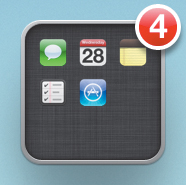
![]() If the app is in a folder, the badge appears on the folder as well.
If the app is in a folder, the badge appears on the folder as well.
A badge with an exclamation point ![]() indicates a problem with the app.
indicates a problem with the app.
Closing Apps
If the multitasking bar gets too crowded, making you scroll long distances to find an app, you can close apps that you haven’t used recently and purge their icons from the list.
Also, if an app is unresponsive or freezes when it opens, and pressing the Home button doesn’t work, you can force-quit the app to return to the Home screen.
To close an app
1. Show the multitasking bar, as described in “To switch to an app” earlier in this chapter.
2. Touch and hold an icon until it wiggles and then tap ![]() .
.
The app closes, and its icon is removed from the recently used list (but not from the iPad itself).
3. If you like, close other apps.
4. When you’re done, press the Home button to stop the wiggling.
To force-quit a frozen app
1. Press and hold the Sleep/Wake button until the power-off screen appears and then release the Sleep/Wake button.
Don’t drag the red slider.
2. Press and hold the Home button for 6 seconds, until the Home screen appears.
3. If the Home screen doesn’t appear, restart your iPad by repeating step 1, but this time, drag the red slider.
Adjusting Screen Brightness
You can make the iPad’s screen brighter or dimmer, or have the iPad adjust screen brightness automatically for ambient light.
To adjust screen brightness
1. Tap Settings > Brightness & Wallpaper ![]() .
.
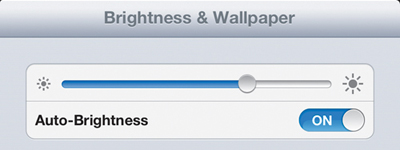
![]() If you’re going to read for a long time, a dim screen is less fatiguing than a bright one.
If you’re going to read for a long time, a dim screen is less fatiguing than a bright one.
2. To adjust brightness manually, drag the slider.
or
To make the iPad autoadjust brightness for current light conditions, turn on Auto-Brightness.
A quick way to adjust screen brightness: Double-click the Home button to show the multitasking bar at the bottom of the screen, flick left to right, and then drag the brightness slider.
Changing the Wallpaper
You can choose the photo or image that you want to use as a background image, or wallpaper, for your Home screen or Lock screen. (The Lock screen is the one you see when you first wake or turn on your iPad.)
The iPad comes with some high-resolution stock images (mostly nature scenes and textured patterns) for use as wallpaper, but you can use a photo from your own photo albums.
To change the wallpaper
1. Tap Settings > Brightness & Wallpaper.
2. Tap the small Wallpaper images ![]() .
.
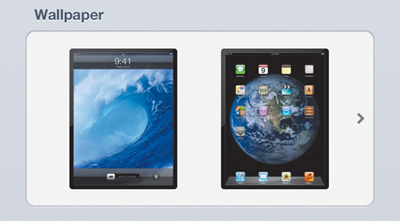
![]() You can choose separate images for the Home screen and the Lock screen.
You can choose separate images for the Home screen and the Lock screen.
3. Tap Wallpaper (to use one of Apple’s stock images) or tap Saved Photos (to use your own photo).
4. Tap the image that you want to use.
5. (Optional) If you chose one of your own photos, you can pinch two fingers together (to zoom out) or spread them apart (to zoom in) and drag the image around to choose the part that you want to display.
6. Tap Set Lock Screen, Set Home Screen, or Set Both.
or
To keep your current wallpaper, tap Cancel.
Changing Screen Orientation
The iPad’s built-in accelerometer senses how you’re holding the iPad in physical space and then orients the screen to either portrait (tall) or landscape (wide) view ![]() .
.
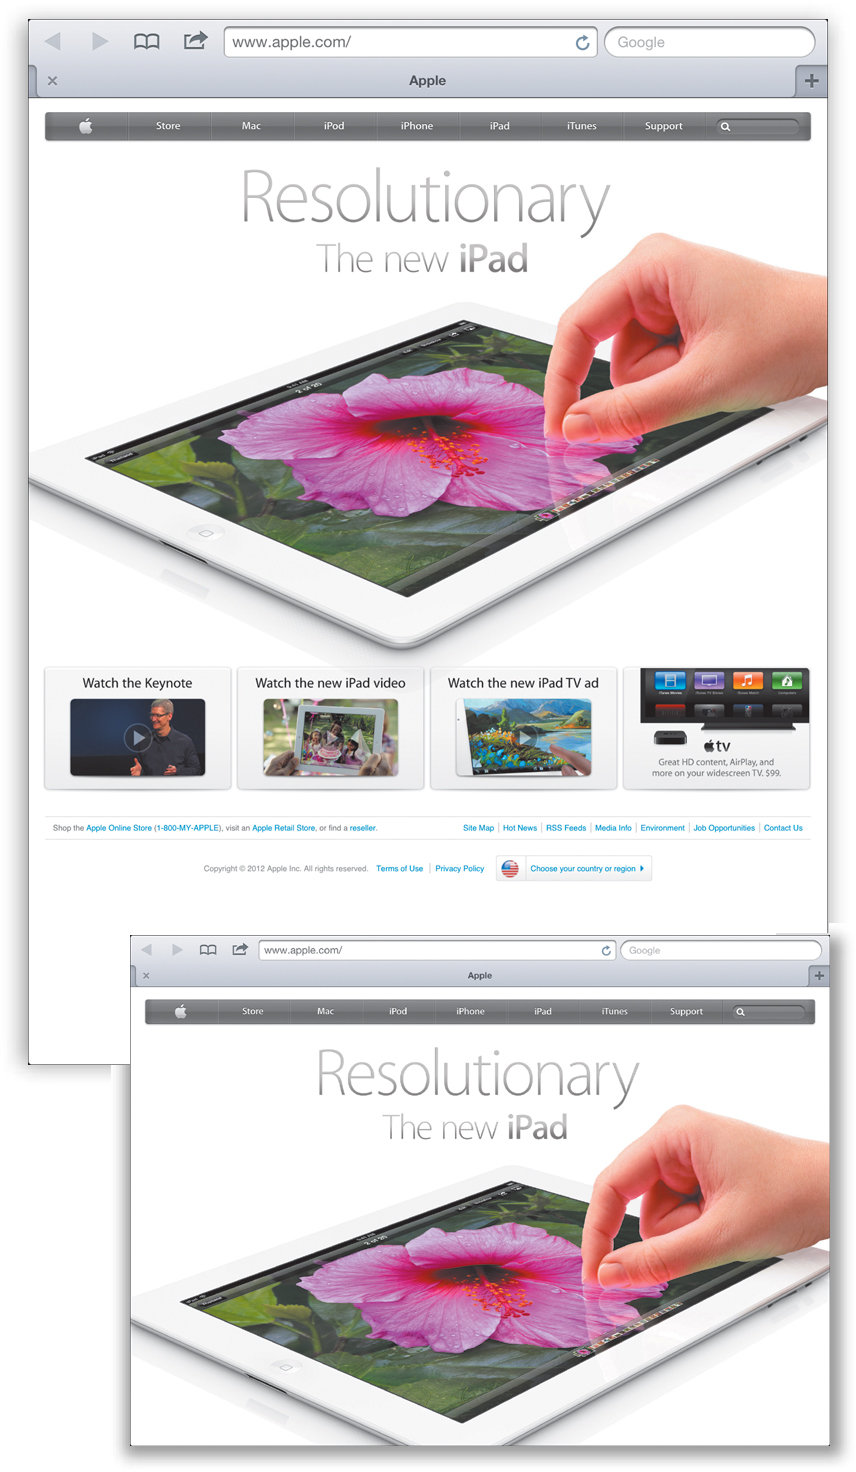
![]() The same Web page in portrait and landscape views. In Safari, Web pages scale automatically to the wider screen, making the text and images larger.
The same Web page in portrait and landscape views. In Safari, Web pages scale automatically to the wider screen, making the text and images larger.
To change the view, rotate the iPad. The Home screen, the Lock screen, and most apps self-adjust to fit the new orientation. (Some apps support only one view. Many games, for example, work only in landscape view.)
If you don’t want the screen to change its orientation, such as when you’re reading while lying down, you can lock the current view to stop it from rotating. You have two ways to do so:
• Use the side switch. The side switch is the toggle switch next to the volume buttons ![]() . You can set it to lock/unlock screen rotation or mute/unmute the sound. To make the iPad lock rotation, tap Settings > General and then tap Lock Rotation (below the words Use Side Switch To). When you choose this option, the opposite option (Mute) becomes available in the multitasking bar.
. You can set it to lock/unlock screen rotation or mute/unmute the sound. To make the iPad lock rotation, tap Settings > General and then tap Lock Rotation (below the words Use Side Switch To). When you choose this option, the opposite option (Mute) becomes available in the multitasking bar.
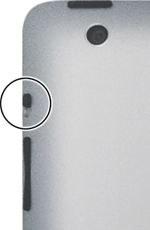
![]() The side switch.
The side switch.
• Use the multitasking bar. Double-click the Home button to show the multitasking bar at the bottom of the screen ![]() , flick left to right, and then tap
, flick left to right, and then tap ![]() .
.
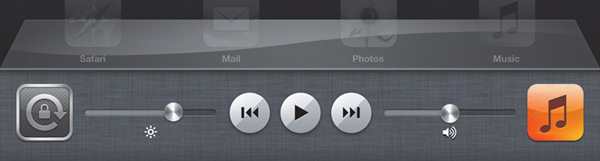
![]() The leftmost button in the multitasking bar either locks orientation or mutes audio, depending on the side-switch setting.
The leftmost button in the multitasking bar either locks orientation or mutes audio, depending on the side-switch setting.
This option is available only if you’ve set the side switch to Mute; to do so, tap Settings > General.
When you lock rotation, a rotation overlay appears briefly onscreen, and the ![]() icon appears in the status bar at the top of the screen.
icon appears in the status bar at the top of the screen.
Adjusting the Volume
The buttons on the right edge of the iPad control the volume ![]() .
.
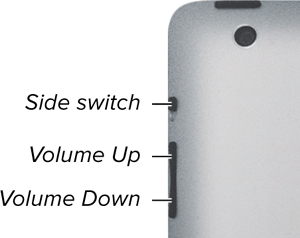
![]() Use these controls to increase, decrease, or mute the sound.
Use these controls to increase, decrease, or mute the sound.
• Volume buttons. The volume control is a rocker switch with two buttons that adjust the audio level of anything that makes noise, such as songs, videos, audiobooks, podcasts, apps, alerts, and sound effects. Volume adjustments affect the iPad’s built-in speaker, earphones or headsets plugged into the headphone jack, and external speakers connected wirelessly or through the dock connector. An audio-level overlay appears briefly onscreen as you adjust the volume.
• Side switch. The side switch is a toggle switch that, by default, mutes the sound when you slide it down. If you don’t need a Mute button, you can set the side switch to lock screen rotation instead: Tap Settings > General and then tap Lock Rotation ![]() . For details, see “Changing Screen Orientation” earlier in this chapter.
. For details, see “Changing Screen Orientation” earlier in this chapter.
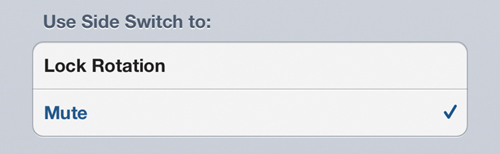
![]() Out of the box, the iPad’s side switch is a Mute button, but you may find it to be more useful as a Lock Rotation button, which was its default behavior on the original iPad.
Out of the box, the iPad’s side switch is a Mute button, but you may find it to be more useful as a Lock Rotation button, which was its default behavior on the original iPad.
Tap Settings > General > Sounds to open the Sounds screen ![]() , where you can set your iPad to play a sound for certain system events: email, messages, tweets, reminders, appointments, keyboard clicks, and more.
, where you can set your iPad to play a sound for certain system events: email, messages, tweets, reminders, appointments, keyboard clicks, and more.
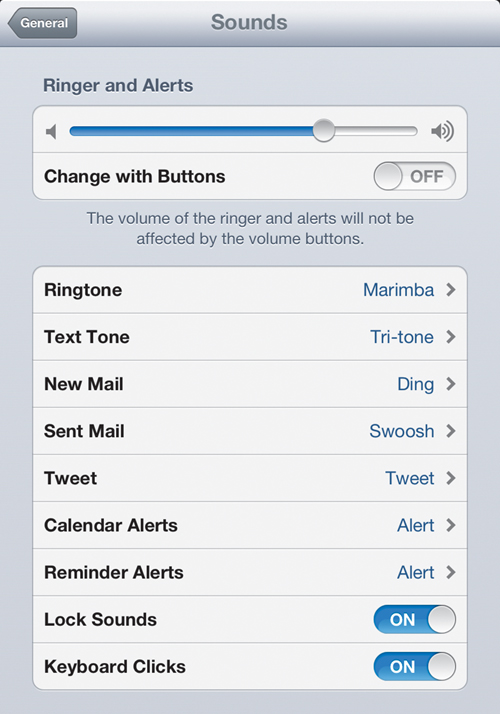
![]() The Sounds screen lets you toggle or change specific audio alerts.
The Sounds screen lets you toggle or change specific audio alerts.
To increase the volume
• Press the Volume Up button.
To raise the volume quickly, press and hold for a second or two.
To limit the maximum volume (if you’re worried about hearing loss), tap Settings > Music > Volume Limit.
To decrease the volume
• Press the Volume Down button.
You can also change the volume by using the audio playback controls: Double-click the Home button to show the multitasking bar at the bottom of the screen, flick left to right, and then drag the volume slider. (If your iPad is locked, the playback controls appear at the top of the screen when you double-click Home.)
To mute the sound
• Press and hold the Volume Down button for a second or two.
or
Slide the side switch down. (This option is available only if you’ve set the side switch to Mute; to do so, tap Settings > General.)
or
Double-click the Home button to show the multitasking bar at the bottom of the screen, flick left to right, and then tap the speaker icon. (This option is available only if you’ve set the side switch to Lock Rotation; to do so, tap Settings > General.)
Muting suppresses only certain sounds. Alerts, notifications, sound effects, and game audio are muted. Media playback (such as music, podcasts, movies, videos, and TV shows) isn’t muted.
Charging the Battery
A drained iPad lacks sufficient power to show the Home screen. You may have to charge it for more than 2 minutes before it shows the Charging. Please Wait screen and for more than 10 minutes before it can show the Home screen ![]() .
.
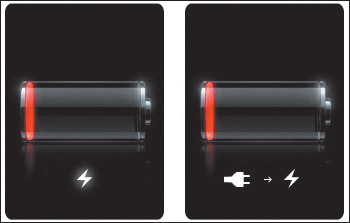
![]() If one of these screens appears, keep your iPad connected and charging.
If one of these screens appears, keep your iPad connected and charging.
A few charging tips:
• Charge your iPad by using only the Apple iPad 10W USB Power Adapter that came with your iPad (or that you bought separately from Apple). Don’t use an Apple USB Power Adapter or an adapter that came with an iPhone/iPod; these adapters look compatible, but their power output is too small to charge an iPad.
• The USB cable that came with your iPad is interchangeable with an iPhone/iPod USB cable.
• In most cases, you must charge your iPad from a power outlet rather than by connecting it to your computer’s USB port, as you would do to charge an iPhone or iPod. Some newer computers (such as late-model iMacs) can charge an iPad via USB cable, but most computers’ USB ports lack the necessary power. To determine whether your computer has enough juice, connect your iPad to it via USB cable. When a connected iPad isn’t charging, the notification Not Charging appears next to the battery icon in the status bar at the top of the screen ![]() .
.

![]() If Not Charging appears in the status bar, you must charge your iPad from a power outlet.
If Not Charging appears in the status bar, you must charge your iPad from a power outlet.
• The battery icon in the status bar shows the battery level or charging status. To turn on the battery percentage indicator, tap Settings > General > Usage > Battery Percentage. When you connect your iPad to power or wake it from sleep, the battery and charge indicators can fluctuate for a few seconds before stabilizing. It’s not unusual for the battery-level reading to show 99% even when the iPad is fully charged.
• Battery life and charge cycles vary by use and settings. A properly maintained battery should deliver up to 1,000 charge cycles and retain 80 percent or more of its original capacity over a typical 5-year life span.
Cleaning the Screen
The Pad’s glass touchscreen has a special coating that does its best to repel fingerprints, but eventually, it will accumulate oils, glazed sugar, sunscreen, or whatever else you have on your hands. To clean the screen, wipe it gently with a soft, lint-free cloth—the same kind that you use to clean eyeglasses or camera lenses.
To clean the rest of the iPad, unplug it from any docks or USB cables and then turn it off. (Press and hold the Sleep/Wake button until a red slider appears; then drag the slider.) You can use a cloth that’s dampened lightly with water, but never use window cleaners, household cleaners, anything from a spray can, alcohol- or ammonia-based cleansers, solvents, or abrasives.
Securing Your iPad
You can use the iPad’s security features to protect your data from co-workers, thieves, cops, spouses, lawyers, busybodies, and governments.
Passcodes
You can set up a security passcode that you must enter each time you power on or wake your iPad (see “Powering On and Off” earlier in this chapter). Setting a passcode turns on data protection, which uses the passcode as the key to encrypt your data. The message Data protection is enabled at the bottom of the Passcode Lock screen lets you know that your data is encrypted.
The iPad’s built-in apps use data encryption (Mail, for example, encrypts your messages and attachments), but third-party apps may or may not use it.
To set a passcode
1. Tap Settings > General > Passcode Lock to open the Passcode Lock screen ![]() .
.

![]() The Passcode Lock screen lets you set your passcode and fine-tune security options.
The Passcode Lock screen lets you set your passcode and fine-tune security options.
2. Choose any of the following options:
• Turn Passcode On. Type a four-digit passcode and then retype it to verify it. From now on, your iPad makes you type the passcode to unlock it or to change or turn off the passcode.
• Turn Passcode Off. Turn off the passcode.
• Change Passcode. Change an existing passcode.
• Require Passcode. Select how long your iPad will wait after being locked before it requires your passcode to be unlocked again. By default, the passcode is required immediately, which is secure but inconvenient if you’ve set a short Auto-Lock time (by tapping Settings > General > Auto-Lock).
• Simple Passcode. A simple passcode is a four-digit number. For added security, turn off Simple Passcode, and use a longer passcode with a combination of numbers, letters, punctuation, and special characters.
• Picture Frame. Tap Settings > Picture Frame to remove the Picture Frame button from the Lock screen.
• Erase Data. For real peace of mind, you can direct your iPad to erase all your data after ten failed passcode attempts. After the tenth mistyped passcode, all settings are reset, and the iPad erases all your information and media by removing the encryption key.
Find My iPad
You can use Find My iPad to track down a lost or stolen iPad by showing its approximate location on a map, provided that the missing iPad is turned on and connected to a Wi-Fi or cellular network. You must set up Find My iPad before you lose your iPad.
To find your iPad, you can sign in to https://www.icloud.com from any Web browser on a Mac or Windows PC, or use the Find My iPhone app on an iPhone, an iPod touch, or another iPad. You can download Find My iPhone for free from the App Store. (This app, despite its name, finds iPads as well as iPhones.)
To use Find My iPad, you need an iCloud account. If you didn’t create one when you first set up your iPad, tap Settings > iCloud and then create an account.
To set up Find My iPad
1. Tap Settings > iCloud.
2. If necessary, sign in to iCloud.
3. On the iCloud screen, turn on Find My iPad.
4. In the permission box that appears, tap Allow.
5. Tap Home > Settings > General > Location Services > On.
This service can show your iPad’s location on a map.
To find a missing iPad
1. On a Mac or Windows PC, open a Web browser, go to https://www.icloud.com, sign in to iCloud, and then click the Find My iPhone icon on the main page.
or
On an iPhone, iPod touch, or iPad, open the Find My iPhone app and then sign in to iCloud.
In either case, a map appears, showing your iPad’s location ![]() .
.
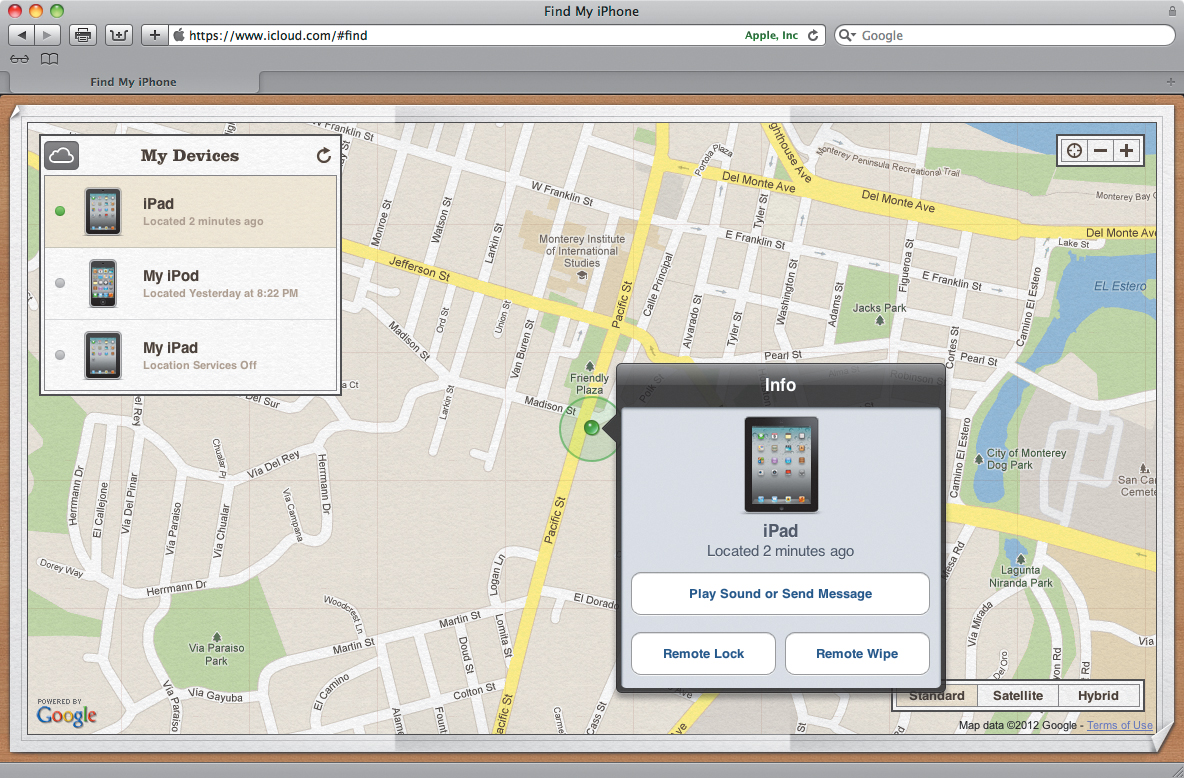
![]() If you’ve enabled Find My iPad for multiple devices, choose a specific device in the My Devices list.
If you’ve enabled Find My iPad for multiple devices, choose a specific device in the My Devices list.
2. (Optional) Click or tap ![]() next to the iPad icon on the map and then choose an option in the pop-up box or screen:
next to the iPad icon on the map and then choose an option in the pop-up box or screen:
• Send a message (such as “Please return my iPad” or “Call 415-555-1234”).
• Play a sound at full volume for 2 minutes (handy if you’ve misplaced your iPad under a pillow).
• Lock your iPad, and create a four-digit passcode (if you haven’t set one previously).
• Wipe your iPad’s contents entirely, erasing sensitive data and restoring the iPad to its factory settings.
Restrictions
If you lend your iPad to guests or kids, tap Settings > General > Restrictions > Enable Restrictions to set up access rules ![]() . You must set a passcode to use this feature. You can block anyone who doesn’t know your passcode from using specific apps (Safari, YouTube, iTunes, and so on), making video calls on FaceTime, installing or deleting apps, taking photos, dictating text, mapping whereabouts, creating or editing accounts, playing multiplayer games, listening to naughty lyrics, and more.
. You must set a passcode to use this feature. You can block anyone who doesn’t know your passcode from using specific apps (Safari, YouTube, iTunes, and so on), making video calls on FaceTime, installing or deleting apps, taking photos, dictating text, mapping whereabouts, creating or editing accounts, playing multiplayer games, listening to naughty lyrics, and more.
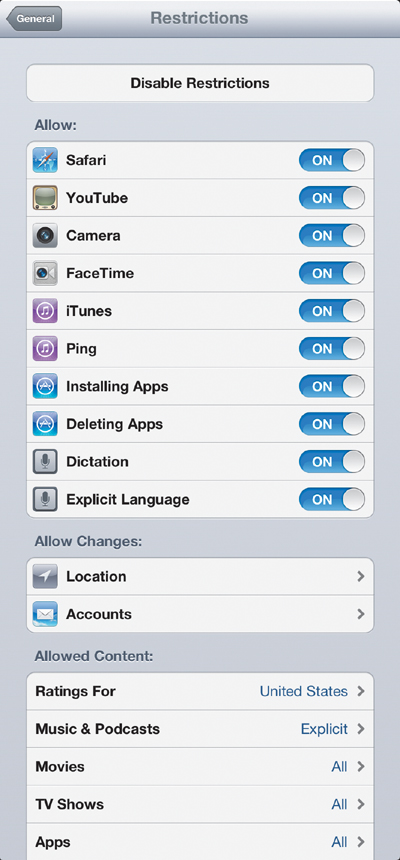
![]() You can toggle restrictions independently. The icons of restricted apps are removed from the Home screen.
You can toggle restrictions independently. The icons of restricted apps are removed from the Home screen.