
6. Images
Images are abstract representations, storing data that makes up pictures. This chapter introduces Cocoa Touch images, specifically the UIImage class, and teaches you all the basic know-how you need for working with image data on iOS. In this chapter, you learn how to load, store, and modify image data in your applications. You discover how to process image data to create special effects, how to access images on a byte-by-byte basis, and more.
Image Sources
iOS images are generally stored in one of several well-defined places on the device. These sources include the photo album, the application bundle, the sandbox, iCloud, and the Internet, among others. Here’s a review of the most common image sources you’ll use in your applications:
• Photo album: The iOS’s photo album contains a camera roll (for camera-ready units), a saved pictures roll, and photos synced from a user’s Photo Stream, computer, or transferred from another digital device using a camera connection kit. Users can request images from this album using the interactive dialog supplied by the UIImagePickerController class. The dialog enables users to browse through stored photos and select the image they want to work with on an album-by-album basis.
• Application bundle: Your application bundle includes static images you add to an Xcode project. These resources appear within the application bundle ([NSBundle mainBundle]) along with your application executable, Info.plist file, and other material included in the project. Examine the included files by inspecting the Target > Build Phases > Copy Bundle Resources pane for your project.
Your application cannot modify these files, but it can load and display them within the application using UIImage’s handy imageNamed: method. Images accessed in this manner can be selected for device-specific resolutions using standard file naming conventions such as “@2x” for Retina display.
• Sandbox: Your application can also write image files into its sandbox and read them back as needed. The sandbox enables you to store files to the Documents, Library, and tmp folders.
The top-level Documents directory can be populated by and accessed from iTunes when the application enables UIFileSharingEnabled in the Info.plist file. Although other parts of iOS outside the sandbox are technically readable, Apple has made it clear that these areas are off limits for App Store applications.
Note
When you use the Document file-sharing option, make sure you store any application-specific files that should not be shared directly with your users in your Library folder.
• iCloud: Apple’s iCloud service enables you to store documents in a shared central location (folders stored in /private/var/mobile/Library/Mobile Documents/) and access them from all your users’ computers and iOS devices. On iOS, you might use the UIDocument class to load iCloud images into your apps.
• Internet: Your application can download images using URL resources to point to web-based files. To make this work, iOS needs an active Internet connection, but when established the data from a remote image is just as accessible as data stored locally.
• Pasteboard: Applications can use image data stored in the system pasteboard. Image data is indistinguishable from any other kind of pastable data. You can recover that data by querying the pasteboardTypes. This returns an array of uniform type identifiers that specify what kind of data is currently available on the pasteboard.
Image UTIs are typically of the form public.png, public.tiff, or public.jpg, or similar. Each application can choose whether it can handle the contents of the pasteboard based on those UTIs.
You can read more about the system pasteboard and its uses in Chapter 2, “Documents and Data Sharing.”
• Shared Data: iOS applications can open and display image files sent by other applications. Applications that declare support for image file types (by defining a CFBundleDocumentTypes array in their Info.plist file) can be called upon to open those files. Shared data is also discussed in detail in Chapter 2.
• Generated Images: You are not restricted to using prebuilt images in your applications. You can generate images on-the-fly as needed. UIKit’s graphics calls enable you to create images from code, building UIImage objects as needed. For example, you might create a color swatch as follows:
// Return a swatch with the given color
- (UIImage *) swatchWithColor:(UIColor *) color
andSize: (CGFloat) side
{
UIGraphicsBeginImageContext(CGSizeMake(side, side));
CGContextRef context = UIGraphicsGetCurrentContext();
[color setFill];
CGContextFillRect(context, CGRectMake(0.0f, 0.0f, side, side));
UIImage *image = UIGraphicsGetImageFromCurrentImageContext();
UIGraphicsEndImageContext();
return image;
}
Place Quartz drawing calls between the begin and end context statements. Retrieve the current image by calling UIGraphicsGetImageFromCurrentImageContext(). Generated images are like any other UIImage instance. You can display them in image views, pass them to table cells to display, place them into buttons, and so forth. Learn more about Quartz drawing specifics by consulting Apple’s Quartz 2D Programming Guide.
Reading Image Data
An image’s file location controls how you read its data. You’d imagine that you could just use a method such as UIImage’s imageWithContentsOfFile: to load your images, regardless of their source. In reality, you cannot.
For example, photo album pictures and their paths are hidden from direct application access unless you have retrieved an ALAsset URL. Apple’s user-granted privileges ensure a level of privacy that’s breeched only when users explicitly grant permission to applications for access. Even then, you must use Asset Library calls to read those files and not UIImage calls.
Images stored in the application bundle are accessed in a different way than those stored on a Web site or in the sandbox. Each kind of image data requires a nuanced approach for access and display.
What follows is a summary of common image reading methods, and how you can use these to read in image data to your application.
UIImage Convenience Methods
The UIImage class offers a simple method that loads any image stored in the application bundle. Call imageNamed: with a filename, including its extension, for example:
myImage = [UIImage imageNamed:@"icon.png"];
This method looks for an image with the supplied name in the top-level folder of the application bundle. If found, the image loads and is cached by iOS. That means the image is memory managed by that cache.
If your data is stored in another location in your sandbox, use imageWithContentsOfFile: instead. Pass it a string that points to the image file’s path. This method will not cache the object the way imageNamed: does.
As a rule, imageNamed: does more work upfront. It non-lazily decodes the file into raw pixels and adds it to the cache, but it gives you memory management for free. Use it for images that you use over and over, especially for small ones. Caching large images may cause more re-reading overhead as you exhaust memory. The method has an undeserved bad reputation due to early iOS bugs and severe memory limitations on early iOS devices, but those issues have long since been resolved and newer devices ship with far more RAM.
Both the named and contents methods offer a huge advantage over other image-loading approaches. For higher-scale devices, namely the iPhone 4 and later, the third-generation iPad and later, and the fifth-generation iPod touch and later, with their higher-pixel density screens, you can use these methods to automatically select between low- and high-resolution images. For screen scales of 2.0, the method first searches for filenames using a @2x naming hint.
Naming Hints
A call to [UIImage imageNamed:@"basicArt.png"] loads the file [email protected], if available, on higher-scale devices, and basicArt.png on 1.0 scale devices. The “@2x” hint indicates higher resolution art for Retina equipment. This naming scheme is tied into both general image loading and more nuanced application launching. The overall scheme looks like this:
<basename> <usage_specific_modifiers> <scale_modifier> <device_modifier>.png
Here’s how the components of the naming break down:
• The basename refers to any filename, such as basicArt, Default, icon, and so forth.
• Usage-specific modifiers are used for launching and system-required items, namely the Default image, icon image, Spotlight image, Settings image, and so forth. These modifiers consist of items such as orientation hints (-Landscape, -Portrait, -PortraitUpsideDown, and so on), size tips (-small, -72, -144, -50, -100, -568h, and so on), and URL schema. Say your app supports a custom scheme named xyz. It can be launched from Mobile Safari via xyz: whatever. You can add –xyz as a usage-specific modifier to your Default images, for example, [email protected]. This enables your app to launch with that resource when accessed from that scheme.
• The scale modifier is the optional @2x. Should Apple ever introduce additional scales, developers might add new modifiers here.
• Device modifiers refer to the various device families, specifically ~iphone and ~ipad. The iPhone 5 and fifth-generation iPod touch belong to the ~iphone family, even if their 4” screens are taller than the 3.5” iPhone 4, iPhone 4S, and fourth-generation iPod. The iPad mini belongs to the ~ipad family.
These naming hints and multi-item resources reflect how cluttered the iOS family has grown over time. A typical application now ships with more than a dozen default and icon images. For this reason, this is a likely area for Apple to evolve, hopefully moving to vector graphics (or even better solutions) and away from multiple files, especially as updated screen sizes and resolutions ship on new devices.
You can find some initial work on PDF-UIImage integration on Github, created by third-party developers. Repositories such as mindbrix/UIImage-PDF attempt to move images into scalable vector assets. Hopefully, Apple will eventually re-engineer image representations, removing the need to use these component modifiers for much longer.
Note
iOS supports the following image types: PNG, JPG, JPEG, TIF, TIFF, GIF, BMP, BMPF, ICO, CUR, XBM, and PDF. The UIImage class does not read or display PDF files; use UIWebView instead.
Finding Images in the Sandbox
By default, each sandbox contains three folders: Documents, Library, and tmp. User-generated data files, including images, normally reside in the Documents folder. This folder does exactly what the name suggests. You store documents to and access them from this directory. Keep document file data here that is created by or browsed from your program. You can also use the Documents folder and iTunes to allow desktop-based users direct access to data.
The Library folder contains user defaults and other state information for your program. Use the Library folder for any application support files that must be retained between successive runs and that are not meant for general end-user access.
The tmp folder provides a place to create transient (short-lived) files on-the-fly. Unlike in tmp, files in Documents and Library are not transient. iTunes backs up all Documents and most Library files (items in Library/Caches are not backed up, just like on the Mac) whenever iOS syncs. In contrast, iOS discards any tmp files when it reboots or when it encounters low storage conditions on the device.
This is the standard way to locate the Documents folder:
NSArray *paths = [NSSearchPathForDirectoriesInDomains(
NSDocumentDirectory, NSUserDomainMask, YES);
return [paths lastObject];
You can also reliably locate the top sandbox folder by calling NSHomeDirectory(). This lets you navigate down one level to Documents with full assurance of reaching the proper destination. The following function provides a handy way to return paths to the Documents folders:
NSString *documentsFolder()
{
return [NSHomeDirectory()
stringByAppendingPathComponent:@"Documents"];
}
To load an image, append its filename to the returned path and tell UIImage to create a new image with those contents. This code loads a file named image.png from the top level of the documents folder and returns a UIImage instance initialized with that data:
path = [documentsFolder() stringByAppendingPathComponent:@"image.png"];
return [UIImage imageWithContentsOfFile:path];
This call returns nil if the path is not valid or points to a nonimage resource.
Loading Images from URLs
The UIImage class can load images from NSData instances, but it cannot do so directly from URL strings or NSURL objects. So, supply UIImage with data already downloaded from a URL. This snippet asynchronously downloads the latest United States weather map from weather.com and then creates a new image using the weather data:
NSString *map =
@"http://maps.weather.com/images/maps/current/curwx_720x486.jpg";
NSOperationQueue *queue = [[NSOperationQueue alloc] init];
[queue addOperationWithBlock: ^{
// Load the weather data
NSURL *weatherURL = [NSURL URLWithString:map];
NSData *imageData = [NSData dataWithContentsOfURL:weatherURL];
// Update the image on the main thread using the main queue
[[NSOperationQueue mainQueue] addOperationWithBlock:^{
UIImage *weatherImage = [UIImage imageWithData:imageData];
imageView.image = weatherImage;
}];
}];
First, it constructs an NSURL object, and then it creates an NSData instance initialized with the contents of that URL. The data returned helps build the UIImage instance, which is added to an image view, taking care to perform that update on the main thread.
A more thorough implementation would return a placeholder image, cache the retrieved data locally, and update the main thread when the placeholder could be replaced with the downloaded asset.
Reading from the Assets Library
An Asset URL provides direct access to media stored outside your application’s sandbox. This access persists indefinitely and does not limit you to images returned by an image picker. A typical assets library URL looks something like this:
assets-library://asset/asset.JPG?id=553F6592-43C9-45A0-B851-28A726727436&ext=JPG
The following snippet demonstrates how to access image assets. It creates a pair of blocks that handle asset access conditions for both success and failure. Upon retrieving an asset, the code creates a data representation, stores it to a CGImageRef, and then converts that into a standard UIImage:
// Retrieve an image from an asset URL
- (void) imageFromAssetURL: (NSURL *) assetURL into: (UIImage **) image
{
ALAssetsLibrary *library = [[ALAssetsLibrary alloc] init];
ALAssetsLibraryAssetForURLResultBlock resultsBlock = ^(ALAsset *asset)
{
ALAssetRepresentation *assetRepresentation =
[asset defaultRepresentation];
CGImageRef cgImage =
[assetRepresentation CGImageWithOptions:nil];
CFRetain(cgImage); // Thanks Oliver Drobnik. ARC weirdness
if (image) *image = [UIImage imageWithCGImage:cgImage];
CFRelease(cgImage);
};
ALAssetsLibraryAccessFailureBlock failure = ^(NSError *__strong error)
{
NSLog(@"Error retrieving asset from url: %@",
error.localizedFailureReason);
};
[library assetForURL:assetURL
resultBlock:resultsBlock failureBlock:failure];
}
Note
Recipes for loading data from the photo album and from asset URLs are discussed in Chapter 8, “Common Controllers,” of The Core iOS Developer’s Cookbook.
Recipe: Fitting and Filling Images
Often you need to resize an image to fit into a smaller space. You can resize an image view, but its contents may not update as you expect. UIKit offers view content modes that specify exactly how a view adjusts content as its size updates. You set these by adjusting the value of the contentMode property.
The most commonly used content modes are as follows. These detail the ways views, including image views, adjust their content to match their current size:
• Fitting (UIViewContentModeScaleAspectFit): Resizes the image while retaining its proportions, fitting it so every part of the image remains visible. Depending on the image’s aspect ratio, the results are either letterboxed or pillarboxed, with some extra area needed to matte the image (see Figure 6-1, top left).
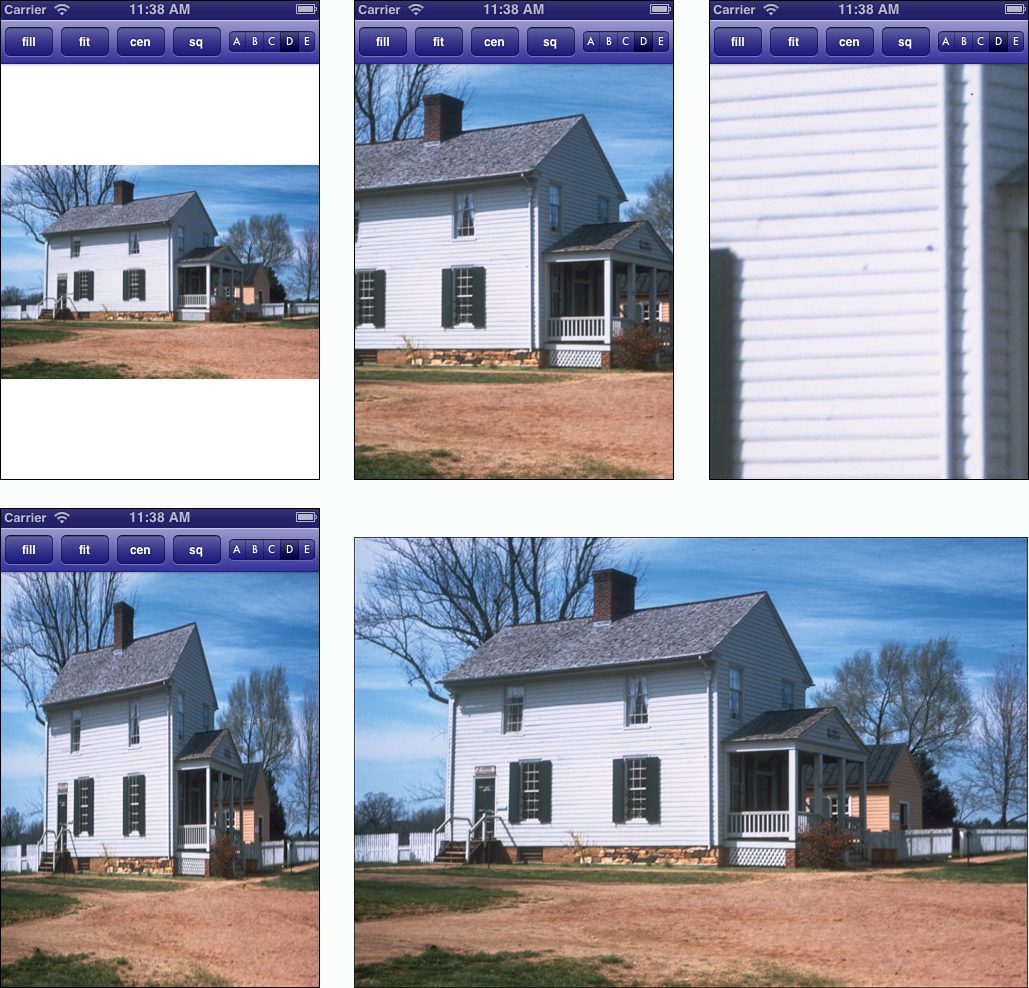
Figure 6-1. These screen shots represent ways to manipulate content to fill available space. Fitting (top left) preserves original aspect ratios, padding as needed with extra space. Filling (top middle) ensures that every available pixel is filled, cropping only those portions that fall outside the frame Centering (top right) uses the original image pixels at a 1:1 scale of pixels to points, cropping from the center out. Squeezing (bottom left) fits the original pixels to the destination aspect ratio, scaling as needed without preserving aspect. The original image appears at the bottom right.
• Filling (UIViewContentModeScaleAspectFill): Punches out part of the image to match the available space. This approach crops any elements that fall outside the pixel display area, either to the top and bottom, or to the left and right. The image is usually centered, with only the smaller dimension being fully displayed (see Figure 6-1, top middle).
• Centering (UIViewContentModeCenter): Places the image at its natural scale directly in the center of the image. Images larger than the pixel display area are cropped. Those smaller are matted as needed (see Figure 6-1, top right). Similar modes allow placement at the top, bottom, left, right, top left, top right, bottom left, and bottom right of the view.
• Squeezing (UIViewContentModeScaleToFill): Adjusts the image’s aspect to fit it into the available space. All pixels are filled.
At times, you’ll want to respect content rules while redrawing an image into fewer bytes. This allows you to mimic this behavior while reducing memory overhead.
Recipe 6-1 shows how to create mode-adjusted images that respect a destination size. These methods are implemented using a UIImage category and return new image instances. You pass a target size and a wanted content mode. The recipe returns a new image based on that size.
The context background is not initialized in this recipe. Pillarboxed or letterboxed pixels remain transparent. You can easily update this code to provide a backing fill color before drawing the image into its destination rectangle. This is left as an exercise for you.
Recipe 6-1. Applying Image Aspect
// Calculate the destination scale for filling
CGFloat CGAspectScaleFill(CGSize sourceSize, CGRect destRect)
{
CGSize destSize = destRect.size;
CGFloat scaleW = destSize.width / sourceSize.width;
CGFloat scaleH = destSize.height / sourceSize.height;
return MAX(scaleW, scaleH);
}
// Calculate the destination scale for fitting
CGFloat CGAspectScaleFit(CGSize sourceSize, CGRect destRect)
{
CGSize destSize = destRect.size;
CGFloat scaleW = destSize.width / sourceSize.width;
CGFloat scaleH = destSize.height / sourceSize.height;
return MIN(scaleW, scaleH);
}
// Fit a size into another size
CGSize CGSizeFitInSize(CGSize sourceSize, CGSize destSize)
{
CGFloat destScale;
CGSize newSize = sourceSize;
if (newSize.height && (newSize.height > destSize.height))
{
destScale = destSize.height / newSize.height;
newSize.width *= destScale;
newSize.height *= destScale;
}
if (newSize.width && (newSize.width >= destSize.width))
{
destScale = destSize.width / newSize.width;
newSize.width *= destScale;
newSize.height *= destScale;
}
return newSize;
}
// Destination rect by fitting
CGRect CGRectAspectFitRect(CGSize sourceSize, CGRect destRect)
{
CGSize destSize = destRect.size;
CGFloat destScale = CGAspectScaleFit(sourceSize, destRect);
CGFloat newWidth = sourceSize.width * destScale;
CGFloat newHeight = sourceSize.height * destScale;
CGFloat dWidth = ((destSize.width - newWidth) / 2.0f);
GFloat dHeight = ((destSize.height - newHeight) / 2.0f);
CGRect rect = CGRectMake(dWidth, dHeight, newWidth, newHeight);
return rect;
}
// Destination rect by filling
CGRect CGRectAspectFillRect(CGSize sourceSize, CGRect destRect)
{
CGSize destSize = destRect.size;
CGFloat destScale = CGAspectScaleFill(sourceSize, destRect);
CGFloat newWidth = sourceSize.width * destScale;
CGFloat newHeight = sourceSize.height * destScale;
CGFloat dWidth = ((destSize.width - newWidth) / 2.0f);
CGFloat dHeight = ((destSize.height - newHeight) / 2.0f);
CGRect rect = CGRectMake(dWidth, dHeight, newWidth, newHeight);
return rect;
}
// Return a new image created with a content mode
- (UIImage *) applyAspect: (UIViewContentMode) mode
inRect: (CGRect) bounds
{
CGRect destRect;
UIGraphicsBeginImageContext(bounds.size);
switch (mode)
{
case UIViewContentModeScaleToFill:
{
destRect = bounds;
break;
}
case UIViewContentModeScaleAspectFill:
{
CGRect rect = CGRectAspectFillRect(self.size, bounds);
destRect = CGRectCenteredInRect(rect, bounds);
break;
}
case UIViewContentModeScaleAspectFit:
{
CGRect rect = CGRectAspectFitRect(self.size, bounds);
destRect = CGRectCenteredInRect(rect, bounds);
break;
}
case UIViewContentModeCenter:
{
CGRect rect = (CGRect){.size = self.size};
destRect = CGRectCenteredInRect(rect, bounds);
break;
}
default:
break;
}
[self drawInRect:destRect];
UIImage *newImage = UIGraphicsGetImageFromCurrentImageContext();
UIGraphicsEndImageContext();
return newImage;
}
Get This Recipe’s Code
To find this recipe’s full sample project, point your browser to https://github.com/erica/iOS-6-Advanced-Cookbook and go to the folder for Chapter 6.
Recipe: Rotating Images
The easiest way to rotate images involves applying a rotation transform to an image view. That approach does not affect the image data, just its presentation onscreen. Plus transforms give the added bonus of managing the view’s touches for free. When you want to rotate the data itself, you can draw data into a rotated context to create an altered image.
There are many reasons to rotate. For example, you may need to adjust a snapshot that was captured at an angle due to the way a user was holding the device. Or you may want to create a collage of rotated and scaled subimages that you merge into a new picture.
Recipe 6-2 establishes a UIImage category that produces images with rotated content. You call it with an angular offset, and it returns a rotated version. In this recipe, the size of the generated image depends on both the original image geometry (its size) and the degree of rotation applied to it.
For example, a square image rotated by 45 degrees is approximately 40% larger in each dimension (see Figure 6-2), occupying a far larger space than the original. Recipe 6-1 calculates this new size by applying an affine transform. Affine transforms are geometric operations that map points in one coordinate system to another coordinate system. iOS uses CGAffineTransform functions, in this case CGRectApplyAffineTransform, to convert rectangles by applying transforms.
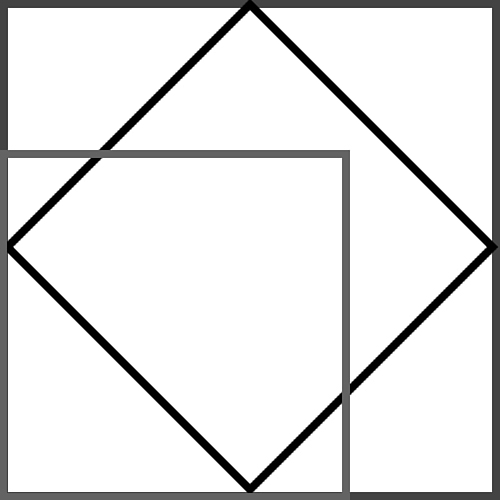
Figure 6-2. Upon rotation, an image may require a far larger space than its original size. The smaller square in the bottom-left corner represents an initial image size. After rotation (to the diamond in the center), the required size to fit within a single image increases to the larger outer square. You choose between expanding the final size, shrinking the results, and cropping parts of the image to fit the available space.
You can, of course, crop the rotated image, cutting off the edges. Alternatively, you may want to expand to encompass the entire picture. This recipe preserves the updated image. It manipulates the image context it draws into, which is sized to fit the entire rotated version. Recipes that follow later in this chapter take the opposite approach, returning an image sized to match the original.
Finally, you could shrink the results, fitting them to the available size. This is usually the least wanted approach because the changed scale will degrade the image contents and may produce user confusion when you present an image that suddenly shrinks onscreen.
Speaking of degradation, should you need to keep rotating the image, make sure you always start with the original data. Each rotation forces pixels to merge, leaving aside any issue of cropping. Multiple rotations applied to the same data produce corrupt results. Rotating the original to each degree required produces cleaner results.
As with Recipe 6-1, unaddressed pixels remain transparent. You could, alternatively, fill the background of the context with whatever color and alpha value you find appropriate to your needs.
UIImage *rotatedImage(
UIImage *image, CGFloat rotation)
{
// Rotation is specified in radians
// Calculate Destination Size
CGAffineTransform t = CGAffineTransformMakeRotation(rotation);
CGRect sizeRect = (CGRect) {.size = image.size};
CGRect destRect = CGRectApplyAffineTransform(sizeRect, t);
CGSize destinationSize = destRect.size;
// Draw image
UIGraphicsBeginImageContext(destinationSize);
CGContextRef context = UIGraphicsGetCurrentContext();
// Translate to set the origin before rotation
// to the center of the image
CGContextTranslateCTM(context,
destinationSize.width / 2.0f,
destinationSize.height / 2.0f);
// Rotate around the center of the image
CGContextRotateCTM(context, rotation);
// Draw the image into the rotated context
[image drawInRect:CGRectMake(
-image.size.width / 2.0f,
-image.size.height / 2.0f,
image.size.width, image.size.height)];
// Save image
UIImage *newImage =
UIGraphicsGetImageFromCurrentImageContext();
UIGraphicsEndImageContext();
return newImage;
}
@implementation UIImage (Rotation)
- (UIImage *) rotateBy: (CGFloat) theta
{
return rotatedImage(self, theta);
}
+ (UIImage *) image: (UIImage *) image rotatedBy: (CGFloat) theta
{
return rotatedImage(image, theta);
}
@end
Get This Recipe’s Code
To find this recipe’s full sample project, point your browser to https://github.com/erica/iOS-6-Advanced-Cookbook and go to the folder for Chapter 6.
Recipe: Working with Bitmap Representations
Although Cocoa Touch provides excellent resolution-independent tools for working with many images, there are times you need to reach down to the bits that underlie a picture and access that data on a bit-by-bit basis. For example, you might apply edge-detection or blurring routines that calculate their results by convolving matrices against actual byte values.
The sample code that supports Recipe 6-3 retrieves bytes that correspond to a point where the user has touched the screen and updates the navigation bar with that color. Accessing pixel-by-pixel color allows the project to look up data from screen coordinates.
Converting Between Coordinate Systems
To access bytes, the touch point must be transformed from the image view’s coordinates to the image’s. That’s made slightly more difficult by setting the view’s content mode to UIViewContentModeScaleAspectFill. As the previous recipe explains, aspect-fill means that every pixel in the view is filled, extending an image out from its center and clipping excess material either along its sides or its top and bottom.
The following method handles conversion by applying an affine transform to the view’s touch point. This scales it from the screen’s coordinate system to the image’s coordinate system. This takes several steps. The point must first be recentered, then transformed, and then reset back from the image’s center. Affine transforms operate with respect to a view’s center, so the touch points coordinates must accommodate that change. In the end, the center-transform-recenter process produces a point that falls onto the image data array that respects the image’s top-left corner as a (0,0) origin:
- (void) handle: (CGPoint) aPoint
{
// Set origin to the center of the view
aPoint.x -= self.center.x;
aPoint.y -= self.center.y;
// Calculate the point in the image's view coordinate system
CGFloat imageWidth = self.image.size.width;
CGFloat imageHeight = self.image.size.height;
CGFloat xScale = imageWidth / self.frame.size.width;
CGFloat yScale = imageHeight / self.frame.size.height;
CGFloat scale = MIN(xScale, yScale);
CGAffineTransform t = CGAffineTransformMakeScale(scale, scale);
CGPoint adjustedPoint = CGPointApplyAffineTransform(aPoint, t);
// Reset the origin to the top-left corner of the image
adjustedPoint.x += imageWidth / 2.0f;
adjustedPoint.y += imageHeight / 2.0f;
// Refresh the image data if needed (it shouldn't be needed)
if (!_imageData)
_imageData = self.image.bytes;
// Retrieve the byte values at the given point –
Byte *bytes = (Byte *)_imageData.bytes;
CGFloat red = bytes[redOffset(adjustedPoint.x,
adjustedPoint.y, imageWidth)] / 255.0f;
CGFloat green = bytes[greenOffset(adjustedPoint.x,
adjustedPoint.y, imageWidth)] / 255.0f;
CGFloat blue = bytes[blueOffset(adjustedPoint.x,
adjustedPoint.y, imageWidth)] / 255.0f;
UIColor *color = [UIColor colorWithRed:red
green:green blue:blue alpha:1.0f];
// Update the nav bar to match the color at the user's touch
_controller.navigationController.navigationBar.tintColor = color;
}
Looking Up Data
Bitmaps have no natural dimensions. They are just blocks of data. Thus, if you want to access byte data at the point (x,y), you must supply the size of each row. The bytes for each pixel (there are 4 bytes for ARGB data) start at an offset of (y * rowWidth + x) * 4. So, the first pixel in the image starts at 0, and goes through byte 3. The second pixel starts at 4, continuing to byte 7, and so forth.
Each channel occupies one byte. Each 4-byte sequence contains a level for alpha, red, green, and then blue. The first byte holds the alpha (opacity) information. The red channel is offset by 1 byte, the green by 2, and the blue by 3. Four helper functions, allow this method to retrieve a calculated offset into the byte array by supplying x, y, and the row-width. The following functions return offsets for any point (x,y) inside an ARGB bitmap using width w:
NSUInteger alphaOffset(NSUInteger x, NSUInteger y, NSUInteger w)
{return y * w * 4 + x * 4 + 0;}
NSUInteger redOffset(NSUInteger x, NSUInteger y, NSUInteger w)
{return y * w * 4 + x * 4 + 1;}
NSUInteger greenOffset(NSUInteger x, NSUInteger y, NSUInteger w)
{return y * w * 4 + x * 4 + 2;}
NSUInteger blueOffset(NSUInteger x, NSUInteger y, NSUInteger w)
{return y * w * 4 + x * 4 + 3;}
The height is not needed for these calculations; the width of each row enables you to determine a two-dimensional point in what is actually a one-dimensional buffer. Each byte ranges from 0 (0%, or 0x00) to 255 (100% or 0xFF). Convert this to a float and divide by 255.0 to retrieve the ARGB value.
Converting Image Data to and from Bitmap Data
To build a bitmap, you draw an image into a bitmap context and then retrieve bytes as a Byte * (aka uint8 *) buffer, which Recipe 6-3 stores via an NSData object. The bytesFromImage: class method creates an RGB color space (alternatives are Gray and CMYK), allocates the bitmap data, and creates a bitmap context, which it draws the image into. The bytes are retrieved from the context, placed into an NSData object, and all the rest of the CG objects are cleaned up. The Data object takes over responsibility for the bytes in question.
The imageWithBytes:withSize: method goes the opposite way. You supply a byte array and the wanted image dimensions. The method creates a new CGImageRef with that data, converts it to a UIImage instance, and returns that image.
As you’ll see in the next recipe, moving back and forth from bitmap representations allows you to introduce image processing to your pictures.
Always make sure to run Xcode’s static analyzer on your bitmap routines. It’s easy to overlook a release or a free call, and the analyzer can help find errors. The Recipe 6-3’s first routine (the imageWithBytes: method) releases the bytes passed to it.
Recipe 6-3. Converting to and from Image Bitmaps
@implementation UIImage (Utils)
// Build image from bytes
+ (UIImage *) imageWithBytes: (Byte *) bytes withSize: (CGSize) size
{
// Create a color space
CGColorSpaceRef colorSpace = CGColorSpaceCreateDeviceRGB();
if (colorSpace == NULL)
{
fprintf(stderr, "Error allocating color space
");
free(bytes);
return nil;
}
// Create the bitmap context
CGContextRef context = CGBitmapContextCreate(
bytes, size.width, size.height, 8, size.width * 4,
colorSpace, kCGImageAlphaPremultipliedFirst);
if (context == NULL)
{
fprintf (stderr, "Error: Context not created!");
free (bytes);
CGColorSpaceRelease(colorSpace );
return nil;
}
// Convert to image
CGImageRef imageRef = CGBitmapContextCreateImage(context);
UIImage *image = [UIImage imageWithCGImage:imageRef];
// Clean up
CGColorSpaceRelease(colorSpace );
free(CGBitmapContextGetData(context)); // frees bytes
CGContextRelease(context);
CFRelease(imageRef);
return image;
}
// Covert UIImage to byte array
+ (NSData *) bytesFromImage: (UIImage *) image
{
CGSize size = image.size;
CGColorSpaceRef colorSpace = CGColorSpaceCreateDeviceRGB();
if (colorSpace == NULL)
{
fprintf(stderr, "Error allocating color space
");
return NULL;
}
void *bitmapData = malloc(size.width * size.height * 4);
if (bitmapData == NULL)
{
fprintf (stderr, "Error: Memory not allocated!");
CGColorSpaceRelease(colorSpace );
return NULL;
}
CGContextRef context = CGBitmapContextCreate(
bitmapData, size.width, size.height, 8, size.width * 4,
colorSpace, kCGImageAlphaPremultipliedFirst);
CGColorSpaceRelease(colorSpace );
if (context == NULL)
{
fprintf (stderr, "Error: Context not created!");
free (bitmapData);
return NULL;
}
CGRect rect = (CGRect){.size = size};
CGContextDrawImage(context, rect, image.CGImage);
Byte *byteData = CGBitmapContextGetData (context);
CGContextRelease(context);
NSData *data = [NSData dataWithBytes:byteData
length:(size.width * size.height * 4)];
free(bitmapData);
return data;
}
- (NSData *) bytes
{
return [UIImage bytesFromImage:self];
}
@end
Get This Recipe’s Code
To find this recipe’s full sample project, point your browser to https://github.com/erica/iOS-6-Advanced-Cookbook and go to the folder for Chapter 6.
Recipe: Basic Image Processing
A somewhat recent addition to iOS, the Accelerate framework offers C-based APIs that allow applications to perform digital signal processing (DSP) using vector and matrix-based arithmetic. According to Apple, its mathematical functions support “speech, sound, audio, and video processing, diagnostic medical imaging, radar signal processing, seismic analysis, and scientific data processing.” These routines are engineered for high performance, and are reusable across most Apple platforms. Accelerate offers portable, reliable, highly-optimized code.
Consider Recipe 6-4, which implements image rotation similar to Recipe 6-2. It uses the Accelerate framework instead of Core Graphics context calls. This implementation crops the image to the original size rather than preserving the rotated dimensions.
What stands out about this recipe is its simplicity (just a call to the ARGB rotation routine) and the bookkeeping. The data is packaged as a vImage_Buffer. Image buffers consist of a pointer to the data in question and fields that store the image’s height, width, and bytes per row. In this case, a row consists of 4 bytes of ARGB data per pixel.
You allocate the output buffer and are responsible for deallocating it after use. In this recipe, the call to Recipe 6-3’s imageWithBytes:withSize: automatically takes care of that deallocation and returns a UIImage instance.
With Accelerate, you can perform most standard image processing routines including scaling, shearing, histograms, gamma adjustments, convolution (see Recipe 6-5), and so forth. Accelerate makes it easy to apply standard routines to image buffers. Recipes 6-3 and 6-4 demonstrate how to make the jump between the UIKit world of UIImage instances and the bitmap word of Accelerate’s C-based functions.
Recipe 6-4. Rotating Images with the Accelerate Framework
@implementation UIImage (vImage)
// Return a base buffer without bytes
- (vImage_Buffer) baseBuffer
{
vImage_Buffer buf;
buf.height = self.size.height;
buf.width = self.size.width;
buf.rowBytes = sizeof(Byte) * self.size.width * 4; // ARGB
return buf;
}
// Return a buffer for the current image, with its bytes populated
- (vImage_Buffer) buffer
{
vImage_Buffer buf = [self baseBuffer];
buf.data = (void *)self.bytes.bytes;
return buf;
}
// Perform rotation
- (UIImage *) vImageRotate: (CGFloat) theta
{
vImage_Buffer inBuffer = [self buffer];
vImage_Buffer outBuffer = [self baseBuffer];
Byte *outData = (Byte *)malloc(
outBuffer.rowBytes * outBuffer.height);
outBuffer.data = (void *) outData;
uint8_t backColor[4] = {0xFF, 0, 0, 0};
vImage_Error error = vImageRotate_ARGB8888(
&inBuffer, &outBuffer, NULL, theta, backColor, 0);
if (error)
{
NSLog(@"Error rotating image: %ld", error);
free(outData);
return self;
}
// This frees the outData buffer
return [UIImage imageWithBytes:outData withSize:self.size];
}
@end
Get This Recipe’s Code
To find this recipe’s full sample project, point your browser to https://github.com/erica/iOS-6-Advanced-Cookbook and go to the folder for Chapter 6.
Recipe: Image Convolution
Many common image effects depend on convolving matrices with image data. You might want to sharpen an image, smooth it, or add an “embossed” effect. Creating a two-dimensional array of values with specific characteristics produces these effects. The following matrix defines pixel operations that output the “emboss” effect shown in Figure 6-3:
- (UIImage *) emboss
{
static const int16_t kernel[] = {
-2, -1, 0,
-1, 1, 1,
0, 1, 2};
return [self convolve:kernel side:3];
}
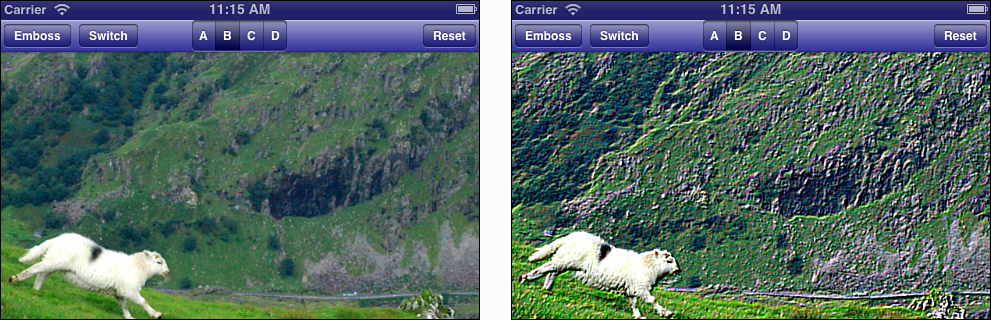
Figure 6-3. Embossing an image produces a pseudo-3D effect, where items appear to push forward out of the screen. The embossed image (bottom) is produced by convolving a simple matrix against the original image (top).
To convolve an image means to iteratively apply a matrix across all pixels. This particular matrix produces the strongest results when nearby pixels to the top right of a given position are dimmer and pixels to the bottom right are brighter. Because this naturally happens at the right and bottom edges of objects within a scene, the output looks embossed, with items appearing to pop out from the rest of the image. The bottom-right portions of the processed sheep in Figure 6-3 are more pronounced than the original.
Recipe 6-5 demonstrates how to perform a convolution using the Accelerate framework. In steps, it’s practically identical to Recipe 6-4. What’s notably different is that you provide a matrix to convolve with and a divisor for normalizing results. A couple common operations are added (sharpen and a 5x5 Gaussian blur) to demonstrate how the convolution method might be called. This is a helpful approach for performing blurs on pre-iOS 6 installs.
These routines are fairly basic. You can apply far more complex image enhancements using Core Image, which is discussed in the next recipe.
Recipe 6-5. Convolving Images with the Accelerate Framework
// Calculate the matrix sum for non-edge convolution
int32_t getDivisor(NSData *kernel)
{
const int16_t *matrix = (const int16_t *)kernel.bytes;
int count = kernel.length / sizeof(const int16_t);
// Sum up the kernel elements
int32_t sum = 0;
for (CFIndex i = 0; i < count; i++)
sum += matrix[i];
if (sum != 0) return sum;
return 1;
}
// Convolve an image against a kernel
- (UIImage *) vImageConvolve: (NSData *) kernel
{
vImage_Buffer inBuffer = [self buffer];
vImage_Buffer outBuffer = [self baseBuffer];
Byte *outData = (Byte *)malloc(
outBuffer.rowBytes * outBuffer.height);
outBuffer.data = (void *) outData;
uint8_t backColor[4] = {0xFF, 0, 0, 0};
const int16_t *matrix = (const int16_t *)kernel.bytes;
uint32_t matrixSide = sqrt(kernel.length / sizeof(int16_t));
int32_t divisor = getDivisor(kernel);
vImage_Error error = vImageConvolve_ARGB8888(
&inBuffer, &outBuffer, NULL, 0, 0, matrix,
matrixSide, matrixSide, divisor,
backColor, kvImageBackgroundColorFill);
if (error)
{
NSLog(@"Error convolving image: %ld", error);
free(outData);
return self;
}
return [UIImage imageWithBytes:outData withSize:self.size];
}
- (UIImage *) sharpen
{
static const int16_t kernel[] = {
0, -1, 0,
-1, 8, -1,
0, -1, 0
};
return [self convolve:kernel side:3];
}
- (UIImage *) gauss5
{
static const int16_t kernel[] = {
1, 4, 6, 4, 1,
4, 16, 24, 16, 4,
6, 24, 36, 24, 6,
4, 16, 24, 16, 4,
1, 4, 6, 4, 1
};
return [self convolve:kernel side:5];
}
To find this recipe’s full sample project, point your browser to https://github.com/erica/iOS-6-Advanced-Cookbook and go to the folder for Chapter 6.
Recipe: Basic Core Image Processing
Core Image filters enable you to process images quickly. Recipe 6-6 introduces basic CI filtering by applying a simple sepia filter to images. iOS 6 offers a wide range of CI filters that have grown over time. You can query these by looking at the built-in set of filter names:
NSLog(@"%@", [CIFilter filterNamesInCategory: kCICategoryBuiltIn]);
Filters include color adjustments, geometric transforms, cropping, and compositing. Often you feed the results of one filter into the next. For example, to create a picture-in-picture effect, you can scale and translate one image and then composite it over another.
Each filter uses a number of inputs, which include both source data and parameters. These vary by filter. Recipe 6-6 uses a sepia tone filter whose inputs are inputImage and inputIntensity. A second perspective filter adds inputs that specify positions for image corners. Figure 6-4 shows the results of this perspective filter implementation. Adjusting the four-corner inputs changes the “direction” of the filter.
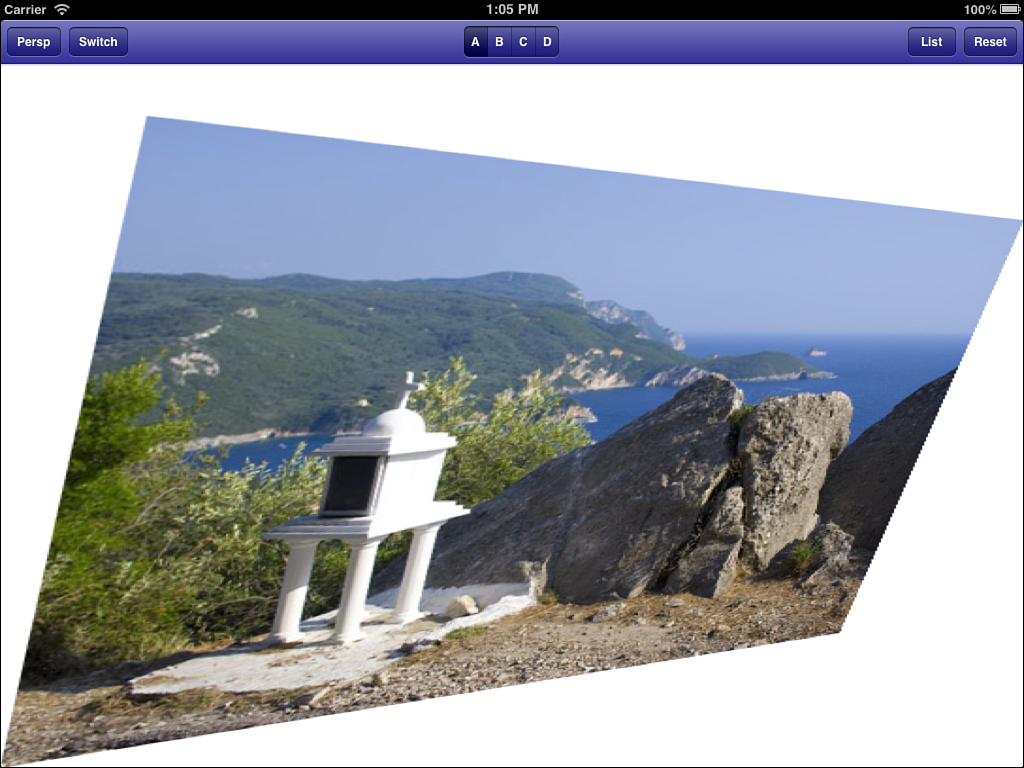
Figure 6-4. A perspective filter distorts the image as if seen from another viewpoint.
Look up input specifics in the latest “Core Image Filter Reference” document and Core Image Programming Guide from Apple. You can also query inputs directly from the filter by calling inputKeys. This returns an array of input parameter names used by the filter.
Nearly all filters offer default settings that provide a basis for you to start playing with them. Calling setDefaults loads these values, allowing you to start testing. Pay special attention to Apple’s guide, which details what each default means and how the filter uses it. It also offers image examples, so you can see what the filter is meant to do.
As a side note, Recipe 6-6 implements a coreImageRepresentation property, which is provided because CI/UIImage integration remains a bit wonky. When the method cannot retrieve a CIImage instance directly from an image, it builds one from the image’s CGImage representation. This kind of workaround helps remind you that Core Image remains an evolving technology under iOS.
- (CIImage *) coreImageRepresentation
{
if (self.CIImage)
return self.CIImage;
return [CIImage imageWithCGImage:self.CGImage];
}
- (UIImage *) sepiaVersion: (CGFloat) intensity
{
CIFilter *filter = [CIFilter
filterWithName:@"CISepiaTone"
keysAndValues: @"inputImage",
self.coreImageRepresentation, nil];
[filter setDefaults];
[filter setValue:@(intensity) forKey:@"inputIntensity"];
CIImage *output = [filter valueForKey:kCIOutputImageKey];
if (!output)
{
NSLog(@"Core Image processing error");
return nil;
}
UIImage *results = [UIImage imageWithCIImage:output];
return results;
}
- (UIImage *) perspectiveExample
{
CIFilter *filter = [CIFilter
filterWithName:@"CIPerspectiveTransform"
keysAndValues: @"inputImage",
self.coreImageRepresentation,
nil];
[filter setDefaults];
[filter setValue:[CIVector vectorWithX:180 Y:600]
forKey:@"inputTopLeft"];
[filter setValue:[CIVector vectorWithX:102 Y:20]
forKey:@"inputBottomLeft"];
CIImage *output = [filter valueForKey:kCIOutputImageKey];
if (!output)
{
NSLog(@"Core Image processing error");
return nil;
}
UIImage *results = [UIImage imageWithCIImage:output];
return results;
}
Get This Recipe’s Code
To find this recipe’s full sample project, point your browser to https://github.com/erica/iOS-6-Advanced-Cookbook and go to the folder for Chapter 6.
Capturing View-Based Screen Shots
At times you need to take a shot of a view or window in its current state or otherwise render a view into an image. Listing 6-1 details how you can draw views into image contexts and retrieve UIImage instances. This code works by using Quartz Core’s renderInContext call for CALayer instances. It produces a screen shot not only of the view, but also of all the subviews that view owns.
There are, of course, limits. You cannot make a screen shot of the entire window (the status bar will be missing in action) and, using this code in particular, you cannot make a screen shot of videos or the camera previews. OpenGL ES views also may not be captured.
This kind of view-to-image utility is particularly handy when working with Core Animation as you create transitions from one view hierarchy to another.
Listing 6-1. Making a Screen Shot of a View
UIImage *imageFromView(UIView *theView)
{
UIGraphicsBeginImageContext(theView.frame.size);
CGContextRef context = UIGraphicsGetCurrentContext();
[theView.layer renderInContext:context];
UIImage *theImage =
UIGraphicsGetImageFromCurrentImageContext();
UIGraphicsEndImageContext();
return theImage;
}
UIImage *screenShot()
{
UIWindow *window =
[[UIApplication sharedApplication] keyWindow];
return imageFromView(window);
}
Drawing into PDF Files
You can draw directly into PDF documents, just as if you were drawing into an image context. As you can see in Listing 6-2, you can use Quartz drawing commands such as UIImage’s drawInRect: and CALayer’s renderInContext: methods, along with your full arsenal of other Quartz functions.
You typically draw each image into a new PDF page. You must create at least one page in your PDF document, as shown in this listing. In addition to simple rendering, you can add live links to your PDFs using functions such as UIGraphicsSetPDFContextURLForRect(), which links to an external URL from the rectangle you define, and UIGraphicsSetPDFContextDestinationForRect(), which links internally within your document. Create your destination points using UIGraphicsAddPDFContextDestinationAtPoint().
Each PDF document is built with a custom dictionary. Pass nil if you want to skip the dictionary, or assign values for Author, Creator, Title, Password, AllowsPrinting, and so forth. The keys for this dictionary are listed in Apple’s CGPDFContext reference documentation.
Listing 6-2. Drawing an Image into a PDF File
+ (void) saveImage: (UIImage *) image
toPDFFile: (NSString *) path
{
CGRect theBounds = (CGRect){.size=image.size};
UIGraphicsBeginPDFContextToFile(path, theBounds, nil);
{
UIGraphicsBeginPDFPage();
[image drawInRect:theBounds];
}
UIGraphicsEndPDFContext();
}
Recipe: Reflection
The final two recipes for this chapter add a bit of razzle dazzle to your images. They offer a natural fit to the special effects introduced by Core Image and Accelerate. They are both part of the QuartzCore framework, used for creating, manipulating, and drawing images.
Reflections enhance the reality of onscreen objects. They provide a little extra visual spice beyond the views-floating-over-a-backsplash, which prevails as the norm. Reflections have become especially easy to implement because of the CAReplicatorLayer class. This class does what its name implies; it replicates a view’s layer and enables you to apply transforms to that replication.
Recipe 6-7 shows how you can use replicator layers to build a view controller that automatically reflects content. A custom reflector view class overrides layerClass to ensure that the view’s layer defaults to a replicator. That replicator is given the instanceCount of 2, so it duplicates the original view to a second instance. Its instanceTransform specifies how the second instance is manipulated and placed onscreen: flipped, squeezed, and then moved vertically below the original view. This creates a small reflection at the foot of the original view.
Due to the replicator, that reflection is completely “live.” Any changes to the main view immediately update in the reflection layer, which you can test yourself using the sample code that accompanies this chapter. You can add scrolling text views, web views, switches, and so forth. Any changes to the original view are replicated, creating a completely passive reflection system.
Good reflections use a natural attrition as the “reflection” moves further away from the original view. This listing adds an optional gradient overlay (using the usesGradientOverlay property) that creates a visual drop-off from the bottom of the view. This code adds the gradient as a CAGradientLayer.
This code introduces an arbitrary gap between the bottom of the view and its reflection. Here, it is hardwired to 10 points, and demonstrated in Figure 6-5, but you can adjust this as you like.
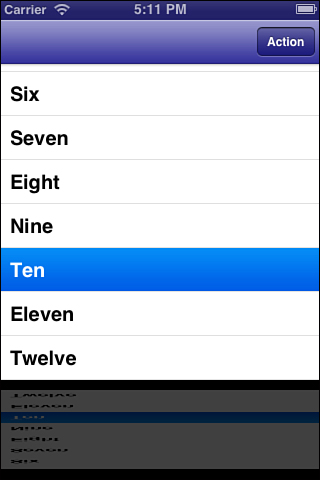
Figure 6-5. This layer-based reflection updates in real time to match the view it reflects. When using a ReflectionViewController like this, you need to add subviews to the controller’s reflecting backdrop, not its view.
To make this recipe work within the context of a view controller, its child classes must do three things. First, add custom views to the controller’s backsplash instead of its view, for example, [self.backsplash addSubview:cannedTable]. Second, be sure to call the super implementation for viewDidAppear. Finally, make sure to update the reflection each time the orientation changes by calling setupReflection for the backsplash.
Recipe 6-7. Creating Reflections
@implementation ReflectingView
// Always use a replicator as the base layer
+ (Class) layerClass
{
return [CAReplicatorLayer class];
}
- (void) setupGradient
{
// Add a new gradient layer to the parent
UIView *parent = self.superview;
if (!gradient)
{
gradient = [CAGradientLayer layer];
CGColorRef c1 = [[UIColor blackColor]
colorWithAlphaComponent:0.5f].CGColor;
CGColorRef c2 = [[UIColor blackColor]
colorWithAlphaComponent:0.9f].CGColor;
[gradient setColors:[NSArray arrayWithObjects:
(__bridge id)c1, (__bridge id)c2, nil]];
[parent.layer addSublayer:gradient];
}
// Place the gradient just below the view using the
// reflection's geometry
float desiredGap = 10.0f; // gap between view and its reflection
CGFloat shrinkFactor = 0.25f; // reflection size
CGFloat height = self.bounds.size.height;
CGFloat width = self.bounds.size.width;
CGFloat y = self.frame.origin.y;
[gradient setAnchorPoint:CGPointMake(0.0f,0.0f)];
[gradient setFrame:CGRectMake(0.0f, y + height + desiredGap,
width, height * shrinkFactor)];
[gradient removeAllAnimations];
[gradient setAnchorPoint:CGPointMake(0.0f,0.0f)];
[gradient setFrame:CGRectMake(0.0f, y + height + desiredGap,
maxDimension, height * shrinkFactor)];
[gradient removeAllAnimations];
}
- (void) setupReflection
{
CGFloat height = self.bounds.size.height;
CGFloat shrinkFactor = 0.25f;
CATransform3D t = CATransform3DMakeScale(1.0, -shrinkFactor, 1.0);
// Scaling centers the shadow in the view.
// Translate the results in shrunken terms
float offsetFromBottom = height * ((1.0f - shrinkFactor) / 2.0f);
float inverse = 1.0 / shrinkFactor;
float desiredGap = 10.0f;
t = CATransform3DTranslate(t, 0.0, -offsetFromBottom * inverse
- height - inverse * desiredGap, 0.0f);
CAReplicatorLayer *replicatorLayer =
(CAReplicatorLayer*)self.layer;
replicatorLayer.instanceTransform = t;
replicatorLayer.instanceCount = 2;
// Gradient use must be explicitly set
if (usesGradientOverlay)
[self setupGradient];
else
{
// Darken the reflection when not using a gradient
replicatorLayer.instanceRedOffset = -0.75;
replicatorLayer.instanceGreenOffset = -0.75;
replicatorLayer.instanceBlueOffset = -0.75;
}
}
@end
Get This Recipe’s Code
To find this recipe’s full sample project, point your browser to https://github.com/erica/iOS-6-Advanced-Cookbook and go to the folder for Chapter 6.
Recipe: Emitters
Add a bit of sparkle to your applications by introducing emitters. Emitters render particles in real time using a suite of custom properties that you adjust. Recipe 6-8 creates a violent purple cloud of particles that moves with your touch on the screen. As with Recipe 6-7’s reflections, emitters enable you to add interactive visual interest to your applications.
Creating an emitter is based on establishing a layer and adding it to a view. You establish the emitter by adding a particle emitter cell and tweaking its characteristics. Here, each particle is based on an image, which in this case is loaded from the spark.png file included in the sample code.
Beyond that, it’s up to you to decide how quickly particles are created, how long they live, their speed, color, and so forth. This kind of recipe is a tweaker’s delight. Feel free to explore how each parameter affects the particle display created as you trace your finger across the screen.
@implementation SparkleTouchView
{
CAEmitterLayer *emitter;
}
- (id) initWithFrame: (CGRect) aFrame
{
if (!(self = [super initWithFrame:aFrame])) return self;
return self;
}
- (void) touchesBegan:(NSSet *)touches withEvent:(UIEvent *)event
{
float multiplier = 0.25f;
CGPoint pt = [[touches anyObject] locationInView:self];
//Create the emitter layer
emitter = [CAEmitterLayer layer];
emitter.emitterPosition = pt;
emitter.emitterMode = kCAEmitterLayerOutline;
emitter.emitterShape = kCAEmitterLayerCircle;
emitter.renderMode = kCAEmitterLayerAdditive;
emitter.emitterSize = CGSizeMake(100 * multiplier, 0);
//Create the emitter cell
CAEmitterCell* particle = [CAEmitterCell emitterCell];
particle.emissionLongitude = M_PI;
particle.birthRate = multiplier * 1000.0;
particle.lifetime = multiplier;
particle.lifetimeRange = multiplier * 0.35;
particle.velocity = 180;
particle.velocityRange = 130;
particle.emissionRange = 1.1;
particle.scaleSpeed = 1.0; // was 0.3
particle.color = [[COOKBOOK_PURPLE_COLOR
colorWithAlphaComponent:0.5f] CGColor];
particle.contents =
(__bridge id)([UIImage imageNamed:@"spark.png"].CGImage);
particle.name = @"particle";
emitter.emitterCells = [NSArray arrayWithObject:particle];
[self.layer addSublayer:emitter];
}
- (void) touchesMoved:(NSSet *)touches withEvent:(UIEvent *)event
{
CGPoint pt = [[touches anyObject] locationInView:self];
// Disable implicit animations
[CATransaction begin];
[CATransaction setValue:(id)kCFBooleanTrue
forKey:kCATransactionDisableActions];
emitter.emitterPosition = pt;
[CATransaction commit];
}
- (void) touchesEnded:(NSSet *)touches withEvent:(UIEvent *)event
{
[emitter removeFromSuperlayer];
emitter = nil;
}
- (void) touchesCancelled:(NSSet *)touches withEvent:(UIEvent *)event
{
[self touchesEnded:touches withEvent:event];
}
@end
Get This Recipe’s Code
To find this recipe’s full sample project, point your browser to https://github.com/erica/iOS-6-Advanced-Cookbook and go to the folder for Chapter 6.
Summary
This chapter introduced many ways to handle images. You read about generating images, resizing them, rotating them, and processing them using both the Accelerate and Core Image frameworks. Before leaving this chapter, here are some thoughts about the recipes you saw here:
• Moving between UIImage and bitmap representations enables you to access images on a byte-by-byte level. This enables you to perform image processing and test touches against content. Exposing images at a byte level means you always have full control over an image content, not just an opaque image object.
• The way you load and manipulate objects varies by source. Items in the application bundle are imported using method calls that cannot be used for those found in the sandbox, on the Internet, or in the system assets library. When loaded, the UIImage class provides a unified workhorse for displaying that data.
• The Accelerate framework may be ugly, but it’s super-reliable. The Core Image framework remains an evolving beast on iOS and may not provide as favorable an experience, although it keeps getting better over time.
• iOS’s QuartzCore library enables you work with graphics at a low level. A lightweight 2-D rendering system, you can use these calls for any kind of drawing operations you work with, whether rendering views in drawRect: or creating images on-the-fly.