Hour 17. Using Live Tiles, Secondary Tiles, Notifications, and Toasts
What You’ll Learn This Hour:
• Creating a wide tile for the app
• Creating secondary tiles
• Updating the tile’s badge information
• Sending tile notifications
• Sending toast notifications to the user
The app tile represents the app to the user, so it needs to be rich and engaging. An app tile can be a small (1×1), square tile or a large (2×1), wide tile. It can be static, which is the default, or alive with activity and continually updated, which is preferred. Apps that have detail information also enable users to pin secondary tiles to the screen so that when they are launched, the app will drill down into the detail information.
The app’s tile is an opportunity to provide value to users even when they are not using the app. It gives the user the sense of activity happening within the app. Users are much more likely to open the app when they see new content that interests them. We can update tiles while the app is running so that it is as fresh as possible when the user exits the app. But we can also use push notifications to update the tiles even if our app is not running. Besides sending tile notifications, we can send toast notifications to the user. This brings up a notification window on the user’s screen. Toast notifications can be beneficial, but they can also annoy users, so they should be used with care.
Creating a Wide Tile
To start this hour, let’s see what it takes to change our single square tile that we have used for all of the projects so far into a wide tile. This is done through the app package manifest file. The app adds a logo file that is 150×150 pixels wide. (We could also add a 310×150 image for our wide tile.) The path to the wide tile file is set in the app package manifest wide logo textbox. In the manifest file, we can also set the short name of the tile.
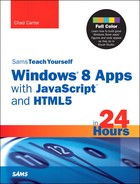
Let’s try it out by creating a new Blank App project template called LiveTileExample. Through our favorite paint program, we can create three different images. The images can be anything, but Figure 17.1 shows the ones included in the example code. The key is that the main image is 150×150 pixels. The Logo textbox in the manifest file already has the imageslogo.png value filled in. The templates provide that image, which is a transparent image with a white box containing an X in the center. The example replaced logo.png with an all-white image that contains the text “150x150”. The example includes a new file called widelogo.png that is all white and set at the size of 310×150 pixels. Finally, the small logo was created with the name of smalllogo.png.
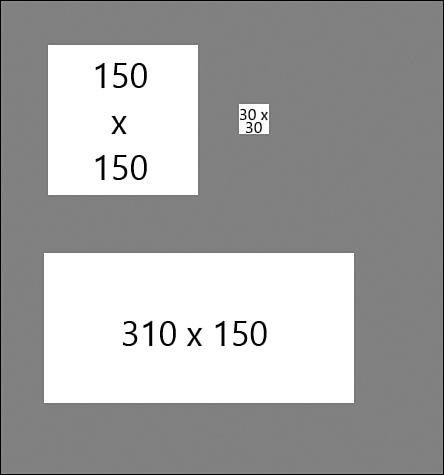
Figure 17.1. Apps can have logos in three different sizes: 150×150, 310×150, or 30x30.
The images then need to be placed in the images folder and included in the project. Visual Studio enables us to show all files in the Solution Explorer toolbar. When all files are displayed, we can right-click the files in the images folder and select Include in Project. With the original logo.png replaced and the two new widelogo.png and smalllogo.png files added to the project, we can browse to the files for the Wide Logo and Small Logo textboxes. If the logos were made with a white background as in the example, it is a good idea to also change the foreground text to Dark in the drop-down list. Since our image wasn’t created as a transparent image, the background color isn’t important, but if we created a nice transparent image, this is where we would modify the background color.
It is a best practice to use the wide size tile only if the app has new and interesting content that is updated at least weekly.
If we run (or at least deploy) the app and then go to the Start menu, we can see the wide logo being displayed. The app defaults to showing a wide tile, if it is provided. The user can switch this to a small tile by selecting it and picking the appropriate command. Notice that the text being displayed is LiveTileExample. Back in the app package manifest file, we can set the Short Name textbox to LiveTile. The short name must be 13 characters or less. If it isn’t, it is truncated. If we rerun/redeploy the app and go back to the start screen, we see the short name used instead (see Figure 17.2).
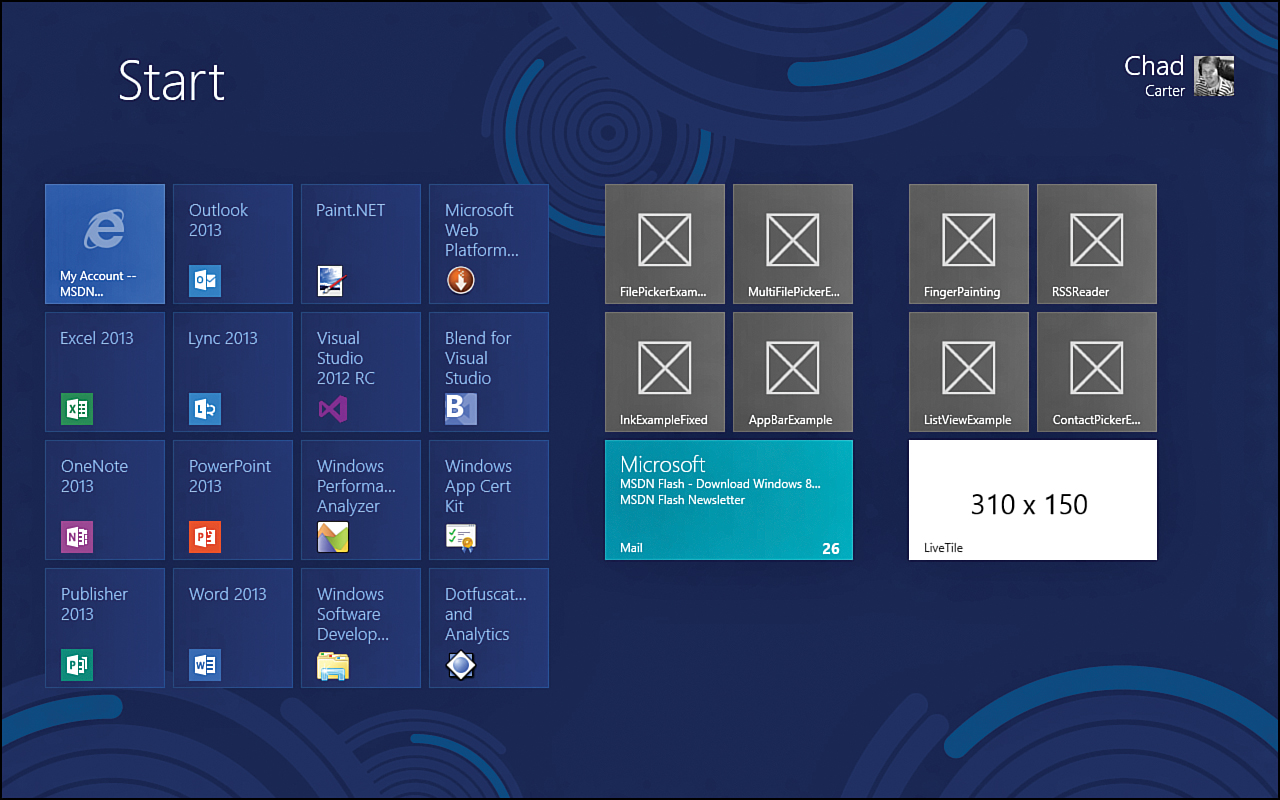
Figure 17.2. When apps declare a wide tile, it is the default version Windows uses. The user can switch it to the small tile at any time.
The small logo, a 30×30 tile, displays when we are in semantic zoom view on the start screen, as in Figure 17.3. It is also displayed in the All Apps list and in the search pane.
Figure 17.3. The 30×30 small logo is utilized when semantic zoom is in use.
For this example, we put text on the image itself to clearly show which image was being used, but this should be avoided because text on images don’t scale well. We have the Show Name option set to All Logos, so if we set our tile to a small tile, the text overlaps the “logo.” We can change the drop-down to Wide Logo Only to make sure the text isn’t displayed when the tile is small. If we don’t want it displayed at all, we select No Logos. See Figure 17.4.
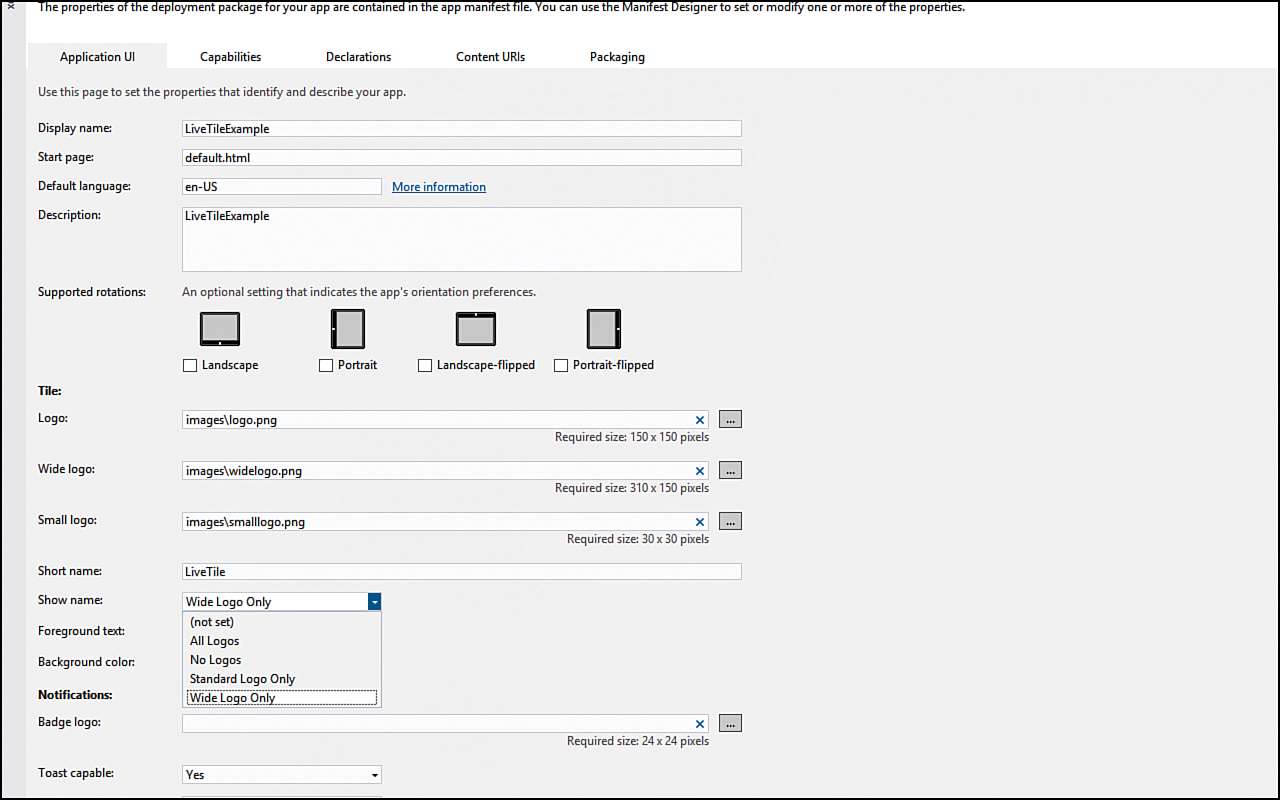
Figure 17.4. The app name can be displayed on the small tile, wide tile, or both tiles. The app name can also be hidden from all tiles.
Best Practices for Tiles
Tiles should display new, tailored, and engaging content to the user. The tile should remain fresh by being updated as the content from the app changes. The content on the tile should be only content that lives on the app’s home page so that the user can easily find it. If users see something on the tile that makes them want to click on it, it is important that they see what caught their eye immediately. The content on the tile needs to be “glanceable”; it is for short messages only. The content should also be safely ignored by the user. If the tile isn’t going to be a live tile, it needs to use only the small size. In addition, ads cannot be displayed in the tiles.
Creating Secondary Tiles
Creating secondary tiles is pretty easy. To demonstrate how the code works, let’s open the default.html file of the LiveTileExample project. We can add the following AppBar control:
<div id="appbar" data-win-control="WinJS.UI.AppBar">
<button data-win-control="WinJS.UI.AppBarCommand"
data-win-options="{id:'btnPinAction', section:'selection'}">
</button>
</div>
Next, we can modify default.js to hook up the app bar. Let’s add a self-executing anonymous function to the bottom of the default.js. We could use a separate js file if we desired:
(function () {
})();
To start, we can add the following code in the anonymous function:
var secondaryTileId = "LiveTileExample.TileId1";
WinJS.Namespace.define("STYWin", {
initAppBar: initAppBar
});
function initAppBar() {
var btnPinAction = document.getElementById("btnPinAction").winControl;
if (Windows.UI.StartScreen.SecondaryTile.exists(secondaryTileId)) {
btnPinAction.label = "Unpin from Start";
btnPinAction.icon = "unpin";
btnPinAction.tooltip = "Unpin from Start";
btnPinAction.element.onclick = unpinSecondaryTile;
} else {
btnPinAction.label = "Pin to Start";
btnPinAction.icon = "pin";
btnPinAction.tooltip = "Pin to Start";
btnPinAction.element.onclick = pinSecondaryTile;
}
}
We are declaring an id for the tile we will be adding. Typically, is generated by the code based on where the user is in the app and what the user wants to pin as a secondary tile. Next, we expose the initAppBar function in the STYWin namespace. The actual initAppBar function is calling the Windows.UI.StartScreen.SecondaryTile.exists function and passing in the id of the secondary tile. If the tile exists, we set the btnPinAction command on the app bar to unpin. If the tile doesn’t exist, we set the command to pin. The onclick event for each condition is set to functions we will create next that will actually pin and unpin the secondary tiles. The pinSecondaryTile function, which can be added to the anonymous function, is as follows:
function pinSecondaryTile() {
var found = Windows.Foundation;
var uriLogo = new found.Uri("ms-appx:///images/logo.png");
var uriSmallLogo = new found.Uri("ms-appx:///images/smalllogo.png");
var uriWideLogo = new found.Uri("ms-appx:///images/widelogo.png");
var currentTime = new Date();
var newTileActivationArguments = "timeTileWasPinned=" + currentTime;
var tile = new Windows.UI.StartScreen.SecondaryTile(secondaryTileId,
"Awesome Secondary Tile Text",
"LiveTileExample | Content 123",
newTileActivationArguments,
Windows.UI.StartScreen.TileOptions.showNameOnWideLogo,
uriLogo,
uriWideLogo);
tile.smallLogo = uriSmallLogo;
tile.foregroundText = Windows.UI.StartScreen.ForegroundText.dark;
var btnPinAction = document.getElementById("btnPinAction");
var selectionRect = btnPinAction.getBoundingClientRect();
selectionRect.x = selectionRect.left;
selectionRect.y = selectionRect.top;
tile.requestCreateForSelectionAsync(selectionRect).done(function (isCreated) {
if (isCreated) {
console.log("Secondary tile was pinned successfully.");
} else {
console.log("Secondary tile was not pinned.");
}
initAppBar();
});
}
To save some characters, and help the lines fit in the book, we are creating an alias for the Windows.Foundation namespace with the variable found. With that set, we grab a reference to the regular title, small tile, and wide tile. To simulate setting information that gets stored with the tile that we can retrieve when our app is activated using that tile, we add the current date to the tile. This is stored in the newTileActivationArguments.
Next, we actually create the tile by instantiating Windows.UI.StartScreen.SecondaryTile. The constructor takes in the id of the tile as the first parameter. The next parameter takes in the text that can show up on the tile. This is followed by the name of the tile that the user will see when searching for the tile. The activation arguments are also passed in. In our case, this is simply "timeTileWasPinned=" + currentTime. The activation arguments are truncated after 2,048 characters, but that gives us plenty of room to create a JSON string to store and then retrieve, to make sure users get back what they are expecting. The tile options are the same that are available in the manifest file. We are passing in Windows.UI.StartScreen.TileOptions.showNameOnWideLogo to display only the text on the wide logo. The last two parameters of the SecondaryTile constructor take in the standard logo and the wide logo. If we won’t use a wide logo, we can exclude the last parameter.
After initializing the SecondaryTile, we set the smallLogo because it wasn’t in the constructor. We also set the foregroundText to dark, just as we did in the manifest for the main tile. So although we have used the exact same images and visual style for the secondary tile as we did for the main tile, we have the flexibility to change it as we want.
When we make a call to create the secondary tile, a flyout window is created. It is a best practice to pass in the location where we want the flyout to occur. This is why we are getting the bounding rectangle of the app bar command button. We are dynamically creating the x and y properties of the selectionRect variable because the function we will pass it to expects the rectangle object to have x, y, width, and height. The getBoundingClientRect returns width and height, but instead of x and y, it provides left and top.
We call the requestCreateForSelectionAsync method on the secondary tile object to create the tile. When it is done, we check the isCreated flag, which is passed to us when the function completes. We simply log to Visual Studio’s output window whether it worked. We provide the user with information when appropriate. Finally, we call initAppBar again to reset the command to show unpin instead of pin.
Because we are using an app bar command, we could have used requestCreateAsync instead, which does not take a selection rectangle of where the flyout should be positioned.
Removing the secondary tile programmatically is similar but simpler because we don’t need to provide as much information. The code follows:
function unpinSecondaryTile() {
var start = Windows.UI.StartScreen;
var tileToGetDeleted = new start.SecondaryTile(secondaryTileId);
tileToGetDeleted.requestDeleteAsync().done(function (isCreated) {
if (isCreated) {
console.log("Secondary tile was unpinned successfully.");
} else {
console.log("Secondary tile was not unpinned.");
}
initAppBar();
});
}
To delete the secondary tile, we only need to pass in the tile id to the Windows.UI.StartScreen.SecondaryTile function. We are logging the result and making sure the app bar command button is being updated in the promise.
We just need to call the initAppBar when our app is activated. At the top of default.js, we need to replace the setPromise call with the following code:
args.setPromise(WinJS.UI.processAll().then(function () {
STYWin.initAppBar();
}));
Now when we run the app, we can bring up the app bar and select the pin command. The flyout window appears, and the user can change the text, as in Figure 17.5. If we look at the start screen, we see that the item is pinned using the wide tile because we provided it. If we close the app, we can then launch the app from the secondary tile we will see the app. When we bring up the app bar, because the tile exists on the start screen, we see the unpin app bar command, which brings up a flyout if we select it, to confirm deleting the secondary tile.
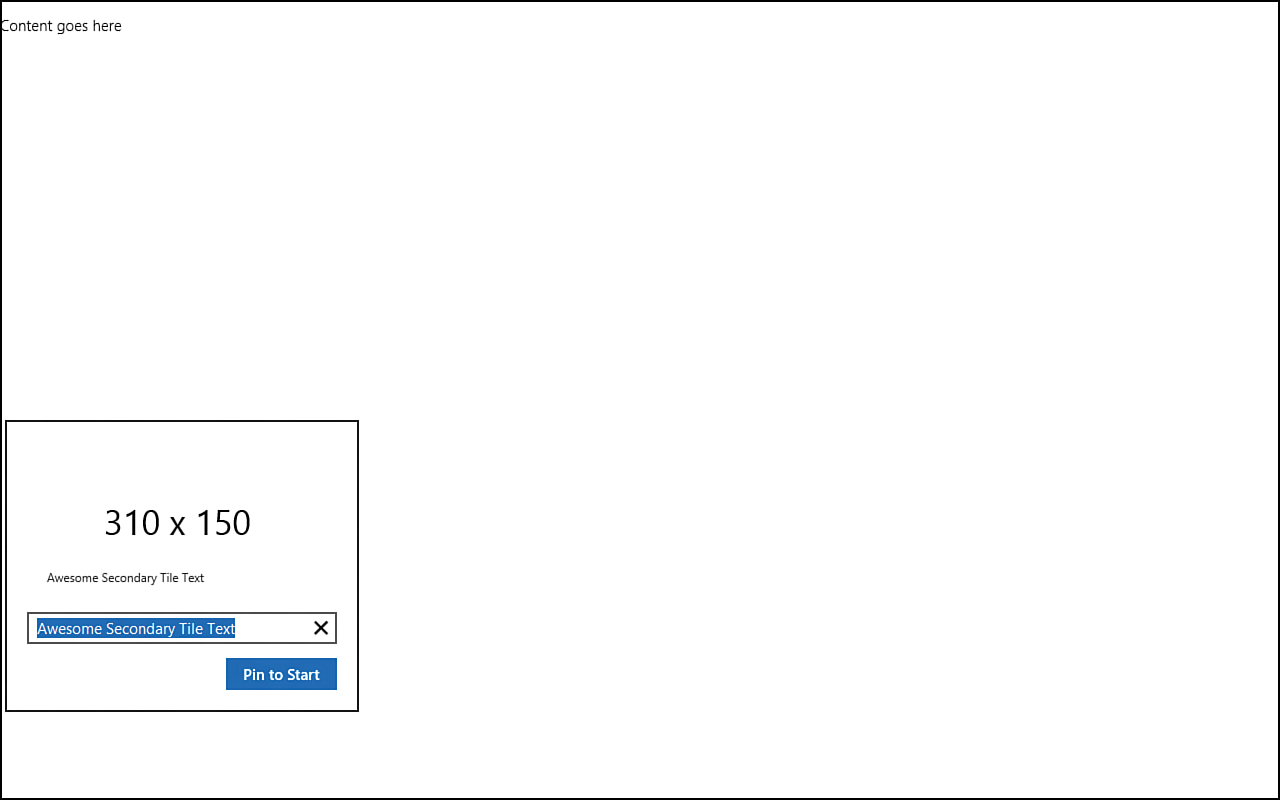
Figure 17.5. Users can confirm that they want to add the secondary tile and even change the text displayed on the secondary tile.
Let’s read in the activation argument we set so that we can see how to write code to determine whether the app was launched from the main tile or from a secondary tile. Inside the onactivated event, right before the call to setPromise, we can add the following condition:
if (args.detail.arguments) {
var info = document.createElement("div");
info.innerHTML = toStaticHTML("<p>Launched from secondary tile " +
args.detail.tileId + " with the following activation arguments : " +
args.detail.arguments + "</p>");
document.querySelector("body").appendChild(info);
}
We can check the arguments being passed to the app when it launches. We also can see the exact tile id that was launched. With these two pieces of information, we can direct the user wherever we need to in the app. For this demo, we simply create a new div element and displaying the tileId and arguments. Figure 17.6 shows the results.
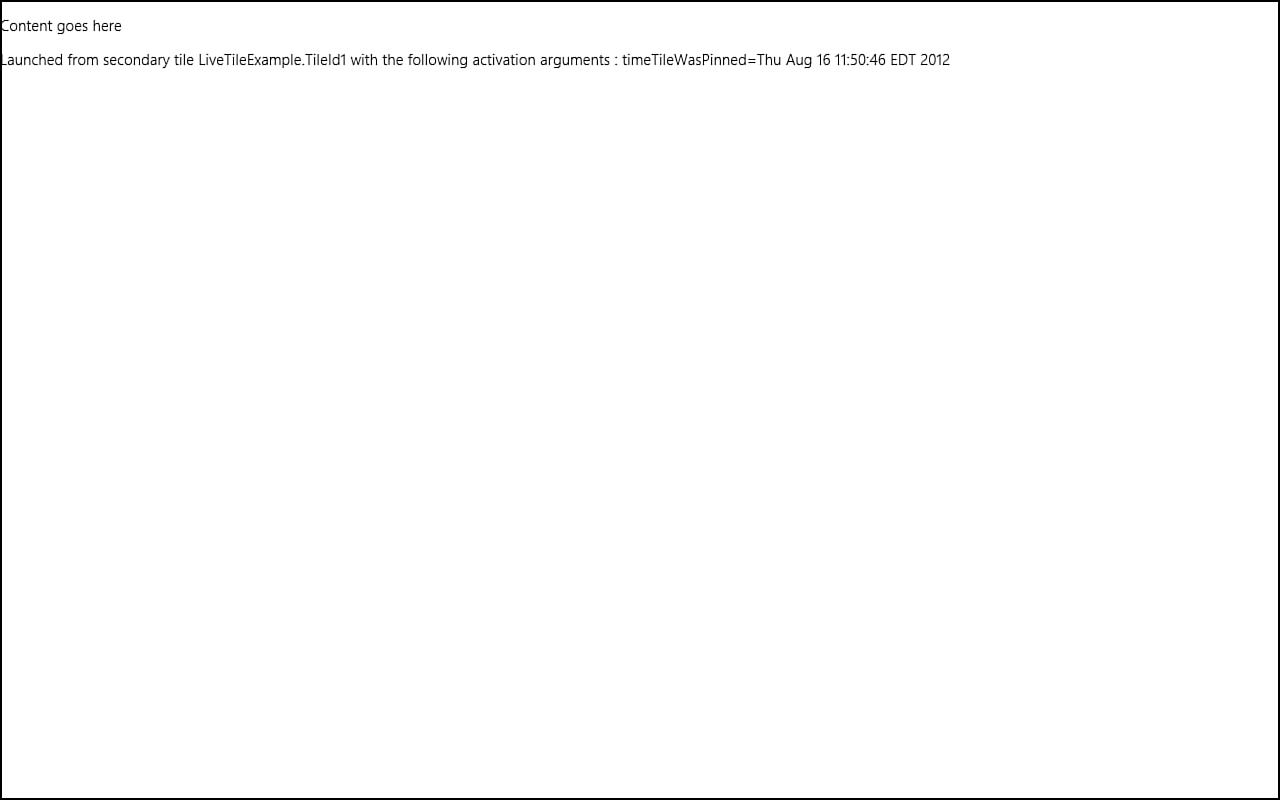
Figure 17.6. When the secondary tile launches the app, we can tell exactly which tile id launched it, and we have access to an extra 2K of data that we can set with the tile.
Using Badges to Update a Tile
Badges are overlays on top of the style. They support both square and wide tiles and enable a number with a value of up to 99 to be sent to the tile. Badges also support predefined glyphs, as with a play or pause glyph. The badges are always legible on the tile, even on top of images. This is where the background color in the manifest can be utilized even if the tile uses an image to cover the entire tile.
Still using the LiveTileExample project, we add in badge notifications to our app here. Next, we simply set a number on the main tile based on how many times the user has pinned the secondary tile since the launch of the program. To start, we need to add the following count variable initialization inside the anonymous function:
var secondaryTileId = "LiveTileExample.TileId1";
var count = 0;
Then at the very top of the pinSecondaryTile, we can add the following code:
function pinSecondaryTile() {
count++;
sendBadgeUpdate();
...
So every time the pinSecondaryTile function is executed, we add to our count, update the badge, and call the sendBadgeUpdate function. Let’s create that function next:
function sendBadgeUpdate() {
var notifications = Windows.UI.Notifications;
var badgeType = notifications.BadgeTemplateType.badgeNumber;
//var badgeType = notifications.BadgeTemplateType.badgeGlyph;
var badgeXml = notifications.BadgeUpdateManager.getTemplateContent(badgeType);
var badge = badgeXml.getElementsByTagName("badge");
badge[0].setAttribute("value", count);
//badge[0].setAttribute("value", "newMessage");
var badgeNotification = new notifications.BadgeNotification(badgeXml);
notifications.BadgeUpdateManager
.createBadgeUpdaterForApplication()
.update(badgeNotification);
}
Sending badge updates from an app is pretty straightforward. The badge notification message is an XML message. The schema for the element follows:
<badge value= "1-99" | "none" | "activity" | "alert" | "available" | "away" | ...
version? = integer />
The ? signifies that the attribute is optional. It can occur zero times or one time. The list of badge glyphs is found at http://msdn.microsoft.com/en-us/library/windows/apps/hh761458. In the sendBadgeUpdate function, we create an alias to the Windows.UI.Notifications namespace. We can then set the type to either badgeNumber or badgeGlyph. This is shown with the commented code where we assign the value to badgeType. When we have the badgeType assigned, we can pass it to the BadgeUpdateManager and get the template content for the type. This getTemplateContent function keeps us from having to create the full XML payload ourselves. When we have the base XML, we can then customize elements and attributes as needed. We get the badge element and then set the value attribute to the count we were incrementing when the user was pinning the secondary tile.
We create a BadgeNotification object by passing in the badgeXml that was just modified. Then we call the BadgeUpdateManager.createBadgeUpdaterForApplication method, which returns a BadgeUpdate object that enables us to change the badge. We then call update on the BadgeUpdate object, passing in the actual notification so that Windows updates the tile with the badge. Figure 17.7 shows the results of pinning the secondary tile three times.
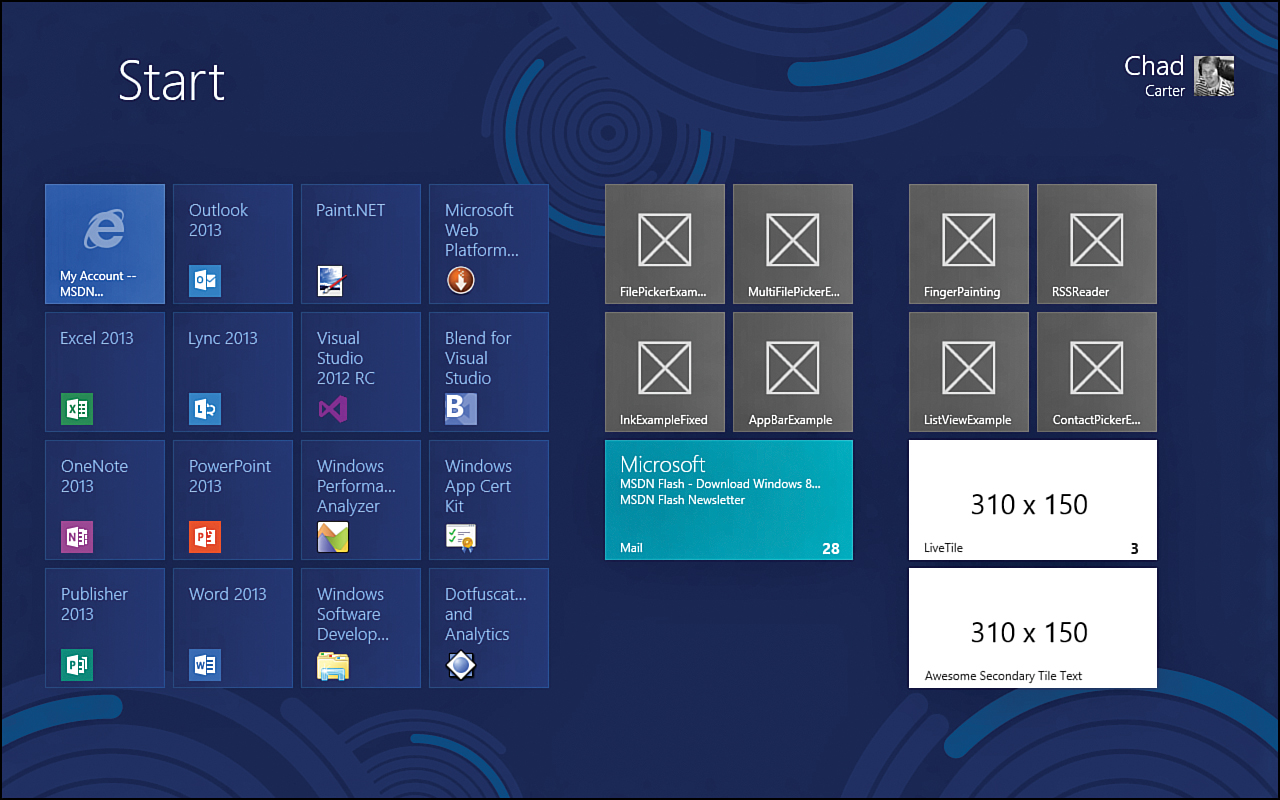
Figure 17.7. We can send badge notifications to the app tile.
If we want to clear the badge, we call the following code:
notifications.BadgeUpdateManager.createBadgeUpdaterForApplication().clear();
Understanding Notifications
We just covered how to use a notification to update the badge information on a tile. We utilized the local delivery mechanism to update the tile. That is, we updated our tile during the course of the user launching and using our app. Besides the local delivery mechanism, we can deliver updates using the scheduled, periodic, and push mechanisms. Table 17.1 shows the four different notification delivery mechanisms and how they can be used.
Table 17.1. Notification Delivery Mechanisms
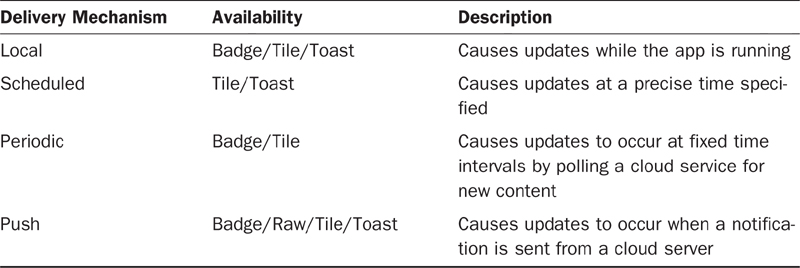
We have discussed using local notifications to update badge information. Local notifications never expire, but it is a best practice to set the expiration time. Scheduled notifications are identical to local notifications, but instead of calling the API methods to update the element, we call an API and specify a precise time when the tile should be updated or a toast notification should be shown. Scheduled notifications shine in calendar and alarm apps. Scheduled notifications expire three days from the time they are delivered, but this time can be overridden. Periodic notifications require a cloud component to work, but this does not require a large investment. Windows polls the cloud service (the app provides the location) for badge or tile updates based on the interval the app has specified. Periodic notifications also have a default expiration of three days from the time the polling occurs, but this also can be overridden. Finally, push notifications allow for real-time communication between the cloud service and the app. It is beneficial to use this mechanism for data such as social network updates, incoming messages, real-time sports scores, or game invitations. When data can be generated at unpredictable times, push notifications should be used. This does require an investment in a cloud service that will manage push notification channels and determine when to send notifications to specific users. Push notifications also expire after three days from the time they are received by the Windows Push Notification Service (WNS), but as expected, the value can be overridden.
Understanding the Windows Push Notification Service
The Windows Push Notification Service (WNS) enables delivery and toast notifications over the Internet. When we use WNS, the app is alive with activity and always up-to-date with fresh content. Tile updates and notifications are shown to the user even if our app is not running. WNS handles communication with our app. It scales to millions of users and is a free service that our app can use.
As mentioned in the last section, to use the periodic or push notification mechanisms, we need a cloud service. Periodic notifications don’t require a lot of investment, and push notifications can require as little or as much as we desire.
The following steps explain the process flow on how the cloud service can work with WNS to provide push notifications to users of an app:
1. To use WNS, an app must request a channel URL from the Notification Client Platform (NCP) API.
2. The NCP sends the request to WNS.
3. WNS returns a channel URL to the NCP.
4. The NCP returns the channel URL to the app.
5. The app sends that channel URL to the cloud service.
6. The cloud service authenticates with WNS and sends a push notification message containing the update message (badge, tile, toast, and even raw data) to the WNS.
7. WNS sends the update message to the NCP.
8. The NCP sends the message to the app so that we can receive the message and process the update. Figure 17.8 shows these steps.
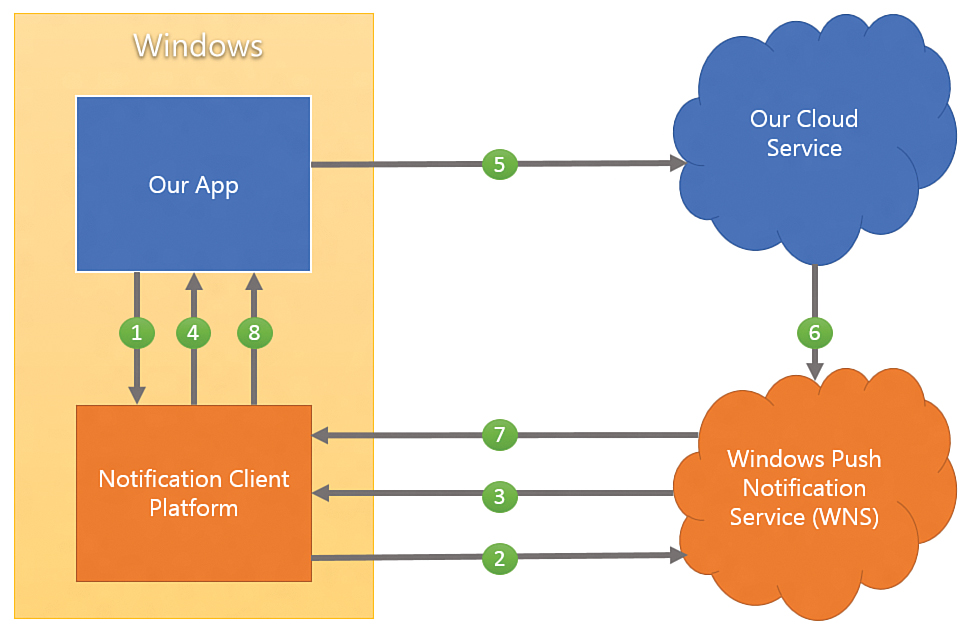
Figure 17.8. The diagram shows the complete data flow involved in working with push notifications.
Using WNS requires our own cloud service, so we don’t create any code in this book. However, assuming that we have a cloud service, we can utilize the push and periodic notifications client-side sample in the Windows SDK sample to see how the process works. The following “Guidelines and Checklist for Push Notifications” documentation from Microsoft is a great resource for understanding best practices when working with WNS: http://msdn.microsoft.com/en-us/library/windows/apps/hh761462.
The technical editor of this book also has a walkthrough of creating a sample service at http://blogs.msdn.com/b/jpsanders/archive/2011/12/02/walkthrough-creating-an-iis-server-to-use-with-wns-push-notifications-metro.aspx.
Updating the Tile
We have seen that a tile starts as a default tile that is defined in our app manifest. We covered how to send badge updates, but we can also update the tile itself with images, text, or both. The tile template catalog has many tile templates that provide the XML structure for us to update the square tile or the wide tile and to update them with text only, image only, or peek templates. The peek templates are basically a tile with two rows. The first row is displayed on the tile, and at the times it chooses (coordinated with other live tiles on the user’s screen), Windows scrolls the image upward so that the first row goes off the screen and the second row is then visible. To the user, this appears like a cool animation because the content is scrolled up and down within the tile space. For example, if we want to use TileSquarePeekImageAndText01 template, we would utilize XML similar to the following:
<tile>
<visual>
<binding template="TileSquarePeekImageAndText01">
<image id="1" src="image1" alt="alt text"/>
<text id="1">Text Header Field 1</text>
<text id="2">Text Field 2</text>
<text id="3">Text Field 3</text>
<text id="4">Text Field 4</text>
</binding>
</visual>
</tile>
This works identical to how we did it for the badge update, but instead of using a badge element, we are using a tile element. The tile templates contain more content because they send more data to the tile than just a number or a glyph, but the concept is identical.
Another example peek template is the following wide tile template:
<tile>
<visual>
<binding template="TileWidePeekImage05">
<image id="1" src="image1.png" alt="alt text"/>
<image id="2" src="image2.png" alt="alt text"/>
<text id="1">Text Header Field 1</text>
<text id="2">Text Field 2</text>
</binding>
</visual>
</tile>
We can choose from many templates; we just need to provide the content, and Windows takes care of making it look great. When using images, we need to make sure that the image we are providing is less than or equal to 200KB and that the resolution is less than or equal to 1,024×1,024 pixels. The type of the image must be .png, .jpg, .jpeg, or .gif. As with all, the tile images should be added with the appropriate scale level.
We grab all of the text elements and change the text of each element appropriately. We also grab the image elements in the template and set the src and alt attribute information. The peek template uses an image that covers the entire tile. For the second row, it uses a smaller image. We provide both images from our app package. Images to update tiles can also be read from local storage but not temporary or roaming storage.
Combining Tile Notifications
It is a best practice to provide both the square tile and the wide tile if the wide tile is present. The following code shows how to handle the square tile:
var squareTemplate = notifications.TileTemplateType.tileSquarePeekImageAndText01;
var squareTileXml = notifications.TileUpdateManager
.getTemplateContent(squareTemplate);
var squareTileTextElements = squareTileXml.getElementsByTagName("text");
squareTileTextElements[0].appendChild(squareTileXml
.createTextNode("Text Header Field 1"));
squareTileTextElements[1].appendChild(squareTileXml
.createTextNode("Text Field 2"));
squareTileTextElements[2].appendChild(squareTileXml
.createTextNode("Text Field 3"));
squareTileTextElements[3].appendChild(squareTileXml
.createTextNode("Text Field 4"));
var squareTileImages = squareTileXml.getElementsByTagName("image");
squareTileImages[0].setAttribute("src", "ms-appx:///images/imageSmall1.png");
squareTileImages[0].setAttribute("alt", "small image text");
No surprising code is listed here. The same pattern is being used that we saw when setting the wide tile. Now that we have the XML for both the wide and square tiles, we need to combine them into a single notification. Because it is just XML, we can easily accomplish this by writing the following code:
var node = tileXml.importNode(squareTileXml
.getElementsByTagName("binding").item(0), true);
tileXml.getElementsByTagName("visual").item(0).appendChild(node);
We are importing the squareTileXml’s binding element and all its children and appending it to the visual element of the tileXml. Combining the XML produces the following result:
<tile>
<visual>
<binding template="TileWidePeekImage05">
<image id="1" src="images/imageWide1.png" alt="wide image text"/>
<image id="2" src="images/imageSmall1.png" alt="small image text"/>
<text id="1">Text Header Field 1</text>
<text id="2">Text Field 2</text>
</binding>
<binding template="TileSquarePeekImageAndText01">
<image id="1" src="image1" alt="alt text"/>
<text id="1">Text Header Field 1</text>
<text id="2">Text Field 2</text>
<text id="3">Text Field 3</text>
<text id="4">Text Field 4</text>
</binding>
</visual>
</tile>
When we have the combined XML notification message, we can send it to the TileUpdateManager to update the tile:
var tileNotification = new notifications.TileNotification(tileXml);
var currentTime = new Date();
//1.5 minutes (60*1000*1.5)
tileNotification.expirationTime = new Date(currentTime.getTime() + 90000);
notifications.TileUpdateManager.createTileUpdaterForApplication()
.update(tileNotification);
This is the same pattern we used for the BadgeUpdateManager. The main difference with this code (besides the names) is that we are setting an expiration time for the tile. So after a minute and a half, the content expires.
We need to kick off this function somewhere in the app. For this example, we do it in the promise of the processAll call right after we call initAppBar:
args.setPromise(WinJS.UI.processAll().then(function () {
STYWin.initAppBar();
Windows.UI.Notifications.TileUpdateManager
.createTileUpdaterForApplication().clear();
STYWin.sendTileUpdate();
}));
In addition to calling the sendTileUpdate function, we clear out the tile when the app launches. This isn’t required because we are updating it, but it demonstrates the functions that should be called when we need to clear a tile. We need to expose the sendTileUpdate method in our namespace. We can modify the following code to do so:
WinJS.Namespace.define("STYWin", {
initAppBar: initAppBar,
sendTileUpdate: sendTileUpdate
});
When we run the app, the wide tile alternates between a full image and a smaller one with some text. If we resize the tile (by selecting it and choosing Small Tile in the app bar), we then see the small image filling the tile, whereas the other part of the peek just shows text. Figure 17.9 shows all four states.
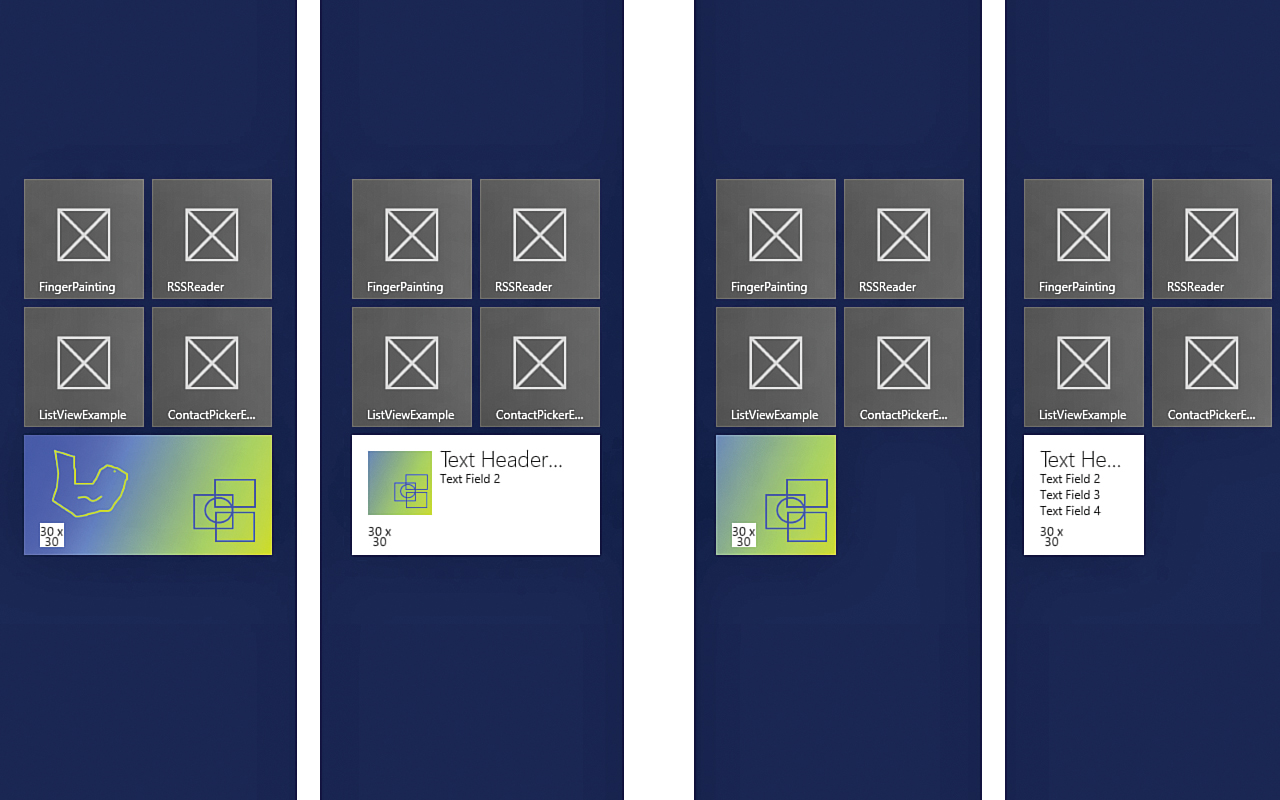
Figure 17.9. Tile notifications with the peek templates provide four pieces of information between the large and small tiles.
Examining Notification Queuing
Notification queuing enables us to send up to five different notifications to a tile. Windows cycles the notifications automatically. The actual process is identical to what we just covered for sending a single notification.
To use this, we need to enable the notification queue for an app. This needs to be done only once, so we can place this code after our call to STYWin.sendTileUpdate:
Windows.UI.Notifications.TileUpdateManager
.createTileUpdaterForApplication()
.enableNotificationQueue(true);
We simulate additional activities that cause more notifications to be sent. These are all being sent at the same time, but they could just have easily been kicked off by some other event. To simulate the two new activities that kicked off the additional notifications, we can add a call to two more functions at the end of the sendTileUpdate function:
sendSecondTileUpdate();
sendThirdTileUpdate();
The code for sendSecondTileUpdate is below:
var notifications = Windows.UI.Notifications;
var template = notifications.TileTemplateType.tileWideSmallImageAndText01;
var tileXml = notifications.TileUpdateManager.getTemplateContent(template);
var tileTextElements = tileXml.getElementsByTagName("text");
tileTextElements[0].appendChild(tileXml.createTextNode("Text Header Field 1"));
var tileImages = tileXml.getElementsByTagName("image");
tileImages[0].setAttribute("src", "ms-appx:///images/imageWide2.png");
tileImages[0].setAttribute("alt", "wide image text");
var squareTemplate = notifications.TileTemplateType.tileSquareText02;
var squareTileXml = notifications.TileUpdateManager
.getTemplateContent(squareTemplate);
var squareTileTextElements = squareTileXml.getElementsByTagName("text");
squareTileTextElements[0].appendChild(squareTileXml
.createTextNode("Text Header Field 1"));
squareTileTextElements[1].appendChild(squareTileXml
.createTextNode("Text Field 2"));
//combine them
var node = tileXml.importNode(squareTileXml
.getElementsByTagName("binding").item(0), true);
tileXml.getElementsByTagName("visual").item(0).appendChild(node);
var tileNotification = new notifications.TileNotification(tileXml);
tileNotification.tag = "tileUpdate2";
notifications.TileUpdateManager.createTileUpdaterForApplication()
.update(tileNotification);
The second notification has the same functionality as the first; it is just an additional notification, after all. However, because we passed true into the enableNotificationQueue function, we have instructed Windows to continually iterate through the notifications instead of replacing them. Of course, that change was made outside the function because it needs to be called only once. We could pass false to the function to switch it back to just display the latest notification. Because we are using the notification queue, we might want to use the tag property as we did in the earlier function. This ensures that the notification isn’t shown twice. In fact, this has the benefit of replacing the existing notification, if any. So if we sent a notification of a news story and then had an update, we could use the same tag for the notification, and it would replace the outdated headline/info with the new notification information. While in the code we have used for tileUpdate2, the tag information should relate to the content being sent in some way.
For sake of completeness, although no structural difference exists between the following sendThirdTileUpdate and the previous function, the code is as follows:
var notifications = Windows.UI.Notifications;
var template = notifications.TileTemplateType.tileWidePeekImage05;
var tileXml = notifications.TileUpdateManager.getTemplateContent(template);
var tileTextElements = tileXml.getElementsByTagName("text");
tileTextElements[0].appendChild(tileXml.createTextNode("Text Header Field 1"));
tileTextElements[1].appendChild(tileXml.createTextNode("Text Field 2"));
var tileImages = tileXml.getElementsByTagName("image");
tileImages[0].setAttribute("src", "ms-appx:///images/imageWide3.png");
tileImages[0].setAttribute("alt", "wide image text");
tileImages[1].setAttribute("src", "ms-appx:///images/imageSmall3.png");
tileImages[1].setAttribute("alt", "small image text");
var squareTemplate = notifications.TileTemplateType.tileSquarePeekImageAndText01;
var squareTileXml = notifications.TileUpdateManager
.getTemplateContent(squareTemplate);
var squareTileTextElements = squareTileXml.getElementsByTagName("text");
squareTileTextElements[0].appendChild(squareTileXml
.createTextNode("Text Header Field 1"));
squareTileTextElements[1].appendChild(squareTileXml
.createTextNode("Text Field 2"));
squareTileTextElements[2].appendChild(squareTileXml
.createTextNode("Text Field 3"));
squareTileTextElements[3].appendChild(squareTileXml
.createTextNode("Text Field 4"));
var squareTileImages = squareTileXml.getElementsByTagName("image");
squareTileImages[0].setAttribute("src", "ms-appx:///images/imageSmall3.png");
squareTileImages[0].setAttribute("alt", "small image text");
//combine them
var node = tileXml.importNode(squareTileXml
.getElementsByTagName("binding").item(0), true);
tileXml.getElementsByTagName("visual").item(0).appendChild(node);
var tileNotification = new notifications.TileNotification(tileXml);
tileNotification.tag = "tileUpdate3";
notifications.TileUpdateManager.createTileUpdaterForApplication()
.update(tileNotification);
For this to work, the actual images referenced in the two notifications must be added to the project. If we want to use web images, we replace the local app protocol of ms-appx with http or https.
Sending Toast Notifications
The last items we discuss this hour are toast notifications. Toast notifications are initiated by apps but are controlled by the user. Toast notifications deliver transient messages outside the context of the app. They are used to get the user’s attention immediately. But the user can permanently turn off toast notifications for apps.
Toast notifications enable the user to quickly navigate back to a contextually relevant location in an app. So if we were writing a financial stock app and the user wanted to be notified if the price of a stock has a certain change in value, then when the app sent the toast notification to the user and the user clicked it, it would make sense for the app to drill down into that specific stock. Toast notifications are easy to invoke from the app or the cloud. They use a template catalog like the one we saw for the badges and tiles. For example, the template for ToastImageAndText03 is as follows:
<toast>
<visual>
<binding template="ToastImageAndText03">
<image id="1" src="image1" alt="image1"/>
<text id="1">headlineText</text>
<text id="2">bodyText</text>
</binding>
</visual>
</toast>
In general, it is best to allow users to opt into the toast notifications when they first run the app. It is also a good idea to show recent toast notification on the tile and to assume that the toast is still relevant.
To demonstrate how to use toasts, let’s add the following function to the LiveTileExample default.js:
function sendToastUpdate() {
var notifications = Windows.UI.Notifications;
var notificationManager = notifications.ToastNotificationManager;
var template = notifications.ToastTemplateType.toastImageAndText03;
var toastXml = notificationManager.getTemplateContent(template);
var images = toastXml.getElementsByTagName("image");
images[0].setAttribute("src", "images/imageSmall2.png");
images[0].setAttribute("alt", "toast image text");
var toastTextElements = toastXml.getElementsByTagName("text");
toastTextElements[0].appendChild(toastXml
.createTextNode("Text Header Field 1"));
toastTextElements[1].appendChild(toastXml
.createTextNode("Text Field 2"));
var toast = new notifications.ToastNotification(toastXml);
notificationManager.createToastNotifier().show(toast);
}
All of this code should look familiar; it is identical to how we have worked with local notifications for badges and tiles. We need to call this function to make the toast show up. Let’s expose it through our namespace:
WinJS.Namespace.define("STYWin", {
initAppBar: initAppBar,
sendTileUpdate: sendTileUpdate,
sendToastUpdate: sendToastUpdate
});
If the app contains a wide tile, notifications should be sent at the same time for the square and wide tiles. It is impossible to know which tile size the user is running when the notification arrives, so it needs to include both.
Let’s call the function in the activated event handler, where we call STYWin.initAppBar and STYWin.sendTileUpdate:
STYWin.sendToastUpdate();
Before we can run the project, we need to modify the app package manifest file. We need to change the Toast-capable drop-down list box to Yes under the Application UI tab. Without this, the toast notifications will not work.
When we run the project, we see the notification pop up right away. So we can see that this code definitely works as we expect by displaying a toast notification. However, having a notification be displayed as soon as the app launches isn’t practical. To fix that, let’s replace the following two statements
var toast = new notifications.ToastNotification(toastXml);
notificationManager.createToastNotifier().show(toast);
with the following code:
var id = "ToastId";
var currDate = new Date();
currDate = new Date(currDate.getTime() + 20000); //20 seconds from now
var toast = new notifications.ScheduledToastNotification(toastXml, currDate);
toast.id = id;
notificationManager.createToastNotifier().addToSchedule(toast);
Now if we run the app and want to either switch back to the start screen or run another app. 20 seconds after the app is launched, the toast notification will be displayed. This occurs because, instead of creating a regular ToastNotification object, we create a ScheduledToastNotification object. Then instead of calling show on the object, we are calling addToSchedule. The ScheduledToastNotification constructor takes in the XML document just as the ToastNotification constructor does. However, the ScheduledToastNotification constructor also takes in the delivery time of when the notification should occur. An overload to the constructor also takes in two additional parameters: snoozeInterval and maximumSnoozeCount. This could be beneficial for an alarm clock app if we needed the toast notification to be re-sent until the user acknowledged it by dismissing it. The app would send it every snoozeInterval (milliseconds) for maximumSnoozeCount times. In our example, we send the notification only one time, 20 seconds after the app is launched. Figure 17.10 shows the toast notification.

Figure 17.10. Toast notifications can notify the user of something important.
If we wanted to override the default sound that is played, we can pick from a list found at http://msdn.microsoft.com/en-us/library/windows/apps/br230842. For example, we can add the following code after we initialize the toastXml variable:
var audio = toastXml.createElement("audio");
audio.setAttribute("src", "ms-winsoundevent:Notification.IM");
This adds an audio element to the XML document since the audio element isn’t in the template. Once we add the audio element, we set he src attribute to the IM notification sound. If we wanted the toast to not create any sound, we could add the silent attribute and set the value to true. Another option we have is to set the loop attribute to true if we wanted the audio to continue to play until the notification was addressed (dismissed by user or timed out).
We have created the audio element, but we haven’t actually added to our XML document. We do that by writing the following code:
var toastNode = toastXml.selectSingleNode("/toast");
toastNode.appendChild(audio);
If we want the toast notification to have a long duration, we can add the following statement after the audio code we just added:
toastNode.setAttribute("duration", "long");
We are grabbing a handle on the toast element. We then add the duration attribute on the element and set the value to long. This has nothing to do with the audio; it is simply how long the toast notification displays on the screen.
Now when we run the app, it plays the IM notification sound instead of the default sound. It also stays on the screen longer than it did. The last piece of code we add for our toast notification is instructions to handle the fact that our app can be launched from the toast. To demonstrate this, let’s open the LiveTileExample project property window and change the Launch Application setting to No under the Debugging configuration property, as in Figure 17.11.
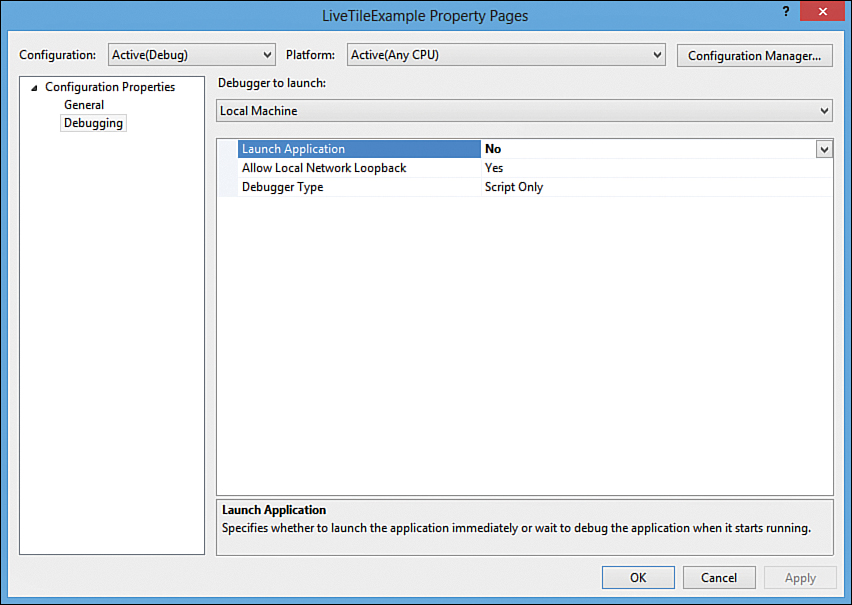
Figure 17.11. Visual Studio enables us to attach to an app even when it is launched from outside Visual Studio.
Let’s put a break point on the following line inside the onactivated event handler:
if (args.detail.kind === activation.ActivationKind.launch) {
Now we can click F5 to have Visual Studio watch for the app to start so that it can attach to it. Then we can go to the start screen and launch the app from the main tile. Visual Studio attaches to the process, and we hit the break point. We can click F5 to continue.
As expected, the toast notification is to run in 20 seconds. After the app is launched and we see the content on the screen, we can close the app by pressing Alt+F4 or dragging the window to the bottom of the screen. After the toast notification pops up, we can tap it, and it launches our app again. Visual Studio will break into the debugger and we could interrogate the values of the detail property being passed in through the event arguments. There isn’t anything in there for us to key off to know that we were launched by a toast. This is important to know because we want to bring the user to the place in the app that makes the most sense, based on the toast notification the user tapped to launch the app.
We can stop debugging the app and add the following code to our sendToastUpdate function after we initialize the id variable:
var id = "ToastId";
toastNode.setAttribute("launch",
'{"type":"toast","myval":"12345","moredata":"abc123", "id":"' + id + '"}');
We can set the launch attribute on the toast element to any data we want. This is identical to how we worked with the secondary tile. In fact, with the added code, we can run the app and go through the same process of running the app from the main tile, closing it down, and then clicking on the toast notification to see the results in Figure 17.12.
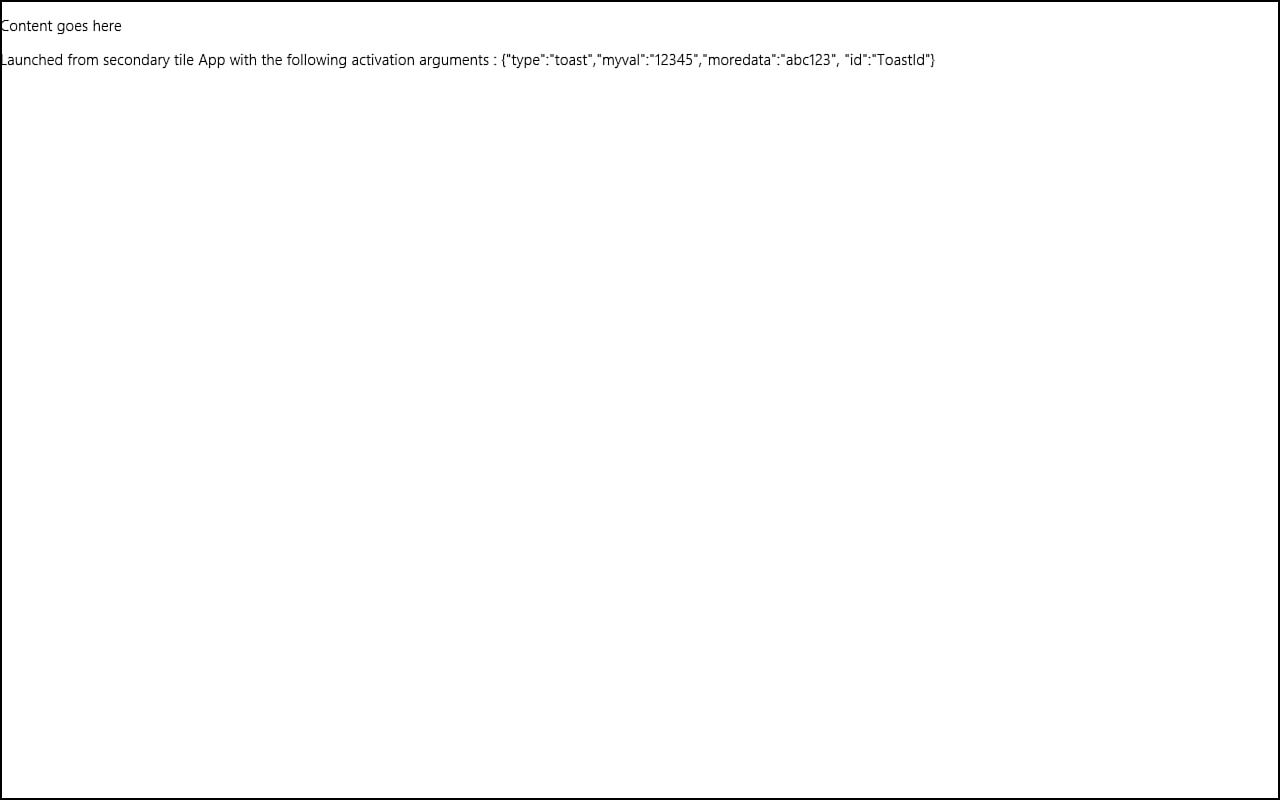
Figure 17.12. Setting the launch attribute on the toast notification adds information to the detail.arguments property. The existing code makes it think it was launched from a secondary tile.
We see that when the app is launched from the toast notification, the detail.arguments property is populated just as it was with the secondary tile. In fact, our simple code thinks it was launched from the secondary tile. The main point is, we have full access to any data we set. In this case, because we set the data as JSON, we can pull that out with the JSON.parse function and act on it accordingly.
Best Practices for Toast Notifications
When using toast notifications, we should consider these best practices. We should use toast notifications for real-time, personal content such as IM, email, and calls. The toast notifications should provide familiar information and contain short messages—they should be “glanceable.” Toast notifications should show enough information to users that they can decide whether they want to react to the information. Toast notifications should be used in conjunction with tiles and badges so that users can see what they missed if they were away from the device. Also, although an app can show a toast while it is running in the foreground, showing toast notifications when the app is in the background is best. It is also important to never assume that the user will see the toast; there is no history on the toasts that were sent. The closest we have to this is also sending the toast down as tile notifications with queuing turned on; then we can display up to the last five relevant toast information.
Further Exploration
The following “Guidelines and Checklist for Tiles and Badges” document from Microsoft has excellent information that needs to be understood when working with tiles and badges: http://msdn.microsoft.com/en-us/library/windows/apps/hh465403.
Some of the Windows SDK samples utilize the NotificationsExtensions library. This is a C# library written by Microsoft. It is exposed as a WinRT component so that JavaScript code can call it. The purpose of the library is to keep developers from having to manipulate the XML document directly. More information on this library can be found in the document “Quickstart: Using the NotificationsExtensions Library in Your Code,” at the following location: http://msdn.microsoft.com/en-us/library/windows/apps/hh969156.
Apps can also send badge updates on the lock screen. If an app is planning to utilize the lock screen, the document “Quickstart: Showing Tile and Badge Updates on the Lock Screen” would be beneficial to read: http://msdn.microsoft.com/en-us/library/windows/apps/hh700416.
In addition to sending notifications to the main tile of the app, we can send tile notifications to the secondary tile. The process is identical, but the actual function documentation can be found at the following location: http://msdn.microsoft.com/en-us/library/windows/apps/windows.ui.notifications.tileupdatemanager.createtileupdaterforsecondarytile.aspx.
The Windows SDK samples of interest for this hour are
• App tiles and badges sample
• Push and periodic notifications client-side sample
• Raw notifications sample
• Secondary tiles sample
Summary
We spent the hour discussing the doorways into apps. Tiles need to be inviting. The user also should feel the urge to see what is behind the tile. We covered how to create a secondary tile so that the user can drill down into specific content in an app. We looked at how easy it is to send badge notifications to an app’s tiles. We explored how to send numbers or predefined glyphs. We talked about notifications in general and how the Windows Push Notification Service (WNS) works. We investigated the different ways to send notifications in apps. We wrote code only for sending notifications locally because it didn’t require any external cloud services.
We wrote code to update the main tile with a tile template that we modified. We also enabled notification queuing and sent multiple tile notifications to the main app tile. We didn’t discuss the sending notifications to the secondary tile, but this works the exact same way: It just calls TileUpdateManager.createTileUpdaterForSecondaryTile instead. We finished the hour talking about toast notifications. All these notifications work in the same manner, but we have a few more options with toasts, such as the capability to set audio. We also covered how to distinguish how the app was launched.
Q&A
Q. Can I programmatically change the size of the live tile to be wide or square?
A. No. Only the user can change the size of the tile. If a wide tile is provided, it defaults to that and the user can resize it to the smaller square tile.
Q. Do I need to send 99 to the budget notification only if the number is actually larger?
A. No. The number being sent to the notification, can be any number, but if it is between 1 and 99, the number itself is shown. If it is over 99, 99+ is displayed instead. However, we don’t need any kind of conditional statements to account for how the number will be displayed.
Q. Can more than one toast notification be displayed at a time?
A. Yes. Additional toast notifications are displayed beneath the first toast notification.
Q. Why aren’t my toast notifications displaying?
A. Assuming that the code has been written correctly, a common issue is forgetting to set the toast capable property to true in the app package manifest.
Workshop
Quiz
1. Can any symbol from Segoe UI Symbol be used as a glyph for the badge notifications?
2. You should always send the square tile and wide tile notifications in the same XML document. True or false?
3. To send push notifications, apps talk directly to the Windows Push Notification Service. True or false?
4. How many tile notifications does Windows show on a tile if notification queuing is enabled?
Answers
1. No. Only the predefined glyphs defined at http://msdn.microsoft.com/en-us/library/windows/apps/hh761458 can be used.
2. True. If the app contains a wide tile, notifications should be sent at the same time for the square and wide tiles. It is impossible to know which tile size the user is running when the notification arrives, so it needs to include both.
3. False. Apps talk to the Notification Client Platform. The cloud service communicates with WNS, but not the app.
4. If notification queuing is not enabled, Windows shows only the last notification. However, if notification queuing is enabled, Windows cycles through a maximum of five notifications on the tile.
Activities
1. Modify LiveTileExample to send a glyph as the badge notification instead of a number.
2. Add two more tile notifications to LiveTileExample so that the tile loops through a total of five notifications.
3. Add a tile notification for the secondary tile. Hint: Use Notifications.TileUpdateManager.createTileUpdaterForSecondaryTile.
4. Modify launch conditions in LiveTileExample to display different information based on whether a secondary tile was selected or the user launched the app through the toast.
5. Create your own cloud service to handle push notifications.