Hour 21. Making the Simon Game
What You’ll Learn This Hour:
• Using game states
• Creating a game loop
• Creating a “follow the leader” game
• Playing sounds through JavaScript
• Saving high scores
• Displaying high scores to the player
Many of the apps in stores today are games. People love playing games. During this hour, we explore how to create a complete game from scratch. We discuss game specifics such as working with game states and using a game loop. We even walk through creating a small demo on the side to show how a game loop can work. Along the way, we style the game and each screen the game uses.
We spend time looking at the logic of the game and work through the flow of the code so that the game works as expected. We implement sound effects and handle input, and we also implement a high score system and store the results to the user’s roaming settings.
Starting a New Project
Simon Says is a popular game from childhood that involves following the instructions of the leader, Simon, when the leader says “Simon says...” and ignoring those instructions if they don’t start with that phrase. An electronic version of the game came out in the 1980s, consisting of four big colorful buttons on a round disc. It starts by playing a sound as it lights up one of the four colored buttons. The player then needs to press the same button. The toy proceeds to light up the first button again and then choose another button. The player must then match the new order. This continues with the toy adding an additional color selection every turn. The game continues until the player selects a button in the wrong order.
This hour focuses on writing that game. Because this is a simple game, we can focus on the areas surrounding the game, including the game loop, game states, scoring, and sound. To get started, we add a new Navigation project called Simon.
Understanding Game States
When creating games, it is best to utilize game states. Game states are simply finite state machines that specify the state of the game. In a finite state machine, the machine (or game, in this case) has a limited number of known states it can be in.
Examples of the states of a game include the menu state and the playing state. This could be a state of level 1 or just a state of playing. A typical game state includes a paused state. Other game states could be game over, game won, or game lost. The game developer determines the states the game will have.
We set states in our game and check against those states to drive logic and display. For example, if the game is in a playing state, we want to make sure that the enemies on the screen are progressing toward the player to cause harm. However, if the game is in the paused state, we want to make sure the enemies aren’t going through their artificial intelligence (AI) routines and progressing toward the player.
Depending on how we set up our screens, we might want to stop drawing the game when we are in a paused state because a brand-new page fragment was loaded with a menu screen. Or when the game is paused, instead of going to an entirely different screen, perhaps a pause button is brought up or the pause menu is shown over top of the main gameplay. In this case, we could still be drawing the frames behind the scene but not updating the AI logic or listening for input on the items that affect the game. (We would want to listen to input for the pause menu items so the player could close the pause menu and get back to the game.)
Game states enable us to create logic regarding how to display the game world to the player. We have stubbed out some game states in utility.js:
var gameStates = {
paused: 0,
playing: 1,
menu: 2,
scores: 3,
won: 4,
lost: 5
}
We are concerned with the game being paused, played, at the menu, and on the high scores screen, as well as whether the player has just won or lost the game. Sometimes simply a game over state is enough.
When the game starts we place the game into the menu state and make sure that the menu is the first screen to be displayed. If we are resuming from suspend, we can look at the state we were in and load that screen instead. Most likely, if we were in the playing state, we would want to hydrate the game as appropriate, but instead of launching the player straight into the game, we would bring up the pause menu to enable the user to continue the game from there when ready.
Some states are tied directly to screens. For example, we could have a menu screen and a menu game state. We could have a scores game state and a high scores screen. However, some game states are not tied directly to the screens. For example, we have a playing state, a paused state, a won state, and a lost state that are all tied to the game screen. Within that one screen, we set the different game states based on what is happening in the game or what the player is doing while in the game screen.
With the code we created for Simon, we can simply set a game state by calling this:
SessionState.gameState = STYWin.Utility.gameStates.menu;
We can check a game state by using the following condition:
(SessionState.gameState == STYWin.Utility.gameStates.playing)
Creating a Game Loop Example
Simon is a simple event-based game, so we don’t have a game loop in the game. However, for many games, the game loop is critical. This section discusses what a game loop is and how it works.
For many games, the game is continually drawing to the screen. We have seen code that implements this partially with the FingerPainting app we just finished. It had a draw loop that is part of a game loop. However, it really didn’t have an update loop because it was listening to the touch events to store the touch points. Then in the draw loop, it looped through the touch points to draw on the screen. This was a partial game loop, then, in that the drawing code was set up as if for a game that is constantly changing the contents being displayed. No physics or AI logic needed to be called, though. Admittedly, our Simon game also won’t need an update loop because there is no physics and no complex AI, and our input will be handled through JavaScript events. This is why we create a quick demo to show how a game loop would work.
But why not just create a game in this hour that would use a game loop? Quite simply, there isn’t enough time. Entire books have been written on game programming, a couple by this author. To finish a mostly complete game this hour, we need to make it as simple as possible. However, because game loops are an important topic, we create a demo using the same code we created for Simon and create another demo that contains a game loop.
We can run the demo and see the results of the number being updated on the screen. Although this demo isn’t too exciting, the game loop we created is a nice starting point for any games that require both an update loop and a draw loop.
Styling the Game
After the diversion of seeing how a game loops work, let’s get back to creating the game called Simon. We left after creating the skeleton of the game. Let’s add the elements to make the game look like a game.
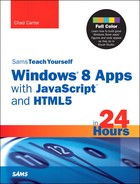
Inside menu.html in the Simon project, let’s change the page title to “Hello, I'm Simon.” Let’s make four different color squares the background of the menu screen so that it isn’t a single color. Let’s also add the following markup immediately following the menu fragment div:
<div id="blue"></div>
<div id="red"></div>
<div id="green"></div>
<div id="yellow"></div>
We can make the menu screen’s background look identical to the game screen. We add the same markup to game.html shortly; this should be changed to a custom control. We style those div elements in default.css because the same styles apply when they are used in the game.html. We could use them in the (high) scores screen as well, but we will do something a little differently in that screen. Inside default.css, we need to add the following CSS rules right before the snapped media query:
#green {
-ms-grid-column: 1;
-ms-grid-row: 1;
background-color: green;
}
#yellow {
-ms-grid-column: 2;
-ms-grid-row: 1;
background-color: yellow;
}
#blue {
-ms-grid-column: 1;
-ms-grid-row: 2;
background-color: blue;
}
#red {
-ms-grid-column: 2;
-ms-grid-row: 2;
background-color: red;
}
We have styled these div elements to exist inside a 2×2 grid. The color of each div matches the name. We need to make sure that the container for the div elements is actually a 2×2 grid. Inside menu.css, we replace the existing content with the following CSS rules:
.menu {
display: -ms-grid;
-ms-grid-columns: 1fr 1fr;
-ms-grid-rows: 1fr 1fr;
}
.menu section[role=main] {
-ms-grid-row: 1;
-ms-grid-row-span: 2;
-ms-grid-column: 1;
-ms-grid-column-span: 2;
height: 100%;
width: 100%;
}
.menu section {
text-align: center;
margin-top: calc(50% - 190px);
}
.menu button {
width: 250px;
height: 150px;
margin: 20px;
font-size: xx-large;
background-color: rgba(50,50,50,.35);
}
The first rule sets up the menu screen to use a 2×2 grid, to get the color div elements to show up properly. We explicitly put the main section into the first row and column and had it expand the entire width of the screen. Then to make sure the buttons are centered horizontally and vertically, we have the third CSS rule. The last CSS rule makes the buttons large and adds a little color to the background so that they show up nicely against the game board. This CSS rule styles the Back button as well, but we don’t see it on the menu page for this game. We also center the buttons in the page. Figure 21.1 shows the results of running the game.
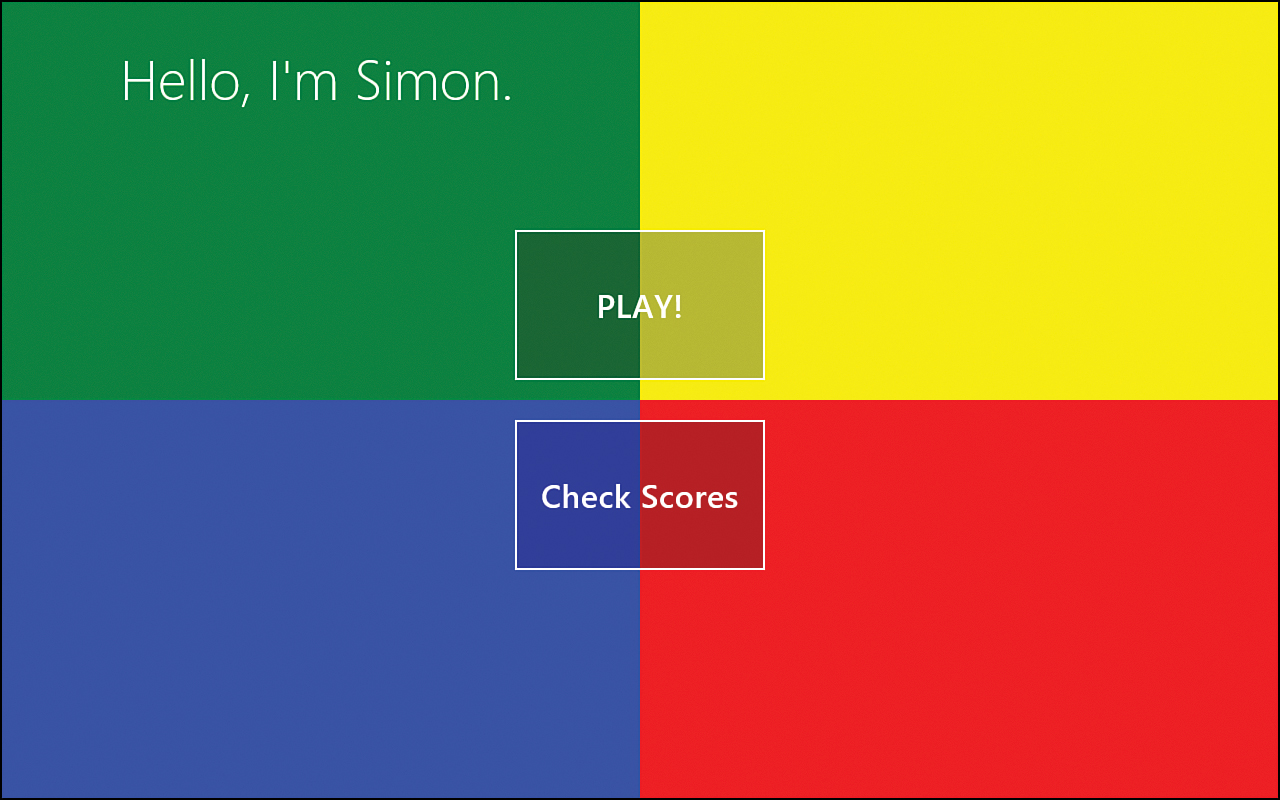
Figure 21.1. The style of the main menu screen of the Simon game is complete.
As with styling the menu, we need to add the following style to game.css so that the color div elements are displayed correctly. We also want the section to be rendered behind our div elements so we can capture the click events:
.game {
display: -ms-grid;
-ms-grid-columns: 1fr 1fr;
-ms-grid-rows: 1fr 1fr;
}
.game section[role=main] {
z-index: -1;
}
We need to add the color div elements to the game.html file as well. The following can be added immediately following the game fragment div:
<div id="blue"></div>
<div id="red"></div>
<div id="green"></div>
<div id="yellow"></div>
We can remove the content paragraph from the Main content section. For the page title of game, we want to put it in a custom app bar similar to the one we created for the FingerPainting app. Let’s replace the current header element with the following markup inside game.html:
<div id="headerAppBar" data-win-control="WinJS.UI.AppBar"
aria-label="Navigation Bar"
data-win-options="{layout:'custom',placement:'top'}">
<header aria-label="Header content" role="banner">
<button class="win-backbutton" aria-label="Back"
disabled type="button"></button>
<h1 class="titlearea win-type-ellipsis">
<span class="pagetitle">Leaving? Don't Go...</span>
</h1>
</header>
</div>
Creating the Game Logic
We can run the game and see that we have it looking the way we want. Now we can create the game logic so that it functions the way we want. When it is Simon’s turn, he checks his list of colors. If he has colors, he “plays” those colors in order with a time delay so that the user can see the colors being selected. After Simon has played all the colors in his list, he adds another color and plays that last color. After the last color was played, the player gets control of the game board. The game simply listens to the user play the colors. If the user plays them in the correct order, the game returns to Simon to repeat the process. If the player fails to tap each color in the correct order, the game is over.
All the game logic resides inside the game.js file. Inside the ready function, we add the following call:
Then we add the function outside the page definition:
var ss = STYWin.SessionState;
var timeoutId = 0;
var timeDelayBetweenColors = 1000;
var easyScore = 50;
function init() {
ss.gameState = STYWin.Utility.gameStates.playing;
ss.colors = [];
ss.pickedNewColor = false;
ss.simonColorIndex = 0;
//Wait 1.2 seconds after page load to kick off Simon's first move
timeoutId = setTimeout(simonSelectColor, 1200);
}
We have set up an alias for the SessionState object and declared a variable to hold the setTimeout calls. The init function sets the gameState to playing. It initializes a list of colors and sets a flag letting Simon remember whether he has already picked a color. The last property stores the current index Simon needs to use to find a color from the colors array. Finally, we schedule a call to tell Simon to select a color in 1.2 seconds. We store the id of this schedule in case we need to clear it. We also can add the following code to the unload function, which sets the state to menu and clears out any schedules calls:
STYWin.SessionState.gameState = STYWin.Utility.gameStates.menu;
if (timeoutId) {
clearTimeout(timeoutId);
timeoutId = 0;
}
We have started using SessionState properties, but we haven’t created them yet. Let’s add the following code to the jssessionstate.js file after initializing the gameState property:
SessionState.colors = [];
SessionState.simonColorIndex;
SessionState.pickedNewColor;
SessionState.playerColorIndex;
SessionState.score = 0;
Besides the colors, simonColorIndex, pickedNewColor, and gameState, which we saw being set in the init function, we create a playerColorIndex and score. As with the simonColorIndex, the playerColorIndex stores the color from the colors array that it should compare the player’s last tap with.
In the game.js file, let’s create the function that is called from the init function:
function simonSelectColor() {
if (ss.pickedNewColor) {
ss.pickedNewColor = false;
//reset pos for player count
ss.playerColorIndex = 0;
startPlayerTurn();
return;
}
var color;
if (ss.colors.length == ss.simonColorIndex) {
var newColor = generateRandomColor();
ss.colors.push(newColor);
ss.pickedNewColor = true;
}
if (timeoutId) {
clearTimeout(timeoutId);
}
timeoutId = setTimeout(colorSelectedBySimon, timeDelayBetweenColors);
}
Simon checks the pickedNewColor property to determine whether he has already picked a color. If he has already picked a color, his turn is over and it is time to see whether the player can repeat the colors. If that happens, we reset the flag, set the playerColorIndex to 0, and then tell the player to start.
However, the first time into the function, there are no colors in the array and Simon hasn’t already selected any colors, so the check we perform determines whether simonColorIndex equals the number of colors in the colors array. If it does, Simon needs to generate another color. If a new color needs to be generated, we make a call to generateRandomColor, which does what its name suggests and returns one of the four colors. We then push that color onto the colors array. Finally, it sets the flag so that the next time we are in this function, Simon will know that he has already picked a color and that it isn’t his turn anymore.
After a color is generated (if needed), we make a call to colorSelectedBySimon. This is also wrapped in a setTimeout function. We set the timeDelayBetweenColors to 1,000 milliseconds, or 1 second. A possible future enhancement is to make that value a setting that the user can change or that the game can modify, based on the difficulty or the number of correct taps so far. Before making that call, we clear any schedules we already have.
As a recap, the simonSelectColor function tells the colorSelectedBySimon function that it needs to take action on that color and show the player. This is called as many times as needed (as many colors as there are in the colors array). If a new color needs to be added to the array, it is added. The next time into this function, control moves to the user because the startPlayerTurn function will be called.
simonSelectColor calls three functions: startPlayerTurn, generateRandomColor, and colorSelectedBySimon. The colorSelectedBySimon function follows:
function colorSelectedBySimon() {
var color = ss.colors[ss.simonColorIndex];
lightUpColorAndPlaySound(color);
//need to increment the position for next color
ss.simonColorIndex++;
//Let simon know the color has been selected and he can pick another one
//or give control back to the user
simonSelectColor();
}
Now that Simon has selected (or added) a color, the colorSelectedBySimon function grabs the next color from the colors array and calls a function we will see shortly that plays a sound and gets the user’s attention for the selected color. It then increases the index so that Simon can determine whether he needs to pick another color, end his turn, or just let this function pick the next color in the list. This function calls simonSelectColor so that those choices can be made.
The generateRandomColor function follows:
function generateRandomColor() {
var randomnumber = Math.floor(Math.random() * 4);
var color;
switch (randomnumber) {
case 0:
color = "blue";
break;
case 1:
color = "red";
break;
case 2:
color = "green";
break;
case 3:
color = "yellow";
break;
}
return color;
}
Nothing too surprising appears here; we are just creating a random number between 0 and 3 and returning the string representation of the color based on the number.
Handling Input
The first function called in simonSelectColor was startPlayerTurn. This function simply hooks up the click event handler for each color div element. The following functions need to be added to game.js:
function startPlayerTurn() {
addButtonEventListeners();
}
function addButtonEventListeners() {
document.getElementById("blue")
.addEventListener("click", buttonHander, false);
document.getElementById("red")
.addEventListener("click", buttonHander, false);
document.getElementById("green")
.addEventListener("click", buttonHander, false);
document.getElementById("yellow")
.addEventListener("click", buttonHander, false);
}
function removeButtonEventListeners() {
document.getElementById("blue")
.removeEventListener("click", buttonHander, false);
document.getElementById("red")
.removeEventListener("click", buttonHander, false);
document.getElementById("green")
.removeEventListener("click", buttonHander, false);
document.getElementById("yellow")
.removeEventListener("click", buttonHander, false);
}
function buttonHander(evt) {
var color = evt.srcElement.id;
if (color == ss.colors[ss.playerColorIndex]) {
playerChoseWisely(color);
} else {
playerChosePoorly();
}
}
When Simon hands control to the user, we simply hook up event handlers for each color. We have created a function to remove the click event listener as well because we need to remove the event handler when it is Simon’s turn again. The actual click event handler is the function buttonHander, which gets the id of the div that was clicked, which is simply the color. It then compares the color clicked on with the current color the player should be tapping by looking at the colors array at the location of the playerColorIndex. If a match is found, the playerChoseWisely function is called; otherwise, the playerChosePoorly function is called.
Playing Sounds
Let’s add the following lightUpColorAndPlaySound function to the game.js file:
function lightUpColorAndPlaySound(color) {
document.getElementById(color + 'Sound').play();
return WinJS.UI.Animation.fadeOut(
document.querySelector("#" + color)).then(function () {
return WinJS.UI.Animation.fadeIn(document.querySelector("#" + color));
});
}
When Simon selects a color (and the player selects a color), the previous function is called. This plays a sound, fades the selected color, and then fades it back in to grab the player’s attention that the color was selected. We can create a folder called sounds on the root of our project and copy the MP3 files named as the colors. These are simply differently pitched beeps. We can also add wrong.mp3 to the sounds folder. These can be found in the Hour21 folder.
Extra work would be needed to make sure that JavaScript and HTML5 actually play every sound. Instead of doing that work, a game framework such as CreateJS could be used.
We can add the corresponding audio elements to the game.html file immediately following the color div elements:
<audio id="blueSound">
<source src="/sounds/blue.mp3" type="audio/mp3" />
</audio>
<audio id="redSound">
<source src="/sounds/red.mp3" type="audio/mp3" />
</audio>
<audio id="greenSound">
<source src="/sounds/green.mp3" type="audio/mp3" />
</audio>
<audio id="yellowSound">
<source src="/sounds/yellow.mp3" type="audio/mp3" />
</audio>
<audio id="wrongSound">
<source src="/sounds/wrong.mp3" type="audio/mp3" />
</audio>
Finishing Up the Game Logic
Now we can look at the logic we need to create to handle the player actually tapping a color in the correct order. If the player tapped the right color, the playerChoseWisely function is called. We need to add the function to the game.js file:
function playerChoseWisely(color) {
lightUpColorAndPlaySound(color);
//increase score
ss.score += 10;
ss.playerColorIndex++;
//player has finished Simon's sequence
if (ss.playerColorIndex == ss.colors.length) {
//stop listening for taps
removeButtonEventListeners();
//reset Simon's color index
ss.simonColorIndex = 0;
if (timeoutId) {
clearTimeout(timeoutId);
}
//hand control back to Simon
timeoutId = setTimeout(simonSelectColor, 800);
}
}
As soon as the tap happens, we want to provide feedback to the user, so we call lightUpColorAndPlaySound. We then increase the player score by 10 and increment the player’s color index so that the next tap checks the next color in the colors array. We also check to see if the player has just tapped the last color in the sequence. If so, the game stops listening for click events. We then set Simon’s color index to 0 so that when he goes, he knows that he needs to select the first color in the colors array. We call simonSelectColor to start the next round. This is done in a delay so that the user has almost a second to focus.
If the player did not select the right color, the following function is called:
function playerChosePoorly() {
removeButtonEventListeners();
document.getElementById("wrongSound").play();
var body = document.querySelector("body");
var bodyColor = body.style.backgroundColor;
body.style.backgroundColor = "darkred";
WinJS.UI.Animation.fadeOut(document.querySelectorAll("div"))
.then(function () {
return WinJS.UI.Animation.fadeIn(document.querySelectorAll("div"));
}).then(function () {
body.style.backgroundColor = bodyColor;
if (ss.score > easyScore) {
STYWin.SessionState.gameState = STYWin.Utility.gameStates.won;
} else {
STYWin.SessionState.gameState = STYWin.Utility.gameStates.lost;
}
endGame();
});
}
If the player chose the wrong color, the game no longer listens for click events on the color div elements. The wrong.mp3 file is played, which sounds like a buzzer. We then set the background color of the body to a dark red and call the WinJS Animation library to fade out all the div elements so that we will only see the dark red body. We then fade all the div elements back in and reset the background color to what it was before. We check the user’s score and set the game state to either won or lost. Finally, we call endGame. The endGame function follows:
function endGame() {
if (timeoutId) {
clearTimeout(timeoutId);
timeoutId = 0;
}
ss.colors = [];
ss.playerColorIndex = 0;
ss.simonColorIndex = 0;
if (ss.gameState == STYWin.Utility.gameStates.won) {
displayWon();
} else {
displayLost();
}
}
We clear out any scheduled calls and also clear out the colors array, as well as reset the color indexes. We then check to see if the player won or lost and call the appropriate function. The won and lost game states are set by the playerChosePoorly function, based on a certain score being reached. The displayWon and displayLost functions are shown here:
function displayWon() {
//do stuff like display fireworks or some other congrats gesture
//save high score
var isHighScore = saveScore();
if (isHighScore) {
//navigate to high scores screen
WinJS.Navigation.navigate("/screens/scores/scores.html");
}
else {
goToMenu();
}
}
function displayLost() {
//do stuff
//navigate to the menu page
goToMenu();
}
These are mainly stubs that can be added to later. The game doesn’t offer a reward for winning or getting a high score, nor does anything noteworthy happen when the player loses. We check to see if the score the player earned was good enough for the high scores screen. If it is, we navigate to the high scores screen. Otherwise, we send the player to the menu. Likewise, if the player lost, the menu screen displays. Each of these scenarios could use a little more flare. The goToMenu function and the saveScore stub follow:
function goToMenu() {
if (WinJS.Navigation.canGoBack) {
WinJS.Navigation.back();
} else {
WinJS.Navigation.navigate("/screens/menu/menu.html");
}
}
function saveScore() {
return false;
}
When asked to go to the menu, we see if we can go back. Assuming that we can, we just go back in history. Otherwise, we do a full navigation to the menu screen. The saveScore function is just a stub, and we build it out in the next section. For now, it just returns false, stating that the score was not a high score.
The core of the logic is done. Everything else we add will enhance the game and make it compliant with the certification requirements, but the actual game play is done. If we run the game now, it works as expected. As long as we select the same colors as Simon, the game continues. We can bring up the About settings screen and go to the high scores screen.
Implementing the High Scores Screen
We declared the variable easyScore at the beginning with a value of 50. We the added 10 to the score in the playerChoseWisely function. Then inside the playerChosePoorly function, we had the condition of (ss.score > easyScore) to determine whether the user won or lost. In this section, we save those high scores and display them in the scores screen.
The saveScore function needs to be replaced with the following:
function saveScore() {
var appData = Windows.Storage.ApplicationData.current;
var roamingSettings = appData.roamingSettings;
var highScores;
var name;
return Windows.System.UserProfile.UserInformation.getDisplayNameAsync()
.then(function (displayName) {
name = displayName;
if (!roamingSettings.values["hs"]) {
roamingSettings.values["hs"] =
JSON.stringify([{
name: displayName,
score: ss.score,
date: new Date()
}]);
return true;
} else {
highScores = JSON.parse(roamingSettings.values["hs"]);
var d = new Date();
highScores.push({ name: displayName, score: ss.score, date: d });
highScores.sort(function (a, b) {
return b.score - a.score;
});
//store added high score
roamingSettings.values["hs"] = JSON.stringify(highScores);
if (highScores.length > 10) {
//lowest score removed
var droppedScore = highScores.splice(10, 1);
//store update list
roamingSettings.values["hs"] = JSON.stringify(highScores);
if (droppedScore[0].date == d) {
return false;
} else {
//high score!
return true;
}
}
else {
//high score (hardly any high scores present...)
return true;
}
}
});
}
We store the high scores in the user’s roaming data. If we had a cloud service, we could also send the scores to an online leaderboard. Currently, we are just storing them in roaming settings so that when the user goes to another machine, the same scores appear on that machine.
The logic of this code is wrapped inside the getDisplayNameAsync call’s promise. This function returns the user’s display name. The getDisplayNameAsync object can also grab the account picture, first name, and last name. When we have the display name, we store it in a variable called name. We then check to see if we have saved any high scores previously. If not, we create a single high score record and assign that to our roaming settings value called hs. We store the name, score, and date. If high scores were stored previously, we grab them from storage and add the current score to the list. We then sort it by score, in descending order, and put the list back into storage. We are storing only 10 high scores for this game, although this is an arbitrary number that can be much as long as can fit in the 10K limit for roaming settings. If the high score list contains more than 10 scores, we drop the last record. If the last record we just dropped was the same one that we added (compared on the date field), then we return false to indicate that the score wasn’t saved because it wasn’t a high score. Otherwise, we return true to state we did store the score because it was a high score. Similarly, we return true if fewer than 10 entries were present. If there were more than 10 and we dropped a row, we store the modified list in storage to overwrite the version with 11 records.
Because the saveScore function is now returning a promise instead of a Boolean, we need to modify the displayWon function. Let’s replace the displayWon function with the following code:
function displayWon() {
//do stuff like display fireworks or some other congrats gesture
//save high score
saveScore().then(function (isHighScore) {
if (isHighScore) {
//navigate to high scores screen
WinJS.Navigation.navigate("/screens/scores/scores.html");
}
else {
goToMenu();
}
});
}
Now let’s open the scores.js file and work on displaying the saved high scores. We need to create the following getHighScores function outside the page definition:
function getHighScores() {
var appData = Windows.Storage.ApplicationData.current;
var roamingSettings = appData.roamingSettings;
var highScores;
var p = document.querySelector("p");
var highscoreContainer = document.getElementById("highscorecontainer");
if (roamingSettings.values["hs"]) {
highscoreContainer.style.visibility = "visible";
p.style.visibility = "hidden";
var template = document.getElementById("highScoreTemplate");
highScores =
JSON.parse(roamingSettings.values["hs"]);
var i, hs, row;
for (i = 0; i < highScores.length; i++) {
hs = highScores[i];
template.winControl.render(hs).then(function (result) {
row = result.querySelector("tr");
highscoreContainer.appendChild(row);
});
}
} else {
p.style.visibility = "visible";
highscoreContainer.style.visibility = "hidden";
}
}
We call this function inside the page’s ready function:
getHighScores();
The function does what the name implies and reads the high scores from the roaming settings. If no high scores are present, the p element is set to some text, stating that no high scores are saved yet. Otherwise, the scores are pulled out of storage as we saw earlier. When the scores are in memory from parsing the JSON data, we want to display them on the screen. We could have used a ListView control to display the information, but because we want to list this data in a table, we create our own template and render to that. We saw how to do this during Hour 10, “Binding Data to Our Apps.”
For this to make sense, let’s also populate scores.html. The following markup replaces the section contents:
<table><tbody id="highscorecontainer">
<tr>
<th>Name</th><th>Score</th><th>Date</th>
</tr>
</tbody></table>
<p>No high scores saved yet. Play to see your name here!</p>
We have removed the content of the p element and replaced it with a message if there are no high scores yet. We added the table above the p element, which has header information and ultimately gets the individual rows of each high score. The rows are rendered with the following template (which can be added immediately at the top of the body element):
<div id="highScoreTemplate" data-win-control="WinJS.Binding.Template">
<div class="templateItem">
<table><tbody>
<tr>
<td data-win-bind="innerText: name"></td>
<td data-win-bind="innerText: score"></td>
<td data-win-bind=
"innerText: date STYWin.Utility.formatDate"></td>
</tr>
</tbody></table>
</div>
</div>
Now that we see how the HTML is laid out, let’s look back at the function to see how to populate the table:
var i, hs, row;
for (i = 0; i < highScores.length; i++) {
hs = highScores[i];
template.winControl.render(hs).then(function (result) {
row = result.querySelector("tr");
highscoreContainer.appendChild(row);
});
We loop through the highScores array, and for each high score (stored in hs), we add the rendered row (from the highScoreTemplate) to the tbody of the table.
The template uses a converter function called formatDate. Let’s add that function in the utlity.js file:
function formatDate(date) {
var dateFormatter = new Windows.Globalization
.DateTimeFormatting.DateTimeFormatter("year month day dayofweek");
var timeFormatter = new Windows.Globalization
.DateTimeFormatting.DateTimeFormatter("hour minute second");
var d = new Date(date);
return dateFormatter.format(d) + " @ " + timeFormatter.format(d);
}
This is similar to how we bound data during Hour 10. This time, we grab the date and time and append them together. As a refresher, the following markup takes the date property of the high score object and binds it to the innerText value of the innerText element only after obtaining the real data to bind from the formatDate converter function:
<td data-win-bind="innerText: date STYWin.Utility.formatDate"></td>
The converter function takes in the date value and returns a string to be bound.
We also need to expose the converter function in the STYWin.Utility namespace:
WinJS.Namespace.define("STYWin.Utility", {
gameStates: gameStates,
formatDate: WinJS.Binding.Converter(formatDate)
});
The last task we need to complete for the high scores screen is to style the screen. We add the following CSS rules to the scores.css file:
.scores p,
.scores table {
margin-left: 120px;
width: calc(100%-120px);
border-spacing: 0px;
}
section {
overflow: auto;
}
.scores table tr {
text-align: center;
font-size: x-large;
}
.scores table th {
border-bottom: 8px double black;
}
.scores table th,
.scores table tr:nth-child(4n+1) td {
background-color: yellow;
color: black;
}
.scores table tr:nth-child(4n+2) td {
background-color: blue;
color: white;
}
.scores table tr:nth-child(4n+3) td {
background-color: green;
color: white;
}
.scores table tr:nth-child(4n+4) td {
background-color: red;
color: white;
}
.scores table tr th:last-child,
.scores table tr td:last-child {
width: 440px;
}
.scores table tr th,
.scores table tr td {
width: 340px;
height: 90px;
}
.scores p,
.scores table tr th {
font-size: xx-large;
}
Quite a few rules exist here. The first makes sure that the left margin of 120px is applied to the content. It also sets border-spacing to 0 on the table itself. The section that contains the table has overflow turned on so that, if needed, we can scroll the high score list.
The table itself is being styled by centering all the text and setting the font size to x-large. The header columns on the table have a double black border on the bottom. The styles that look similar to the following are styling the rows in the colors Simon likes:
.scores table tr:nth-child(4n+4) td {
background-color: red;
color: white;
}
If the rule is unfamiliar, a glance back at Hour 1, “Getting a Refresher on JavaScript, HTML5, and CSS3,” might be beneficial. The rule allows the rows to be styled differently based on the formula.
After coloring the rows of the table, we set the width of the last column to 440px. We set the other column widths to 340 and the height to 90. Finally, we set the text of the header columns to be xx-large.
To have the scores screen look right in snapped view, we need to add the following media query:
@media screen and (-ms-view-state: snapped) {
.scores p,
.scores table {
margin-left: 20px;
}
.scores table tr {
font-size: medium;
}
.scores th,
.scores td {
width: 100px;
}
.scores th {
font-size: large;
}
}
As expected, we change the content margin to 20px instead of 120px. We also scale down the font to medium and set the width of the columns to 100px each. We scale down the font of the header column as well.
Then we change the page title of the high score screen as follows:
<span class="pagetitle">High Scores of Simon's Friends</span>
When we run the game and obtain some high scores, we see a screen similar to Figure 21.2.
Figure 21.2. The high scores screen is being populated from roaming storage.
Saving the Game
The last action we take with this game is to save state. Fortunately, everything is being stored in the SessionState object; we just need to modify the init function inside game.js. Let’s wrap the colors and pickedNewColor initialization with the following condition to see if we were called after the game came back from being suspended:
//came in from suspend ...
if (!ss.colors.length > 0) {
ss.colors = [];
ss.pickedNewColor = false;
}
Because we aren’t resetting the variables, we let Simon pick up where we left off. The key is that we aren’t resetting the colors array. So Simon goes first upon resuming, to remind the player of the colors to repeat, and the game continues. We need to hook up these properties inside default.js. Inside the oncheckpoint event handler, we add the following code:
app.sessionState.colors = STYWin.SessionState.colors;
app.sessionState.simonColorIndex = STYWin.SessionState.simonColorIndex;
app.sessionState.pickedNewColor = STYWin.SessionState.pickedNewColor;
app.sessionState.playerColorIndex = STYWin.SessionState.playerColorIndex;
app.sessionState.score = STYWin.SessionState.score;
app.sessionState.gameState = STYWin.SessionState.gameState;
Similarly, when we resume, we want to set the SessionState object with what the app stored. Let’s add the following inside the activated event handler. We can add the code right after setting the nav.history property inside the condition checking to see if there is any history:
STYWin.SessionState.colors = app.sessionState.colors;
STYWin.SessionState.simonColorIndex = app.sessionState.simonColorIndex;
STYWin.SessionState.pickedNewColor = app.sessionState.pickedNewColor;
STYWin.SessionState.playerColorIndex = app.sessionState.playerColorIndex;
STYWin.SessionState.score = app.sessionState.score;
STYWin.SessionState.gameState = app.sessionState.gameState;
We reset simonColorIndex, pickedNewColor, and playerColorIndex in the code, so those three values don’t really need to be retrieved nor stored.
If we run the app and suspend and terminate it, when we come back, we are in the game screen (assuming that this is where we were when we suspended the game) and that Simon starts his turn again from the first color. We could modify the code in game.js to not reset the other values and truly be just as if the user left and came back, but that would most likely cause the player to lose because the player likely wouldn’t remember the sequence.
Further Exploration
For this game, we created everything without third-party controls, but when dealing with HTML5 and JavaScript, a game library can really help. We didn’t want to use any third-party libraries in the book, but real apps can benefit from them because they save time and energy. A large list of game but libraries can be found at https://github.com/bebraw/jswiki/wiki/Game-Engines.
One of the game libraries gaining popularity is EaselJS, which can found at www.createjs.com/#!/EaselJS.
Playing sounds rapidly in HTML5 and JavaScript can be troublesome. It can be overcome, but if sound events are kicked off too close together, they will be dropped and the sound won’t be played as many times as requested. The folks who make EaselJS also have a sister project called SoundJS. It works with a couple more of their libraries help create a great HTML5 game.
Summary
We have went from 0 to a full game this hour. The game logic wasn’t too complex, but many times the actual gameplay doesn’t take long to create; all the other parts, such as artwork, sounds, and leaderboards, take more time. We created a nice skeleton app that we can use for future projects. We utilized the Navigator project template to help manage screens. If we created a game that utilized a canvas, we would simply have the main game page use the Fixed Layout page, to get the benefit of navigation.
We also covered how to add sound by using the HTML5 audio tag and playing it dynamically. We spent some time saving high scores and displaying them to the user.
At this point, this part of the book explored the process of creating three complete apps. This experience is useful in creating many different types of apps and games. The next part of the book delves into the Windows Store and how to ready an app for certification so that developers can sell our apps and games.
Q&A
Q. Which should be used to draw on the screen at about 60 frames per second, setTimeout or requestAnimationFrame?
A. requestAnimationFrame should be used in place of setTimeout when trying to draw to the screen in a game loop. requestAnimationFrame is tied to the refresh rate of the display.
Q. What does the clearTimeout function do?
A. When using the setTimeout function, a time might come when we need to cancel the function making a call. To do that, we can call clearTimeout and pass in the timeoutId that we stored when creating the setTimeout function. Calling clearTimeout prevents the function passed to setTimeout from being called.
Workshop
Quiz
1. Which should be used to draw on the screen at about 60 frames per second, setTimeout or requestAnimationFrame?
2. The operating system uses game states to determine whether it should suspend the game. True or false?
3. How is an audio file played through code?
4. In game loops, the update and draw methods should always be called the same number of times per second. True or false?
Answers
1. requestAnimationFrame should be used instead of setTimeout when drawing to the screen.
2. False. Game states are created so that an app can apply different logic and displays based on the current game state. Game states can—and usually do—change per game. The OS doesn’t know anything about game states, nor does it need to.
3. Simply calling the play function plays an audio file loaded in the HTML page.
4. False. Although having the update and draw calls execute at the same time is acceptable, it is also acceptable to have the update method run more often than the draw method.
Activities
1. Change the four squares of colors present on the menu screen and the game screen into a custom control.
2. Create another settings flyout that enables the user to change how long the space is between Simon picking colors. Alternatively, write code to automatically increase the speed, based on how many colors have been added.
3. Implement a sharing source contract to share the player’s high score.
4. Update the player’s live tile with the last score and play date. Also display the top score and the score closest to the player’s last score.
5. Implement a pause mechanism in the game. If the player brings up the app bar, the game should pause.
6. Make the winning game state cause something to happen on the screen (such as a fireworks show).