Hour 3. Exploring the Windows Runtime (WinRT) and Windows Library for JavaScript (WinJS)
What You’ll Learn This Hour:
• What the Windows Runtime is
• What makes up the Windows Runtime API
• How to deal with language projections and Windows Metadata
• How to use many of the Windows Library for JavaScript controls
As we build our Windows Store apps, we rely heavily—in fact, almost entirely—on the Windows Runtime (WinRT) and its APIs. We also utilize the Windows Library for JavaScript (WinJS) during our development efforts in this book. We cover many details during this hour, from the actual WinRT APIs to the WinJS UI controls. We also look at how to use WinRT components made by other languages and some of the items to look out for when passing different types between those languages.
In addition, we cover creating and using many of the WinJS UI controls, such as Flyout, Menu, Rating, ToggleSwitch, and Tooltip. Finally, we show how WinRT, WinJS, the language projection, the core operating system services, and our app code all work together.
What Is the Windows Runtime?
The Windows Runtime (WinRT) is a set of functionality to which Windows Store apps have access. In fact, anything useful must be done through the Windows Runtime. The Windows Runtime API enables apps to talk to the operating system. WinRT consists entirely of native code. This means that it was written in C/C++ (and most likely some Assembler) and talks directly to the hardware. Some of the API is brand new. Other parts simply wrap the existing Win32 API that all current desktop apps use to talk to the operating system. Our apps must call into the WinRT API to work with the system. It is possible for a JavaScript app to never directly call any WinRT methods; however, such an app probably won’t be very exciting.
Most of the WinRT API is available to all languages. However, JavaScript does not have access to the Windows.UI.XAML controls because that is reserved for the UI being used by C#, VB, and C++. We utilize standard HTML, so there is no need for a Windows.UI.HTML namespace. Some UI controls in that namespace don’t exist in HTML, but Microsoft has created the Windows Library for JavaScript for those needs. We discuss the Windows Library for JavaScript later this hour, in the section “Understanding the Windows Library for JavaScript.”
Understanding Language Projections
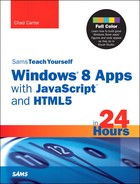
Each language has its own projection, which allows JavaScript code to access the WinRT API. The WinRT API is everything with the Windows namespace. Figure 3.1 shows how Visual Studio provides intelliSense to us for the WinRT API.
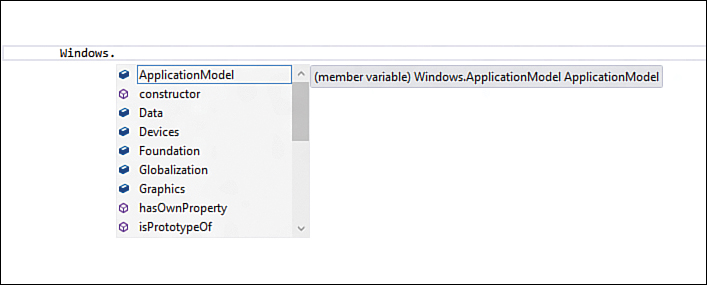
Figure 3.1. Visual Studio gives us intelliSense for the WinRT API. We have access to the Windows namespace.
Each language talks to the Windows Runtime through language projections. Projections allow each language to use the syntax style it is used to. For example, in C++/C#/VB, types, properties, and methods are commonly PascalCased (or TitleCased). In JavaScript, events are all lowercase. Functions are camelCased. No types exist in JavaScript, but when dealing with the WinRT, the types are PascalCased.
Looking at the Windows Runtime Metadata
The WinRT API definitions are exposed in the ECMA 335 metadata format. This is the same format that .NET uses. These metadata format files have a .winmd extension, which provides intelliSense to Visual Studio for the different languages.
The Windows Metadata is generated natively from the C++ or C#/VB compiler. This facilitates the multilanguage projection generation and drives Visual Studio’s full intelliSense on statically known information.
Creating Hybrid Apps
Sometimes business logic is already created in a C++, C#, or VB DLL. Having our JavaScript code call out to these DLLs can be useful. Just as Microsoft provides the Windows Runtime components that make up the WinRT API, we can create our own WinRT component. Some rules govern doing so in the different languages, but the process is straightforward and simple. In fact, Visual Studio provides templates for the languages to create a component.
After a WinRT component is made, any language can use it—including JavaScript. Now we are able to write JavaScript code that has access to the business logic created in another language.
This was a fundamental requirement when designing the Windows Runtime—multiple languages needed to be able to use the API in the same app. Furthermore, the semantics of the library should appear as if the library were created specifically for that language. This is no small matter. Trying to get Visual Basic 6 to work with COM objects written in C was brutal. Better, but not by much, is getting the managed code to call out directly to the Win32 API. Crossing those boundaries comes with all kinds of problems because the basic types we use to describe data differ based on language.
For example, consider the simplest example of a Boolean value. In VB, false is 0 and true is -1. In C++ and C#, false is 0 and true is 1. In JavaScript, false is 0 and true is anything else. Clearly, WinRT must handle these correctly. The rule it uses for Booleans is 0 as false and anything else as true. If it needs to send True to Visual Basic, it sends -1.
The table found at http://msdn.microsoft.com/library/hh710232 is important information and we need to look at it more closely if we need to work on a hybrid app. Understanding how the data is actually handled in the Windows Runtime is important, we also need to know how other languages treat those values when we are creating hybrid applications.
Try It Yourself: Creating a Hybrid Application That Works with 64-Bit Integers
1. Create a new JavaScript Widows Store application project from the Blank App project template and call it HighPrecisionNumberExample.
2. In the Solution Explorer in Visual Studio, right-click and select Add | New Project.
3. Select a Visual C# | Windows Store | Windows Runtime Component project and name it WinRTHighPrecisionNumberComponent.
4. At this point, we have a single hybrid solution with a JavaScript project and a C# project.
5. Rename Class1.cs in the C# Project to HighPrecisionNumber.cs.
6. Replace the content of HighPrecisionNumber.cs with the following code:
using System;
namespace WinRTHighPrecisionNumberComponent
{
public sealed class HighPrecisionNumber
{
public HighPrecisionNumber()
{
LargeNumber = 9007199254740992 + 7;
}
public Int64 LargeNumber { get; set; }
public string MyString { get { return LargeNumber.ToString(); } }
public bool Compare(Int64 a, Int64 b) { return a == b; }
}
}
7. The C# code in step 6 simply creates a 64-bit integer. The magical number is the maximum value that JavaScript can hold. It is a 53-bit precision number. We then add another 7 to it to modify an additional 3 bits. We also have a compare method in the C# component that we will have our JavaScript method call. We return the number as a string in the MyString property.
8. Now in the JavaScript default.js file, we need to add the following function immediately after the call to app.start();.
function doNumberTest() {
var b = new WinRTHighPrecisionNumberComponent.HighPrecisionNumber();
var val1 = b.largeNumber;
var val2 = b.largeNumber;
var body = document.querySelector("body");
var div1 = document.createElement("div");
var div2 = document.createElement("div");
var div3 = document.createElement("div");
var div4 = document.createElement("div");
var div5 = document.createElement("div");
var div6 = document.createElement("div");
div1.innerText = "b.largeNumber as string " + b.myString;
div2.innerText = "val1: " + val1 + " -- b.largeNumber: " + b.largeNumber;
//stored locally, but not changed
//passed back to C# for comparison
var areEqual = b.compare(val1, val2);
div3.innerText = "Are val1 and val2 Equal? " + areEqual;
//added 0 to val1 (makes it lose precision)
//compares modified val1 with unmodified val2
val1 = val1 + 0;
areEqual = b.compare(val1, val2);
div4.innerText = "Are val1 + 0 and val2 Equal? " + areEqual;
//compares modified val1 with unmodified val2
//with JavaScript compare
areEqual = (val1 === val2);
div5.innerText = "Does val1 === val2? " + areEqual;
//compares unmodified val2 with
//C# large Number
areEqual = b.compare(val2, b.largeNumber);
div6.innerText = "Are val2 and b.largeNumber Equal? " + areEqual;
body.appendChild(div1);
body.appendChild(div2);
body.appendChild(div3);
body.appendChild(div4);
body.appendChild(div5);
body.appendChild(div6);
}
9. Call the doNumberTest function inside the app.onactivated event handler function. Add the following line immediately following the outer if:
doNumberTest();
10. Now we need to reference the C# WinRT component in our JavaScript app. To do this, we right-click the References node under our JavaScript project and select Add Reference. When the dialog window comes up, select Projects, on the left side. Then check the check box beside the WinRTHighPrecisionNumberComponent and click OK.
11. Run the solution. Figure 3.2 shows the results. The code can be found under Hour03HighPrecisionNumberExample.
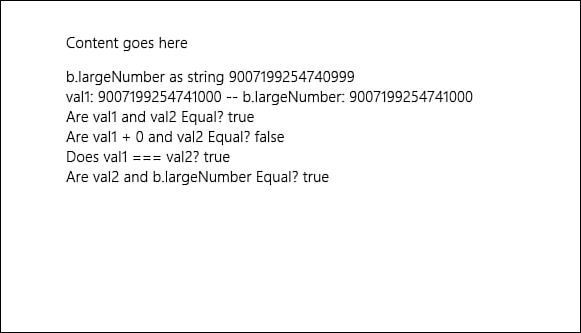
Figure 3.2. Our hybrid app displays precision loss in JavaScript for 64-bit integers.
Understanding the WinRT API
Figure 3.3 shows the Windows Runtime architecture. The Windows core OS services are the foundation. All the green boxes are the Windows Runtime. The small green boxes represent some of the API. The larger green box on the left represents the metadata for all the APIs. Above WinRT is the language projection, followed by our app.

Figure 3.3. The Windows Runtime Architecture and how it relates to the system and our apps.
Understandably, a lot of API calls are available; the operating system exposes all the functionality to Windows Store apps, after all. Because of the large number of calls and the limited space in this book, we do not list them here. Instead, the following link is a great reference for digging into the WinRT API: http://msdn.microsoft.com/library/br211377.
As we progress through the book and work with some of these APIs, we take note of how they work and what they can do. However, this book does not cover all of the WinRT APIs—there are just too many, and this book is not meant to be a reference book. Instead, it is intended to help developers get up to speed quickly so they can begin writing Windows Store apps.
To kick off our first detailed discussion point of the WinRT API, let’s open the NoWinJS example from /Hour03/NoWinJS. This code demonstrates that our JavaScript Windows Store app can utilize WinRT without using or even referencing WinJS. We discuss WinJS in the next section, “Understanding the Windows Library for JavaScript.” For now, we are taking note of how the language projection (which enables us to call into the Windows Runtime) is indeed separate from WinJS.
The code is simplistic. The project was created using the Blank App project template. Then under the project references, the WinJS library was removed. The script and CSS reference to the WinJS JavaScript and CSS were also removed from default.html. Finally, a button was added with an id of btn. The complete code for default.html follows:
<!DOCTYPE html>
<html>
<head>
<meta charset="utf-8" />
<title>NoWinJS</title>
<!-- NoWinJS references -->
<link href="/css/default.css" rel="stylesheet" />
<script src="/js/default.js"></script>
</head>
<body>
<p>Content goes here</p>
<button id="btn">Show Message</button>
</body>
</html>
The code in default.js was also stripped out and replaced with this:
(function() {
document.addEventListener("DOMContentLoaded", function (event) {
var btn = document.getElementById("btn");
btn.onclick = showMessage;
});
function showMessage() {
var messageDialog =
new Windows.UI.Popups.MessageDialog("My message dialog");
messageDialog.showAsync();
}
})();
The code is wrapped in a self-executing anonymous function to keep the global space clean. It then adds an anonymous function to the DOMContentLoaded event. The function finds the button by id in the HTML page and then sets the onclick event of the button to the showMessage function defined next.
The showMessage function calls out to the Windows Runtime. It creates an instance of the MessageDialog, which is in the Windows.UI.Popups namespace. Finally, it calls the asynchronous showAsync function to make the dialog box pop up.
If you are using a third-party library or legacy JavaScript code that uses the alert function, you can set the window.alert function to your own function. The code then will work as expected.
window.alert = function (message) {
var messageDialog =
new Windows.UI.Popups.MessageDialog(message);
return messageDialog.showAsync();
};
Logging to the console window is better than bringing up the dialog box, but this is the closest behavior to what was originally coded to use the alert function. Windows Store apps do not use the alert function.
Understanding the Windows Library for JavaScript
Windows Library for JavaScript (WinJS) is added functionality that our apps can call that talks to the WinRT API. Our apps are not required to use WinJS, and there is nothing in WinJS that we can’t write ourselves. However, this functionality is provided so that we don’t have to write it! Without it, we would have more difficulty passing the user experience (UX) guidelines we talk about during Hour 5, “Understanding Microsoft Design Style Principles.” Figure 3.4 shows how the different pieces we have been discussing, such as WinRT, language projections, and now WinJS, fit together with our app and the operating system.

Figure 3.4. The layers of a JavaScript Windows Store app working with WinRT and WinJS.
The Windows Library for JavaScript consists of CSS and JavaScript files. It contains two CSS files: ui-light.css and ui-dark.css. We can use one of these base styles to give our app the “Microsoft design style UI look.” We discuss styling our apps with these style sheets during Hour 6, “Customizing the Style of Our Apps.” In addition to the CSS files, the library contains two JavaScript files: base.js and ui.js. The library is made up of these four files.
The JavaScript files are organized into namespaces, which are designed to make our job of creating Windows Store apps much easier. WinJS helps us handle our app’s activation. We talk about activating apps and the entire app life cycle during Hour 15, “Handling Our App Life Cycle Events.” We also can access storage where we can use session state that isn’t a part of WinRT itself. In addition, we now have a consistent way to define our own pages, classes, and namespaces. Hour 2, “Trying Out File | New | Project,” covered defining page controls. We discuss defining namespaces and classes during Hour 4, “Creating WinJS Namespaces, Classes, and Custom Controls.” Finally, WinJS includes a set of UI controls we can use in our Windows Store apps. Table 3.1 shows some of these controls. A full list of the controls we have access to is located at http://msdn.microsoft.com/en-us/library/windows/apps/hh465453.
Table 3.1. WinJS UI Controls Adapted from Microsoft’s Documentation

Some of the controls listed in Table 3.1 were created in the Hour03WinJSCommonControls project. The project was created using the Blank App project template. The style sheet was changed from ui-dark to ui-light. Listing 3.1 gives the entire file contents for default.html.
Listing 3.1. Entire Contents of default.html from the WinJSCommonControls Example
<!DOCTYPE html>
<html>
<head>
<meta charset="utf-8" />
<title>WinJSCommonControls</title>
<!-- WinJS references -->
<link href="//Microsoft.WinJS.1.0/css/ui-light.css" rel="stylesheet" />
<script src="//Microsoft.WinJS.1.0/js/base.js"></script>
<script src="//Microsoft.WinJS.1.0/js/ui.js"></script>
<!-- WinJSCommonControls references -->
<link href="/css/default.css" rel="stylesheet" />
<script src="/js/default.js"></script>
</head>
<body>
<div id="dates">
<div data-win-control="WinJS.UI.DatePicker"
data-win-options='{current: "November 5, 1955" }'></div>
</div>
<div id="purchaseItem">
<div id="purchaseItemMessage" class="message"></div>
<button id="btnBuyItem">Purchase great item for $5.95</button>
<div id="confirmPurchaseFlyout" data-win-control="WinJS.UI.Flyout">
<div>Purchase this item for $5.95</div>
<button id="btnConfirmPurchase">
Purchase Item</button>
</div>
</div>
<div id="htmlFragContent" data-win-control="WinJS.UI.HtmlControl"
data-win-options="{uri: '/htmlFrag.html'}"> </div>
<div id="menuDemo">
<div id="menuMessage" class="message"></div>
<button id="btnShowMenu">Display Menu</button>
<div id="contextMenu" data-win-control="WinJS.UI.Menu">
<button data-win-control="WinJS.UI.MenuCommand" data-option="One"
data-win-options="{id:'cmdOption1', label:'Option: 1'}"></button>
<button data-win-control="WinJS.UI.MenuCommand" data-option="Two"
data-win-options="{id:'cmdOption2', label:'Option: 2'}"></button>
<button data-win-control="WinJS.UI.MenuCommand" data-option="Three"
data-win-options="{id:'cmdOption3', label:'Option: 3'}"></button>
</div>
</div>
<div>
<div id="rating1" data-win-control="WinJS.UI.Rating"
data-win-options="{maxRating: 3, averageRating: 2.7, userRating: 3}">
</div>
</div>
<div>
<div id="rating2" data-win-control="WinJS.UI.Rating"
data-win-options="{maxRating: 3, averageRating: 2.7, userRating: 1}">
</div>
</div>
<div>
<div id="rating3" data-win-control="WinJS.UI.Rating"
data-win-options="{maxRating: 3, averageRating: 2.7, enableClear: false}">
</div>
</div>
<div id="toggleTooltip" data-win-control="WinJS.UI.Tooltip"
data-win-options="{innerHTML: 'Will be overwritten...', placement: 'right'}">
<div id="toggleSwitch" data-win-control="WinJS.UI.ToggleSwitch"
data-win-options="{labelOn: 'Yes', labelOff: 'No', title: 'Autosave'}">
</div>
</div>
</body>
</html>
We can see that the code in Listing 3.1 is a typical HTML5 document. It is referencing the Windows Library for JavaScript CSS and JavaScript files in the head section, along with the app’s own CSS and JavaScript files.
Inside the body element, we declare multiple WinJS UI controls. First up is the WinJS.UI.DatePicker control. We set the date to November 5, 1955. We will be creating another date picker control through JavaScript code when we discuss the JavaScript file.
WinJS controls all use HTML5 custom data attributes. It uses data-win-control and data-win-options. When we discuss the JavaScript portion of the app, we will see how WinJS actually uses those custom data attributes to create the controls and set the options on the controls. For now, it is important to understand that the data-win-control stores the namespace and class of the control. The data-win-options attribute enables us to set the different options available for that specific control. In the case of the DatePicker control, one option is the current value. More details on the WinJS.UI.DatePicker are at http://msdn.microsoft.com/en-us/library/windows/apps/br211681.
Next up is the WinJS.UI.Flyout control. This control enables the user to provide information to the app without navigating away from the current page. The Flyout typically confirms an action with the user. For example, if the user has tapped to purchase an item or to delete a file, a Flyout should display with a button telling the user what is about to happen. If the user wants to continue with the task, he or she clicks the button in the Flyout. Otherwise, the user clicks elsewhere and the Flyout closes without processing anything. In our HTML, we have created a Purchase Item button. When a user clicks that button, confirmPurchaseFlyout displays so the user can confirm the purchase. We will see the JavaScript that makes this work shortly. More details on WinJS.UI.Flyout can be found at http://msdn.microsoft.com/en-us/library/windows/apps/br211726.
The next WinJS UI control we see is WinJS.UI.HtmlControl. The option for this control is the URI of the HTML fragment we want to load. We are loading the htmlFrag.html fragment file. This provides a way for us to dynamically add HTML (perhaps from a database) to our app. We can even add WinJS UI controls within the page fragments. The entire file contents for htmlFrag.html follow:
<div>
This is content located inside of the htmlFrag.html file.
</div>
<div>
This is a WinJS time picker control within a HTML Fragment
<div data-win-control="WinJS.UI.TimePicker" ></div>
</div>
We can see in the page fragment that we are actually using a WinJS.UI.TimePicker with no options. More information on the TimePicker control can be found at http://msdn.microsoft.com/en-us/library/windows/apps/br229736.
After loading the HtmlControl, we create a WinJS.UI.Menu control. This control can be used in a variety of places where we need to give the user more options. In our example, we bring up the menu when the user clicks the btnShowMenu button. The menu itself consists of three buttons with the labels “Option: 1”, “Option: 2”, and “Option: 3”. We will see how to wire up those buttons when we dive into the JavaScript portion of the project. More information on the Menu control is located at http://msdn.microsoft.com/en-us/library/windows/apps/hh700921.
Next, we create three WinJS.UI.Rating controls. All three have an option set that sets the max number of stars at three. Each one also sets the average rating to 2.7. The first sets the user rating (as if the user has already rated it) to 3. The second rating control’s user rating value is set to 1. The last rating control’s user rating is not set, nor is the last control able to be cleared. If that option is not set, the user can clear a rating by sliding a finger to the left off the rating control. A great quickstart guide for this control is available in the Microsoft documentation, at http://msdn.microsoft.com/en-us/library/windows/apps/hh465489.
The last two WinJS UI controls we demo in this project are the toggle switch control and the ToolTip control. The WinJS.UI.ToggleSwitch control is a binary control much like the check box; it is either on or off. The options we set changed the default on and off labels and the title of the toggle switch. The title always displays when it is set. No default title exists, so nothing shows up if title isn’t set.
More information on the toggle switch control resides at http://msdn.microsoft.com/en-us/library/windows/apps/Hh701411.
The toggle switch control is embedded inside the WinJS.UI.Tooltip control. The WinJS ToolTip control actually wraps the controls for which it will be the ToolTip. The ToolTips can be as simple as text, as in the demo, or can be complete HTML content. If the ToolTip is to provide the user with a lot of info, then the option infotip should be set with a value of true. For our purposes, we wanted the ToolTip to display on the right side of the toggle switch control, so we set the placement option to right. We also set some dummy text to the innerHTML because we overwrite that value in JavaScript, as we discuss shortly. We could have omitted the option in this case, but we wanted to show how it would be set in most cases.
More information on the ToolTip control can be found at http://msdn.microsoft.com/en-us/library/windows/apps/br229763.
We didn’t spend much time styling this project. In fact, the entire file contents for default.css follow:
body {
margin-left: 120px;
}
.win-datepicker {
display: block;
margin-top: 60px;
}
.message {
color: blue;
font-size: large;
}
#toggleTooltip {
display: inline-block;
}
WinJS adds styles to the controls when it creates them in the rendered HTML. These styles, such as win-datepicker, can then be styled by our app’s CSS file to customize it as we would like. We come back to this during Hour 6. We added more CSS style rules to the date controls and also added some spacing. The message class displays text after we handle certain events in the JavaScript; this text is set to blue. Finally, the ToolTip control was assigned an id of toggleTooltip and styled as an inline-block. The reason for this is that the div element has the default style of block. If we didn’t override the style to inline-block, then if we hovered anywhere beside the toggle switch, we would have displayed the ToolTip. Instead, we want it to display only if we are hovering over the control itself.
Before we dig into the JavaScript portion of this project, let’s see what the project looks like when it is run (see Figure 3.5).
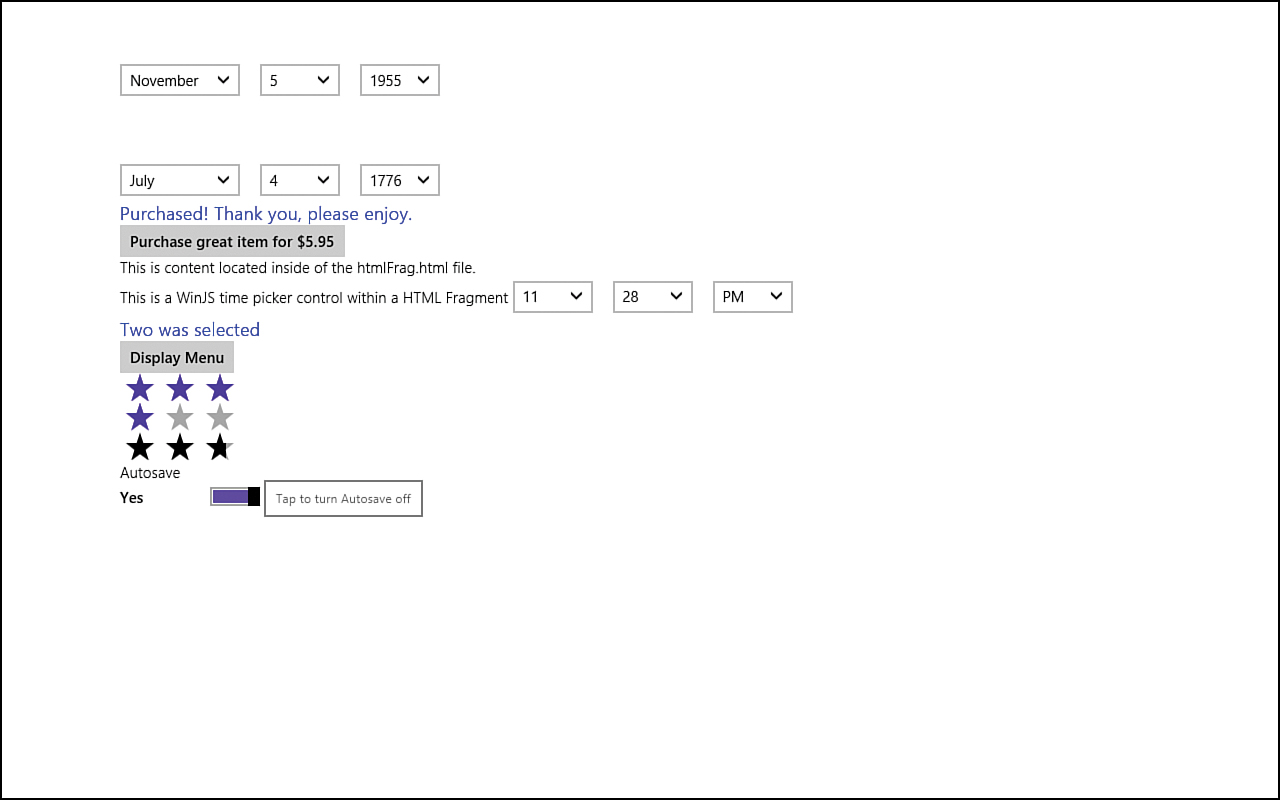
Figure 3.5. Some of the WinJS controls in action.
Listing 3.2 shows the entire file contents for default.js.
(function () {
"use strict";
var app = WinJS.Application;
var activation = Windows.ApplicationModel.Activation;
WinJS.strictProcessing();
app.onactivated = function (args) {
if (args.detail.kind === activation.ActivationKind.launch) {
args.setPromise(
WinJS.UI.processAll().done(function () {
addDateControls();
hookUpEventHandlers();
})
);
}
};
app.start();
var purchasedItem = false;
function addDateControls() {
//create div to hold our date control
var independenceDayDiv = document.createElement("div");
//store the date in a variable (not required, could use a string)
//Month is 0 based
var date = new Date(1776, 7-1, 4);
//since year is 1776, need to set min and max year as the defaults
//(1912-2111: 100 years past and 99 years in the future)
//doesn't include 1776
var independenceDay = new WinJS.UI.DatePicker(independenceDayDiv,
{ current: date, minYear: 1607, maxYear: 1807 });
//append this child to end of the body element
document.getElementById("dates").appendChild(independenceDayDiv);
}
function hookUpEventHandlers() {
//Hook up the main buy item button on the page
var btnBuyItem = document.getElementById("btnBuyItem");
btnBuyItem.addEventListener("click", showConfirmPurchaseFlyout, false);
//hook up the confirm purchase button in the flyout control
var btnConfirmPurchase = document.getElementById("btnConfirmPurchase");
btnConfirmPurchase.addEventListener("click", completeItemPurchase, false);
//hook up context menu
var btnShowMenu = document.getElementById("btnShowMenu");
btnShowMenu.addEventListener("click", showOptionsMenu, false);
//hook up menu options
document.getElementById("cmdOption1")
.addEventListener("click", handleSelectedOption, false);
document.getElementById("cmdOption2")
.addEventListener("click", handleSelectedOption, false);
document.getElementById("cmdOption3")
.addEventListener("click", handleSelectedOption, false);
//before the tooltip opens notify us so we can set the text
var toggleTooltip = document.getElementById("toggleTooltip");
toggleTooltip.addEventListener("beforeopen", setTooltip, false);
}
//called when the buy item button on the main page is clicked
function showConfirmPurchaseFlyout(event) {
var btnBuyItem = document.getElementById("btnBuyItem");
document.getElementById("confirmPurchaseFlyout")
.winControl.show(btnBuyItem);
}
//called when the purchase button in the flyout control is clicked
function completeItemPurchase() {
var purchaseItemMessage = document.getElementById("purchaseItemMessage");
if (!purchasedItem) {
purchasedItem = true;
purchaseItemMessage.innerText = "Purchased! Thank you, please enjoy.";
}
else
purchaseItemMessage.innerText = "Duplicate. Ignoring request.";
document.getElementById("confirmPurchaseFlyout").winControl.hide();
}
function showOptionsMenu(event) {
var btnShowMenu = document.getElementById("btnShowMenu");
document.getElementById("contextMenu").winControl.show(btnShowMenu);
}
function handleSelectedOption(evt) {
var data = evt.currentTarget.getAttribute("data-option");
var menuMessage = document.getElementById("menuMessage");
menuMessage.innerText = data + " was selected";
}
function setTooltip(event) {
var toggleSwitch = document.getElementById("toggleSwitch");
var toggleTooltip = document.getElementById("toggleTooltip");
toggleTooltip.winControl.innerHTML = "Tap to turn Autosave " +
(toggleSwitch.winControl.checked ? "off" : "on");
}
})();
The default.js file includes a little code, but it is not complex. Let’s start at the top and work our way down. The first line helps us ensure that we are using strict mode when writing code.
The next two lines of code simply create aliases for the WinJS.Application namespace and the Windows.ApplicationModel.Activation namespace. The app variable references the WinJS application namespace, and the activation variable references the Windows Runtime ApplicationModel.Activation namespace.
We briefly postpone talking about the call to the strictProcessing function inside WinJS. This is tied to the WinJS.UI.processAll function, which we discuss shortly.
Next is the onactivated event of the app. WinJS helps us handle our app’s activation. We talk about activating our apps and the entire app life cycle during Hour 15. For now, it is sufficient to know that after the DOM is fully loaded in our application, this onactivated event kicks off. Typically, we need to check several conditions when the app is activated, but for this demo, we have simplified these to just checking to see if the app was just launched. For our demos so far, this is the only way an app is activated. So within the condition, we see a call to setPromise. We discussed promises in Hour 1, “Getting a Refresher on JavaScript, HTML5, and CSS3”; we discuss this specific call in detail during Hour 15. For now, just know that it causes Windows to continue to display the splash screen while our app loads, until we are completely done with the code that args.setPromise wraps. The referenced code is listed again here, for clarity:
args.setPromise(
WinJS.UI.processAll().done(function () {
addDateControls();
hookUpEventHandlers();
})
);
Inside the setPromise call, we execute the WinJS.UI.processAll function. This function tells WinJS to convert all the custom data attribute values associated to the HTML elements into actual WinJS controls. The WinJS.strictProcessing function we glossed over earlier affects this call to processAll (and the similar function process, which just process a single element passed to it). The strictProcessing function activates processing rules that help us avoid script injection into our WinJS controls.
When we are done calling processAll, we want to actually create our controls and add our event handlers. We do this after the asynchronous processAll call completes by chaining the done function. Inside of using done, we call out to our app’s initialization functions.
The call to app.start() allows WinJS to make sure that all the different events that were queued during the startup process actually get called. We discuss these events more during Hour 15.
Now we can get to the actual logic of our app. The first method that gets called after the page is loaded is the addDateControls function. This function creates a new div element called independenceDayDiv. The United States Independence Day is July 4, 1776, or 7/4/1776. The JavaScript Date object takes a 0-based value for the months. So we want to pass in the seventh month (July), but because it is 0 based, we pass in 7-1. Then through code, we programmatically create a WinJS.UI.DatePicker control, passing in the date object we just set as the current date in the options. We also set the minYear and maxYear options. The control defaults to 100 years in the past and 99 years in the future, to populate the year drop-down list with 200 years. 1776 isn’t within the last 200 years, so we explicitly set the dates to 1607 and 1807. Finally, we append the div we created (and associated to the DatePicker control) to the document after the other date we set declaratively in the markup.
The next function to get called is hookUpEventHandlers. This function wires the different events to the controls we have on the page. The btnBuyItem button on the page has its click event hooked up to the showConfirmPurchaseFlyout function. That function actually shows the Flyout control and associates to the control that kicked it off so that it can be positioned correctly. The button in that flyout is actually the second item to have its click event hooked into a function in the hookUpEventHandlers function. The handler for the click event is found in the completeItemPurchase function.
So the process so far is that the user has clicked the button that reads “Purchase great item for $5.95,” causing the flyout to display. The user then clicked the “Purchase Item” confirmation button on the flyout. When that happens, the completeItemPurchase function is called, which checks to see if the user has already purchased the item. If so, a message is created stating that this is a duplicate; it then ignores the purchase request and exits. If the user hasn’t haven’t purchased the item, the flag is set so that we know the user just purchased the item; a message then goes to the user, thanking him or her for purchasing the item. Before exiting the function, the flyout control is hidden.
The next piece of code that gets wired up in the hookUpEventHandlers function is the menu control. We have a button that makes the menu display on the screen. The event handler for that button is showOptionsMenu, which simply finds the menu control and calls the show function, passing in the button on the page so that the menu is positioned correctly. The hookUpEventHandlers function then wires up each individual option inside the menu, as shown here:
//hook up menu options
document.getElementById("cmdOption1")
.addEventListener("click", handleSelectedOption, false);
document.getElementById("cmdOption2")
.addEventListener("click", handleSelectedOption, false);
document.getElementById("cmdOption3")
.addEventListener("click", handleSelectedOption, false);
Each of these calls the handleSelectedOption function, which simply sets the message on which button was clicked by looking at the data-option custom data attribute of the button that was clicked.
The last piece of code in this example project is the ToolTip code inside the hookUpEventHandlers. We attach the setTooltip function to the beforeopen event. This is called right before the ToolTip is rendered on the screen. The setTooltip function modifies the actual content of the ToolTip based on the current value of the toggle switch:
toggleTooltip.winControl.innerHTML = "Tap to turn Autosave " +
(toggleSwitch.winControl.checked ? "off" : "on");
When working with WinJS controls, we need to access the winControl object attached to the HTML element we created. In this case, we are assigning the innerHTML of the winControl object of the ToolTip div we declared in markup to different values, depending on whether the toggle button is currently switched on or off. If the switch is currently on, we let the user know that tapping the switch turns it off. Otherwise, we let the user know that tapping it turns it on.
That was a lot of code for a pretty simple project, but we covered a lot of new ground as we discussed the WinJS UI controls. Some great controls are provided for us out of the box.
Further Exploration
We covered a lot of ground in this hour. However, these pages can’t contain all the information out there. The Windows Runtime API is large—it involves how our apps can actually work with the operating system and it has a large footprint. We didn’t scratch the surface of the different APIs that WinRT offers—in fact, we didn’t even smudge the surface! This WinRT API reference link was provided earlier, but because it is so important, it is being listed again: http://msdn.microsoft.com/en-us/library/windows/apps/br211377.
The Windows SDK samples of interest for this hour are
• HTML DatePicker and TimePicker controls sample
• HTML FlipView control sample
• HTML Flyout control sample
• HTML Rating control sample
• HTML ToggleSwitch control sample
• HTML Tooltip control sample
Summary
The concepts discussed during this hour are important to understand because we use the Windows Runtime API and the Windows Library for JavaScript in almost every hour. Besides covering the Windows Runtime and how to work with other language components in our projects, we explored the language projections and the WinRT metadata provided. We also looked at the Windows Library for JavaScript and many of the UI controls it provides.
Q&A
Q. Can Windows 8 desktop applications call the WinRT API?
A. Yes, Windows 8 desktop apps can access some of the WinRT API calls. Desktop apps cannot call out to APIs that render to the screen, such as the Windows.UI.Popups.MessageDialog control we saw at the beginning of the hour. However, desktop applications can access the device hardware, such as the camera. This book focuses entirely on Windows Store apps and does not cover Windows desktop applications.
Q. Where are the Windows Runtime Metadata files stored?
A. They are stored in the System32WinMetadata folder. For example, if the Windows directory is on the C: drive, the path that stores the metadata files would be located at C:WindowsSystem32WinMetadata.
Q. Can I use XAML along with HTML?
A. No. XAML can be used only with languages such as C++, C#, and VB, just as HTML can be used only with the JavaScript apps and can’t be the view engine for the other languages. (There is a WebView control for the other languages, but it is not the view engine.)
Q. How do I add a progress bar to my app?
A. We don’t have time to discuss the progress bar control during this hour. However, we discuss the progress bar and how to style it during Hour 6.
Workshop
Quiz
1. The namespace for the Windows Runtime is found under Win32. True or false?
2. When writing Windows Store apps using JavaScript, we also have access to custom WinRT components written in languages such as C++, C#, and VB. True or false?
3. When using JavaScript to access WinRT, we must call WinJS, which then talks to WinRT. True or false?
4. What does "use strict" do when it is placed inside a JavaScript file?
Answers
1. False. The namespace for the Windows Runtime is found under Windows. Win32 is the API that was written for previous versions of Windows. The WinRT API still calls some of these Win32 calls, but the namespace we use for our Windows Store apps is Windows. This is also different than the DOM window that is also available to us but not part of Windows.
2. True. We can create hybrid apps that are written in JavaScript but utilize WinRT components written in languages such as C++, C#, and VB.
3. False. Our JavaScript code can talk directly to WinRT through language projections. Our apps can also communicate with WinJS. WinJS calls WinRT for some tasks and has its own code of other tasks.
4. "use strict" helps by keeping us from using some of the bad parts of the JavaScript language. It makes sure the code complies with the ECMAScript 5.1 standard.
Activities
1. Create a new Blank App project and a Flyout control when a button is pressed.
2. Add a rating control to the project with 10 stars. Make the default rating 7.5.