Hour 24. Making Money with Windows Store Apps
What You’ll Learn This Hour:
• Exploring options for making money with Windows Store apps
• Investigating the trends of all apps in the Windows Store
• Marketing apps
• Seeing how an app is working in the wild
• Determining how many times a download page is being viewed
• Determining how many times an app is being downloaded and/or purchased
• Making money with ads
We have gone on a fantastic journey learning about the new operating system, Windows 8, and how it changes how software will be utilized in the future. We have seen how to get apps ready to be put into the marketplace. We have seen what it takes to actually submit the apps and pass certification. During this hour, we look at how that hard work can pay off by exploring ways to make money after submitting an app to the Windows Store.
We look at how to use the Windows Store dashboard effectively to see how many views our app is receiving and how many times it is being downloaded. We can see how many times our app is being purchased, as well as determine how well it is performing. We can see whether it is crashing or throwing exceptions, and we can find customer reviews and ratings. Using this information, we can make modifications to the app, to please more users and result in more sales.
Understanding Monetization Options
Microsoft provides many choices for developers when it comes to the languages for developing apps for Windows 8. Throughout this book, we have seen that JavaScript is a first-class citizen for building native Windows Store apps. Microsoft also provides many options when it comes to monetizing Windows 8 apps. As we saw during Hour 18, “Creating a Trial and Handling In-App Purchases,” we can create free apps, apps with a time trial, apps with feature limited trials, apps with no trials (not recommended), apps with a subscription payment model, and in-app purchases. We can use the Windows Store to collect payment, as we saw during Hour 18 when we called the CurrentApp (and CurrentAppSimulator) API calls. But we can also use our own payment gateway code if we already have the infrastructure in place.
Realistically, we can use our own payment gateway even if our own payment gateway isn’t in place, but doing so might not make sense when we have another option. This depends on the volume of sales for our app. For apps that aren’t blockbusters, putting in the investment required to make a Payment Card Industry (PCI) security standards–compliant payment gateway doesn’t make sense. But this is a great option for businesses that already have that investment from online orders.
Of course, using a service such as PayPal for in-app purchases and subscriptions is also possible. If a user buys the app in the Windows Store, the 70/30 (favoring the developer) split is in effect (80/20 when app tops $25,000 in sales). If we want to avoid that, we can make the download free with only in-app purchases and then direct users to a payment gateway to complete the in-app purchases. Depending on how this is implemented, it might cause friction and prompt folks to not purchase anything. On the other hand, if the payment process is smooth, there could be quite a bit of savings in processing fees. Time will tell how willing or reluctant users will be to pay for apps outside the Windows Store. The same rules apply for in-app purchases using a third-party commerce system, as they do for using the Windows Store for the payment gateway. This means that the app must explain what features are free and what functionality requires the user to make a purchase. Finally, the app must make it clear to the user who the billing operator is and who is processing the payments. If a third-party transaction provider is used, the transactions must comply with the App Developer Agreement, at http://msdn.microsoft.com/en-us/library/windows/apps/hh694058.aspx.
Some markets accept only free apps. If we want to offer apps to these markets, we need to be aware that no paid apps are allowed. The following markets allow only free apps:
Getting Paid
We saw during Hour 22, “Understanding the Windows Store,” that we need to set up a Developer Account. To get paid, we also need to configure a payout account where Microsoft will send the payments. Through the Windows Store dashboard, we can configure the account by populating all of the appropriate information. We can change this information at any point, but it could delay the processing of our funds for one payment cycle. This is because the account information needs to be verified (just as it does the first time around).
After an account has been confirmed, we need to fill out our tax profile (tax info), also on the Windows Store dashboard. For some countries and regions where we sell our apps, Microsoft remits sales and use tax on our behalf. In other countries, depending on our location, we might need to remit sales and use tax to the appropriate taxing authority. The App Developer Agreement, located at http://msdn.microsoft.com/en-us/library/windows/apps/hh694058, helps determine in which countries Microsoft remits tax on our behalf. The tax forms we file can be submitted to the tax authority electronically. Even non-American developers must fill out U.S. tax forms to sell apps through the Windows Store. The appropriate forms are part of the tax profile we need to populate.
Based on the information in the tax profile, different tax withholding rates might apply. This withholding rate applies only to sales made to the United States. For developers registering outside the United States, the default withholding rate is 30 percent, but this number can be reduced if the country has agreed to an income tax treaty with the United States.
After setting up a tax profile, we can start receiving money for our apps. A payment threshold in place requires developers to have at least $200 in app sales pending payment. This is app sales, not app proceeds. App sales are the entire amount; app proceeds are the amount sold minus the Store fee. The $200 is across all apps being sold. So if we have an app that has $175 in sales and another that has $25 in sales, we qualify to get paid the proceeds from both apps.
It is important to note that the Windows Store fee of 30 percent goes down to 20 percent once an app has sales of $25,000 or more. This is per app, so if app A is at $40,000 in sales and app B is at $10,000 in sales, the app A fees are 20 percent and app B fees are 30 percent.
The money earned is divided into three categories: Reserved, Pending, and Available. The Reserved category contains the money that is being held and is not yet available for payment. This is typically the most recent sales. Funds stay in the Reserved category for approximately 30 days. The Pending category shows the money that is not in Reserve, but is scheduled for payment. Finally, the Available category shows the money that will be sent to our account when the next billing cycle occurs.
App sales and app proceeds are not the same. App sales is the total amount sold through the store (not including tax paid by the buyer). App proceeds is the amount we will be paid. The difference between the two is the Windows Store fee, which goes to Microsoft.
Using the Windows Store Dashboard Effectively
We can use the Windows Store dashboard to keep an eye on our app sales. We need to click on the financial summary page to reach the financial summary overview. This page shows the total amount we have been paid to date (Total Paid to Date), app proceeds since the last payment, financials by app, and payment history.
When looking at the Financials by App table, we can see how much each app has earned since it was first listed in the Windows Store. The table also shows how much the app earned since the last time we got paid. We can drill down into the individual transactions as well by clicking the specific app name we want to look at.
Similarly, the Payment History table lists all the payments that have been made to our payout account. Earnings and payments are estimated over dozens of different currencies. However, each transaction is available to us at any time. We can look at the data to analyze it. We can also run detailed transaction reports. Microsoft even enables us to download the transactions as a CSV (comma-delimited file) that contains the exact details for each of the app’s transactions in the previous two years.
We can track our sales from the Windows Store dashboard with the analytical data Microsoft provides. This is available even if we have turned off telemetry data. Hour 22, “Understanding the Windows Store,” discussed telemetry. The dashboard provides a link to a financial summary page that shows a high-level overview of the sales of our apps. It gives the total amount Microsoft has paid into our accounts in the Total Paid to Date data. It doesn’t account for any taxes that have been withheld. The page also shows the app proceeds since the last payment. This shows the estimated amount that our apps have earned since the last time we were paid. As mentioned earlier, this money is divided into three categories: Reserved, Pending, and Available.
Exploring Windows Store Trends
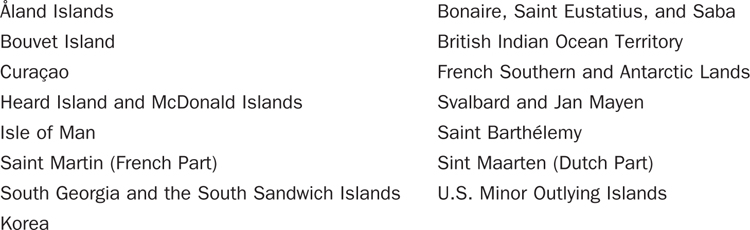
The Windows Store dashboard also provides a tool where we can explore Store trends. This page shows how many apps customers have downloaded. We have visibility into their different geographic and demographic information. We can analyze the apps that are being downloaded by category, subcategory, and user demographic information. Figure 24.1 shows the download information.

Figure 24.1. The Explore Store Trends page in the Windows Store dashboard provides visibility into the most active markets and applies filters to the data.
The data is displayed for all market segments by time frames we can choose. It defaults to showing the data from the last month. We can filter the results by certain market segments. We see the most active market segments, which can help us narrow the results to just the segments we are focusing on. For example, after seeing that the most active market segments are males aged 22–40, we could create a filter to narrow that or perhaps take a look at other segments to determine whether it is trending up or down. For example, in Figure 24.2, we can see that females aged 41–55 in Australia are tracking at a similar download curve as the overall market shown in Figure 24.1. This can be extremely valuable when trying to determine what app we should develop or which market segment we should focus on.
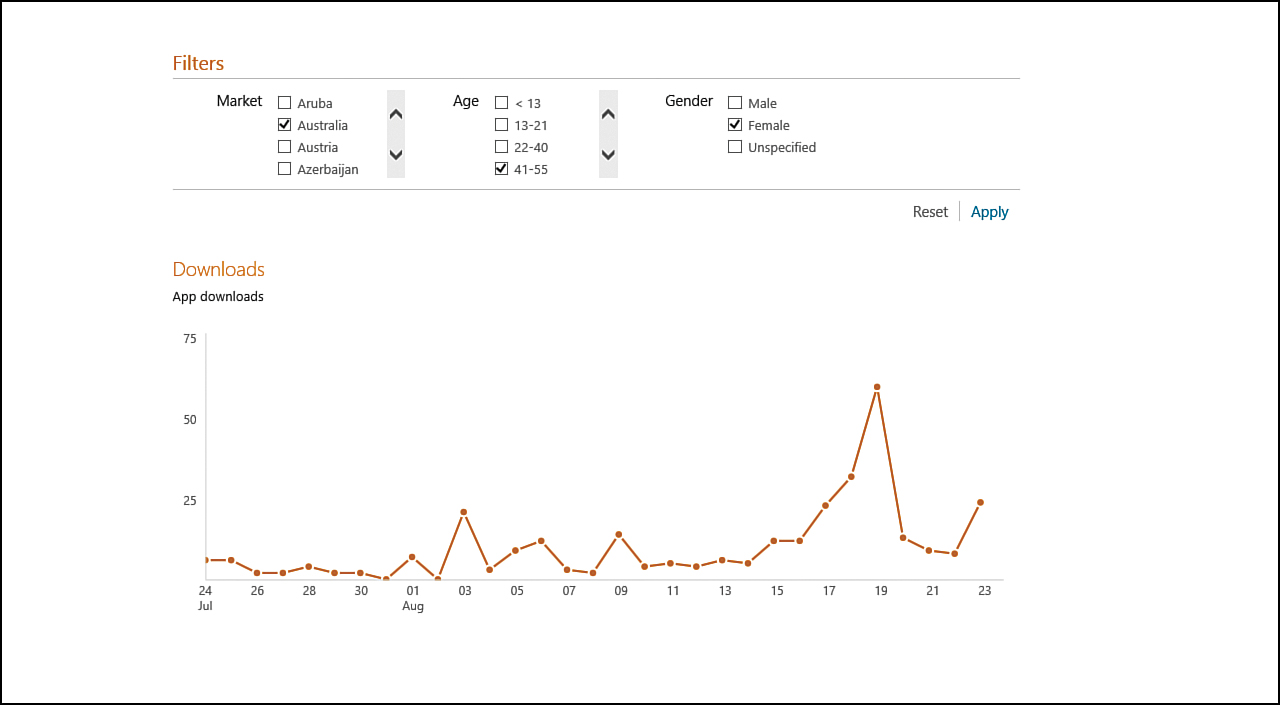
Figure 24.2. The app downloads data that can be filtered to include only the market segments we are interested in.
Examining Our Apps in the Windows Store
Besides seeing trends of apps being downloaded, we can see information about our apps as well. The Adoption page enables us to view how many times our app has been viewed in the Windows Store and how often it has been downloaded. The page displays the different ways folks were referred to our listing view, which can help us understand how our marketing efforts are working. We can see how often our app was purchased over time. We also have access to view our in-app purchases. The chart shows all the purchases made from within our app over time. For apps that offer more than five in-app offers, the remaining offers after the fifth are combined in a line labeled Others. The other interesting bit of information on the Adoption page is the average usage of our app per day. This shows how often users launch our app each day. Push notifications, discussed during Hour 17, “Using Live Tiles, Secondary Tiles, Notifications, and Toasts,” can be used to try to entice users to use our app again. We should always be finding ways to improve our app and provide additional content to keep it fresh; that will keep users wanting to come back to use it again and again.
The Downloads page lets us see the number of downloads our app has had over time. As with the market and demographic data we saw for all apps, we have the same visibility with our apps. For each app we create, we can view the number of downloads by age group and by market. We can see which market segments produced the most activity for our app, a beneficial piece of information for our marketing efforts.
The same info available on the Downloads page is available in the In-app purchases pages. As expected, however, this data is all about the in-app offers our app has. It, too, shows the purchases made, by age group and by market segments.
We can also view the Ratings page, which shows any feedback we have received for our app. To have a successful app, we need to pay attention to the feedback and make adjustments accordingly.
It is key to remember that complaints are simply unmet expectations. It could be that the expectation should have been met, or it could mean that the expectation is unreasonable.
Regardless, we need to be aware of how our app is being perceived and make adjustments accordingly. The Ratings page shows the ratings that the users gave our app in the past 30 days. (There can be up to a 24-hour delay for a user rating to be reflected in the chart.) Not only do we see the ratings, but we can also see the reviews, which can be even more valuable if they provide items that we can take action on to affect the review scores.
Marketing Our Apps Effectively
The app name is usually the very first thing potential users see when they find the app in the Windows Store. We avoid longer names when possible. Because Windows uses the Segoe UI font, different characters take up different amounts of space horizontally on the screen. For example, a W takes up more pixels than an I. Microsoft specifies how many W characters can be displayed in different places our app name shows up. In the Windows Store catalog search listing or category listing, 15 W characters are displayed. In the Windows Store catalog app listing, 23 W characters are displayed. Only 17 W characters are displayed if the app is in snapped view state. The Windows Search listings display 20 W characters (in 2 rows of 10). The Windows Small (Square) tile displays 20 W characters (in 2 rows of 10). If a short name is provided in our manifest, that is used instead. ToolTips show the full name. The Windows Wide tile shows 22 W characters, again showing the short name, if it is available. ToolTips for the tiles show 256 W characters. So depending on what letters make up the name of our app, we might want to stick with an app name that is around 20 characters wide.
East-Asian characters are typically wider than Latin characters, so this results in even fewer characters being displayed.
The last note about names is that it is best to not use names trademarked by others. The trademark owner could have the app removed from the store, and you wouldn’t be able to resubmit until the name of the app and all instances of it were changed.
The description of an app is almost as important as the name. The first three lines of the description are especially important because this is what potential users will see. They might not even bother scrolling down or choosing the View More option to see the rest of the description if the first three lines don’t interest them. Creating a good description can be challenging, but focusing on the first three lines is a little less overwhelming. A description should be between 200 and 3,000 characters, depending on the complexity of the app. It is important to include enough information to keep the potential user interested, but it also needs to read quickly. The balance can be hard to achieve, but it is extremely important. A short list should detail the app’s best features or characteristics used. If the app offers a free trial, the description should tell how it works. The description also needs to be grammatically correct, with correct spelling. Otherwise, even the perfect app will appear less than perfect
The third piece of data that is extremely important—arguably, more important—is images. The Windows Store enables us to enter many images, as we saw during Hour 22 as we went through the app submission process. We can load up to eight screenshots, and each one can have a description of 200 characters or less. The minimum image size must by 1,366×766. We can also set up to four promotional images that can be one of the following sizes:
• 414×180
• 414×468
• 558×756
• 846×468
Our app needs as many screenshot images as possible to show off functionality. Keep in mind that showing title screens or menus might not be the best use of the screenshot slot. Leaderboards, which set the game apart, might be shown, but otherwise, this might not be an image that invokes emotion from the potential user.
The promotional images should all be utilized. We need to have compelling artwork that would look great as a predominant tile on the Windows Store hub page. That is prime real estate, and if we don’t provide great-looking promotional images, the chances of being listed in the hub are small.
The app name, description, and images are all important. Those items can be thought of as a resume and cover letter sent to a potential employer. The employer is presumably getting many resumes every day and will spend only a few seconds glancing at both the resume and cover letter. If it is too crowded or doesn’t stand out, the employer will likely ignore it. Our desire, however, is to get an interview in which we can showcase our skill set.
We want our app name, description, and images to show potential users that they should call our app for an interview—in other words, that they should download the app and give it try. The trial mode of our app is like our interview in this analogy. Whether we get the job or the user buys the app depends on how well we interview or how well the user enjoys using the app. And if we do a good enough job creating, promoting, and selling our apps, we may not need to go for an interview in a long, long while.
Besides the apps being listed in the store, they are also accessible as web pages. This is beneficial for search engines to be able to find our apps so that if folks are searching online, they can find them.
In addition, Microsoft has created the Windows Store protocol so that we can create a link directing the user directly to our app within the Windows Store. Our web site could check the web browser user string agent for “Windows NT 6.2.” Of course, we could cross-sell our apps and provide links to the specific app page from within our about settings flyout. For example, let’s say we have app A and the user is using app A. They go to the settings flyout and select our “about” page. On this flyout, we could list other apps we sell, like app B and app C. These could be links using the Windows Store protocol to link the user directly to the app detail page in the Windows Store. The Windows Store protocol follows:
ms-windows-store:PDP?PFN=
We just need to append the app’s Package Friendly Name to the end of the URL. We can obtain this value from within Visual Studio by looking at our app package manifest under the Packaging tab.
In addition to linking to the store from our site, we can have Internet Explorer (IE) 10 display an app switch button. If we link our site to an app (through our web site code), the user who is browsing our site can click the App Switch button and either be taken to the Windows Store to view and hopefully download our app or, if the app is already installed, the app will be launched. To enable this all we need to do is add the following meta tags to the head element of our HTML markup on our website:
<meta name="msApplication-ID" content="STWin.FingerPainting"/>
<meta name="msApplication-PackageFamilyName"
content="STWin.FingerPainting_345ab7xf4vk56"/>
We need to take advantage of all these ways to drive folks to our apps. Having a link directly to the store is critical and allows for great promotion opportunities through social media and other advertising techniques.
Making Money by Selling Advertising
If we are offering free apps, we can also provide advertising space in our apps. Users are typically harsh on apps that charge and have advertising. Nothing keeps an app from charging and having advertising, but depending on the circumstance, it may cause poor app reviews. Additionally, even if we have a free app, some users would rather pay something for the app than see advertisements. So a good balance is to have advertisements, and if the users want to remove them, they can buy the full version of the app, which simply removes the ads. This is a model many users are comfortable with.
Microsoft has their own ad service, Microsoft Advertising, but that ad service isn’t the only one available. Microsoft allows any ad service to be used as long as the content adheres to the policies in the App Developer Agreement and will pass certification requirements.
Further Exploration
More information on connecting a web site to an app can be found at http://blogs.msdn.com/b/ie/archive/2011/10/20/connect-your-web-site-to-your-windows-8-app.aspx.
To getting started with Microsoft Advertising, we can go to the following link to get the SDK and documentation around adding ads to our apps: http://advertising.microsoft.com/windowsadvertising/developer.
Summary
Getting to this point has been a delightful journey. We have gone from brushing up on HTML5 technologies and learning about JavaScript promises to understanding how the Windows Runtime works and what the Windows Library for JavaScript (WinJS) is. We examined all the different WinJS controls. We learned about design principals and how to make apps that perform well and are secure. We looked at how to utilize the different hardware sensors, along with multitouch and other input, to make our apps work well. We looked at how to work with data both locally and remotely and how to bind data to the UI.
We spent time during the course of the book at looking at what it means to be a Windows Store app and how we can effectively display our content in fullscreen, filled, snapped, and portrait view states. We looked at how to effectively use the app bar and file pickers, and we spent time looking at contracts and extensions, such as sharing. We learned how we need to handle our app’s life cycle, and we worked with Live tiles, notifications, and toasts. We also looked at ways we could implement trial modes in our apps along with in-app purchases.
We created two apps and a game that follow the best practices we learned through the course of the book. We finished this part of the book by looking at the Windows Store—what it takes to submit an app and how we can pass certification. During this hour, we looked at ways to monetize our app using either the Windows Store to or a third-party transaction provider. We talked about how the money is split and how we get paid. We explored ways to look at the data the Windows Store dashboard provides and how we can make informed decisions about the market segment we might want to target. We also saw how we have access to excellent information about our app and how we can act on that information to make our app better and increase sales.
Congratulations on finishing the book!
Q&A
Q. What is the Windows Store fee?
A. The Windows Store fee is the amount of money kept by Microsoft when we sell apps through the Windows Store. This is 30 percent of the app sales. The fee is reduced to 20 percent after the app reaches $25,000 in sales.
Q. What is the minimum payment threshold in place that must be met before payment is made?
A. There is a payment threshold in place that requires developers to have at least $200 in app sales pending payment before funds are released.
Q. Where can I find how many copies of my app have sold?
A. App downloads and app purchases can be viewed from the Windows Store dashboard at http://dev.windows.com.
Q. Where else can I go for help and support as I create my Windows Store apps?
A. When signing up for the Windows Store, developers are given support incidents to use. Microsoft employees and the community-at-large answer questions developers may have when creating Windows Store apps. The forums are located at http://social.msdn.microsoft.com/Forums/en-US/winappswithhtml5/threads.
Workshop
Quiz
1. Do all countries allow paid apps in their marketplace?
2. What is the difference between app sales and app proceeds?
3. How many screenshots should be created and uploaded when we submit our app?
4. What is the Windows Store protocol?
Answers
1. No. Several countries and regions allow only free apps to be distributed.
2. App sales is the total amount sold through the store (not including tax paid by the buyer). App proceeds is the amount we will be paid.
3. The Windows Store enables us to upload eight images; all eight should be utilized.
4. Microsoft created the Windows Store protocol so that we can create a link that directs the user directly to our app within the Windows Store. The Windows Store protocol is as follows:
ms-windows-store:PDP?PFN=
Activities
1. Write an app and submit it to the Windows Store!
2. Write a game and submit it to the Windows Store!
3. Make money with Windows Store apps!