
Hour 20. Making the FingerPainting App
What You’ll Learn This Hour:
• Incorporating many of the pieces covered so far into a single app
• Organizing an app with a lot of moving parts
• Seeing how the remaining contracts and extensions work
We started the FingerPainting App during Hour 15, “Handling Our App Life Cycle Events.” We created the shell of the app by adding in an app bar and a navigation bar. We started the project from the Split App project because we want a beginning page that shows previous works of art. Up to this point, we have been launching straight into the artboard page, where the actual painting happens. We add the start page during this hour. In Hour 15, we also handled the draw loop and took advantage of the requestAnimationFrame function for performance reasons. We handled the actual input, accepting mouse, stylus, and, of course, fingers. We then added functionality for the brush size and stored the brush size in session state. During this hour, we store more items in session state and also make sure appropriate items roam with the user.
We modified FingerPainting during Hour 16, “Using Contracts and Extensions.” We added the capability for a user to select an image from any source, and we displayed on the canvas so that it scaled correctly. We then added the capability for users to print the drawing through the Print extension. We also used the Settings extension and created a stub of an About page and the beginnings of the General settings page where the user can currently set the default brush size.
During Hour 18, “Creating a Trial and Handling In-App Purchases,” we added feature-limited capabilities around loading content to display on the canvas. We also added the capability to talk to the web cam, but we also restricted that to paid functionality. In addition, we added the capability to use more colors than just black. However, some colors can be used only after they have been purchased as an in-app purchase.
This hour covers creating more settings and storing more items in session state and local storage. We hook up the File Save command on the app bar and the capability to clear the artboard. We spend time setting up the artboard so that it can share its contents and receive content from other apps. We also set up the home page to display the user’s previous works of art. A lot has been done on this project already, but there’s still a lot to do!
Getting Started
To avoid any frustration of not having the app work because the WindowsStoreProxy.xml is not set up from when we used it during Hour 18, the code has been modified in trialsmanager.js to use the loadPurchaseProxyFile function to load the local proxy file for the licensing data instead. We also commented out the call to loadListingInformationAsync. The proxy file was also modified to simulate a purchased app and the in-app purchase of the additional colors.
The starting point for this hour is located under the Hour20/FingerPainting-Start folder. Again, this simply copied the project from Hour 18 and uncommented the code so that it reads the custom store proxy XML file instead of needing the WindowsStoreProxy.xml file modified. The XML file itself has been modified to simulate that the user has purchased the app and the in-app feature so every color is available.
Saving the Artwork
To save artwork, we borrow from the filesaver.js file we created during Hour 14, “Using the AppBar and Pickers,” in the InkExample project. The slightly modified version is in Listing 20.1.
"use strict";
(function () {
function canShowPicker() {
var retVal = true;
var viewManagement = Windows.UI.ViewManagement;
var currentState = viewManagement.ApplicationView.value;
if (currentState === viewManagement.ApplicationViewState.snapped &&
!viewManagement.ApplicationView.tryUnsnap()) {
// Fail silently if we can't unsnap
retVal = false;
}
return retVal;
}
function saveImage() {
if (!canShowPicker())
return;
try {
var pickers = Windows.Storage.Pickers;
var picker = new pickers.FileSavePicker();
picker.suggestedStartLocation =
pickers.PickerLocationId.picturesLibrary;
picker.viewMode = pickers.PickerViewMode.thumbnail;
picker.fileTypeChoices.insert("GIF file", [".gif"]);
picker.fileTypeChoices.insert("PNG file", [".png"]);
picker.fileTypeChoices.insert("BMP file", [".bmp"]);
picker.fileTypeChoices.insert("JPG file", [".jpg"]);
picker.defaultFileExtension = ".png";
picker.pickSaveFileAsync()
.done(writeOutImage, STYWin.Utilities.asyncError);
}
catch (e) {
STYWin.Messages.displayError("save" + e.toString());
}
}
function writeOutImage(storageFile) {
var canvas = document.getElementById("artboard");
var blob = canvas.msToBlob();
var saveStream = null;
var sto = Windows.Storage;
storageFile.openAsync(sto.FileAccessMode.readWrite)
.then(function (stream) {
saveStream = stream;
return sto.Streams.RandomAccessStream.copyAsync(
blob.msDetachStream(), saveStream);
}).then(function () {
// since we return the promise, it will be executed
//before the following .done
return saveStream.flushAsync();
},
function (e) {
// errors occurred during saveAsync are reported as catastrophic.
// for us it just means we could not save the file,
//so we throw a different error.
throw new Error("saveAsync");
}).done(function (result) {
// print the size of the stream on the screen
STYWin.Messages.displayStatus("File saved!", "Success");
var appbar = document.getElementById("appbar").winControl;
appbar.hide();
// output stream is IClosable interface
//and requires explicit close
saveStream.close();
},
function (e) {
STYWin.Messages.displayStatus("save " + e.toString(),"Error");
// if the error occurred after the stream was opened,
//close the stream
if (saveStream) {
saveStream.close();
}
});
}
WinJS.Namespace.define("STYWin.FileSaver", {
saveImage: saveImage,
writeOutImage: writeOutImage
});
})();
There isn’t any new code here—we have simply added the appropriate namespaces and changed the id of the canvas to the one we are using, artboard. We decoupled the saveImage and writeOutImage functions. (We actually renamed createFile to saveImage.) The core logic did not change, so if any of this seems unfamiliar, refer back to Hour 14.
After adding the filesaver.js file to our js folder, we need to reference it in default.html. We can add the reference directly above the reference to appbar.js:
<script src="/js/filesaver.js"></script>
Finally, we can hook up the saveImage function to our app bar command. Inside jsappbar.js, we can the following code in the init function:
document.getElementById("cmdSave")
.addEventListener("click", STYWin.FileSaver.saveImage, false);
Now when we run the app, we can invoke the File Save command in the app bar and cause the File Save Picker to open so we can pick a location to save our artwork. Nice.
Creating the Home Page
Next, we hook up the first page shown in the Split App template to list all previously saved images. If there are no images, the user is sent directly to the artboard as it functions currently.
To start, let’s change the data-win-options of the contenthost div in default.html to this:
data-win-options="{home: '/pages/items/items.html'}"
If we try to run the app, we get an error because items.js is trying to reference the Data object from the nonexistant data.js file we removed when we first created the project. We don’t need sample data. Instead we want to display thumbnails of all the files that the user recently used. To get rid of the bugs, we need to implement the feature we want.
Let’s start by replacing the ready function of the items.js file with the code in Listing 20.2.
Listing 20.2. ready Function Located in item.js
ready: function (element, options) {
var listView = element.querySelector(".itemslist").winControl;
var sto = Windows.Storage;
var appPerms = sto.AccessCache.StorageApplicationPermissions;
var appView = Windows.UI.ViewManagement.ApplicationView;
var data = appPerms.mostRecentlyUsedList.entries;
if (data.length === 0) {
WinJS.Navigation.navigate("/pages/artboard/artboard.html", null);
return;
}
var promiseArray = [];
fileData = [];
fileData.push({
displayName: "Start a New Painting",
dateCreated: "",
displayType: "",
thumbnail: "ms-appx:///images/transparent.png",
token: "",
backgroundcolor: "white" //TODO: Pull from Settings
});
var self = this;
data.forEach(function (d) {
promiseArray.push(appPerms.mostRecentlyUsedList.getFileAsync(d.token)
.then(function (retrievedFile) {
// Process retrieved file
fileData.push({
displayName: retrievedFile.displayName,
dateCreated: retrievedFile.dateCreated,
displayType: retrievedFile.displayType,
thumbnail: URL.createObjectURL(retrievedFile),
token: d.token,
backgroundcolor: ""
});
URL.revokeObjectURL(retrievedFile);
},
function (error) {
// Handle errors
}));
})
WinJS.Promise.join(promiseArray)
.then(function () {
var list = new WinJS.Binding.List(fileData);
listView.itemDataSource = list.dataSource;
listView.itemTemplate = element.querySelector(".itemtemplate");
listView.oniteminvoked = self.itemInvoked.bind(self);
self.initializeLayout(listView, appView.value);
listView.element.focus();
});
},
After grabbing a handle to the itemslist ListView control and creating some aliases for long namespaces, we declare and initialize the data variable. We are setting it to the mostRecentlyUsedList of files the user has saved. We modify our FileSaver code to add a file to this list when the user saves the artwork. The very next condition checks to see if that list is empty. If so, we just navigate directly to the artboard page. Next, we create an array to hold the promises of us retrieving each file from the mostRecentlyUsedList. We create another array to hold the actual file data we will be retrieving and, ultimately, displaying in the ListView on the items page. We push the very first “file” into fileData. It isn’t really a file; it is a way for the user to start a new painting instead of opening an existing file.
Next, after storing a reference to this, we loop through each entry in the mostRecentlyUsedList and call the getFileAsync method on the file by passing in the file’s token.
mostRecentlyUsedList does not provide any file information. Instead, it provides a token. With this token, we can have the file system retrieve the actual file. The getFileAsync function returns a promise, so we are adding that promise to the promiseArray. When we bind all the images to the list view, we want to do the binding only after we have retrieved all the files. Thus, we add each getFileAsync promise to the promiseArray. After getFileAsync actually retrieves the file, we call getThumbnailAsync to get the thumbnail information. After we obtain the thumbnail information, we add all the data for the file into the fileData array. Besides obtaining the display name, date created, displayType, and thumbnail, we also set the background color to nothing. When we created the fake image at the top so we could use it as a Start a New Painting button, we set the background color to white. Ultimately, we set it to the background color in the app settings, but we currently have only brushSize in the settings. (We will change that in an upcoming section of this hour.) transparent.png is a 1×1 transparent image that we load. The file needs to be created (or copied) and placed in the images folder. It is transparent, so the background color is displayed.
After all the files in the mostRecentlyUsedList are loaded in the fileData array, we start the data binding process. WinJS.Promise.join waits for every promise to finish (each file to load) before it calls the binding data. The binding data didn’t change much from what was already there in the template. We are declaring the list variable, setting it as a new WinJS.Binding.List of the fileData, and then using that as the dataSource. Because this is in a promise, we are using the self variable we declared earlier instead of this so that we are working with the right data.
Still inside the items.js file, we need to add the fileData variable we initialized to the top of the module right before the call to ui.Pages.define:
var fileData;
We can replace the itemInvoked function with the following code:
itemInvoked: function (args) {
var sto = Windows.Storage;
var appPerms = sto.AccessCache.StorageApplicationPermissions;
var token;
if (args.detail.itemIndex > 0) {
token = fileData[args.detail.itemIndex].token;
}
WinJS.Navigation.navigate("/pages/artboard/artboard.html",
token ? { token: token } : null);
},
The itemInvoked function is called when an image is tapped. When this happens, we want to launch the artboard page. If the Start a New Painting tile was tapped, we just want to navigate to the artboard page with no options. But if any other tile was tapped, we want to grab the token for the associated tile and pass that into the artboard page.
If we run the app at this point, we are just sent to the artboard page because we don’t have anything in the mostRecentlyUsedList. It is up to our app to populate that array. This list can contain 25 entries. As we add more, the older entries are removed to keep the list at 25 entries. We also have access to the futureAccessList, which enables us to store 1,000 entries. It does not handle removing them automatically because it doesn’t know which ones we want to remove. In this app, we are working only with the mostRecentlyUsedList. Let’s add values to that array by adding the following code back in the filesaver.js file at the top of the writeOutImage function:
if (!storageFile)
return;
Windows.Storage.AccessCache.StorageApplicationPermissions
.mostRecentlyUsedList.add(storageFile, storageFile.name);
When we go to write out the file, we add it to the mostRecentlyUsedList. This enables us to access the files the user saved through the app without requiring permission for the pictures or documents folder.
One small bit of styling we need to do is to add the following CSS rule to the top of items.css:
body .itemspage {
background-color: #FFF;
}
When we styled the artboard, we set the background color to a dark gray to show where the canvas is and where the background is. We need to override that on the items page; otherwise, if we navigate back to it after going to the artboard page, we will see the dark gray.
Let’s modify the item template in the items.html file to use the data we are binding to the ListView control. In the itemtemplate, we can replace the value of the data-win-bind attribute of the img element with the following:
"src: thumbnail; alt: displayName; style.backgroundColor: backgroundcolor"
We can also change h4 element to be bound to displayName instead of title. We can change the h6 element to be bound to dateCreated instead of subtitle.
In addition, we can remove the following reference to the nonexistent data.js in items.html:
<script src="/js/data.js"></script>
Now we can run the app and save a painting. Then we can save another painting. Then we can leave the app and come back. This time, because we have files in the recent list, we are greeted by the items page showing a list of all images, as in Figure 20.1.
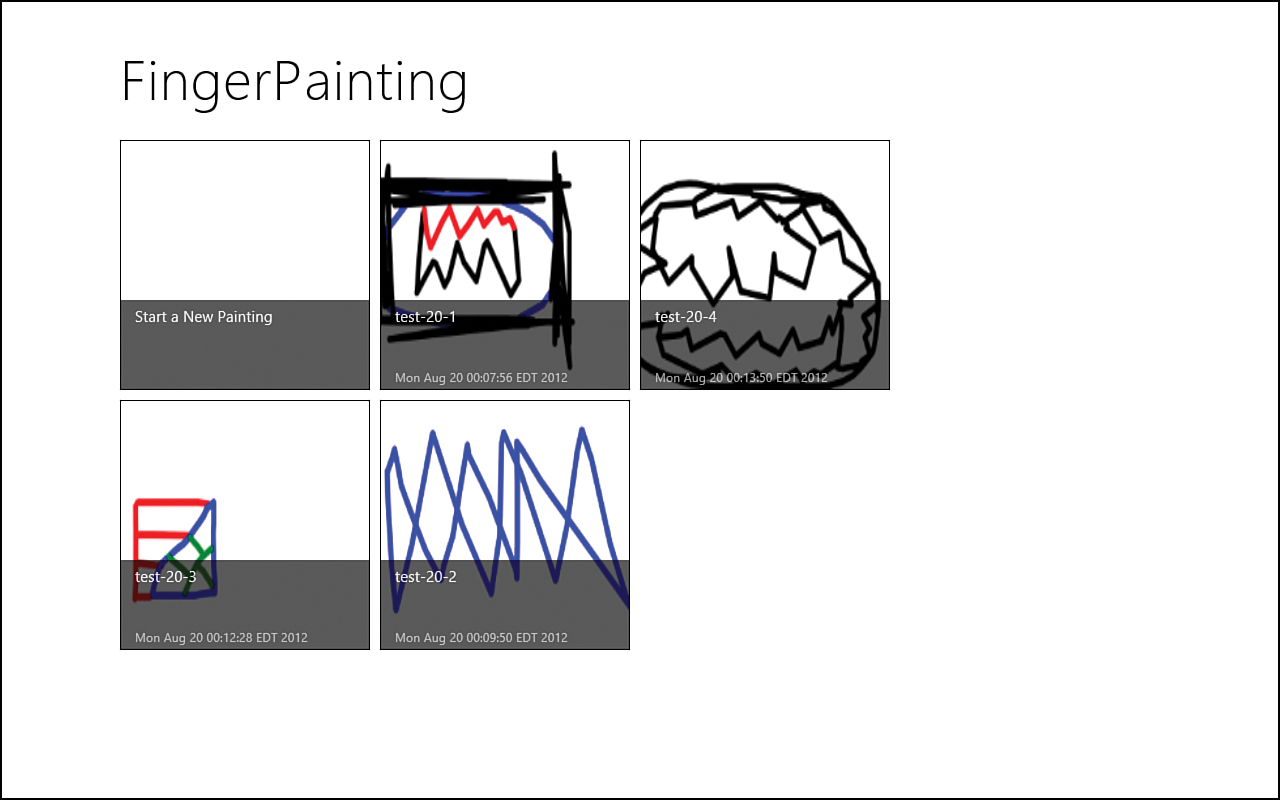
Figure 20.1. The landing page of the FingerPainting app displays any recent images that have been saved.
So we have the functionality we want on the front page, except that if we invoke any of the items, the images themselves aren’t being loaded on the artboard canvas. This should be expected because we haven’t written any code to handle that yet. Also, the images aren’t sorted by the date they were used. They really should be sorted from the newest files to the oldest files.
Let’s fix the sort order. We just need to sort the fileData before we bind it to the list. We want to sort it on date, so we need to modify the Start a New Painting initial record. Currently, we have the dateCreated as an empty string in the items.js file, but to make JavaScript treat it as a date and have it show up as the first tile in the list, we need to change to new Date():
fileData.push({
displayName: "Start a New Painting",
dateCreated: new Date(),
displayType: "",
thumbnail: "ms-appx:///images/transparent.png",
backgroundcolor: "white" //TODO: Pull from Settings
});
Next, we can do the sort and clear out the date we just set so that it doesn’t show up on the tile itself. We can add the following code right before we declare the list variable:
fileData.sort(function (a, b) {
if (b.dateCreated > a.dateCreated) return 1;
if (b.dateCreated < a.dateCreated) return -1;
return 0;
});
fileData[0].dateCreated = "";
var list = new WinJS.Binding.List(fileData);
Now when we run the app, we can see the tiles sorted correctly, as in Figure 20.2.
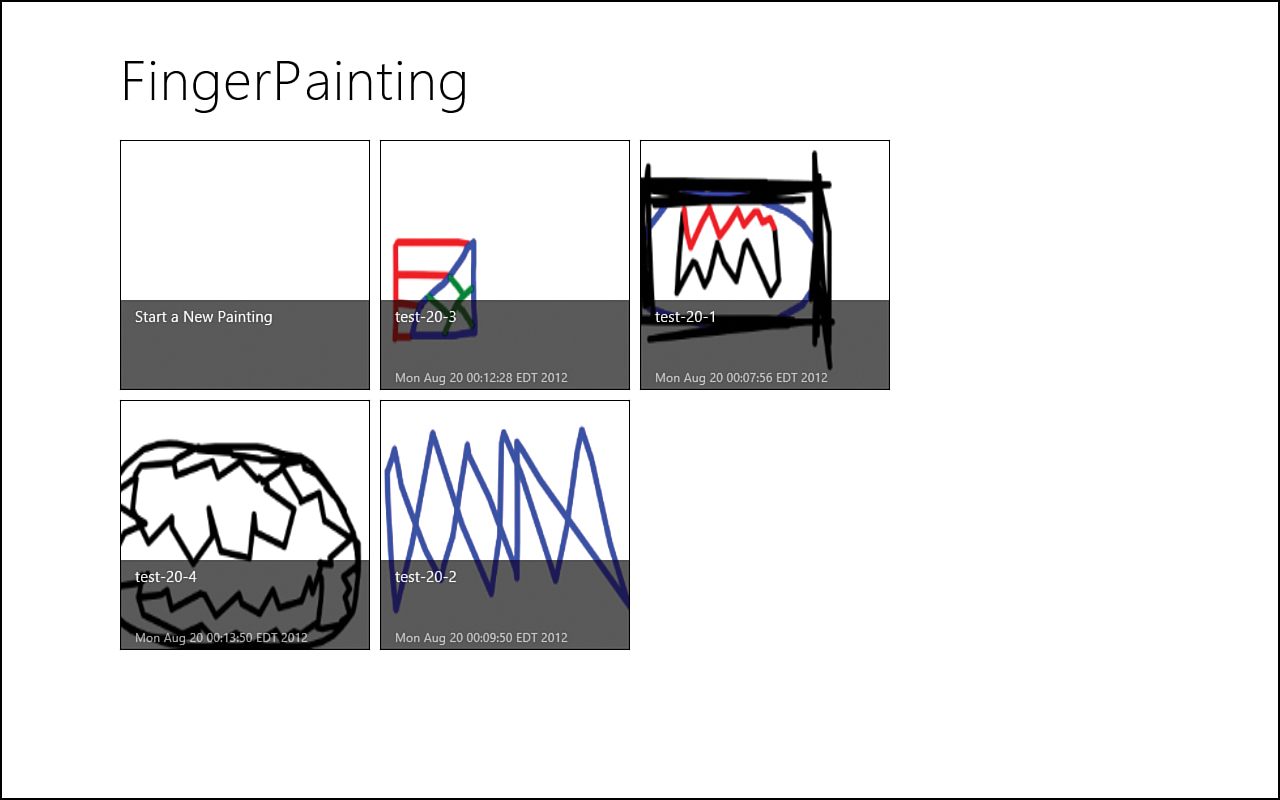
Figure 20.2. The tiles are now sorted by date created, in descending order, so that the user can easily select the latest file.
Now we can write code to load the selected image in the canvas for the user to work with. We are passing the token to the artboard page, so let’s open the artboard.js file and utilize the token to load the actual file onto the artboard.
We can add the following condition immediately after calling clearArtBoard in the ready function:
if (options) {
var sto = Windows.Storage;
var appPerms = sto.AccessCache.StorageApplicationPermissions;
appPerms.mostRecentlyUsedList.getFileAsync(options.token).then(
function (retrievedFile) {
setBackgroundImage(retrievedFile);
});
}
Now when we run the app, we can select an existing tile and have it load as expected. The code is calling the getFileAsync for the token passed in and is then passing that file to the existing setBackgroundImage.
We need to add in a little error handling, in case the user removes an image in the mostRecentlyUsedList and it is no longer on the file system. In data.forEach, we need to add the following line under the // Handle errors comment in items.js:
appPerms.mostRecentlyUsedList.remove(d.token);
Saving State
We need to store some more items in session state so that when the user navigates away from the artboard, the information is stored in session state. If the app is suspended, important information to the user must be preserved.
To begin, let’s open js/sessionstate.js and, after setting the brushSize, we can set the following values:
SessionState.selectedColor = "black";
SessionState.unsavedImage = false;
The unsavedImage flag warns about any work done on the painting so that we can bring up confirmation boxes where appropriate.
Next, let’s open js/artboard.js and use these new settings instead of the existing hardcoded values. Inside the ready function, we can replace the ctx.strokeStyle assignment with this:
ctx.strokeStyle = STYWin.SessionState.selectedColor;
Inside of default.js, we need to set the session values during activation and during suspension. In the activated event handler, we can add in the following code immediately after we set the brushSize:
STYWin.SessionState.selectedColor = app.sessionState.selectedColor;
STYWin.SessionState.unsavedImage = app.sessionState.unsavedImage;
Likewise, in the checkpoint event handler, we can add the following code:
app.sessionState.selectedColor = STYWin.SessionState.selectedColor;
app.sessionState.unsavedImage = STYWin.SessionState.unsavedImage;
We can open js/colorpicker.js and store the selected color in the SessionState object when it changes. We can add the following statement after we set ctx.strokeStyle in the setColor function:
STYWin.SessionState.selectedColor = ctx.strokeStyle;
For the unsavedImage flag, we want to change that to true when drawing occurs, so we open the artboard.js file again and, inside the startCapturePoints function, add the following statement after calling canvas.msSetPointerCapture:
STYWin.SessionState.unsavedImage = true;
We can reset it to false at the end of the init function right before calling drawLoop:
STYWin.SessionState.unsavedImage = false;
Now we want to add functionality so that if a user starts drawing but then clicks the New button, the app issues an alert that the user is about to lose the artwork. Similarly, if the user browses from the artboard back to the main listing page, the app should save the image locally. If we had access to a cloud service, we could store the image in the cloud and just add a reference in roaming settings. But because roaming settings allow only 100KB and we don’t have a cloud service to use for this book, we store the image in local settings. All of the session state will be stored in roaming, so if the user goes to another machine, everything will be there except the painting itself.
We are still in the init function in the artboard.js file, so let’s add a couple event listeners right above the unsavedImage initialization we added:
document.getElementById("cmdNew")
.addEventListener("click", confirmNewFlyout, false);
document.getElementById("btnNew").onclick = clearArtBoard;
The cmdNew button is the New command on the app bar. The btnNew is a button in confirmNewFlyout, which we create shortly. The idea is, the user clicks the New command on the app bar and is greeted with flyout control asking for confirmation to create a new painting and lose existing work. The confirmation should pop up only if something actually changed. If the flyout is shown and the user clicks the btnNew, then clearArtBoard is called.
Let’s add the confirmNewFlyout function inside artboard.js is called when the user is trying to create a new painting without saving previous work. The function follows:
function confirmNewFlyout() {
var cmdNew = document.getElementById("cmdNew");
document.getElementById("confirmNewFlyout")
.winControl.show(cmdNew);
}
As expected, this shows the flyout control and displays it close to the New command on the app bar. Now we can add the actual flyout control to the markup. Let’s make the following control the last child of the body element in default.html:
<div id="confirmNewFlyout" data-win-control="WinJS.UI.Flyout">
<div>Changes to the painting will be lost.
Confirm to start a new painting.</div>
<button id="btnNew">Confirm</button>
</div>
The clearArtBoard function needs a small modification: It needs to hide the confirmation flyout and the app bar if they are visible. We can simply add the following to the end of the clearArtBoard function in artboard.js:
document.getElementById("confirmNewFlyout")
.winControl.hide();
STYWin.AppBar.hide();
Now let’s finish flushing out the unsavedImage flag. We need to make sure it is set to true whenever work is being done on the canvas. It should be set to false when the work has been saved or a brand new image has been loaded.
Let’s open filesaver.js and add the following code right before calling saveStream.flushAsync in writeOutImage:
if (store) {
STYWin.SessionState.unsavedImage = false;
}
We need to add the second parameter to this function as well:
function writeOutImage(storageFile, store) {
Next, let’s replace the following code
if (!storageFile)
return;
Windows.Storage.AccessCache.StorageApplicationPermissions
.mostRecentlyUsedList.add(storageFile, storageFile.name);
with this:
if (!storageFile)
return;
if (store == null)
store = true;
if (store) {
Windows.Storage.AccessCache.StorageApplicationPermissions
.mostRecentlyUsedList.add(storageFile, storageFile.name);
}
The writeOutImage function is now accepting this second parameter call store. This signifies whether we should store the file that we are writing to disk in the mostRecentlyUsedList. We also wrapped the unsavedImage flag with this condition. This is because we will call this function when we save our image to a temporary file in local storage. Remember, the image is too big to store in the roaming folders. When the app is suspended or the user browses away from the artboard without saving first, the image is saved in local storage. We utilize this existing function to write the image to disk, so we just need to add a flag to specify whether we want to add the file to the most recently used list. We want the unsavedImage flag to be reset to false (signifying no changes) only if we are actually storing the image in the most recently used list. Otherwise, we treat it as though it isn’t saved.
Now we can write the code that will save the image to local storage if the user navigates away from the artboard page without saving first. To do that, we need to hook into the navigating event. In the artboard.js file, we need to add the following code at the very beginning of the ready function:
WinJS.Navigation.addEventListener("navigating", this.navigating);
We can add the navigating event handler under the ready function still inside the page definition:
navigating: function (evt) {
if (STYWin.SessionState.unsavedImage) {
var sto = Windows.Storage;
var cco = sto.CreationCollisionOption;
var appData = sto.ApplicationData.current;
var folder = appData.localFolder;
var storageFile = "wip.png";
evt.detail.setPromise(
folder.createFileAsync(storageFile, cco.replaceExisting)
.then(function (file) {
return STYWin.FileSaver.writeOutImage(file, false);
})
);
}
},
We check to see if the image has been saved and then call the writeOutImage function, passing in false to the store parameter so that it doesn’t try to store it in the most recently used list. If the work in progress file (wip.png) is already present, we just overwrite it. This is all done in the setPromise function, which causes the navigation to wait until the promise is completed before navigating away from the page. This is important because the writeOutImage function would fail because the artboard canvas would be undefined as the elements were being removed from the page.
Inside the unload function, we need to remove the listener for both the navigating event and the btnNew click event:
WinJS.Navigation.removeEventListener("navigating", this.navigating);
document.getElementById("btnNew")
.removeEventListener("click", clearArtBoard, false);
We have saved the file into local storage in case the user navigates away from the artboard without saving it to the library; we also want to save the file in case the app is suspended. In the oncheckpoint event handler of default.js file (which gets called when the app is suspending), we can add the following code after we set the app.sessionState properties:
//on artboard and have an unsaved Image?
if (STYWin.SessionState.unsavedImage && document.getElementById("artboard")) {
var sto = Windows.Storage;
var cco = sto.CreationCollisionOption;
var appData = sto.ApplicationData.current;
var folder = appData.localFolder;
var storageFile = "wip.png";
return folder.createFileAsync(storageFile, cco.replaceExisting)
.then(function (file) {
return STYWin.FileSaver.writeOutImage(file, false);
});
}
As the comment states, we are simply checking to see if we need to save the image and if we are on the artboard page. This is determined by seeing whether the canvas is available (the canvas id is artboard). Assuming that we need to save the image, we call the same code as before. This is a prime candidate for refactoring.
Finally, we need to modify the main listing page to include the work in progress painting that wasn’t saved. We already put the Start a New Painting tile at the front of the line. Now we want to do the same if we have a file that we saved to local storage so that users know that, if they don’t navigate back to it, they will lose that work. We need to modify the code in the pagesitemsitems.js JavaScript file.
In items.js, we can add the following code to the ready function immediately after the fileData initialization and right before we push the Start a New Painting image in the list:
if (STYWin.SessionState.unsavedImage) {
fileData.push({
displayName: "Recover Unsaved Painting",
dateCreated: new Date(),
displayType: "",
thumbnail: "ms-appx:///images/transparent.png",
//"ms-appdata:///local/wip.png",
token: "wip",
backgroundcolor: "red"
});
}
We are loading the transparent image again. We can access the image through the URL that is commented out, but the image is cached. This causes the image to get outdated quickly and doesn’t produce the desired results. So instead, we show just the red background, which nicely gets the user’s attention. Figure 20.3 shows the result of the red background.
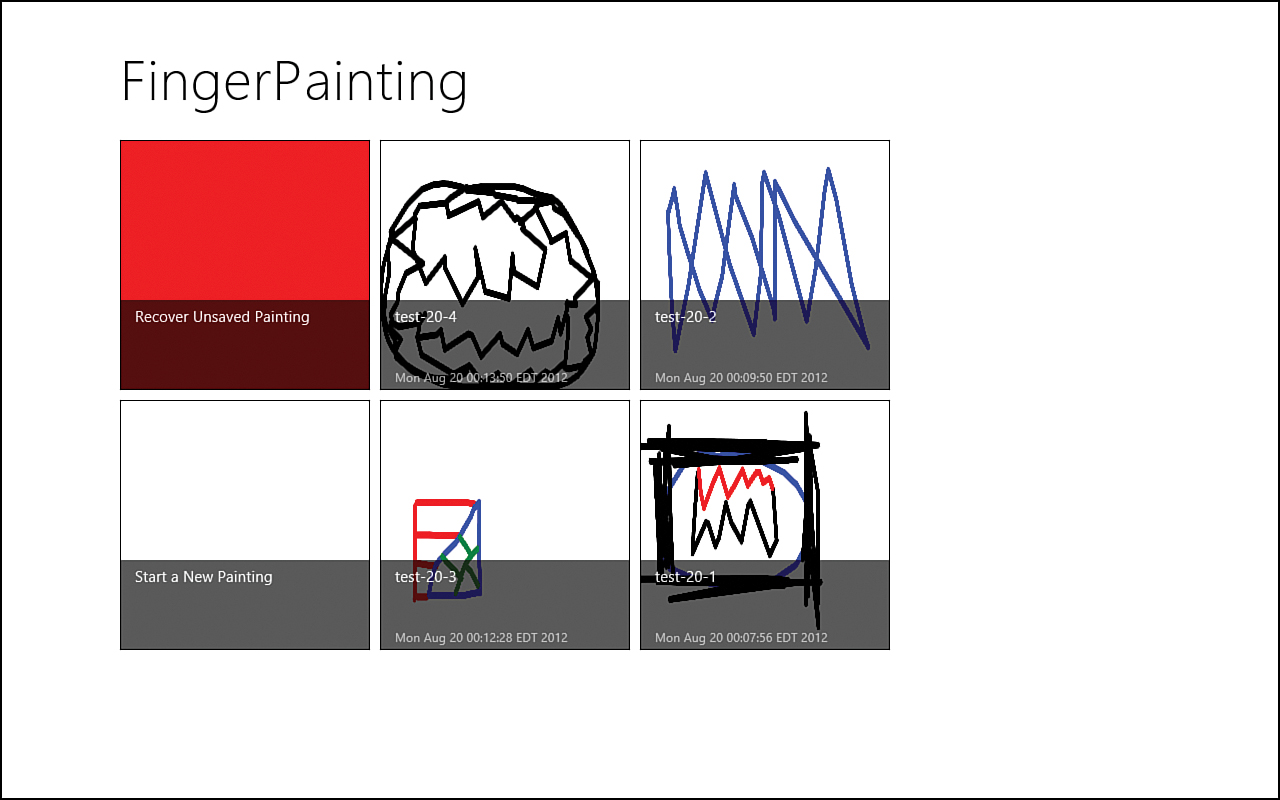
Figure 20.3. Users can quickly identify that they have unsaved artwork.
Next, we need to replace the following code in the WinJS.Promise.join section, at the end of the ready function in items.js:
fileData[0].dateCreated = "";
with:
fileData[0].dateCreated = "";
if (fileData[1].token == "")
fileData[1].dateCreated = "";
We know that the first tile will never show the date created value because it will be either the New Painting tile or the work in progress tile. We check the second tile to see if it has a blank token. If so, we know that it is the New Painting tile, so we also remove the date so that it doesn’t get displayed in the item template of the ListView control.
Now we need to modify the itemInvoked function to account for the newly added “recover unsaved painting” tile. We need to replace the current itemInvoked function with the following code:
itemInvoked: function (args) {
var sto = Windows.Storage;
var appPerms = sto.AccessCache.StorageApplicationPermissions;
var token;
token = fileData[args.detail.itemIndex].token;
if (token != "wip" && STYWin.SessionState.unsavedImage) {
var self = this;
var msg = new Windows.UI.Popups.MessageDialog(
"Cancel to go back and recover unsaved painting. " +
"Confirm to start a new painting. " +
"Changes to the unsaved painting will be lost.");
msg.commands.append(new Windows.UI.Popups.UICommand("Confirm",
function (cmd) { self.openPainting(token); }));
msg.commands.append(new Windows.UI.Popups.UICommand("Cancel",
undefined));
msg.showAsync();
} else {
this.openPainting(token);
}
},
openPainting: function(token) {
WinJS.Navigation.navigate("/pages/artboard/artboard.html",
token ? { token: token } : null);
},
Instead of checking the itemIndex as before, we check the token and see if it is an unsaved image. If the user is selecting any item (such as a new painting or user-saved image) and artwork wasn’t saved, a pop-up window appears. This can also be a flyout, as on the artboard page. Because it is a pop-up dialog box, we added the Confirm/OK button and the Cancel button. Cancel doesn’t do anything extra when it is clicked, but Confirm calls the second function we snuck in, called openPainting. It is the same one-liner that was part of the original itemInvoked function. It either passes along the token or passes null to the artboard page, depending on whether any data is present in the token. The New Painting tile does not have a token, but we set the unsaved/work in progress token to be wip. Of course, the regular files all have tokens because that is how we can actually access them.
We need to check for this new work in progress token when the artboard page loads. Inside artboard.js, we need to replace the following existing code in the ready function
appPerms.mostRecentlyUsedList.getFileAsync(options.token).then(
function (retrievedFile) {
setBackgroundImage(retrievedFile);
});
with the following code:
var cco = sto.CreationCollisionOption;
var appData = sto.ApplicationData.current;
var folder = appData.localFolder;
if (options.token == "wip") {
var storageFile = "wip.png";
folder.getFileAsync(storageFile)
.then(function (retrievedFile) {
setBackgroundImage(retrievedFile);
});
//set it back to unsave as if they leave right away
//they will lose their work
STYWin.SessionState.unsavedImage = true;
} else {
appPerms.mostRecentlyUsedList.getFileAsync(options.token).then(
function (retrievedFile) {
setBackgroundImage(retrievedFile);
});
}
We placed the existing code in the else condition. The actual condition just checks for the work in progress token and loads that file, if needed. Otherwise, it functions just like it did before by loading the token associated with the file from the most recently used list.
When running the app, on the artboard page, if we start painting and then select the New command on the app bar, we are greeted with the flyout to confirm that we want to discard the current painting. Likewise, if we navigate backward and then select any item other than the Unsaved tile, we are greeted with the pop-up dialog box, as in Figure 20.4. If we run the app, start a painting, and then suspend and terminate the app through Visual Studio, then when we launch it again, our information is retained.
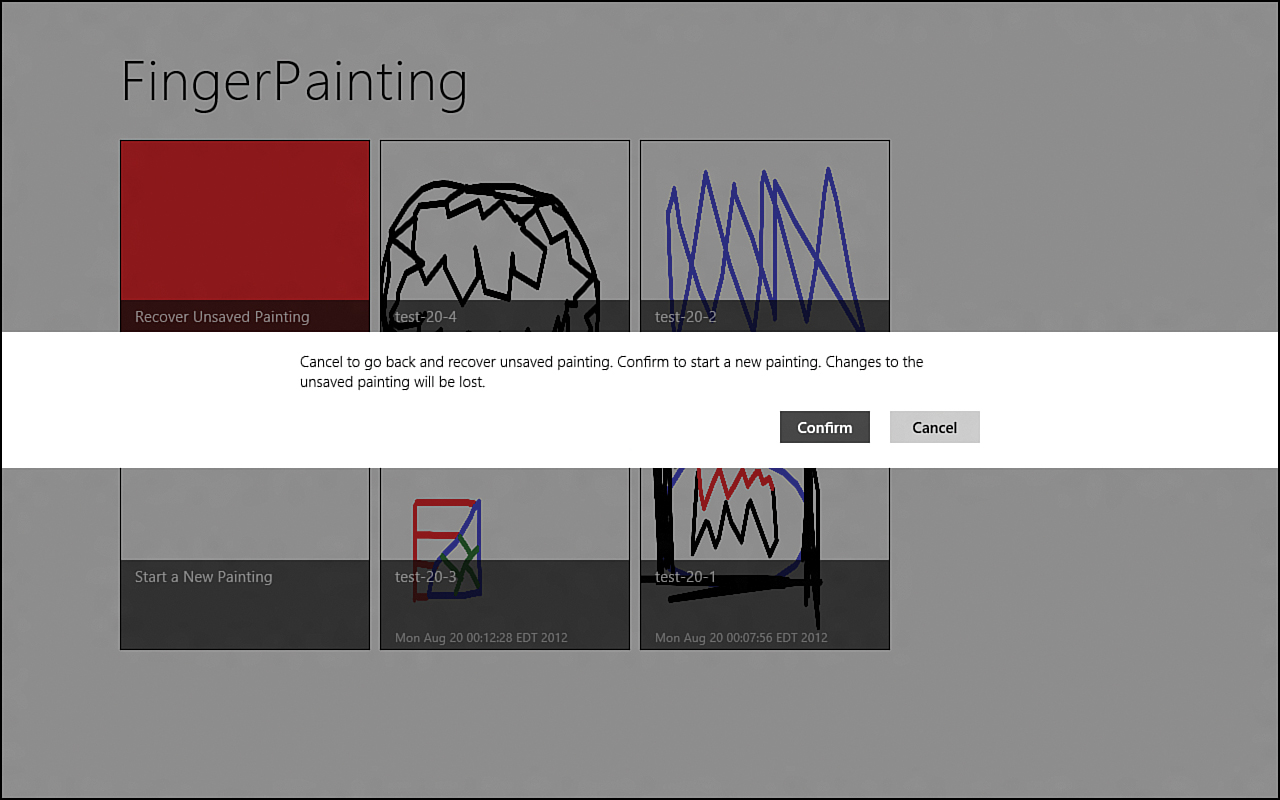
Figure 20.4. When the user opens any tile other than the unsaved/work in progress tile, the pop-up dialog box appears asking for confirmation to discard unsaved work.
Saving Settings
In the General settings flyout, we created the capability for the user to change the brush size. Now we add in the default color of the brush and the default background color of the artboard when a new one is created.
Try It Yourself: Adding Settings to the FingerPainting App
1. To start, we open jssettings.js and add the following two settings under the brushSize initialization:
Settings.color = "black";
Settings.backgroundColor = "white";
2. We also set the color and backgroundColor from the roamingSettings:
Settings.color = roamingSettings.values["color"];
Settings.backgroundColor = roamingSettings.values["backgroundColor"];
3. We also set the roaming settings with our values in the saveSettings function:
roamingSettings.values["color"] = STYWin.Settings.color;
roamingSettings.values["backgroundColor"] = STYWin.Settings.backgroundColor;
4. After opening jssessionstate.js, we change the selectedColor initialization to:
SessionState.selectedColor = STYWin.Settings.color;
5. Inside pagesartboardartboard.js, we modify the clearArtBoard function and set the fillStyle to the background color from the app settings:
ctx.fillStyle = STYWin.Settings.backgroundColor;
6. Inside pagesitemsitems.js, we find the comment //TODO: Pull from Settings and change the New Painting tile’s background color to the settings color by changing the backgroundcolor assignment to the following code:
backgroundcolor: STYWin.Settings.backgroundColor
7. Now we create colors in the General settings flyout. Let’s open settingflyoutsgeneralgeneral.html and add the following option to the data-win-options custom data attribute on the WinJS SettingsFlyout control with the settingsCommandId of general:
width: 'wide',
8. We add the same color values we have for the app bar color flyout. We need to add the following markup after the ddlBrushSize select element:
<label>Select the default brush color: </label>
<div id="settingsPalette">
<div id="settingsSelectedColor" style="top: 2px; left: 2px; width: 40px;
height: 40px; background-color: #000000;"
aria-labelledby="listLabel">
</div>
<div style="width: 40px; height: 17px">
<p id="listLabel">Color</p>
</div>
<!-- Top row colors -->
<div id="#000000" class="color" style="top: -70px; left: 60px;
background-color: #000000">
</div>
<div id="#808080" class="color" style="top: -102px; left: 94px;
background-color: #808080">
</div>
<div id="#8b0000" class="color" style="top: -134px; left: 128px;
background-color: #8b0000">
</div>
<div id="#ff0000" class="color" style="top: -166px; left: 162px;
background-color: #ff0000">
</div>
<div id="#ffa500" class="color" style="top: -198px; left: 196px;
background-color: #ffa500">
</div>
<div id="#ffff00" class="color" style="top: -230px; left: 230px;
background-color: #ffff00">
</div>
<div id="#008000" class="color" style="top: -262px; left: 264px;
background-color: #008000">
</div>
<div id="#0000ff" class="color" style="top: -294px; left: 298px;
background-color: #0000ff">
</div>
<!-- Bottom row colors -->
<div id="#ffffff" class="color" style="top: -292px; left: 60px;
background-color: #ffffff">
</div>
<div id="#c0c0c0" class="color" style="top: -324px; left: 94px;
background-color: #c0c0c0">
</div>
<div id="#955a5a" class="color" style="top: -356px; left: 128px;
background-color: #955a5a">
</div>
<div id="#ffc0cb" class="color" style="top: -388px; left: 162px;
background-color: #ffc0cb">
</div>
<div id="#ffd700" class="color" style="top: -420px; left: 196px;
background-color: #ffd700">
</div>
<div id="#adff2f" class="color" style="top: -452px; left: 230px;
background-color: #adff2f">
</div>
<div id="#00dd00" class="color" style="top: -484px; left: 264px;
background-color: #00dd00">
</div>
<div id="#ff00ff" class="color" style="top: -516px; left: 298px;
background-color: #ff00ff">
</div>
</div>
9. Next, we add the identical code for the background color. Only the ids have changed. The following markup needs to be placed immediately following the markup just added:
<label>Select the default background color: </label>
<div id="backgroundPalette">
<div id="settingsSelectedBackgroundColor" style="top: 2px; left: 2px;
width: 40px; height: 40px; background-color: #000000;"
aria-labelledby="listLabel">
</div>
<div style="width: 40px; height: 17px">
<p id="listLabel2">Color</p>
</div>
<!-- Top row colors -->
<div id="#000000x" class="color" style="top: -70px; left: 60px;
background-color: #000000">
</div>
<div id="#808080x" class="color" style="top: -102px; left: 94px;
background-color: #808080">
</div>
<div id="#8b0000x" class="color" style="top: -134px; left: 128px;
background-color: #8b0000">
</div>
<div id="#ff0000x" class="color" style="top: -166px; left: 162px;
background-color: #ff0000">
</div>
<div id="#ffa500x" class="color" style="top: -198px; left: 196px;
background-color: #ffa500">
</div>
<div id="#ffff00x" class="color" style="top: -230px; left: 230px;
background-color: #ffff00">
</div>
<div id="#008000x" class="color" style="top: -262px; left: 264px;
background-color: #008000">
</div>
<div id="#0000ffx" class="color" style="top: -294px; left: 298px;
background-color: #0000ff">
</div>
<!-- Bottom row colors -->
<div id="#ffffffx" class="color" style="top: -292px; left: 60px;
background-color: #ffffff">
</div>
<div id="#c0c0c0x" class="color" style="top: -324px; left: 94px;
background-color: #c0c0c0">
</div>
<div id="#955a5ax" class="color" style="top: -356px; left: 128px;
background-color: #955a5a">
</div>
<div id="#ffc0cbx" class="color" style="top: -388px; left: 162px;
background-color: #ffc0cb">
</div>
<div id="#ffd700x" class="color" style="top: -420px; left: 196px;
background-color: #ffd700">
</div>
<div id="#adff2fx" class="color" style="top: -452px; left: 230px;
background-color: #adff2f">
</div>
<div id="#00dd00x" class="color" style="top: -484px; left: 264px;
background-color: #00dd00">
</div>
<div id="#ff00ffx" class="color" style="top: -516px; left: 298px;
background-color: #ff00ff">
</div>
</div>
10. The ids of the actual colors have an additional x at the end. This is so that we still get the HTML color in the id, but we can separate the foreground color of our stroke and the background color of the canvas. We strip that out through JavaScript. Let’s open the general.js file and add the following code after we set brushSize in the ready function:
//hook up colors
var element = document.getElementById("settingsPalette");
var divs = element.getElementsByClassName("color");
var idx;
for (idx = 0; idx < divs.length; idx++) {
divs[idx].addEventListener("click", colorSelected, false);
}
document.getElementById("settingsSelectedColor")
.style.backgroundColor = STYWin.Settings.color;
//hook up background colors
element = document.getElementById("backgroundPalette");
divs = element.getElementsByClassName("color");
for (idx = 0; idx < divs.length; idx++) {
divs[idx].addEventListener("click", backgroundColorSelected, false);
}
document.getElementById("settingsSelectedBackgroundColor")
.style.backgroundColor = STYWin.Settings.backgroundColor;
11. This is the same code we created before for the app bar. Next, we add the event handlers outside the page definition in general.js:
function colorSelected(evt) {
STYWin.Settings.color = evt.srcElement.id;
var element = document.getElementById("settingsSelectedColor");
element.style.backgroundColor = STYWin.Settings.color;
}
function backgroundColorSelected(evt) {
STYWin.Settings.backgroundColor = evt.srcElement.id.replace("x","");
var element = document.getElementById("settingsSelectedBackgroundColor");
element.style.backgroundColor = STYWin.Settings.backgroundColor;
}
12. The only point of interest in this code is that we are stripping out the additional x on the end of the color in the id for the background colors. Finally, we add the following CSS rules to the general.css file:
#backgroundPalette, #settingsPalette {
border: 1px solid gray;
height: 70px;
width: 330px;
padding: 2px;
padding-top: 25px;
}
.color {
position: relative;
border: 1px solid gray;
height: 30px;
width: 30px;
}
13. Now when we run the app, we can bring up the settings flyout and see the color and background color settings we can modify. Figure 20.5 shows the updated settings flyout.
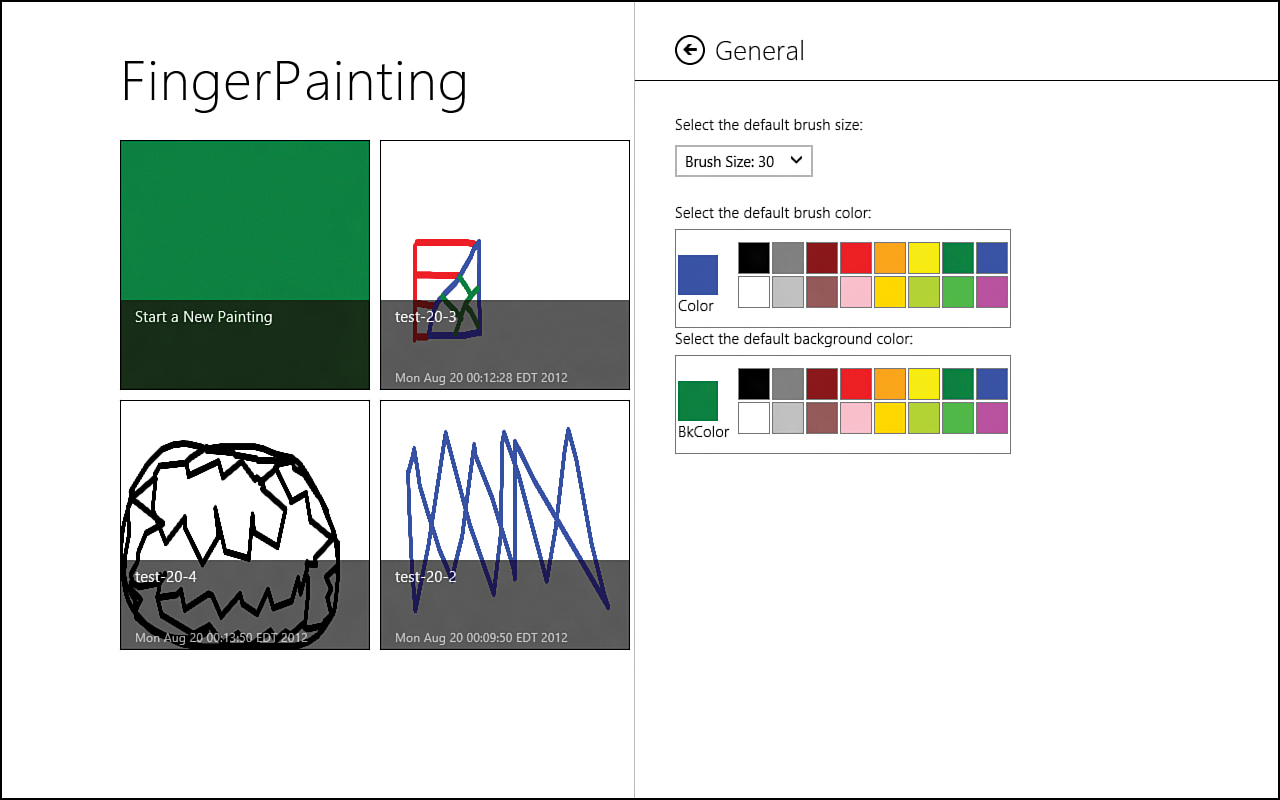
Figure 20.5. The General settings tab now enables the user to select the default color and default background color in addition to the brush size.
Sharing Content with Other Apps
We talked about the sharing contracts during Hour 16, but we didn’t show any sample code for sharing information or receiving. This section shows how to set up the source-sharing contract to share artboard images with another app. The next section covers how to become a target app to accept images.
To start, let’s create a new folder in the solution called share. Under this newly created folder, we create a JavaScript file called shareSource.js. Inside default.html, we reference this file immediately after we reference the print.js file:
<script src="/share/shareSource.js"></script>
Inside share/shareSource.js, we add the following code:
"use strict";
(function () {
WinJS.Namespace.define("STYWin.Share", {
registerForShareSourceContract: registerForShareSourceContract,
unregisterForShareSourceContract: unregisterForShareSourceContract
});
var dataTransferManager = Windows.ApplicationModel.DataTransfer
.DataTransferManager.getForCurrentView();
function registerForShareSourceContract() {
dataTransferManager.addEventListener(
"datarequested", dataRequested);
}
function unregisterForShareSourceContract() {
dataTransferManager.removeEventListener(
"datarequested", dataRequested);
}
}();
This should appear familiar because this is identical to how we set up the print contract during Hour 16. The key is that we are getting the current view for the DataTransferManager. This is the same pattern we saw quite a few times. Let’s add the dataRequested event handler:
var imageFile;
function dataRequested(evt) {
var request = evt.request;
// Title is required
var dataPackageTitle = "FingerPainting Artwork";
request.data.properties.title = dataPackageTitle;
// The description is optional.
var dataPackageDescription = "Look at this cool painting I created with "
+ "the FingerPainting app on Windows!";
request.data.properties.description = dataPackageDescription;
var sdf = Windows.ApplicationModel.DataTransfer.StandardDataFormats;
request.data.setDataProvider(sdf.bitmap, onDeferredImageRequested);
}
When the dataRequested event kicks off, we set the title and the optional description. Then we call the setDataProvider function, passing in that we will be using an image and calling the onDeferredImageRequested function to complete the request. This is required when we won’t return to the DataTransferManager right away. This way, when we return, it calls our function where we can have the long-running process. Our process isn’t that long because it is just saving a file, but it is long enough that we need to go through this step.
The onDeferredImageRequested function follows:
function onDeferredImageRequested(request) {
var deferral = request.getDeferral();
var sto = Windows.Storage;
var cco = sto.CreationCollisionOption;
var appData = sto.ApplicationData.current;
var folder = appData.localFolder;
var storageFile = "share.png";
var imageFile;
folder.createFileAsync(storageFile, cco.replaceExisting)
.then(function (file) {
imageFile = file;
return STYWin.FileSaver.writeOutImage(file, false);
}).then(function () {
if (imageFile) {
var streamReference = sto.Streams.RandomAccessStreamReference
.createFromFile(imageFile);
request.setData(streamReference);
deferral.complete();
}
}, function (err) {
deferral.complete();
});
}
To begin, we grab a reference to the deferral object. This is so we can call complete when we are finished so that the DataTransferManager knows to pass the data to the target app. We are calling the same code we created when storing the work in progress image in local storage. Now we are creating a file called share.png. There is a difference, though: We are returning the writeOutImage function. Although we don’t care about any real return value, we do need one. Currently, the function uses the done function in the promise chain, so nothing is returned. Let’s modify the writeOutImage function in the jsfileSaver.js file. We can change the call from done to then and return the result:
}).then(function (result) {
STYWin.Messages.displayStatus("File saved!", "Success");
var appbar = document.getElementById("appbar").winControl;
appbar.hide();
// output stream is IClosable interface
//and requires explicit close
saveStream.close();
return result;
},
We can also return the promise itself by simply adding the return keyword in front of the call to openAsync, as in the following code:
return storageFile.openAsync(sto.FileAccessMode.readWrite)
Now that we are finished modifying the writeOutImage function, let’s look back at the onDeferredImageRequested event handler. We can see that the next step after writing the image to disk is to call the following function and pass in the imageFile we just saved:
.RandomAccessStreamReference.createFromFile
We then use the stream and call setData on the request. After giving the DataTransferManager access to the stream, we call deferral.complete to signal that we are done and that the image can be shared.
Finally, we need to register for the share contract when the artboard page loads. We need to add the following code immediately following the registerForPrintContract:
STYWin.Share.registerForShareSourceContract();
That is all that’s needed to share the image. To test this, we need an app installed that can accept images. If one doesn’t exist on the system, we can run the Windows SDK sample called “Sharing Content Target App Sample.” We need the “Sharing Content Source App Sample” to test the next section. Figure 20.6 shows the results of sharing to the target app sample.
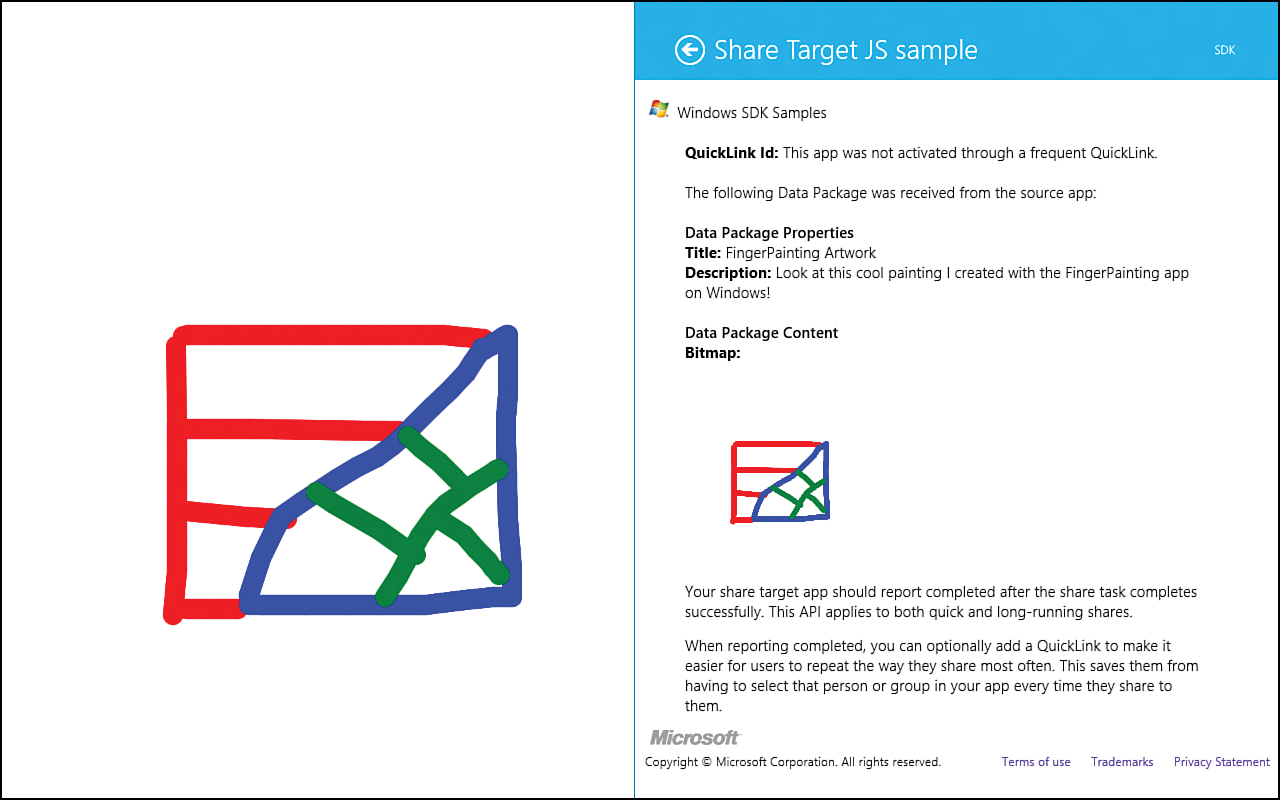
Figure 20.6. The FingerPainting app can now share to apps that accept images.
Receiving Content from Other Apps
Unlike the share source contract, which is simply code, the share target contract requires a UI. Fortunately, Microsoft provides a template. We can right-click the share folder we created in the last section and select Add|New Item. From there, we can select Share Target Contract. We leave the name as shareTarget.html. This creates HTML, CSS, and JavaScript files. It also modifies the package.appxmanifest file. Let’s open the manifest and go to the Declarations tab. We see by default that the change supports receiving both in text and uri. We can remove both of those and add a new one for bitmap.
We can replace the entire contents of shareTarget.js with this:
"use strict";
(function () {
var app = WinJS.Application;
var share;
WinJS.strictProcessing();
WinJS.Application.addEventListener("shareready", shareReady, false);
// This function responds to all application activations.
app.onactivated = function (args) {
if (args.detail.kind === Windows.ApplicationModel.Activation
.ActivationKind.shareTarget) {
args.setPromise(WinJS.UI.processAll());
share = args.detail.shareOperation;
document.querySelector(".shared-title").innerText =
share.data.properties.title;
document.querySelector(".shared-description").innerText =
share.data.properties.description;
document.querySelector(".shared-status").innerText =
"Receiving Image ... ";
WinJS.Application.queueEvent({ type: "shareready" });
}
};
app.start();
})();
The default code is valuable, but for our needs, replacing it with what we need is easier than trying to piecemeal it together. We add an event listener for the shareready event. This will be an event that we kick off at the end of this code. When someone shares an image, it launches the app (even a second instance of the app) with the activation kind of shareTarget. It is a best practice to not navigate to other pages because the flyout has its own Back button. If we need complex navigation, we need to hide and show elements appropriately. In our case, we don’t need extra navigation.
As usual, we set the promise around the WinJS.UI.processAll so that it instantiates any WinJS controls we have on the shareTarget.html page. Then we store the shareOperation in our own share variable. We set some values in the HTML with some of the data we have received, such as the title and description. We also set a shared-status innerText to Receiving Image. This doesn’t currently exist, but we add it to the shareTarget.html file shortly. Finally, we kick off the custom shareReady event, which causes the shareReady event handler to be called. Let’s create that function now:
function shareReady(evt) {
if (share.data.contains(Windows.ApplicationModel.DataTransfer
.StandardDataFormats.bitmap)) {
share.data.getBitmapAsync()
.done(function (bitmapStreamReference) {
bitmapStreamReference.openReadAsync()
.done(function (bitmapStream) {
if (bitmapStream) {
var blob = MSApp.createBlobFromRandomAccessStream(
bitmapStream.contentType, bitmapStream);
document.querySelector(".shared-thumbnail").src =
URL.createObjectURL(bitmapStream,
{ oneTimeOnly: true });
var sto = Windows.Storage;
var cco = sto.CreationCollisionOption;
var appData = sto.ApplicationData.current;
var folder = appData.localFolder;
var storageFile = "received.png";
var saveStream = null;
return folder.createFileAsync(storageFile,
cco.replaceExisting)
.then(function (file) {
return file.openAsync(sto.FileAccessMode.readWrite);
}).then(function (stream) {
saveStream = stream;
return sto.Streams.RandomAccessStream.copyAsync(
blob.msDetachStream(), saveStream);
}).then(function () {
// since we return the promise, it will be executed
//before the following .done
return saveStream.flushAsync();
},
function (e) {
reportCompleted("Couldn't Save " + e.toString(),"Error");
}).done(function (result) {
saveStream.close();
setTimeout(function () {
reportCompleted("Successfully Received Image!");
}, 1500);
},
function (e) {
if (saveStream) {
saveStream.close();
}
reportCompleted("Couldn't Save " + e.toString(),
"Error");
});
}
});
});
}
else {
reportCompleted("Item Being Shared is Not an Image", "Error");
}
}
The shareReady event handler is the core of the shareTarget code. But this isn’t anything we haven’t seen before. To start, we make sure we actually have a bitmap because that is all we know how to handle. Assuming that we do have a bitmap, we open it and set the thumbnail image in the HTML markup to display it. We then save the image into the app’s local folder. Just as we store the work in progress file using wip.png, we are saving this file as received.png. If the file already exists, we just overwrite it. This means that if the user tries to share multiple images with the app before launching it, he or she has access to only the last one. There isn’t room in this hour to store them all and include all of them in the main listing page in a way that makes sense, so simply show the last one that was shared.
Assuming that the file is saved successfully, we call the reportCompleted function, passing in the status of Successfully Received Image!. If errors occur, we pass in the error messages; we also pass in a flag stating that it was an error. Let’s create the reportCompleted function:
function reportCompleted(status, error) {
document.querySelector(".sharecontrols").style.display = "none";
document.querySelector(".shared-status").innerText = status;
setTimeout(function () {
if (error == "Error") {
share.reportError(status);
} else {
share.reportCompleted();
}
}, 1500);
}
The main purpose of this function is to call the share.reportCompleted function, which tells the DataTransferManager that we are done with the sharing process. Similarly, the share.reportError function tells the DataTransferManager that we are done but an error occurred. We have a call to setTimeout here and a similar one in shareReady function. The purpose of these is to actually show the user data (because the save happens so fast). We don’t want the flyout to appear and then immediately disappear because it will be unclear whether it succeeded or failed. So we wait 1.5 seconds after we save the file before we call the reportCompleted function. Then we wait another 1.5 seconds to display the status. When the share.reportCompleted function is called, the flyout is dismissed.
When discussing the reportCompleted function, we skipped the first two lines. The first line hides the progress bar and text. The second line sets the status element to the status passed in. That class doesn’t exist in the HTML, so let’s add the following after the shared-description h4 element to the shareTarget.html file:
<h6 class="shared-status"></h6>
We change the word Sharing... to:
Receiving...
We remove the commentbox textbox and the submitbutton because we aren’t using them in shareTarget.html.
Finally, we can the following CSS rule to the shareTarget.css file:
.shared-status {
font-size: x-large;
}
That’s all there is to receiving data. Now that we have the data, we need to make sure our app can utilize it. We create another special tile (similar to New and Unsaved) for the Received image. This Received tile will have a background of blue. In the pagesitemsitems.js file, we can add the following code in the ready function immediately after we initialize fileData:
sto.ApplicationData.current.localFolder.getFileAsync("received.png").then(
function (file) {
fileData.push({
displayName: "Load Received Image",
dateCreated: new Date(),
displayType: "",
thumbnail: "ms-appx:///images/transparent.png",
//"ms-appdata:///local/received.png",
token: "received",
backgroundcolor: "blue"
});
},
function (err) {
//don't worry about it...
//file doesn't exist
});
We specify the word received as the token. The code is the same pattern we used for the work in progress image, except that we don’t know whether it exists. An error can occur if there is no file, so we just ignore it. No “FileExists” API exists for us to tie into.
The last piece of code we need to add goes into the pagesartboardartboard.js file. In the ready function, we need to add the following else if after the if (options.token == "wip") condition and before the else:
else if (options.token == "received") {
var storageFile = "received.png";
folder.getFileAsync(storageFile)
.then(function (retrievedFile) {
setBackgroundImage(retrievedFile);
});
}
Because this is another special file, we load the saved file instead of trying to load the file from the most recently used list from the token. If we wanted to save multiple files that were shared with the app, we would need to display all of them and then show them to the user. We didn’t provide any way for the user to delete the shared item. This can be added to the app bar, if desired. The app can now be a share target and can accept images, as in Figure 20.7.
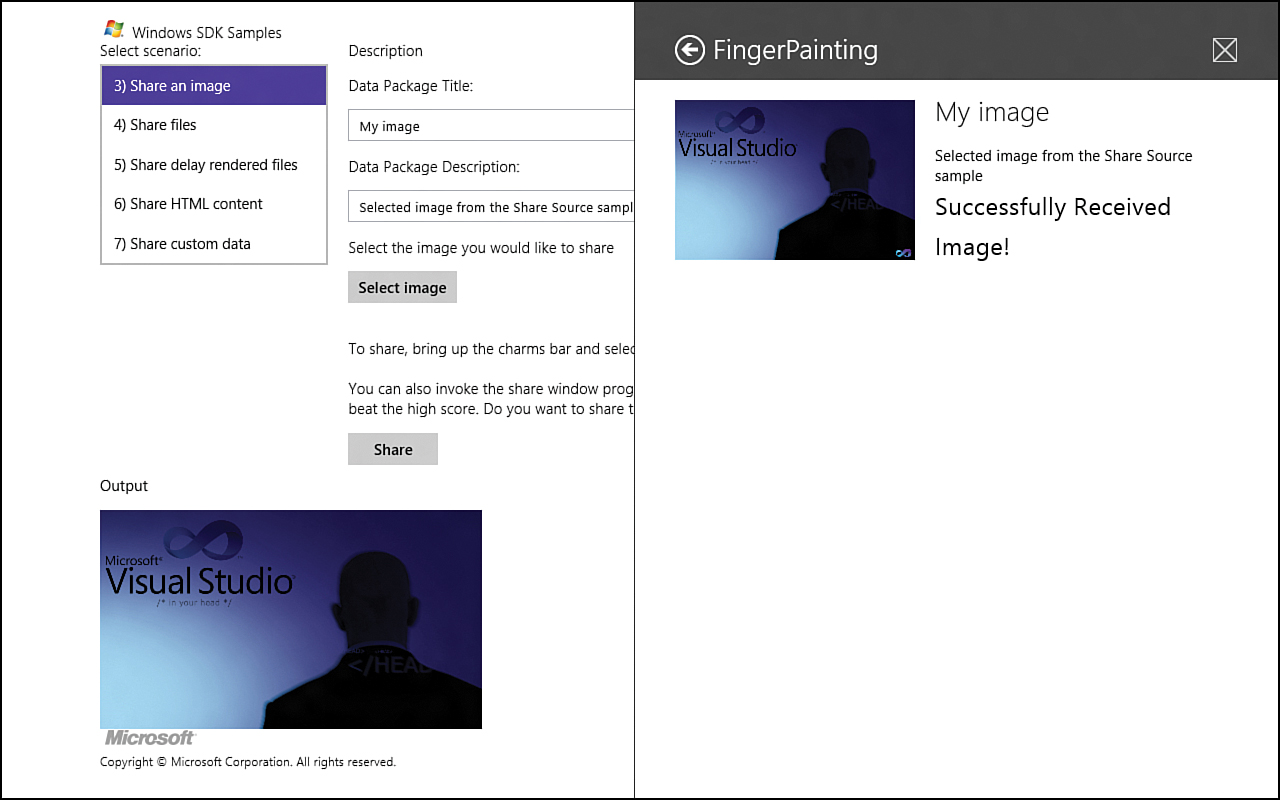
Figure 20.7. The FingerPainting app can accept images from apps that share them.
The app needs to have the navigation tightened up. For example, when receiving an image without first having any images saved, the app does not allow the user to go back to the main tile screen. Also, when no images are saved, hitting the back button on the canvas simply clears the canvas and doesn’t send the user to the tile screen.
The only thing left to do in the app is to fix the app bar and add live tiles. We don’t have time to do either, but we have shown code on how to do both. The app bar always displays the selection commands on the left side when they should be visible only when we are on the artboard page. Also, the Clear command was never hooked up and should be removed because we already have the New command, and it is redundant. An activity at the end of the hour asks for the app bar to be cleaned up. Take some time and make the changes needed to hide the commands that shouldn’t be visible and display them when they should be. Live tiles should also be added and a wide tile should be set. Finally, the code isn’t using Internet access, so the Internet client capability in the app package manifest should be removed.
Although it is unclear whether this capability is practical, it is pretty cool that our app can share an image with itself because it supports both the source and target sharing contracts. See Figure 20.8.
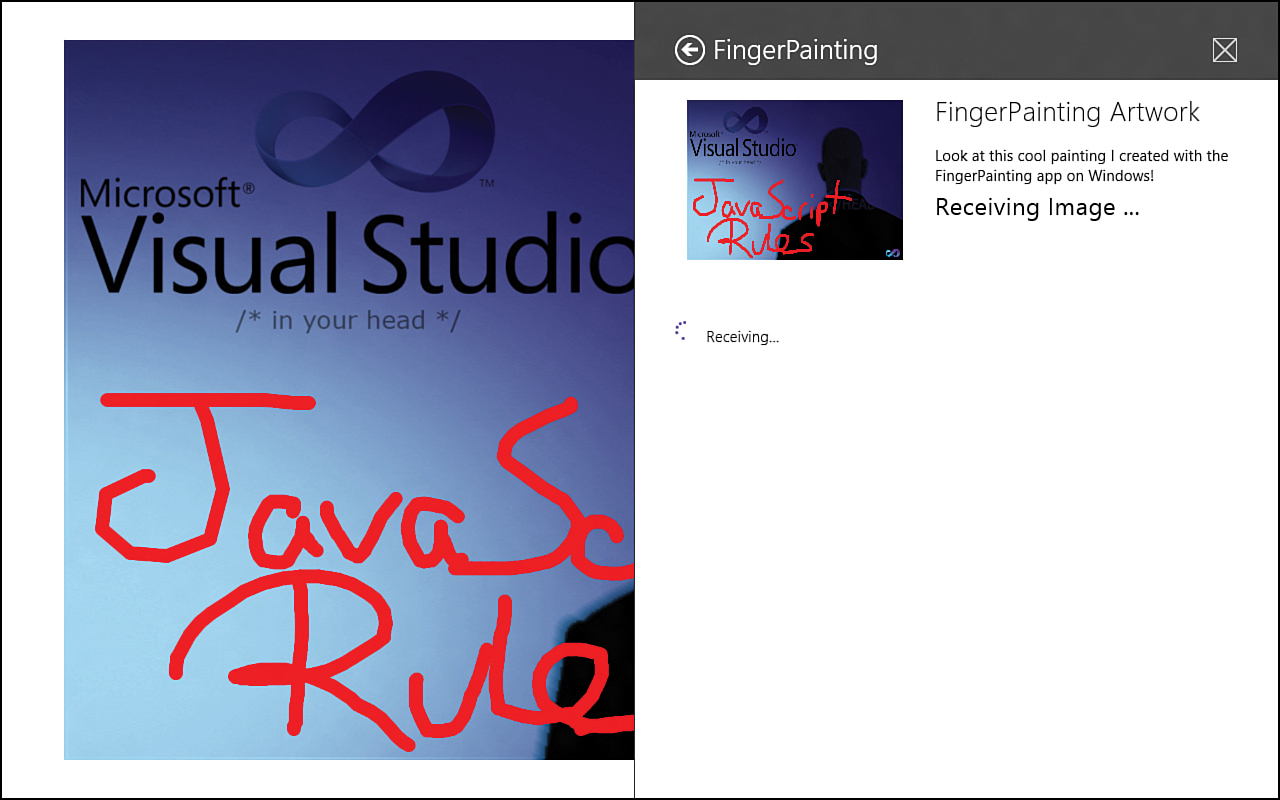
Figure 20.8. Although it’s not exactly practical, the app even has the capability to share an image with itself. The image shows how the shareTarget page displays the receiving information while the image is being saved.
We didn’t quite wrap up the app here, but we have a well-functioning app that, with just a little more work, can be placed in the Windows Store. We discuss the Windows Store during Hour 22, “Understanding the Windows Store.” Congratulations on completing a nontrivial app!
Summary
We wrote a lot of code this hour. No new concepts were discussed, but it was important to bring together many of the concepts. We saved a work in progress file and built out the main front page of the app. We added settings for the brush color and the background color, and we updated session state to store those values.
The last half of the hour discussed implementing the source and target sharing contracts. We saw how the code was straightforward enough to accomplish the task of sharing content with other apps. It is really a great that we can share data with apps that haven’t even been created yet. We also added the target sharing contract so that we can receive images from other apps. Some of the code definitely could use some refactoring, but we also saw how to organize multiple JavaScript files by page and functionality. Gone are the days of needing to have all JavaScript logic in a single file.
Q&A
Q. Can an app implement both a source share contract and a target share contract?
A. Yes, apps can implement just the source share or the target share, or they can implement both. Also, apps do not have to implement either one.
Q. When is using the Windows.UI.Popup acceptable?
A. It is acceptable only when a workflow exception occurs or when the app cannot continue in a workflow without user input or confirmation. We can use it in the app this hour to let users know they are about to lose their work when it might not be obvious.
Workshop
Quiz
1. The mostRecentlyUsedList automatically stores all the file data of the recently used files. True or false?
2. The mostRecentlyUsedList holds 25 items. As we add new items, it automatically removes the oldest entries. True or false?
3. What declarations need to be set in the app package manifest when implementing the source and target share contracts?
4. When calling URL.createObjectURL, what other function needs to be called if oneTimeOnly isn’t set in the constructor?
Answers
1. False. The mostRecentlyUsedList stores tokens that we can use to request the file from the file system. We must call the add function manually anytime we want to add a file to the mostRecentlyUsedList.
2. True. The mostRecentlyUsedList stores a maximum of 25 recently used files. We can remove and add as needed, but when 25 are present, newly added items cause the oldest item to be removed automatically.
3. When implementing the source share contract, new declarations need to be made. When implementing the target share contract, the Share Target declaration must be set.
4. When using URL.createObjectURL, we can have Windows clean up the resource by using the OneTimeUse option, or we can manage it ourselves by calling the revokeObjectURL function. If these aren’t called, memory will continually be consumed as more images are loaded and not released.
Activities
1. Log the user actions and touch points, and implement an undo feature.
2. Add a new setting in which the user can turn off the warnings of losing work.
3. The app bar has issues. A Clear button needs to be removed because the New button produces that functionality. The selection command buttons are being displayed at all times instead of just on the artboard page.
4. Add in Live Tile updates to send four of the most recently used photos to the tile in addition to the logo.
5. Tighten up the navigation in the app. Make sure that navigating to the main item page works as expected when the app is in different states.