
4. Working with JavaFX
The previous chapter shows you how to create JavaFX applications with simple controls and shapes. We also show you examples with animation. Chapter 3 is mostly about getting comfortable with JavaFX. With the chapter’s examples, you learned how to use the JavaFX scene graph, manipulate JavaFX properties with binding expressions, and create custom binding objects.
In this chapter we move on to desktop applications that use JavaFX for the UI. There really is no “typical” desktop application. But desktop applications all present a UI to the user and let the user manipulate model objects through UI controls. This includes selection controls, button clicks, and editing with text input controls.
Chapter 2 presents a small Swing application that emphasizes loose coupling among event handlers and model objects. These concepts are no less important with JavaFX. This chapter shows you how to build a similar application with JavaFX. You’ll also discover how to manipulate model objects using JavaFX UI controls.
What You Will Learn
• Create JavaFX properties.
• Use ChangeListeners and observable collections.
• Explore Scene Builder and create a JavaFX UI.
• Incorporate JavaFX controls, events, and listeners into JavaFX applications.
• Create background tasks in JavaFX that safely update the UI.
4.1 Creating JavaFX Properties
The previous chapter showed you JavaFX properties in action with ChangeListeners, InvalidationListeners, and most importantly binding expressions and custom binding objects. Binding shows how powerful JavaFX properties are. Now let’s show you how to create and use JavaFX properties in model classes.1
1. We show you how to add JavaFX properties to JPA-annotated entity classes in Chapter 16. See “Entity Classes and JavaFX Properties” on page 807.
We start with the Person class from Chapter 2 (see Listing 2.5 on page 30). Recall that Person has JavaBeans properties, including several String properties, an immutable long property (id), and a Person.Gender property (gender). We’re now going to create JavaFX properties for these values. Listing 4.1 shows a straightforward implementation for JavaFX property firstname.
To construct a StringProperty (an abstract type), we use SimpleStringProperty, which provides an implementation of a JavaFX StringProperty that wraps a String value. The property’s constructor has three arguments: a reference to the containing bean, the name of the property, and the initial value of the property. (The initial value is optional.) The first two values let you invoke getBean() for the containing bean and getName() for the property name, as shown in Listing 3.9 on page 104.
The property’s setter and getter methods forward their calls to the JavaFX property’s setter and getter. Method firstnameProperty() returns the created JavaFX property. This arrangement follows the naming convention for traditional JavaBeans while still providing access to the JavaFX property. Remember, you only need to access a JavaFX property when creating a binding expression or attaching a listener.
Listing 4.1 Person JavaFX Property firstname—Simple Implementation
public class Person implements Serializable {
private final StringProperty firstname =
new SimpleStringProperty(this, "firstname", "");
public String getFirstname() {
return firstname.get();
}
public void setFirstname(String firstname) {
this.firstname.set(firstname);
}
public final StringProperty firstnameProperty() {
return firstname;
}
. . . code omitted for other properties . . .
}
JavaFX Properties with Lazy Evaluation
Before we discuss the other JavaFX properties for class Person, let’s show you another way to implement the JavaFX property firstname. Consider if you had a JavaFX bean with many JavaFX properties and your application creates many of these objects. Each JavaFX property is itself an Object and therefore the number of Objects created could become large. (For example, the JavaFX node hierarchy consists of classes with many JavaFX properties, and JavaFX applications potentially create many scene graph nodes.)
An alternate implementation delays the creation of the JavaFX property until you attach a listener or use the property in a binding expression. In other words, the JavaFX property is not created until the user invokes the firstnameProperty() method. Simply changing the property’s value does not create the JavaFX property. To achieve this lazy instantiation, you create a shadow field to hold the value until the JavaFX property is needed. Listing 4.2 shows the approach.
The setter and getter first make sure the JavaFX property is not null before using it. Otherwise, you get and set the value using shadow field _firstname. Method firstnameProperty() creates the JavaFX property if it does not yet exist. Therefore, the JavaFX property is only created if method firstnameProperty() is invoked.
Listing 4.2 Person JavaFX Property firstname—Alternate Implementation
private StringProperty firstname;
private String _firstname = ""; // shadow field
public String getFirstname() {
return (firstname != null) ? firstname.get() : _firstname;
}
public void setFirstname(String newFirstname) {
if (firstname != null) {
firstname.set(newFirstname);
} else {
_firstname = newFirstname;
}
}
public final StringProperty firstnameProperty() {
if (firstname == null) {
firstname = new SimpleStringProperty(this, "firstname", _firstname);
}
return firstname;
}
Consider using this alternate implementation when your model class has a large number of properties.2
2. We don’t use lazy evaluation with class Person because Person includes a computed property that requires eager JavaFX property evaluations. See “Computed Properties” on page 135.
Object Properties
JavaFX provides property implementations for primitive property types and the String class. You’ve already seen SimpleStringProperty for abstract StringProperty. There is also SimpleIntegerProperty for abstract IntegerProperty, SimpleDoubleProperty for abstract DoubleProperty, and so on. For other types, use SimpleObjectProperty with generics. For example, a Color property uses SimpleObjectProperty-<Color> for abstract ObjectProperty<Color>.
Listing 4.3 shows how to implement the Person gender property using SimpleObjectProperty<Person.Gender> and ObjectProperty<Person.Gender>, which wraps a Person.Gender value. Here, we use the non-lazy implementation that we showed you for property firstname in Listing 4.1 on page 132. The constructor sets a reference to the containing bean (this), the property name ("gender"), and an initial value (Gender.UNKNOWN). The setter and getter forward calls to the JavaFX property’s setter and getter. The genderProperty() method returns the JavaFX property when the user needs to create a binding expression or attach a listener.
Listing 4.3 Person JavaFX Property gender
. . .
public enum Gender {
MALE, FEMALE, UNKNOWN
}
private final ObjectProperty<Person.Gender> gender =
new SimpleObjectProperty<>(this, "gender", Gender.UNKNOWN);
public Person.Gender getGender() {
return gender.get();
}
public void setGender(Person.Gender gender) {
this.gender.set(gender);
}
public final ObjectProperty<Person.Gender> genderProperty() {
return gender;
}
Immutable Properties
Recall that property id in our Person class is immutable. In this case, there is no need to create a JavaFX property. The JavaFX properties are specifically designed to track changes in the property’s value, which can’t happen with immutable.
You can easily use the value of an immutable property to update another property. Here’s an example that sets the text of a label to the value of the id property.
myLabel.setText(myPerson.getId());
If you have a property that depends on the value of the id property, you can still use getId() in a binding expression with the Fluent API.
Immutable Properties
Even though it’s pointless to observe immutable properties, you could provide a JavaFX property implementation for property id (for completeness). In this case, you should use the “lazy creation” approach described in Listing 4.2 on page 133.
Computed Properties
Listing 4.4 shows the implementation of Person method toString() from Chapter 2. This returns a nicely formatted String that depends on properties firstname, middlename, lastname, and suffix and excludes them if the values are empty.
Listing 4.4 Conventional JavaBean toString() Method for Person
@Override
public String toString() {
StringBuilder sb = new StringBuilder();
if (!firstname.isEmpty()) {
sb.append(firstname);
}
if (!middlename.isEmpty()) {
sb.append(" ").append(middlename);
}
if (!lastname.isEmpty()) {
sb.append(" ").append(lastname);
}
if (!suffix.isEmpty()) {
sb.append(" ").append(suffix);
}
return sb.toString();
}
Let’s create a read-only property in JavaFX that computes its value based on these same properties. Like toString(), we’ll use StringBuilder to build a nicely formatted String and only include the values if they are not empty. We call this computed StringProperty fullname.
Since we want method getFullname() to always return the most up-to-date value, we create a custom binding to keep property fullname synchronized with the rest of the properties upon which it depends. Listing 4.5 shows this custom binding object.
Using super.bind(), the anonymous constructor sets the property dependencies: firstname, middlename, lastname, and suffix. Method computeValue() builds the String, which looks very similar to the toString() implementation in Listing 4.4.
Listing 4.5 Custom Binding Object for Property fullname
public class Person implements Serializable {
. . .
private final StringBinding fullNameBinding = new StringBinding() {
{
super.bind(firstname, middlename, lastname, suffix);
}
@Override
protected String computeValue() {
StringBuilder sb = new StringBuilder();
if (!firstname.get().isEmpty()) {
sb.append(firstname.get());
}
if (!middlename.get().isEmpty()) {
sb.append(" ").append(middlename.get());
}
if (!lastname.get().isEmpty()) {
sb.append(" ").append(lastname.get());
}
if (!suffix.get().isEmpty()) {
sb.append(" ").append(suffix.get());
}
return sb.toString();
}
};
}
Listing 4.6 shows our implementation of property fullname. Note that it is fully observable and its value can change, but there is no setter. We return a ReadOnlyStringProperty for method fullnameProperty(). This prevents users of the property from changing its value.
JavaFX provides wrapper classes that implement read-only JavaFX properties. When you use a wrapper class, two properties are created: one is read only and the other can be modified. The wrapper class keeps these properties synchronized for you.
Listing 4.6 shows the Person constructors that set the binding for property fullname. With this binding, any changes to properties firstname, middlename, lastname, or suffix update property fullname. If a user binds to property fullname, changes will propagate to the user’s binding, too.
Method toString() now becomes trivial. It returns the fullname property value for the Person.
Listing 4.6 Person JavaFX Property fullname
. . .
private final ReadOnlyStringWrapper fullname =
new ReadOnlyStringWrapper(this, "fullname");
public final ReadOnlyStringProperty fullnameProperty() {
return fullname.getReadOnlyProperty();
}
public final String getFullname() {
return fullname.get();
}
public Person() {
this("", "", Gender.UNKNOWN);
}
public Person(String first, String last, Person.Gender gender) {
this.firstname.set(first);
this.lastname.set(last);
this.gender.set(gender);
this.id = count++;
this.fullname.bind(fullNameBinding);
}
public Person(Person person) {
this.firstname.set(person.getFirstname());
this.middlename.set(person.getMiddlename());
this.lastname.set(person.getLastname());
this.suffix.set(person.getSuffix());
this.gender.set(person.getGender());
this.notes.set(person.getNotes());
this.id = person.getId();
this.fullname.bind(fullNameBinding);
}
@Override
public String toString() {
return fullname.get();
}
. . .
Note that if you have a read-only JavaFX property whose value is maintained internally rather than computed, you would use the same read-only wrapper approach. If the property is not computed, you would not need to bind its value.
Methods equals() and hashCode()
The previous version of class Person based equals() and hashCode() solely on property id (see Listing 2.3 on page 24). This lets you use equals() on objects that perhaps have different values for the name properties but equal id’s. We’re going to take a different approach now and make sure that two Person objects are equal only if all of their properties are equal. We’re making this change to take advantage of the JavaFX observable collection classes, which we discuss in the next section.
Listing 4.7 shows the updated equals() and hashCode() methods for class Person. The computed property fullname necessarily includes all of its dependent properties, so we just need to include properties id, notes, and gender to the computation as well.
Listing 4.7 Person equals() and hashCode() Methods
public class Person implements Serializable {
. . . code omitted . . .
@Override
public int hashCode() {
int hash = 3;
hash = 97 * hash + Objects.hashCode(this.id)
+ Objects.hashCode(this.fullname.get())
+ Objects.hashCode(this.notes.get())
+ Objects.hashCode(this.gender.get());
return hash;
}
@Override
public boolean equals(Object obj) {
if (obj == null || getClass() != obj.getClass()) {
return false;
}
final Person other = (Person) obj;
return Objects.equals(this.id, other.id)
&& Objects.equals(this.fullname.get(), other.fullname.get())
&& Objects.equals(this.notes.get(), other.notes.get())
&& Objects.equals(this.gender.get(), other.gender.get());
}
}
4.2 Using JavaFX Properties in a JavaFX Application
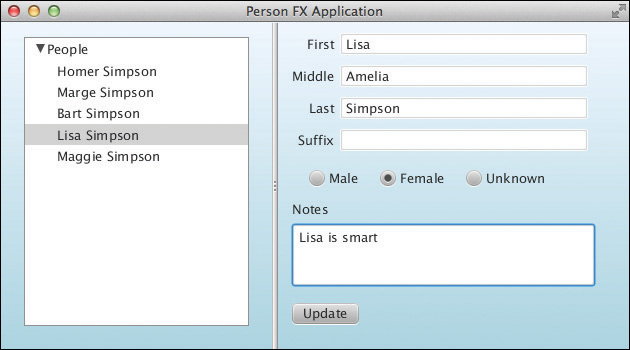
Now let’s create a JavaFX application that uses binding with a Person object to show how JavaFX properties are observable. Figure 4.1 shows program PersonFXAppBound program running. A label (the component at the top) is bound to Person marge with
margeLabel.textProperty().bind(marge.fullnameProperty());
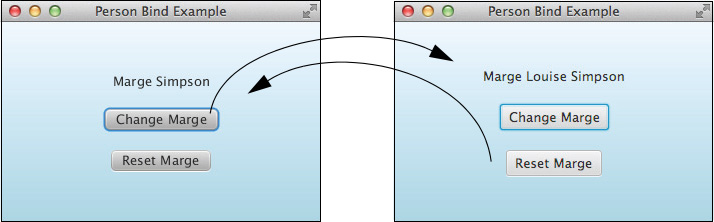
Figure 4.1 Program PersonFXAppBound: Binding the label’s text will keep it synchronized with the underlying model
The Change button modifies Person marge, resulting in the updated label (right side). The Reset button resets the Person marge to its original setting, as shown on the left side.
Creating a JavaFX FXML Application
We structure this application with FXML. To build this application using the NetBeans IDE, following these steps.
1. From the top-level menu, select File | New Project . . . .
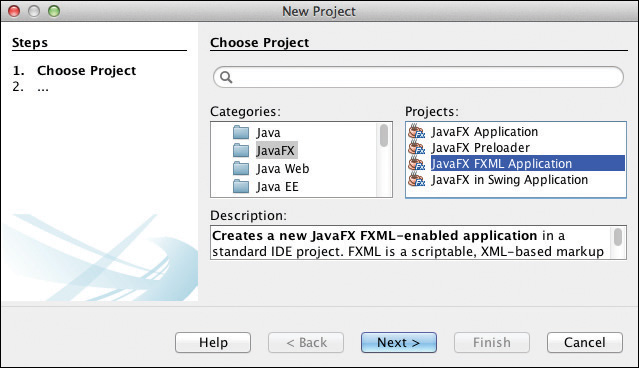
2. From the Choose Project dialog, select JavaFX under Categories and JavaFX FXML Application under Projects, as shown in Figure 4.2. Click Next.
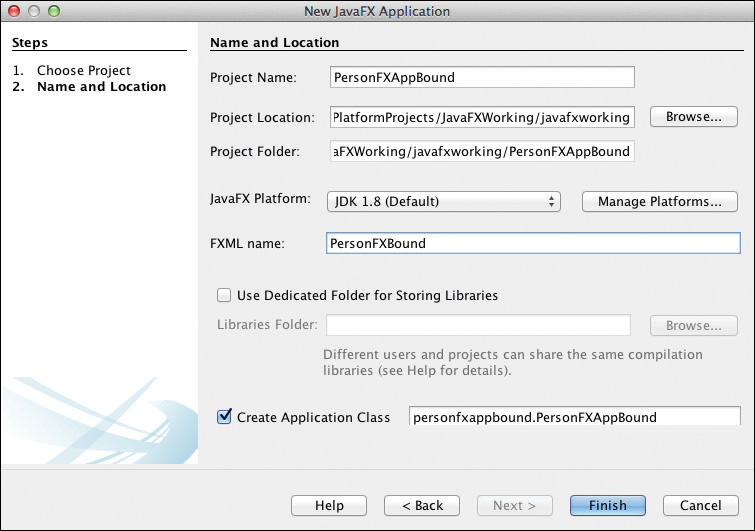
3. In the Name and Location dialog, specify PersonFXAppBound for the Project Name and PersonFXBound for the FXML name. Make sure the JavaFX Platform is (at least) JDK 1.8. Accept the defaults for the remaining fields and click Finish, as shown in Figure 4.3.
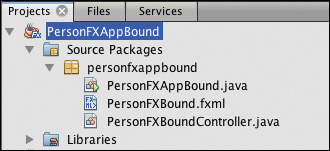
NetBeans creates a JavaFX Application project. Expand node Source Packages and personfxappbound to view the three files created for this application: PersonFXAppBound.java (the main application class), PersonFXBound.fxml (the FXML file), and PersonFXBoundController.java (the controller class), as shown in Figure 4.4.
Add Person.java to Application PersonFXAppBound
You’ll now create class Person.java in its own package and supply code, as follows.
1. In project PersonFXAppBound, right click on node Source Packages and select New | Java Class from the context menu.
2. NetBeans displays the New Java Class Name and Location dialog. Specify Person for Class Name and com.asgteach.familytree.model for Package, as shown in Figure 4.5. Click Finish.
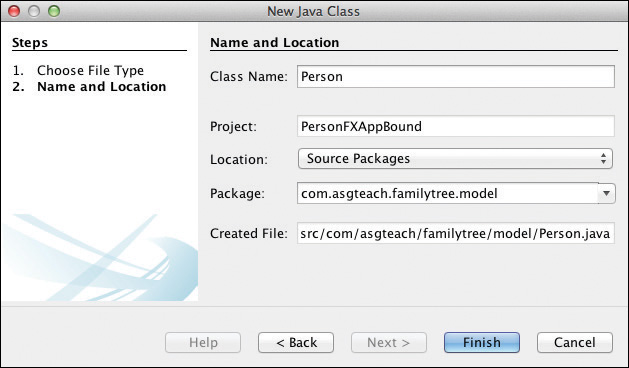
3. NetBeans creates file Person.java in package com.asgteach.familytree.model.
4. Use the code for Person.java as discussed in the previous section and shown here in Listing 4.8.
public class Person implements Serializable {
private final long id;
private final StringProperty firstname =
new SimpleStringProperty(this, "firstname", "");
private final StringProperty middlename =
new SimpleStringProperty(this, "middlename", "");
private final StringProperty lastname =
new SimpleStringProperty(this, "lastname", "");
private final StringProperty suffix =
new SimpleStringProperty(this, "suffix", "");
private final ObjectProperty<Person.Gender> gender =
new SimpleObjectProperty<>(this, "gender", Gender.UNKNOWN);
private final StringProperty notes =
new SimpleStringProperty(this, "notes", "");
private final StringBinding fullNameBinding = new StringBinding() {
{
super.bind(firstname, middlename, lastname, suffix);
}
@Override
protected String computeValue() {
StringBuilder sb = new StringBuilder();
if (!firstname.get().isEmpty()) {
sb.append(firstname.get());
}
if (!middlename.get().isEmpty()) {
sb.append(" ").append(middlename.get());
}
if (!lastname.get().isEmpty()) {
sb.append(" ").append(lastname.get());
}
if (!suffix.get().isEmpty()) {
sb.append(" ").append(suffix.get());
}
return sb.toString();
}
};
private final ReadOnlyStringWrapper fullname =
new ReadOnlyStringWrapper(this, "fullname");
private static long count = 0;
public enum Gender {
MALE, FEMALE, UNKNOWN
}
public Person() {
this("", "", Gender.UNKNOWN);
}
public Person(String first, String last, Person.Gender gender) {
this.firstname.set(first);
this.lastname.set(last);
this.gender.set(gender);
this.id = count++;
this.fullname.bind(fullNameBinding);
}
public Person(Person person) {
this.firstname.set(person.getFirstname());
this.middlename.set(person.getMiddlename());
this.lastname.set(person.getLastname());
this.suffix.set(person.getSuffix());
this.gender.set(person.getGender());
this.notes.set(person.getNotes());
this.id = person.getId();
this.fullname.bind(fullNameBinding);
}
public final long getId() {
return id;
}
public final ReadOnlyStringProperty fullnameProperty() {
return fullname.getReadOnlyProperty();
}
public final String getFullname() {
return fullname.get();
}
public String getNotes() {
return notes.get();
}
public void setNotes(String notes) {
this.notes.set(notes);
}
public final StringProperty notesProperty() {
return notes;
}
public String getFirstname() {
return firstname.get();
}
public void setFirstname(String firstname) {
this.firstname.set(firstname);
}
public final StringProperty firstnameProperty() {
return firstname;
}
public Person.Gender getGender() {
return gender.get();
}
public void setGender(Person.Gender gender) {
this.gender.set(gender);
}
public final ObjectProperty<Person.Gender> genderProperty() {
return gender;
}
public String getLastname() {
return lastname.get();
}
public void setLastname(String lastname) {
this.lastname.set(lastname);
}
public final StringProperty lastnameProperty() {
return lastname;
}
public String getMiddlename() {
return middlename.get();
}
public void setMiddlename(String middlename) {
this.middlename.set(middlename);
}
public final StringProperty middlenameProperty() {
return middlename;
}
public String getSuffix() {
return suffix.get();
}
public void setSuffix(String suffix) {
this.suffix.set(suffix);
}
public final StringProperty suffixProperty() {
return suffix;
}
@Override
public int hashCode() {
int hash = 3;
hash = 97 * hash + Objects.hashCode(this.id)
+ Objects.hashCode(this.fullname.get())
+ Objects.hashCode(this.notes.get())
+ Objects.hashCode(this.gender.get());
return hash;
}
@Override
public boolean equals(Object obj) {
if (obj == null || getClass() != obj.getClass()) {
return false;
}
final Person other = (Person) obj;
return Objects.equals(this.id, other.id)
&& Objects.equals(this.fullname.get(), other.fullname.get())
&& Objects.equals(this.notes.get(), other.notes.get())
&& Objects.equals(this.gender.get(), other.gender.get());
}
@Override
public String toString() {
return fullname.get();
}
}
FXML Markup
Listing 4.9 shows the FXML for this application, which uses a vertical box (VBox) to hold three controls: a Label and two Buttons.
The VBox is the top or root node. We specify the controller class name (PersonFXBoundController), the preferred width and height, and a linear gradient for the VBox’s background color. The alignment is centered and we specify a 20-pixel spacing between children nodes.
The VBox has three children. Label is the first (so it appears at the top). We provide an fx:id value so we can reference the label in the Java controller code. Next, we define two buttons. For each one, we specify the text and onAction properties. The onAction property references a method that is defined in the controller.
Listing 4.9 PersonFXBound.fxml
<?xml version="1.0" encoding="UTF-8"?>
<?import java.lang.*?>
<?import java.util.*?>
<?import javafx.scene.*?>
<?import javafx.scene.control.*?>
<?import javafx.scene.layout.*?>
<VBox id="VBox" prefHeight="200" prefWidth="320"
xmlns:fx="http://javafx.com/fxml"
fx:controller="personfxappbound.PersonFXBoundController"
alignment="CENTER" spacing="20"
style="-fx-background-color:
linear-gradient(aliceblue, lightblue);">
<Label fx:id="margeLabel" />
<Button text="Change Marge"
onAction="#changeButtonAction" />
<Button text="Reset Marge"
onAction="#resetButtonAction" />
</VBox>
Controller Class
Controller class PersonFXBoundController is shown in Listing 4.10. Annotation @FXML identifies the scene graph object created in FXML (Label margeLabel) as well as the two action methods referenced in the FXML (resetButtonAction() and changeButtonAction()). The controller creates one Person object (marge).
Method initialize() is invoked after the scene graph is created. Here we specify that the label’s text property is bound to the fullname property of Person marge.
Both button action methods modify the middlename property of Person marge. The binding keeps the label synchronized with the updated fullname property.
Listing 4.10 PersonFXBoundController.java
package personfxappbound;
import com.asgteach.familytree.model.Person;
import java.net.URL;
import java.util.ResourceBundle;
import javafx.event.ActionEvent;
import javafx.fxml.FXML;
import javafx.fxml.Initializable;
import javafx.scene.control.Label;
public class PersonFXBoundController implements Initializable {
@FXML
private Label margeLabel;
final Person marge = new Person("Marge", "Simpson", Person.Gender.FEMALE);
@FXML
private void changeButtonAction(ActionEvent event) {
marge.setMiddlename("Louise");
}
@FXML
private void resetButtonAction(ActionEvent event) {
marge.setMiddlename("");
}
@Override
public void initialize(URL url, ResourceBundle rb) {
// margeLabel uses binding to keep the textfield synchronized
// with Person marge
margeLabel.textProperty().bind(marge.fullnameProperty());
}
}
JavaFX Application Code
Listing 4.11 shows the Java application code that reads the FXML, starts the JavaFX Application Thread, and instantiates the scene graph.
Listing 4.11 PersonFXAppBound.java
package personfxappbound;
import javafx.application.Application;
import javafx.fxml.FXMLLoader;
import javafx.scene.Parent;
import javafx.scene.Scene;
import javafx.stage.Stage;
public class PersonFXAppBound extends Application {
@Override
public void start(Stage stage) throws Exception {
Parent root = FXMLLoader.load(getClass()
.getResource("PersonFXBound.fxml"));
Scene scene = new Scene(root);
stage.setScene(scene);
stage.setTitle("Person Bind Example");
stage.show();
}
public static void main(String[] args) {
launch(args);
}
}
4.3 Observable Collections
The examples so far deal only with observable variables. JavaFX also has observable collections that let you observe when changes are made as you add to, remove from, or update a collection. You react to changes by attaching change listeners or invalidation listeners to these collections.
Significantly, collections signal change events by using the item’s equals() method. If you replace one item with another, no change event is fired if the two items are equal. Thus, we need to make sure that a modified Person object with perhaps just an updated notes property or middlename property generates a change event. (This is why the Person class equals() verifies that all Person properties are equal, as shown in Listing 4.7 on page 138.)
Listing 4.12 shows the FamilyTreeManager class implemented with JavaFX collections. We create an observable map using static method observableHashMap(). FXCollections provides static methods that return observable versions of the same collection types as java.util.Collections.
The FamilyTreeManager forwards methods addPerson(), updatePerson(), and deletePerson() to the underlying observable map. Method getAllPeople() returns an ArrayList with copies of the Person items from the observable map using functional operations (see “Functional Data Structures” on page 39 for more information). To encapsulate the implementation of FamilyTreeManager as much as possible, we provide addListener() and removeListener() methods and forward these to the underlying observable map.
Listing 4.12 FamilyTreeManager—Using ObservableMap
package com.asgteach.familytree.model;
import javafx.collections.FXCollections;
import javafx.collections.ObservableMap;
public class FamilyTreeManager {
private final ObservableMap<Long, Person> observableMap =
FXCollections.observableHashMap();
private static FamilyTreeManager instance = null;
protected FamilyTreeManager() {
// Singleton class: prevent direct instantiation
}
public static FamilyTreeManager getInstance() {
if (instance == null) {
instance = new FamilyTreeManager();
}
return instance;
}
public void addListener(
MapChangeListener<? super Long, ? super Person> ml) {
observableMap.addListener(ml);
}
public void removeListener(
MapChangeListener<? super Long, ? super Person> ml) {
observableMap.removeListener(ml);
}
public void addListener(InvalidationListener il) {
observableMap.addListener(il);
}
public void removeListener(InvalidationListener il) {
observableMap.removeListener(il);
}
public void addPerson(Person p) {
Person person = new Person(p);
observableMap.put(person.getId(), person);
}
public void updatePerson(Person p) {
Person person = new Person(p);
observableMap.put(person.getId(), person);
}
public void deletePerson(Person p) {
observableMap.remove(p.getId());
}
public List<Person> getAllPeople() {
List<Person> copyList = new ArrayList<>();
observableMap.values().stream().forEach((p) ->
copyList.add(new Person(p)));
return copyList;
}
}
Let’s show you how to use the FamilyTreeManager in program PersonFXAppCoarse. Since this program does not create a JavaFX scene graph, we create a standard Java application using the following steps.
1. Select File | New Project from the NetBeans top-level menu. Select Java under Categories and Java Application under Projects.
2. NetBeans displays the Name and Location dialog. Specify PersonFXAppCoarse for Project Name and accept the defaults for the remaining fields, as shown in Figure 4.6. Click Finish.

3. Create package com.asgteach.familytree.model and add files Person.java (as shown in Listing 4.8 on page 142) and FamilyTreeManager.java (as shown in Listing 4.12 on page 149).
The main program, class PersonFXAppCoarse.java, is shown in Listing 4.13. This program manipulates Person objects with the FamilyTreeManager.
After obtaining the singleton FamilyTreeManager object, we add listener mapChangeListener. The program then creates two Person objects (homer and marge) and adds them to the FamilyTreeManager with addPerson(). Because we attach a change listener, the addPerson() generates change events. To test the behavior of the observable map, the program invokes addPerson() again with marge and no change event is fired.
Next, the program modifies both Person objects and invokes method updatePerson(). Again we observe change events.
Finally, Person marge is removed with deletePerson() twice. The first remove generates a change event and the second remove does not.
Listing 4.13 PersonFXAppCoarse—ObservableMap in Action
package personfxapp;
import com.asgteach.familytree.model.FamilyTreeManager;
import com.asgteach.familytree.model.Person;
import javafx.collections.MapChangeListener;
public class PersonFXApp {
public static void main(String[] args) {
final FamilyTreeManager ftm = FamilyTreeManager.getInstance();
// Attach a change listener to FamilyTreeManager
ftm.addListener(mapChangeListener);
final Person homer = new Person("Homer", "Simpson", Person.Gender.MALE);
final Person marge = new Person("Marge", "Simpson",
Person.Gender.FEMALE);
// Add Person objects
ftm.addPerson(homer);
ftm.addPerson(marge);
// add marge again, no change event
ftm.addPerson(marge);
homer.setMiddlename("Chester");
homer.setSuffix("Junior");
// Update homer
ftm.updatePerson(homer);
marge.setMiddlename("Louise");
marge.setLastname("Bouvier-Simpson");
// Update marge
ftm.updatePerson(marge);
ftm.deletePerson(marge);
// delete marge again, no change event
ftm.deletePerson(marge);
}
. . . mapChangeListener shown in Listing 4.14 . . .
}
Listing 4.14 shows the MapChangeListener for this program. The change event (type MapChangeListener.Change<Long, Person>) includes boolean methods wasAdded() and wasRemoved(). Both of these methods return true when the map is updated. You can access the new value with getValueAdded() and the removed or replaced value with getValueRemoved(). Method getValueRemoved() returns null when an object is added, and getValueAdded() returns null when an object is removed. Method getMap() returns the updated map.
Listing 4.14 MapChangeListener for FamilyTreeManager
// MapChangeListener<Long, Person> for FamilyTreeManager
private static final MapChangeListener<Long, Person> mapChangeListener =
(change) -> {
if (change.wasAdded() && change.wasRemoved()) {
System.out.println(" UPDATED");
} else if (change.wasAdded()) {
System.out.println(" ADDED");
} else if (change.wasRemoved()) {
System.out.println(" REMOVED");
}
System.out.println(" map = " + change.getMap());
System.out.println(" " + change.getValueAdded()
+ " was added [" + change.getKey() + "].");
System.out.println(" " + change.getValueRemoved()
+ " was removed [" + change.getKey() + "].");
};
Listing 4.15 shows the console output after running program PersonFXAppCoarse. Tracking the changes, you see that Person homer is added, Person marge is added, Person homer is updated, Person marge is updated, and lastly Person marge is removed. Note that the second add for Person marge is not observed as well as the second removal of Person marge.
Listing 4.15 Program PersonFXAppCoarse Output
Output:
ADDED
map = {0=Homer Simpson}
Homer Simpson was added [0].
null was removed [0].
ADDED
map = {0=Homer Simpson, 1=Marge Simpson}
Marge Simpson was added [1].
null was removed [1].
UPDATED
map = {0=Homer Chester Simpson Junior, 1=Marge Simpson}
Homer Chester Simpson Junior was added [0].
Homer Simpson was removed [0].
UPDATED
map = {0=Homer Chester Simpson Junior, 1=Marge Louise Bouvier-Simpson}
Marge Louise Bouvier-Simpson was added [1].
Marge Simpson was removed [1].
REMOVED
map = {0=Homer Chester Simpson Junior}
null was added [1].
Marge Louise Bouvier-Simpson was removed [1].
4.4 JavaFX Applications
We are now ready to build a JavaFX application with the Person and FamilyTreeManager classes using JavaFX properties and observable collections. This is the JavaFX equivalent of the Swing program presented in Chapter 2 (program PersonSwingAppEnhancedUI described in “Improving the User Experience” on page 63). In this JavaFX example, we display Person objects from the FamilyTreeManager in the left side of the application using the JavaFX TreeView control. Users edit the selected Person object with the form on the right side. The Update button is only enabled when the user makes modifications using the UI controls. The Person editor form is cleared when the user clicks on the top (root) node of the TreeView.
Figure 4.7 shows the JavaFX version of this application (project PersonFXMLAppEnhancedUI) running with the user making edits to Person Lisa Simpson.
Program Structure
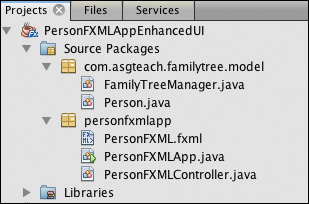
Use the NetBeans IDE to create a new JavaFX FXML Application, as described previously (see “Creating a JavaFX FXML Application” on page 139). Figure 4.8 shows the project structure of this application in the NetBeans IDE. Like the Swing programs you’ve seen, the FamilyTreeManager and Person source files are in the package com.asgteach.familytree.model. Since the application code is structured for FXML, you see three source files: the FXML (PersonFXML.fxml), the controller class (PersonFXMLController), and the main application code (PersonFXMLApp), all in package personfxmlapp.
Before we examine the FXML and controller class, let’s look at the main application code as shown in Listing 4.16. Here you see the now-familiar code that reads and loads the scene graph from the FXML file and configures and shows the stage, the main window for JavaFX applications.
Listing 4.16 PersonFXMLApp JavaFX Application
package personfxmlapp;
import javafx.application.Application;
import javafx.fxml.FXMLLoader;
import javafx.scene.Parent;
import javafx.scene.Scene;
import javafx.stage.Stage;
public class PersonFXMLApp extends Application {
@Override
public void start(Stage stage) throws Exception {
Parent root = FXMLLoader.load(getClass().getResource(
"PersonFXML.fxml"));
Scene scene = new Scene(root);
stage.setTitle("Person FX Application");
stage.setScene(scene);
stage.show();
}
public static void main(String[] args) {
launch(args);
}
}
Scene Builder and FXML
So far we’ve built our FXML markup by manually editing the FXML and configuring the properties of the JavaFX controls we need. This works great for simple JavaFX scene graphs. However, the more controls you add, the more difficult this approach becomes. It’s much nicer to have a visual editor to help you with the layout and generate the FXML markup for you.
Scene Builder is a stand-alone application that lets you create a JavaFX scene. Similar to the Swing Form Designer, you place controls on the design area through drag and drop and use context menus and property sheets to configure the controls. Scene Builder is written in JavaFX so you have some nice UI graphics that help you create your application’s design.
Once you download and install Scene Builder,3 NetBeans automatically brings it up when you open an FXML file (via Open or double-click). If you don’t want to have Scene Builder edit your FXML, just open the FXML file with Edit.
3. You can download Scene Builder for free at www.oracle.com.
Figure 4.9 shows the Scene Builder layout designer where you visually place and position controls. Here you see the controls we use for the PersonFXMLAppEnhancedUI application. Note that the text field opposite label First is highlighted.
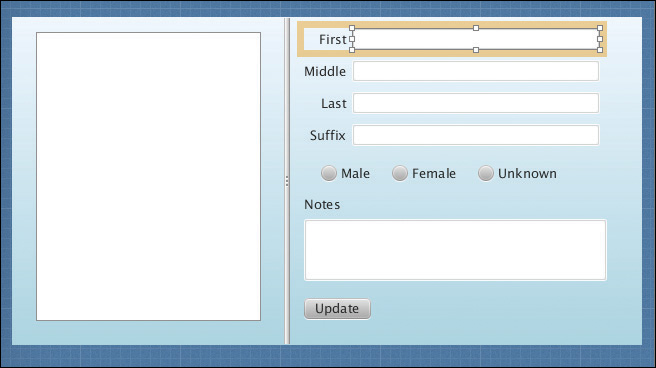
Figure 4.10 shows the Scene Builder Hierarchy that displays an expandable/collapsible tree of your scene graph as well as the Inspector that lets you inspect and configure the controls in your design. The same text field that is highlighted in the design view is also highlighted in the Hierarchy.

The Inspector is divided into three categories: Properties (collapsed), Layout (which is currently shown), and Code (not shown in this view). The Inspector is handy for specifying the FXML references from your controller class and for configuring other node properties.
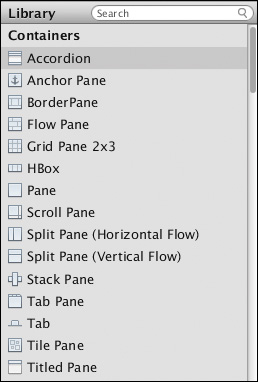
Figure 4.11 shows the Scene Builder Library selector. You use the Library selector to add basic controls, pop-up controls, containers, menu content, shapes, charts, and miscellaneous items to your layout design. The Library selector has a search mechanism that helps you quickly find and select the component you need.
There is a tie between an FXML file and its controller class. Scene Builder reads the designated controller class and provides references in drop down menus that are marked with the @FXML annotation in the controller class. Scene Builder does not modify the controller class.
However, you can use the FXML file’s Make Controller menu item to synchronize the controller code with FXML edits. After saving the FXML file in Scene Builder, select the Make Controller menu item in NetBeans. NetBeans will add or remove @FXML annotated fields and methods in the controller class. As you gain experience working with Scene Builder, you’ll discover the work flow that’s right for you.
Remember, Scene Builder generates FXML code, not Java. Let’s look at the FXML Scene Builder generated for our sample application, shown in Listing 4.17. First, you’ll see that Scene Builder generates very readable FXML. Secondly, Scene Builder favors layout container AnchorPane, which lets you specify how its contained children should behave when the window is resized.
The main window for the application uses an AnchorPane that contains a SplitPane control. The SplitPane (with a left side and a right side) has an AnchorPane for each side. The TreeView control is on the left side and the right side holds the form for editing a Person. This includes a VBox with multiple HBox controls (one for each label and text field), an HBox to hold the radio buttons, a text area for the notes, and an Update button.
The SplitPane control has a linear gradient configured for its background property. The TreeView control is configured for a specific size (properties prefHeight and prefWidth), and the AnchorPane settings resize the TreeView dynamically to maintain its configured anchors.
Each radio button belongs to the same toggle group (providing the mutual exclusion behavior on selection), and its action event references method genderSelectionAction(), which is defined in the controller class. Note that the first radio button creates the toggle group, but the second and third radio buttons use the notation
toggleGroup="$genderToggleGroup"
which references the already-created toggle group.
Each text field and associated label appears in an HBox. The text field has an fx:id (so the controller class can reference it) and an onKeyReleased key event reference for the handleKeyAction() event handler, defined in the controller class.
The text area has a similar configuration as the text fields, with an fx:id and an onKeyReleased key event reference. You’ll recognize (from the Swing applications in Chapter 2) that these event handlers detect when a user edits Person properties and subsequently enable the Update button.
Finally, the Update button has text “Update,” an fx:id reference, and an action event reference for the updateButtonAction() event handler.
Listing 4.17 Scene Builder Generated FXML
<?import java.lang.*?>
<?import java.util.*?>
<?import javafx.scene.*?>
<?import javafx.scene.control.*?>
<?import javafx.scene.layout.*?>
<AnchorPane id="AnchorPane" prefHeight="328.0" prefWidth="630.0"
xmlns:fx="http://javafx.com/fxml"
fx:controller="personfxmlapp.PersonFXMLController">
<children>
<SplitPane dividerPositions="0.43630573248407645" focusTraversable="true"
prefHeight="328.0" prefWidth="630.0"
style="-fx-background-color: linear-gradient(aliceblue, lightblue);"
AnchorPane.bottomAnchor="0.0"
AnchorPane.leftAnchor="0.0"
AnchorPane.rightAnchor="0.0"
AnchorPane.topAnchor="0.0">
<items>
<AnchorPane minHeight="0.0" minWidth="0.0"
prefHeight="340.0" prefWidth="257.0">
<children>
<TreeView fx:id="personTreeView" prefHeight="289.0"
prefWidth="225.0" AnchorPane.bottomAnchor="23.0"
AnchorPane.leftAnchor="23.0" AnchorPane.rightAnchor="23.0"
AnchorPane.topAnchor="14.0" />
</children>
</AnchorPane>
<AnchorPane minHeight="0.0" minWidth="0.0" prefHeight="326.0"
prefWidth="351.9998779296875">
<children>
<HBox id="HBox" alignment="CENTER_RIGHT" layoutX="31.0"
layoutY="147.0" spacing="20.0">
<children>
<RadioButton fx:id="maleRadioButton"
onAction="#genderSelectionAction" text="Male">
<toggleGroup>
<ToggleGroup fx:id="genderToggleGroup" />
</toggleGroup>
</RadioButton>
<RadioButton fx:id="femaleRadioButton"
onAction="#genderSelectionAction" text="Female"
toggleGroup="$genderToggleGroup" />
<RadioButton fx:id="unknownRadioButton"
onAction="#genderSelectionAction" text="Unknown"
toggleGroup="$genderToggleGroup" />
</children>
</HBox>
<VBox id="VBox" alignment="TOP_CENTER" layoutX="14.0"
layoutY="10.0" spacing="10.0">
<children>
<HBox id="HBox" alignment="CENTER_RIGHT" spacing="5.0">
<children>
<Label text="First" />
<TextField fx:id="firstnameTextField"
onKeyReleased="#handleKeyAction" prefWidth="248.0" />
</children>
</HBox>
. . . other <HBox> elements for the rest of the text fields . . .
</children>
</VBox>
<Label layoutX="14.0" layoutY="178.0" text="Notes" />
<TextArea fx:id="notesTextArea" layoutX="14.0" layoutY="201.0"
onKeyReleased="#handleKeyAction" prefHeight="62.0"
prefWidth="303.0" wrapText="true" />
<Button fx:id="updateButton" layoutX="14.0" layoutY="280.0"
mnemonicParsing="false" onAction="#updateButtonAction"
text="Update" />
</children>
</AnchorPane>
</items>
</SplitPane>
</children>
</AnchorPane>
JavaFX Controls
Before we examine the controller class, let’s look at a partial hierarchy of the JavaFX controls, shown in Figure 4.12 and Figure 4.13. Node extends Object, Parent extends Node, and Control extends Parent. We don’t use most of these controls in our application, but the diagrams let you see how the TextField, Label, TextArea, RadioButton, Button, and TreeView controls fit into the JavaFX Control class hierarchy.
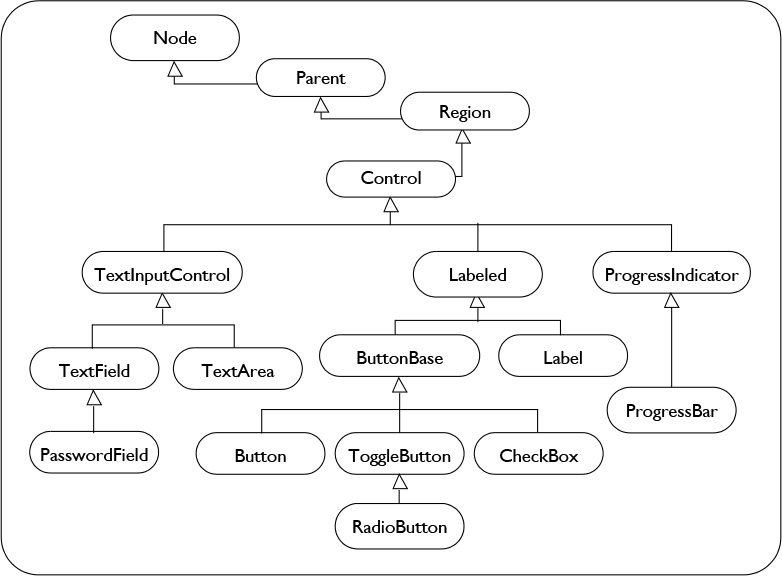
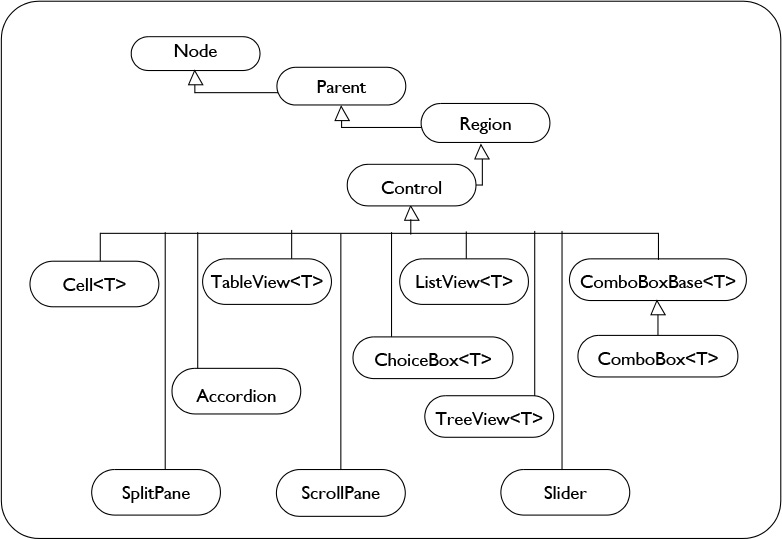
Labeled is a superclass of Label, CheckBox, and other button controls. Many of the controls in Figure 4.13 are generic, with <T> denoting the type of item contained within the control. JavaFX controls are manipulated with their JavaFX properties and you can attach listeners to these properties or use them in binding expressions. We’ll show you examples of binding properties and attaching listeners with controls in this section.
Let’s look at some of the controls we use in our JavaFX application.
Label
Like Swing’s JLabel, Label holds non-editable text. Label can display text, images, or both. If the text does not fit in the label, the label uses ellipsis to indicate truncated text. In our example, we define all the Label controls in FXML and do not need to reference them in the controller class. Here’s how to create a Label in Java code.
Label mylabel = new Label("First");
TextField
The TextField control lets users edit a single line of text. We define a key released event handler for all of the text fields and configure a bidirectional binding between the text field and its corresponding Person property. Here, for example, is the binding for the text field that edits the firstname Person property referenced by person.
firstnameTextField.textProperty()
.bindBidirectional(person.firstnameProperty());
Because the binding is bidirectional, a change to either the text property in the TextField control or the firstname property in the Person object updates the corresponding property.
TextArea
We use a TextArea control to edit the Person notes property. The TextArea control lets users edit multi-line text. Similar to the TextField, we configure a key released event handler and specify bidirectional binding. Here is the binding expression we use for the TextArea.
notesTextArea.textProperty().bindBidirectional(person.notesProperty());
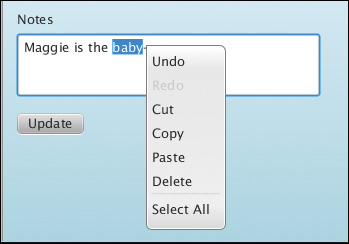
TextArea also has a built-in context menu that helps you edit text, as shown in Figure 4.14.
RadioButton
RadioButton is a Labeled control that’s similar to Swing’s JRadioButton. You specify a toggle group when radio buttons must be mutually exclusive. Here is the FXML that sets up a toggle group and adds three radio buttons to it. For each radio button, we specify an fx:id reference and method genderSelectionAction(), the action event handler implemented in the controller class.
<RadioButton fx:id="maleRadioButton"
onAction="#genderSelectionAction" text="Male">
<toggleGroup>
<ToggleGroup fx:id="genderToggleGroup" />
</toggleGroup>
</RadioButton>
<RadioButton fx:id="femaleRadioButton"
onAction="#genderSelectionAction" text="Female"
toggleGroup="$genderToggleGroup" />
<RadioButton fx:id="unknownRadioButton"
onAction="#genderSelectionAction" text="Unknown"
toggleGroup="$genderToggleGroup" />
Button
Button is a Labeled control that presents a “pushed” graphic when clicked and invokes an action event handler if one is configured. Here’s the FXML we use to define the Update button.
<Button fx:id="updateButton" layoutX="14.0" layoutY="280.0"
onAction="#updateButtonAction" text="Update" />
Property fx:id is the reference name of the button in the controller class. Method updateButtonAction() is the button’s action handler defined in the controller class.
TreeView
The TreeView control presents a hierarchical display of items that can be expanded and collapsed. Here’s the FXML we use to define the TreeView control. Configuring the AnchorPane setting enables the TreeView control to resize as its containing layout control resizes.
<TreeView fx:id="personTreeView" prefHeight="289.0" prefWidth="225.0"
AnchorPane.bottomAnchor="23.0" AnchorPane.leftAnchor="23.0"
AnchorPane.rightAnchor="23.0" AnchorPane.topAnchor="14.0" />
The items are displayed with TreeItem<Person>, which we build in the controller class. First, we create a “People” root node and then build the rest of the TreeItem objects. Next, we set the root node of the TreeView with setRoot() and specify that the root node should be expanded initially. FamilyTreeManager method getAllPeople() returns a list, which we use to build the TreeItems for the TreeView.
TreeItem<Person> rootNode = new TreeItem<>(new Person(
"People", "", Person.Gender.UNKNOWN));
// Populate the TreeView control
ftm.getAllPeople().stream().forEach((p) -> {
root.getChildren().add(new TreeItem<>(p));
});
personTreeView.setRoot(rootNode);
personTreeView.getRoot().setExpanded(true);
JavaFX Controller Class
Recall that our application lets users select a Person item from the left-side TreeView UI control (see Figure 4.7 on page 154). When a Person is selected, that Person appears in the Person form editor on the right side. The Update button remains disabled until the user edits the Person.
Upon finishing editing, the user updates the application with new values for the Person by clicking the Update button. The FamilyTreeManager updates the application, and the TreeView displays the new values (if any) of the just-edited Person item.
Users can also select the top node (the root node), in which case the Person form editor clears and the Update button is disabled. Any edits made in the Person form editor are lost if the user selects a new item without saving the changes.
Let’s look at the controller class now. This class provides method initialize() to configure the scene graph. The controller class is also responsible for defining the event handlers, change listeners, and other support code that implements the behavior we just described.
Listing 4.18 shows the controller class’s declaration section, where we define any objects created in the FXML file that are accessed here in the controller class. Recall that the FXML loader is responsible for instantiating these objects, so you won’t see any code that creates them.
We also create a Logger object (see “Java Logging Facility” on page 51 for a description) and a FamilyTreeManager instance. There are also several class variables here. Variable thePerson holds the currently selected Person from the TreeView control. Variable genderBinding is a custom binding object that keeps the Person gender property synchronized with the form editor. The changeOK boolean keeps track of when the application should listen for user edits. BooleanProperty enableUpdateProperty (a JavaFX property) controls the Update button’s disable property with binding.
Tip
We could just manually control the Update button’s disable property. However, having a separate property lets us configure different artifacts or controls later, especially if we no longer use the Update button.
Listing 4.18 PersonFXMLController—Controller Class
public class PersonFXMLController implements Initializable {
@FXML
private TextField firstnameTextField;
@FXML
private TextField middlenameTextField;
@FXML
private TextField lastnameTextField;
@FXML
private TextField suffixTextField;
@FXML
private RadioButton maleRadioButton;
@FXML
private RadioButton femaleRadioButton;
@FXML
private RadioButton unknownRadioButton;
@FXML
private TextArea notesTextArea;
@FXML
private TreeView<Person> personTreeView;
@FXML
private Button updateButton;
private static final Logger logger = Logger.getLogger(
PersonFXMLController.class.getName());
private final FamilyTreeManager ftm = FamilyTreeManager.getInstance();
private Person thePerson = null;
private ObjectBinding<Person.Gender> genderBinding;
private boolean changeOK = false;
private BooleanProperty enableUpdateProperty;
Listing 4.19 shows the controller’s initialize() method. This method configures the Logger object, instantiates the enableUpdateProperty, binds the Update button to the inverse of the enableUpdateProperty (with .not(), see “Fluent API and Bindings API” on page 113), and defines the custom binding object for the gender property. Method buildData() (shown next) populates the FamilyTreeManager with Person objects. We then build and configure the TreeView control. Note that we also attach a listener to the selection property of the TreeView’s underlying model.
Listing 4.19 Controller Class initialize() Method
@Override
public void initialize(URL url, ResourceBundle rb) {
// Change level to Level.INFO to reduce console messages
logger.setLevel(Level.FINE);
Handler handler = new ConsoleHandler();
handler.setLevel(Level.FINE);
logger.addHandler(handler);
try {
FileHandler fileHandler = new FileHandler();
// records sent to file javaN.log in user's home directory
fileHandler.setLevel(Level.FINE);
logger.addHandler(fileHandler);
logger.log(Level.FINE, "Created File Handler");
} catch (IOException | SecurityException ex) {
logger.log(Level.SEVERE, "Couldn't create FileHandler", ex);
}
enableUpdateProperty = new SimpleBooleanProperty(
this, "enableUpdate", false);
updateButton.disableProperty().bind(enableUpdateProperty.not());
// the radio button custom binding
genderBinding = new ObjectBinding<Person.Gender>() {
{
super.bind(maleRadioButton.selectedProperty(),
femaleRadioButton.selectedProperty(),
unknownRadioButton.selectedProperty());
}
@Override
protected Person.Gender computeValue() {
if (maleRadioButton.isSelected()) {
return Person.Gender.MALE;
} else if (femaleRadioButton.isSelected()) {
return Person.Gender.FEMALE;
} else {
return Person.Gender.UNKNOWN;
}
}
};
buildData();
TreeItem<Person> rootNode = new TreeItem<>(
new Person("People", "", Person.Gender.UNKNOWN));
buildTreeView(rootNode);
personTreeView.setRoot(rootNode);
personTreeView.getRoot().setExpanded(true);
personTreeView.getSelectionModel().selectedItemProperty()
.addListener(treeSelectionListener);
}
Listing 4.20 shows the code for private methods buildData() and buildTreeView(). The buildData() method adds Person objects for Homer, Marge, Bart, Lisa, and Maggie to the FamilyTreeManager. The buildTreeView() method fetches Person objects from the FamilyTreeManager to create each TreeItem<Person> object, adding the item to the root node. Note that we also attach a listener to the FamilyTreeManager (its underlying observable map).
Listing 4.20 Methods buildData() and buildTreeView()
private void buildData() {
ftm.addPerson(new Person("Homer", "Simpson", Person.Gender.MALE));
ftm.addPerson(new Person("Marge", "Simpson", Person.Gender.FEMALE));
ftm.addPerson(new Person("Bart", "Simpson", Person.Gender.MALE));
ftm.addPerson(new Person("Lisa", "Simpson", Person.Gender.FEMALE));
ftm.addPerson(new Person("Maggie", "Simpson", Person.Gender.FEMALE));
logger.log(Level.FINE, ftm.getAllPeople().toString());
}
private void buildTreeView(TreeItem<Person> root) {
// listen for changes to the familytreemanager's map
ftm.addListener(familyTreeListener);
// Populate the TreeView control
ftm.getAllPeople().stream().forEach((p) -> {
root.getChildren().add(new TreeItem<>(p));
});
}
TreeView Selection Listener
This JavaFX application includes several listeners that react to changes much like the Swing version (see Listing 2.19 on page 60 and Listing 2.21 on page 63). First, we have the TreeView selection change listener, which we attach to the selection property of the TreeView model as follows. This listener is invoked when the user selects a different item in the TreeView.
personTreeView.getSelectionModel().selectedItemProperty()
.addListener(treeSelectionListener);
Recall that ChangeListeners use generics so that observable values passed in the change event handler can be accessed without type casting. Listing 4.21 shows the code for the tree selection change listener. When a user selects a different Person item, the application performs the following tasks. Specifically, the change listener
• sets the enableUpdateProperty to false (which, because of binding, disables the Update button)
• disallows edits in the Person form editor until a new Person is displayed
• clears the Person editing form and returns if the new selection is either the root TreeView item or null (returned when the user collapses the tree view and a leaf node is selected)
• makes a copy of the selected Person object and configures its bindings. This populates the Person form editor with the newly selected Person’s data. The gender property is a bit tricky, since its type is a Person.Gender enum that corresponds to separate radio buttons.
Once the Person form editor and class variable thePerson are configured, the listener sets boolean changeOK to true, which allows the user to make edits in the Person form editor. The Update button remains disabled.
Listing 4.21 ChangeListener for TreeView Model Selection Property
// TreeView selected item event handler
private final ChangeListener<TreeItem<Person>> treeSelectionListener =
(ov, oldValue, newValue) -> {
TreeItem<Person> treeItem = newValue;
logger.log(Level.FINE, "selected item = {0}", treeItem);
enableUpdateProperty.set(false);
changeOK = false;
if (treeItem == null || treeItem.equals(personTreeView.getRoot())) {
clearForm();
return;
}
// set thePerson to the selected treeItem value
thePerson = new Person(treeItem.getValue());
logger.log(Level.FINE, "selected person = {0}", thePerson);
configureEditPanelBindings(thePerson);
// set the gender from Person, then configure the genderBinding
if (thePerson.getGender().equals(Person.Gender.MALE)) {
maleRadioButton.setSelected(true);
} else if (thePerson.getGender().equals(Person.Gender.FEMALE)) {
femaleRadioButton.setSelected(true);
} else {
unknownRadioButton.setSelected(true);
}
thePerson.genderProperty().bind(genderBinding);
changeOK = true;
};
Listing 4.22 shows methods configureEditPanelBindings() and clearForm(). Method configureEditPanelBindings() is interesting and deserves a closer look. Note that although bindBidirectional() appears to be symmetric, it is not. That is, when you bind bidirectionally with
a.bindBidirectional(b);
property a takes on the value of property b initially. From then on, the binding is symmetric, where b will take on a’s value if a changes and a will take on b’s value if b changes. With this in mind, note that in method configureEditPanelBindings(), the UI controls invoke the bindBidirectional() method for several properties. This is how we initially configure the UI controls with the Person’s property values and subsequently update the Person’s properties with user edits.
Method clearForm() provides a straightforward clearing of the UI controls.
Listing 4.22 Configure Bindings and Clear Person Form Editor
private void configureEditPanelBindings(Person p) {
firstnameTextField.textProperty()
.bindBidirectional(p.firstnameProperty());
middlenameTextField.textProperty()
.bindBidirectional(p.middlenameProperty());
lastnameTextField.textProperty()
.bindBidirectional(p.lastnameProperty());
suffixTextField.textProperty().bindBidirectional(p.suffixProperty());
notesTextArea.textProperty().bindBidirectional(p.notesProperty());
}
private void clearForm() {
firstnameTextField.setText("");
middlenameTextField.setText("");
lastnameTextField.setText("");
suffixTextField.setText("");
notesTextArea.setText("");
maleRadioButton.setSelected(false);
femaleRadioButton.setSelected(false);
unknownRadioButton.setSelected(false);
}
We detect when the user makes changes by listening for key released events with the text field and text area controls. Here is the FXML for the TextField control for editing Person property firstname, where property onKeyReleased is set to method handleKeyAction().
<TextField fx:id="firstnameTextField"
onKeyReleased="#handleKeyAction" prefWidth="248.0" />
Similarly, here is the FXML for the RadioButton control where property onAction is set to method genderSelectionAction(). A radio button selection change invokes the onAction event handler.
<RadioButton fx:id="femaleRadioButton"
onAction="#genderSelectionAction" text="Female"
toggleGroup="$genderToggleGroup" />
Listing 4.23 shows the code for both event handlers. The @FXML annotation makes these method names accessible from the FXML markup. Once the user makes a change (either by releasing a key in the text input controls or by making a selection change with the radio buttons), the handlers set the enableUpdateProperty to true. Because of binding, this enables the Update button.
Listing 4.23 Control onKeyReleased and RadioButton Selection Handlers
@FXML
private void handleKeyAction(KeyEvent ke) {
if (changeOK) {
enableUpdateProperty.set(true);
}
}
@FXML
private void genderSelectionAction(ActionEvent event) {
if (changeOK) {
enableUpdateProperty.set(true);
}
}
Listing 4.24 shows the Update button event handler. Note that class variable thePerson is kept in sync with the editing controls thanks to the bidirectional binding and the custom binding object for the radio button controls. We set the enableUpdateProperty to false and update the Person in the FamilyTreeManager with updatePerson().
Listing 4.24 Update Button Action Event Handler
@FXML
private void updateButtonAction(ActionEvent event) {
enableUpdateProperty.set(false);
ftm.updatePerson(thePerson);
}
MapChangeListener
FamilyTreeManager method updatePerson() updates the FamilyTreeManager’s observable map with the new Person data. Because we have a listener attached to the FamilyTreeManager observable map, the listener’s event handler is invoked when an update occurs. The event handler method includes the new value. The change listener replaces the Person in the TreeView that corresponds to this new value. Note that we now must compare Person objects using getId(). Person method equals() won’t work, since this method compares all Person properties. Listing 4.25 shows the code.
Listing 4.25 MapChangeListener for FamilyTreeManager’s Map
// MapChangeListener when underlying FamilyTreeManager changes
private final MapChangeListener<Long, Person> familyTreeListener =
(change) -> {
if (change.getValueAdded() != null) {
logger.log(Level.FINE, "changed value = {0}", change.getValueAdded());
// Find the treeitem that this matches and replace it
for (TreeItem<Person> node : personTreeView.getRoot().getChildren()) {
if (change.getKey().equals(node.getValue().getId())) {
// an update returns the new value in getValueAdded()
node.setValue(change.getValueAdded());
return;
}
}
}
};
The above change listener uses TreeView method getRoot().getChildren() to loop through the items in the TreeView. A MapChangeListener change event includes methods getKey() (the key of the Person object that is changed), getValueAdded() (the Person object that is added), and getValueRemoved() (the Person object that is removed). When an object is replaced, getValueAdded() is the new value and getValueRemoved() is the old value. Here, we don’t access the old value, but we make sure that the new value is non-null before attempting to perform the replacement.
A Word About Loose Coupling
Note that this small JavaFX application follows the same principles of loose coupling that we described for the Swing example application (see “Event Handlers and Loose Coupling” on page 59). Specifically, the TreeView UI control is not accessed from the Update button event handler, even though the button event handler knows that a Person object displayed in the TreeView is about to change. Also, the FamilyTreeManager and Person are purely model objects and have no dependencies on any of the UI controls.
JavaFX bidirectional binding provides a convenient way to keep the model object (here Person) in sync with UI controls that let the user change the model’s properties.
Program PersonFXMLAppEnhancedUI provides a functional equivalent of the Swing program PersonSwingAppEnchancedUI.
4.5 Concurrency and Thread Safety
JavaFX, like Swing, is a single-threaded GUI. All changes to the scene graph must occur on the JavaFX Application Thread. This means that if you have a long-running background task, you should execute that task in a separate thread so that your UI remains responsive. “Swing Background Tasks” on page 73 shows you how to do this with Swing using helper class SwingWorker. Let’s apply these same principles of concurrency and thread safety to our JavaFX example.
Concurrency in JavaFX
The JavaFX Platform class has several static methods to help you with multi-threaded applications: runLater() and isFXApplicationThread().
Platform.runLater()
The static runLater() method submits a Runnable to be executed at some unspecified time in the future. This is similar to the SwingUtilities.invokeLater(), where other UI events already scheduled may occur first. Use runLater() from a background thread to execute code that updates the JavaFX scene graph.
Platform.isFXApplicationThread()
The static isFXApplicationThread() method returns true if the calling thread is the JavaFX Application Thread. Use this method when you want to execute code that updates the JavaFX scene graph and you may or may not be in a background thread.
Observable Properties and Thread Safety
A general thread safety issue with JavaFX is that you should not update observable values in a background thread that are bound to or affect properties in the scene graph. Observable values include JavaFX properties that you can bind to, as well as properties that you can attach listeners to. With listeners, however, you can take precautions and place code that updates the scene graph in a Platform.runLater() Runnable. With binding, however, you must ensure that updates to properties occur on the JavaFX Application Thread if property changes affect the scene graph.
For class Person and its many JavaFX properties that can be bound to JavaFX UI controls, we ensure thread safety with thread containment. That is, we only update Person objects in the JavaFX Application Thread. Furthermore, when we use a Person object in a background thread, we always make a thread-safe local copy of it first.
Making the JavaFX version of the FamilyTreeManager thread safe is interesting. First, a caller can attach a change listener to the observable map. If map modifications occur on a background thread, the change event will fire on the background thread. In the Swing version, we address this issue by using SwingPropertyChangeSupport. This helper class configures the change support object to fire property change events on the EDT.
With JavaFX, we’ll take the opposite approach with the FamilyTreeManager code. That is, we put the burden on the caller and require the listener to process any change events in the JavaFX Application Thread. We check to see if the method is invoked on the JavaFX Application Thread and process the change by invoking Platform.runLater(). This ensures that any change to the scene graph is performed on the JavaFX Application Thread. Listing 4.26 shows the modified MapChangeListener method in the PersonFXMLController class.
Listing 4.26 Modified MapChangeListener
// MapChangeListener when underlying FamilyTreeManager changes
// Check to see if on FXT, if not call Platform.runLater()
private final MapChangeListener<Long, Person> familyTreeListener =
change -> {
if (Platform.isFxApplicationThread()) {
logger.log(Level.FINE, "Is JavaFX Application Thread");
updateTree(change);
} else {
logger.log(Level.FINE, "Is BACKGROUND Thread");
Platform.runLater(()-> updateTree(change));
}
};
private void updateTree(MapChangeListener.Change<? extends Long,
? extends Person> change) {
if (change.getValueAdded() != null) {
// Find the treeitem that this matches and replace it
for (TreeItem<Person> node :
personTreeView.getRoot().getChildren()) {
if (change.getKey().equals(node.getValue().getId())) {
// an update returns the new value in getValueAdded()
node.setValue(change.getValueAdded());
return;
}
}
}
}
Listing 4.27 shows the thread-safe JavaFX version of FamilyTreeManager, which follows many of the steps we showed you in the Swing version from Chapter 2. The observable map uses a ConcurrentHashMap as its underlying collection. Method getInstance() and the add and remove listener methods are also synchronized.
In the methods that make changes to the map, we first make a copy of Person. Method getAllPeople() also makes copies of each Person item as it populates a list. These methods are synchronized.
Listing 4.27 Thread-Safe FamilyTreeManager
package com.asgteach.familytree.model;
import java.util.ArrayList;
import java.util.List;
import java.util.concurrent.ConcurrentHashMap;
import javafx.beans.InvalidationListener;
import javafx.collections.FXCollections;
import javafx.collections.MapChangeListener;
import javafx.collections.ObservableMap;
public class FamilyTreeManager {
private final ObservableMap<Long, Person> observableMap =
FXCollections.observableMap(new ConcurrentHashMap<Long, Person>());
private static FamilyTreeManager instance = null;
protected FamilyTreeManager() { }
// Thread-safe lazy initialization
public synchronized static FamilyTreeManager getInstance() {
if (instance == null) {
instance = new FamilyTreeManager();
}
return instance;
}
public synchronized void addListener(
MapChangeListener<? super Long, ? super Person> ml) {
observableMap.addListener(ml);
}
public synchronized void removeListener(
MapChangeListener<? super Long, ? super Person> ml) {
observableMap.removeListener(ml);
}
public synchronized void addListener(InvalidationListener il) {
observableMap.addListener(il);
}
public synchronized void removeListener(InvalidationListener il) {
observableMap.removeListener(il);
}
public synchronized void addPerson(Person p) {
final Person person = new Person(p);
observableMap.put(person.getId(), person);
}
public void updatePerson(Person p) {
// both addPerson and updatePerson use observableMap.put()
addPerson(p);
}
public synchronized void deletePerson(Person p) {
final Person person = new Person(p);
observableMap.remove(person.getId());
}
public synchronized List<Person> getAllPeople() {
List<Person> copyList = new ArrayList<>();
observableMap.values().stream().forEach((p)
-> copyList.add(new Person(p)));
return copyList;
}
}
4.6 JavaFX Background Tasks
JavaFX has a concurrency package, javafx.concurrent, with classes that let you create background tasks and safely monitor a task’s progress, state, and results. The JavaFX concurrency package consists of two main classes, Task and Service, that both implement the Worker interface. A Task is not reusable but a Service is. Let’s examine the Task class and learn how to invoke it in a background thread in our JavaFX FamilyTree application.
Worker and Task
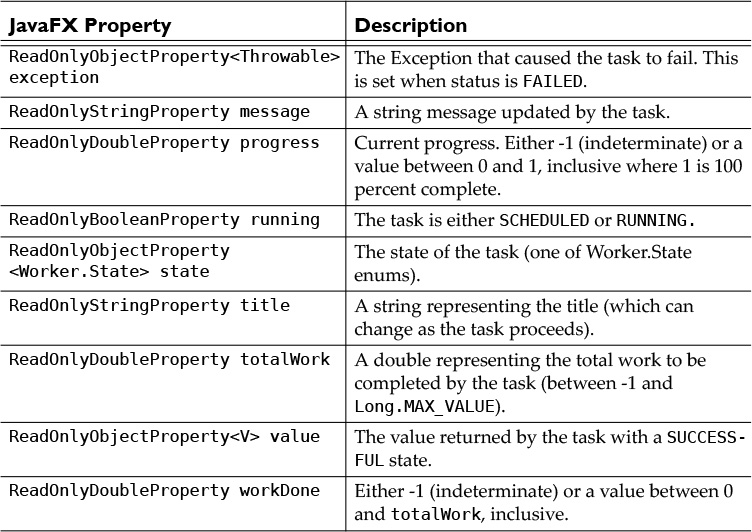
Both the Task and Service classes implement the Worker interface with common JavaFX properties and a well-defined life cycle. We only use Task in our examples, but Service also implements the Worker interface and shares this life cycle behavior and properties. A Task object’s life cycle is defined by Worker.State values shown in Table 4.1. A Worker always begins its life cycle in state READY. It then transitions to SCHEDULED and then RUNNING. It stays in state RUNNING until it either completes or is cancelled. After completion the state is one of SUCCEEDED, FAILED, or CANCELLED.

A Task object maintains several read-only JavaFX properties that you can safely observe from the JavaFX Application Thread. These properties let you monitor the state of a task and access a value upon successful completion or access a task’s progress as it is running. Table 4.2 describes these JavaFX properties.
A Task must provide the call() method, which is invoked in a background thread. Method call() returns a value of its generic type. In addition, you can define callback methods that correspond to the various completion states of the Task in order to process the results depending on the Task’s outcome.
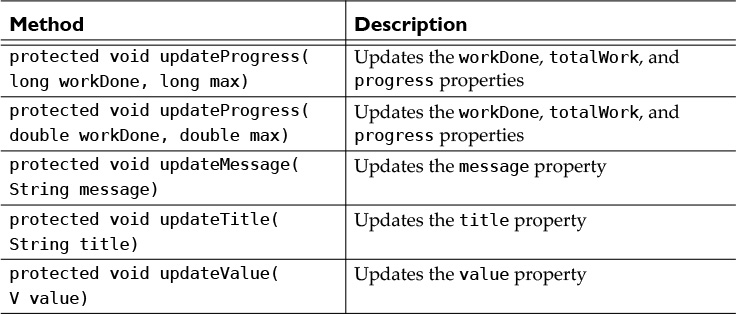
The Task class also provides several methods you can invoke from any thread to update Task properties, as shown in Table 4.3. Note that the update may not happen immediately, and several update calls may be coalesced to reduce event notifications.
With a general description of the JavaFX Task, let’s modify the JavaFX FamilyTree application from the previous section and create a background task to update edited Person items in the FamilyTreeManager. We call this application project PersonFXMLAppMultiThread.
Since the program updates the Person in the FamilyTreeManager in a background task, we’ll add a progress indicator to the scene graph to show that work is being done. Figure 4.15 shows this application running with the added progress indicator visible.
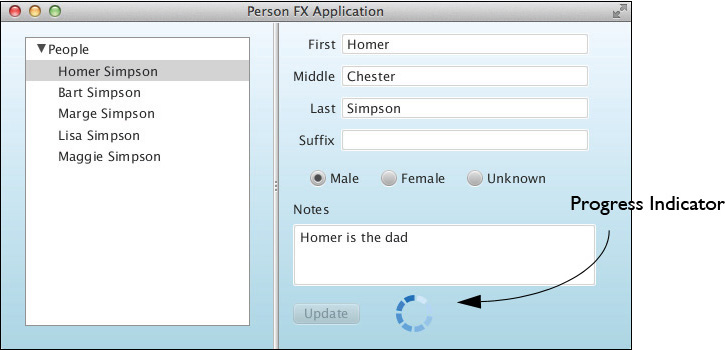
ProgressIndicator
A JavaFX progress indicator control is a circular display that reflects either a percent complete (using a pie-shaped fill for partial completions) or a rotating, dashed circular graphic for indeterminate tasks. The default constructor creates an indeterminate indicator. To create a progress indicator that displays a percentage of completion, specify a starting value for the progress property in the constructor (or in the FXML markup).
Typically, progress indicators are visible only during the execution of a background task. When the task finishes, the indicator becomes invisible again. In this application, we control the progress indicator’s visibility with binding.
To have a progress indicator reflect the completion progress of a task, bind the progress indicator progress property to the progress status of the background task. For example, the following code creates a progress indicator that reflects the completion of a background task called myTask. During the execution of this task, you invoke the Task updateProgress() method as needed. This method, described in Table 4.3, updates the task’s progress, workDone, and totalWork properties in the JavaFX Application Thread, allowing you to safely bind to the progress property.
ProgressIndicator myProgressIndicator = new ProgressIndicator(0.0);
. . .
// Begin a Background Task
. . .
Task<Void> myTask = new Task<Void>() { . . . };
myProgressIndicator.progressProperty().bind(myTask.progressProperty());
new Thread(myTask).start();
// End a background task
Listing 4.28 shows the updated FXML file with the progress indicator added to the scene graph. We use the default constructor, which configures the progress indicator as indeterminate.
Listing 4.28 Add a ProgressIndicator to Scene Graph
<children>
. . .
<Button fx:id="updateButton" layoutX="14.0" layoutY="280.0"
onAction="#updateButtonAction" text="Update" />
<ProgressIndicator fx:id="updateProgressIndicator" layoutX="117.0"
layoutY="272.0" />
</children>
. . .
Most of the changes required to implement the background task are in the Controller class. First, Listing 4.29 shows the changes made to the class declarations and the initialize() method. We provide an @FXML annotation for the progress indicator to control its visibility. We also add an IntegerProperty counter (backgroundActive) that reflects how many background tasks are currently active. We bind the progress indicator’s visibility to this property, using the Fluent API method greaterThan(0). Since we increment property backgroundActive when a background task starts and decrement it when the task completes, the progress indicator remains visible only when a background task is active.
Integer Counter and Thread Safety
Note that we always access property backgroundActive on the JavaFX Application Thread. This means that we can safely update and bind to this property.
Listing 4.29 Changes to Controller Class: Declarations and initialize()
. . .
@FXML
private Button updateButton;
@FXML
private ProgressIndicator updateProgressIndicator;
private static final Logger logger = Logger.getLogger(
PersonFXMLController.class.getName());
private final FamilyTreeManager ftm = FamilyTreeManager.getInstance();
private Person thePerson = null;
private ObjectBinding<Person.Gender> genderBinding;
private boolean changeOK = false;
private BooleanProperty enableUpdateProperty;
private IntegerProperty backgroundActive = new SimpleIntegerProperty(0);
. . .
@Override
public void initialize(URL url, ResourceBundle rb) {
. . .
updateProgressIndicator.visibleProperty()
.bind(backgroundActive.greaterThan(0));
. . .
}
The big change, of course, happens with the Update button’s action event handler, method updateButtonAction(), shown in Listing 4.30. Before the Task is started the event handler must configure a few variables on the JavaFX Application Thread. First, the event handler makes a local copy of class field thePerson. If another Update button click occurs before this task is finished, the subsequent task will have its own copy of the Person object. Second, we disable the Update button (until further edits are made either to this Person or to another Person). Third, we increment the backgroundActive property.
Because we use an indeterminate progress indicator, the Task has very little work to do. It implements method call() to invoke the FamilyTreeManager updatePerson() method.
We create callback methods for a successful completion (setOnSucceeded) and a failed completion (setOnFailed). These methods are always invoked on the JavaFX Application Thread after the Task completes, so you can perform scene graph modifications here. We decrement property backgroundActive. Because of binding, this makes the progress indicator invisible if backgroundActive’s new value is less than 1.
After the Task is fully defined, we start the background thread with
new Thread(updateTask).start();
Note that, as in the Swing examples, we artificially make this a long-running task by including a call to Thread.sleep() in the background thread (in method call()). Method call() returns the updated Person object, which we access within the onSucceeded property’s method. The onFailed property’s method accesses the Exception object (which could be null).
Listing 4.30 Method updateButtonAction()
@FXML
private void updateButtonAction(ActionEvent event) {
// update the family tree manager on a background thread
final Person person = new Person(thePerson);
enableUpdateProperty.set(false);
backgroundActive.set(backgroundActive.get() + 1);
Task<Person> updateTask = new Task<Person>() {
@Override
protected Person call() throws Exception {
Thread.sleep(1000); // for test only
ftm.updatePerson(person);
return person;
}
};
updateTask.setOnSucceeded(t -> {
backgroundActive.set(backgroundActive.get() - 1);
logger.log(Level.FINE, "Update task finished: {0}",
t.getSource().getValue());
logger.log(Level.FINE, "tasks stillInBackground = {0}",
backgroundActive.get());
});
updateTask.setOnFailed(t -> {
backgroundActive.set(backgroundActive.get() - 1);
// t.getSource().getException() could be null
logger.log(Level.WARNING, "Update task failed {0}",
t.getSource().getException() != null
? t.getSource().getException()
: "Unknown failure");
logger.log(Level.FINE, "tasks stillInBackground = {0}",
backgroundActive.get());
});
new Thread(updateTask).start();
}
To show you how all this works, let’s run application PersonFXMLAppMultiThread and edit Person Bart. Here are the log messages produced when we click the Update button to save the changes. As shown, the MapChangeListener event handler is invoked on the background thread (see Listing 4.26 on page 174).
Dec 04, 2013 10:05:35 AM personfxmlapp.PersonFXMLController lambda$6
FINE: selected person = Bart Simpson
Dec 04, 2013 10:06:08 AM personfxmlapp.PersonFXMLController lambda$4
FINE: Is BACKGROUND Thread
Dec 04, 2013 10:06:08 AM personfxmlapp.PersonFXMLController updateTree
FINE: changed value = Bart Seymour Simpson
Dec 04, 2013 10:06:08 AM personfxmlapp.PersonFXMLController lambda$1
FINE: Update task finished: Bart Seymour Simpson
4.7 Monitoring Background Tasks
Now let’s show you several examples that provide periodic or partial results to the main JavaFX Application Thread. These example programs let users initiate a background task that converts the FamilyTreeManager’s Person items to all uppercase. The UI displays each Person when it completes the conversion, and a label shows the current Person being processed. These examples all show you how to safely update the JavaFX UI during execution of a background task.
We discuss several approaches that provide partial results to the main JavaFX Application Thread from a background task, as follows.
• Program PersonFXMLAppFXWorker invokes thread-safe method updateValue() to provide intermediate or partial results. We use binding with the task’s valueProperty() to safely update the UI.
• Program PersonFXMLAppFXWorker2 defines a read-only property and updates this property (safely) during execution of the background task. This approach is convenient when the task updates an observable collection. The program shows how easy it is to use an observable collection with a control such as TableView.
• Program PersonFXMLAppFXWorker3 updates the JavaFX scene graph (safely) during execution of the background task. This approach is useful when a long-running background task produces data used to create nodes in the UI.
Let’s show you each of these approaches.
Using Method updateValue()
Figure 4.16 shows application PersonFXMLAppFXWorker running. Note that the UI is active while the background task is running and the user can select and edit Person items concurrently. Here you see both the uppercase conversion task running, as well as the background task that updates a Person to the FamilyTreeManager. (The uppercase conversion does not save the uppercase Person items; it’s just busywork!)

Figure 4.16 Program PersonFXMLAppFXWorker: Running a background task with partial results displayed in UI
Before examining the background task code, let’s first show you the UI controls we add to the JavaFX scene graph.
ProgressBar
The progress bar provides a horizontal bar, which, like the progress indicator, can also be indeterminate. In this example, however, we use a progress bar that indicates percent complete by updating its progress property. The progress property is a double value between 0 (0 percent complete) and 1 (100 percent complete).
We add a text area, label, progress bar, and button to the scene graph. Listing 4.31 shows the FXML markup generated by Scene Builder to add these UI controls. The Process All button and the progress bar are maintained by an HBox layout control for horizontal placement. The Label and TextArea are placed above and below the HBox component.
Listing 4.31 Add Controls to FXML
<HBox id="HBox" alignment="CENTER" layoutX="7.0" layoutY="176.0" spacing="5.0">
<children>
<Button fx:id="processAllButton"
onAction="#processAllButtonAction" text="Process All" />
<ProgressBar fx:id="progressBar" prefWidth="161.0" progress="0.0" />
</children>
</HBox>
<TextArea fx:id="statusTextArea" editable="false" layoutX="7.0"
layoutY="208.0" prefHeight="106.0" prefWidth="257.0" wrapText="true" />
<Label fx:id="statusMessage" layoutX="7.0" layoutY="147.0" />
Safely Updating the UI
Table 4.3 on page 178 lists the Task methods you can safely invoke from a background thread. These methods make Task update the appropriate JavaFX properties on the JavaFX Application Thread. This lets you safely bind your UI controls to any of these properties or use them in binding expressions. You’ll see that we invoke updateMessage(), updateProgress(), and updateValue() in method call() to keep the Task properties synchronized with the task’s progress.
Extending Task
Our previous example uses class Task directly. Here we extend Task in order to encapsulate several class variables, as shown in Listing 4.32. Class ProcessAllTask extends class Task with <String> for Task’s generic type. This means that method call() returns String, method getValue() returns String, valueProperty() returns a read-only String JavaFX property, and method updateValue() requires a String parameter. Here, String property value holds the constructed names transformed to uppercase letters.
The ProcessAllTask constructor takes an ObservableList<Person> and stores it in ProcessAllTask class variable processList. Class variable buildList is the StringBuilder object we use to construct the transformed names.
Method call() is invoked in a background thread. This method loops through processList, processing each Person, invoking updateMessage() with the current Person, appending the transformed name to buildList, and invoking updateProgress() with the current work done and the total work to be done. Property value is updated with thread-safe updateValue().
The code that converts a Person’s names to all uppercase is contained in method doProcess(). The call to Thread.sleep() helps test the responsiveness of the UI with a long-running background task. Method call() returns the completed String of transformed names.
private class ProcessAllTask extends Task<String> {
private final ObservableList<Person> processList;
private final StringBuilder buildList = new StringBuilder();
public ProcessAllTask(final ObservableList<Person> processList) {
this.processList = processList;
}
@Override
protected String call() throws Exception {
logger.log(Level.FINE, "Begin processing");
final int taskMaxCount = processList.size();
logger.log(Level.FINE, "processing list: {0}", processList);
int taskProgress = 0;
for (final Person person : processList) {
if (isCancelled()) {
break;
}
// do something to each person
updateMessage("Processing " + person);
logger.log(Level.FINE, "processing: {0}", person);
doProcess(person);
buildList.append(person.toString()).append("
");
// Update value property with new buildList
updateValue(buildList.toString());
updateProgress(100 * (++taskProgress) / taskMaxCount, 100);
Thread.sleep(500);
}
// return the final built String result
return buildList.toString();
}
// Called on the background thread
private void doProcess(Person p) {
p.setFirstname(p.getFirstname().toUpperCase());
p.setMiddlename(p.getMiddlename().toUpperCase());
p.setLastname(p.getLastname().toUpperCase());
p.setSuffix(p.getSuffix().toUpperCase());
}
}
Listing 4.33 shows the Process All button’s action event handler that initiates the background task. The handler instantiates ProcessAllTask with a list of Person items. Then, it sets up the bindings between the UI controls and the ProcessAllTask properties that are monitored. The event handler also creates callback methods that are invoked on the JavaFX Application Thread when the background task completes (either successfully, with a failure, or with a cancellation). Finally, the event handler starts the task in a new background thread.
The event handler sets up the bindings by binding the UI control progress bar to the task’s progress property. It also binds the UI Label control to the task’s message property, which displays the currently processed Person. Lastly, the event handler binds the UI TextArea control to the task’s value property.
The callback methods log the results of the Task and reset the UI controls (method resetUI() is shown next).
Listing 4.33 Method processAllButtonAction()
@FXML
private void processAllButtonAction(ActionEvent event) {
logger.log(Level.FINE, "Process All Button");
// only one task to run at a time so disable the button
processAllButton.setDisable(true);
// create the task with a list
final ProcessAllTask processTask = new ProcessAllTask(
FXCollections.observableArrayList(ftm.getAllPeople()));
// configure the UI
progressBar.progressProperty().bind(processTask.progressProperty());
statusMessage.textProperty().bind(processTask.messageProperty());
statusTextArea.textProperty().bind(processTask.valueProperty());
// set up handlers for success and failure
processTask.setOnSucceeded(t -> {
logger.log(Level.FINE, "Process All task finished: {0}",
t.getSource().getValue());
resetUI();
});
processTask.setOnFailed(t -> {
// t.getSource().getException() could be null
logger.log(Level.WARNING, "Update task failed {0}",
t.getSource().getException() != null
? t.getSource().getException()
: "Unknown failure");
resetUI();
});
processTask.setOnCancelled(t -> {
logger.log(Level.FINE, "Process All task cancelled.");
resetUI();
});
// start the task in a background thread
new Thread(processTask).start();
}
Listing 4.34 shows how to reset the UI. Note that we must unbind the UI controls before resetting their text properties. Method resetUI() also re-enables the Process All button.
// reset the UI
private void resetUI() {
statusTextArea.textProperty().unbind();
statusTextArea.setText("");
progressBar.progressProperty().unbind();
progressBar.setProgress(0);
statusMessage.textProperty().unbind();
statusMessage.setText("");
processAllButton.setDisable(false);
}
Updating a Read-Only JavaFX Property
Our next example is a slight variation of the previous example. Figure 4.17 shows application PersonFXMLAppFXWorker2 running, which uses a read-only observable list property to publish partial results. We then configure a TableView control with this observable list, automatically displaying partial results. Because the task does not use a thread-safe method to publish partial results, it must wrap updates in a Runnable and invoke Platform.runLater().
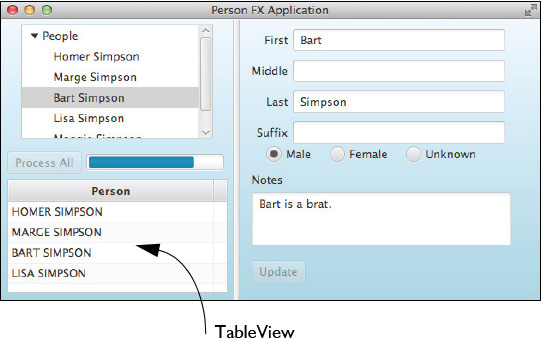
Figure 4.17 Program PersonFXMLAppFXWorker2: Running a background task with partial results displayed in UI
Publishing Partial Results
As Figure 4.17 indicates, we add controls to the UI with FXML. We include the Process All button, a progress bar, and a TableView control with a single column, as shown in Listing 4.35.
Listing 4.35 Add Controls to FXML
<HBox id="HBox" alignment="CENTER" layoutX="7.0" layoutY="153.0" spacing="5.0">
<children>
<Button fx:id="processAllButton" mnemonicParsing="false"
onAction="#processAllButtonAction" text="Process All" />
<ProgressBar fx:id="progressBar" prefWidth="161.0" progress="0.0" />
</children>
</HBox>
<TableView fx:id="nameDisplay" layoutX="7.0" layoutY="185.0" prefWidth="257.0"
maxHeight="-Infinity" maxWidth="-Infinity" minHeight="-Infinity"
minWidth="-Infinity" prefHeight="132.99990000000253" >
<columns>
<TableColumn prefWidth="240.0" text="Person" fx:id="personColumn" />
</columns>
</TableView>
Listing 4.36 shows the ProcessAllTask for this example. This time we extend Task defined with generic ObservableList<Person>. Furthermore, we use a ReadOnlyObjectWrapper to create a read-only JavaFX property (see “Read-Only Properties” on page 109 for a discussion) and provide two public methods to access the property: getPartialResults() and partialResultsProperty(). You’ll see that ProcessAllTask maintains this read-only property on the JavaFX Application Thread, making its access by code that updates the UI thread safe.
Method call() is invoked on the background thread. It processes the list of Person objects passed in the constructor. As it adds Person objects to partialResults observable list, it invokes Platform.runLater().
private class ProcessAllTask extends Task<ObservableList<Person>> {
private final ObservableList<Person> processList;
private final ReadOnlyObjectWrapper<ObservableList<Person>>
partialResults = new ReadOnlyObjectWrapper<>(this, "partialResults",
FXCollections.observableArrayList(new ArrayList<>()));
public final ObservableList getPartialResults() {
return partialResults.get();
}
public final ReadOnlyObjectProperty<ObservableList<Person>>
partialResultsProperty() {
return partialResults.getReadOnlyProperty();
}
public ProcessAllTask(final ObservableList<Person> processList) {
this.processList = processList;
}
@Override
protected ObservableList<Person> call() throws Exception {
logger.log(Level.FINE, "Begin processing");
final int taskMaxCount = processList.size();
logger.log(Level.FINE, "processing list: {0}", processList);
int taskProgress = 0;
for (final Person person : processList) {
if (isCancelled()) {
break;
}
// do something to each person
logger.log(Level.FINE, "processing: {0}", person);
doProcess(person);
// Update the property on the FX thread
Platform.runLater(() -> {
partialResults.get().add(person);
});
updateProgress(100 * (++taskProgress) / taskMaxCount, 100);
Thread.sleep(500);
}
return partialResults.get();
}
// Called on the background thread
private void doProcess(Person p) {
p.setFirstname(p.getFirstname().toUpperCase());
p.setMiddlename(p.getMiddlename().toUpperCase());
p.setLastname(p.getLastname().toUpperCase());
p.setSuffix(p.getSuffix().toUpperCase());
}
}
Listing 4.37 shows the code to handle the Process All button. Here, you see the power of observable lists, where we set TableView method setItems() to an observable list. As the list changes, the TableView control automatically refreshes. TableColumn method setCellValueFactory() specifies that the column’s cell data is created from the Person object’s fullname property.
Not apparent in the screen shot shown in Figure 4.17 on page 188, the ProcessAll Task completion callback methods invoke method resetUI(). This fades out the TableView control. When the fade animation completes, the Process All button is enabled. (See “Animation” on page 100 for more details on Transitions.)
Listing 4.37 Process All Button
@FXML
private void processAllButtonAction(ActionEvent event) {
logger.log(Level.FINE, "Process All Button");
// only one task to run at a time so disable the button
processAllButton.setDisable(true);
// create the task with a list
final ProcessAllTask processTask = new ProcessAllTask(
FXCollections.observableArrayList(ftm.getAllPeople()));
// configure the UI
progressBar.progressProperty().bind(processTask.progressProperty());
personColumn.setCellValueFactory(
new PropertyValueFactory<>("fullname"));
nameDisplay.setOpacity(1);
nameDisplay.setItems(processTask.getPartialResults());
// set up handlers for success and failure
processTask.setOnSucceeded(t -> {
logger.log(Level.FINE, "Process All task finished: {0}",
t.getSource().getValue());
resetUI();
});
processTask.setOnFailed(t -> {
// t.getSource().getException() could be null
logger.log(Level.WARNING, "Update task failed {0}",
t.getSource().getException() != null
? t.getSource().getException()
: "Unknown failure");
resetUI();
});
processTask.setOnCancelled(t -> {
logger.log(Level.FINE, "Process All task cancelled.");
resetUI();
});
// start the task in a background thread
new Thread(processTask).start();
}
// reset the UI
private void resetUI() {
FadeTransition ft = new FadeTransition(Duration.millis(1500),
nameDisplay);
ft.setToValue(0);
ft.setDelay(Duration.millis(2000));
ft.setOnFinished(a -> {
processAllButton.setDisable(false);
});
ft.play();
progressBar.progressProperty().unbind();
progressBar.setProgress(0);
}
Updating the JavaFX Scene Graph from a Background Task
The previous example updates a read-only property in the background task. You can also safely update the JavaFX scene graph from a background task as long as you wrap any update code in a Runnable and invoke Platform.runLater(). Application PersonFXMLAppFXWorker3 is an example of a background task that creates scene graph content within a background task. Figure 4.18 shows this application running. As each Person is processed, its name is added to the scene graph as a Text control with a Drop Shadow effect, and it fades in using a FadeTransition. When the background task completes, the list of names (Text controls) fades out and the Process All button is re-enabled.
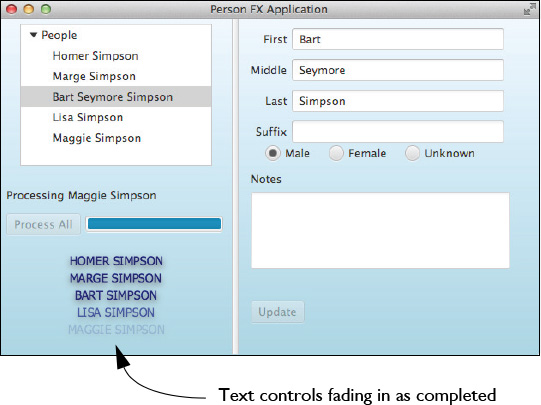
Figure 4.18 Program PersonFXMLAppFXWorker3: Running a background task with partial results displayed in UI
To build the UI for this background task, we add a Label, Button, Progress Bar, and TilePane layout to the scene graph, as shown in Listing 4.38. You’ve seen these same controls previously, except we now use a TilePane layout control to display the Text shapes that hold each name. The TilePane includes a drop shadow effect.
Listing 4.38 FXML Controls for Background Task UI
<HBox id="HBox" alignment="CENTER" layoutX="7.0" layoutY="226.0" spacing="5.0">
<children>
<Button fx:id="processAllButton" mnemonicParsing="false"
onAction="#processAllButtonAction" text="Process All" />
<ProgressBar fx:id="progressBar" prefWidth="161.0" progress="0.0" />
</children>
</HBox>
<Label fx:id="statusMessage" layoutX="7.0" layoutY="197.0" />
<TilePane fx:id="nameDisplay" alignment="TOP_CENTER" hgap="50.0" layoutX="7.0"
layoutY="268.0" prefHeight="109.0" prefWidth="257.0" vgap="3.0">
<effect>
<DropShadow color="#666666" offsetY="3.0" />
</effect>
<padding>
<Insets top="5.0" />
</padding>
</TilePane>
Listing 4.39 shows class ProcessAllTask. Note that in this example we specify <Void> for the generic type, since the Task does not return anything. As before, we pass in the Person list with the constructor.
The call() method sets a loop to process each person. It updates the message and invokes helper method makeText() to create and configure the Text. It builds a FadeTransition and sets the fade transition’s “to” value to 1 (making the animation fade in the Text node). All the configuration code occurs on the background thread. Not until we add content to the scene graph must we invoke Platform.runLater(), as shown in Listing 4.39.
Listing 4.39 Class ProcessAllTask
private class ProcessAllTask extends Task<Void> {
private final ObservableList<Person> processList;
public ProcessAllTask(final ObservableList<Person> processList) {
this.processList = processList;
}
@Override
protected Void call() throws Exception {
logger.log(Level.FINE, "Begin processing");
final int taskMaxCount = processList.size();
logger.log(Level.FINE, "processing list: {0}", processList);
int taskProgress = 0;
for (final Person person : processList) {
if (isCancelled()) {
break;
}
// do something to each person
updateMessage("Processing " + person);
logger.log(Level.FINE, "processing: {0}", person);
doProcess(person);
final Text t = makeText(person);
FadeTransition ft = new FadeTransition(
Duration.millis(1500), t);
ft.setToValue(1);
// Update scene graph on JavaFX Application Thread
Platform.runLater(() -> {
nameDisplay.getChildren().add(t);
ft.play();
});
updateProgress(100 * (++taskProgress) / taskMaxCount, 100);
Thread.sleep(500);
}
return null; // because of <Void>
}
// Called on the background thread
private void doProcess(Person p) {
p.setFirstname(p.getFirstname().toUpperCase());
p.setMiddlename(p.getMiddlename().toUpperCase());
p.setLastname(p.getLastname().toUpperCase());
p.setSuffix(p.getSuffix().toUpperCase());
}
private Text makeText(Person p) {
final Text t = new Text(p.toString());
t.setFill(Color.NAVY);
t.setFont(Font.font("Tahoma", FontWeight.THIN, 14));
t.setOpacity(0);
return t;
}
}
Listing 4.40 shows the code to handle the Process All Button event handler. As before, we instantiate ProcessAllTask with the list of Person objects and bind the Task progress and text properties to UI controls. The completion callback methods reset the UI. This time when we reset the UI, we fade out the TilePane control. When the fade finishes, we clear the TilePane control, enable the Process All Button, and return the (now empty) TilePane to opaque.
Listing 4.40 Process All Button
@FXML
private void processAllButtonAction(ActionEvent event) {
logger.log(Level.FINE, "Process All Button");
// only one task to run at a time so disable the button
processAllButton.setDisable(true);
// create the task with a list
final ProcessAllTask processTask = new ProcessAllTask(
FXCollections.observableArrayList(ftm.getAllPeople()));
// configure the UI
progressBar.progressProperty().bind(processTask.progressProperty());
statusMessage.textProperty().bind(processTask.messageProperty());
// set up handlers for success and failure
processTask.setOnSucceeded(t -> {
logger.log(Level.FINE, "Process All task finished: {0}",
t.getSource().getValue());
resetUI();
});
processTask.setOnFailed(t -> {
// t.getSource().getException() could be null
logger.log(Level.WARNING, "Update task failed {0}",
t.getSource().getException() != null
? t.getSource().getException()
: "Unknown failure");
resetUI();
});
processTask.setOnCancelled(t -> {
logger.log(Level.FINE, "Process All task cancelled.");
resetUI();
});
// start the task in a background thread
new Thread(processTask).start();
}
// reset the UI
private void resetUI() {
FadeTransition ft = new FadeTransition(
Duration.millis(1500), nameDisplay);
ft.setToValue(0);
ft.setDelay(Duration.millis(2000));
ft.setOnFinished(a -> {
nameDisplay.getChildren().clear();
processAllButton.setDisable(false);
nameDisplay.setOpacity(1);
});
ft.play();
progressBar.progressProperty().unbind();
progressBar.setProgress(0);
statusMessage.textProperty().unbind();
statusMessage.setText("");
}
4.8 Key Point Summary
This chapter explores ways to use JavaFX in desktop applications, where users are presented with model data and make changes to the data. We address creating model classes with JavaFX properties and using observable collections. We show typical JavaFX controls to build a UI, such as TreeView, TextField, RadioButton, Label, TextArea, and Button. We create listeners to respond to changes and use binding expressions to keep model data synchronized with UI controls. Finally, we show how to create background tasks with JavaFX, paying attention to thread safety and updating the scene graph only on the JavaFX Application Thread.
Here are the key points in this chapter.
• JavaFX provides implementations for the abstract JavaFX property classes that wrap the type’s value. For example, SimpleStringProperty implements StringProperty and wraps a String value, SimpleIntegerProperty implements IntegerProperty and wraps Integer, and so forth.
• Use SimpleObjectProperty<T> to provide an implementation of a JavaFX property that wraps an Object of type T. We use SimpleObjectProperty<Person.Gender> to create a JavaFX property that wraps a Person.Gender enum value.
• Consider implementing JavaFX properties with lazy evaluation. This strategy prevents instantiation of the JavaFX property until a listener is attached or binding is applied.
• Immutable values don’t require JavaFX property implementations.
• JavaFX computed properties use binding expressions to keep the computed value in sync with the properties upon which it depends.
• JavaFX provides read-only property wrappers to implement JavaFX read-only properties. When you use a wrapper class, two synchronized properties are created. One is exposed and read only. The other can be modified and is encapsulated in the model class.
• When you create a read-only JavaFX property, expose public methods for the read-only property and the getter, but not the setter.
• When model classes have JavaFX properties, use binding to keep the model and UI synchronized.
• JavaFX provides observable collections. Class FXCollections includes static methods that return observable versions of the same collection types available with java.util.Collections.
• Observable collections let you respond to changes by attaching change and invalidation listeners to the collection. InvalidationListener is type neutral, and the ChangeListener type depends on the underlying collection type.
• We use ObservableMap<Long, Person> in the FamilyTreeManager to maintain the collection of Person items.
• MapChangeListener lets you respond to changes in an observable map. You can determine if the change was an addition, update, or removal, and you can access the old and new values.
• Scene Builder is a stand-alone application that generates FXML. You place controls on the design area using drag and drop and configure controls with context menus and property sheets.
• JavaFX controls generate one or more events, which you can listen for and respond to with event handlers.
• You can attach a ChangeListener to the selection property of a TreeView model to listen for selection changes.
• Use bidirectional binding to keep the UI and model objects synchronized.
• JavaFX is a single-threaded UI. Put long-running tasks in a background thread to keep the UI responsive.
• JavaFX Tasks let you execute long-running code in a background thread and safely update the UI. Background tasks include status properties that you can safely bind to with UI control variables.
• In general, you should not update observable values in a background thread.
• To publish partial results with a background task, use thread safe Task method updateValue() or wrap any updates to public properties or the scene graph in a Runnable and execute with Platform.runLater().