
14. Data System
This chapter explores the Data System API, which is an important bridge between files and nodes. You’ll learn how to create file types that are recognized by the NetBeans Platform and how to manipulate these file types using both the File System API and Data System API.
DataObject and DataNode are the main classes in the Data System API. These important classes let you manage files within a NetBeans Platform application.
A MultiView editor lets users examine different views of the same file, typically a text-based view and a Visual view. You’ll learn how to use DataObjects to build a MultiView editor. A Visual view creates a Swing JPanel, which lets you add Swing components, Visual Library API widgets (flexible graphical components), or JavaFX content.
Not all NetBeans Platform applications need to make use of the Data System API. If you do not need to integrate new types of files into your application, you probably do not need the Data System API.
What You Will Learn
• Use the File System, the Data System, and the Nodes APIs to understand the relationship between file, FileObject, DataObject, and node objects.
• Create new file types and register their MIME types, DataLoader, Template File, and MultiView elements.
• Create a MultiView editor based on a text-based MIME type. Learn how to synchronize the underlying document among multiple views.
• Use both the Visual Library and JavaFX to build views in a MultiView editor.
• Build node hierarchies for DataObjects based on file contents.
• Create new XML-based file types with specific root elements.
• Parse XML files with the NetBeans Platform XMLUtil class.
• Incorporate the NetBeans Platform XML editor into a NetBeans Platform application.
• Create conditionally-enabled actions for specific file types.
• Create conditionally-enabled actions for specific MultiView windows.
14.1 Data System API Overview
The NetBeans Platform File System API lets you work with files and provides enhanced file manipulation functionality. You’ve seen how to add arbitrary attributes to files or monitor changes with a FileChangeListener. FileObjects, however, represent raw data. You can’t do much with files other than read and write them with IOStream. (You can also read them as an array of bytes or as strings or lines with text files.)
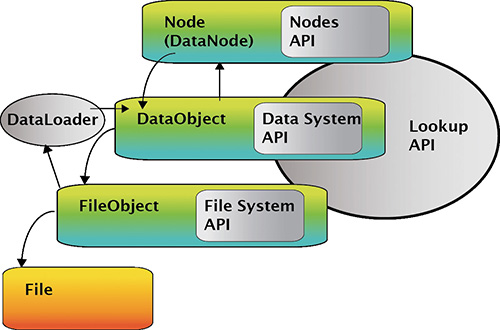
The Data System API, in contrast, is the glue between the Nodes API and the File System API. Its main class, the DataObject, wraps a FileObject, and lets you perform tasks related to particular kinds of files. The nodes associated with a file let you visualize the file within Explorer Views. Nodes, DataObjects, and FileObjects each have a Lookup, which is important for accessing the capabilities associated with a file.
A FileObject has a MIME type. Registered DataLoaders exist for MIME types and create DataObjects subtypes that know something about the file (for example, how to open the file in an appropriate editor). Figure 14.1 shows the relationship between files, FileObject, DataObject, and nodes.
DataLoaders construct a single DataObject for a FileObject. However, sometimes more than one FileObject corresponds to a DataObject. For example, when you edit a Swing Design form using the NetBeans IDE Java editor, a pair of FileObjects correspond to the single DataObject (a .java file and a .form file).
The DataLoader recognizes the FileObject type via its MIME type, creating the DataObject associated with the FileObject. Typically you don’t call methods directly on a DataObject. Rather, you ask for capabilities via the DataObject’s Lookup and invoke methods on that capability. This is an application of the Capability Pattern described earlier (see “NetBeans Platform Capability Pattern” on page 428). DataObjects provide programmatic access to files and create models from their contents.
Nodes wrap DataObjects and provide human-readable information in a presentation layer. For example, in the Favorites window, each file and folder is represented by a node. Different file types have different nodes with their own set of actions and icons.
DataLoaders are factories for DataObjects. A FileObject with a particular MIME type has an associated DataLoader that creates a DataObject for that file. A FileObject’s MIME type is determined by a MIME type resolver. MIME resolvers are registered in the folder Services/MIMEResolver in a module’s layer.
Typically MIME resolvers use a file’s extension to determine its MIME type. For XML files, the MIME resolver also looks at the file’s root element.
When you create new file types, the New File Type wizard registers a MIME resolver, DataLoader, file template, and DataObject for that file type.
FileObject, DataObject, and Node
Let’s now see how you access these related objects programmatically. To illustrate, we’ll access a text file called myfile.txt. A file with extension .txt is an unknown MIME type and is treated as a generic text file in NetBeans. When you open the Favorites window, myfile.txt (if it exists) is shown with a generic document icon.
The code fragments in this section all use custom displayMessage() method to write information to the Output window. Furthermore, code is embedded in try blocks with catch handlers for IOException, as shown in Listing 14.1. (See “The Output Window” on page 628 for an introduction to the Output window.)
Listing 14.1 Helper Method displayMessage() and try Block Code
. . .
private final InputOutput io;
private final OutputWriter writer;
private static final String FILENAME = "myfile.txt";
public FileManipulations() {
io = IOProvider.getDefault().getIO(Bundle.CTL_FileManipulations(),
false);
writer = io.getOut();
}
private void displayMessage(String msg) {
writer.println(msg);
}
. . .
// Example code manipulating FileObject, DataObject, and Node
try {
. . .
[See Listing 14.2, Listing 14.3, Listing 14.4,
Listing 14.5, and Listing 14.6 ]
. . .
} catch (IOException ex) {
Exceptions.printStackTrace(ex);
}
FileObject MIME Type and Lookup
Let’s begin by accessing file myfile.txt as a FileObject. We use the getFileObject() method of its parent FileObject folder, as shown in Listing 14.2. The call to getMIMEType() returns “content/unknown.”
FileObjects have a Lookup, which we access to open the file. Here, we look up an implementation of Openable and, if found, invoke its open() method to open the file in the NetBeans Platform plain text editor.
Listing 14.2 FileObjects Have MIME Types and Lookup
. . .
// Is there a file called myfile.txt in this folder?
FileObject myfile = myfolder.getFileObject(FILENAME);
. . .
// Show that the FileObject has a MIME Type
displayMessage(myfile.getNameExt() + " MIME Type: " + myfile.getMIMEType());
// Show that the FileObject has a lookup
Openable open_impl = myfile.getLookup().lookup(Openable.class);
if (open_impl != null) {
displayMessage("Openable found in fileobject");
// Open the file (this opens the file in a plain text editor)
open_impl.open();
}
Output Window
myfile.txt MIME Type: content/unknown
Openable found in fileobject
DataObject Factory and DataObject Lookup
The DataLoader lets you access a FileObject’s DataObject. DataLoaders are factories for DataObjects and are registered in your application. You use the static DataObject find() method to access a FileObject’s DataObject as shown in Listing 14.3.
DataObjects also have Lookups. Listing 14.3 shows the equivalent code for opening the file represented by this DataObject. As before, we invoke the Openable method open(). If the file is already opened, the plain text editor window receives focus.
Listing 14.3 Factory Creates DataObject; DataObjects Have a Lookup
// Find the DataObject associated with the file
// Use static DataObject method find()
DataObject dob = DataObject.find(myfile);
if (dob != null) {
displayMessage("Found DataObject " + dob.getName() + " for "
+ myfile.getNameExt());
// Show that the DataObject also has a Lookup
open_impl = dob.getLookup().lookup(Openable.class);
if (open_impl != null) {
displayMessage("Openable found in dataobject");
// If already opened, focuses on the Editor Window
open_impl.open();
}
. . .
}
Output Window
Found DataObject myfile.txt for myfile.txt
Openable found in dataobject
Accessing FileObjects from DataObjects
In many cases, multiple FileObjects can be associated with a DataObject. However, one FileObject is designated as the primary file, which you access with the DataObject getPrimaryFile() method. Listing 14.4 shows how to access the FileObject from the DataObject and then read the file’s contents using convenience method asLines().
Listing 14.4 Get FileObject from DataObject and Read Contents
// Get the FileObject from the DataObject
FileObject myfob = dob.getPrimaryFile();
if (myfob != null) {
displayMessage("Got FileObject " + myfob.getNameExt()
+ " from DataObject");
displayMessage("Display Contents:");
// Use FileObject to read the contents
for (String line : myfob.asLines()) {
displayMessage(line);
}
}
Output Window
Got FileObject myfile.txt from DataObject
Display Contents:
testing
one
two
DataObjects and Nodes
You’ve already seen how the NetBeans Platform Favorites window displays files and folders from your local file system in an Explorer View. As you may have surmised from Chapter 7 (see “Building a Node Hierarchy” on page 295 for details), each of these folders and files in the Explorer View is a node. Node is the presentation of your data and represents a DataObject, which in turn wraps a FileObject, representing a file on disk.
Nodes not only provide the human-friendly view but also offer a context menu of actions and capabilities stored in its Lookup. You’re already familiar with nodes, but a specialized subclass of AbstractNode called DataNode wraps DataObjects (see Figure 7.3 on page 295 for a diagram of the Node class hierarchy).
DataObjects create node hierarchies. You invoke the getNodeDelegate() method, which returns the DataObject’s node. With node, you can now access the familiar objects associated with nodes: actions, icons, and of course, the all-important Lookup.
Listing 14.5 shows how to access the node from the DataObject and access the node’s icon and list of actions.
Listing 14.5 Node from DataObject / Manipulate Node
// Get the Node that represents the DataObject
Node node = dob.getNodeDelegate();
if (node != null) {
displayMessage("Node is: " + node.getDisplayName());
// See if the Node has an Icon (Image)
Image image = node.getIcon(BeanInfo.ICON_COLOR_16x16);
if (image != null) {
displayMessage("Got the Node's Icon " + image.toString());
}
// Get the Node's Context-Menu Actions
displayMessage("-------Node Context Menu Actions-------");
for (Action action : node.getActions(true)) {
if (action == null) {
// separator
displayMessage("-------");
} else {
displayMessage("Action " + action.toString());
}
}
Output Window
Node is: myfile.txt
Got the Node's Icon BufferedImage@893049b: type = 3 DirectColorModel:
rmask=ff0000 gmask=ff00 bmask=ff amask=ff000000 IntegerInterleavedRaster:
width = 16 height = 16 #Bands = 4 xOff = 0 yOff = 0 dataOffset[0] 0
-------Node Context Menu Actions-------
. . . (output truncated)
Using DataNode and Lookup
Now let’s reverse direction and show you how to obtain the DataObject from a node. To use the node directly, you must cast node to DataNode and invoke the getDataObject() method. However, a cleaner approach is to use the node’s Lookup and obtain its DataObject with the type-safe lookup() method. Listing 14.6 shows both approaches.
Listing 14.6 Get the DataObject from the Node
// Get the DataObject from the DataNode (cumbersome)
if (node instanceof DataNode) {
// cast to DataNode
DataNode dataNode = (DataNode) node;
displayMessage("Node is a DataNode: " + dataNode.getDisplayName());
DataObject mydob = dataNode.getDataObject();
if (mydob != null) {
displayMessage("Got the DataObject from the DataNode: "
+ mydob.getName());
}
}
// Better to use Lookup (type-safe)
DataObject dob2 = node.getLookup().lookup(DataObject.class);
if (dob2 != null) {
displayMessage("Got the DataObject from the Node's Lookup: "
+ dob2.getName());
}
Output Window
Node is a DataNode: myfile.txt
Got the DataObject from the DataNode: myfile.txt
Got the DataObject from the Node's Lookup: myfile.txt
14.2 Creating a New File Type
Now that you’ve learned about FileObject, DataObject, and DataNode, let’s build an application with a new file type and register this file type in the application. This example shows you how to manipulate FileObjects, DataObjects, and nodes within the context of a NetBeans Platform application. You’ll learn how to manipulate particular kinds of files within your program. With the New File Type wizard, you define a MIME type and register a DataLoader, which creates the necessary DataObjects when needed. The wizard also registers a File Template. The application then applies this File Template when a user creates a new file of this type.
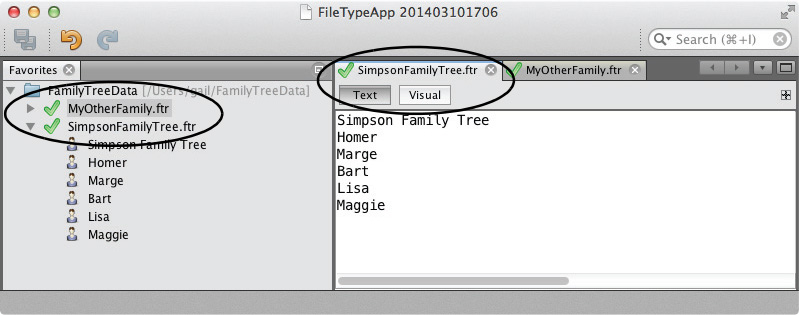
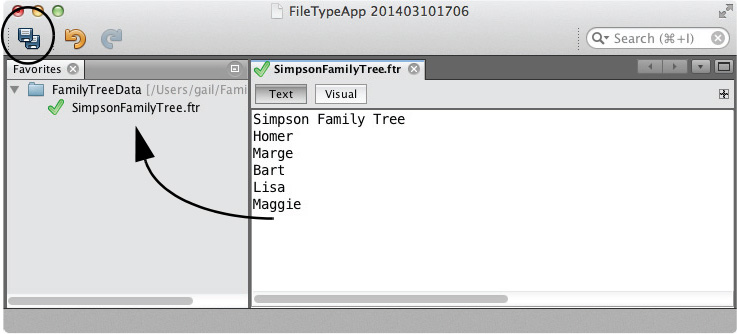
Figure 14.2 shows the application running. You see that the Favorites window on the left includes several files with extension ftr (the new file type) identified with a special icon. Opening an FTR file brings up the file in a plain text editor in a MultiView window with two tabs labeled Text and Visual. For now, we’ll work with just the Text window. We discuss adding functionality to the Visual tab in the next section (see “Working with MultiView Windows” on page 697).
When the user expands the file (clicks the expansion icon in the Favorites window), additional nodes appear based on the file’s content. When the user edits the file and saves a new version, the Favorites window is synchronized with the new contents. This fairly simple example lets you see the relationship among file, FileObject, DataObject, DataNode, and node.
Because the Favorites window deals with displaying files, this new file type has the expected behaviors associated with files in general. Actions such as copy, delete, and rename are implemented by default. With the Templates module included, you can also create new FTR files, new empty files, and new folders. We also provide a context-sensitive action for this new file type that displays information about the file.
Here’s a summary of the steps to build this application and create a new file type.1
1. Alternatively you can build a NetBeans module outside of a NetBeans Platform application. Such a module runs inside a version of the NetBeans IDE, giving you access to all of the IDE’s file-oriented features and editors. Here, we show you how to build a non-IDE based application and include just the NetBeans modules you need.
• Create a new NetBeans Platform application called FileTypeApp.
• Create a new module called FamilyTreeSupport and add it to the FileTypeApp application.
• Add the Favorites and Templates modules to the FileTypeApp application.
• In module FamilyTreeSupport, create a new file type based on extension ftr or FTR (familytree).
• Create a new FTR file and open it for editing.
• Add a custom context-sensitive action to familytree files.
• Provide child nodes based on content. These nodes are displayed when the user expands the file’s node in an Explorer View window. Respond to edit changes so the Favorites window is synchronized with the file’s edited contents.
Create a NetBeans Platform Application and Module
Let’s begin with the steps to create the application and add the FamilyTreeSupport module.
1. Create a new application called FileTypeApp using the NetBeans Platform New Project wizard.
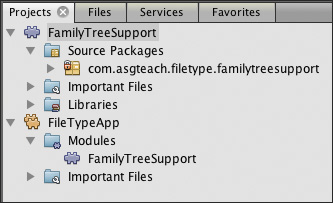
2. Next, create a Module and add it to the FileTypeApp application. Call the module FamilyTreeSupport and provide package name com.asgteach.familytreesupport. The application and module are shown in the Projects view in Figure 14.3.
Add the Favorites and Templates Modules
The Favorites window is a file viewer for your local disk. See “Favorites Window” on page 637 for a description of this useful module. The Templates module lets you create empty files and folders from the Favorites window. Follow these steps to include both the Favorites and Templates modules in the FamilyTreeApp application.
1. Right click project FileTypeApp in the Projects view and select Properties from the context menu.
2. Under Categories, select Libraries. NetBeans lists all of the Platform Modules organized in clusters. Under cluster platform, select modules Favorites and Templates and click OK.
3. When you run the FileTypeApp application, the Favorites window is now available in the top-level Window menu.
Create a New File Type
Create a new file type that is recognized by your application. The result of running the New File Type wizard registers a MIME type resolver and a DataLoader that recognizes this MIME type. The wizard also creates and registers a template for this file type and instantiates a DataObject when the user opens a file of this type. The Favorites window displays this file’s DataNode with its own icon. Furthermore, the DataNode includes menu items, actions, and properties (and if defined, child nodes).
Here are the steps.
1. In the Projects view, expand module FamilyTreeSupport | Source Packages, select the package name, right click, and select New | Other from the context menu.
2. In the Choose File Type dialog, under Categories select Module Development and under File Types select File Type. Click Next.
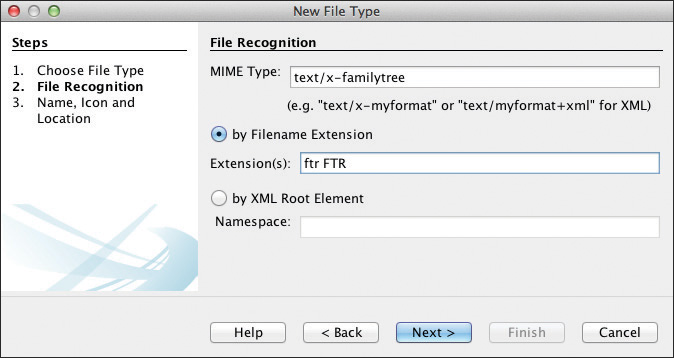
3. NetBeans displays the File Recognition dialog that lets you specify how your application will recognize this new file type. First, specify the MIME Type as text/x-familytree. This specifies that the file is a text-based file type called familytree. Select radio button by Filename Extension and provide one or more extensions. Use extension ftr and FTR2, as shown in Figure 14.4. This defines a new MIME type that applies to files with extension ftr (or FTR). Click Next.
2. Do not include a “dot” preceding the file extension in the dialog.
4. NetBeans displays the Name, Icon, and Location dialog. For Class Name Prefix, specify FamilyTree. Click the Browse button and navigate to the provided icon file check.png. Make sure the Use MultiView checkbox is selected and accept the defaults for the remaining fields, as shown in Figure 14.5. Click Finish.
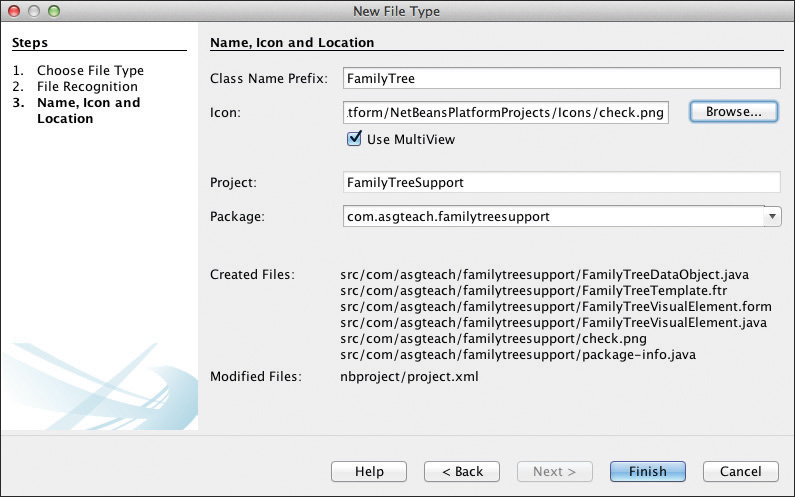
Now let’s examine the files that NetBeans creates to support this new file type.
• FamilyTreeDataObject.java—This is a generated DataObject class that wraps a FileObject for FTR files. Annotations register the MIME type, the file’s icon, an editor, and typical actions associated with Explorer View file elements: Open, Copy, Cut, Paste, Delete, Properties, and so forth. Note that this class extends MultiDataObject, which is a subclass of DataObject. MultiDataObjects are DataObjects that can handle more than one FileObject. Listing 14.7 on page 683 and Listing 14.8 on page 685 show this generated file.
• FamilyTreeTemplate.ftr—This file is the template used by the New File wizard when the user creates a new FTR file (see Listing 14.10 on page 687).
• FamilyTreeVisualElement.java—This Java file extends JPanel and implements MultiViewElement, which provides similar life cycle methods as TopComponents (see Listing 14.9 on page 685). MultiViewElement is one of perhaps several that provide different representations of the same file. This JPanel can hold Swing components, Visual Library elements, or even JavaFX components with the JFXPanel control.
• check.png—This is the 16 x 16 graphic icon attached to FTR files.
• package-info.java—This Java file registers FamilyTreeTemplate.ftr for the New File wizard (see Listing 14.11 on page 688).
Let’s look at the FamilyTreeDataObject first. Listing 14.7 includes the annotations that register the MIME resolver and the actions available for this file type.
Listing 14.7 FamilyTreeDataObject—Registration Information
@Messages({
"LBL_FamilyTree_LOADER=Files of FamilyTree"
})
@MIMEResolver.ExtensionRegistration(
displayName = "#LBL_FamilyTree_LOADER",
mimeType = "text/x-familytree",
extension = {"ftr", "FTR"}
)
@DataObject.Registration(
mimeType = "text/x-familytree",
iconBase = "com/asgteach/familytreesupport/check.png",
displayName = "#LBL_FamilyTree_LOADER",
position = 300
)
@ActionReferences({
@ActionReference(
path = "Loaders/text/x-familytree/Actions",
id = @ActionID(category = "System",
id = "org.openide.actions.OpenAction"),
position = 100,
separatorAfter = 200
),
@ActionReference(
path = "Loaders/text/x-familytree/Actions",
id = @ActionID(category = "Edit",
id = "org.openide.actions.CutAction"),
position = 300
),
@ActionReference(
path = "Loaders/text/x-familytree/Actions",
id = @ActionID(category = "Edit",
id = "org.openide.actions.CopyAction"),
position = 400,
separatorAfter = 500
),
@ActionReference(
path = "Loaders/text/x-familytree/Actions",
id = @ActionID(category = "Edit",
id = "org.openide.actions.DeleteAction"),
position = 600
),
@ActionReference(
path = "Loaders/text/x-familytree/Actions",
id = @ActionID(category = "System",
id = "org.openide.actions.RenameAction"),
position = 700,
separatorAfter = 800
),
@ActionReference(
path = "Loaders/text/x-familytree/Actions",
id = @ActionID(category = "System",
id = "org.openide.actions.SaveAsTemplateAction"),
position = 900,
separatorAfter = 1000
),
@ActionReference(
path = "Loaders/text/x-familytree/Actions",
id = @ActionID(category = "System",
id = "org.openide.actions.FileSystemAction"),
position = 1100,
separatorAfter = 1200
),
@ActionReference(
path = "Loaders/text/x-familytree/Actions",
id = @ActionID(category = "System",
id = "org.openide.actions.ToolsAction"),
position = 1300
),
@ActionReference(
path = "Loaders/text/x-familytree/Actions",
id = @ActionID(category = "System",
id = "org.openide.actions.PropertiesAction"),
position = 1400
)
})
public class FamilyTreeDataObject extends MultiDataObject {
. . .
}
Listing 14.8 shows the remaining code for class FamilyTreeDataObject. The DataObject registers an editor for the appropriate MIME type and includes a static method to create a MultiViewEditorElement (see the related FamilyTreeVisualElement.java in Listing 14.9 on page 685). We also change the button’s label for the plain text editor to Text from the default label Source.
Because we register a text editor here, the DataObject includes an EditorCookie in its Lookup. This makes it possible to access the editor’s underlying model (a Swing text document) that reflects the current state of user edits.
Listing 14.8 FamilyTreeDataObject—File Loader and MultiElement Registration
. . .
public class FamilyTreeDataObject extends MultiDataObject {
public FamilyTreeDataObject(FileObject pf, MultiFileLoader loader)
throws DataObjectExistsException, IOException {
super(pf, loader);
registerEditor("text/x-familytree", true);
}
@Override
protected int associateLookup() {
return 1;
}
@MultiViewElement.Registration(
displayName = "#LBL_FamilyTree_EDITOR",
iconBase = "com/asgteach/familytreesupport/check.png",
mimeType = "text/x-familytree",
persistenceType = TopComponent.PERSISTENCE_ONLY_OPENED,
preferredID = "FamilyTree",
position = 1000
)
@Messages("LBL_FamilyTree_EDITOR=Text")
public static MultiViewEditorElement createEditor(Lookup lkp) {
return new MultiViewEditorElement(lkp);
}
}
Listing 14.9 shows the FamilyTreeVisualElement, which is similar in structure to TopComponent. The FamilyTreeVisualElement has a Lookup, a generated design section, actions that can be defined, and window life cycle methods. The MultiViewElement also includes field MultiViewElementCallback, which provides access to the enclosing TopComponent.
Method getVisualRepresentation() returns JComponent, the instance of the MultiViewElement, and is invoked whenever this view is activated. The default implementation returns this.
We’ll return to this file when we add visual components.
Listing 14.9 FamilyTreeVisualElement.java
@MultiViewElement.Registration(
displayName = "#LBL_FamilyTree_VISUAL",
iconBase = "com/asgteach/familytreesupport/check.png",
mimeType = "text/x-familytree",
persistenceType = TopComponent.PERSISTENCE_NEVER,
preferredID = "FamilyTreeVisual",
position = 2000
)
@Messages("LBL_FamilyTree_VISUAL=Visual")
public final class FamilyTreeVisualElement extends JPanel
implements MultiViewElement {
private FamilyTreeDataObject ftDataObject;
private JToolBar toolbar = new JToolBar();
private transient MultiViewElementCallback callback;
public FamilyTreeVisualElement(Lookup lkp) {
ftDataObject = lkp.lookup(FamilyTreeDataObject.class);
assert obj != null;
initComponents();
}
@Override
public String getName() {
return "FamilyTreeVisualElement";
}
. . .
**Generated Matisse Design Code***
. . .
@Override
public JComponent getVisualRepresentation() {
return this;
}
@Override
public JComponent getToolbarRepresentation() {
return toolbar;
}
@Override
public Action[] getActions() {
return new Action[0];
}
@Override
public Lookup getLookup() {
return ftDataObject.getLookup();
}
@Override
public void componentOpened() {
}
@Override
public void componentClosed() {
}
@Override
public void componentShowing() {
}
@Override
public void componentHidden() {
}
@Override
public void componentActivated() {
}
@Override
public void componentDeactivated() {
}
@Override
public UndoRedo getUndoRedo() {
return UndoRedo.NONE;
}
@Override
public void setMultiViewCallback(MultiViewElementCallback callback) {
this.callback = callback;
}
@Override
public CloseOperationState canCloseElement() {
return CloseOperationState.STATE_OK;
}
}
Listing 14.10 shows the Template file, which you customize for your application as we have here. NetBeans uses the Template file as a starting point when a user creates a new FTR file.
Listing 14.10 FamilyTreeTemplate.ftr
FAMILY Family Tree
Listing 14.11 shows how the Template file is registered with the generated package-info.java.
Listing 14.11 package-info.java
@TemplateRegistration(folder = "Other", content = "FamilyTreeTemplate.ftr")
package com.asgteach.familytreesupport;
import org.netbeans.api.templates.TemplateRegistration;
All of this registration information is included in the module’s generated-layer.xml file when you build the module. The generated Layer file registers the FamilyTree FTR file type with <folder>, <file>, and <attr> tags that specify configuration information available through the System FileSystem (see “The Layer File and System FileSystem” on page 654).
The main folder names include editors to register the MultiView editor for text-based x-familytree type files, Services/MIMEResolvers to describe the MIME Resolver for FamilyTreeDataObject, loaders for both actions and factories with text/x-familytree files, and Templates to register FamilyTreeTemplate.ftr for creating new files of this type.
Create and Edit a New FTR File
With the FamilyTree file type defined, let’s run the application and create a new FTR file, as follows.
1. Run the FileTypeApp application and open the Favorites window.
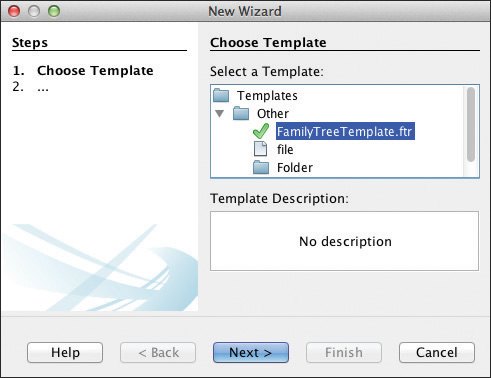
2. From the Favorites window, select a folder, right click, and select New | All Templates. The application displays the Choose Template dialog. Select FamilyTreeTemplate.ftr, as shown in Figure 14.6. Click Next.
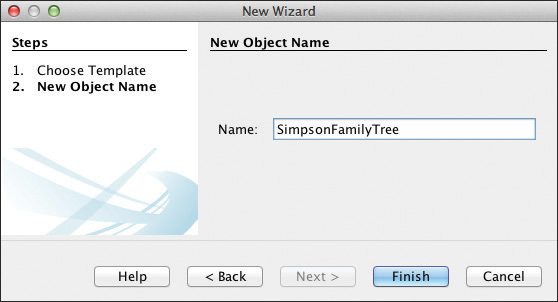
3. The application now displays the New Object Name dialog. Specify a name for the new file, as shown in Figure 14.7. Click Finish.
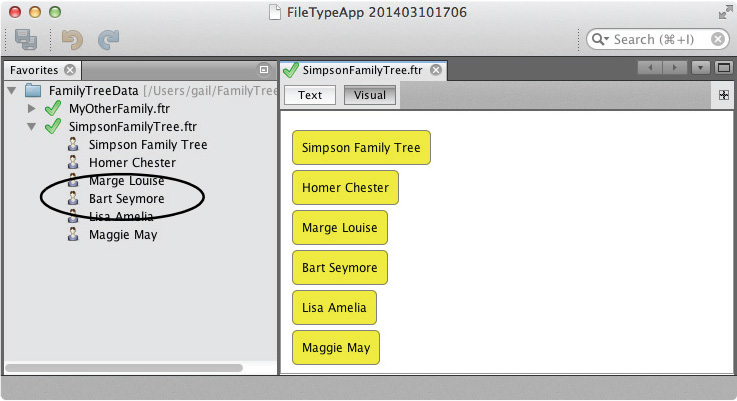
4. Figure 14.8 shows the new file created (SimpsonFamilyTree.ftr) in the Favorites window and opened in the FamilyTree MultiView editor.
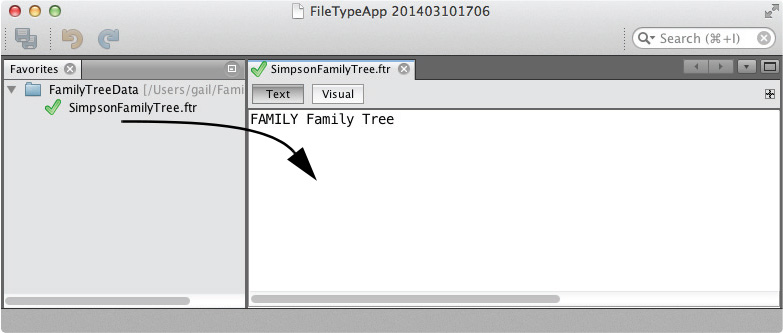
5. Edit the file and provide the Simpson Family names, as shown in Figure 14.9. Note that as you edit the file, the Save All icon is enabled. When you click the Save All icon, the changes are saved to the SimpsonFamilyTree.ftr file.
Context-Sensitive Action
To add a context-sensitive action to your file as it’s displayed in an Explorer View, you create a conditionally-enabled action (see “Context-Aware Actions” on page 428 in Chapter 9 for more information). Here, we add a Get Info action for our file type to the FamilyTreeSupport module, which displays an Information Dialog, as shown in Figure 14.10.
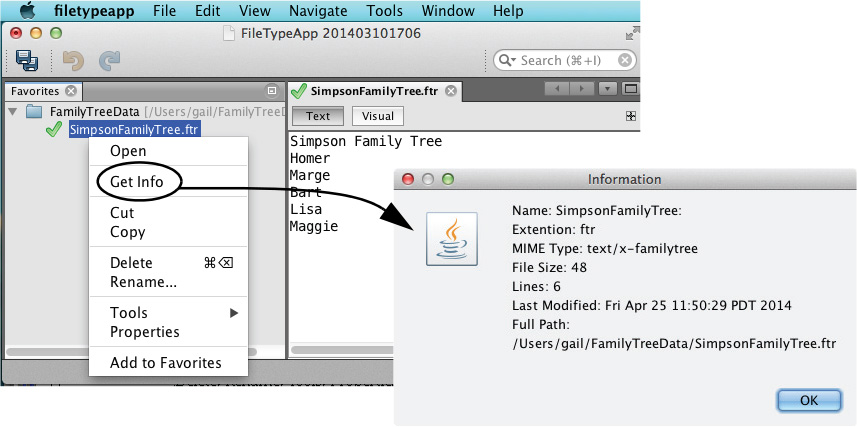
Note that the file’s context menu also includes typical file-type actions, such as Open, Cut, Copy, Delete, Rename, Tools, Properties, and Add to Favorites (because we’re using the Favorites window).
Follow these steps to add this context-sensitive action to the text/x-familytree file type.
1. In the FamilyTreeSupport module Source Packages, right click on the package name and select New | Action.
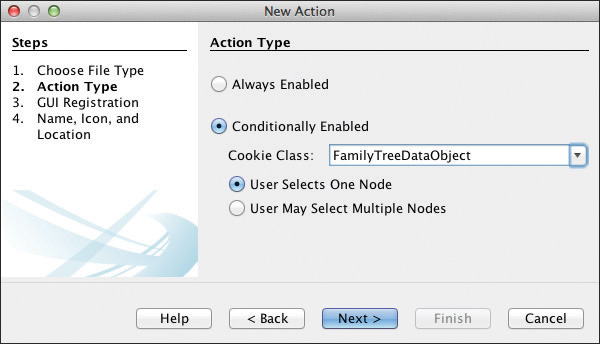
2. In the Action Type dialog, select Conditionally Enabled. For the Cookie Class, specify FamilyTreeDataObject, which is the DataObject type for this file type. Select radio button User Selects One Node and click Next, as shown in Figure 14.11.
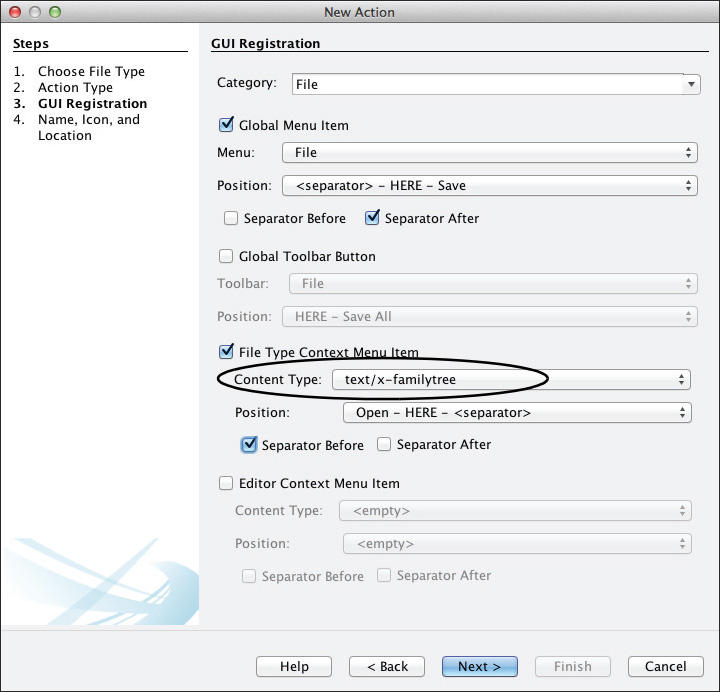
3. Figure 14.12 shows the GUI Registration dialog. Register an action both in the top-level menu under File and in the context menu of this particular file type. Select Global Menu File and choose a position. Select File Type Context Menu Item and text/x-familytree from the drop down list for the context type. Click Finish. (Note that the Get Info action in the File menu will only be enabled if a file of type text/x-familytree is selected.)
4. NetBeans next displays the Name, Icon, and Location dialog shown in Figure 14.13. For Class Name specify GetInfoAction and for Display Name specify Get Info. Optionally provide an icon (for the top-level Menu item; context menus do not include icons). Accept the defaults for the remaining fields and click Finish.
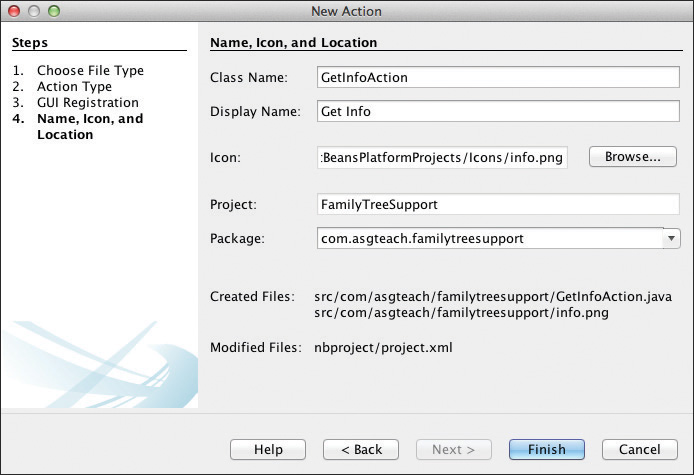
Listing 14.12 shows GetInfoAction.java, which includes annotations that register this action. We add code to the actionPerformed() method to pop up a dialog with information about the file. The Get Info action displays the selected file’s name, extension, MIME type, the number of bytes, the number of lines, its last modification date, and its full path, as shown in Figure 14.10 on page 690.
Of interest is the @ActionReference with path ",Loaders/text/x-familytree/Actions" which adds this action to the context menu of these file types (identified by the appropriate DataLoader).
The context is type FamilyTreeDataObject, which we specified in the New Action wizard.
Listing 14.12 GetInfoAction.java
@ActionID(
category = "File",
id = "com.asgteach.familytreesupport.GetInfoAction"
)
@ActionRegistration(
iconBase = "com/asgteach/familytreesupport/info.png",
displayName = "#CTL_GetInfoAction"
)
@ActionReferences({
@ActionReference(path = "Menu/File", position = 1450,
separatorAfter = 1475),
@ActionReference(path = "Loaders/text/x-familytree/Actions",
position = 150, separatorBefore = 125)
})
@Messages("CTL_GetInfoAction=Get Info")
public final class GetInfoAction implements ActionListener {
private final FamilyTreeDataObject context;
private static final Logger logger = Logger.getLogger(
GetInfoAction.class.getName());
public GetInfoAction(FamilyTreeDataObject context) {
this.context = context;
}
@Override
public void actionPerformed(ActionEvent ev) {
FileObject f = context.getPrimaryFile();
String displayName = FileUtil.getFileDisplayName(f);
String name = f.getName();
StringBuilder sb = new StringBuilder("Name: ").append(name);
sb.append(":
Extension: ").append(FileUtil.getExtension(displayName));
sb.append("
MIME Type: ").append(FileUtil.getMIMEType(f));
try {
sb.append("
File Size: ").append(f.getSize());
sb.append("
Lines: ").append(f.asLines().size());
sb.append("
Last Modified: ").append(f.lastModified());
sb.append("
Full Path:
").append(f.getPath());
NotifyDescriptor nd = new NotifyDescriptor.Message(sb.toString());
DialogDisplayer.getDefault().notify(nd);
} catch (IOException e) {
logger.log(Level.WARNING, null, e);
}
}
}
The actionPerformed() method obtains the FileObject from the DataObject context. With the FileObject, we can display the file name, the extension, MIME type, length in bytes, number of lines, the last modification data, and the file’s full path. The standard NotifyDescriptor and DialogDisplayer pop up an Information dialog and block until dismissed by the user. (See “NotifyDescriptor.Message” on page 527 for more on the NotifyDescriptor dialogs.)
Provide Child Nodes Based on Content
The FamilyTreeDataObject (see Listing 14.8 on page 685) instantiates a MultiView editor when the user opens an FTR file. The generated code does not include the overloaded createNodeDelegate() method. Instead FamilyTreeDataObject relies on a default implementation inherited from DataObject. The createNodeDelegate() method returns a node (typically a DataNode) that represents this DataObject in an Explorer View. The default method sets the icon and display name and adds the DataObject to the node’s Lookup.
To customize this default behavior, override the createNodeDelegate() method. For this example, we create a list of child nodes, one for each line in the FTR text file. The Favorites window automatically displays these child nodes when the user expands the file’s node (see Figure 14.14 on page 697). The Favorites window must also be synchronized as users edit and save changes to the file.
As shown previously, a ChildFactory creates child nodes (for Person objects, see Listing 7.2 on page 300). Listing 14.13 shows the overridden createNodeDelegate() method, which likewise uses private class FamilyTreeChildFactory to create child nodes. Note that the FamilyTreeDataObject is included (this) in both the DataNode constructor and the FamilyTreeChildFactory constructor.
The FamilyTreeChildFactory has three tasks.
• Add a FileChangeListener to the underlying FileObject and refresh its data when receiving a file change event. This keeps the Favorites window synchronized when the user edits an FTR file. Here, we use the FileChangeAdapter class, since we only care about file change events. (We discuss FileChangeListeners in “Monitoring File Changes” on page 636.) The refresh() method rebuilds the child node hierarchy as needed.
• In the createKeys() method, parse the file, adding a String-based key to its underlying list of keys. (Blank lines are ignored.)
• In the createNodeForKey() method, create an AbstractNode based on the String key (line of text), using the personIcon.png graphic for the icon.
We discuss nodes, ChildFactory, and creating node hierarchies in detail in Chapter 7 (see “Building a Node Hierarchy” on page 295).
Listing 14.13 FamilyTreeDataObject and FamilyTreeChildFactory
public class FamilyTreeDataObject extends MultiDataObject {
. . .
@Override
protected Node createNodeDelegate() {
return new DataNode(this, Children.create(
new FamilyTreeChildFactory(this), true), getLookup());
}
private static class FamilyTreeChildFactory extends ChildFactory<String> {
private final FileObject fileObject;
public FamilyTreeChildFactory(FamilyTreeDataObject dataObject) {
fileObject = dataObject.getPrimaryFile();
fileObject.addFileChangeListener(new FileChangeAdapter() {
@Override
public void fileChanged(FileEvent fe) {
refresh(true);
}
});
}
@Override
protected boolean createKeys(List<String> list) {
// create a String for each line in the file
try {
// skip blank lines
for (String line : fileObject.asLines()) {
if (!line.isEmpty()) {
list.add(line);
}
}
} catch (IOException ex) {
Exceptions.printStackTrace(ex);
}
return true;
}
@Override
protected Node createNodeForKey(String key) {
AbstractNode childNode = new AbstractNode(Children.LEAF);
childNode.setDisplayName(key);
childNode.setIconBaseWithExtension(
"com/asgteach/familytreesupport/personIcon.png");
return childNode;
}
}
}
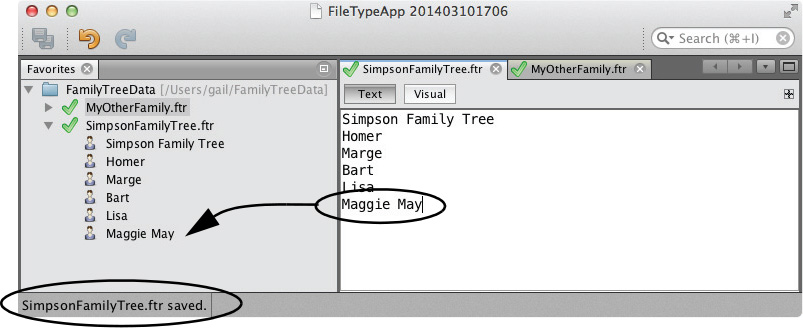
These changes create two enhancements. First, the Favorites window displays each line of text with a node. Second, as you edit an FTR file and save it (click Save All in the top-level toolbar), the Favorites window refreshes with the new file contents, as shown in Figure 14.14.
The NetBeans default text editor handles installing and subsequently removing a Savable in the TopComponent’s Lookup as a user makes and saves changes. (See “Implement Openable and SavablePersonCapability” on page 500 for examples on working with Savable.)
14.3 Working with MultiView Windows
The FamilyTreeDataObject includes support for MultiView windows. A MultiView editor is a TopComponent with more than one embedded window, called a MultiViewElement. MultiViewElements are selectable with buttons in a toolbar that let you switch views. Our FileTypeApp has a window labeled Text that displays a plain text editor. The editor is completely supplied by the NetBeans Platform. The other window labeled Visual is currently empty (blank).
Let’s add a Visual view of our file now so that users can switch between the text editor and the Visual view. As users make edits in the Visual view, these changes appear in the Text view and vice versa. Thus, both views access the same underlying document model that is synchronized as users edit the file. A change made through either view enables the Save All toolbar icon, and after saving, the Favorites window shows the updated contents.
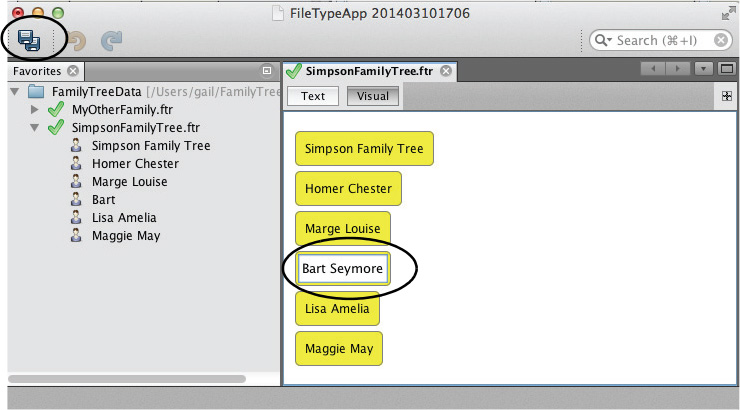
Figure 14.15 shows the FileTypeApp with file SimpsonFamilyTree.ftr opened in the Visual view of the FTR editor. The Visual view uses the NetBeans Platform Visual Library to create movable widgets corresponding to each line in the FTR file. In this screenshot, the user is editing element Bart. The changes have not yet been saved to the file (so the Favorites window is not yet updated), and the Save All icon is enabled reflecting a modification to the underlying model.
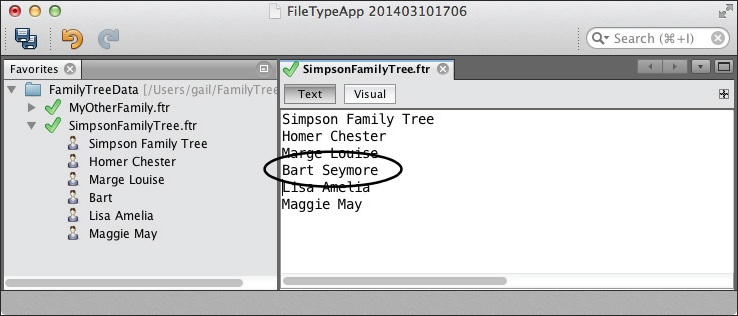
At any time, users can select the Text button in the editor’s toolbar to activate the Text view of this file, as shown in Figure 14.16. Here, you see the edited contents from the underlying document model.
When users click either the Save All icon or the File | Save menu item, the Favorites window shows the saved contents, as shown in Figure 14.17. The Save All icon is then disabled.
Now let’s show you how to create a visual element with the Visual Library and keep the underlying document model consistent among multiple views.
Using the Visual Library
A complete description of the Visual Library is beyond the scope of this book, but we can provide a cursory outline to get you started. As its name implies, the Visual Library lets you create views with selectable, movable, and changeable graphical components called widgets. When you build a view with the Visual Library, you construct a Scene, which is a specialized widget that consists of a tree structure of widgets. The Scene is the root element and creates a Swing-compatible JComponent view that you can add to a Swing component.
To create actions for widgets, use ActionFactory and add them to the widgets with method addAction(). Some ActionFactory methods require a provider (such as the EditAction). Other actions have default providers (such as the MoveAction). In this application, we add both a MoveAction and an in-place editor action, using an implementation of TextFieldInplaceEditor.
A widget can be a container for additional widgets and also have a layout. Our example uses LayoutWidget (a transparent widget that has a layout and holds other widgets) and a LabelWidget (a widget that displays text).
A default NetBeans Platform application does not include the Visual Library API module. Therefore, before you can set a dependency on this module, you must first include the module in your application’s build. Here are the steps.
1. In the Projects view, right click on the FileTypeApp project and select Properties from the context menu.
2. In the Project Properties dialog under Categories, select Libraries.
3. In the list of Platform Modules, scroll down and expand cluster platform.
4. Scroll to the end of the platform cluster, select Visual Library API, and click OK.
Now you can set a dependency on this module, as follows.
1. In the Projects view, expand project FamilyTreeSupport, right click on the Libraries node, and select Add Module Dependency . . . from the context menu.
2. In the list of modules, scroll down to the end, select Visual Library API, and click OK.
Building a Scene and Adding Widgets
Let’s now return to FamilyTreeVisualElement.java and build a Scene with widgets for each text line in the file. This requires a set of LabelWidgets (one for each non-empty text line) based on the opened document from the FTR file. Because the FamilyTreeDataObject is configured with a file type and registered editor, we can access both the editor and the underlying document through the FamilyTreeDataObject Lookup.
Although this example is basic, you will see how the MultiViewElement’s life cycle methods synchronize the underlying model when changes are made. Listing 14.14 shows the FamilyTreeVisualElement with added fields and a modified constructor, which now builds a Scene from the Visual Library.
The LayoutWidget field layer has a layout and is a container for other widgets. We use the default layout, which provides absolute positioning. We obtain the EditorCookie from the FamilyTreeDataObject Lookup and use it to access the underlying document model (StyledDocument). Field scene is the top-level Visual Library Scene object that creates a Swing-compatible view. Finally, border is a reusable Border element constructed through the Visual Library’s BorderFactory and provides a rounded border with a yellow background in all of the LabelWidgets.
The constructor includes code to set the JPanel’s layout (BorderLayout), instantiate the LayerWidget and add it to the Scene, and add the Scene’s view to a Swing JScrollPane.
Listing 14.14 FamilyTreeVisualElement—Adding Widgets
@Messages("LBL_FamilyTree_VISUAL=Visual")
public final class FamilyTreeVisualElement extends JPanel
implements MultiViewElement {
private final FamilyTreeDataObject ftDataObject;
private final JToolBar toolbar = new JToolBar();
private transient MultiViewElementCallback callback;
private final LayerWidget layer;
private EditorCookie editCookie = null;
private StyledDocument doc = null;
private final Scene scene = new Scene();
private final Border border = BorderFactory.createRoundedBorder(
10, 10, Color.yellow, Color.gray);
private static final Logger logger = Logger.getLogger(
FamilyTreeVisualElement.class.getName());
public FamilyTreeVisualElement(Lookup lkp) {
ftDataObject = lkp.lookup(FamilyTreeDataObject.class);
assert ftDataObject != null;
initComponents();
setLayout(new BorderLayout());
layer = new LayerWidget(scene);
scene.addChild(layer);
add(new JScrollPane(scene.createView()));
}
. . .
}
Similar to TopComponents, MultiViewElements implement overridden life cycle methods that let you control how a MultiViewElement is initialized and refreshed. Here we use the componentShowing() method to initialize the widgets in the Scene from the open document. The componentShowing() method is invoked each time the user switches views and also when the application starts up with this view showing. (See “Window System Life Cycle Management” on page 369 for a description of these life cycle methods.) We use the DataObject’s EditorCookie (from the Lookup) to make sure the editor is open and that the document has been initialized.
Opening an FTR file opens the file in the plain text editor by default. This open initializes the underlying document, making it available through the EditorCookie getDocument() method. If, however, the application last quit with the FTR file opened in the Visual view, then this visual element opens first with the underlying document not yet initialized. The componentShowing() method makes sure the document is properly initialized in this scenario.
The refreshLines() method parses the document and creates a LabelWidget for each line (ignoring empty lines). Since the componentShowing() method is invoked each time the user switches view from the Text to the Visual view, the Scene always displays the current edited document.
The makeWidget() method builds a LabelWidget (a widget that displays text) and sets its location, border, and text label. This method also configures the widget with two actions, an EditAction (that lets the user edit the widget’s label) and a a MoveAction (that lets the user move the widget within the Scene). MoveAction has a default provider obtained from the ActionFactory. For EditAction, we configure a Provider, shown next.
Listing 14.15 shows the code for the componentShowing(), refreshLines(), and makeWidget() methods.
Listing 14.15 FamilyTreeVisualElement—Adding the Widgets
public final class FamilyTreeVisualElement extends JPanel
implements MultiViewElement {
. . .
@Override
public void componentShowing() {
editCookie = ftDataObject.getLookup().lookup(EditorCookie.class);
if (editCookie != null) {
doc = editCookie.getDocument();
if (doc == null) {
editCookie.open(); // open
try {
doc = editCookie.openDocument(); // get document
} catch (IOException ex) {
Exceptions.printStackTrace(ex);
return;
}
}
refreshLines();
}
}
private void refreshLines() {
layer.removeChildren();
try {
String docString = doc.getText(0, doc.getLength());
int i = 1;
for (String text : docString.split("
")) {
if (!text.isEmpty()) {
LabelWidget widget = makeWidget(text,
new Point(20, 40 * i++));
layer.addChild(widget);
}
}
scene.validate();
} catch (BadLocationException ex) {
Exceptions.printStackTrace(ex);
}
}
private LabelWidget makeWidget(String text, Point point) {
LabelWidget widget = new LabelWidget(scene, text);
widget.getActions().addAction(editorAction);
widget.getActions().addAction(ActionFactory.createMoveAction());
widget.setPreferredLocation(point);
widget.setBorder(border);
return widget;
}
. . .
}
The makeWidget() method adds a TextFieldInplaceEditor to the LabelWidget. Listing 14.16 shows the code that implements this in-place editor, which requires overriding the isEnabled(), getText(), and setText() methods. The setText() method updates both the LabelWidget and the underlying document. The NetBeans-provided plain text editor receives the resulting DocumentListener events and responds by adding a Savable implementation to the TopComponent’s Lookup. This, in turn, enables the toolbar’s Save All icon. If the user switches views, the Text view shows the updated text.
The updateDocument() method performs the actual update to the underlying document. Because we create widgets from non-empty lines only, we massage the document to remove any extra newline characters. This ensures that correct positions are provided when updating the document’s text.
If the user sets the widget’s label to an empty string, the method removes the widget from the scene by invoking refreshLines() (shown previously).
Listing 14.16 FamilyTreeVisualElement—Implementing the LabelWidget Editor
private final WidgetAction editorAction =
ActionFactory.createInplaceEditorAction(new LabelTextFieldEditor());
private class LabelTextFieldEditor implements TextFieldInplaceEditor {
@Override
public boolean isEnabled(Widget widget) {
return true;
}
@Override
public String getText(Widget widget) {
return ((LabelWidget) widget).getLabel();
}
@Override
public void setText(Widget widget, String text) {
LabelWidget lw = (LabelWidget) widget;
String oldText = lw.getLabel();
lw.setLabel(text);
updateDocument(lw, oldText.length());
}
}
private void updateDocument(LabelWidget labelWidget, int oldTextSize) {
if (editCookie != null) {
doc = editCookie.getDocument();
if (doc != null) {
try {
//normalize the file--get rid of extra newlines
String docString = doc.getText(0, doc.getLength());
StringBuilder sb = new StringBuilder();
for (String text : docString.split("
")) {
if (!text.isEmpty()) {
sb.append(text);
sb.append("
");
}
}
// replace with normalized text
doc.remove(0, doc.getLength());
doc.insertString(0, sb.toString(), null);
// find the starting position in the document for the
// new String
int startPosition = 0;
for (Widget widget : layer.getChildren()) {
if (widget instanceof LabelWidget) {
LabelWidget lw = ((LabelWidget) widget);
if (lw.equals(labelWidget)) {
doc.remove(startPosition, oldTextSize + 1);
if (labelWidget.getLabel().isEmpty()) {
// get rid of the widget if it's empty
refreshLines();
} else {
doc.insertString(startPosition,
labelWidget.getLabel() + "
", null);
}
break;
} else {
startPosition += lw.getLabel().length() + 1;
}
}
}
} catch (BadLocationException ex) {
Exceptions.printStackTrace(ex);
}
}
}
}
}
Create a Toolbar Action to Add a Widget to the View
The Visual view of the FTR editor lets users edit a widget’s text label and remove the widget (by setting its label to an empty string). Let’s now add an action to the application’s toolbar and top-level File menu that lets users add widgets to the view (and a new line of text to the document). This action will be conditionally-enabled, available only when the Visual view has focus (is active).
We know that context is determined by the contents of the Global Lookup. Therefore, let’s create a new capability and add an implementation to the FamilyTreeVisualElement’s Lookup. We also create a new conditionally-enabled action that invokes a specific method in this capability. Here are the steps.
• Create a new capability called Droppable with abstract method drop().
• Create a new conditionally-enabled Add Name action that invokes the drop() method.
• Implement Droppable with the code that builds a LabelWidget. Add this implementation to the FamilyTreeVisualElement’s Lookup.
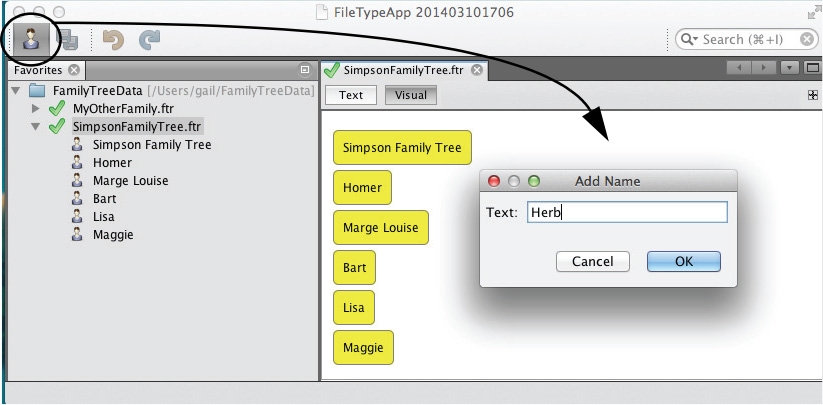
Figure 14.18 shows the FileTypeApp running. The Add Name action is enabled only when the Visual view of the FTR editor has focus. After clicking the Add Name icon in the toolbar, the action displays a dialog to prompt for the new name. When the user supplies a name and clicks OK, a new LabelWidget appears at the bottom of the Visual view. The Save All icon then becomes enabled.
1. Add Java Interface Droppable to module FamilyTreeSupport, as shown in Listing 14.17.
public interface Droppable {
public void drop(String text);
}
2. Add a new conditionally-enabled action to module FamilyTreeSupport called AddNameAction that requests a text String from the user and invokes the drop() method with the text. Specify Droppable as the Cookie Class (the context). Listing 14.18 shows the action implementation.
Listing 14.18 AddNameAction.java
@ActionID(
category = "Edit",
id = "com.asgteach.familytreesupport.AddNameAction"
)
@ActionRegistration(
iconBase = "com/asgteach/familytreesupport/personIcon.png",
displayName = "#CTL_AddNameAction"
)
@ActionReferences({
@ActionReference(path = "Menu/File", position = 1300,
separatorAfter = 1350),
@ActionReference(path = "Toolbars/File", position = 300)
})
@Messages("CTL_AddNameAction=Add Name")
public final class AddNameAction implements ActionListener {
private final Droppable context;
public AddNameAction(Droppable context) {
this.context = context;
}
@Override
public void actionPerformed(ActionEvent ev) {
NotifyDescriptor.InputLine inputLine =
new NotifyDescriptor.InputLine("Text:", "Add Name");
Object result = DialogDisplayer.getDefault().notify(inputLine);
if (result == NotifyDescriptor.OK_OPTION) {
String text = inputLine.getInputText();
if (!text.isEmpty()) {
context.drop(text);
}
}
}
}
3. Listing 14.19 shows the changes to FamilyTreeVisualElement to support the AddNameAction. To add an object to the FamilyTreeVisualElement Lookup, you must instantiate InstanceContent and configure a proxy Lookup to include the FamilyTreeDataObject’s Lookup. A proxy Lookup lets you combine Lookups from more than one source. (See “Lookup as an Object Repository” on page 225 for more on using InstanceContent with Lookups.) We re-implement the getLookup() method to return this proxy Lookup.
Next, we implement Droppable, override the drop() method, and add the implementation to the Lookup. Adding the Droppable implementation to the FamilyTreeVisualElement’s Lookup enables the AddNameAction in the application’s toolbar when the Visual view has focus.
The drop() method inserts the provided text into the underlying document and invokes refreshLines() to rebuild the view. (Listing 14.15 on page 702 shows the refreshLines() method.)
Listing 14.19 FamilyTreeVisualElement—Implementing Droppable
public final class FamilyTreeVisualElement extends JPanel
implements MultiViewElement {
private final FamilyTreeDataObject ftDataObject;
private final JToolBar toolbar = new JToolBar();
private transient MultiViewElementCallback callback;
private ProxyLookup proxyLookup = null;
private final InstanceContent instanceContent = new InstanceContent();
. . .
public FamilyTreeVisualElement(Lookup lkp) {
proxyLookup = new ProxyLookup(
lkp, new AbstractLookup(instanceContent));
ftDataObject = lkp.lookup(FamilyTreeDataObject.class);
assert ftDataObject != null;
initComponents();
setLayout(new BorderLayout());
layer = new LayerWidget(scene);
scene.addChild(layer);
add(new JScrollPane(scene.createView()));
instanceContent.add(new Droppable() {
@Override
public void drop(String text) {
// add text to end of document and call refreshLines()
if (doc != null) {
try {
if (!(doc.getText(doc.getLength(), 1)).endsWith("
")) {
doc.insertString(doc.getLength(), "
", null);
}
doc.insertString(doc.getLength(), text + "
", null);
refreshLines();
} catch (BadLocationException ex) {
Exceptions.printStackTrace(ex);
}
}
}
});
}
@Override
public Lookup getLookup() {
return proxyLookup;
}
. . .
}
Using JavaFX
Let’s continue our exploration of MultiView windows and add a Visual view with JavaFX content to our application. We’ll provide the same functionality as the Visual view we just showed you. This VisualFX view includes synchronizing the underlying document among all the views, an in-place editor, a mouse drag of the visual elements, and a toolbar action to add elements. In addition, a fade-in transition plays when the user switches to the VisualFX view. And because we’re using JavaFX, we style the elements with CSS.
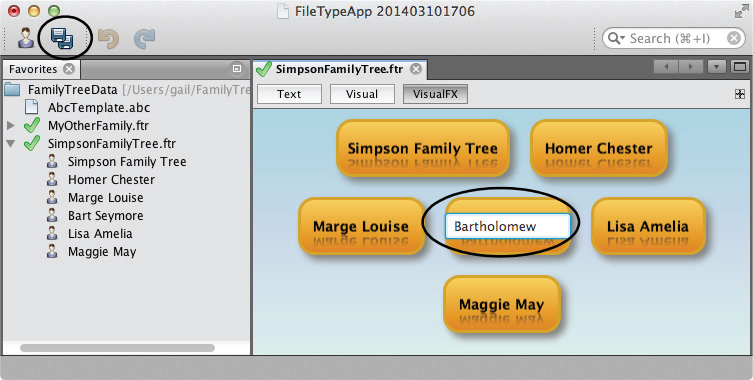
Figure 14.19 shows the application running. The MultiView window now has three views: Text, Visual, and the VisualFX view shown. The user is editing the document and the toolbar’s Save All icon is enabled. Similar to the MultiView window behavior you’ve already seen, changes made in the VisualFX view appear in both the Text and Visual views. Edits made in each of the other views similarly affect the VisualFX view.
The key strategy here is applying the same approach from Chapter 6 that integrates JavaFX content with NetBeans Platform applications. We use FXML for layout and an FXML controller class to manage and isolate JavaFX content. The VisualFX view uses all three types of communication strategies: self-contained events, one-way communication, and two-way communication (see “Communication Strategies” on page 261). In particular, note that property change support in the FXML controller class communicates user-initiated changes in the underlying document back to the enclosing MultiView element. We’ll explain all of this as we show you how to build the VisualFX view.
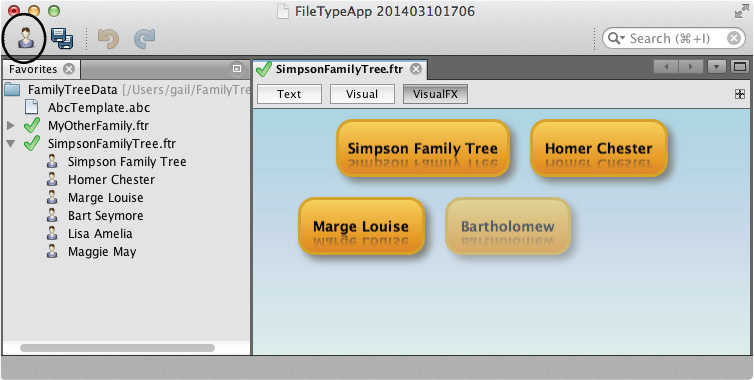
Figure 14.20 shows the FileTypeApp application as the user clicks the VisualFX button. The text elements fade in, one by one. Also, note that the toolbar Add Name icon is enabled for both the Visual and VisualFX views.
Here’s a summary of the steps required to add the VisualFX view to the FTR MultiView editor.
• Create the FamilyTreeVisualFXElement.java Java file by refactor copying FamilyTreeVisualElement.java.
• Create files FtrVisual.fxml, FtrVisualController.java, and FtrCSS.css for the JavaFX content.
• Configure FamilyTreeVisualFXElement to build the JavaFX scene graph and store a reference to the JavaFX controller. Build the JavaFX content in the componentShowing() life cycle method and when a property change event is received. Clear the JavaFX content in the componentHidden() life cycle method. Initiate a fade-in transition when the user switches to the VisualFX view.
• Configure the JavaFX controller class. Add a public refresh() method that builds the JavaFX scene graph based on the underlying document. Include drag mouse handlers to move elements around. Include a double-click mouse event that opens the in-place editor. Fire property change events when the user edits names. Add a public doFadeIn() method that plays the fade-in transitions and a public clear() method that clears the JavaFX content.
Add FamilyTreeVisualFXElement.java
1. In module FamilyTreeSupport | Source Packages, right click FamilyTreeVisualElement.java and select Copy from the context menu.
2. Select the package name, right click, and select Paste. In the context menu, select Refactor Copy. In the dialog, specify FamilyTreeVisualFXElement for the new Java class name.
You will make changes to build the JavaFX Scene and instantiate the JavaFX controller class. First, create the JavaFX-related files.
Create the JavaFX FXML, Controller Class, and CSS Files
Add files FtrVisualFX.fxml, FtrVisualFXController.java, and FtrCSS.css to the FamilyTreeSupport module.3 We’ll configure these files after we’ve made changes to the MultiView element file, FamilyTreeVisualFXElement.java.
3. To create the FXML and JavaFX Controller files, build a new JavaFX FXML Application project in the NetBeans IDE and copy the resulting FXML document and FXML Controller class to the FamilyTreeSupport module Source Package.
Configure FamilyTreeVisualFXElement.java
FamilyTreeVisualFXElement has a structure that is similar to the MultiView element you’ve already seen. Here, however, we construct the JavaFX scene and store a reference to the JavaFX controller class. To safely store the reference, we use a countdown latch to wait for the createScene() method to complete.
As in the previous section, we also implement Droppable and add it to this element’s Lookup. This implementation appends the provided String to the end of the document and then invokes the controller’s refresh() method (using Platform.runlater() to execute on the JavaFX application Thread).
Listing 14.20 shows the code that registers the MultiView element, configures the proxy Lookup with InstanceContent and AbstractLookup, adds the Droppable to the Lookup, and creates the JavaFX content.
Listing 14.20 FamilyTreeVisualFXElement—Initializing JavaFX Content
@MultiViewElement.Registration(
displayName = "#LBL_FamilyTreeFX_VISUAL",
iconBase = "com/asgteach/familytreesupport/check.png",
mimeType = "text/x-familytree",
persistenceType = TopComponent.PERSISTENCE_NEVER,
preferredID = "FamilyTreeFXVisual",
position = 2000
)
@Messages("LBL_FamilyTreeFX_VISUAL=VisualFX")
public final class FamilyTreeVisualFXElement extends JPanel
implements MultiViewElement, PropertyChangeListener {
private final FamilyTreeDataObject ftDataObject;
private final JToolBar toolbar = new JToolBar();
private transient MultiViewElementCallback callback;
private ProxyLookup proxyLookup = null;
private final InstanceContent instanceContent = new InstanceContent();
private EditorCookie editCookie = null;
private StyledDocument doc = null;
private static JFXPanel fxPanel;
private FtrVisualFXController controller;
private static final Logger logger = Logger.getLogger(
FamilyTreeVisualFXElement.class.getName());
public FamilyTreeVisualFXElement(Lookup lkp) {
proxyLookup = new ProxyLookup(lkp,
new AbstractLookup(instanceContent));
ftDataObject = lkp.lookup(FamilyTreeDataObject.class);
assert ftDataObject != null;
initComponents();
setLayout(new BorderLayout());
init();
instanceContent.add(new Droppable() {
@Override
public void drop(String text) {
// add the text to the end of the document, then refreshLines()
if (doc != null) {
try {
if (!(doc.getText(doc.getLength(), 1)).endsWith("
")) {
doc.insertString(doc.getLength(), "
", null);
}
doc.insertString(doc.getLength(), text + "
", null);
String docString = doc.getText(0, doc.getLength());
Platform.runLater(() -> controller.refresh(docString));
} catch (BadLocationException ex) {
Exceptions.printStackTrace(ex);
}
}
}
});
}
private void init() {
fxPanel = new JFXPanel();
add(fxPanel, BorderLayout.CENTER);
Platform.setImplicitExit(false);
// need to wait for this to complete so that we can
// safely add ourselves as a property change listener
final CountDownLatch latch = new CountDownLatch(1);
Platform.runLater(() -> {
try {
createScene();
} finally {
latch.countDown();
}
});
try {
latch.await();
} catch (InterruptedException ex) {
logger.log(Level.WARNING, null, ex);
}
}
private void createScene() {
try {
URL location = getClass().getResource("FtrVisualFX.fxml");
FXMLLoader fxmlLoader = new FXMLLoader();
fxmlLoader.setLocation(location);
fxmlLoader.setBuilderFactory(new JavaFXBuilderFactory());
Parent root = (Parent) fxmlLoader.load(location.openStream());
javafx.scene.Scene scene = new javafx.scene.Scene(root);
fxPanel.setScene(scene);
controller = (FtrVisualFXController) fxmlLoader.getController();
} catch (IOException ex) {
Exceptions.printStackTrace(ex);
}
}
. . .
}
Listing 14.21 shows the FamilyTreeVisualFXElement life cycle methods and the property change event handler. The componentOpened() method adds the class as a property change listener to the JavaFX controller class, and the componentClosed() method removes the listener.
The componentShowing() method (which is invoked when the user selects the VisualFX tab to make this element visible) accesses the underlying document from the DataObject EditorCookie. The refresh() method synchronizes the JavaFX content with the current state of the document.
The doFadeIn() method fades in the individual JavaFX scene graph elements with a sequential FadeTransition. A countdown latch makes sure this method executes after refresh() completes.
The propertyChange() method is invoked when the user makes a change to the text in the JavaFX scene graph. This event handler receives the updated String and replaces the underlying document with this new value. The updated document is detected in the NetBeans-provided Text editor, which responds by placing a Savable in its Lookup.
The propertyChange() event handler refreshes the JavaFX content after processing the document changes.
Listing 14.21 FamilyTreeVisualFXElement—Life Cycle and Property Change
public final class FamilyTreeVisualFXElement extends JPanel
implements MultiViewElement, PropertyChangeListener {
. . .
@Override
public void componentOpened() {
// requires a countdown latch to make sure
// controller is properly initialized
controller.addPropertyChangeListener(this);
}
@Override
public void componentClosed() {
controller.removePropertyChangeListener(this);
}
@Override
public void componentShowing() {
editCookie = ftDataObject.getLookup().lookup(EditorCookie.class);
if (editCookie != null) {
doc = editCookie.getDocument();
if (doc == null) {
editCookie.open(); // open
try {
doc = editCookie.openDocument(); // get document
} catch (IOException ex) {
Exceptions.printStackTrace(ex);
return;
}
}
try {
String docString = doc.getText(0, doc.getLength());
final CountDownLatch latch = new CountDownLatch(1);
Platform.runLater(() -> {
try {
controller.refresh(docString);
} finally {
latch.countDown();
}
});
try {
latch.await();
// wait for refresh() to complete before calling the fade-in
Platform.runLater(() -> controller.doFadeIn());
} catch (InterruptedException ex) {
logger.log(Level.WARNING, null, ex);
}
} catch (BadLocationException ex) {
Exceptions.printStackTrace(ex);
}
}
}
@Override
public void componentHidden() {
Platform.runLater(() -> controller.clear());
}
@Override
public void propertyChange(PropertyChangeEvent evt) {
// the controller made changes; we have to update
// the underlying document and refresh the JavaFX scene
if (evt.getPropertyName().equals(
FtrVisualFXController.PROP_DOCELEMENT_REMOVED) ||
evt.getPropertyName().equals(
FtrVisualFXController.PROP_DOCUMENT_UPDATED)) {
// update the document
if (doc != null) {
try {
doc.remove(0, doc.getLength());
doc.insertString(0, (String) evt.getNewValue(), null);
Platform.runLater(() ->
controller.refresh((String) evt.getNewValue()));
} catch (BadLocationException ex) {
Exceptions.printStackTrace(ex);
}
}
}
}
}
Configure FXML, CSS, and Controller Class Files
Create the JavaFX content and controller code. Let’s begin with the FXML file, shown in Listing 14.22. Here you see a FlowPane layout control with its alignment set to TOP_CENTER and padding insets of 10 pixels on all sides. The FlowPane control includes an assigned fx:id ("mypane") that the controller class uses to reference this layout control. The FXML code also identifies the controller class (FtrVisualFXController) and specifies a CSS style sheet file.
Note that the FlowPane does not contain any child nodes. The controller class generates child nodes based on the underlying document (provided by the FamilyTreeVisualFXElement class).
Listing 14.22 FtrVisualFX.fxml
<?xml version="1.0" encoding="UTF-8"?>
<?import java.lang.*?>
<?import java.net.*?>
<?import java.util.*?>
<?import javafx.scene.*?>
<?import javafx.geometry.Insets?>
<?import javafx.scene.control.*?>
<?import javafx.scene.layout.*?>
<?import javafx.scene.shape.*?>
<?import javafx.scene.text.*?>
<?import javafx.scene.effect.*?>
<FlowPane
hgap="20"
vgap="20"
alignment="TOP_CENTER"
id="FlowPane"
fx:id="mypane"
xmlns:fx="http://javafx.com/fxml"
fx:controller="com.asgteach.familytreesupport.FtrVisualFXController">
<padding>
<Insets bottom="10.0" left="10.0" right ="10.0" top="10.0"/>
</padding>
<stylesheets>
<URL value="@FtrCSS.css" />
</stylesheets>
<children> </children>
</FlowPane>
Listing 14.23 shows the CSS file, which defines class-based styles for the Rectangle, Text, and FlowPane. The Rectangle style has a multi-element gradient for its fill and a drop shadow effect and the Text style specifies font, weight, and size. The FlowPane background color is a 3-part linear gradient.
.ftr-rectangle {
-fx-fill:
linear-gradient(#ffd65b, #e68400),
linear-gradient(#ffef84, #f2ba44),
linear-gradient(#ffea6a, #efaa22),
linear-gradient(#ffe657 0%, #f8c202 50%, #eea10b 100%),
linear-gradient(from 0% 0% to 15% 50%, rgba(255,255,255,0.9),
rgba(255,255,255,0));
-fx-effect: dropshadow( three-pass-box , gray , 10 , 0 , 5.0 , 5.0 );
-fx-stroke-width:3.0;
-fx-stroke: goldenrod;
}
.ftr-text {
-fx-font: Verdana;
-fx-font-weight: bold;
-fx-font-size: 14;
}
.ftr-pane {
-fx-background-color: linear-gradient(lightblue, #c9d9e8, #ddeeeb);
}
Listing 14.24 shows the first part of the JavaFX controller class, FtrVisualFXController.java. Annotation @FXML identifies field mypane from the FXML file. The controller will use mypane to add nodes to the JavaFX scene graph. The controller also adds property change support with SwingPropertyChangeSupport so that the property change event fires on the EDT. The public static Strings define the monitored property names for property change support.
Event handlers nodeOnMousePressedHandler and nodeOnMouseDraggedHandler implement node dragging (move action) and use the orgSceneX, orgSceneY, orgTranslateX, and orgTranslateY fields to maintain node dragging.
Listing 14.24 FtrVisualFXController—Fields and Mouse Dragging
public class FtrVisualFXController implements Initializable {
@FXML
private FlowPane mypane;
private SwingPropertyChangeSupport propChangeSupport = null;
private final SequentialTransition seqTran = new SequentialTransition();
public static final String PROP_DOCUMENT_UPDATED = "DocumentUpdated";
public static final String PROP_DOCELEMENT_REMOVED = "DocElementRemoved";
private double orgSceneX;
private double orgSceneY;
private double orgTranslateX;
private double orgTranslateY;
private static final Logger logger = Logger.getLogger(
FtrVisualFXController.class.getName());
@Override
public void initialize(URL url, ResourceBundle rb) {
propChangeSupport = new SwingPropertyChangeSupport(this, true);
mypane.getStyleClass().add("ftr-pane");
}
EventHandler<MouseEvent> nodeOnMousePressedEventHandler = ((event) -> {
if (event.getButton().equals(MouseButton.PRIMARY)) {
orgSceneX = event.getSceneX();
orgSceneY = event.getSceneY();
orgTranslateX = ((Node) (event.getSource())).getTranslateX();
orgTranslateY = ((Node) (event.getSource())).getTranslateY();
}
});
EventHandler<MouseEvent> nodeOnMouseDraggedEventHandler = ((event) -> {
if (event.getButton().equals(MouseButton.PRIMARY)) {
double offsetX = event.getSceneX() - orgSceneX;
double offsetY = event.getSceneY() - orgSceneY;
double newTranslateX = orgTranslateX + offsetX;
double newTranslateY = orgTranslateY + offsetY;
((Node) (event.getSource())).setTranslateX(newTranslateX);
((Node) (event.getSource())).setTranslateY(newTranslateY);
}
});
. . .
}
Now let’s look at the public methods that the MultiView element class invokes. Listing 14.25 shows the doFadeIn() method (which plays the sequential FadeTransitions), the refresh() method, and the clear() method.
The refresh() method receives a String argument and builds a multi-node element for each non-empty line in the String. The multi-node element consists of a StackPane layout control containing a Rectangle and Text element. There is also a hidden TextField control that becomes visible when the user double clicks the StackPane. This provides the in-place editor.
The TextField event handler invokes the updateDocument() method, which processes the user edits and fires a property change event.
Let’s point out a few interesting JavaFX coding points.
• Variable seqTran is a SequentialTransition. This is cleared and rebuilt each time with each StackPane FadeTransition, fading in from opacity 0 to opacity 1.
• The MultiView element class invokes clear() from the componentHidden() method, which clears the FlowPane layout control. This makes sure that the JavaFX content doesn’t flash but fades in smoothly when the user switches to the VisualFX view.
• The width of the Rectangle is determined by the bounds of the Text control, so that each Rectangle is only as wide as necessary to fit the Text node.
• The width of the hidden TextField is bound to the width of the Rectangle. This makes the TextField fit nicely over the underlying Rectangle when the TextField becomes visible.
• The TextField event handler is invoked when the user finishes editing with the Return key. The handler replaces the new text in the Text element, makes the TextField invisible again, adjusts the width of the underlying Rectangle, and invokes the updateDocument() method.
• The updateDocument() method processes the JavaFX node hierarchy and inserts the new text String into its proper place in the underlying document String. The firePropertyChange() method makes the edited String available to the listening MultiView element class.
Listing 14.25 FtrVisualFXController—Build Content from String
public class FtrVisualFXController implements Initializable {
. . .
// Invoked by Swing visual element on the JavaFX Application Thread
public void doFadeIn() {
seqTran.playFromStart();
}
// Invoked by Swing visual element on the JavaFX Application Thread
public void clear() {
seqTran.getChildren().clear();
mypane.getChildren().clear();
}
// Invoked by Swing visual element on the JavaFX Application Thread
public void refresh(String docString) {
clear();
for (String line : docString.split("
")) {
if (!line.isEmpty()) {
// Build the StackPane
StackPane stack = new StackPane();
// Build the Text
final Text ftrText = new Text(line);
ftrText.getStyleClass().add("ftr-text");
ftrText.setEffect(new Reflection());
// Build the Rectangle
Rectangle ftrRectangle = new Rectangle(
ftrText.getBoundsInParent().getWidth() + 40, 55);
ftrRectangle.setArcHeight(30);
ftrRectangle.setArcWidth(30);
ftrRectangle.getStyleClass().add("ftr-rectangle");
// Build a TextField for editing
TextField tf = new TextField();
tf.prefWidthProperty().bind(ftrRectangle.widthProperty());
tf.setVisible(false);
tf.setOnAction(event -> {
String oldText = ftrText.getText();
ftrText.setText(tf.getText());
tf.setVisible(false);
updateDocument(ftrText, oldText.length(), docString);
ftrRectangle.setWidth(
ftrText.getBoundsInParent().getWidth() + 30);
});
// Add the Rectangle, Text, TextField to StackPane
stack.getChildren().addAll(ftrRectangle, ftrText, tf);
stack.setOnMouseClicked(event -> {
// enable editing on a double-click event
if (event.getClickCount() == 2 &&
event.getButton().equals(MouseButton.PRIMARY)) {
tf.setText(ftrText.getText());
tf.setVisible(true);
}
});
// Add the drag handlers
stack.setOnMousePressed(nodeOnMousePressedEventHandler);
stack.setOnMouseDragged(nodeOnMouseDraggedEventHandler);
// Add the StackPane to the top-level Node (mypane)
mypane.getChildren().add(stack);
FadeTransition ft = new FadeTransition(
Duration.millis(650), stack);
ft.setFromValue(0);
ft.setToValue(1);
seqTran.getChildren().add(ft);
}
}
}
private void updateDocument(Text theText, int oldTextSize,
String docString) {
//normalize the file--get rid of extra newlines
StringBuilder sb = new StringBuilder();
for (String text : docString.split("
")) {
if (!text.isEmpty()) {
sb.append(text);
sb.append("
");
}
}
// find the starting position in the document for the new String
int startPosition = 0;
for (Node node : mypane.getChildren()) {
if (node instanceof StackPane) {
StackPane sp = (StackPane) node;
for (Node childNode : sp.getChildren()) {
if (childNode instanceof Text) {
Text textNode = (Text) childNode;
if (textNode.equals(theText)) {
if (theText.getText().isEmpty()) {
sb.delete(startPosition,
startPosition + oldTextSize + 1);
this.propChangeSupport.firePropertyChange(
PROP_DOCELEMENT_REMOVED, docString, sb.toString());
} else {
sb.replace(startPosition,
startPosition + oldTextSize, theText.getText());
this.propChangeSupport.firePropertyChange(
PROP_DOCUMENT_UPDATED, docString, sb.toString());
}
break;
} else {
// not our Text node, keep looking
startPosition += textNode.getText().length() + 1;
}
}
}
}
}
}
public void addPropertyChangeListener(
PropertyChangeListener listener) {
this.propChangeSupport.addPropertyChangeListener(listener);
}
public void removePropertyChangeListener(
PropertyChangeListener listener) {
this.propChangeSupport.removePropertyChangeListener(listener);
}
}
14.4 Creating an XML-Based File Type
Now let’s show you how to create an application with a new XML file type. This is an XML file with the expected XML extension, yet with a unique root element that includes a specific namespace. The New File Type wizard registers a MIME Resolver that recognizes an XML file root element with a specific namespace. We’ll call this MIME type text/familytree+xml (that is, a text-based XML file with namespace familytree).
The New File Type wizard registers the file type, specifies a MIME resolver, and registers a DataLoader that recognizes this file type. We also provide an icon for this new file type. Like the previous example, the New File Type wizard creates a template for this file type, registers the template, and generates a DataObject. The wizard also creates a skeletal MultiView editor.
With an XML file type, you can incorporate the rich editing capabilities of the NetBeans Platform XML editor, including formatting, schema code completion, and XML verification. You enable this rich XML editor by including the required modules from the NetBeans Platform ide cluster in your application. We’ll show you how to do this later in this section.
Figure 14.21 and Figure 14.22 show this application running. Let’s point out a few features before we begin building this application.
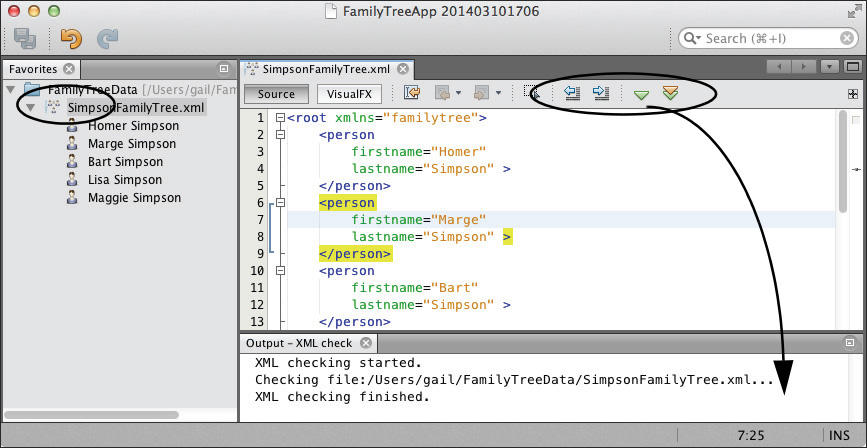
• The XML file called SimpsonFamilyTree.xml shown in the Favorites window has a special icon that we assign to this particular XML file type.
• This file is opened in the XML editor, which provides color-coded XML element editing and a toolbar at the top of the editor for operations such as XML verification. The XML verification process appears in the Output window, shown below the editor window.
• When you right click the SimpsonFamilyTree.xml file, a context menu appears with expected operations such as Open, Cut, Copy, Delete, Rename, and others. These operations are automatically included when you create a new file type.
• The context menu also includes menu item Show XML Structure, a custom action built specifically for our new file type. The action parses the XML file and displays XML Elements and Attributes in the Output window, as shown in Figure 14.22.
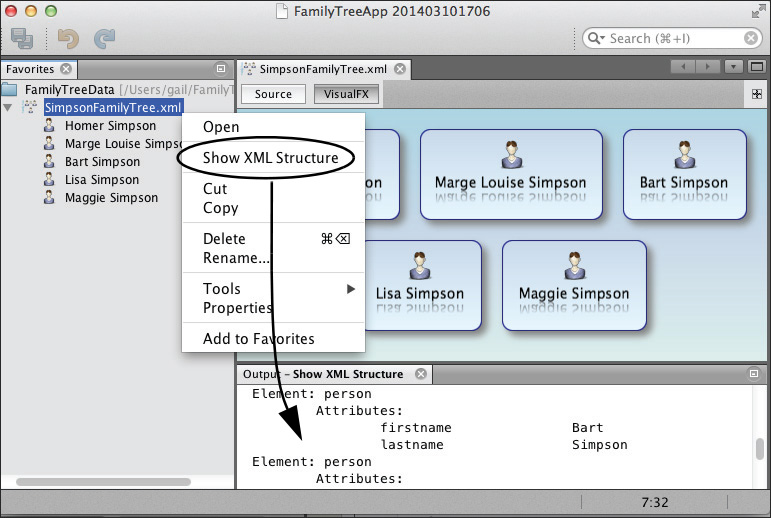
• The MultiView editor includes two views. The Source view is the standard NetBeans Platform XML editor. The VisualFX view shows a JavaFX view of the XML file and displays contents only with no editing. It does, however, reflect any edits made to the Source view.
• You can expand the file node in the Favorites window and each child node displays the attributes and values of the <person> element tag.
• As in the previous example, the Save All icon and Save All and Save menu items are enabled when you edit the file. After saving the changes, the Favorites windows shows the changes. When you switch between the Source and VisualFX views, the window always shows the current edited state of the file.
Note that you can optionally create this module as a NetBeans IDE plugin and have the full features of the NetBeans IDE available in your application.4 However, we show you how to create a stand-alone NetBeans Platform application. This requires that you manually add the modules that provide XML file editing support.
4. To create this as a NetBeans IDE plugin, do not create a NetBeans Platform Application project. Instead, create a Module Project for the PersonFileType module and Run the module. This installs the module into a version of the NetBeans IDE.
Here’s a summary of the steps to build the FamilyTreeApp application with an XML file type. We add a custom VisualFX view to the XML editor in a later section.
• Create a NetBeans Platform application called FamilyTreeApp.
• Create a module called PersonFileType.
• Add the Favorites and Template modules to the application.
• Create and register a new XML-based file type called FamilyTree.
• Add code to create child nodes for the FamilyTree DataNodes.
• Add the NetBeans IDE XML editor support.
• Add a context menu action to all FamilyTree XML files called Show XML Structure.
Create a NetBeans Platform Application and Module
Here are the steps to create the application and add the PersonFileType module.
1. Create a new application called FamilyTreeApp using the NetBeans Platform New Project wizard.
2. Create a Module and add it to the FamilyTreeApp application. Call the module PersonFileType and provide package name com.asgteach.familytree.personfiletype. The application and module are shown in the Projects view in Figure 14.23.
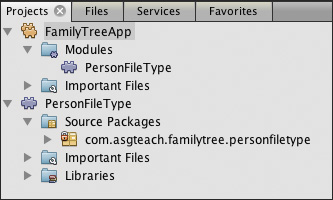
Add the Favorites and Templates Modules
The Favorites window is a file viewer for your local disk. See “Favorites Window” on page 637 for a description of this useful module. The Templates module lets you create empty files and folders from the Favorites window. Follow these steps to include the Favorites and Templates modules in the FamilyTreeApp application.
1. Right click project FamilyTreeApp in the Projects view and select Properties from the context menu.
2. Under Categories, select Libraries. NetBeans lists all of the Platform Modules organized in clusters. Under cluster platform, select modules Favorites and Templates and click OK.
3. When you run the FamilyTreeApp application, the Favorites window will now appear in the top-level Window menu.
1. In the Projects view, expand module PersonFileType | Source Packages, select the package name, right click, and select New | Other from the context menu.
2. In the Choose File Type dialog under Categories, select Module Development. Under File Types select File Type. Click Next.
3. NetBeans displays the File Recognition dialog. Specify the MIME Type as text/familytree+xml. This defines a text-based XML file type called familytree. Select radio button by XML Root Element and provide familytree for Namespace, as shown in Figure 14.24. This new MIME type applies to XML files with root element familytree. Click Next.
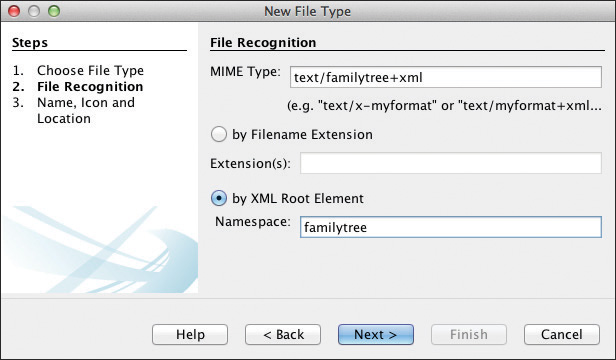
4. NetBeans displays the Name, Icon, and Location dialog. For Class Name Prefix, specify FamilyTree. Click the Browse button and navigate to the provided icon file FamilyTreeIcon.png. Make sure the Use MultiView checkbox is selected and accept the defaults for the remaining fields, as shown in Figure 14.25. Click Finish.

NetBeans creates the following files to support this new file type. See “Create a New File Type” on page 681 for more details about these files.
• FamilyTreeDataObject.java—A DataObject that wraps a FileObject for FamilyTree XML files. Listing 14.28 on page 728 shows this file.
• FamilyTreeTemplate.xml—A template used by the New File wizard when the user creates a new Family Tree XML file.
• FamilyTreeVisualElement.java—This Java file extends JPanel and implements MultiViewElement. We rename this file FamilyTreeVisualFXElement.java and build JavaFX content (see Listing 14.31 on page 735).
• FamilyTreeIcon.png—This is the 16 x 16 graphic icon attached to Family Tree XML files.
• package-info.java—This Java file registers FamilyTreeTemplate.xml as a template for the New File wizard.
Your application will now recognize an XML file with namespace root of familytree. Listing 14.26 shows the template file that was created for this application.
Listing 14.26 FamilyTreeTemplate.xml
<root xmlns="familytree">
</root>
Next, we’ll create test file SimpsonFamilyTree.xml with familytree root and place it in our file system. Listing 14.27 shows this test file.
Listing 14.27 SimpsonFamilyTree.xml
<root xmlns="familytree">
<person
firstname="Homer"
lastname="Simpson" >
</person>
<person
firstname="Marge"
lastname="Simpson" >
</person>
<person
firstname="Bart"
lastname="Simpson" >
</person>
<person
firstname="Lisa"
lastname="Simpson" >
</person>
<person
firstname="Maggie"
lastname="Simpson" >
</person>
</root>
Add Child Nodes for the FamilyTreeDataObject DataNodes
Modify FamilyTreeDataObject.java and override the createNodeDelegate() method to build child nodes based on file content. This code is similar to Listing 14.13 on page 695. Here we parse the XML file and build the child nodes based on the <person> element tag. Listing 14.28 shows the code.
Class FamilyTreeChildFactory uses the NetBeans Platform XMLUtil parse() method to create a DOM document5 from an XML file. With the DOM document, you can request a list of element tags by name and get attribute maps. The getElementsByTagName() method returns a list of org.w3c.dom.Node objects (not Node from the Nodes API). The createKeys() method uses this information to build its list of keys based on type Person. Person.java is shown in Listing 14.29 on page 730.
5. DOM stands for Document Object Model. The XMLUtil parse() method builds a DOM based on XML content. The DOM lets you build documents, navigate their structure, and add, modify, or delete elements and content. See http://www.w3.org/DOM/ for further information.
The ChildFactory also installs a FileChangeListener that performs a refresh when the underlying file is updated.
Listing 14.28 FamilyTreeDataObject
@Messages({
"LBL_FamilyTree_LOADER=Files of FamilyTree"
})
@MIMEResolver.NamespaceRegistration(
displayName = "#LBL_FamilyTree_LOADER",
mimeType = "text/familytree+xml",
elementNS = {"familytree"},
position = 0
)
@DataObject.Registration(
mimeType = "text/familytree+xml",
iconBase = "com/asgteach/familytree/personfiletype/FamilyTreeIcon.png",
displayName = "#LBL_FamilyTree_LOADER",
position = 0
)
@ActionReferences({
. . . code omitted . . .
})
public class FamilyTreeDataObject extends MultiDataObject {
public FamilyTreeDataObject(FileObject pf, MultiFileLoader loader)
throws DataObjectExistsException, IOException {
super(pf, loader);
registerEditor("text/familytree+xml", true);
InputSource inputSource = DataObjectAdapters.inputSource(this);
CheckXMLCookie checkCookie = new CheckXMLSupport(inputSource);
getCookieSet().add(checkCookie);
ValidateXMLCookie validateXMLCookie = new ValidateXMLSupport(
inputSource);
getCookieSet().add(validateXMLCookie);
}
@Override
protected int associateLookup() {
return 1;
}
@MultiViewElement.Registration(
displayName = "#LBL_FamilyTree_EDITOR",
iconBase =
"com/asgteach/familytree/personfiletype/FamilyTreeIcon.png",
mimeType = "text/familytree+xml",
persistenceType = TopComponent.PERSISTENCE_ONLY_OPENED,
preferredID = "FamilyTree",
position = 1000
)
@Messages("LBL_FamilyTree_EDITOR=Source")
public static MultiViewEditorElement createEditor(Lookup lkp) {
return new MultiViewEditorElement(lkp);
}
@Override
protected Node createNodeDelegate() {
return new DataNode(this, Children.create(new
FamilyTreeChildFactory(this), true), getLookup());
}
private static class FamilyTreeChildFactory extends ChildFactory<Person> {
private final FileObject fileObject;
private final FamilyTreeDataObject dataObject;
public FamilyTreeChildFactory(FamilyTreeDataObject dataObject) {
this.dataObject = dataObject;
fileObject = dataObject.getPrimaryFile();
fileObject.addFileChangeListener(new FileChangeAdapter() {
@Override
public void fileChanged(FileEvent fe) {
refresh(true);
}
});
}
@Override
protected boolean createKeys(List<Person> list) {
try {
EditorCookie editorCookie = dataObject.getLookup().lookup(
EditorCookie.class);
// Get the InputStream from the EditorCookie
try (InputStream is = ((org.openide.text.CloneableEditorSupport)
editorCookie).getInputStream()) {
// use XMLUtil to create a org.w3c.dom.Document
Document doc = XMLUtil.parse(
new InputSource(is), true, true, null, null);
NodeList nodeList = doc.getElementsByTagName("person");
for (int i = 0; i < nodeList.getLength(); i++) {
//For each node in the list, get a org.w3c.dom.Node
org.w3c.dom.Node personNode = nodeList.item(i);
NamedNodeMap map = personNode.getAttributes();
Person person;
if (map != null) {
person = new Person();
person.setLastname("Unknown");
for (int j = 0; j < map.getLength(); j++) {
org.w3c.dom.Node attrNode = map.item(j);
if (attrNode.getNodeName().equals("firstname")) {
person.setFirstname(attrNode.getNodeValue());
}
if (attrNode.getNodeName().equals("lastname")) {
person.setLastname(attrNode.getNodeValue());
}
}
list.add(person);
}
}
}
} catch (SAXException | IOException ex) {
Exceptions.printStackTrace(ex);
}
return true;
}
@Override
protected Node createNodeForKey(Person key) {
AbstractNode childNode = new AbstractNode(Children.LEAF);
childNode.setDisplayName(key.toString());
childNode.setIconBaseWithExtension(
"com/asgteach/familytree/personfiletype/personIcon.png");
return childNode;
}
}
}
Listing 14.29 is a simple Person class with properties firstname and lastname.
public class Person {
private String firstname = "";
private String lastname = "";
public String getFirstname() {
return firstname;
}
public void setFirstname(String firstname) {
this.firstname = firstname;
}
public String getLastname() {
return lastname;
}
public void setLastname(String lastname) {
this.lastname = lastname;
}
@Override
public String toString() {
return new StringBuilder(firstname).append(" ")
.append(lastname).toString();
}
}
Add the XML Text Editor
The NetBeans Platform includes an XML Text editor that you can add to applications. This editor provides color-coding on XML elements, syntax checking, schema code completion, formatting, and many actions you would expect from a sophisticated XML editor. Here are the steps to add the XML Text editor to our application.
1. In the Projects view, right click the application name (FamilyTreeApp) and select Properties.
2. NetBeans displays the Project Properties dialog. Select category Libraries.
3. NetBeans displays all the modules available in the various clusters that form the NetBeans Platform.
4. In the Platform Modules window, expand node ide as shown in Figure 14.26 on page 733.
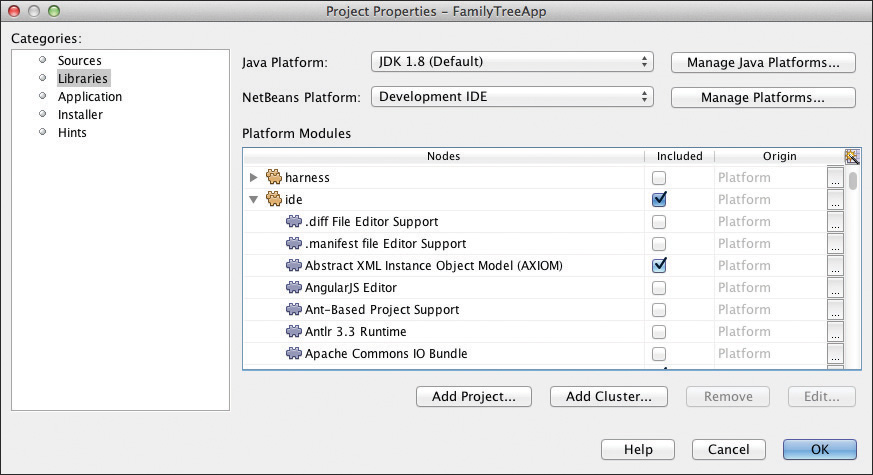
5. Select the modules from the ide cluster as listed in Table 14.1. These modules will configure a full-blown, fancy XML editor with color coding, formatting, and XML validation in your application.
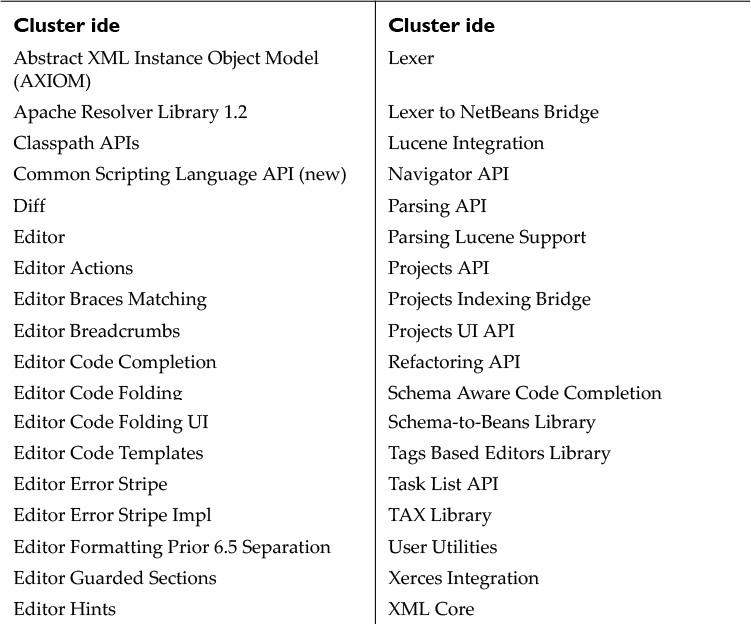

With the XML editor modules included and a new FileType installed, you can now edit a FamilyTree XML file in your application.
Add a Context-Sensitive Action
Follow the steps in “Context-Sensitive Action” on page 689 to add a conditionally-enabled action to module PersonFileType. Call the action ShowXMLStructureAction and add it to the top-level File menu and the FamilyTree XML DataNode context menu. The Cookie Class is FamilyTreeDataObject. Listing 14.30 shows the code to implement this action.
Note that we use the same NetBeans XMLUtil method to parse the XML file and create a DOM document. The XML content information is displayed in the Output window (see Figure 14.22 on page 723). See “The Output Window” on page 628 for more details about the Output window.
Listing 14.30 ShowXMLStructureAction.java
@ActionID(
category = "File",
id = "com.asgteach.familytree.personfiletype.ShowXMLStructureAction"
)
@ActionRegistration(
iconBase = "com/asgteach/familytree/personfiletype/info.png",
displayName = "#CTL_ShowXMLAction"
)
@ActionReferences({
@ActionReference(path = "Menu/File", position = 1465,
separatorAfter = 1482),
@ActionReference(path = "Loaders/text/familytree+xml/Actions",
position = 150, separatorBefore = 125)
})
@Messages({
"CTL_ShowXMLAction=Show XML Structure",
"CTL_SHOWXMLStructureActionListener=Show XML Structure"})
public final class ShowXMLStructureAction implements ActionListener {
private final FamilyTreeDataObject context;
public ShowXMLStructureAction(FamilyTreeDataObject context) {
this.context = context;
}
@Override
public void actionPerformed(ActionEvent ev) {
InputOutput io = IOProvider.getDefault().getIO(
Bundle.CTL_SHOWXMLStructureActionListener(), false);
io.select(); // "XML Structure" tab is selected
try {
EditorCookie editorCookie = context.getLookup().lookup(
EditorCookie.class);
io.getOut().reset();
try (InputStream is = (
(org.openide.text.CloneableEditorSupport) editorCookie)
.getInputStream()) {
Document doc = XMLUtil.parse(
new InputSource(is), true, true, null, null);
parseDoc(doc, "root", io);
parseDoc(doc, "person", io);
}
} catch (SAXException | IOException ex) {
Exceptions.printStackTrace(ex);
}
}
private void parseDoc(Document doc, String element, InputOutput io) {
NodeList nodeList = doc.getElementsByTagName(element);
io.getOut().println("Child Nodes, Size = " + nodeList.getLength());
for (int i = 0; i < nodeList.getLength(); i++) {
org.w3c.dom.Node personNode = nodeList.item(i);
String nodeName = personNode.getNodeName();
// Print the element and its attributes to the Output window
io.getOut().println("Element: " + nodeName);
// Create a map for Element's attributes
NamedNodeMap map = personNode.getAttributes();
if (map != null) {
StringBuilder attrBuilder = new StringBuilder();
// Iterate through map and display attribute name and value
for (int j = 0; j < map.getLength(); j++) {
org.w3c.dom.Node attrNode = map.item(j);
String attrName = attrNode.getNodeName();
attrBuilder.append("
").append(attrName);
attrBuilder.append(" ").append(attrNode.getNodeValue());
}
if (!attrBuilder.toString().isEmpty()) {
io.getOut().println(" Attributes:"
+ attrBuilder.toString());
}
}
}
}
}
Add JavaFX Content
Now let’s add JavaFX content to our renamed VisualFX view. The structure will be the same as the JavaFX content shown in the previous section (see “Using JavaFX” on page 708). Here, however, we have less work to do, since we only display content from the XML file. We’ve also changed the appearance with different CSS styles. To add JavaFX content, use the following files, which keeps the JavaFX and Swing code loosely coupled.
• FamilyTreeVisualFXElement.java—This Java file extends JPanel and implements MultiViewElement. The class stores a reference to the FamilyTreeFXController and invokes public methods in this controller class to build the JavaFX scene graph.
• FamilyTree.css—CSS style definitions to style the JavaFX scene.
• FamilyTreeFX.fxml—Declarative FXML code that defines the static part of the JavaFX scene graph.
• FamilyTreeFXController.java—The JavaFX controller class with public methods that the visual element class can invoke as needed.
Listing 14.31 shows the FamilyTreeVisualFXElement code. Because this element invokes the controller’s refresh() method, a countdown latch is necessary to make sure the controller reference is safely initialized. We refresh the JavaFX content in the componentShowing() method, which updates the JavaFX scene graph each time the user switches to the VisualFX view. As before, we clear the JavaFX content in the componentHidden() method.
Listing 14.31 FamilyTreeVisualFXElement.java
@MultiViewElement.Registration(
displayName = "#LBL_FamilyTree_VISUALFX",
iconBase = "com/asgteach/familytree/personfiletype/FamilyTreeIcon.png",
mimeType = "text/familytree+xml",
persistenceType = TopComponent.PERSISTENCE_NEVER,
preferredID = "FamilyTreeVisualFX",
position = 2000
)
@Messages("LBL_FamilyTree_VISUALFX=VisualFX")
public final class FamilyTreeVisualFXElement extends JPanel
implements MultiViewElement {
private final FamilyTreeDataObject ftDataObject;
private final JToolBar toolbar = new JToolBar();
private transient MultiViewElementCallback callback;
private EditorCookie editCookie = null;
private Document doc = null;
private static JFXPanel fxPanel;
private FamilyTreeFXController controller;
private static final Logger logger = Logger.getLogger(
FamilyTreeVisualFXElement.class.getName());
public FamilyTreeVisualFXElement(Lookup lkp) {
ftDataObject = lkp.lookup(FamilyTreeDataObject.class);
assert ftDataObject != null;
initComponents();
setLayout(new BorderLayout());
init();
}
private void init() {
. . . see the init() method in Listing 14.20 on page 711 . . .
}
private void createScene() {
. . . see the createScene() method in Listing 14.20 on page 711 . . .
}
. . . code omitted . . .
@Override
public void componentShowing() {
editCookie = ftDataObject.getLookup().lookup(EditorCookie.class);
if (editCookie != null) {
try (InputStream is = ((org.openide.text.CloneableEditorSupport)
editCookie).getInputStream()) {
doc = XMLUtil.parse(new InputSource(is),
true, true, null, null);
final CountDownLatch latch = new CountDownLatch(1);
Platform.runLater(() -> {
try {
controller.refresh(doc);
} finally {
latch.countDown();
}
});
try {
latch.await();
// wait for refresh() to complete before initiating fade-in
Platform.runLater(() -> controller.doFadeIn());
} catch (InterruptedException ex) {
logger.log(Level.WARNING, null, ex);
}
} catch (IOException | SAXException ex) {
Exceptions.printStackTrace(ex);
}
}
}
@Override
public void componentHidden() {
Platform.runLater(() -> controller.clear());
}
}
Listing 14.32 is the CSS to style our JavaFX content. Note that the Rectangles have a “leaner” look and the Text is no longer bold.
.ftr-rectangle {
-fx-fill: linear-gradient(#c9d9e8, #e7f7ff);
-fx-effect: dropshadow( three-pass-box , gray , 10 , 0 , 5.0 , 5.0 );
-fx-stroke-width:1.0;
-fx-stroke: darkblue;
}
.ftr-text {
-fx-font-size: 14;
}
.ftr-pane {
-fx-background-color: linear-gradient(lightblue, #c9d9e8, #ddeeeb);
}
Listing 14.33 is the FXML for the JavaFX content. Again, a FlowPane control handles the scene’s layout.
Listing 14.33 FamilyTreeFX.fxml
<FlowPane
hgap="20"
vgap="20"
alignment="TOP_CENTER"
id="FlowPane"
fx:id="mypane"
xmlns:fx="http://javafx.com/fxml"
fx:controller=
"com.asgteach.familytree.personfiletype.FamilyTreeFXController">
<padding>
<Insets bottom="10.0" left="10.0" right ="10.0" top="20.0"/>
</padding>
<stylesheets>
<URL value="@FamilyTree.css" />
</stylesheets>
<children> </children>
</FlowPane>
Listing 14.34 shows the all-important FX controller class, FamilyTreeFXController.java. Here are a few interesting points about this JavaFX code.
• A double-click mouse event on the FlowPane control initiates the sequential transition that fades in the StackPane elements.
• The VisualFX MultiView element class invokes the public refresh(), doFadeIn(), and clear() methods on the JavaFX Application Thread. These methods implement one-way communication between Swing and the JavaFX controller.
• The private makeElement() method builds each StackPane element by parsing the editor’s underlying document.
• Each StackPane element includes an ImageView control that displays the Image file personIcon32.png, a 32 x 32 PNG file.
• The StackPane groups a VBox control with an ImageView and Text on top of the Rectangle.
Listing 14.34 FamilyTreeFXController.java
public class FamilyTreeFXController implements Initializable {
@FXML
private FlowPane mypane;
private final SequentialTransition seqTran = new SequentialTransition();
private static final Logger logger = Logger.getLogger(
FamilyTreeFXController.class.getName());
private final Image image = new Image(
FamilyTreeFXController.class.getResourceAsStream("personIcon32.png"));
@Override
public void initialize(URL url, ResourceBundle rb) {
mypane.getStyleClass().add("ftr-pane");
mypane.setOnMouseClicked((event) -> {
if (event.getClickCount() == 2) {
doFadeIn();
}
});
}
// Invoked by Swing visual element on the JavaFX Application Thread
public void doFadeIn() {
seqTran.playFromStart();
}
// Invoked by Swing visual element on the JavaFX Application Thread
public void clear() {
seqTran.getChildren().clear();
mypane.getChildren().clear();
}
// Invoked by Swing visual element on the JavaFX Application Thread
// Document is a parsed XML org.w3c.dom.Document
public void refresh(Document doc) {
clear();
NodeList nodeList = doc.getElementsByTagName("person");
for (int i = 0; i < nodeList.getLength(); i++) {
//For each node in the list, create a org.w3c.dom.Node
org.w3c.dom.Node personNode = nodeList.item(i);
NamedNodeMap map = personNode.getAttributes();
Person person;
if (map != null) {
person = new Person();
person.setLastname("Unknown");
for (int j = 0; j < map.getLength(); j++) {
org.w3c.dom.Node attrNode = map.item(j);
if (attrNode.getNodeName().equals("firstname")) {
person.setFirstname(attrNode.getNodeValue());
}
if (attrNode.getNodeName().equals("lastname")) {
person.setLastname(attrNode.getNodeValue());
}
}
StackPane stack = makeElement(person.toString());
// Add the StackPane to the top-level Node (mypane)
mypane.getChildren().add(stack);
FadeTransition ft = new FadeTransition(
Duration.millis(650), stack);
ft.setFromValue(0);
ft.setToValue(1);
seqTran.getChildren().add(ft);
}
}
}
private StackPane makeElement(String displayName) {
// Build the StackPane
StackPane stack = new StackPane();
// Build the Text
final Text ftrText = new Text(displayName);
ftrText.getStyleClass().add("ftr-text");
ftrText.setEffect(new Reflection());
// Build the ImageView, put ImageView & Text in VBox
ImageView iv = new ImageView(image);
VBox vbox = new VBox(3, iv, ftrText);
vbox.setAlignment(Pos.TOP_CENTER);
vbox.setPadding(new Insets(10, 0, 0, 0));
// Build the Rectangle
Rectangle ftrRectangle = new Rectangle(
ftrText.getBoundsInParent().getWidth() + 40, 90);
ftrRectangle.setArcHeight(20);
ftrRectangle.setArcWidth(20);
ftrRectangle.getStyleClass().add("ftr-rectangle");
// Add the Rectangle, VBox to StackPane
stack.getChildren().addAll(ftrRectangle, vbox);
return stack;
}
}
14.5 Key Point Summary
This chapter explores the Data System API, which provides handshaking between the Nodes API and the File System API. Here are the key points in this chapter.
• The DataObject class wraps a FileObject and creates a node that lets you visualize the file in an Explorer View.
• The DataObject’s node may represent a multi-level node hierarchy, where child nodes depend on a file’s contents.
• FileObjects have registered MIME types and DataLoaders, which are factories that create DataObjects.
• DataObjects have a Lookup that hold capabilities (such as editors) associated with a file.
• When you create a new file type, the New File Type wizard registers a MIME type resolver, DataLoader, file template, and DataObject subtype for that file type.
• In the New File Type wizard, use the MultiView checkbox to generate a MultiView editor associated with a file type. A MultiView window is a TopComponent with more than one window that is selectable with toolbar buttons. The default is Source (for text-based editors) and Visual (for Swing JComponent-based views).
• MultiViewElements have life cycle methods similar to TopComponent life cycle methods. You override these methods to control how views are initialized and refreshed.
• The New File Type wizard creates a default template that generates contents when creating a new file of that type. You can customize the template.
• Use the DataObject type associated with the file for the Cookie Class to create a conditionally-enabled action associated with a file type. To include the action in the file’s Explorer View context menu, include checkbox File Type Context Menu Item and specify its MIME Type.
• Override a DataObject’s createNodeDelegate() method to provide a custom node hierarchy. Install a FileChangeListener to keep the node hierarchy synchronized with the underlying file.
• Use Swing, the Visual Library, or JavaFX to create content for MultiView visual windows.
• Keep the views synchronized by updating the underlying document with any edits. You access the document through the DataObject’s EditorCookie, available through its Lookup.
• The Visual Library lets you build Scenes with selectable, movable, and modifiable graphical components called widgets. The Scene is the root element and creates a Swing-compatible JComponent view that you can add to a Swing JPanel.
• Add actions to widgets to provide new behaviors, such as editing content.
• To add an action that is enabled when a particular visual element has focus, create a capability and add its implementation to the visual element’s Lookup. The conditionally-enabled action depends on this capability. Use InstanceContent, AbstractLookup, and ProxyLookup to properly configure the visual element’s Lookup.
• To build visual elements with JavaFX content, use the JavaFX integration strategies that keep JavaFX and Swing code loosely coupled.
• One-way communication between Swing visual elements and JavaFX controllers invoke public JavaFX controller methods on the JavaFX Application Thread. Use property change events to communicate user-initiated changes in the JavaFX scene graph back to the visual element.
• Create new XML file types with specific root elements.
• The NetBeans Platform is bundled with a full-featured XML editor. To use it in your NetBeans Platform application, include modules from the ide cluster.
• Use the NetBeans Platform XMLUtil class to manipulate XML content. The XMLUtil parse() method builds DOM documents from XML files.
• Build node hierarchies based on XML content by parsing the file and obtaining a DOM NodeList for specific tag names.