
12. Creating Music with Sound Libraries
Lesson overview
In this lesson, you’ll learn how to do the following:
• Create music without needing to know how to play an instrument
• Listen to clips in the Media Browser before bringing them into the Multitrack Session
• Modify clip lengths to add more variety to a composition
• Use files from a “music construction kit” to assemble music quickly
• Use pitch transposition and time-stretching to incorporate clips with a different native tempo or pitch than the current session
• Add effects processing to a track to complete the composition
This lesson will take about 60 minutes to complete. Download the project files for this lesson from the Lesson & Update Files tab on your Account page at www.peachpit.com and store them on your computer in a convenient location, as described in the Getting Started section of this book. Your Accounts page is also where you’ll find any updates to the chapters or to the lesson files. Look on the Lesson & Update Files tab to access the most current content.
Using commercially available sound libraries and Audition’s Multitrack Editor, you can create music easily for commercials and audio for video, kiosks, and other applications—even if you don’t play a musical instrument.
About sound libraries
Before computers, needledrop music often provided music for commercials, radio station breaks, and even some TV shows and movies. Needledrop music got its name because various companies produced sets of vinyl records with different types of music, sometimes classified by mood, and you would “drop the needle” on a suitable track for your background music. These records were usually expensive, and you needed to pay for a new license every time you wanted to use the music—even if the same song was used twice in a single project.
![]() Note
Note
If you have not already downloaded the project files for this lesson to your computer from your Account page, make sure to do so now. See “Getting Started” at the beginning of the book.
Today, many companies make sound libraries available on CD-ROM, DVD-ROM, or via download that consist of musical fragments, loops, and sound effects.
You can assemble these various sound clips to create professional-quality, custom music. Sound library licensing agreements vary; many are royalty-free, but read the fine print to avoid potential legal problems.
There are two main types of libraries: Construction kits typically include folders, each with compatible files at a consistent tempo and key, which makes it easy to mix and match the files within the folder to create a custom arrangement. General-purpose sound libraries consist of collections of loops that are often themed (e.g., dance music, jazz, rock, etc.) but whose key and tempo may vary.
![]() Tip
Tip
The Adobe Resource Central, with thousands of royalty-free loops, sound effects, music beds, and more, is a great source of content for Audition owners. You can access it by choosing Help > Download Sound Effects and More, and then following the onscreen directions to download the content.
The Lesson12 folder contains a construction kit created especially for this book called Moebius, which contains 13 loops and a loop called Moebius Mix that provides a representative mix of these loops. The construction kit loops are all at 120 bpm and in the key of F#. Although this lesson suggests assembling the various loops in a particular manner, music is all about creativity. Feel free to depart from the suggestions and create your own piece of music once you know how the process works.
Getting started
Before assembling a piece of music, you need to create a Multitrack Session and listen to the various available loops to become familiar with the construction kit elements.
1. Open Audition if needed, and click the Multitrack tab.
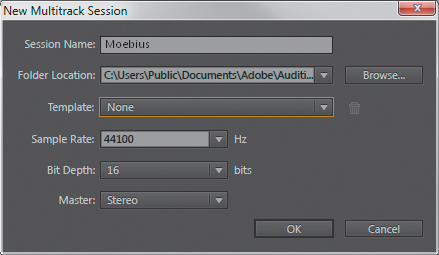
2. In the New Multitrack Session dialog box, enter Moebius as the Session Name. Choose None for Template, and then for Sample Rate, Bit Depth, and Master, choose 44100 Hz, 16 bits, and Stereo, respectively. Click OK.
3. Click the Media Browser tab, and then in the left pane, navigate to the Lesson12 folder and double-click on it. In the right pane, click the Moebius_120BPM_F# folder’s disclosure triangle to expand it and show the files in the right pane of the Moebius construction kit.
4. Click the Media Browser’s Auto-Play button.
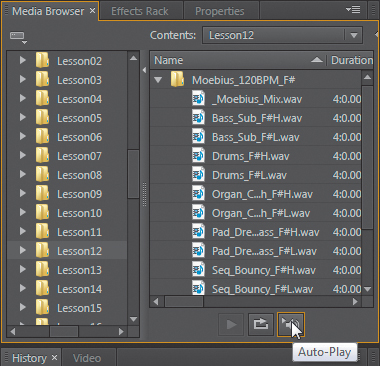
5. Click files in the Moebius folder to hear them play. Click the file _MoebiusMix.wav to hear a representative mix of the various files playing together.
6. Choose View > Zoom Out Full (All Axes) to see an overview of the tracks as you build the composition in subsequent steps.
7. Right-click in the timeline, and choose Time Display > Bars and Beats.
![]() Tip
Tip
To reveal the complete filename in the Media Browser, you may need to click on the divider between Name and Duration, and drag to the right.
8. Right-click again on the Time Display, and choose Time Display > Edit Tempo. Confirm that the Tempo is 120 beats/minute with a Time Signature of 4/4 and a Subdivisions setting of 16. If any of these values differ, enter the specified values. Click OK.
![]() Note
Note
Snap helps align the start of an audio clip to a rhythmic value. The resolution depends on the zoom level; for example, when zoomed full out, audio clips will snap to the nearest measure. Zoom in further, and they’ll snap to the nearest beat.
9. If Snap is not already enabled, click the Snap button (the magnet icon to the Time Display’s immediate left) or type S.
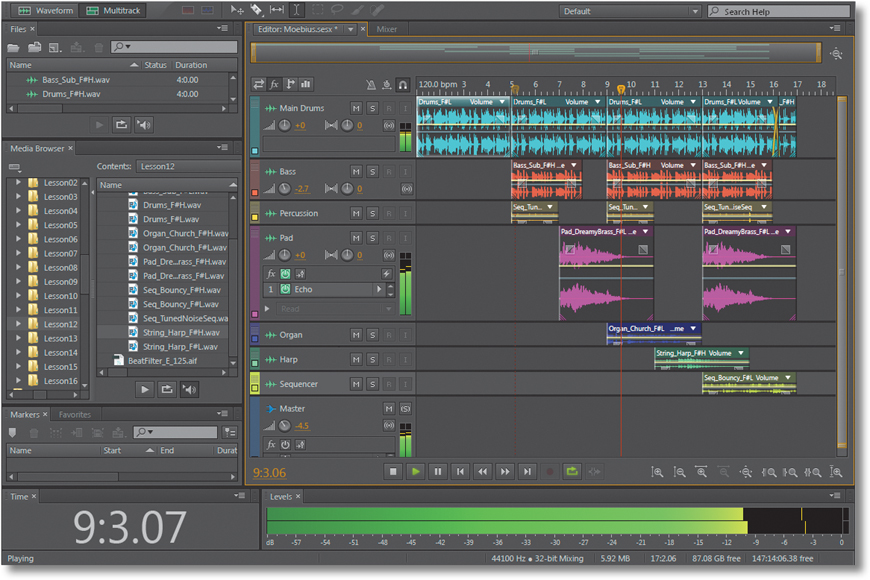
Building a rhythm track
Although there are no “rules” about creating a piece of music, it’s common to start with a rhythm track consisting of drums and bass, and then add other melodic elements. Feel free to customize the colors for each track to make it easier to locate particular tracks at a glance.
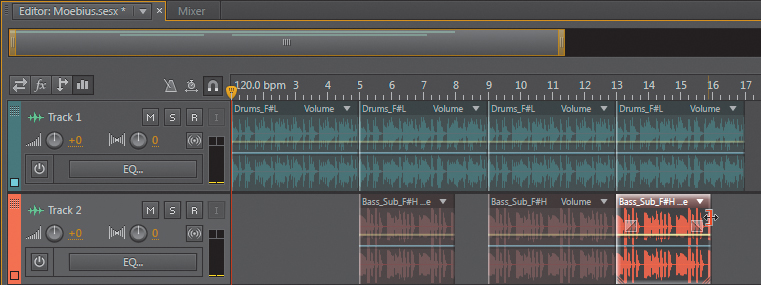
1. From the Media Browser, drag the file Drums_F#L into Track 1 so its left edge is flush with the beginning of the session.
2. Hold down the Alt (Option) key and click the clip’s name (Drums_F#L). Drag right to copy the audio clip, and release the mouse when the clip’s start is at the beginning of measure 5.
3. Similarly, create another copy so that the new clip copy starts at measure 9.
![]() Note
Note
Adding more tracks increases the Output level. The quickest fix is to scroll down to the Master track and reduce the volume to prevent the Output meters from going “into the red.” Ideally, it’s better to keep the Master level at 0 and adjust individual tracks to compensate for excessive Output levels.
4. Similarly, create another copy so that the new clip copy starts at measure 13. There should now be four successive Drums_F#L clips in a row, lasting a total of 16 measures (e.g., the right edge of the last Drums_F#L clip is at the start of measure 17).
5. Enable the Transport Loop button, return the playhead to the beginning, and click Play. The music should play through to the end and then jump back to the beginning and repeat. Click Stop after verifying this.
6. From the browser, drag the file Bass_Sub_F#H into Track 2 so the clip’s left edge starts at measure 5.
![]() Note
Note
If you move the mouse after a clip has snapped to a rhythmic division, the clip may move off the rhythm. To make sure it has snapped properly, after dropping the clip, click on the clip’s name and move the clip until it snaps into place.
7. In the same way you copied the drum file, copy two more iterations of the Bass_Sub_F#H so that the second copy starts at measure 9 and the third copy starts at measure 13.
8. Because a constant bass part can get monotonous, you can trim some of the file so it drops out and let the drums carry the beat. To do this, hover the cursor over the right edge of the bass clip that begins at measure 5—in the part of the waveform just below the name—until the cursor turns into a left-facing Trim tool, as signified by a red right bracket.
9. Click and drag left until the clip ends at the beginning of measure 8.
10. Drag the right edge of the third copy left so that it ends at measure 16.
11. Add some variety to the drum track as well by rearranging its pattern. Hover the cursor over the right edge of the last drum clip until it turns into a red right bracket, click, and then drag to the left to trim the clip so that it ends at measure 16.
12. From the Media Browser, drag the file Drums_F#H into Track 1 so the clip’s left edge starts at measure 16. Hover the cursor over the right edge of this drum clip until it turns into a red right bracket, click, and then drag to the left so that this clip ends at the beginning of measure 17.
13. Return the playhead to the beginning, and click Play to listen to the drum and bass tracks.
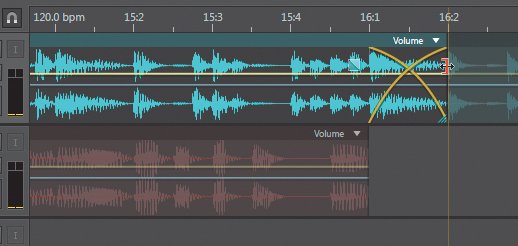
14. The transition between the fourth and fifth drum clips seems a little abrupt. To smooth this, zoom in for a detailed view of the transition between the two clips at measure 16. Click on the fourth drum clip (the one that ends at measure 16) to select it.
15. Hover the cursor over the right edge of the fourth drum clip until it turns into a red right bracket, click, and then drag right so that the clip now ends at measure 16, beat 2 (shown as 16:2 on the Time Display if you’re zoomed in far enough). This will auto-crossfade the end of the fourth clip with the beginning of the fifth clip. Play that transition; it will sound much smoother.
Adding percussion
Before moving on to additional melodic elements, let’s add a little light percussion to augment the rhythmic feel.
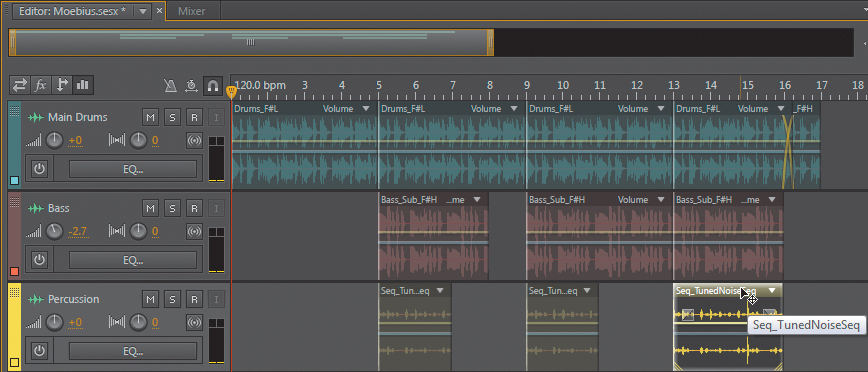
1. From the Media Browser, drag the file Seq_TunedNoiseSeq into Track 3 so its left edge snaps to the beginning of measure 5.
2. Hover the cursor over the right edge of this clip until the cursor turns into a red right bracket, click, and then drag left so that the clip ends at the beginning of measure 7.
![]() Note
Note
The file Seq_TunedNoiseSeq.wav doesn’t include a key because it’s an unpitched percussion sound.
3. Hold down the Alt (Option) key, click the clip’s name, and drag right to copy the audio clip. Release the mouse button when the clip starts at the beginning of measure 9.
4. Hold down the Alt (Option) key, click the clip’s name, and drag right to copy the audio clip. Release the mouse button when the clip starts at the beginning of measure 13.
5. Hover the cursor over the right edge of this clip until the cursor turns into a red right bracket, click, and then drag right so that the clip ends at the beginning of measure 16.
![]() Tip
Tip
To remember which sounds are on which track, click in the track name field, and then type in a descriptive name.
6. Return the playhead to the beginning, and click Play to hear the music so far. After playing through the music, click Stop.
Adding melodic elements
With drums, bass, and percussion covered, you’ll now add some melodic elements. Because you’re already familiar with the process of dragging from the Media Browser, aligning clips to rhythmic divisions via snapping, and shortening clips, this process will go expeditiously.
![]() Tip
Tip
If you minimize the track heights and choose View > Zoom Out Full (All Axes), you’ll see all the tracks and their associated clips.
1. Drag the file Pad_DreamyBrass_F#L into Track 4 so it starts at measure 7.
2. Drag the file Pad_DreamyBrass_F#H into Track 4 so it starts at measure 13.
3. Drag the file Organ_Church_F#L into Track 5 so it starts at measure 9.
4. Drag the file String_Harp_F#H into Track 6 so it starts at measure 11.
![]() Note
Note
If you need to create additional tracks, right-click (Control-click) in a blank space in the Multitrack Editor and choose Track > Add Stereo Audio Track.
5. Drag the file Seq_Bouncy_F#L into Track 7 so it starts at measure 13.
6. Return the playhead to the beginning, and click Play to hear what you’ve assembled so far.

Using loops with different pitch and tempo
The advantage of the construction kit approach is that files within the kit will have a common pitch and tempo. However, it’s also possible to use files with different pitches and tempos if they’re not too different from the current session: Extreme changes can lead to an unnatural sound.
In this lesson, you’ll use a file in the key of E instead of F# with a tempo of 125 bpm instead of 120 bpm. It even has a different file format—AIF instead of WAV.
1. If you need to create a new track for another loop, right-click (Control-click) within the Multitrack Editor and choose Track > Add Stereo Audio Track.
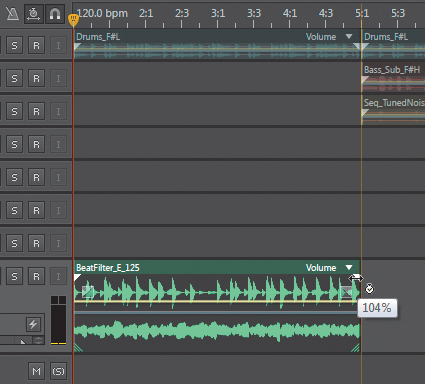
2. Drag the file BeatFilter_E_125.aif from the Lesson12 folder into Track 8 or any empty track. It should start at the beginning of the track.
3. Return the playhead to the beginning and click Play. You’ll hear that this new clip is out of time and out of tune with the rest of the music.
4. To match the clip tempo to the Session tempo, activate the Toggle Global Clip stretching button (a clock with a double arrow underneath located to the left of the timeline). Then click the white stretch triangle toward the right of the BeatFilter_E_125 clip (just underneath the clip’s name header), and drag right until the end of the clip reaches the beginning of measure 5 (shown as 5:1 on the timeline).
5. With the BeatFilter_E_125.aif clip selected, click the Waveform tab (pitch edits need to be made in the Waveform Editor).
6. In the Waveform Editor, press Ctrl+A (Command+A) to select the entire waveform. Choose Effects > Time and Pitch > Stretch and Pitch (process).
7. In the Stretch and Pitch dialog box, choose Default from the Presets drop-down menu.
8. Click the Advanced disclosure triangle. If necessary, select Solo Instrument or Voice, and deselect Preserve Speech Characteristics.
9. The BeatFilter_E_125.aif needs to transpose up two semitones so that its key is F# instead of E (E-F-F#). Click on the Semitones field and type 2. Click Apply.

10. When the file is finished processing, click the Multitrack tab to return to the Multitrack Session.
11. Click Play. BeatFilter_E_125 is now in time and in pitch with the rest of the music.
Adding effects
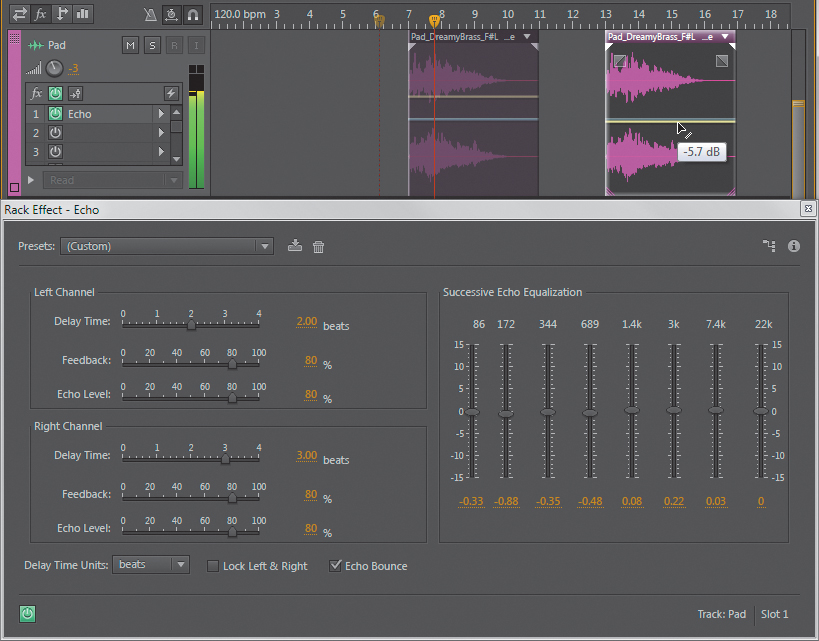
The basics of the music are in place. You can now use some of the techniques described in Chapters 10 and 11 to modify the music further, such as change clip levels, add processing, alter panning, and so on. In this section, you’ll make the brass pad even dreamier with some echo.
1. Click and drag on the divider between Track 4 and Track 5, and drag down until you can see Track 4’s Effects Rack. Remember that the fx button in the Multitrack Editor’s toolbar must be enabled.
2. In Track 4’s Effects Rack, click insert 1’s right arrow and choose Delay and Echo > Echo. This turns on the master fx button automatically.
3. If necessary, choose the Echo’s Default preset from the Presets drop-down menu, and then choose beats from the Delay Time Units drop-down menu.
4. Set the Echo parameters as follows: Left Channel Delay Time to 2, Right Channel Delay Time to 3, and for both channels, Feedback and Echo Level to 80. Set all Successive Echo Equalization sliders to 0. Select Echo Bounce so the echo creates a wider stereo image.
5. Click Play to hear how the echo affects the overall sound.
6. The second clip in Track 4 seems a bit loud. To reduce its level so it sits more in the background, click on the clip’s yellow volume line (if it’s not visible, choose View > Show Clip Volume Envelopes), and drag it down to around -5.7dB.
Review questions
1. What are the important characteristics of a sound library’s construction kit?
2. Can you use files from sound libraries in commercials or video soundtracks?
3. Where can you find royalty-free content for use in your projects??
4. Can files be used if they have a different pitch or tempo than the Multitrack Session?
5. Are there any limitations to stretching time or changing pitch?
Review answers
1. The files are matched with respect to tempo and pitch.
2. The legal agreements for sound libraries vary; be sure to read them to avoid getting into possible copyright infringement issues.
3. Adobe’s Resource Central is available for Adobe Audition CC users and contains thousands of files.
4. Yes, you can process pitch with the Waveform Editor’s stretch and pitch processing function, and stretch a clip to a different tempo simply by clicking and dragging in the Multitrack Editor.
5. The greater the amount of stretching or pitch transposition, the less natural the sound.