9. Setting Up Customers
Step 1: Create a Customer Record
Step 2: Invoice the Customer
Step 3: Collect Payment
Step 4: Make the Deposit to Your Bank Account
It is not surprising to me—and perhaps not to you, either—that the accounts receivable process is the most organized and “cared for” task in QuickBooks. The process of producing a customer invoice needs to be completed quickly because you have to provide a document to a customer to get paid.
In this chapter, you will find useful information to help you do the following:
• Customize and set important preferences
• Work with prospecting activities
• Set up customers, jobs, and supporting lists
Whether you are a first-time QuickBooks user or you have been using the software for years, the details in this chapter will help you set up your customers in QuickBooks correctly.
Customizing Home Page Customer Activities
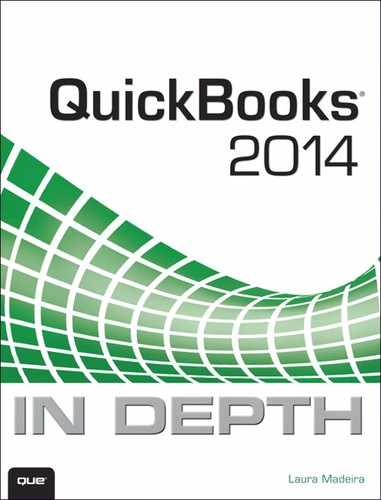
QuickBooks makes performing customer activities easy with a customizable list of tasks on the Home page (see Figure 9.1).
Figure 9.1. The Home page provides easy access to common customer activities.
Depending on your version of QuickBooks, you can add or remove the following transaction types or tasks from your Home page:
• Sales Orders—Use this transaction to commit a sale to a customer (QuickBooks Premier, Accountant, or Enterprise).
• Estimates—Use this transaction type to provide customers with quotes for your product or service and, most important, provide the basis for Customer or Job budgets.
• Sales Tax Tracking—Use this task to collect sales tax from your customers and remit to the taxing authority.
→ For more information on customizing the Home page, refer to Chapter 2, “Getting Around QuickBooks.”
The next section details the selected features that can be enabled or disabled on the Home page.
Preferences That Affect Accounts Receivable
You can simplify your Accounts Receivable tasks by setting certain QuickBooks preferences. Some of these preferences save you keystrokes, which can save data entry time.
Not every preference that affects Accounts Receivable impacts your financials. Some preferences enable specific features such as those shown in Figure 9.2. To set preferences in QuickBooks, from the menu bar, select Edit, Preferences, and then choose the type of preference on the left side of the Preferences dialog box.
Figure 9.2. Preferences enable features and specific types of customer transactions.

Preferences in QuickBooks come in two forms:
• My Preferences are settings that are unique to the user logging in to the data file and are not shared by other users.
• Company Preferences are settings that are common for all users. When a preference is modified on the Company Preferences tab of the Preferences dialog box, the change affects all users.
Caution
The Admin user is the default user that is created when you first start using QuickBooks. Proper controls should be in place to allow only certain individuals to log in to the data file as the Admin user. For more information, see “Setting Up Users and Permissions,” p. xx.
To set Company Preferences, open the file as the Admin or External Accountant user and switch to single-user mode (if you are using the data file in a multiuser environment).
The sections that follow outline the preference settings that improve your QuickBooks accounts receivable workflow. Many preferences can help you work more efficiently in QuickBooks. Be sure to have each user log in to QuickBooks with his or her username and review all the available preferences on the My Preferences tab.
Payments
Payments preferences help you with customer payment processing and improve your overall process for receiving money from customers. From the menu bar, select Edit, Preferences; then on the left side of the Preferences dialog box, select Payments.
Company Preferences
These specific preferences are set for all users:
• Receive Payments—These settings make it easier for you to assign customer payments to the customers’ invoices:
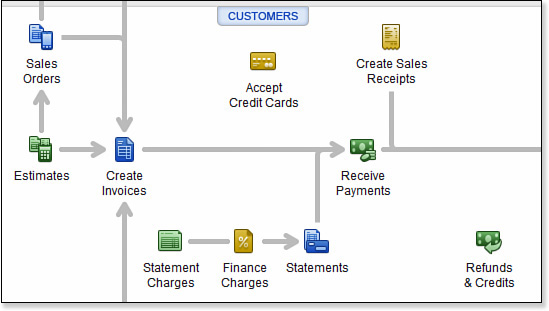
• Automatically Apply Payments—When you select this option and record the receive payment transaction, QuickBooks applies the payment to an invoice of the same amount. If no invoice amount matches the exact dollar amount, the payment is applied to the oldest invoice first. See Figure 9.3.
Figure 9.3. Payment preferences are important to review and set before sending invoices to your customers.
• Automatically Calculate Payments—When selected, you do not need to put a total in the Amount box on the Receive Payments dialog box. QuickBooks calculates and prefills the amount as the sum total of each of the invoices marked as received.
• Use Undeposited Funds as a Default Deposit to Account—When selected, this preference causes QuickBooks to place all customer payments into a current asset account that is created by QuickBooks. Undeposited Funds is like a safe that holds your customer payments before they are taken to the bank for deposit. When you record a Make Deposit transaction, QuickBooks removes the funds from the Undeposited Funds account and places them in your bank account.
• Invoice Payments—After signing up for Intuit PaymentNetwork, your customers can pay your invoices online via bank-to-bank transfer, Electronic Funds Transfer (EFT) similar to paying with a company check, or a credit card. Following are the invoice payments options:
• Allow Customers to Pay Each Invoice Online—Click Learn More to sign up for the Intuit PaymentNetwork service.
• Include Online Payment Link on Invoices—Adds a payment web address to all invoices you email from QuickBooks. You can choose to allow payments to be made by bank account only or by bank account and credit card. Select the Explain link to learn more. You can modify this file preference for selected customers or even on an invoice-by-invoice basis.
• Also Include on Printed Invoices—Adds a payment web address on invoices printed or emailed.
• Intuit PaymentNetwork Email—Enter the email address you use (or plan to use) to sign in to Intuit PaymentNetwork.
• Turn Off Online Payments—This action turns off links for all invoices and all customers. If you resend a past invoice that includes the link, the newly sent invoice will not include the online payment link.
My Preferences
The Payments settings do not have My Preferences.
Sales & Customers
The Sales & Customers preference settings enable you to customize QuickBooks for the tasks you use to manage customer activities. You can also make it easier for your employees to do their daily tasks by customizing the Home page so that the needed transaction types are available. From the menu bar, select Edit, Preferences; then on the left side of the Preferences dialog box, select the Sales & Customers preference.
Company Preferences
These specific preferences are available for all users:
• Sales Forms—These settings enable you to set a default shipping method that displays on customer forms. You can also choose to be warned when duplicate invoice numbers are detected.
• Miscellaneous—A drop-down list enables you to select the default packing slip form.
• Collections Center—This option enables the Collections Center, which has now been replaced with the Income Tracker.
• Custom Pricing—With this option, you can disable or enable Price Levels. Price Levels are assigned to your customers and automate unique customer pricing. For example, you might use the price level feature to offer wholesale pricing to certain customers and charge retail pricing to others.
→ For more information on using Advanced Pricing in QuickBooks Enterprise, refer to Chapter 9, “Using Advanced Pricing in QuickBooks Enterprise.”
• Sales Orders—Available with QuickBooks Premier, Accountant, or QuickBooks Enterprise Solutions, the Sales Order transaction type enables you to commit sales to customers and track backorders. Preferences include warning about duplicate sales order numbers, printing options for items with zero amounts, and choosing templates for Packing Slips and Pick Lists.
My Preferences
These settings affect the currently logged-in user:
• Add Available Time/Costs to Invoices for the Selected Job—This setting determines how QuickBooks prompts the logged-in user when unbilled costs exist for a Customer or Job. Options include the following:
• Prompt for Time/Costs to Add
• Don’t Add Any
• Ask What to Do
Checking
The Checking Preferences are for defining specific bank accounts for sales-related activities, such as depositing a customer’s payment into a predefined bank account. From the menu bar, select Edit, Preferences; and then on the left side of the Preferences dialog box, select the Checking preference.
Company Preferences
No Checking Company Preferences affect your workflow for accounts receivable tasks.
My Preferences
The Open the Make Deposits default account preference is optional. Use this preference to specify the default bank account selected for making deposits. If you have multiple bank accounts you make deposits to, you might not want to set a default on this tab. When no preference is set, the first bank account listed on the Chart of Accounts is the default.
Finance Charge
Does your company charge your late-paying customers a finance charge on open balances? If so, you will want to set these preferences. From the menu bar, select Edit, Preferences; then on the left side of the Preferences dialog box, select the Finance Charge preference.
Company Preferences
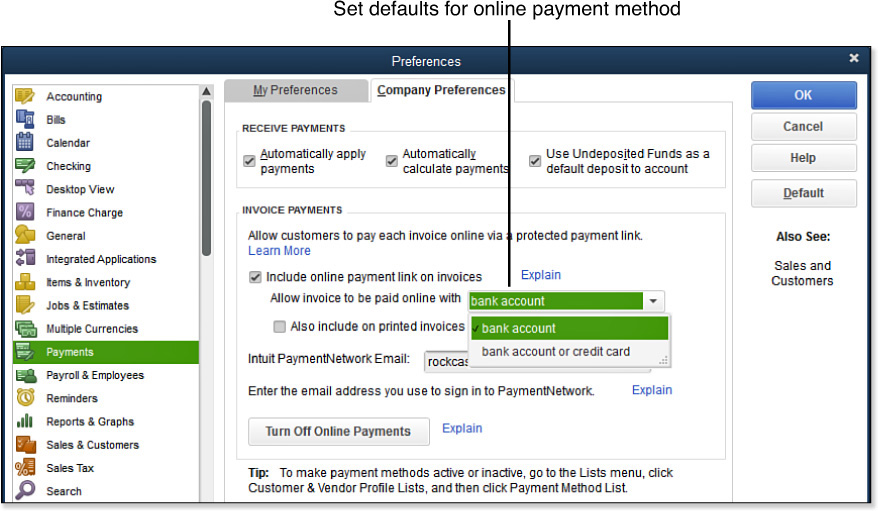
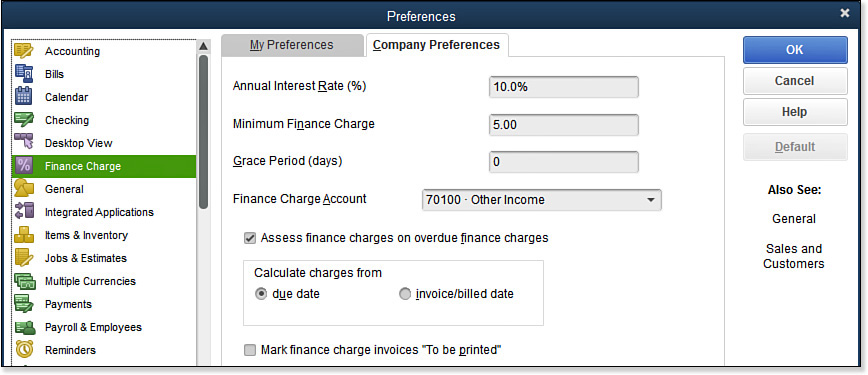
These preferences set your company’s annual interest rate, minimum finance charge, grace period, and income account you want to credit.
These settings affect your financial reports and determine how QuickBooks calculates and reports on finance charges (see Figure 9.4):
• Annual Interest Rate (%)—Enter the interest rate you want to use when calculating finance charges on late payments.
• Minimum Finance Charge—Enter a dollar amount to use as the minimum finance charge.
• Grace Period (days)—Use this setting to calculate a grace period before finance charges apply.
• Finance Charge Account—Enter the account you will use to track the finance charges you collect from your customers. Typically, you would select an income account type.
• Assess Finance Charges on Overdue Finance Charges—When selected, this option includes unpaid finance charge amounts previously invoiced in the new amount used to calculate additional late fees. In my experience, when you do this, you become the “squeaky wheel” that gets paid.
• Calculate Charges From—The choices are Due Date and Invoice/Billed Date. If you create an invoice for a customer for $1,000 that is due in 30 days and you select the Calculate Charges from Due Date option, the amount is not considered overdue until 30 days from the invoice due date.
• Mark Finance Charge Invoices “To Be Printed”—If this option is not selected, you can send a statement to the customer at the end of your billing cycle to communicate the amounts that are owed instead of sending an invoice for the finance charges assessed.
Figure 9.4. Assess finance charges, and remember that the “squeaky wheel” is the one that gets paid!
My Preferences
Finance Charge settings do not have My Preferences.
Jobs & Estimates
The preference settings found in this section enable certain accounts receivable transaction types in QuickBooks. From the menu bar, select Edit, Preferences; then on the left side of the Preferences dialog box, select the Jobs & Estimates preference.
Company Preferences
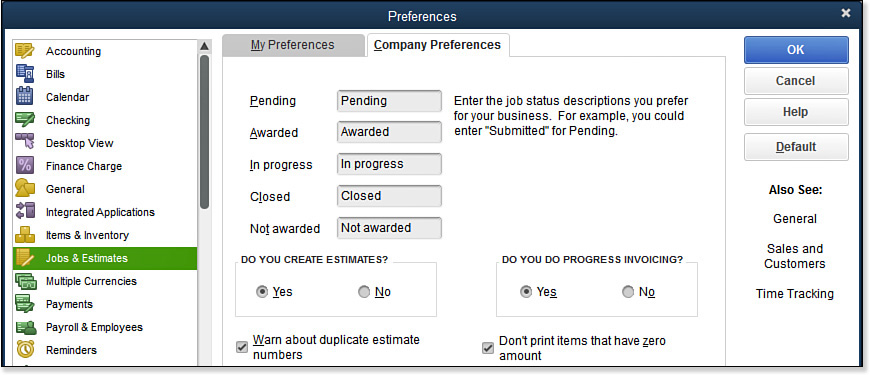
These choices have to do with enabling specific estimating and invoicing features in QuickBooks, as well as defining custom job status descriptions (see Figure 9.5):
• Job Status Descriptions—Selecting this option enables you to modify the job status descriptions, such as changing Not Awarded to Lost.
• Do You Create Estimates?—Selecting Yes adds an icon to the Home page for Estimates.
• Do You Do Progress Invoicing?—Selecting Yes brings up a dialog box when creating an invoice from an estimate. The dialog box includes the options to create an invoice for all items, a percentage, or selected items from a multiline estimate.
• Warn About Duplicate Estimate Numbers—Selecting this option provides good internal controls over your documents.
• Don’t Print Items That Have Zero Amount—Selecting this option is useful when creating a progress invoice with many lines. This selection is available if you selected Yes with the Progress Invoicing option.
Figure 9.5. Jobs & Estimates preferences enable specific transaction types for you to use.
My Preferences
Jobs & Estimates do not have My Preferences.
Reminders
The Reminders Preferences can be useful if you want QuickBooks to prompt you when certain accounts receivable tasks are due. From the menu bar, select Edit, Preferences; then on the left side of the Preferences dialog box, select the Reminders preference.
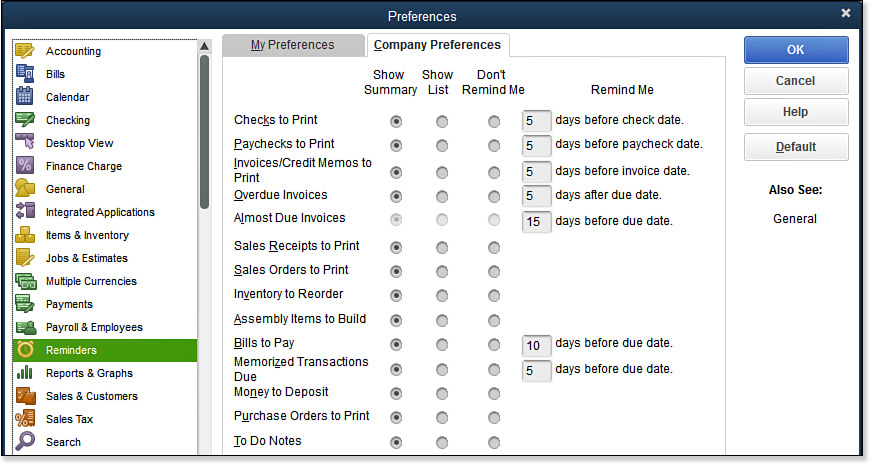
Company Preferences
The Company Preferences for Reminders, shown in Figure 9.6, determines how QuickBooks shows reminders. Options include Summary, List, and Don’t Remind Me. Accounts Receivable reminders include Invoices/Credit Memos to Print, Overdue Invoices, Almost Due Invoices, and other customer activity–related reminders.
Figure 9.6. The selections on the Company Preferences tab determine how QuickBooks reminds all users.
My Preferences
Users can specify whether they want to see the reminders when they open the QuickBooks data file. Regardless of this setting, users can select Company, Reminders from the menu bar or by selecting the Reminders icon located to the far right of the icon bar at any time to review the reminder list contents.
Reports & Graphs
Review the My Preferences and Company Preferences for working with reports and graphs. You can override the defaults set here at the time a particular report is prepared. From the menu bar, select Edit, Preferences; and then on the left side of the Preferences dialog box, select the Reports & Graphs preference.
Company Preferences
Review each of the listed preferences; they often affect how certain Accounts Receivable reports calculate:
• Summary Report Basis—Choose to have the default basis for reports selected for you. Although this setting affects many reports in QuickBooks, selected reports can be prepared only on the accrual basis (for example, this affects Accounts Receivable or Accounts Payable reports).
• Aging Reports—This option sets the default for calculating overdue invoices. You can choose to age from the due date or from the transaction date. Typically, aging from the transaction date causes invoices to show as overdue earlier than if you age from the due date.
• Reports–Show Items By—This item reports setting has the following options:
• Name Only—Item Reports display the Item Name/Number associated with the product or service you sell.
• Description Only—Item Reports display the description typed in the New or Edit Item dialog box.
• Name and Description—Item reports display both the Name/Number and the Description field.
• Reports—Show Accounts By—This setting offers you the following options for displaying reports:
• Name Only—Reports display the name and account number (if the preference to enable account numbers is selected).
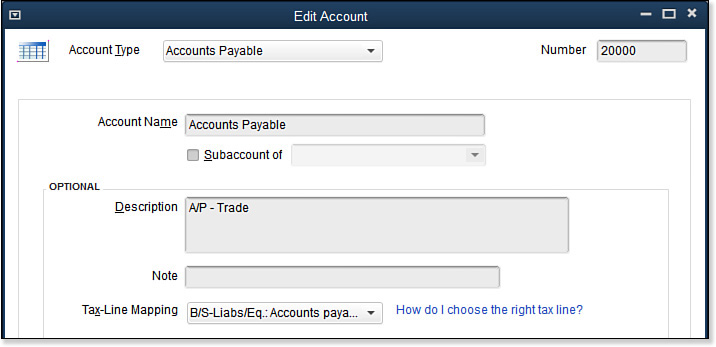
• Description Only—Reports display the description typed in the New or Edit Account dialog box (see Figure 9.7). No account numbers display on the reports.
Figure 9.7. Enter an optional description in the New or Edit Account dialog box; reports can display this description.
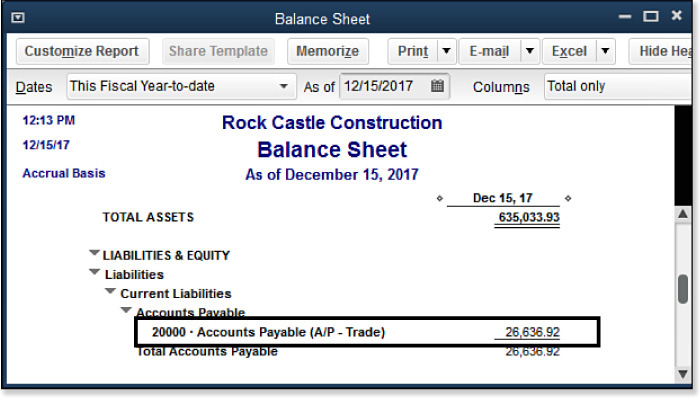
• Name and Description—Reports display the account number (if enabled in preferences), the name, and the description as typed in the New Account or Edit Account dialog box in parentheses (see Figure 9.8).
Figure 9.8. Reports show the additional description when you select the Name and Description reporting preference.
• Classify Cash—If you need to prepare a cash flow statement, QuickBooks uses these settings to determine which accounts are considered Operating, Investing, or Financing. This preference does not specifically relate to accounts receivable.
• Format—This option enables you to override the default header, footer, and font for all QuickBooks reports. Do not override the Report Title, Subtitle, or Date Prepared because QuickBooks will accurately fill in this information for you each time you prepare a report.
My Preferences
The My Preferences selections include the following:
• Prompt Me to Modify Report—This opens the Modify Report dialog box with each created report. (This action is the same as selecting Customize Report from a displayed report.)
• Reports & Graphs—These are refresh options for reports and graphs when data changes. These prompt the user to refresh or to not refresh.
• Graphs Only—These are specific display settings for preparing graphs.
Sales Tax
The Sales Tax preference shown in Figure 9.9 is important if your business is required to collect sales tax on sales made to your customers. Be sure to research each state’s sales tax regulations so you can comply with the laws and avoid penalties. From the menu bar, on the left side of the Preferences dialog box, select Edit, Preferences; then select the Sales Tax preference.
Figure 9.9. Use these Company Preferences to configure Sales Tax defaults in QuickBooks.
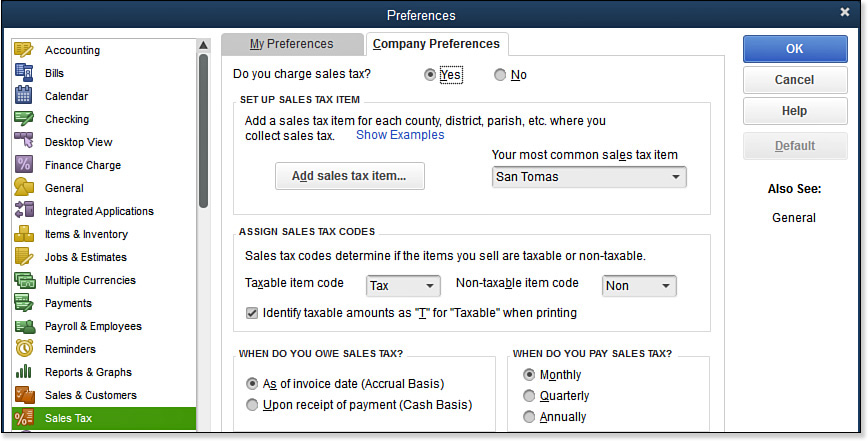
Company Preferences
To enable sales tax tracking, next to the Do You Charge Sales Tax? Field, select Yes. Additionally, complete the following selections:
• Set Up Sales Tax Item—When you click the Add Sales Tax Item button, QuickBooks opens the New Item dialog box with the Sales Tax item type selected. Here you define a name for the sales tax item, type a description and a rate, and assign the tax agency you will be remitting the collected tax to. A separate drop-down list enables you to select your most common sales tax item.
• Assign Sales Tax Codes—This is the name of the code that will be assigned to your product or service items. Usually the defaults of Tax and Non are considered appropriate. You can select to have a T print on your customer invoices for items that are taxable. This option is useful if on one invoice you sell both taxable and nontaxable items.
• When Do You Owe Sales Tax?—If you are not sure what each state department of revenue requires, review the websites or call to get the correct information.
• When Do You Pay Sales Tax?—This setting tells QuickBooks what date range to select automatically when paying your sales tax. For example, if you select Monthly, QuickBooks computes the amount owed for the previous month in the Pay Sales Tax Liability dialog box. This setting also defaults the reporting period for Sales Tax Liability reports.
My Preferences
There are no My Preferences for Sales Tax.
Send Forms
For sending forms, users have the option to use Web Mail, Outlook, or QuickBooks Email. From the menu bar, select Edit, Preferences; then on the left side of the Preferences dialog box, select the Send Forms preference.
Company Preferences
This preference enables you to set email defaults, including a default message when sending supported forms or reports. Select the different forms from the Change Default For drop-down list. Click the Spelling button to check your template content for spelling errors.
Create multiple email templates with merged data from the QuickBooks file. You can select from these templates when emailing by selecting from the menu bar File, Send Forms.
Figure 9.10. QuickBooks provides the option to create multiple email templates.

My Preferences
These settings affect the currently logged-in user:
• Auto-Check the “Email Later”—If enabled, QuickBooks automatically selects the To Be Emailed checkbox on newly created invoices where the customer’s Preferred Delivery Method is email.
• Send Email Using—You can select your preferred method for sending transactions and reports:
• Web Mail
• Outlook
• QuickBooks Email (Using Billing Solutions)
QuickBooks users can use Outlook, Outlook Express, other web-based email (such as Gmail or Hotmail), or the QuickBooks email server as the preferred method for sending reports and transactions from within QuickBooks. If you select Outlook, however, your preference can affect certain Billing Solutions features. From the menu bar, select Help and, in the search box, type billing solutions.
Spelling
This preference determines how QuickBooks assists you with spelling on accounts receivable transactions. From the menu bar, select Edit, Preferences; then on the left side of the Preferences dialog box, select the Spelling preference.
Company Preferences
There are no Company Preferences for the Spelling preference.
My Preferences
Users can set QuickBooks spelling preferences for sales and purchase transactions and can include custom-added spelling words.
Time & Expenses
Time & Expenses is a specific method of invoicing that is common to the professional services industry. With this method, customers’ sales are invoiced based on hours or costs of the project plus an agreed-to markup and/or overhead fee. Select Edit, Preferences from the menu bar; then on the left side of the Preferences dialog box, select the Time & Expenses preference.
Company Preferences
If your company needs to provide customers with an invoice showing employee or vendor time and/or individual costs plus an added markup, enable this preference (see Figure 9.11) by selecting from the following:
Figure 9.11. Enable these preferences if your company tracks time or bills customers for reimbursement of costs.
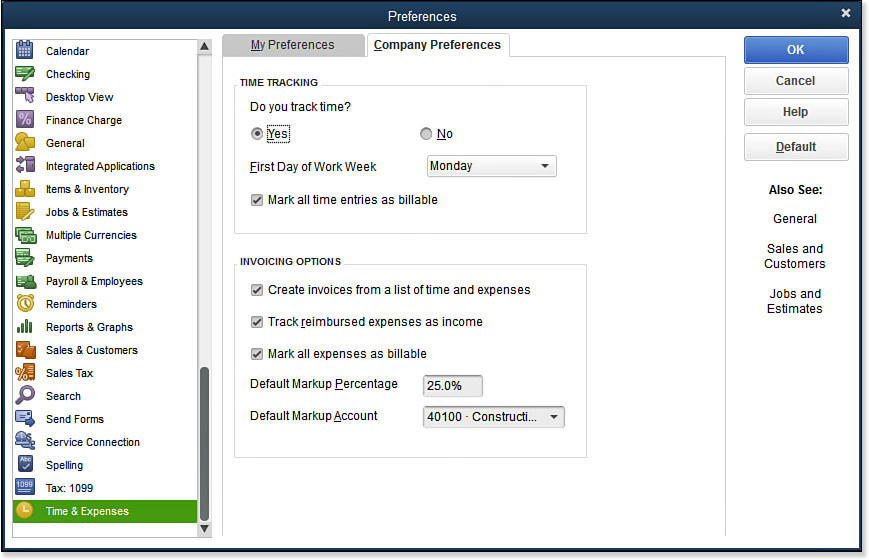
• Time Tracking—The Time Tracking options include the following:
• Yes—With this feature, selecting Yes enables time recording on timesheets, which can be transferred to vendor and employee payment transactions and customer invoices.
• First Day of Work Week—This feature lets you define the first day of the work week.
• Mark All Time Entries as Billable—This feature is useful if you list vendor or employee time on the invoices to your customers.
• Invoicing Options—The Invoicing options include the following:
• Create Invoices from a List of Time and Expenses—Select Yes for Do You Track Time to enable time recording on timesheets, which can be transferred to customer invoices. This is useful when your company will be detailing on a customer’s invoice specific amounts associated with hours paid to vendors, employees, or payees on the Other Names list.
• Track Reimbursed Expenses as Income—Select this checkbox if you want to track costs invoiced to customers as income. An example might be a law firm that charges the customer for costs incurred for shipping charges and wants to show the amount as income. The income would be offset by the expense, usually in an overhead expense account.
• Mark All Expenses as Billable—Select this option to mark all expense line transactions as billable if a customer is assigned to the line. This feature is useful if you list detailed costs on the invoices to your customers.
• Default Markup Percentage—Select this option to define a percentage to add to the customer’s invoice when billing for time and costs. An example is including a 10% markup, adding $10.00 to a $100.00 cost reimbursement invoice.
• Default Markup Account—Use this option to select a default account (typically an Income category) for tracking all amounts charged to the customer as markup.
My Preferences
There are no My Preferences for the Time & Expenses settings.
Working with the Customer Center
Are you new to using QuickBooks? I expect one of the first lists you have already added to in QuickBooks is the customer list. You might have imported your customers while creating your new file using the Express Start as discussed in Chapter 1, “Getting Started with QuickBooks”.
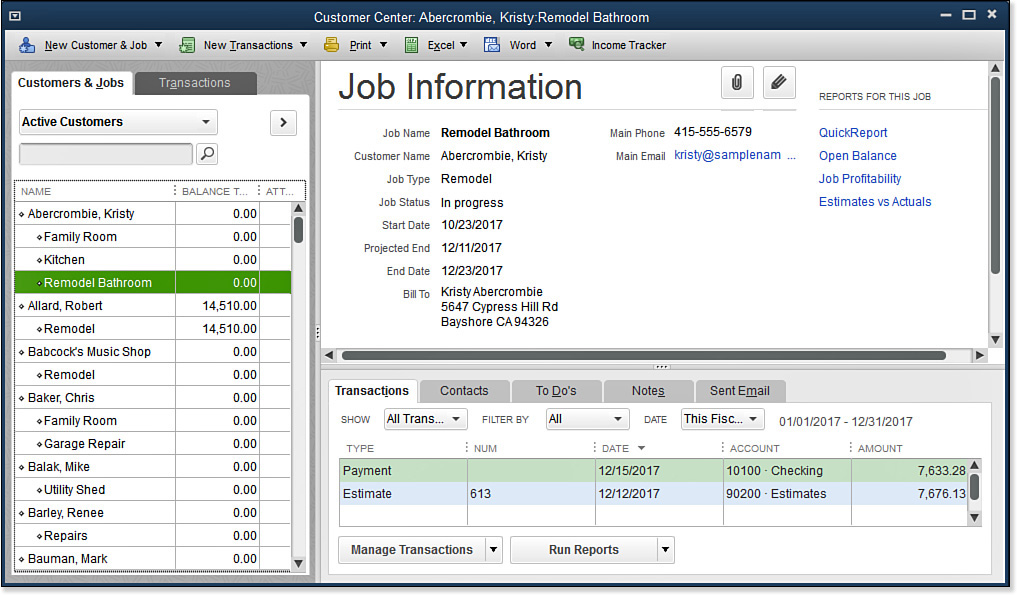
The Customer Center (see Figure 9.12) provides one location for viewing contact details and accessing many customer tasks and reports, including the following:
• Creating a new Customer or Job, or editing an existing one
• Accessing the Add Multiple Customers:Jobs feature
• Recording commonly used customer transactions
• Printing the Customer & Job list, information, or transactions
• Exporting the Customer list or transactions as an Excel or CSV file; importing or pasting customers from Excel
• Preparing customer letters and customizing the built-in letter templates
• Accessing the Collections Center (replaced by the new Income Tracker)
• Filtering your list of customers to include All Customers; Active Customers; Customers with Open, Overdue, or Almost Due Balances; or a custom filter of your choice
• Attaching documents to the customer record, such as a copy of a signed agreement
• Accessing a map and driving directions to the Customer or Job location
• Adding or editing customer notes and to-do reminders and tracking emails sent
• Viewing and filtering transactions by customer or by transaction type
• Preparing a QuickReport, Open Balance Report for the currently selected customer
• Showing Estimates and a Customer Snapshot for the currently selected customer
Figure 9.12. From the Customer Center, you can access most customer activities and useful reports.
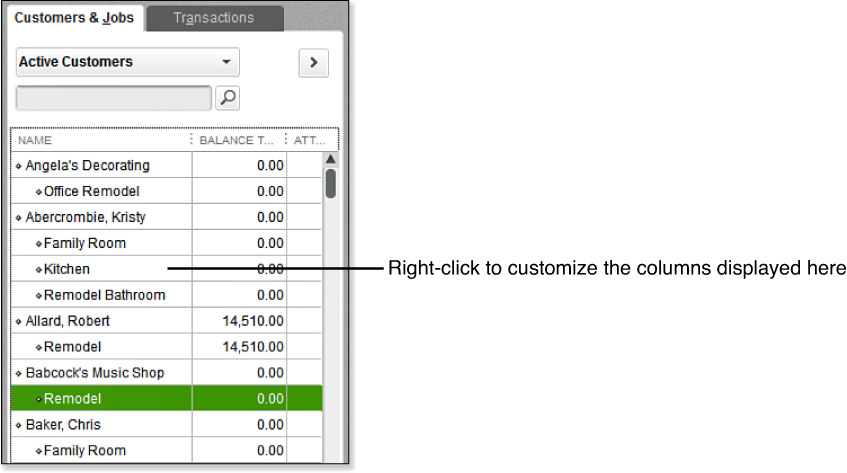
Tip
You can customize the information displayed on the Customers & Jobs tab (left side of the Customer Center.
1. On the displayed list of customers, right-click with your cursor and select Customize Columns.
2. The Customize Columns dialog box displays. Click a data field listed in the Available Columns box; then in the center of the dialog box, click the Add button. Your selected field is now added to the Chosen Columns.
3. To reposition the placement of the columns of data, highlight a field in the Chosen Columns box and click either Remove, Move Up, or Move Down.
The following sections provide more details about creating a customer or job and using the Customer Center for researching transactions.
Adding or Modifying Customers and Jobs
Customers are the individuals or businesses you sell your product or service to. QuickBooks can also track a job for a customer, if you want to track the profitability for different projects for the same customer. For example, if you’re renovating a house, you might create a job for each room. Similarly, an attorney might track the revenue and costs for individual legal matters for the same customer.
Tip
You can efficiently enter multiple customers or jobs at one time using an Excel-like data entry grid. Do you have a ready-made list of customers in an Excel file? To learn more about adding multiple customer records, see “Add/Edit Multiple List Entries,” p. xxx.
If you are just setting up your QuickBooks file, review the information in Chapter 1, “Getting Started with QuickBooks,” in the section titled “Adding People You Do Business With.” In this referenced section, you learn how to import your contacts from Outlook, Gmail, or another email provider.
Creating jobs is not required in QuickBooks, but it is helpful when you have multiple projects for a single customer. This section offers instruction specifically for setting up customers and jobs of customers.
With a customer listing on the left selected in Customer Center, you can access the following:
Tip
If you begin typing the name of your customer or job in the Company Name field, QuickBooks populates the Customer Name and Bill To Name field in a new Customer or Job record.
• Transactions—View and filter the transactions assigned to the currently selected customer or job record.
• Contacts—Store multiple contact names for each customer or job record.
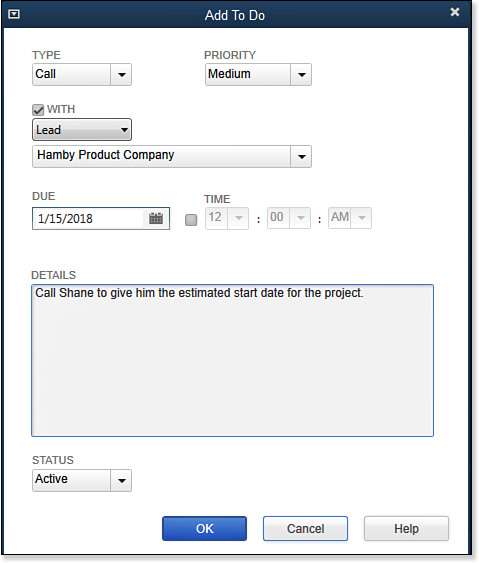
• To Dos—Keep track of important To Dos by assigning the event an action, such as a call, meeting, task, and so on. Associate the To Do with a lead, customer, vendor, or employee. Assign the task a due date and time with details that will display on your QuickBooks calendar (from the menu bar, select Company, Calendar).
• Notes—Add, edit, and filter notes assigned to customer or job records.
• Sent Email—Track emails sent to customers or jobs from within QuickBooks. List can be filtered for a specific date range.
To practice adding a new customer record and assigning a job to that customer, open the sample data file as described in Chapter 1. If you are working in your own file, use these instructions to begin entering the customers you sell your product or service to:
1. On the Home page, or from the menu bar, click the Customers button and select Customers, Customer Center.
2. In the New Customer & Job drop-down list, select New Customer.
3. The New Customer dialog box displays with the Address Info tab selected (see Figure 9.13). In the Customer Name field, type Angela’s Decorating. It is important to mention that no two names from any of the lists in QuickBooks can be the same.
→ For more information, see “When Your Vendor Is Also Your Customer,” p. xxx.
Figure 9.13. Completing the contact information for your customer is good practice for your record keeping.
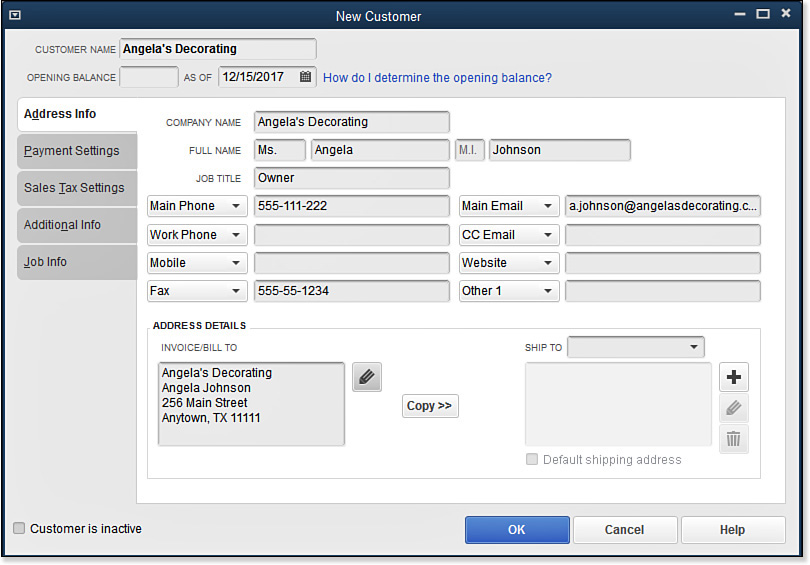
4. Leave the Opening Balance field blank. To learn more about entering opening balances in QuickBooks, see Chapter 3. If you are a new business, the amounts your customer owes you will be recorded using the accounts receivable transactions detailed in this chapter.
5. The As Of (date) field supports the Opening Balance field and has no effect when no dollar value is entered in the Opening Balance field.
6. Complete the remaining fields for this practice by adding the contact information and address. Consider completing the Salutation, First Name, and Last Name fields. Doing so enables you to send professional-looking letters to your customers in the future.
7. For this exercise, on the Payment Settings tab, for Payment Terms, select Net 30 from the drop-down list. This instructs QuickBooks to calculate due dates that are 30 days from your invoice dates. In your own data, use the Add New choice to create terms that suit your specific needs. Leave the remaining Payment Settings as defaults for this exercise.
When you are working with your file, you can define these additional fields:
• Account No—This is the account number you assign to your customer; it can optionally be printed on customer transactions.
• Preferred Delivery Method—Select this if you will be using the Create Batch Invoices feature available with QuickBooks Premier, Accountant, and Enterprise.
• Preferred Payment Method—Prefill the customer payment transaction with this default.
• Credit Card Information—Safely and securely store your customer’s credit card numbers for ease in processing payments. However, be sure to review the instructions for setting up user rights in the file, to limit who can modify or view this information. See more information in Chapter 1.
• Credit Limit—Setting this limit enables QuickBooks to warn you when a transaction will exceed the allowed credit.
• Price Level—Available with QuickBooks Premier, Accountant, or Enterprise, this offers the capability to default to a specified rate for the items or services you sell. For example, you might offer a 10% discount on all purchases made by this customer. You can have only one price level assigned per customer, and it cannot be based on volume pricing. Refer to Figure 9.25 for the information used to create a Price Level.
→ For more flexibility with pricing, see “QuickBooks Enterprise with Advanced Pricing,” p. xxx.
• Add Online Payment Link to Invoices—Choices include using the company default set in preferences, using the bank only, using bank or credit card payment links, and turning off the links on invoices for this customer.
8. Click the Sales Tax Settings tab. The information in this dialog box defaults from the Sales Tax preferences discussed earlier in this chapter. If necessary, you can change them at the time the transaction is created.
9. Click the Additional Info tab. If you’re working in the practice file, select Commercial from the Customer Type field, or select Add New to create your own customer type. Many sales reports can be filtered by customer type.
10. Leave the Rep field blank for this exercise. In your own data, you can select the Rep field if you will be tracking sales by Rep.
11. For this exercise, leave the custom fields blank. When working with your data, you can click the Define Fields button and add custom fields that you assign to your Customer, Vendor, or Employee records. You can also add these custom fields to your sales transactions and include them in many reports.
12. Select the Job Info tab. For this exercise, leave the Job Status information blank. In your own file, if you are tracking project activity at the customer level, complete the fields as needed. Some of the job profitability reports can be filtered by these fields.
13. Click OK to close the New Customer dialog box. You return to the Customer Center, and Angela’s Decorating is selected.
14. From the New Customer & Job drop-down list, select Add Job.
15. Type Office Remodel for the Job Name. Complete any other fields as desired on each of the New Job tabs.
16. Click OK to add this job record to the Angela’s Decorating customer record. You return to the Customer Center, and Office Remodel displays beneath Angela’s Decorating, as Figure 9.14 shows.
Figure 9.14. Create jobs to track costs and revenue for multiple projects for the same customer.
Caution
Specifying terms is part of the process for managing your Accounts Receivable balances. You should also review the Reporting—Company Preferences tab on the Preferences dialog box for settings that affect A/R Aging reports. You can select to have the A/R Aging or Detail reports age from the invoice due date or age from the invoice transaction date.
• Notes—Keep track of any additional information in these dated notes. You can filter the notes list for specific dates, and you can edit or delete notes as needed.
Now that you have created a new customer in the sample file, you are prepared to create a list of your own customers. When your customer’s address or contact information changes, you can return to the Customer Center to edit the same information.
Finding Customer Transactions
The Customer Center provides access for adding to or modifying your customer or job records in QuickBooks, but it also includes convenient access to finding customer transactions.
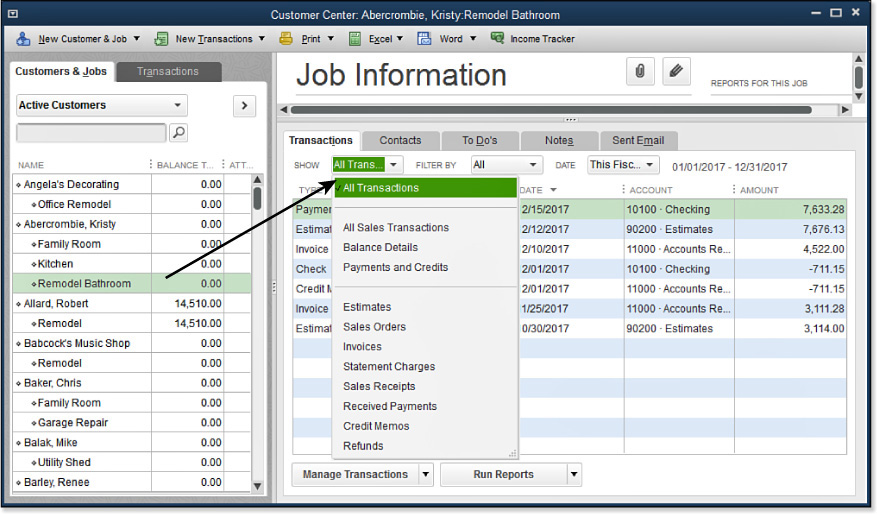
With the Customer Center open, select a customer or job with your cursor. Then click the Transactions tab on the right, and the individual transactions assigned to that customer or job display. In the previously displayed Figure 9.12, the job Remodel Bathroom for customer Abercrombie, Kristy is selected, and to the right are individual transactions for that job.
You can filter the resulting transactions by selecting options in the Show, Filter By, and Date drop-down lists. The options available differ depending on the type of transaction being filtered for.
In Figure 9.15, the options available for filtering include customer transactions. Your transaction types might differ from the displayed types if you do not have the related feature enabled in preferences. The only transaction type that can have a customer or job record assigned that is not included in these options is the Make Journal Entry.
Figure 9.15. Conveniently filter for specific transaction types and dates for the selected customer.
Another useful feature of working with the Customer Center is available on the Transactions tab. On the Transactions tab, you can locate similar transaction types for all customers.
To do so, follow these steps:
1. From the Customer Center, click the Transactions tab.
2. Select the Estimates type, as in Figure 9.16.
Figure 9.16. Use the Transactions tab of the Customer Center to find like transaction types.
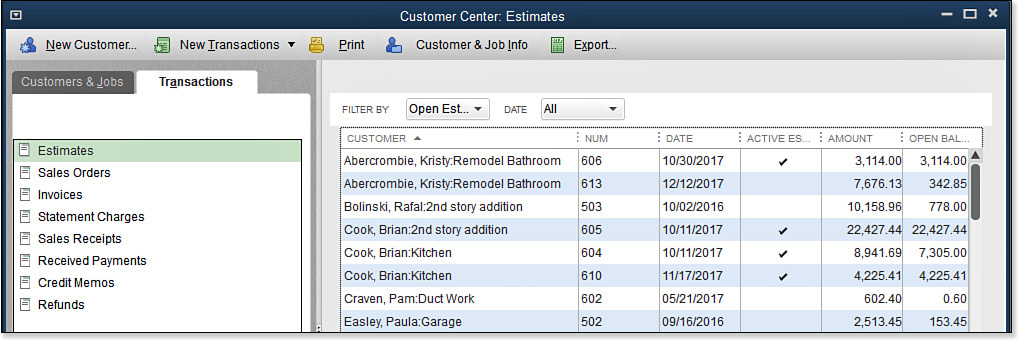
3. From the Filter By drop-down list, select Open Estimates.
4. (Optional) Filter for a specific date range.
5. Click any column header to sort the data by that column.
6. Double-click any transaction to open the selected transaction. Click Save & Close to return to the Transactions tab details.
7. Click the Print button to print the listed transactions. Click OK to close the Transaction Report message. Click Print to print the list of transactions, or click Cancel to return to the Customer Center’s Transactions tab.
8. Click the Customer & Job Info tab. QuickBooks displays the Edit Customer or Job dialog box for the selected customer or job, edit as needed. Click OK to close and be returned to the Customer Center:Estimates listing.
9. Click the Excel button to export the list of transactions to an Excel worksheet or CSV file format.
10. (Optional) Click the Manage Transactions or Run Reports drop-down choices at the bottom of the Customer Center.
The Customer Center provides a single location from which you can create or modify your customer records or research customer transactions.
In the next section, you learn about managing your prospects using the Lead Center.
Working with Prospects in the Lead Center
The Lead Center helps you keep track of your business prospecting activities. From the menu bar, select Customers, Lead Center to open the Lead Center (see Figure 9.17).
Figure 9.17. Keep track of prospect contacts and activities in the Lead Center.
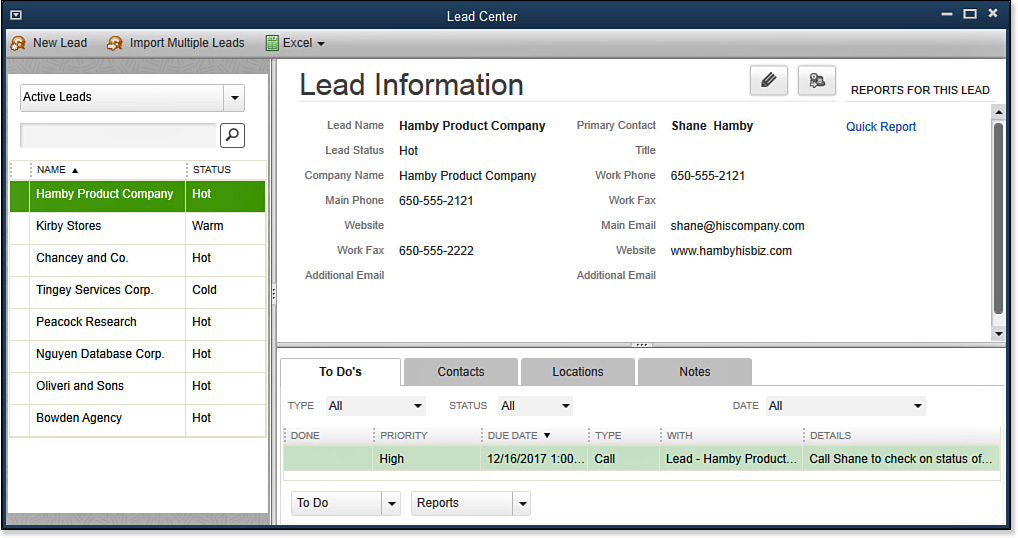
From the Lead Center, you can click the following options, which perform various functions:
• New Lead—Enter a single new lead.
• Import Multiple Leads—Using a preformatted grid, you can enter multiple leads row by row, or copy and paste from an existing Excel worksheet.
• Excel—Export a Lead Contact List, a Lead Status List, or a list of Converted Leads (leads that became customers).
Use the new Lead Center to track important business prospecting activities and save time when creating customer records from your lead base.
To practice creating a new lead record, open the sample data file as instructed in Chapter 1. You might also use these instructions if you are getting started with lead management in your own data file:
1. In the Lead Center, click New Lead.
2. In the Name field, type your own name.
3. Complete the remaining fields on the Company and Contacts tab.
4. (Optional) Add other locations or contacts for this new lead.
5. Click OK to complete adding the lead.
6. With the lead selected on the left, click the To Do button on the To Do List to add a new reminder activity. See Figure 9.18. These To Do activities are included in your calendar reminders. See Chapter 18, “Using Other Planning and Management Tools.”
Figure 9.18. Stay organized with your prospecting activities by adding To Dos to the lead record.
7. Click any header column to sort the data by that column.
8. Click the Contacts, Locations, or Notes tab to view additional information about your lead.
9. Continue adding a few more leads using any of the mentioned methods.
10. In this exercise, select a lead from the list and click the icon in the top right to Convert to Customer. QuickBooks creates a new customer record from the details in the Lead Center. Select Yes to the Convert Lead message, confirming that that action cannot be undone.
11. The lead is no longer listed in the Lead Center. Open the Customer Center to view the new customer record, contacts, and notes that transferred with the lead.
Setting Up Sales Tax
Tip
Each state has different requirements and rates for reporting sales tax. It is critical that you research the applicable regulations and set up QuickBooks correctly. Otherwise, your business can be subjected to expensive—and avoidable—penalties.
In QuickBooks, you can collect and remit sales tax on behalf of governmental authorities. To do so, you need to establish sales tax items and codes. You might also need to create sales tax groups.
Do not forget to register with the department of taxation for the state(s) you will be selling in. Each state has specific rules and guidelines and also provides you with a unique filing identification number for your business. Not all states require sales tax to be charged to your customers on specific items sold. To see if the taxing authority has special guidelines to follow, call the sales tax department; my experience is that staff members are quite helpful and can direct you to the needed documentation.
Creating Sales Tax Items
Sales tax items identify specific rates charged to your customers and the tax authority vendor to which you remit the sales tax. You might have one sales tax item or several on your item list.
After enabling Sales Tax in preferences, to create a sales tax item in your data file, follow these steps:
1. From the menu bar, select Lists, Item List.
2. In the Item drop-down list, select New to open the New Item dialog box.
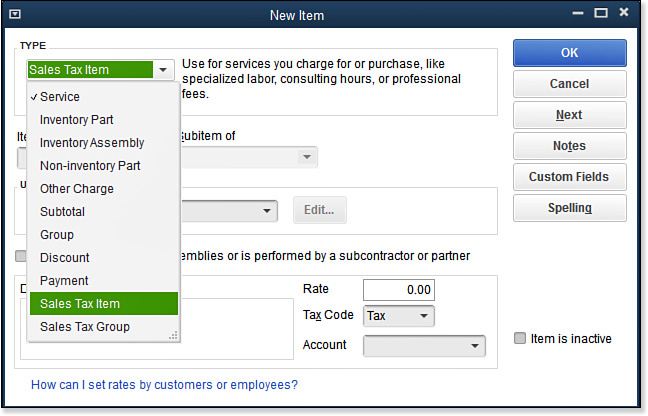
3. In the Type drop-down list, select Sales Tax Item, as in Figure 9.19.
Figure 9.19. Sales tax is properly calculated and tracked in QuickBooks when you use the Sales Tax item type.
4. Enter a sales tax name for the sales tax item; the name should identify the applicable jurisdiction (see Figure 9.20).
Figure 9.20. Setting up your sales tax item with the proper rate and vendor ensures that you collect and remit sales taxes correctly.
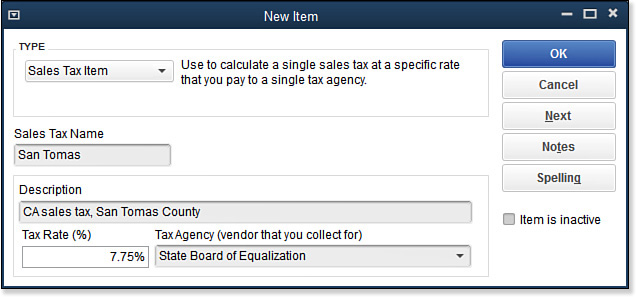
5. Enter a Description you want printed on the customer’s invoice.
6. In the Tax Rate (%) box, enter the rate the taxing authority charges.
7. In the Tax Agency (vendor you collect for) drop-down list, select the vendor to which you remit your sales tax payments. If your vendor is not set up in QuickBooks, select Add New at the top of the list to create a sales tax vendor record.
8. Click OK to save the sales tax item.
With sales tax items created, you can group them into sales tax groups if the state requires collection and reporting on multiple tax entities.
Creating Sales Tax Group Items
Sales Tax Groups are optional in QuickBooks. In many states, you are required to report the collection of sales tax for a combination of city, county, and state, but you want to show the customer a single tax rate. In QuickBooks, you can accomplish this by first creating your individual city, county, and state sales tax items, and then assigning them to a Sales Tax Group item type. The Sales Tax Group item is then assigned to the customer.
To create a Sales Tax Group item in your data file, follow these steps:
1. From the menu bar, select Lists, Item List.
2. From the Item drop-down list, select New to open the New Item dialog box. If necessary, click OK to close the New Feature message.
3. In the Type drop-down list, select the Sales Tax Group item.
4. Enter a Group Name or Number that identifies the group.
5. In the Description box, enter the description you want printed on the customer’s invoice.
6. In the Tax Item column, from the drop-down list, select the appropriate city, county, or state sales tax items previously created (refer to Figure 9.20).
7. Click OK to save the new Sales Tax Group item.
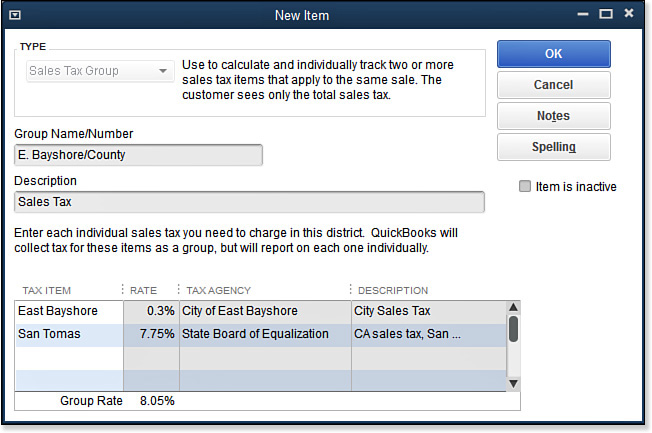
In the example in Figure 9.21, you are going to collect and remit the sales tax at a rate of 8.05%. In this example, part of the payment will be made to the State Board of Equalization, and the other portion will be paid to the City of East Bayshore. However, when this tax group is assigned to a customer, the invoice shows a single rate of 8.05%.
Figure 9.21. Use Sales Tax Groups to track multiple taxes but show one tax rate on a customer’s invoice.
Creating Sales Tax Codes
The primary purpose of sales tax codes in QuickBooks is to identify a product or service as taxable or nontaxable and identify a customer as taxable or nontaxable. If you track sales tax, you must have at least one taxable code, but you might have multiple nontaxable tax codes.
A sales tax code list also is useful when the state has reporting requirements on the types of nontaxable sales you make. Creating a unique nontaxable sales code for each of these nontaxable sales types enables you to report the total sales by nontaxable sales tax type.
Examples of nontaxable tax codes might include some or all of the following:
• Nontaxable reseller
• Out-of-state sales
• Sale to a nonprofit organization
• Government entity
To see a list of suggested nontaxable tax codes, from your keyboard, press F1 to open the Help content. From the Have a Question window, type Sales Tax Code and select the Nontaxable Sales Tax Codes Examples topic. QuickBooks provides a list of commonly used sales tax codes. See Figure 9.22 for a sample Sales Tax Code List.
Figure 9.22. Sales tax codes are assigned to your customers and help with reporting requirements by your taxing authority.

When creating a customer invoice, QuickBooks determines whether the item being sold is taxable and whether the customer is assigned a taxable or nontaxable sales tax code before computing any sales tax charge on an invoice.
To create a list of Sales Tax Codes or edit the existing Sales Tax Codes in your data file, follow these steps:
1. Make sure you have enabled the sales tax preference, as discussed earlier in this chapter.
2. From the menu bar, select Lists, Sales Tax Code List.
3. In the Sales Tax Code drop-down list, select New to create a new code. Alternatively, select a sales tax code from the list and then, in the Sales Tax Code drop-down list, select Edit Sales Tax Code. (Note that a new QuickBooks data file defaults with one taxable tax code and one nontaxable tax code.)
4. In the New Sales Tax dialog box (or Edit Sales Tax dialog box), Type a three-character code in the Sales Tax Code field. Make the three-character code something meaningful. You will see this code on the dialog boxes New Item, Edit Item, New Customer, and Edit Customer, and optionally on the lines of the customer’s invoice.
In the next section, you complete the process and assign the appropriate code to your customer record.
Note
Items are typically assigned a generic taxable or nontaxable sales tax code. You might create other Sales Tax Codes for resellers or out-of-state sales, which you assign to customers but not items.
Assigning Sales Tax Codes to Products or Services
Items are created in QuickBooks for use with sales and purchase transactions. The primary purpose of creating items is to handle the behind-the-scenes accounting and to assign the taxable status for an item on a customer invoice.
The following items in QuickBooks enable you to assign a taxable code, as Figure 9.23 shows:
• Service Item—created for selling or buying service items
• Inventory Part—created for selling or buying inventory items
• Inventory Assembly—created for simplifying the build of a finished good
• Non-inventory Part—created for selling or buying items you do not stock in inventory
• Other Charge—created for selling or buying other items, like freight or miscellaneous charges
• Discount—created for use on sales forms to auto calculate discounts
Figure 9.23. When an item is set up with a Non-Tax Code, no tax is calculated, even if the customer is taxable.
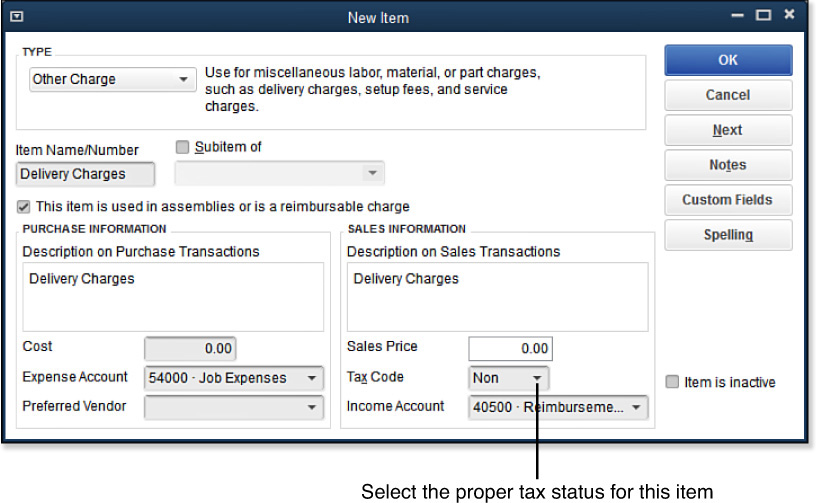
If you expect to charge sales tax on an item, it should be marked as taxable even if it is sold to a nontaxable customer. QuickBooks validates whether an item is taxable and then verifies that the customer is taxable before it charges sales tax.
If the item is always nontaxable, even if it is sold to a taxable customer (for example, labor), it should be assigned a nontaxable sales tax code so that it will never have sales tax calculated on the sale of that item.
Some states require the sale of labor services to be taxed if they are invoiced with products and not taxed if they are invoiced separately. Although this might not be the requirement for the state jurisdictions you sell in, to handle this situation, create two Labor Service type items—one named Taxable Labor and assigned a taxable tax code, and another named Nontaxable Labor and assigned a nontaxable tax code. You can then select the appropriate item when you invoice your customers.
Assigning Sales Tax Codes and Sales Tax Items to Customers
Enabling the sales tax preference and creating sales tax items, groups, and codes are part of the sales tax setup. You also need to assign a tax code and a tax item to each customer.
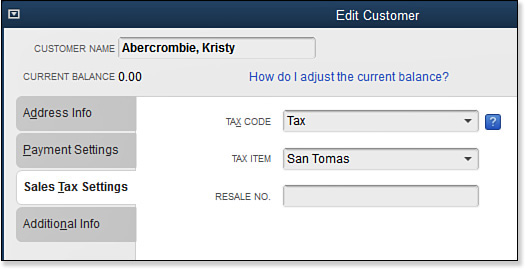
To assign or edit an existing customer’s tax code (as well as tax item), as in Figure 9.24, follow these steps:
Figure 9.24. Assign the proper sales tax code and sales tax item to each of your customers.
1. On the Home page, click the Customers button to open the Customer Center.
2. Select the customer for whom you want to assign or edit a tax code.
3. Click the Edit Customer button.
4. In the New or Edit Customer dialog box, click the Sales Tax Settings tab.
5. In the drop-down lists in the Sales Tax Information box, select the appropriate Tax Code and Tax Item. If the customer is a reseller of your product, for best recordkeeping practices, record the Resale No. you might be required to provide, in case of a sales tax audit.
Caution
You can assign one tax code and one tax item to each customer. You cannot assign a tax code or tax item to a job. If you have a customer with multiple locations and you are required to charge different sales tax rates for each location, you need to create a unique customer for each location.
The sales tax code defines the customer as taxable or not. The sales tax item defines the sales tax rate to be charged to the customer.
Because QuickBooks enables you to save a customer record without one or both of these settings, be sure to review your customer sales tax list often to ensure that you have assigned a sales tax code and sales tax item to each of your customers.
You can easily manage this information by customizing the columns in the Customer Center, as discussed earlier, by adding the sales tax code and sales tax item.
Creating Price Level Lists
Each time you sell a product or service to a customer with an assigned price level, QuickBooks defaults the sales price to match the price level. (This feature is available in specific editions of QuickBooks Premier, Accountant, or all Enterprise Solutions editions.) The price level assigned to a customer affects all sales to the customer for the selected item(s). Price levels cannot be based on discounts earned from buying a product in bulk. However, the following section in this chapter details using a feature that permits offering price discounts based on volume purchasing.
To create a price level, follow these steps:
1. Enable the use of Price Levels. From the menu bar, select Edit, Preferences, Sales & Customers. On the Company Preferences tab, place a checkmark in the Enable Price Levels setting. Click OK to save your selection.
Note
Using the price level feature is truly a time saver! However, I also make the case for showing the customer the full price and then manually adding a discount line on the invoice. Doing this helps the customer see the financial benefit of doing business with your company.
2. From the menu bar, select Lists, Price Level List. After creating the price level, assign the price level to the appropriate customers.
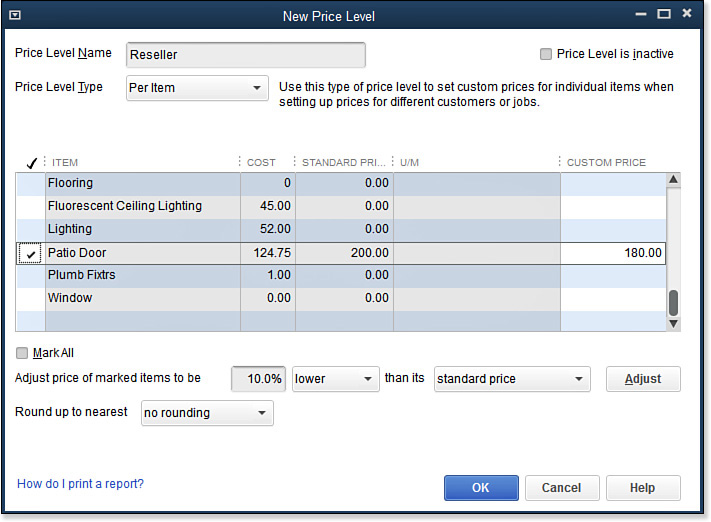
3. Calculate the price level using one of two methods (see Figure 9.25):
• Fixed Percentage Price Levels—An example is creating a Price Level that awards a customer a 10% discount on all purchases.
• Per Item Price Levels—You might have preferred customers who get a specific rate for a particular item.
Figure 9.25. Price levels automate custom sales prices and can be assigned to specific customers.
4. To assign a price level to a customer, from the Customer Center, select a customer on the left.
5. Click the Edit Customer button and choose the Payment Settings tab.
6. From the Price Level drop-down list, select the proper Price Level to assign to this customer. You can assign one Price Level per customer.
It is important to note that Price Levels do not work with the batch invoicing method, discussed later in this chapter. Join me in the following section to learn about a unique pricing tool offered only in QuickBooks Enterprise with Advanced Pricing.
Using Advanced Pricing in QuickBooks Enterprise
New for 2014 is Advanced Pricing, a feature exclusively available with QuickBooks Enterprise Solutions. Advanced Pricing is a subscription-based feature, charged annually. The feature replaces the free Price Levels, discussed in the previous topic, with much more sophisticated automated price settings.
Advanced Pricing provides the capability to have QuickBooks automatically apply:
• Quantity discounts
• Manufacturer discounts
• Scheduled promotions with future start dates
• Thousands of price rules or combinations of rules
With Advanced Pricing, QuickBooks automatically changes the prices of items on sales forms according to the rules you create. Each price rule can contain multiple conditions that must be met before QuickBooks changes the sales price.
Price Rules
After purchasing Advanced Pricing, follow these steps to set up a Price Rule:
1. Enable Advanced Pricing. From the menu bar, select Edit, Preferences, Sales & Customers. From the Company Preferences tab, select Enable Advanced Pricing and choose your option for handling price rounding.
2. If your file previously had Price Levels, you will see a message about QuickBooks converting these to Price Rules. Click to dismiss the message. It is prudent at this time to review the details of the former Price Levels that are now Price Rules.
3. To create a new Price Rule, from the menu bar, select Lists, Price Rules. The New Price Rule window displays.
4. From the Price Rule drop-down list at the bottom of the Price Rule List, select New.
5. Type a Price Rule Name and Description (see Figure 9.26).
Figure 9.26. With Price Rules, QuickBooks automates pricing when conditions are met.
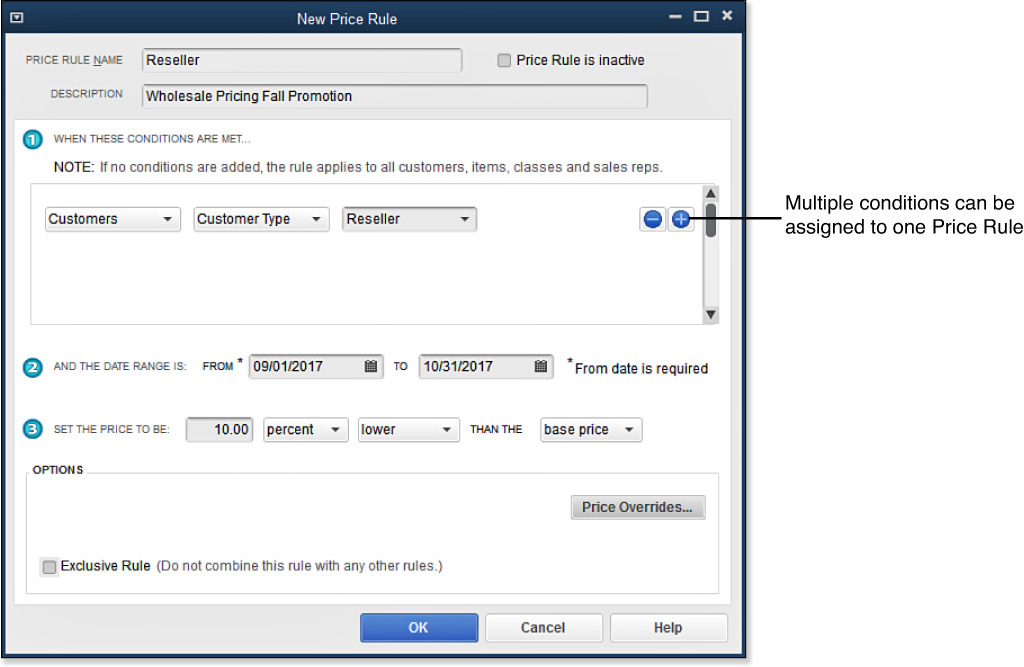
6. Provide conditions for the newly created Price Rule. These conditions can be any combination of the following:
• Customer Name, Type, Job Type or Custom Fields
• Item Name, Item Type, Preferred Vendor
• Class
• Sales Rep
7. Select a Date Range if this promotion is for a specific period of time.
8. Specify the price to be a percentage or amount decrease or increase over the item’s current base price. The base price is determined by the item’s Sales Price or Rate, depending on which item type you are assigning. Or you can choose to calculate the decrease or increase from the cost recorded on the item’s record.
9. In the Options section, select whether there are to be any Price Overrides. When selected, you can specify a price for selected items that will be used instead of the Price Rule decrease or increase.
10. Select Exclusive Rule when you want this rule to not be combined with any other rules used in calculating the price for items on sales forms.
11. Click OK when finished.
Quantity Discount
Also included with your Advanced Pricing subscription is Quantity Discounts. As detailed previously, with Quantity Discounts, you can reward your customers for making bulk purchases. For example, QuickBooks can charge different prices when a customer buys 10 to 19 items, or 20 to 29 items, or 30 or more items.
After purchasing Advanced Pricing, follow these steps to set up a Quantity Discount and assign it to a specific item (product or service):
1. Enable Advanced Pricing. From the menu bar, select Edit, Preferences, Sales & Customers. From the Company Preferences tab, select Enable Advanced Pricing and choose your option for handling price rounding.
2. If your file previously had Price Levels, you will see a message about QuickBooks converting these to Price Rules. Click to dismiss the message.
3. To assign Quantity Pricing to an item from the menu bar, select Lists, Item List; with an item selected, on the right, click the Qty Discount button to open the Quantity Discount window for the selected item (see Figure 9.27).
Figure 9.27. Quantity Pricing is new to Enterprise 2014; reward your customers for bulk purchases.
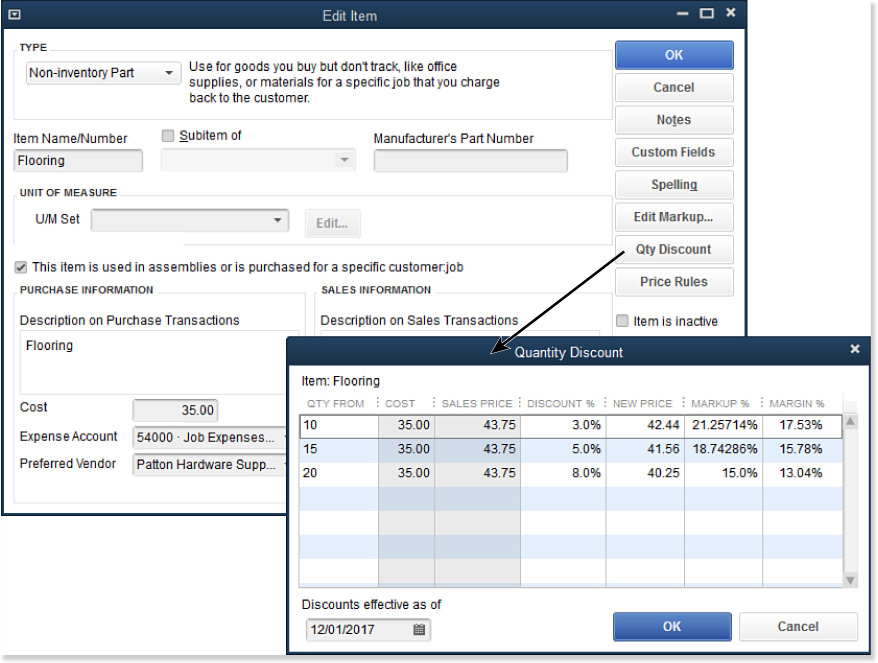
4. In the Qty From column, type an amount. Note that, for this feature to work properly, your item should have an amount recorded in the Rate (or Cost) field of an Item record.
5. Enter a discount %. The New Rate column calculates automatically.
6. Optionally, enter the New Rate amount. The Discount % calculates automatically.
7. Select a Discounts effective date.
8. Click OK when completed.
You can now create invoices to customers, and QuickBooks will automatically calculate Price Rules and Quantity Discounts where the conditions are met.
Caution
Multiple price rules and quantity rules can both apply on a single customer invoice. Test the use of the Price Rule and the Quantity Rule, to make sure you achieve your desired results.
QuickBooks provides details when price rules are used on an invoice, but not when Quantity Discounts are used. See Figure 9.28.
Figure 9.28. Easily view the Applied Price Rules from a customers invoice.

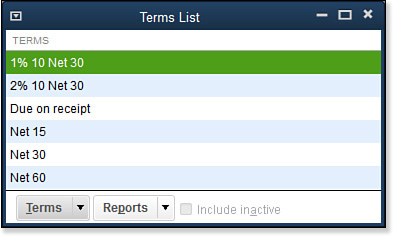
Creating Payment Terms
QuickBooks terms offer a shortened description and calculate on an invoice when you expect to receive payment from a customer or when a vendor expects to receive payment from you. For example, 1% 10 Net 30 is an expression for payment due in 30 days, with a 1% discount if paid within 10 days.
To practice creating a payment term, open the sample data file as instructed in Chapter 1. You might also use these instructions if you are creating a new payment term in your own data file:
1. From the menu bar, select Lists, Customer & Vendor Profile Lists, Terms List. A list of terms displays (see Figure 9.29).
Figure 9.29. Terms lists calculate due dates on customer and vendor transactions.
2. In the Terms drop-down list, select New. The New Terms dialog box displays (see Figure 9.30).
Figure 9.30. Complete all the fields when creating a new payment term.
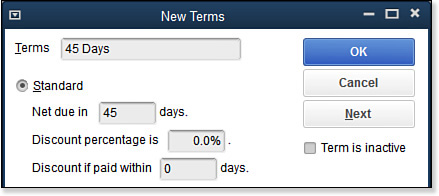
3. In the Terms field, type 45 Days.
4. Select the Standard option and type 45 in the Net Due In field.
5. Click OK. You return to the Terms List.
6. (Optional) Click the Reports button, and then select QuickReport to prepare a report of transactions using the selected term.
7. You can now assign this term to the customer and vendor record or transactions.
If you want the due date to be a specific date, use the Date Driven terms and complete the necessary fields.
Customizing QuickBooks Forms
You can customize most forms in QuickBooks, such as sales orders and customer invoices. You can access these powerful features from the ribbon toolbar tabs displayed at the top of most transactions.
→ To learn more about working with the Create Invoices ribbon, see “Using the Ribbon Toolbar,” p. xxx.
When customizing the QuickBooks invoice form, you can use these options:
• Overall Design—Includes how the form looks, whether the form has a design imprint, and whether field titles are shaded, as well as other format options.
• Data Fields—Customizes the data layout on a form.
Let’s first tackle customizing the overall design of the invoice using the Customize My Forms Wizard.
Using the Customize My Forms Wizard
To create a consistent look and feel for your printed forms, consider using the Intuit—Customize My Forms Wizard. This feature is free for the first 30 days for each QuickBooks data file. After 30 days, if you need to make changes to a design, the fee is $4.99 per design. Any changes you pay for come with a 60-day satisfaction guarantee.
Note
If you want to “practice” using this tool before committing the changes to your own forms, use the Rock Castle Construction file as instructed in Chapter 1.
When using the sample data for this exercise, you cannot save the design or apply it to your own data’s QuickBooks forms.
In just a few simple steps, you can add a professional look to all the QuickBooks forms. To customize QuickBooks forms, follow these steps:
1. From the menu bar, select Customers, Create Invoices.
2. To customize your forms, select the Customize Design icon on the Formatting tab of the ribbon toolbar at the top of the transaction and select Customize Design.
3. The QuickBooks Forms Customization dialog box opens (see Figure 9.31). An Internet connection is required. Choose a background that is specific to your business from the Industry drop-down list. As you select a background, the resulting design displays on the right for you to view.
Figure 9.31. Add a professional look to your business forms.
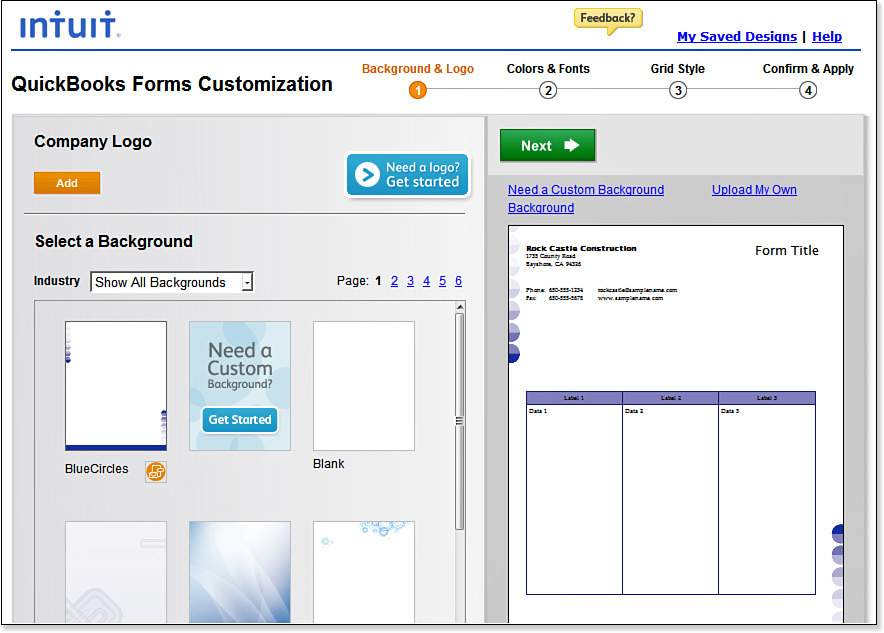
4. Click the Add button under Company Logo to browse for your logo file. If you do not have a company logo, click the Need a Logo? Get Started button. Intuit has partnered with 99designs to offer affordable custom design services.
Note
Our firm uses this same Intuit design service partnered with 99designs to create the logo displayed on our website, www.quick-training.com.
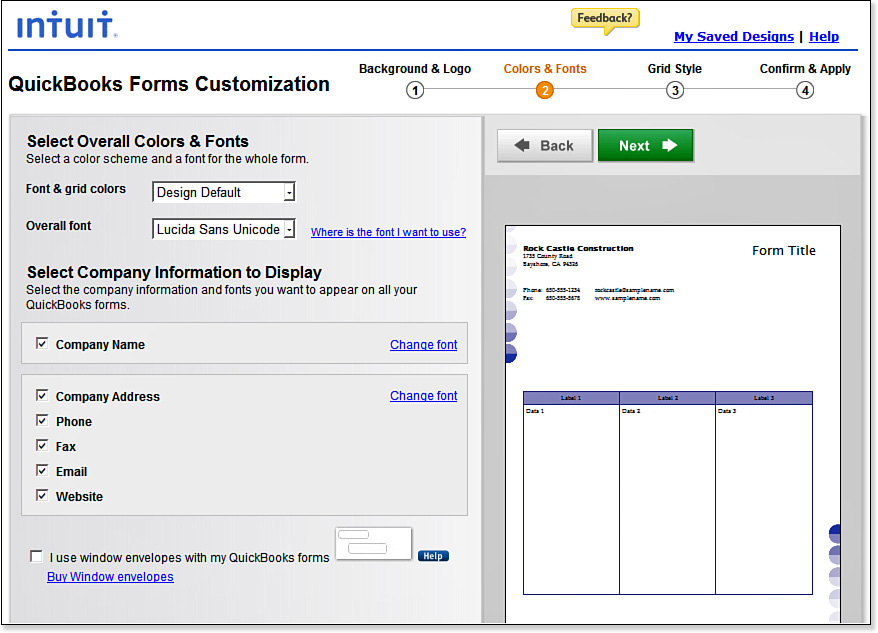
5. Click Next to display Step 2—Colors and Fonts, shown in Figure 9.32. Select your font and grid colors overall or for specific fields by clicking the appropriate drop-down list. A grayed-out field indicates that the data for that field does not exist in your QuickBooks data file. (Optional) Place a checkmark in the box to indicate that you mail your invoices in window envelopes. Click Next.
Figure 9.32. Select font and grid colors and other design options for your customized forms.
6. Step 3—Select a Grid Style displays. Click to select a shaded style grid of your choice. Click Next at the top of the dialog box.
Note
If you are prompted for payment to apply the designs to your forms, this indicates that you have previously used the initial free service. After a period of time, the service is available but requires a minimal fee.
7. Step 4—Review Design displays. Click the Back button to make changes. Click Continue to select the forms to assign the design to. Click No Thanks to cancel your changes. You are redirected to a website that displays matching business forms.
8. The Apply Design dialog box displays (see Figure 9.33). Place a checkmark next to each of the forms to which you want to apply the customized design. You can select from the many QuickBooks forms (Invoice, Sales Receipt, Purchase Order, and so on), making it easy to customize several forms at once.
Figure 9.33. Apply the design customization to multiple forms at once.

9. Click Apply. The Design Applied dialog box displays with instructions for identifying your customized templates on the Templates list. After reading the details, click OK to close the message.
10. The Save Design Online (Recommended) dialog box displays with these options:
• Save—The design is available for future editing; you are prompted to define a name for the design and to create a secure login for future editing. A message displays showing the date the form was customized and the last day to make changes without an additional fee. Click OK to close.
• No Thanks—Select this if you do not want to save the design. A warning message displays; click OK to close, and you are redirected to a website showing other business items that match your customized style. Close the open web pages when completed reviewing the information.
11. The Intuit Business Forms web page displays. Click the X in the top-right corner to close the web page when you’re finished with your review of the information.
Now that you have customized the overall design of your invoice form, let’s look at managing the data that is both displayed on the screen during input and printed on the customer’s invoice.
Using the Customize Data Layout Tool
Use the Customize Data Layout tool to create a new template or edit the layout and design of an existing invoice, purchase order, or other template. One distinct difference from the method taught previously is that the changes you make now are only for the currently selected form. If you want to make changes to the format for multiple forms at one time, use the method discussed in the previous section.
In this exercise, you create a new invoice template using the sample data as instructed in Chapter 1. Your selection options might differ, depending on the version of QuickBooks you are using and whether you are using a different sample data file.
To customize the QuickBooks data layout on forms, follow these steps:
1. From the menu bar, select Customers, Create Invoices.
2. Select the Manage Templates icon on the Formatting tab of the ribbon toolbar at the top of the Create Invoices transaction.
3. The Manage Templates dialog displays. Scroll through the list of templates to select the template you want to modify. As each template is selected, a preview of the finished template displays to the right. For the instructions that follow, I have selected the Intuit Product Invoice. Click OK when you have selected the template you want to modify.
4. The Basic Customization dialog box displays. Review the information that you can modify from this dialog box, including the following:
• Use Logo—Browse for your logo image file to attach to the form. QuickBooks copies the logo to a folder that resides in the same location as your QuickBooks data file.
• Select Color Scheme and Apply Color Scheme—Alter the color of borders and header fonts.
• Change Font For and Change Font—Select a data field and choose Change Font to change the font for that specific field.
• Company & Transaction Information and Update Information—Click to select the fields you want to display on your form, and then click the Update Information button.
5. Click the Additional Customization button at the bottom of the screen.
6. If prompted with the Locked Template message, click the Make a Copy button. Intuit protects the original templates and does not allow you to edit them without making a copy first. The Additional Customization dialog box displays with the Selected Template name in the top left.
7. Click the following tabs to modify the respective information:
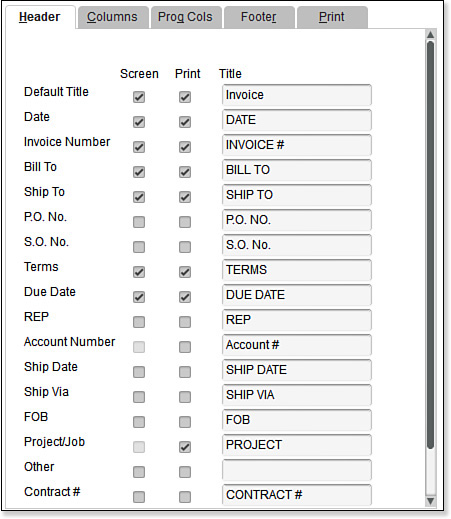
• Header—Each field selection offers the option to view onscreen, print on the invoice, and add a title. See Figure 9.34.
Figure 9.34. Customize your forms for which fields to display onscreen and print on the invoice.
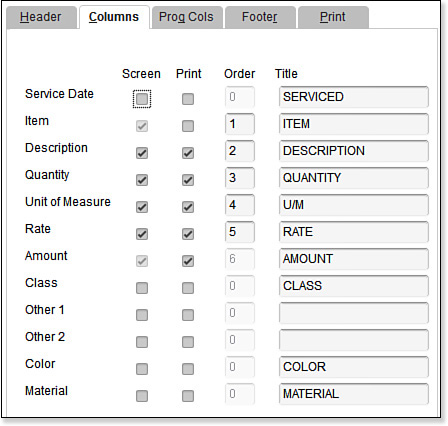
• Columns—Each field offers the option to select which columns appear onscreen and in print, and in what order. Accept the default title or assign a new title to each field. See Figure 9.35.
Figure 9.35. For your customized forms, define the label and order of the displayed and printed fields.
• Prog Cols—If you have enabled Estimates or Sales Orders, these fields allow you to select which columns appear onscreen or in print, and in what order. Accept the default title or type a new title in the field.
• Footer—These fields enable you to manage the data that displays at the bottom of forms onscreen and in print. Accept the default title or assign a new title to the field. Optionally, select to include a long text disclaimer on your invoice and to include the Intuit PaymentNetwork link (allowing your customers to pay online by check) on printed invoices.
• Print—Here you find settings for managing the printing of the invoice, adding page numbers, and printing trailing zeros.
8. If you added any fields to your form, you might be prompted with a Layout Designer message. For this exercise, click OK to dismiss the message.
9. Click Print Preview to take a closer look at the changes.
10. At the bottom of the Additional Customization dialog box, click the Layout Designer button. Use the layout designer in Figure 9.36 to do the following:
Figure 9.36. Use the layout designer to rearrange the fields or modify the attributes of the field.
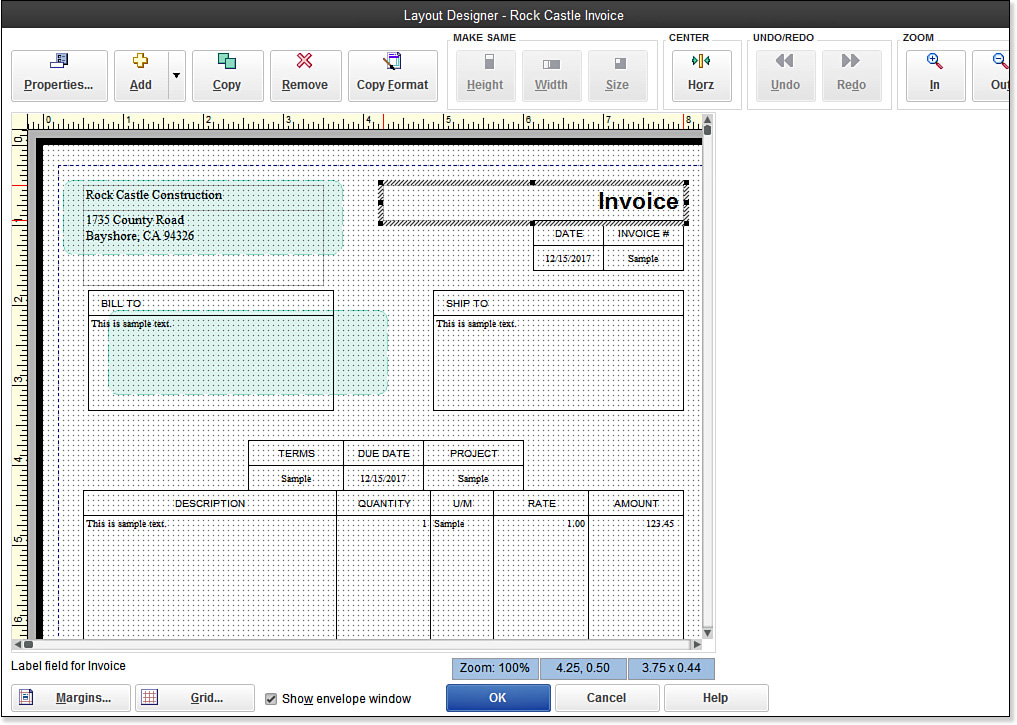
• Modify the properties for the selected field’s font, text, border, and background.
• Add a text box, data field, or image.
• Copy or remove a field.
• Use the Copy Format button to apply formatting from one field to others. Click End Format to turn off this feature.
• Make multiple fields the same height, width, or size by holding down the Ctrl key on your keyboard while selecting the desired fields.
• Click Center to place a selected field in the center of the form.
11. Click Undo or Redo as needed.
12. Use the Zoom In or Out buttons to see the detail more closely.
13. Click the Margins button to set the margins for the form. Click OK to close.
14. Click the Grid button to see various options related to the grid. Click OK to close.
15. If you use window envelopes, click Show Envelope Window to determine whether the business address is positioned correctly.
16. Click OK to save your changes, or select Cancel or Help. Select Yes to the Layout Designer message to return to the Additional Customization dialog box.
17. Click OK to close the Additional Customization window. Click OK to close the Basic Customization dialog box. You return to the Create Invoices dialog box (in this example).
You can use the newly created or modified invoice format when preparing an invoice for your customers.
Tip
QuickBooks can help you put on a professional look for your communications with suppliers and customers. To download ready-made customized forms, from the ribbon toolbar at the top of a displayed Create Invoices transaction, click the Formatting tab and choose Download Templates. An Internet connection is required.
The Forms Intuit Community site displays. Scroll through the list of forms that you can download and use with your QuickBooks data.
Forms include Credit Memos, Estimates, Invoices, Purchase Orders, Sales Orders, Sales Receipts, Statements, and, specifically for nonprofit entities, Donation forms.
Accounts Receivable Processes
Within QuickBooks, you have some flexibility in how you handle your company’s receivables workflow. Your company might use some or all of the transaction types listed in this chapter, depending on the product or service that you sell.
In the section “Preferences That Affect Accounts Receivable” in this chapter, I discuss the preferences you can define after you determine what sales transaction type or feature you need.
Table 9.1 details the transactions used in the Accounts Receivable module and their primary purposes.
Table 9.1. Accounts Receivable Transactions
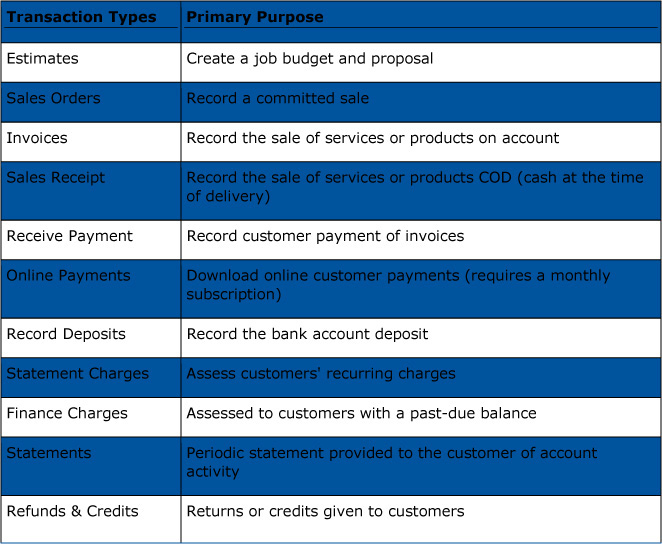
Whether you start with an estimate or sales order or you prepare an invoice for a customer, the proper workflow for recording a sale has some or all of these steps:
1. (Optional) Create a quote using an estimate transaction type. Estimates are useful if you will be providing a quote or multiple quotes for a prospect. Estimates not won can be marked as inactive.
2. (Optional) Create a sales order. Sales orders are best when you have a commitment for a sale to a customer, but you cannot fulfill it at the time the order comes in. Sales orders can be created directly from an estimate.
3. Prepare an invoice, sales receipt, or statement charge. The invoice transaction can be created directly from the estimate or sales order.
4. Receive the customer payment in an Undeposited Funds account.
5. Record the deposit in your bank account.
Performing these related tasks in QuickBooks is easy from the Home page, as Figure 9.1 shows. Whether you are new to QuickBooks or are an experienced user, you will find the Home page useful in getting around QuickBooks and in determining what the next transaction process should be.
Over my years of consulting with clients, I have noticed that many do not know the proper accounts receivable process. Following a recommended workflow helps you avoid some of the more common errors instead of having to fix them at a later date.
Using QuickBooks Estimates
Use a QuickBooks estimate to give prospects a quote for your products or services. The estimate helps you keep track of the sales price you have quoted and keep track of your estimated costs. In accounting terms, the estimate is considered “nonposting,” which means that when you record an estimate, you are not yet recording revenue.
Tip
Do you need to track Active versus Inactive Estimates? From the ribbon toolbar on the Create Estimates dialog box, select the Main tab and toggle the checkmark on or off for Mark as Active or Mark as Inactive.
When an estimate is inactive, it does not display on drop-down lists or reports that are filtered only for active estimates.
Estimates also provide the means for QuickBooks to prepare a budget (expected costs and revenue) for a customer or job. Many job costing reports use the estimate details. You can view these reports using the sample data referred to in Chapter 1. From the Reports menu, select Jobs, Time & Mileage, and view the Job Estimates vs. Actuals Summary or Detail (to name just a couple).
To practice creating a new estimate, open the sample data file as instructed in Chapter 1. If you are using your own data file, make sure you have enabled estimates as discussed in the preferences section of this chapter:
1. On the Home page, click the Estimates icon. The Create Estimates transaction displays (see Figure 9.37).
Figure 9.37. Use estimates to track your projected job costs and to save time creating invoices when the quote becomes a sale.
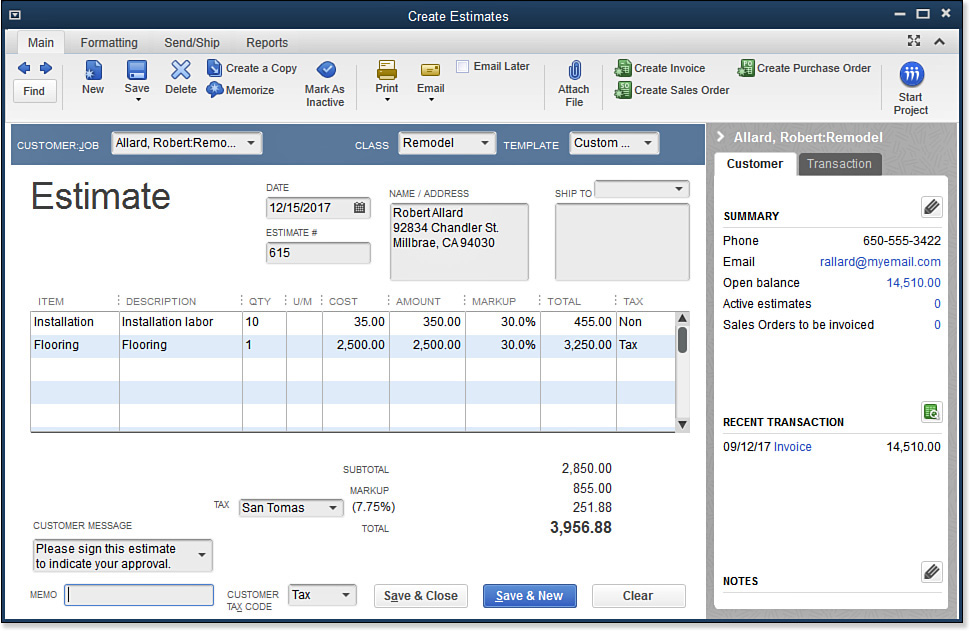
2. In the Customer:Job drop-down list, select the customer Allard, Robert:Remodel job.
3. For this exercise, leave the prefilled values in the Template, Date, Estimate #, and Name/Address fields.
4. Click the first field in the Item column and use Installation. Accept the prefilled description of Installation Labor.
5. In the Qty field, type 10.
6. Leave the U/M (Unit of Measure) field blank.
7. Accept the Cost field default of $35.00.
8. In the Markup field, type 30%. (See the caution that follows this sidebar.) Accept the default Tax line assignment.
9. In the Item column on the next available row, select the non-inventory part, Flooring.
10. In the Qty field, type 1. Leave the U/M (Unit of Measure) field blank.
11. In the Cost field, type 2,500.00.
12. In the Markup field, type 30%. Accept the default Tax line assignment.
13. Click Save & Close to complete the estimate, or click Save & New to practice creating another estimate.
You now have an estimate and can track quotes you provide to your prospects. When your prospect becomes a customer, create the invoice from the estimate.
You can also use estimates to create sales orders, which the next section covers.
Caution
When working with estimates, if you want the markup to be a percentage over cost, you must also type the percent (%) character. To charge a fixed dollar amount over cost, type the dollar amount.
If you do not include anything in the Markup column, QuickBooks job budget vs. cost reports considers the amount in the Cost column the same as the Total, which is essentially the Sales Price. Best practice is to include a markup percentage or dollar amount.
Using QuickBooks Sales Orders
Sales orders are used to record the sale of products you do not have in stock or services you have scheduled to provide at some future date. Sales orders are perfect for tracking backorders. Sales orders are not available with QuickBooks Pro, but are included with all other editions of the QuickBooks for Windows desktop products.
You can start with a blank sales order, or if you created an estimate, you can create the sales order from the estimate.
The Sales & Customers—Company Preferences tab on the Edit Preferences dialog box offers settings you can adjust, which makes working with sales orders more efficient for your business.
→ For instructions on creating sales orders, see “Handling Inventory Backorders,” p. xxx.
Creating Customer Invoices
If my guess is correct, this is one of the first sections of the book you have turned to. My clients typically are quick to get an invoice to a customer for payment for the product or service being sold.
This section provides some basic instruction for using multiple methods of invoicing in QuickBooks. You might even learn some new techniques.
Using the Ribbon Toolbar
The ribbon toolbar is accessible from the top of the Create Invoices dialog box and on other transaction types. The selections on the toolbar differ depending on the particular transaction type that is displayed.
When working with the Create Invoices transaction, on the ribbon toolbar at the top of the transaction, you have the following available:
• Main—On this tab, access these commonly used transaction tools and features:
• Find—Search for a specific invoice, or use the arrows to move backward or forward one record at a time.
• New, Save or Delete—Create a new transaction, save a transaction, or delete the currently displayed transaction.
• Create a Copy—Duplicate the currently displayed invoice.
• Memorize—Assign the displayed transaction to a list of memorized transactions. More information follows in this section.
• Mark as Pending or Mark as Final—When an invoice is marked as pending, it is considered nonposting and does not affect your Accounts Receivable balance or the accounts assigned to the items used. I recommend not using this method and instead using sales orders when you need to record a committed sale that you cannot fulfill at the time of the commitment.
• Print or Email (with option for Later)—Here you have options for providing the invoice to your customers. When you select the box for Print Later or Email Later, you can efficiently process these multiple transactions at one time.
• Attach File—This option gives you free document storage (local on your server or computer hard drive) of scanned documents, emails, and so on.
• Add Time/Costs—This is useful if you do Time and Expense Invoicing, discussed later in this section.
• Apply Credits—Click to apply open credits for the selected Customer or Job.
• Receive Payments—Record money in from your customer for this specific invoice.
• Create a Batch—Create a batch of invoices when the customers being invoiced all share the same invoice template, date, items, and rates. The section “Batch Invoicing,” later in this chapter, covers this more.
• Refund/Credit—Selecting this icon opens the Create Credit Memos/Refunds dialog box. If you click the icon when a saved invoice is displayed, QuickBooks creates a new Credit Memo with the same lines as on your original invoice.
• Online Pay—Learn about how you can sign up (no monthly fee) for taking online payments from your customers. Our company wouldn’t be without this service. If you are not presently accepting credit cards from your customers, let the author’s company provide you with a quote and any current giveaways for signing up for a merchant services account. Email the author at [email protected].
• Formatting—On this tab, you can access the following:
• Preview—View the invoice format as your customer would see it.
• Manage Templates—See a list of all the templates available with the currently opened QuickBooks file.
• Download Templates—Intuit offers many customized forms already; be sure to check this out! An Internet connection is required.
• Customize Data Layout—Settings here include ways to control what data displays and what data prints, along with many other useful settings.
• Spelling—Spell-check the currently displayed transaction. Customize your spell checker list by selecting Edit, Preferences, Spelling, and choosing the My Preferences tab.
• Insert Line—Insert a line directly above where your cursor is placed on the displayed transaction. A shortcut to this same task is available by pressing Ctrl+Insert on your keyboard.
• Delete Line—Delete the currently selected line. A shortcut to this same task is available by pressing Ctrl+Delete on your keyboard.
• Copy Line—Copy the selected line to the windows clipboard.
• Paste Line—Duplicate the line details in the clipboard to the currently selected line.
• Customize Design—You can customize multiple forms in just a few steps with self-service and paid-for service. Use this to create a new customized design or apply a saved design.
• Send/Ship—QuickBooks offers several options for managing distribution of your invoice to your customers, including the following:
• Email—Email a single invoice or a batch of invoices at one time.
• FedEx, UPS, USPS—Include options when working with these shipping vendors to send, find, schedule, track, and print postage on shipping labels or directly on envelopes (fees might apply).
• Mail Invoice—Use your own web mail account to send invoices by email. Sign up for Intuit QuickBooks Billing Solutions and send your customer an invoice with a tear-off remittance slip, as in Figure 9.38.
Figure 9.38. Using Intuit’s QuickBooks Billing Solutions; provide your customers with an invoice with a tear-off remittance slip.
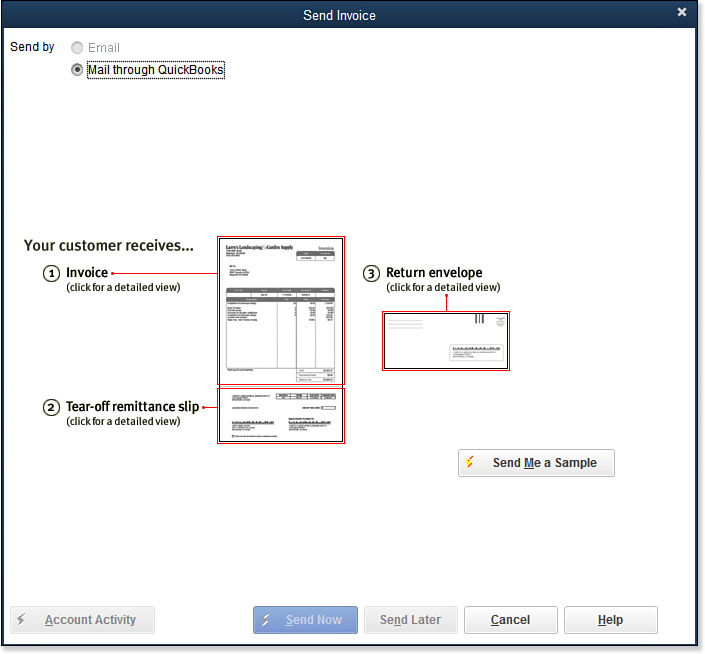
• Prepare Letter—Efficiently communicate with your customers by preparing letters directly from your QuickBooks file. Customize the letter templates to meet your business’s specific needs.
• Reports—Access these reports detailing the currently displayed transaction:
• Quick Report—Displays only if a Create Invoices transaction is open.
• Transaction History—Displays related transactions (if any). This information is also available on the Transaction tab to the right of the invoice details.
• Transaction Journal—Detailed report showing the behind-the-scenes transaction accounting.
• View Open Invoices—Listing by Customer and Job of all open invoices.
• Sales by Customer Detail—Detailed sales information by customer.
• Average Days to Pay Summary—Useful details about the length of time it takes for your customers to pay their balances.
You are now ready to create a basic invoice to provide to your customers.
Creating a Basic Invoice
QuickBooks makes it easy to prepare and send invoices to your customers. A basic invoice might contain a single line or many lines, depending on the nature of the products and services you provide.
Tip
When entering data, you can use common keyboard shortcuts to complete transactions. For this exercise, start typing Rice into the Customer:Job field—the customer Rice, Linda displays.
Without leaving the field, press the Alt key while you tap the down arrow key to navigate through the list from that point forward.
When you have the proper job selected, use the Tab key to advance to the next field.
To practice creating an invoice, open the sample data file as instructed in Chapter 1. You might also use these instructions if you are creating an invoice for your own customers:
1. On the Home page, click the Create Invoices icon. Depending on the sales and customer preferences you have enabled, you might have to select Create Invoices from the drop-down list next to the Invoices icon.
2. The Create Invoices transaction displays, as in Figure 9.39. Select the Rice, Linda:Repairs job.
Figure 9.39. Creating a basic invoice is simple using QuickBooks.
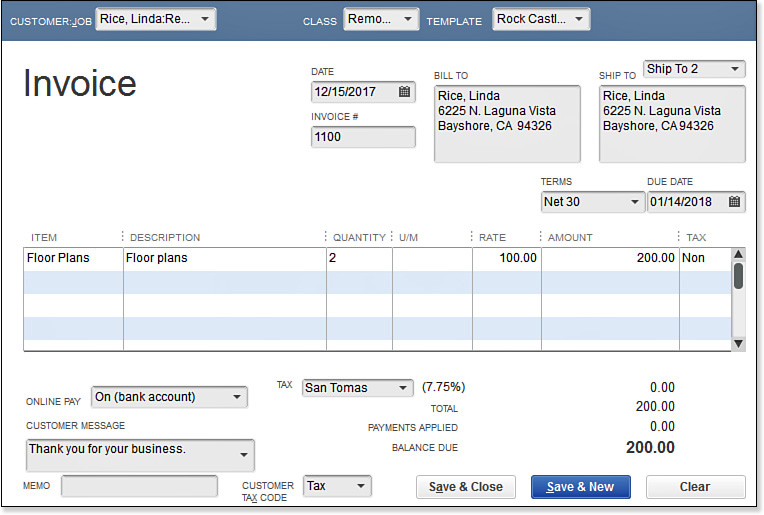
3. In the Class field, select Remodel.
4. Leave the prefilled Template, Date, Invoice #, Bill To, Ship To, Terms, and Due Date details. If you are working in your own data, optionally choose a different template.
5. Select the Floor Plans item in the Item column.
6. Accept the prefilled description.
7. In the Quantity field, type 2 and leave the U/M (Unit of Measure) field blank.
8. In the Rate field, type 100.00. QuickBooks did not include a rate because the item record did not have a value recorded in the Sales Price field of the stored item record. QuickBooks automatically calculates the row total. The item used, Floor Plans, is a nontaxable item (per the original setup of this item), even though the customer is taxable.
9. (Optional) Select to include a link on the invoice for your customer to pay online. Links include options for your customer to pay by Electronic Funds Transfer (EFT) only or to choose between paying by EFT or credit card.
10. (Optional) Select or create a new Customer Message that will display on the invoice for your customer.
11. (Optional) Type a Memo. This detail will be included in your reports and will not be included on the customer’s invoice.
12. Leave the Sales Tax item selected. This location is assigned to the original setup of your customer on the Sales Tax Settings tab of the customer (not job) record.
13. Leave the assigned Customer Tax Code; this is also set up with the customer’s record.
14. In the Print drop-down list, select Preview. (Optional) Click the Zoom In button to see more details.
15. Click Close to return to the Create Invoices dialog box.
16. Click Save & Close if you have completed this task, or click Save & New to practice creating another invoice.
Tip
New for QuickBooks 2014: conveniently add multiple attachments to your emails generated from within QuickBooks. From the ribbon toolbar or a displayed customer invoice select Email, Invoice and Attached Files. You can then browse to select the items you wish to attach.
Do you routinely add multiple items to your invoices? QuickBooks Enterprise Solutions 14.0 (all editions) includes the capability to select multiple items (see Figure 9.40) in one easy, searchable window.
Figure 9.40. QuickBooks Enterprise includes the capability to quickly add multiple items to an invoice.
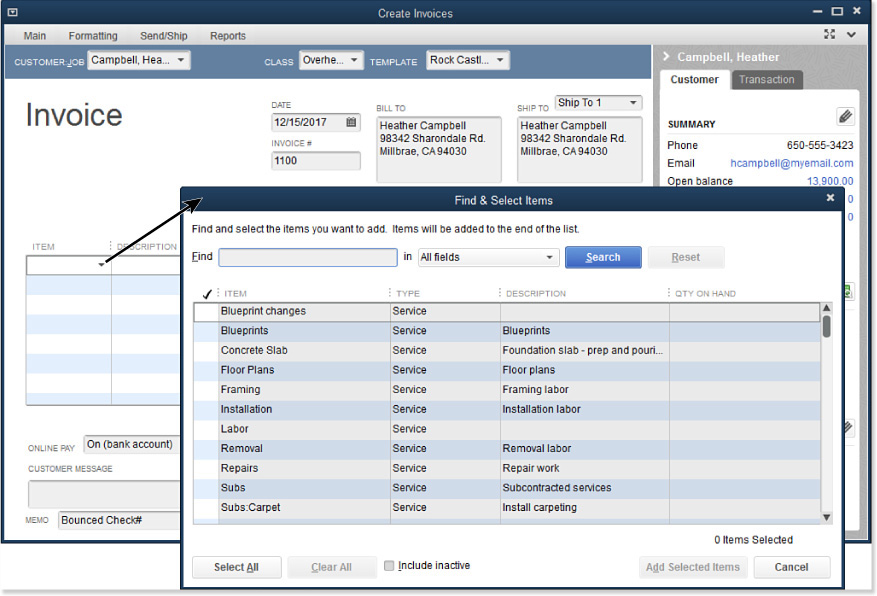
Batch Invoicing
Do you issue recurring invoices to a group of customers for the following?
• Same service or product item?
• Same price?
• Same billing frequency?
• Same invoice template?
Note
To successfully use Batch Invoicing, make sure that each customer or job has important information in your records, including Terms, Send Method, and Tax Status. These items are more difficult to change after processing a batch of invoices.
If you answered Yes to each of the above, you will save time invoicing using the QuickBooks Batch Invoicing feature.
Batch Invoicing involves three basic steps:
1. Creating your billing group involves naming the group and then assigning customers and/or jobs
2. Selecting the line items and rates for the batch invoices
3. Reviewing the list of invoices to be prepared
To practice using Batch Invoicing, open the sample data file as instructed in Chapter 1. You might also use these instructions if you are creating Batch Invoicing with your own data:
1. From the menu bar select, Customers, Create Batch Invoices.
2. If the warning message “Is Your Customer Info Set Up Correctly?” displays, read the information provided. Your success with using Batch Invoicing depends on how well your customer records are set up. The message refers to the following fields that should be defined for each customer before creating invoices using the Batch Invoicing feature:
• Customer payment terms
• Customer sales tax rates
• Customer and Job preferred send method
3. Click OK to dismiss the message for this practice.
4. The Batch Invoice dialog box displays. Click the Billing Group drop-down list (top right), and select Add New.
5. In the Group Name field, type Monthly and then click Save. Or, if you are creating a Billing Group in your own data, provide a name that is meaningful to your business. Click Save.
6. In the Search Results box, which displays all active jobs, select a few jobs of your choice. In this example, three jobs were selected, as Figure 9.41 shows. Notice you can search for a specific list of customers or choose Select All or Clear All for ease in setting up your Billing Group.
Figure 9.41. When creating a Billing Group, select the Customers or Customer:Jobs you want to issue a recurring invoice for.
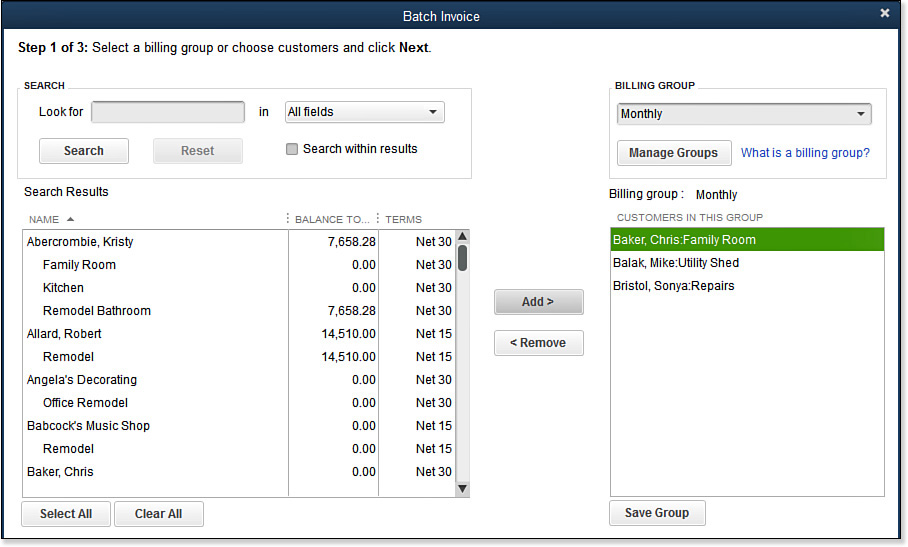
7. Click Save Group. You can return to this dialog box at any time to modify the list of customers or jobs included.
8. Click Next. “Step 2 of 3” displays, as in Figure 9.42. Leave the Rock Castle invoice template selected. If you are working in your own data, select the invoice template you want to use.
Figure 9.42. Batch invoices share the same item, description, quantity, rate, and tax status.
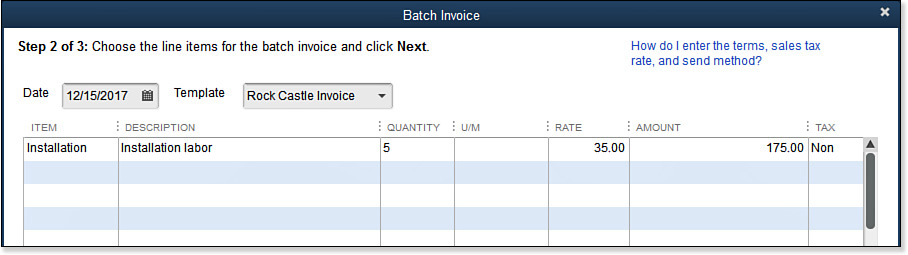
9. In the Item column, select Installation.
10. In the Quantity column, type 5.
11. Leave the U/M (Unit of Measure) blank.
12. Leave the prefilled rate of $35.00 that was originally stored with the item record. QuickBooks calculates the Amount field and assigns the Tax status recorded with the item record.
13. (Optional) Select or add a new Customer Message (not shown).
14. Click Next. “Step 3 of 3” displays, as in Figure 9.43. Unclick any customers or jobs you don’t want to invoice at this time.
Figure 9.43. Review the listed terms, the send method, and the tax settings before creating the invoices.
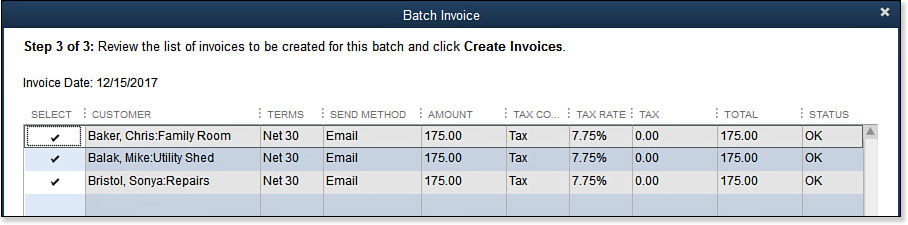
15. Click Create Invoices when you are ready. If any of the fields displayed are blank or show incorrect information, click Cancel. Update the corresponding customer records, and then return to the Batch Invoicing menu to complete the steps listed here.
16. After you click Create Invoices, the Batch Summary dialog box displays. Here you can print or email the newly created invoices. If you did not indicate a Preferred Send method in the Customer or Job record, the invoice is included in the unmarked total.
You might be asking, what if customers have different items or rates, but on a recurring basis? The next section details how to use Memorized Invoice transactions when Batch Invoicing doesn’t meet your specific needs.
Memorized Transaction Group
Memorized transactions offer a recurring invoice alternative to Batch Invoicing. With memorized transactions, you can assign different items or prices to each customer, yet still create a group of invoices all at once.
When working with a memorized group, you need to do the following:
1. Create a memorized group.
2. Define the frequency of the recurring transactions.
3. Assign memorized transactions to the group.
To practice using a Memorized Transaction Group of customer invoices, open the sample data file as instructed in Chapter 1. This practice builds on the exercise completed in the section titled “Basic Invoicing”:
1. From the menu bar, select Lists, Memorized Transaction List.
2. In the Memorized Transaction drop-down list, select New Group.
3. Type a group name. In this practice, type Monthly. See Figure 9.44.
Figure 9.44. Create the Memorized Transaction Group first.
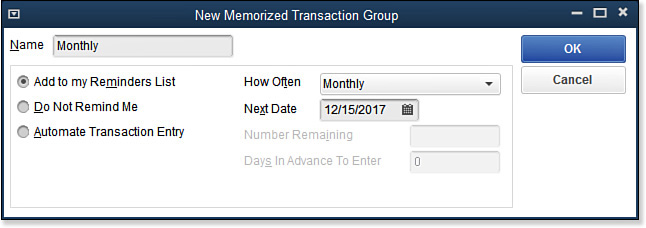
4. In the How Often drop-down list, choose Monthly.
5. For this exercise, you can accept the date that QuickBooks prefills in the Next Date field, or assign a different date if you are using your own data.
6. Click OK to close the New Memorized Transaction Group message. You return to the Memorized Transaction List, and your newly created Group name is in bold text. Next, you add a previously recorded invoice to your memorized group.
7. On the Home page, click the Create Invoices icon. Depending on the sales and customer preferences you have enabled, you might have to select Create Invoices from the drop-down list next to the Invoices icon.
8. At the top left, on the Main tab of the ribbon toolbar, click the arrow pointing to the left. A previously recorded invoice displays. Alternatively, create a new invoice from scratch.
9. From the Main tab of the ribbon toolbar, select Memorize Transaction.
10. In the Name field, type a descriptive name, such as the customer or job name on the invoice. When creating a memorized transaction (see Figure 9.45) in your own data file, type a name that will be helpful for you to identify the transaction in a group.
Figure 9.45. Click the Memorize icon on the Main tab of the ribbon toolbar to store a transaction for future recurring use.
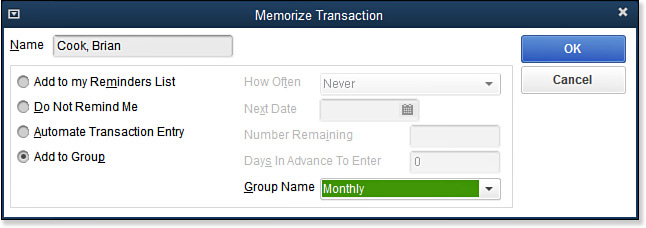
11. Click to select Add to Group, and then select your newly created group from the Group Name drop-down list.
12. Click OK.
13. Return to the Memorized Transaction List (see Figure 9.46) to see your memorized transaction now part of the memorized transaction group.
Figure 9.46. The Memorized Transaction Group name displays in bold text, with the transactions assigned to that group indented to the right.
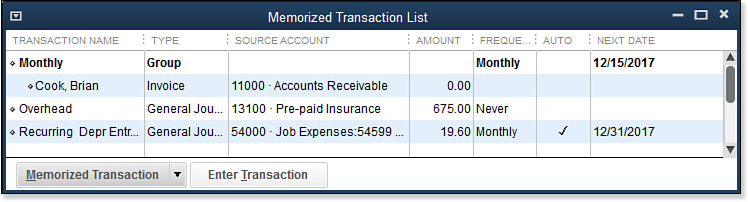
14. To process this recurring Memorized Transaction Group, double-click the group name, Monthly.
15. The Using Group dialog box displays, QuickBooks prefills the Date that will be assigned to each of the transactions in the group. Alternatively, choose another date.
16. Click OK. QuickBooks creates the transactions in the group. Click OK again to close the message indicating that the transactions in the group were entered. Review the tip on emailing these forms that follows these steps.
Tip
Do you need to print or email your newly created forms? Select File, Print Forms, or Send Forms and follow the instructions.
Note
Use your mouse cursor on the sides or corners of the Memorized Transaction list to expand the information, or click the top-right box (next to the X) to expand the list contents.
You have learned several easy techniques for invoicing your customers: how to create and send a basic invoice, use the batch invoicing feature, and memorize recurring invoices. Let’s get a little more complex with the next invoice method, named Progress Invoicing. This type of invoice is often used in the construction industry or any industry that invoices customers based on % (or $) completion of the work contracted.
Progress Invoicing
The progress invoicing feature enables you to generate multiple invoices from a single estimate. To use progress invoicing, you must first enable the preference on the Jobs & Estimates—Company Preferences tab of the Preferences dialog box. (You must log in to the file as the Admin or External Accountant User type.)
Certain industries you do business with might require the work performed or products being made to be invoiced in stages of completion. This method of invoicing is often referred to as percentage of completion. Conversely, you would not need to use progress invoicing when you present a single invoice at the point of delivery or project completion.
To practice creating a progress invoice for a customer, open the sample data file as instructed in Chapter 1. If you are working in your own data, the Company Preferences for progress invoicing must be enabled on the Jobs & Estimates—Company Preferences tab of the Preferences dialog box.
This practice exercise continues with the estimate created earlier:
1. On the Home page, click the Create Invoices icon. Depending on the sales and customer preferences you have enabled, you might have to select from the drop-down list next to the Invoices, Create Invoices icon. The name of the icon may differ if you have not enabled Time and Expense invoicing as discussed on p. xxx.
2. In the Customer:Job drop-down list, select the Allard, Robert:Remodel customer.
3. In the Available Estimates dialog box, select the estimate. The selected row is shaded, as in Figure 9.47.
Figure 9.47. Select the Estimate you want to use for creating the progress invoice.
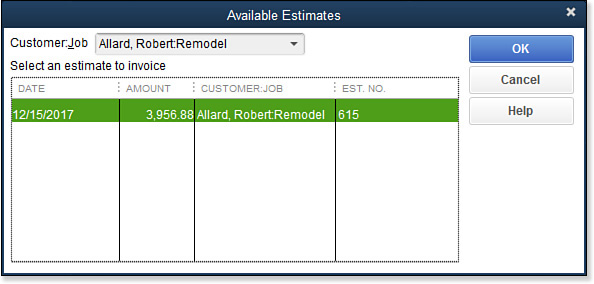
4. Click OK, and QuickBooks displays a Create Progress Invoice Based on Estimate message.
5. For this exercise, select Create Invoice for Selected Items or for Different Percentages of Each Item, and then click OK. You might also want to familiarize yourself with the other options. See Figure 9.48. Click OK.
Figure 9.48. When Progress Invoicing is enabled, you can choose from these options when creating an invoice.
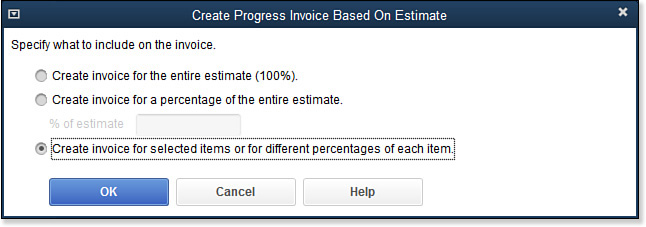
6. QuickBooks opens the Specify Invoice Amounts for Items on Estimate dialog box.
7. Toggle the Show Quantity and Rate and Show Percentage options to see how the displayed view changes.
8. In the Qty column for Installation, type 7. In the same column for Flooring, type .50 (invoicing for 50% of the materials). Figure 9.49 displays the result of entering these values.
Figure 9.49. Enter either a Qty or a percentage in the Curr % column to add line items to the customer’s progress invoice.

9. Review the dollar total by row displayed in the Amount column.
10. When you click OK, QuickBooks adds the items to your invoice.
11. From the top-right corner of the invoice, in the Template drop-down list (see Figure 9.50), select the Progress Invoice template.
Figure 9.50. The Progress Invoice template includes columns for Estimate Amount and Prior Percentage invoiced.
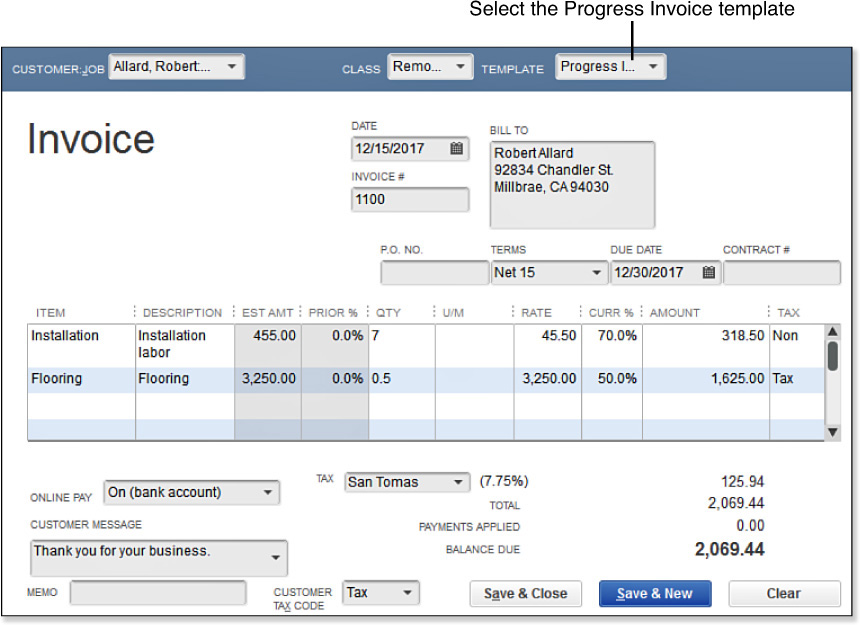
12. For this exercise, click Save & New to practice creating a second invoice. A blank Create Invoice dialog box displays.
13. Repeat the preceding steps 2–4.
14. On the Create Progress Invoice Based on Estimate dialog box, select Create an Invoice for Selected Items or for Different Percentages of Each Item (see Figure 9.48). Click OK.
15. QuickBooks prepares the transaction. Click Save on the Main tab of the ribbon. The transaction remains displayed.
16. In the Main tab on the ribbon toolbar, click the Print, Preview option to see the completed invoice.
17. Click Close to return to the Create Invoices dialog box. Click Save & Close.
Caution
Are you tracking inventory in your QuickBooks data file? Be careful to progressively bill only whole increments of inventory part items, such as 3 wheels, instead of 2.5 wheels.
If instead you are trying to create a printable document to record a customer’s deposit or prepayment, use the instructions in Chapter 10, “Managing Customers” in the section “Unique Customer Transactions.”
With progress invoicing, your customers can see the percentage of the quoted contract that they are being invoiced for. The next method, time and expense invoicing, often referred to as cost plus invoicing, meets the needs of customers for whom you quote a fixed markup over your costs.
Time and Expense Invoicing
Time and expense invoicing enables you to charge your customers the costs you incur on their behalf plus an agreed-upon markup (to cover overhead costs and profit).
The time and expenses feature is available in QuickBooks Pro, Premier (all editions), Accountant, and QuickBooks Enterprise Solutions (all editions). You can enable this feature on the Time & Expenses—Company Preferences tab of the Preferences dialog box.
Before you begin creating a time and expense invoice, you must have billable charges for your customer. The Write Checks, Enter Bills, Credit Card Charges and Make General Journal Entries transactions can all have costs selected as billable, as in Figure 9.51.
Figure 9.51. When creating a customer- or job-related expense, place a checkmark in the Billable column if you need to add the charge to a future customer invoice.
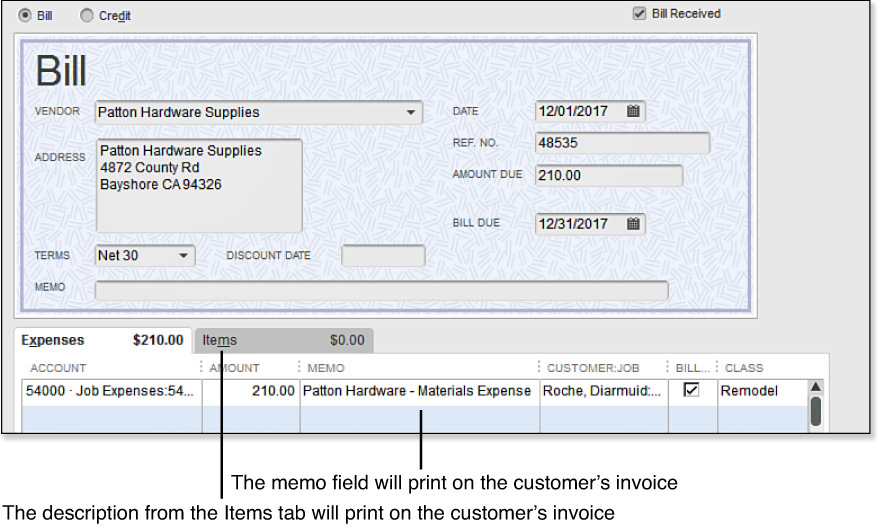
Optionally, you can set a preference that defaults all time or all expense entries as billable to your customers when a customer or job is assigned to the transaction line. On the menu bar, select Edit, Preferences, Time & Expenses and select the Company Preferences tab.
Note
It is not necessary to remove (or add) the checkmark in the Billable column if you are not providing your customers a Time and Expense type of invoice.
You can review the costs marked as billable by selecting Reports, Jobs, Time & Mileage, Unbilled Costs by Job from the menu bar.
To practice creating a time and expense invoice, open the sample data file as instructed in Chapter 1. You might also use these instructions if you are creating a time and expense invoice for your own customers:
1. Review the preference setting for working with Time and Expense invoicing. On the menu bar, select Edit, Preferences, Time & Expenses (at the end of the list) and select the Company Preferences tab. You must be logged in to the file as the Admin or External Accountant user type.
→ For more information on selecting the proper preference setting, see “Time & Expenses,” p. xxx.
2. Click OK to close the Time & Expenses Preferences dialog box.
3. On the Home page, in the drop-down list next to the Invoices icon, select Invoice for Time & Expenses. A message about this improved feature might display. Read and optionally select the Do Not Display This Message in the Future checkbox. Click OK to close the message.
4. The Invoice for Time & Expenses dialog box displays. Select a Date Range. For this practice exercise, accept the prefilled To Date of 12/15/201x. Figure 9.52 shows the date of 12/15/17.
Figure 9.52. Invoice multiple customers more efficiently after enabling the preference to create invoices from a list of time and expenses.

5. In the sample company, select the Rock Castle Invoice template, or select a template from your data that suits your needs.
6. (Optional) Click any header column to sort the list by the selected column. For example, clicking the Total column sorts the list in ascending or descending order of the amount to be invoiced.
7. For this exercise, place a checkmark next to Abercrombie, Kristy:Family Room. In your own file, you could select multiple customers at once, if desired.
8. Select the Let Me Select Specific Billables for This Customer:Job checkbox at the bottom of the dialog box.
9. Click Create Invoice. QuickBooks displays the Choose Billable Time and Costs dialog box. From here, you can view expenses marked as billable from the following tabs:
• Time—This is employees’ time from paychecks; click the Options button to see choices for transferring employee time to the customer’s invoice. Click OK to return to the Choose Billable Time and Costs dialog box.
• Expenses—These are costs from the Expense tab of a write check, vendor bill, credit card charge, or journal entry.
• Mileage—These costs are recorded using the menu Company, Enter Vehicle Mileage.
• Items—These are costs from the Items tab of a write check, credit card charge or vendor bill.
10. From the Time tab, place a checkmark in the first column next to the time entry for Gregg O. Schneider. Or optionally, click Select All for this practice. In your own data, you can choose which costs you want to include on the customer’s invoice. If you will not be invoicing the client for any of the displayed costs, review the caution that follows these instructions.
11. When you click OK, QuickBooks transfers the charges you selected to the invoice. The Description on the invoice defaults from the item record or the memo field included in most expense transactions (see Figure 9.51, earlier).
12. Click Save & Close. QuickBooks replaces the Billable checkmark on the originating expenses transactions with an invoice icon. This indicates that the cost has been included on a customer invoice.
Note
The Choose Billable Time and Costs dialog box enables you to review the expenses invoiced to your customer. You can click any column header to sort by that field. When sorted, the invoice lines will be in the same order as the sort. You can also click the Hide column at the right of a charge to indicate that you won’t be invoicing the customer for certain charges.
Choosing to Hide an expense does not remove the expense from your own records; instead, it excludes the expense from this or future Time and Expense invoices.
Do you invoice your customers for the services of vendors or employees? If necessary, you can create billing rate levels (see Figure 9.53) that you associate with your vendors and/or employees. In turn, QuickBooks applies the proper billing rate when you add expenses marked as billable (refer to Figure 9.51) to an invoice. The billing rate feature is available only in QuickBooks Premier and QuickBooks Enterprise editions.
Figure 9.53. Billing Rate Levels are assigned to vendors, customers, and other name lists. They default the sales price for a person when time is tracked to specific service items.
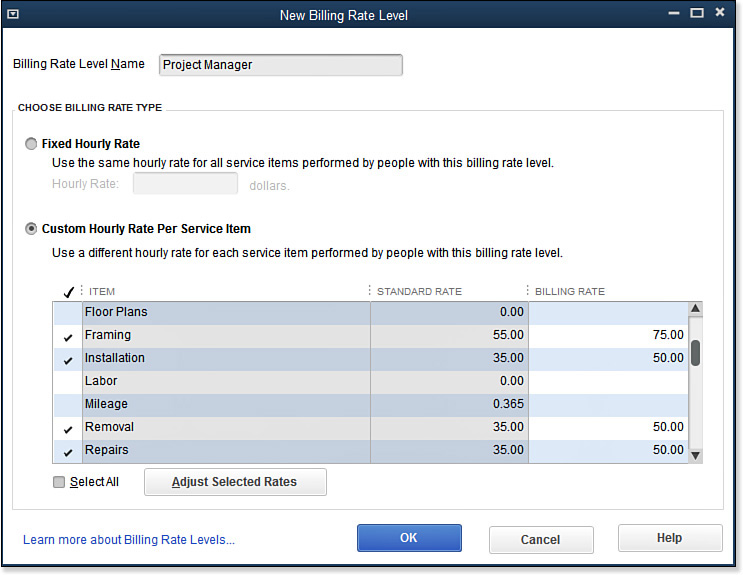
To use billing rates, follow these steps:
1. Create your service items. See Chapter 4 for more details.
2. Create your billing rate levels. From the menu bar, select Lists, Billing Rate Level List and follow the prompts.
3. Assign each billing rate level to vendors, employees, or other names, as needed.
4. Invoice your customers using Add Time/Costs. QuickBooks uses the corresponding billing rate you have assigned.
Use time and expense invoicing when you are permitted to add a markup to job expenses.
Recording a Sales Receipt
Use a QuickBooks Sales Receipt when you are recording a sale and taking payment at the time of sale, commonly referred to as Cash on Delivery, or COD. Recording a sales receipt does not increase Accounts Receivable because you are receiving payment at the time of sale.
You can add QuickBooks Sales Receipts or remove them from the Home page in the Desktop View—Company Preferences tab of the Preferences dialog box. To change this preference, you need to log in to the file as the Admin or External Accountant User.
Sales receipts are a perfect choice for a company that does not offer terms to its customers. Some retail establishments might summarize the day’s cash register tally into a sales receipt for a generic customer named Daily Sales.
To practice creating a sales receipt, open the sample data file as instructed in Chapter 1. You might also use these instructions if you are creating a sales receipt in your own data:
1. On the Home page, click the Create Sales Receipts icon. The Enter Sales Receipts dialog box displays, as in Figure 9.54.
Figure 9.54. Enter sales receipts when payment is collected at the time of sale.
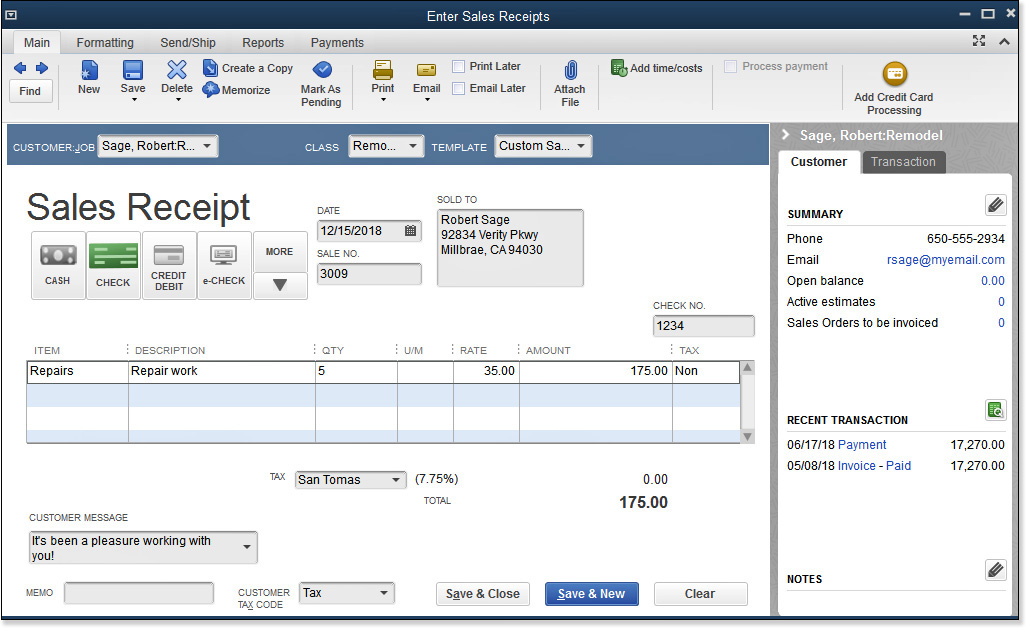
2. In the Customer:Job drop-down list, select Sage, Robert:Remodel job.
3. In the Class field, select Remodel.
4. For this exercise, leave the Template, Date, and Sale No. as prefilled by QuickBooks.
5. Select the Check icon as the payment type. Type 1234 in the Check No. box.
6. In the Item column, select Repairs.
7. Using the Tab key on your keyboard, advance to the Qty field and type 5. QuickBooks prefills the Amount column. Accept the defaulted Tax column data. This tax assignment is assigned to the Repairs item setup.
8. (Optional) Select a Customer Message.
9. For this exercise, click Save on the Main tab of the transaction ribbon. In the Print drop-down list on the Main tab of the ribbon, you can preview, print, or choose from other useful commands.
10. Click Save & Close to complete the Sales Receipt, or click Save & New to practice creating another sales receipt transaction.
You might be asking, where did the money that you just recorded go in your accounting records? First, review your Payments preference, as discussed earlier in this chapter; then learn how to add these payments to a bank deposit in the section “Making the Bank Deposit.”
Recording a Statement Charge
Statement charges are useful if you want to accumulate charges before requesting payment, or if you assess a regular monthly charge to your customer. Use statement charges when you are not going to be providing the customer with an invoice, but instead will provide the customer with a periodic statement.
Recording statement charges one customer at a time can be time-consuming. If this charge is recurring, consider adding the transactions to a Memorized Transaction Group discussed previously.
To practice recording a statement charge, open the sample data file as instructed in Chapter 1:
1. On the Home page, click the Statement Charges icon.
2. In the Customer:Job drop-down list, select the Babcock’s Music Shop:Remodel job. See Figure 9.55.
Figure 9.55. Use statement charges for a customer or job when you are not providing an invoice for the charges.
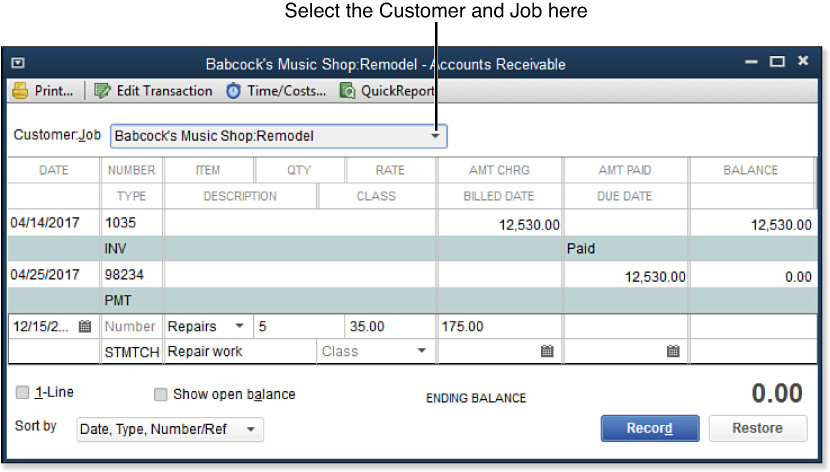
3. For this exercise, place your cursor in the next available row and accept the prefilled date. The selected customer’s Accounts Receivable register displays.
4. Leave the Number field blank. In the Item field, type Repairs.
5. In the Qty field, type 5.
6. In the Class field, type Remodel.
7. Click Record to save the charge on the customer’s register. Repeat steps 2–7 as needed to add more statement charges.
Recording the Customer Payment
Sales Receipts record your customer’s payment at the time of the sale. However, many businesses issue invoices or statement charges and expect the customer to remit payment within an agreed-upon number of days.
Note
Does your company accept credit card payments from your customers? Although a discount fee is charged, the benefit of possibly getting paid more quickly might outweigh the costs.
Intuit offers a Merchant Service that permits your customers to pay online by check or credit card. You can learn more by clicking the Add Credit Card Processing on the Main tab of the ribbon toolbar on certain transactions. If you would like to receive our discounted rates and receive our current credit card processing promotions, contact the author at [email protected].
When your customer pays an amount that is due in full or in part, you record a receive payment transaction.
When a customer payment is posted to your bank account depends on your payment preference settings.
Access information about the many online customer payment methods that work with your QuickBooks file at http://payments.intuit.com/products/quickbooks-payment-solutions/quickbooks-online-billing.jsp.
To review your current payment settings, choose Edit, Preferences from the menu bar and select the Payments preference, Company Preferences tab. You need to be logged in to the file as the Admin or External Accountant User type. See Figure 9.56.
Figure 9.56. The Company Preferences for Receive Payments determines how QuickBooks records money received from customers.
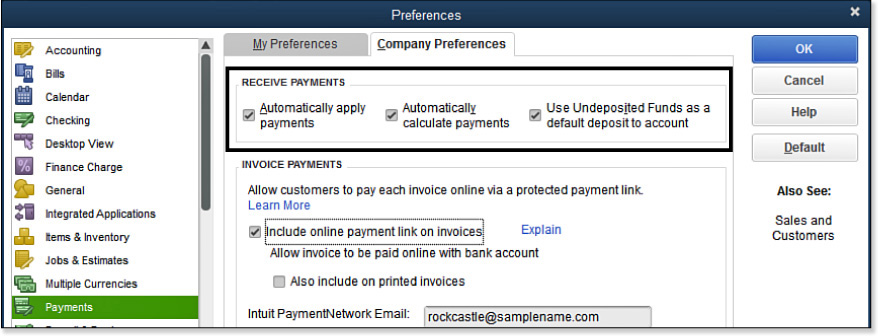
Access these additional features from the following tabs on the ribbon toolbar located at the top of the Receive Payments transaction.
• Main—Access common payment actions from the following tabs:
• Find—Click Find to open the Simple and Advanced find dialog box. Or click the arrows to move forward and backward through previously recorded transactions.
Tip
Often a customer will send in a payment but will not indicate on the payment what invoice he or she is paying for.
On the Main tab of the ribbon toolbar for searching selected fields, click the Look Up Customer/Invoice icon.
From the displayed results, select any of the matches and click the Use Selected Customer or Transaction.
• New, Delete—Complete the selected task for the currently displayed transaction.
• Print/Email—Print or email a payment receipt.
• Attach File—Take advantage of free document storage (local on your server or computer hard drive) of scanned documents, emails, and so on.
• Look Up Customer/Invoice—Find a customer or specific invoice.
• Un-Apply/Auto Apply Payment—Clear the payment details in the grid or automatically apply the payment.
• Discounts and Credits—Open the Discount and Credit dialog box. The next section has more details.
• Record Bounced Check—Assists when you need to record a check that is returned for insufficient funds.
• Process Payment—When selected and the transaction is saved, automatically begins the process to approve the payment by credit card or ACH.
• Add Credit Card Processing—Select this to learn about Intuit Merchant Service for QuickBooks.
• Reports—Access commonly used reports, including a Processed Payment Receipt and an Open Invoices report.
• Payments—Link to adding credit card processing or accepting eCheck processing. Get paid faster!
This Receive Payments transaction reduces the balance your customer owes you and increases the balance in your Undeposited Funds account. In the next section, you learn how to add this and other monies received to complete the deposit transaction in QuickBooks.
To practice recording a customer payment, open the sample data file as instructed in Chapter 1:
1. On the Home page (see Figure 9.1), click the Receive Payments icon.
2. The Receive Payments dialog box displays.
3. From the Received From drop-down list, select Melton Johnny:Dental office.
4. In the Amount field, type 5,000.00.
5. Select the Credit Debit icon. See Figure 9.57. The Save Credit & Debit Card Information dialog box displays.
Figure 9.57. Record a Receive Payments transaction when a customer remits funds to you.
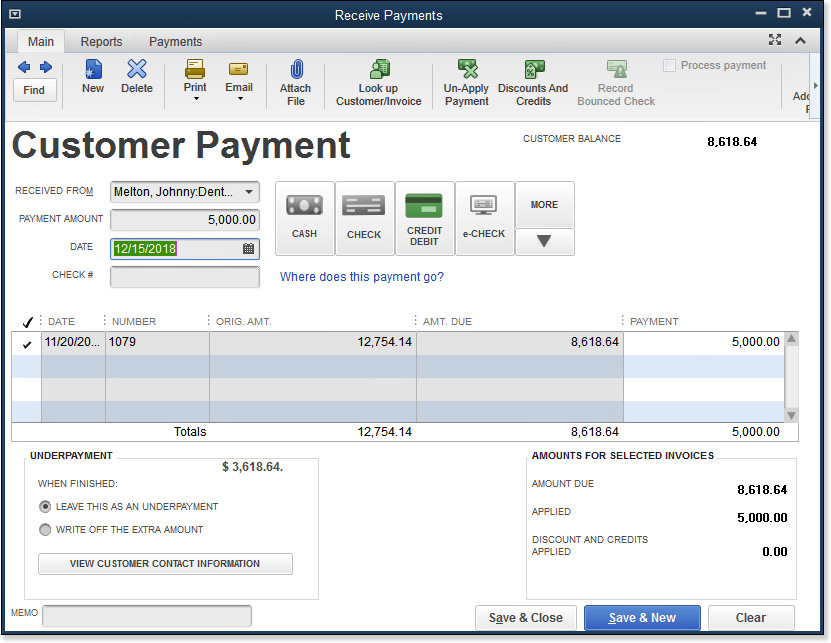
6. Select the proper payment type, and enter the credit card number and expiration date if you will be processing the payment using one of Intuit’s Merchant Payment solutions. Click Done to return to the Receive Payments window.
7. If you selected the preference Automatically Apply Payments, QuickBooks first tries to match the payment with an invoice for the same amount. If a match is not found, the oldest invoice is marked as paid, moving then to each succeeding invoice until the payment is fully applied.
8. For this practice, QuickBooks displays an underpayment message, as well as a link to View Customer Contact Information. Accept the default choice of Leave This as an Underpayment.
9. Click Save & Close to complete this exercise, or click Save & New to practice adding more customer payments.
Making the Bank Deposit
When receiving payments from your customers, you record the payments and then physically store the checks or cash received in a safe place until you can go to the bank.
Depending on the preferences you set, QuickBooks uses an account titled Undeposited Funds to hold payments received but not yet included on a bank deposit ticket.
The Undeposited Funds account also plays an important role in making the bank reconciliation process easier and more accurate. If you list multiple customer payments on one deposit ticket taken to the bank, you need to match this deposit ticket total to the deposit transaction recorded in QuickBooks. By setting the preference to have QuickBooks forward all your customer payments into a temporary Undeposited Funds account (see Figure 9.56), you can group these individual payments in QuickBooks using the Make Deposits transaction. The deposits in your bank account register will now match the deposit amounts on your bank statement.
Check and Cash Payment Deposits
Creating a bank deposit for your cash and check payments correctly is one of the important tasks necessary to properly track the balance of funds you have in your bank account.
To practice making a deposit, open the sample data file as instructed in Chapter 1:
1. On the Home page, click the Record Deposits icon.
2. Using the sample data for practice, the Payments to Deposit dialog box displays a listing of payments received that have not yet been recorded as a deposit into the bank account. When you are working in your data, if this message does not display, you do not have any payments that were recorded to the Undeposited Funds account.
3. From the View Payment Method Type drop-down list, select Cash and Check. This step is optional, but it helps to group the payments by the type of deposit.
4. Click the Select All button to place a checkmark next to each of the amounts listed. See Figure 9.58. Your total might differ if you did not complete the exercise in the previous section.
Figure 9.58. You can filter the Payments to Deposit for specific payment types, helping you group the payments to agree with your bank’s deposit records.
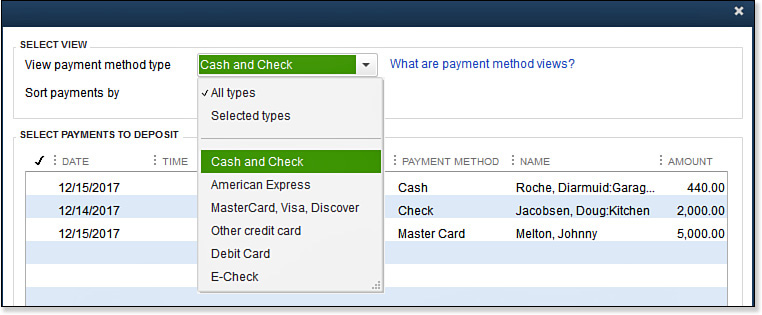
5. Compare your deposit ticket total to the payments subtotal on the Payments to Deposit dialog box. See Figure 9.59.
Figure 9.59. Place a checkmark next to each payment item on your deposit ticket.
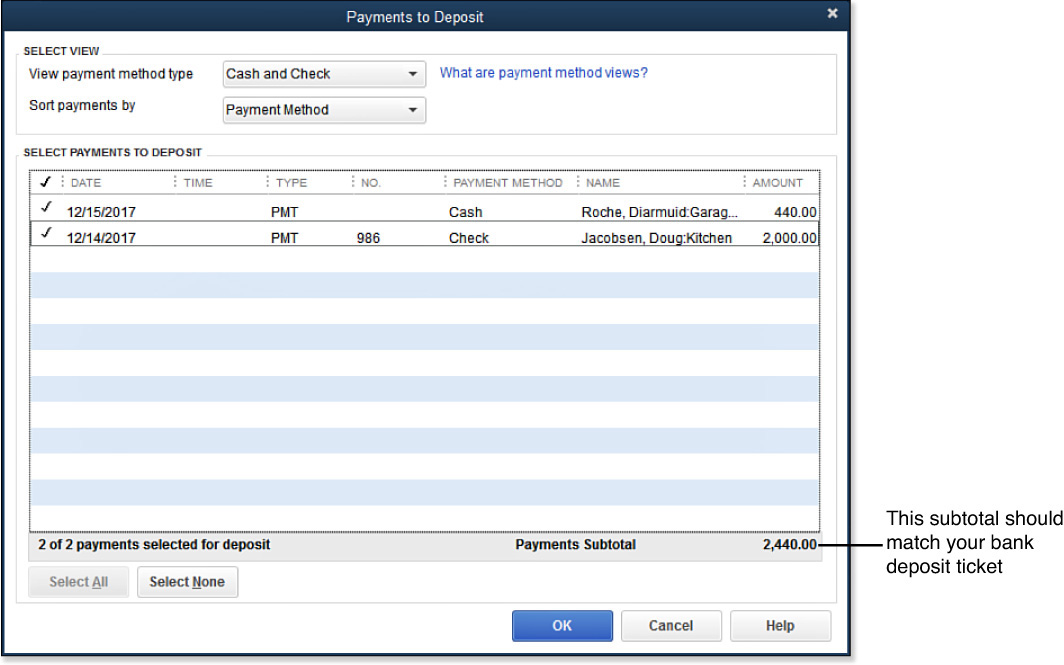
6. When you click OK, QuickBooks adds the selected payments to the Make Deposits dialog box.
7. Confirm that the Deposit To account is correct, and select the Date your bank will credit your account with the funds. Details in the Memo field will display in reports.
8. From the Print drop-down list, select to print a deposit slip (preprinted forms are necessary) or print a deposit summary for your file. See Figure 9.60.
Figure 9.60. Using the Make Deposits dialog box is the final step in recording customer payments.
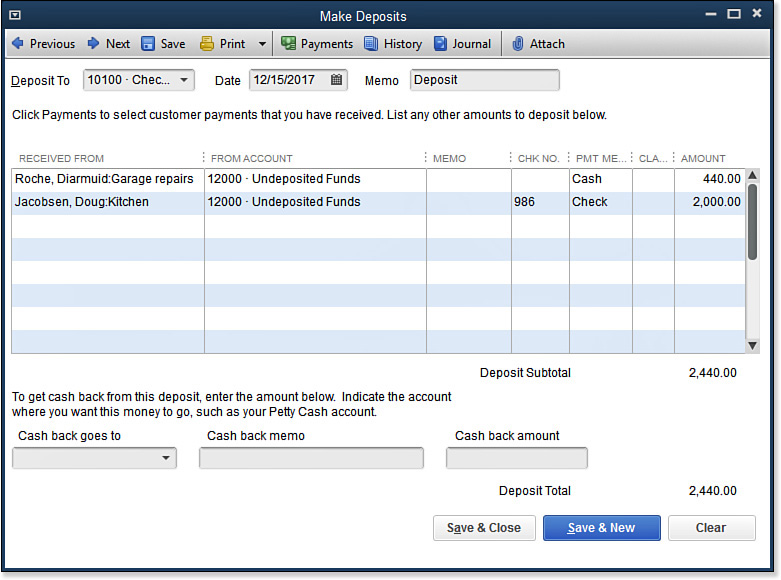
9. Click Save & Close to complete the task, or click Save & New to record another bank deposit.
It’s really that simple! Create an invoice, receive the customer’s payment, and make the deposit into your bank account records. Next, we look at another kind of deposit: when your customer pays you by credit card.
Recording Credit Card Deposits Less a Discount Fee
If you collect credit card payments from your customers, consistently following the process of receiving payments and making deposits is important. Because you don’t physically hold the payment from your customer as you do with cash or check payments, tracking these credit card payments accurately and reconciling with the bank’s monthly statement helps you avoid some common mistakes.
When your business accepts credit card payments from your customers, your merchant account vendor charges you, the seller, a discount fee. Your credit card processor might charge the fee at the time of the deposit, at the end of the billing cycle, or a combination of both.
If you are charged a fee at the end of the month, you can enter the fee into your checkbook register in QuickBooks or create a journal entry with a debit to your credit card expense account and a credit to your bank account.
What if your merchant vendor reduces the amount of your customer’s payment credited to your bank account? To help you keep accurate records, follow these steps:
Tip
I teach my clients to leave credit card deposits in the QuickBooks Undeposited Funds account until they know the exact amount and date that money was deposited to their bank.
1. Follow the instructions in the section titled “Recording the Customer Payment,” p. xxx.
2. Confirm the amount of the deposit made to your bank from your credit card merchant. If you have online access to your bank institution, you can find this information without having to wait for the monthly bank statement.
3. On the Payments to Deposit dialog box, select the credit card payments that were included in the batch transmitted to your bank account. Does your business receive many payments by credit card? Having a printout of the batch details from your merchant vendor can be helpful.
4. Click OK. QuickBooks includes these credit card payments on a Make Deposits transaction.
5. On the next available line, in the From Account column, enter your credit card discount fees expense account. See Figure 9.61.
Figure 9.61. Record discount fees as part of your credit card deposit.
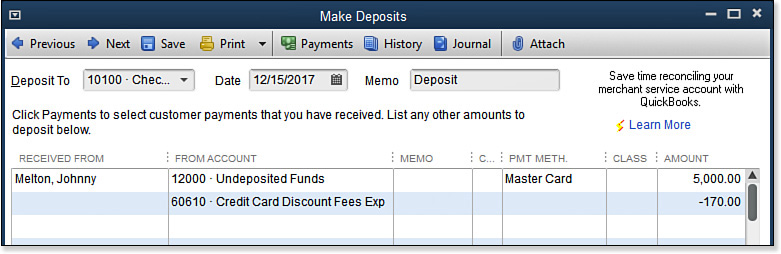
6. In the Amount column, enter a negative amount equal to the fee charged.
7. Confirm that the deposit total on the Make Deposits transaction agrees with the exact amount credited to your bank account by the merchant. Click Save & Close if you are done. Click Save & New to record another deposit.
Timely recording of credit card deposits in agreement with your bank’s deposit records will help your business better manage the monies received in your bank account.
Recording and Applying a Customer Credit Memo
Use the Create Credit Memos/Refund transaction when a customer returns a product or you want to reduce the amount a customer owes you and then either give a refund or maintain the credit toward a future purchase.
To practice refunding an overpayment with a check, open the sample data file as instructed in Chapter 1:
1. On the Home page, click the Customers button to open the Customer Center.
2. For this exercise, scroll through the Customers & Jobs list and select the Hendro Riyadi:Remodel Kitchen job.
3. Double-click the invoice listed on the right.
4. From Main tab on the ribbon toolbar, select Refund/Credit (see Figure 9.62). QuickBooks duplicates the details from the original invoice to a new Create Credit Memos/Refunds transaction.
Figure 9.62. QuickBooks duplicates the invoice lines and creates a credit memo.
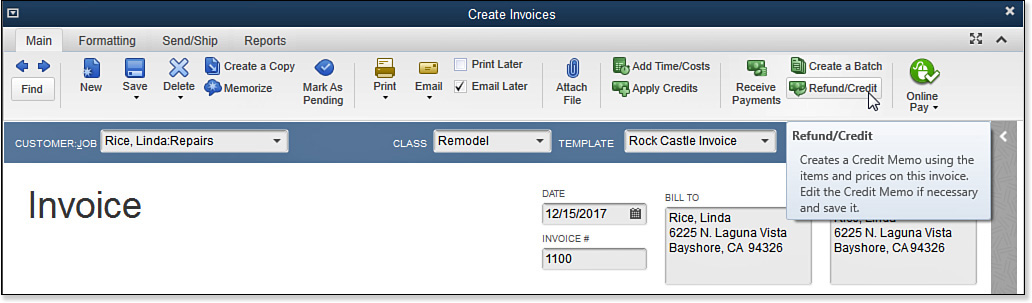
5. Review the lines included on the newly created credit memo. When working in your own data, remove individual lines as needed to agree with the products returned or services to be credited.
6. Click Save & Close. QuickBooks displays the Available Credit message.
7. Select the option to Apply to an Invoice, as in Figure 9.63.
Figure 9.63. Choose how you will record the available credit in QuickBooks.
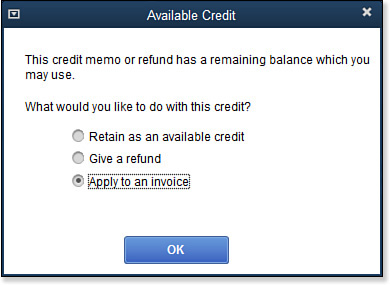
8. QuickBooks displays the Apply Credit to Invoices dialog box. From here, you can change which invoice or how much of the credit is applied. For this exercise, leave the transaction as shown in Figure 9.64.
Figure 9.64. Make sure your records for applying the credit agree with your customer’s records.
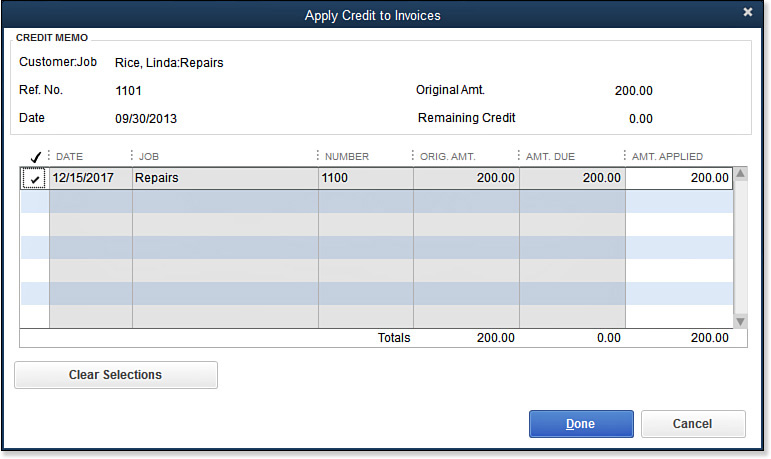
9. Click Done.
10. QuickBooks returns to the Create Invoices dialog box. In this practice exercise, a paid stamp displays on the invoice. Click Save & Close to complete the activity, or click Save & New to create another credit memo.
Tip
To efficiently remove lines on a newly created transaction, with your cursor, select a row and press Ctrl+Delete on your keyboard to remove an entire line one at a time.
Refunding a Customer’s Overpayment
Has your company received an overpayment from a customer? Although it is rare during difficult economic times, knowing how to handle the transaction can help keep your financial records correct and your customer happy.
When you receive an overpayment, you can leave the overpayment in your books and apply it to future invoices, similar to the process for applying credit memos to open invoices.
However, your customer might request that you refund the overpayment.
To practice refunding an overpayment with a check, open the sample data file as instructed in Chapter 1:
1. Record an overpayment in this sample file you are using. On the Home page, click the Receive Payments icon.
2. In the Received From drop-down list, select the Robson, Darci:Robson Clinic job.
3. The customer balance displays on the Receive Payments dialog box. In the Amount field, type 12,500.00. Leave the other fields as they default.
4. QuickBooks displays a message in the lower left about the overpayment. Select Refund the Amount to the Customer.
5. (Optional) Click the View Customer Contact Information to edit the customer’s address that will print on the check. Click OK to return to the Customer Payment transaction.
6. Click Save & Close.
7. QuickBooks opens the Issue a Refund dialog box, shown in Figure 9.65. In the Issue This Refund Via drop-down list, select Check.
Figure 9.65. Be sure to specify a method when you issue a customer refund.
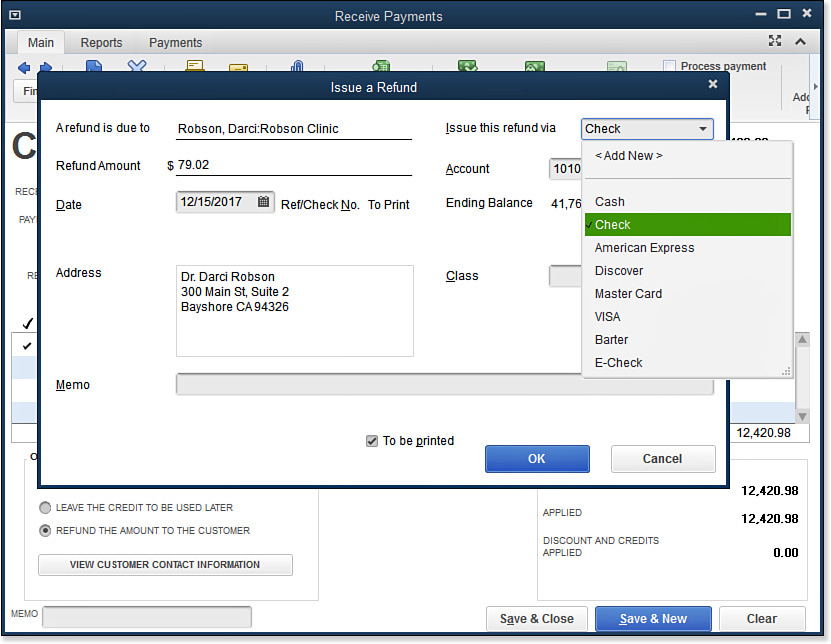
8. Leave the prefilled bank account as is.
9. (Optional) Enter a Class and Memo.
10. Check or remove the checkmark from the To Be Printed checkbox.
11. Click OK.
12. To print the check, from the menu bar, select File, Print Forms, Print Checks, and enter the check number you are placing in your printer.
13. You can also modify the To Be Printed status of a transaction in the Number/Type field in the bank register by selecting Banking, Use Register from the menu bar.
If you did not apply the credit when you first created it, you can later process the credit as a refund or apply it to an open invoice by selecting the Credit To drop-down list from the Create Credit Memos/Refunds dialog box.
Congratulations on reviewing one of the most important chapters, properly working with customer transactions in QuickBooks. Make sure you also review the next chapter, to learn how to be manage these transactions.