3. Accounting 101
In this chapter, you find a brief discussion of fundamental accounting principles for the non-accountant business owner. If you used another method or software for tracking your financials prior to QuickBooks, you can follow step-by-step instructions in this chapter for entering these beginning balances.
Basic Principles of Accounting
This chapter provides a quick review of some of the more important accounting concepts, written especially for the non-accountant business owner. Although there is much more to learn about accounting principles than this chapter covers, you learn enough to help you manage the financials of your business.
You made an important choice when you selected QuickBooks software to help you track the day-to-day financial transactions of your business. QuickBooks completes most of the accounting behind-the-scenes so you can focus on what you do best.
The Matching Principle
The matching principle of accounting refers to recognizing revenue and associated expenses in the same period. Matching income and costs in this manner gives you a much more accurate representation of your financial situation and performance.
Most businesses offer products or services that have related costs, such as the following:
• Asset purchases—Examples are inventory for sale and fixed assets (equipment) used in the production of your product.
• Cost of Goods Sold expenses—Direct expenses incurred when making your product or providing a service. Examples are cost of materials and labor expenses.
Note
This book does not offer tax or accounting advice. Be sure to consult your accounting professional when necessary.
Note
Inventory that you purchase is an asset purchase; it later becomes a cost of goods sold expense when you sell it.
• Expenses—Overhead that has fixed costs and variable expenses, such as rent, office supplies, advertising, and so on.
• Other expenses—Expenses of the business not related to the product or service you provide, such as interest expense or depreciation expense.
It is important to understand the different account types when recording costs so that you categorize your bills or expenses correctly when entering them into QuickBooks.
→ For more information, see “Account Types,” found in Chapter 4, “Understanding QuickBooks Lists,” p. xxx.
No discussion of the matching principle is complete without defining revenue. Revenue (income) is the funds received from customers. Income is typically one of the following:
• Operating income—Income derived from selling your business’s product or service.
• Other income—Income derived from sources other than selling your product or service. An example of other income might be interest earned on balances in your checking account.
You probably already understand the general concept of revenue versus expense. So what does the matching principle have to do with accounting? A retail bike store might keep parts such as wheels, pedals, and chains on hand in its inventory so it can assemble bicycles for its customers. The matching principle requires this store to record the costs of the bike at the time of sale. The initial purchase of inventory is not an expense; it is simply trading one asset, cash, for another asset, inventory. When the asset is sold, the initial purchase cost becomes an expense, which reduces the resulting revenue.
Inventory management, as discussed in this example, is pretty straightforward. QuickBooks tracks your initial purchase as an asset and then records the average cost of each part as an expense when you create an invoice to record the sale to a customer. If you are using QuickBooks Enterprise Solutions, you can opt to use First-In, First-Out inventory costing. Appendix C, “QuickBooks Enterprise Solutions Inventory Features,” has more information.
→ For more information, see chapters “Setting Up Inventory,” p. xxx, and “Managing Inventory,” p. xxx.
However, let’s tackle something a bit more difficult. In this same business, you are required to prepay six months of general liability insurance. Recording this entire balance as an expense in a single month would make that month’s net income appear artificially lower, along with making net income for the next five months artificially higher. To match the expense, you would assign the initial payment to a prepaid expenses account on your balance sheet. You would then use a journal entry each month to record an increase in insurance expense and a decrease in the prepaid expenses account. Each month would then have the cost for insurance that belonged in a single month.
→ For more information, see “Recording Vendor Prepayments,” p. xxx.
QuickBooks accrual basis reporting can help you view your financials in a format that matches revenue with expense. The next section discusses accrual basis reporting.
Accrual Versus Cash Basis Reporting
Although the purpose of this book is not to give specific accounting or tax advice on any of the topics covered, it is worth discussing the nature of accrual versus cash basis reporting as it pertains to creating a new data file.
Cash basis accounting follows these rules:
• Revenue—Recognized when the customer payment is received, not necessarily the same day or month the service or product was provided.
• Expenses—Recognized when the payment is made to the vendor or employee, not necessarily the same day or month the expense relates to.
Accrual basis accounting follows these rules:
• Revenue—Recognized as income on the date of the customer invoice transaction, regardless of when the customer pays the invoice.
• Expenses—Recognized as a cost on the date of the vendor bill, check, or credit card charge, regardless of when you make the payment.
Understanding the basics of these two types of reporting is important. When filing a tax return, businesses must specify cash or accrual as their accounting method. However, for management purposes, business owners can view one or both types of reports when making internal decisions. The capability to view reports in either accrual or cash basis is one of the features that sets the QuickBooks software apart from other accounting solutions.
Cash basis reporting can give you a sense of how cash flows through your business, whereas accrual basis reporting uses the matching principle to give you a much more accurate representation of how revenue and expenses are related.
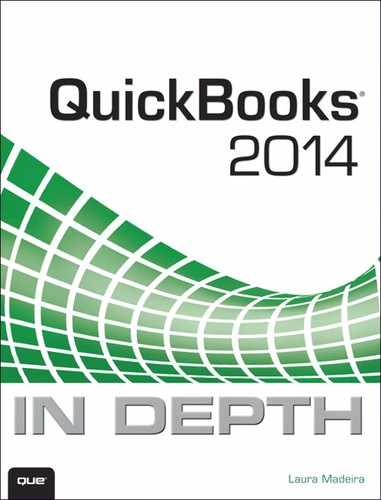
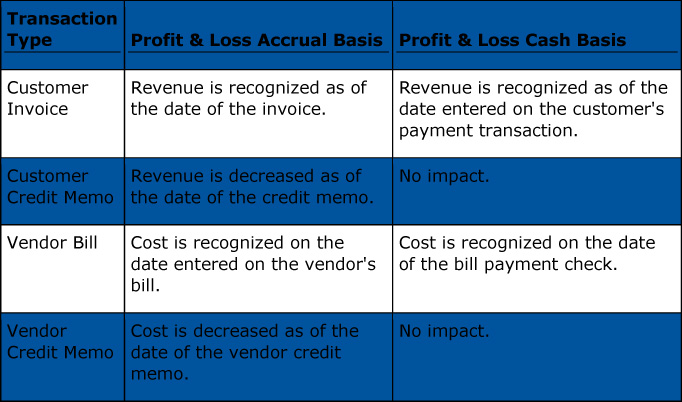
The difference between the two methods is in the timing of when income and expenses are recognized in your financials. Table 3.1 shows how QuickBooks treats the different types of transactions in both reporting methods on the Profit & Loss statement.
Table 3.1. Accrual Versus Cash Accounting
In QuickBooks preferences, you can set a global default basis for all reports which means that when you run reports, they will use the basis you set in the QuickBooks preferences. To do this, follow these steps:
1. Log in to the file as the Admin or External Accountant user type.
2. From the menu bar, select Edit, Preferences, Reports & Graphs.
3. Click the Company Preferences tab and choose Accrual or Cash from the Summary Reports Basis section.
You can also modify the basis of many reports individually. From a displayed report, select Customize Report and, in the Summary Report Basis section, choose Accrual or Cash.
For management analysis, I encourage all business owners to view their financials often using accrual basis reporting. When you review accrual basis reports, you can see trends from one period to the next. Management decisions based on accrual basis reports might be different from decisions made when based on cash basis reports.
Basic Financial Reports
This section describes financial reports that are important to managing the finances of your business.
→ For more details on working with reports, see “Reviewing Your Data,” p. xxx
Balance Sheet
The balance sheet represents the overall financial health of the business. Of the financial statements detailed here, the balance sheet is the only statement that applies to a single date in the business’s calendar year.
A standard company balance sheet has three sections and is represented by this equation: Assets = Liabilities + Equity. The categories include the following:
• Assets—Cash, along with economic resources that can be converted to cash. Assets include:
• Current Assets—Cash, accounts receivable, inventory, and prepaid expenses, to name a few.
• Fixed Assets and Depreciation—Buildings and equipment and their depreciation.
• Other Assets—Goodwill (typically the value of an asset that is intangible but has a quantifiable value), trademarks, and copyrights.
• Liabilities—A debt the business is obligated to pay. Liabilities include:
• Current Liabilities—Debt that typically is paid back within one year.
• Long-term Liabilities—Debt that is expected to take longer than one year to pay back.
• Equity—Owner’s investments, draws, and residual net income or loss in the business over time.
Business owners should review the balance sheet as often as they review the income statement. Most business owners who review the balance sheet have a pretty good idea of whether the information is accurate just by looking at the balances.
Income Statement
The income statement also is referred to as a Profit & Loss statement in QuickBooks. My experience over the years is that business owners review this report often. In QuickBooks, a simple income statement includes these basic sections or totals:
• Income—Monies received from the sale of products and services.
• Cost of Goods Sold—Direct costs of producing your product or service.
• Gross Profit—Income minus cost of goods sold.
• Expense—Costs associated with your business that are not directly related to producing goods or services, often referred to as overhead.
• Net Ordinary Income (Loss)—Income or loss from operations.
• Other Income/Expense—Income or expense not related to operations, such as interest income or interest expense.
• Net Income (Loss)—Income or loss from operations minus other income/loss.
QuickBooks offers you the flexibility to review your Profit & Loss Standard report in either accrual or cash basis. Creating an income statement that shows 12-month periods on the accrual basis makes it easy to spot changes and trends from period to period.
Statement of Cash Flows
The primary purpose of this report is to show the sources and uses of cash in the business. The statement of cash flows includes the following groups:
• Operating Activities—These include the production of the product, sales, and the delivery of the product. They also include activities related to payment from the customer.
• Investing Activities—These activities include the purchase or sale of assets or loans. Assets and loans involve both suppliers and customers.
• Financing Activities—These activities are related to the inflow and outflow of cash. Investors and shareholders are participants in these activities.
Additionally, the following information is included in the statement of cash flows report:
• Net cash increase for the period
• Cash at the beginning of the period
• Cash at the end of the period
QuickBooks automatically assigns a specific chart of accounts to cash flow report categories, based on the account type assigned.
You also can manually assign a chart of accounts to a specific section of the statement. To do this, follow these steps:
1. Log in to the file as the Admin or External Accountant user to set this preference.
2. From the menu bar, select Edit, Preferences, Reports & Graphs, and select the Company Preferences tab.
3. Click the Classify Cash button and follow the instructions on the screen.
Note
The reports referenced in this section are the basic reports used to analyze the financial health of a business. Many chapters in this book include sections that detail specific reports relevant to the topic of that chapter.
Accounting Checklist to Help You Manage Your Financials
This checklist is provided to help the business owner or accounting professional take an organized approach to periodically reviewing a QuickBooks file. This book includes several chapters that help you learn how to accurately and efficiently manage your data, using this checklist.

Setting Up a QuickBooks Data File for Accrual or Cash Basis Reporting
This section is provided for the owner who was tracking business finances in other software or on paper prior to using QuickBooks. In this section, you learn about properly entering the startup balances from your previous records.
However, if you have recently started a new business and QuickBooks is the first financial tracking software you have used, rest easy: You can skip this section because QuickBooks does not require any complex entries to start using the software. Instead, you simply begin the daily tasks of paying vendors or employees and invoicing customers.
If instead you are converting to QuickBooks from a software application other than those currently supported with the QuickBooks conversion tool, you might have to manually enter open customers, vendors, bank account balances, and additional startup information. That is where this section comes in handy.
→ For more information, see “Converting from Other Accounting Software,” p. xx, in Chapter 1.
When you begin using QuickBooks, you need to define a start date—the date you first want QuickBooks to track your financial accounting. If the business had expenses or sold products and services before this start date, you most likely have open transactions. For example, if your start date is January 1, 2017, your beginning balances then are dated as of December 31, 2016.
The following is recommended information to collect when creating a new QuickBooks data file. The dollar totals of the information collected should represent their respective value as of the day before your QuickBooks start date:
• Accounts Receivable—List by customer of amounts owed you on the day before your start date, including any invoices for which the payment was received but not deposited by the start date, the date you select to begin tracking your financials using QuickBooks.
• Accounts Payable—List by vendor of bills you had not paid as of your start date.
• Bank Ending Balance—Ending balance from your bank statement on the day before your start date.
• Uncleared Checks and Deposits—List of all checks and deposits that have not yet cleared your bank account as of your start date.
• Other Balances—List of all other assets, liabilities, and equity you have in the business.
• Payroll—Year-to-date totals for each employee (if using payroll in QuickBooks and you issued payroll checks before using QuickBooks).
To get your QuickBooks data ready for entering current transactions, you need to record these open balances. However, before doing so, you need to have a few things already set up in QuickBooks.
The following sections detail these important startup balances that you need to enter when you convert to QuickBooks from some other accounting software or paper records.
Cash or Accrual Basis Startup Transactions: Accounts Receivable
When you have finished creating your new data file, you need to take some additional steps that are important to the successful setup of your new QuickBooks file. One of these steps is to create a list of customers or jobs that currently owe you money. You might want to review Chapter 9, “Setting Up Customers,” before completing the activities in this section.
Creating a customer or job is easy in QuickBooks; follow these instructions:
1. From the menu bar, select Customers, Customer Center.
2. Select New Customer & Jobs (top left of the Customer Center), or select the menu to Add Multiple Customer:Jobs.
3. Type a Customer Name. By default, QuickBooks sorts the list numerically and alphabetically by this name.
4. QuickBooks enables you to enter an amount in the Opening Balance field on a new Customer or Job record, see Figure 3.1. If you do that, QuickBooks creates a single invoice for the entire amount owed. This method can present a problem when your customer owes you for multiple invoices. Also note the following about using this field to record the opening balances:
Figure 3.1. Best practice is to not use the Opening Balance field in a New Customer dialog box.
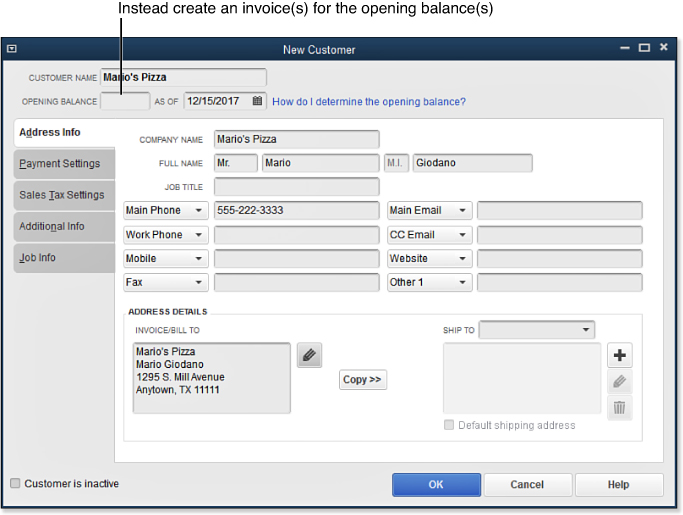
Caution
Recording open customer invoices in the New Customer or New Job dialog box is generally not recommended. Instead, create individual invoices to match the open balance records from your previous accounting software for each customer.
• Accrual basis reporting—For this type of reporting, the Opening Balance field increases Accounts Receivable (debit) and increases Uncategorized Income (credit) assigned the date in the As Of field on the New Customer or New Job dialog box.
• Cash basis reporting—For this type of reporting, the field has no effect until the date of customer payment. When the customer payment is received, it increases (debit) the account you assign to customer payments (either the QuickBooks Undeposited Funds or the bank account) and increases Uncategorized Income (credit).
Tip
Pressing Ctrl+I on your keyboard opens a customer invoice form or accesses it directly from the opening screen in QuickBooks, known as the Home page.
5. To create an individual customer invoice, from the menu bar, select Customers, Create Invoices (see Figure 3.2).
Figure 3.2. Record individual invoices for your customers’ starting balances.
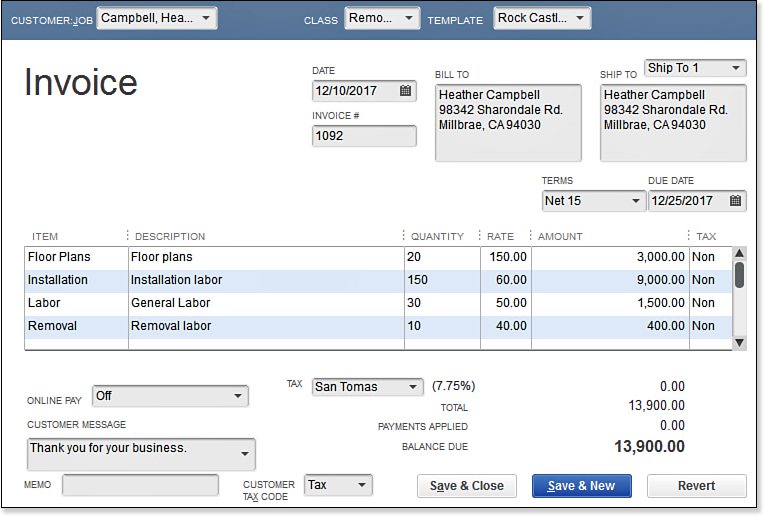
6. In the Customer: Job drop-down list, select the customer or job.
7. In the Date field (it should be before your start date), enter the original invoice date.
8. Enter the originally assigned invoice number.
9. In the Item column, enter the item(s)—the products or services that were sold—if you want to accurately track your revenue from this item. It should be the same item(s) that appeared on the original invoice to the customer.
10. Enter a value in the Quantity column.
11. If the rate did not prefill (because it was not included with a list item record), enter a value in the Rate column.
12. The correct tax status on the line should prefill if the list item was set to the proper sales tax status. If some customers pay sales tax and others do not, you must first indicate the taxable status of an item by selecting from the menu bar Lists, Item List. Highlight the item in question, click the Item button, and select Edit Item. The Edit Item dialog box opens, and you can mark the item with the appropriate sales tax code.
QuickBooks first determines whether an item is taxable, and then it checks whether the customer is a sales-tax-paying customer before assessing sales tax on a customer balance.
13. Check your Balance Due to make sure it agrees with the list item total from which you are working.
14. Click Save & Close if you are finished, or click Save & New if you have more invoice transactions to record.
QuickBooks offers useful Sales by Item reports that provide more granular detail about the items being sold. If you record a partially paid customer invoice only for the balance due, your item sales reports will not offer complete sales information for the item. Instead, you can choose to follow the instructions in the next section. However, this process involves more steps, so proceed only if you find the Sales by Item reports important for these partially paid customer invoices.
To properly prepare reports with cash basis reporting, and to properly report on sales by item, you should perform additional steps for those open invoices that had partially paid balances as of your startup date. These steps are required only if you want to accurately track sales by item:
1. From the menu bar, select Lists, Chart of Accounts.
2. In the Chart of Accounts dialog box, from the Account drop-down list, select New. The Add New Account: Choose Account Type dialog box opens.
3. Select the Bank account type and click Continue.
4. In the Account Name field, type the name Prior Year Payments Account. If account numbering is enabled, enter an account number. Select No to the Set Up Bank Feed message. This is a temporary account that will later have the balances moved to the Opening Balance Equity account in step 15. Click Save & Close.
5. From the menu bar, select Lists, Item List.
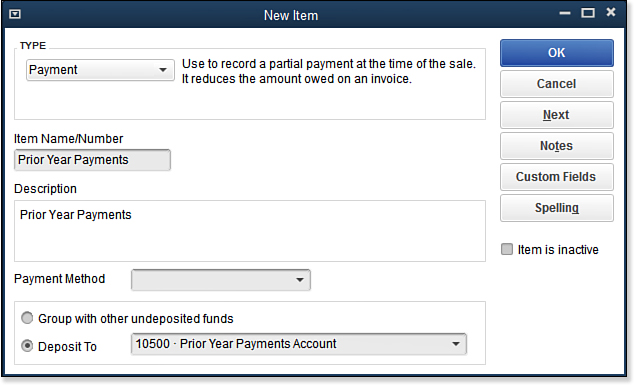
6. In the Item drop-down list, select New. The New Item dialog box opens.
7. In the Type drop-down list, select Payment, and then in the Item Name/Number field, type the name Prior Year Payments.
8. Assign the Prior Year Payments account created in step 1 as the account to Deposit To (see Figure 3.3). Click OK.
Figure 3.3. Create a payment item type to use on partially paid startup customer invoices.
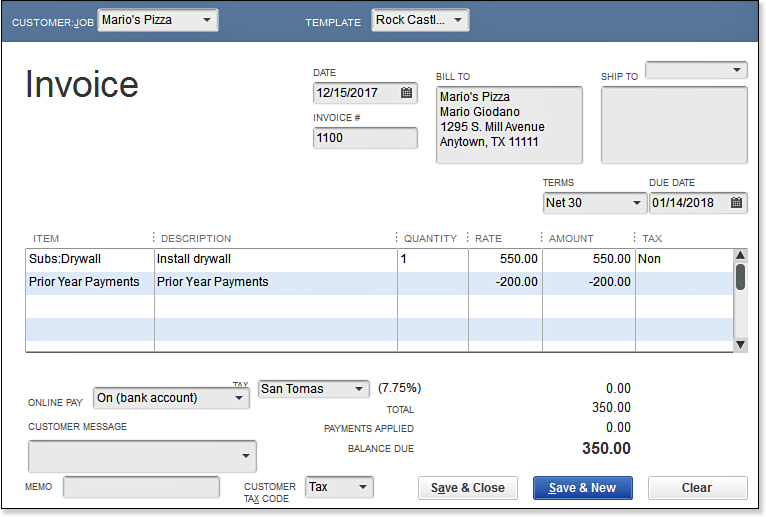
9. To create a partially paid invoice with an open balance, from the menu bar, select Customers, Create Invoices.
10. In the drop-down list, choose the appropriate Customer:Job.
11. Enter the original invoice date (it should be before your QuickBooks start date), and enter the invoice number originally presented to the customer for payment.
12. On line 1 (or more, if needed) of the customer invoice, enter your normal service or product item you sold to the customer. On the next available line, use the new Prior Year Payments item you created, and enter the total of the customer’s prior payments as a negative amount (see Figure 3.4). Click Save & Close if you are finished, or click Save & New to create additional open customer invoices.
Figure 3.4. This example illustrates creating an invoice that was partially paid before the date you started using QuickBooks.
13. Verify that the Balance Due amount on the invoice accurately matches the open invoice total from your prior accounting list or report.
14. Compare your QuickBooks A/R Aging Summary report to your open invoices startup list total. If the balances agree, go to step 15. If they do not agree, review either the Summary or the Detail A/R Aging report, and identify which customer(s) balances are incorrect.
15. When your totals agree, click Banking, Use Register, and select the Prior Year Payments Account.
16. To close the fictitious bank account balance to the Open Balance Equity account, enter the following on the next available line of the register.
• For the date, enter the day before your startup date. Optionally, for the number, use the term Closing.
• In the payment column, enter the same dollar amount as the register total displayed prior to this transaction.
• In the Account field, select the QuickBooks-created equity account named Opening Balance Equity.
17. Click Record to save the transaction.
Your Prior Year Payments bank register should now have a zero balance.
→ For more information, see “Closing Opening Balance Equity into Retained Earnings,” p. xxx.
Note
Entering invoices with partial payment detail provides you with sales reports by item. If this level of detail is not needed on past transactions, you can simply enter a net amount due on the invoice.
Cash or Accrual Basis Startup Transactions: Accounts Payable
Accounts Payable startup refers to vendor bills that were not paid as of your start date. These are the vendor bills you will be paying in your first month of using QuickBooks. Correctly setting up the starting Accounts Payable balance is just as important to your financials as setting up Accounts Receivable.
1. From the menu bar, select Vendors, Enter Bills. In the Vendor drop-down list, choose the appropriate vendor (see Figure 3.5).
Figure 3.5. Enter a vendor bill that was unpaid at your startup date.
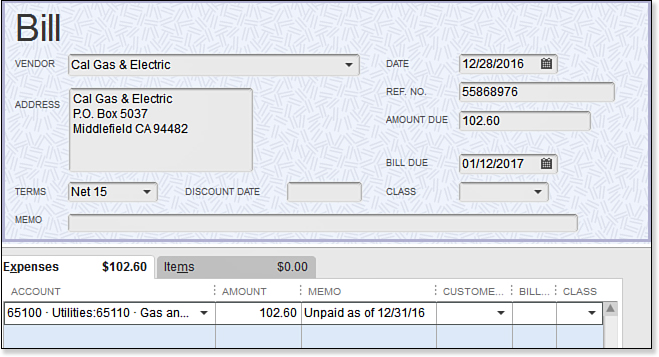
2. Enter the bill date. This date should be on or before your QuickBooks start date, and it is often the date on the vendor’s bill you received.
3. In the Ref. No. field, enter the vendor’s bill number. This serves two important purposes: One is to optionally print the reference number on the bill payment stub that is sent to the vendor, and the other is to allow QuickBooks to warn you if a duplicate bill is later entered with the same Ref. No.
4. Enter a number in the Amount Due field. If you previously paid part of the bill, the amount should equal the balance remaining to be paid. (See the sidebar “Partially Paid Open Vendor Bills on Cash Basis Reporting.”)
5. QuickBooks defaults the Bill Due date to the terms specified on the Payment Settings tab in the New Vendor or Edit Vendor dialog box; however, you also can override the Bill Due date on this screen, if necessary.
6. Click the Expenses tab and assign the appropriate expense account. If you are tracking costs by items, use the appropriate item on the Items tab. For accrual basis, the account or item selected is not as important because the expense was recorded on the vendor’s bill date in your previous software or accounting method. For cash basis, it is most important because the cost is recorded to the expense account or item not when the bill is dated, but on the date of the bill payment check transaction, which should occur after the start date.
7. Click Save & Close, or click Save & New to add more transactions.
8. From the menu bar, select Reports, Vendors & Payables, A/P Aging Summary (or A/P Aging Detail), and compare the totals with your previous accounting software or manual records.
9. If the open bills you are entering are for inventory, make sure you read the details in Chapter 5, “Setting Up Inventory.”
Note
QuickBooks offers useful Purchase by Item reports that provide more granular detail about the items being purchased. If you record a partially paid vendor bill only for the balance due, your item purchase reports will not offer complete purchase information for the item. Instead, you can choose to follow the instructions in the next section. However, this process involves more steps, so proceed only if you find the Purchases by Item reports important for these partially paid vendor bills.
To properly prepare reports on cash basis, you should perform additional steps for open vendor bills that have partial payments as of your startup date. These steps are required if you want to accurately track your costs by item, including in reports such as the Purchases by Item.
Use the Prior Year Payments bank account that you created in the previous set of steps. This is a temporary account; you will move the balances to the Opening Balance Equity account in step 9.
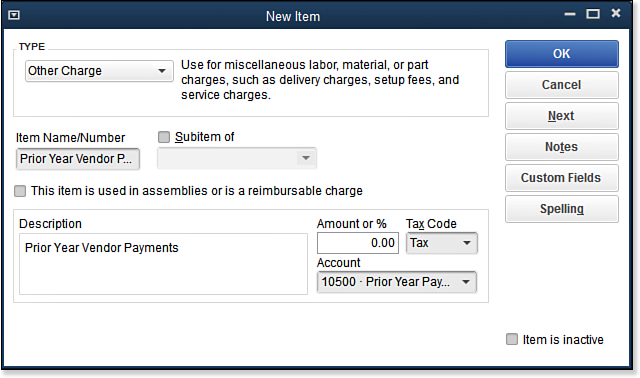
1. From the menu bar, select Lists, Item List. The Item List dialog box opens.
2. In the Item drop-down list, select New.
3. In the New Item dialog box, select the Other Charge item type. In the Item Name/Number field, type Prior Year Vendor Payments (see Figure 3.6). Assign it to the Prior Year Payments bank account by selecting it from the Account drop-down list. (You created this account in the previous set of steps. See the sidebar “Partially Paid Open Customer Invoices on Cash Basis Reporting.”) Click OK to save.
Figure 3.6. Create an Other Charge type item to record prior-year vendor payments on startup vendor bills.
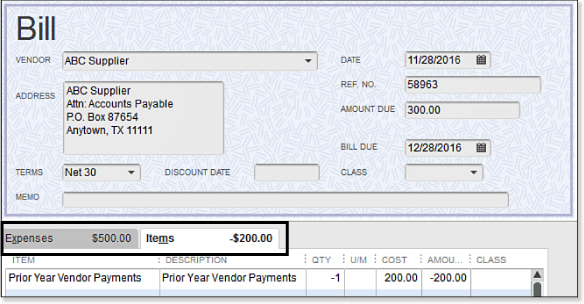
4. Follow steps 1–6 in the preceding section titled “Cash or Accrual Basis Startup Transactions: Accounts Payable,” with the exception that you need to record the full amount of the original bill. You can use the Expenses tab and assign the appropriate expense account, or if you are tracking costs by item, you can use the Items tab and assign the correct item.
5. On the Items tab of the Enter Bills dialog box, add the Other Charge type item, called Prior Year Vendor Payments. Enter a negative amount equal to the total of all previous bill payments (see Figure 3.7).
Figure 3.7. Create an open vendor bill, including any prior-year vendor payment line detail.
6. Verify that the Amount Due amount on the Enter Bills dialog box accurately matches the open vendor invoice total from your previous software (or accounting method) report.
7. Compare your QuickBooks A/P Aging Summary report to the open vendor bill startup list total from your previous software. If the balances agree with each other, go to the next step. If they do not agree, review either the Summary or Detail A/P Aging report, and identify which vendor(s) balances are incorrect; then make the needed changes.
8. When the totals of your prior accounting Payables agree with the new QuickBooks A/P Summary report, from the menu bar, click Banking, Use Register. In the Use Register dialog box, select the Prior Year Payments fictitious bank account. Click OK.
9. On the next available register line, enter the day before your startup date and the word Closing for the number. In the Deposit column, enter the total amount you see in the balance column of this register. In the Account field, select the QuickBooks-created equity account named Opening Balance Equity.
10. Click Record to save your transaction.
When completed, your Prior Year Payments account will have a zero balance.
→ For more information, see “Closing Opening Balance Equity into Retained Earnings,” p. xxx.
Cash or Accrual Basis Startup Transactions: Bank Account Statement Balance
In addition to setting up the Accounts Receivable and Payable startup transactions, you must record the balance the bank had on record as of the start date. Having accurate information is necessary when you are ready to reconcile the bank account in QuickBooks to the bank’s monthly statement.
To create your beginning bank balance, follow these steps:
Tip
To check whether your QuickBooks recorded bank balance is correct, from the menu bar, select Banking, Use Register, and then select your bank account to open the register.
If the amount is correct and agrees with your bank’s statement ending balance, no further action is required. Otherwise, double-click the transaction and edit the amount. If the QuickBooks register does not yet have a beginning balance, follow the steps listed in this section.
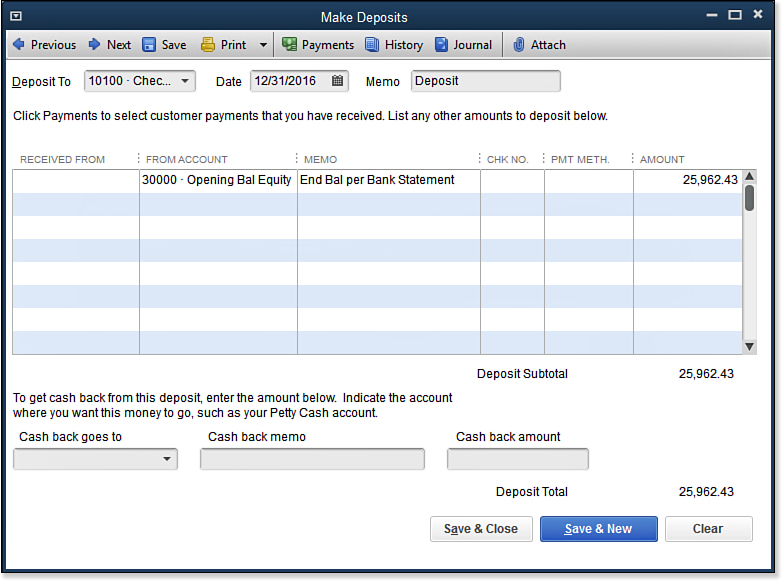
1. From the menu bar, select Banking, Make Deposits to record your bank statement beginning balance (if a positive balance). However, if you have been using QuickBooks for recording payments before you entered your beginning bank balance, you might need to close the displayed Payments to Deposit dialog box.
2. In the Deposit To field, enter your bank account from your chart of accounts list. The date should be the same as your bank statement ending date, usually the day before your QuickBooks start date.
Tip
If your bank account has a negative balance as of your start date, you can use a check to record that amount.
3. In the From Account drop-down list (see Figure 3.8), select Opening Balance Equity. The balance belongs in Retained Earnings, but posting it here first gives you a chance to make sure the opening entries for your cash account are correct.
Figure 3.8. Enter the ending balance from the bank’s statement.
→ For more information, see Chapter 15, “Closing Opening Balance Equity to Retained Earnings,” p. xxx
4. Enter an optional Memo.
5. Enter the Amount. The amount recorded here is the ending balance from the bank statement the day before your QuickBooks start date. This amount should not include any uncleared checks or deposits; these are added later individually.
6. Click Save & Close to record the transaction.
If you have outstanding deposits that did not clear your bank funds, the way you enter them depends on the basis of accounting used:
• Accrual basis users create the deposit(s) using the same steps as outlined for entering the beginning bank balance and date the transactions before the start date.
• Cash basis users select Customers, Receive Payment from the menu bar, and apply the deposit to an open invoice, which you created earlier in this chapter. Date this transaction on or after your start date.
Cash or Accrual Basis Startup Transactions: Recording Uncleared Bank Checks
You are almost finished with the startup entries. The last thing to do is to record the checking account’s uncleared checks and debits, as in Figure 3.9. To complete the startup process for your banking transactions, follow these instructions to create your uncleared checks:
1. From the menu bar, select Banking, Write Checks.
2. In the Write Checks dialog box, enter the actual check number that was issued in the No. field.
3. In the Date field, enter the date of the original check, which should be before the start date.
4. In the Pay to the Order Of drop-down list, select the payee.
5. Enter the amount of the check.
6. On the Expenses tab (see Figure 3.9), select the Opening Bal Equity account. (This account is used because, in both accrual and cash basis reporting, the check expense amount was included in our prior software or accounting method profit and loss totals.)
Figure 3.9. These details illustrate entering a check that was not cashed by the bank as of the start date.
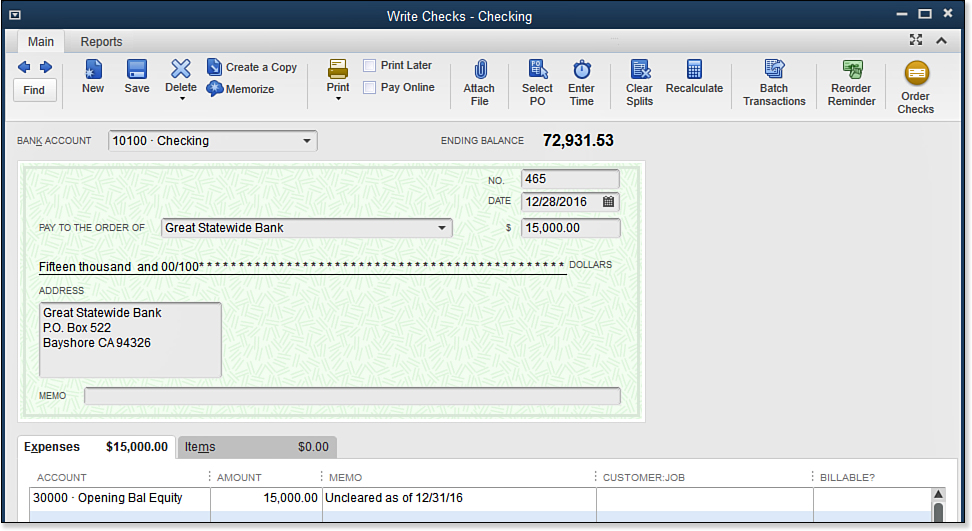
7. Click Save & Close (or Save & New) until you have completed this task.
To verify the accuracy of the information, from the menu bar, select Reports, Company & Financial, Balance Sheet Standard, and set the date to be one day before your start date. Your bank account balance(s) should be equal to Bank Statement Ending Balance plus Outstanding (uncleared) Deposits minus Outstanding (uncleared) Checks.