5. Setting Up Inventory
Enable Inventory
Add Inventory Parts
Purchasing Inventory with a Vendor Bill
Selling Inventory
Inventory can be described as a company’s merchandise, raw materials, and finished and unfinished products that have not yet been sold.
QuickBooks can track the products you purchase, stock, and then later sell to customers. QuickBooks can also track the products you assemble (a component) and use to create a product for sale (finished good). QuickBooks has a perpetual inventory system, meaning each time you record a purchase transaction, inventory is increased, and when you record a sales transaction, inventory is decreased. (See the “Proper Inventory Processes” section later in this chapter.)
QuickBooks Pro, Premier, and Enterprise Solutions record the cost of inventory using the Average Cost method, in contrast to LIFO (Last In, First Out) or FIFO (First In, First Out). This means that the cost recorded at the time a product is sold is equal to the number of inventory units purchased divided by the total cost of the units. QuickBooks automates this process for you. As long as you record your documents correctly and date them appropriately, QuickBooks assigns the correct average cost.
If you are using QuickBooks Enterprise Solutions 14.0, you also have the option to use FIFO costing, or the First In, First Out method. The upcoming section “Inventory Features by QuickBooks Edition with Advanced Inventory” highlights the main differences among the editions of QuickBooks.
→ If you are using QuickBooks Enterprise for inventory management, refer to Appendix C, “QuickBooks Enterprise Solutions Inventory Features,” p. xxx.
Ask yourself these important questions to differentiate between using inventory and non-inventory items in QuickBooks:
• Will you be selling what you buy, and do you not know the customer at the time of purchase?—An example is a furniture store that purchases furniture for resale to customers, or a retail store that purchases medical supplies that are sold to customers. These qualify as the proper use of inventory items.
• Are you manufacturing what you sell?—In other words, you buy components (raw materials) and later assemble the components into a finished product that is sold to a customer. An example is a bike store that purchases wheels, steering columns, chains, and so on, and then assembles the components into a completed bike for sale to the customer. This qualifies as the proper use of inventory items.
• Are you purchasing materials that you use, but do not sell?—For example, a car detailing business purchases buffing pads and paint supplies. These items are stored in inventory but are not sold directly to a customer. This example is a more appropriate use of non-inventory items.
• Is the dollar value of your inventory not significant?—Often companies carry a small amount of inventory, but the majority of their vendor product purchases are drop-shipped directly to the customer’s address. For example, a construction company can order appliances for a new home but generally does not stock them. Instead, it has the appliances shipped directly from the vendor to the new home. This example is a more appropriate use of a non-inventory item.
Making the decision to track inventory takes commitment on your part. QuickBooks can help you efficiently and accurately track your inventory with features unique to each edition of QuickBooks.
Inventory Features by QuickBooks Edition
The release of QuickBooks 2014 has again dramatically changed the features available when your business tracks inventory. Now, more than ever, you need to review those features you need the most and make sure you are working in the right QuickBooks edition for your business inventory tracking needs.
If you are using the QuickBooks Pro or Premier editions and later decide your business would benefit from the features available only with QuickBooks Enterprise Solutions, you can expect the transition to be seamless. When you are ready to upgrade, you open your company file in Enterprise Solutions, and your lists, data, report templates, and user permissions automatically transfer.
QuickBooks Pro 2014
QuickBooks Pro 2014 is easy to set up and learn to use. With QuickBooks Pro, you can have up to three simultaneous users working in the same data file. QuickBooks Pro does not come in industry-specific editions.
QuickBooks Pro has the most basic of inventory features, including the following:
• Inventory Items—Included are Inventory Part and Non-inventory Part.
• Purchase Orders—Commitment to purchase from a vendor.
• Change Item Prices in Batch—Feature to change more than one item price at a time by a fixed amount or percentage.
• Warn If Not Enough Inventory to Sell—Preference that enables a warning when attempting to sell inventory without enough quantity on hand.
• Integrate Your FedEx, UPS, and USPS Software—Simplify the management of tracking your shipping documents from within QuickBooks.
After reviewing the inventory features in this chapter, you might decide there are inventory features that you could use in the other editions of QuickBooks. You can easily convert a QuickBooks Pro file to QuickBooks Premier or Enterprise. Chapter 17, “Managing Your QuickBooks Database,” has more information on upgrading your file
QuickBooks Premier 2014
QuickBooks Premier 2014 offers several industry-specific editions. The inventory features include everything offered with QuickBooks Pro 2014 and, in addition, the following:
• Inventory Center—Central location for inventory activities and reporting.
• Inventory Assembly—Creates a finished good from a bill of materials.
• Sales Orders—Handles customer preorders.
• Quantity Available—Preference settings for handling how quantity available is calculated.
• Multiple Unit of Measure—You purchase in one unit and sell in another. (Available only in selected Premier or Enterprise editions.)
If you have purchased the QuickBooks Premier Manufacturing & Wholesale 2014 edition, you have all the preceding features plus the following:
• Sales Order Fulfillment Worksheet—Provides ease in filling orders.
• Create Customer Return Materials Authorization Form—Creates a Word template for you to enter information into.
• Report on Nonconforming Material Report—Creates a Word template for you to enter information into.
• Damaged Goods Log—Creates a Word template for you to enter information into.
• Several Industry-Specific Reports—Includes Inventory Reorder Report by Vendor.
QuickBooks Enterprise Solutions Editions
QuickBooks Enterprise Solutions 14.0 offers specific features for companies that track inventory. This chapter lists the features for the following versions of QuickBooks. Many of the features are more detailed in Appendix C.
• QuickBooks Enterprise Solutions 14.0
• QuickBooks Enterprise Solutions Manufacturing & Wholesale 14.0
• Either of the preceding two versions with an Advanced Inventory subscription
• Either of the preceding two versions with an Advanced Pricing subscription
QuickBooks Enterprise Solutions 14.0
QuickBooks Enterprise Solutions 14.0 includes all the features mentioned previously, as well as the following:
• Auto Create POs—From the inventory stock status reports (and others), you have the option to create multiple purchase orders at one time. New functionality in Enterprise 14.0 includes the Auto Create POs suggesting a quantity needed to order.
• Default Class Assignment—You can set a preference to default class (departments) assignment to Accounts, Items, or Names.
• Enhanced Inventory Receiving—Optional workflow improves how you receive and pay for inventory. Item receipts increase inventory and inventory offset (current liability) accounts until the vendor bill is received and entered.
• Automatic Cost and Price Updates—You can set a preference for automatically handling changes to an item’s default cost, sales price, and markup as recorded with the item record.
• Edit Markup—You can define how markup is calculated from cost.
• Inventory Center Add Image—You can attach an image to an item record. (Currently, you cannot attach an image to a transaction.)
• Custom Fields—These track additional specific detail for your inventory items. Custom fields can be required upon entry and can be defined by type of data, numbers, date, phone, and so on.
• Job WIP Summary Report—Used by construction companies or any type of industry that needs to adjust revenue recognized by percentage of completion. Appendix C has more details.
• Committed Costs by Job Report—Construction companies and other types of industry that review project budgets and want to also factor in open purchase order balances and unpaid wages use this. Appendix C has more details.
QuickBooks Enterprise Solutions Manufacturing & Wholesale 14.0
If you purchased the QuickBooks Enterprise Solutions Manufacturing & Wholesale 14.0 edition, you will have the same industry-specific tools available with QuickBooks Premier Manufacturing & Wholesale 2014, including the following:
• Sales Order Fulfillment Worksheet—Creates an easy form for filling orders.
• Create Customer Return Materials Authorization Form—Creates a Word template for you to enter return information into.
• Report on Nonconforming Material Report—Creates a Word template for you to enter non-conforming information (or materials that did not meet required specifications) into.
• Damaged Goods Log—Creates a Word template for you to enter inventory damage information into.
• Inventory Reorder Report by Vendor—Ease in viewing your inventory part reorder needs grouped by vendor.
Advanced Inventory Subscription
Both QuickBooks Enterprise Solutions 14.0 and QuickBooks Enterprise Solutions Manufacturing & Wholesale 14.0 with an Advanced Inventory subscription include these additional features:
• Bin/Shelf/Row Location Tracking—Tracks specific items to bin/shelf/row location within one or more inventory locations. Sorts pick lists and item receipts by location.
• Barcode Scanning—Increases efficiency and reliability of data entry by scanning items and serial numbers without a keyboard. Helps you create your own barcodes. (Requires any simple USB barcode scanner.)
• Multiple Inventory Sites—Reports and tracks inventory in multiple locations.
• Lot or Serial Number Tracking—Tracks one or the other and a variety of related preference settings.
• FIFO—First In, First Out Inventory costing. This means that the oldest inventory items are recorded as sold first, but it does not necessarily mean that the exact oldest physical object has been tracked and sold.
The optional Advanced Inventory functionality is built into QuickBooks Enterprise Solutions, has an annual fee, and requires a current Full Support Plan (annual fee).
→ For more information on using Advanced Inventory, see Appendix C. p. xxx
Advanced Pricing Subscription
Available exclusively with QuickBooks Enterprise Solutions, Advanced Pricing is an add-on with functionality built into the software. With Advanced Pricing, users can automate sales price changes due to:
• Quantity discounts
• Manufacturer markdowns
• Scheduled promotions
• Regional price changes (using Class or Customer Type list)
• Specific item price specials
Advanced Pricing includes two features:
• Price Rules—You can implement special promotions with user- created sophisticated price rules. You can create thousands of price rules based on any combination of factors, including customers, items, classes, custom fields, and more.
• Quantity Discounts—Let QuickBooks automate pricing discounts, rewarding your customers for buying a specified quantity of your product or service.
→ For more information on using Advanced Pricing, see Appendix C.
QuickBooks has a version right for your business inventory tracking needs. If you need more personalized help in finding the right solution, you can request the help of a QuickBooks certified professional in your area. From the menu bar, select Help, Find a Local QuickBooks Expert. A web page opens in QuickBooks, and you are prompted for a zip code and a preferred distance for the results of the search.
With the help of a qualified consultant, you can be certain you are using QuickBooks correctly for your business.
Enabling Inventory Preferences
To begin using QuickBooks to track inventory, you must first turn on the feature found in the Items & Inventory preference in QuickBooks. By default, when you create a new company data file, inventory management is not enabled.
To turn on the inventory feature, follow these steps:
1. Log in to the data file as the Admin or External Accountant user.
2. From the menu bar, select Edit, Preferences to open the Preferences dialog box.
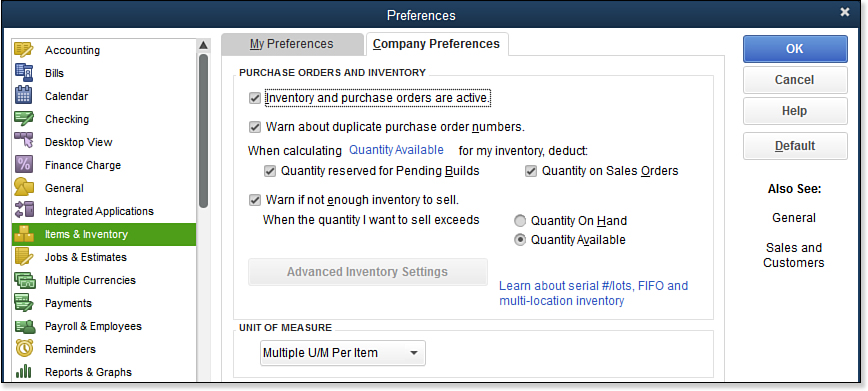
3. On the Items & Inventory—Company Preferences tab, select the Inventory and Purchase Orders Are Active checkbox.
4. Click OK to save the preference.
The preferences Figure 5.1 shows do not affect the accounting for inventory; instead, they enable specific features and preferences within inventory management. The preferences available in your QuickBooks data might differ, depending on the year and edition of QuickBooks you are using.
Figure 5.1. Preferences that enable QuickBooks inventory vary by the version of QuickBooks being used.
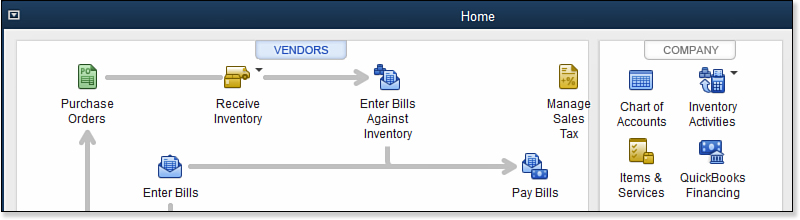
Your QuickBooks Home page now shows the inventory workflow (see Figure 5.2). To have the Home page display automatically when you open your QuickBooks file, from the menu bar, select Edit, Preferences. Click the My Preferences tab and select Desktop View on the left, click the Show Home Page When Opening a Company File checkbox.
Figure 5.2. This is the Home page workflow with inventory and purchase orders enabled.
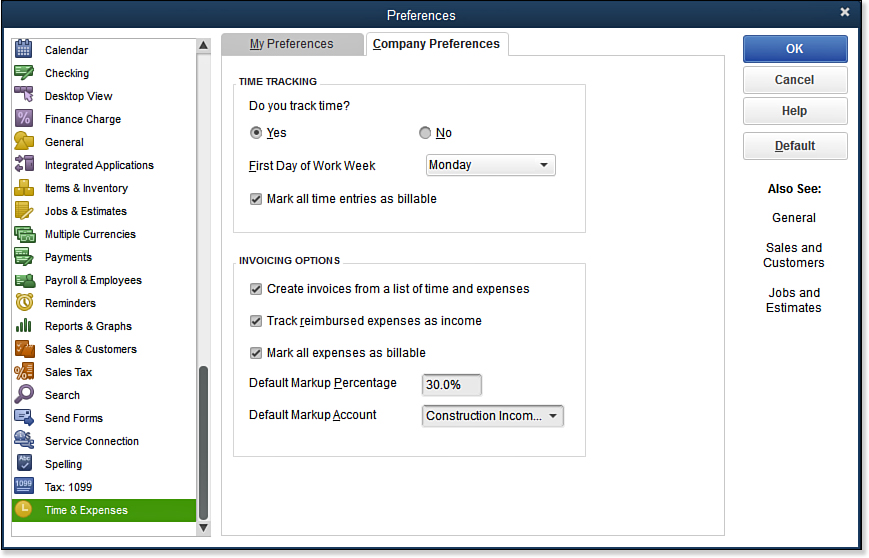
One additional preference that can affect your setup of inventory is found in the Time & Expenses—Company Preferences tab (accessed as you did previously for the Items & Inventory preference). When you enter a percentage in the Default Markup Percentage field, QuickBooks automatically makes the default Sales Price the cost multiplied by the markup on a new item when the cost is first recorded (see Figure 5.3). As part of the setup, you are required to select an account for the Markup amount; usually this is an income account type.
Figure 5.3. Including a Default Markup Percentage makes the sales price of a newly created inventory item cost multiplied by the markup.
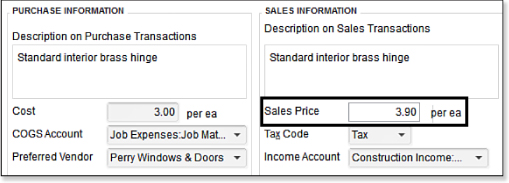
For example, when you create a new inventory list item and enter a cost of $3.00, QuickBooks defaults the sales price of $3.90, or $3.00 + 30% markup, as Figure 5.4 shows.
Figure 5.4. QuickBooks automatically calculates the sales price when you set the preference for default markup in the Time & Expenses preference.
Note
QuickBooks Enterprise 14.0 includes more robust preferences for automatically handling markups when item costs change on purchase documents.
QuickBooks Enterprise Solutions offers many more features, which Appendix C explores.
→ For more information, see Appendix C p. xxx.
Another feature for inventory management is the Unit of Measure (on the Items & Inventory—Company Preferences tab). When selecting this preference (see Figure 5.5), you can define the following for inventory items or non-inventory items in QuickBooks:
Figure 5.5. Both QuickBooks Premier and Enterprise include the Multiple Unit of Measure (U/M) preference.
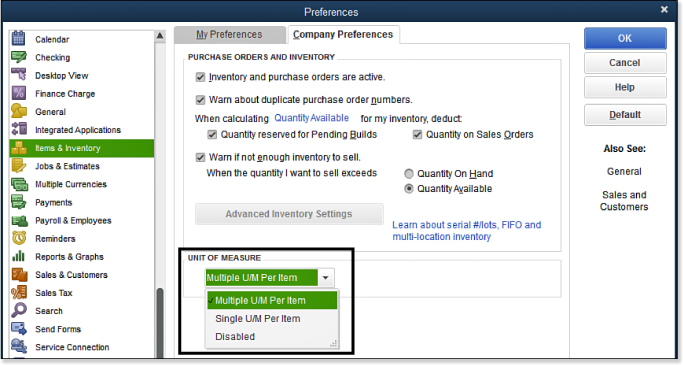
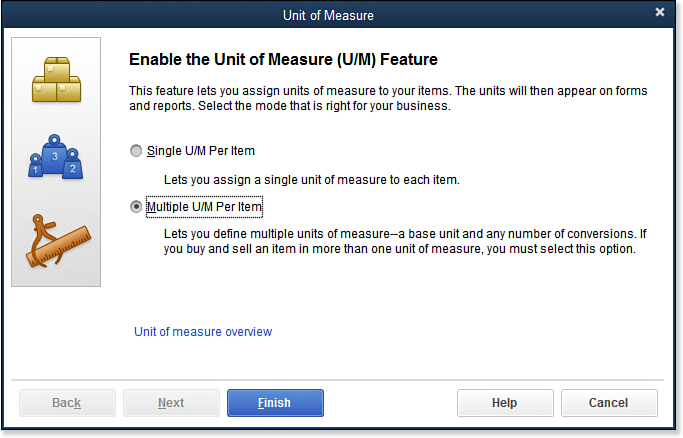
• Single Unit of Measure—Choose this if you buy, stock, and sell each item by the same unit of measure. For example, if you buy by the pound, sell by the pound, and track your inventory by the pound, this option is the best choice.
• Multiple Unit of Measure—If you buy in one measurement—for example, you purchase by the skid (multiple cases of soda)—and sell to the customer in single units (a can of soda), but ship by the case (multiple cans of soda), the Multiple Unit of Measure option is the best choice.
When you select Multiple Unit of Measure and assign it to an inventory or non-inventory item, you can also define your default units of measure for purchase, sales, and shipping transactions.
→ For more information, see “Setting Up Multiple Unit of Measure,” p. xxx.
Unit of Measure settings indirectly affect your accounting by defaulting the unit and the associated cost and sales price. Using this feature can improve your buying and selling accuracy on your documents and can help ensure that proper inventory quantities are recorded.
Inventory Item Type Descriptions
QuickBooks provides several item types for use in managing inventory and non-inventory. You can use these items on purchase and sales transactions. This section details the purpose of these QuickBooks item types used primarily with inventory management.
→ For details on additional types of QuickBooks items, see Chapter 4, “Understanding QuickBooks Lists,” and Chapter 9, “Setting Up Customers.”
Inventory Part
Create an inventory part if any of the following applies to your business:
• Items are purchased and sold.
• Items are stored in stock and later sold.
• Items are purchased and used as components of a finished product (assembled).
The capability to create an assembled good and track the quantity on hand of the finished product is available only in QuickBooks Premier (all editions) and QuickBooks Enterprise (all editions).
Non-inventory Part
Create a non-inventory part if any of the following applies to the specific part:
• Purchased but not sold
• Sold but not purchased
• Purchased and resold, but not tracked as stock (drop-shipped directly to the customer or immaterial in dollar amount)
→ For more information, see “Adding or Editing Inventory Items,” p. xxx.
Group Items and Inventory Assemblies
The group item types and inventory assembly types are similar; in that they both let you record multiple items with a single entry on purchase or sales transactions. The group item type is included with QuickBooks Pro, Premier (all editions), and Enterprise (all editions). Inventory assemblies are included only with QuickBooks Premier (all editions), Accountant, or QuickBooks Enterprise (all editions).
You might want to use assemblies in QuickBooks for a few reasons:
• Track finished goods separately from individual inventory items.
• Customize the price of assembled items. You can specify a price for an assembly, which is different than the sum of the default prices of its component items.
• Get detailed information about your finished goods, including date they were assembled, quantity and cost, and list of component items.
• Set reminders for future builds.
If you are using QuickBooks Pro, Premier (all editions), or QuickBooks Enterprise Solutions (all editions), you might benefit from creating group items.
What are some reasons you would work with a group item? They might include the following:
• Get detailed sales, cost, and budget reporting for multiple items
• Use the option to show a single line of detail when invoicing the customer
You can add inventory assemblies to both purchase and sales transactions. You can add Group Items only to sales transactions. Both help automate the process of entering multiple items on transactions.
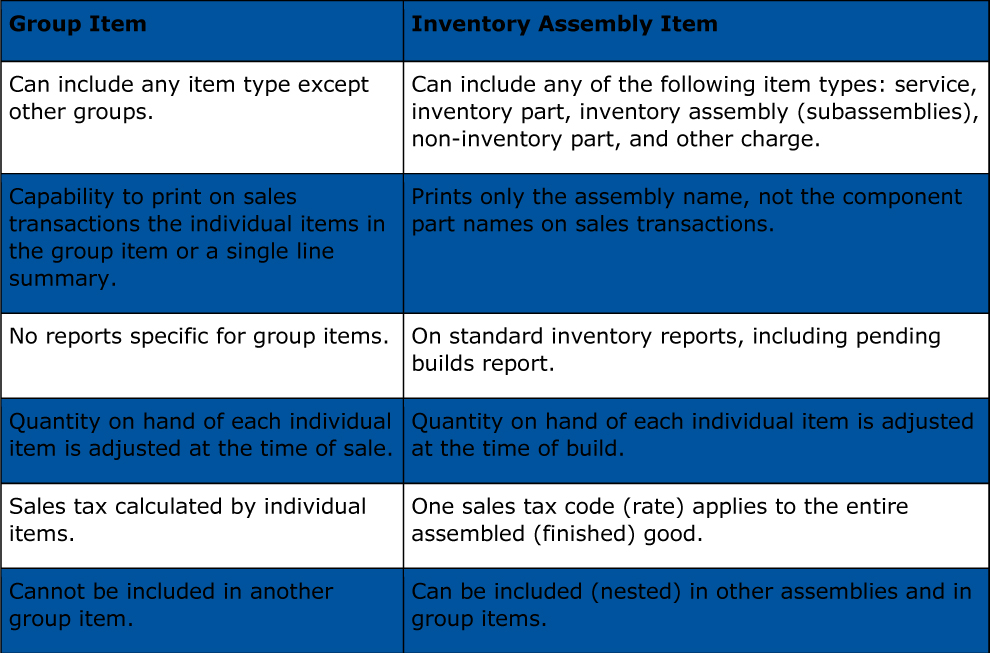
Table 5.1 compares the details of using the Group Item or Inventory Assembly Item. This should help you determine the proper type to use for your business.
Table 5.1. Comparing Group and Inventory Assembly Items

Included in the next section are details on creating both the group item and the inventory assembly. Both save data entry time and improve accuracy when recording purchase and sales transactions with the same multiple items.
Adding or Editing Inventory Items
With inventory and purchase order tracking enabled in your QuickBooks file, you can add your inventory or non-inventory products to the item list. You have several options for adding or modifying your list of products. Choose the method that best meets your needs.
Before you begin tracking inventory, you should know the commitment you are making to additional accounting responsibilities. When choosing to track inventory in the normal course of your business, you need to use purchase transactions to increase inventory, and use sales transactions to decrease inventory. You also need to commit to periodic inventory counts because your inventory can often get out of sync with your accounting information.
Adding or Editing Individual Items
Efficiently add or modify individual inventory or non-inventory items in your QuickBooks data, or use one of several tools detailed in this chapter for working with multiple items at a time.
With QuickBooks Enterprise, you have the added convenience of editing the inventory item’s stored cost and sales price, as well managing the markup and margin with the Inventory Center, without having to open and edit each item record.
For more information, see the “Inventory Center” section in Appendix C, p. xxx.
Inventory Part
When you purchase or build your product and then stock it in your warehouse for future sale to your customer, you should create an inventory part (see Figure 5.6).
Figure 5.6. Adding a new inventory part item.
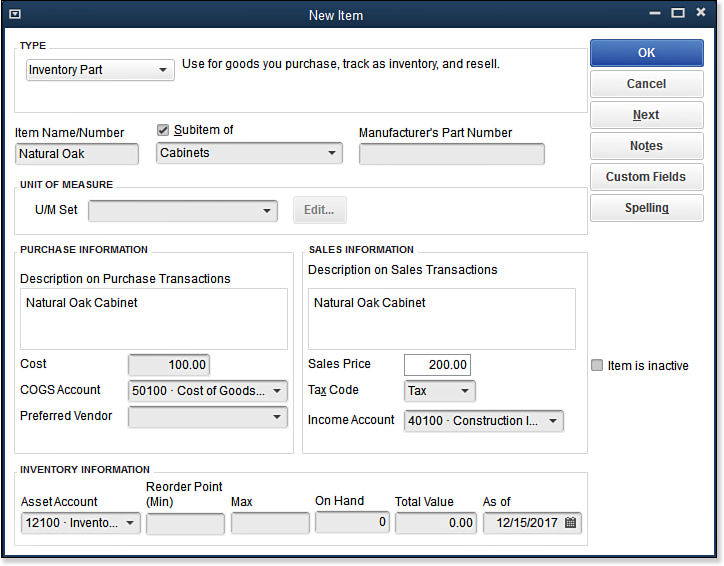
When inventory is used, an Inventory Asset account is increased when you purchase and stock the product. The income and related cost are not recorded until you include the inventory item on your customer’s invoice.
Caution
Converting to QuickBooks after having used other software to track inventory? It is recommended that you use an Inventory Adjustment transaction to enter your opening quantity on hand instead of entering a quantity in the On Hand field of a new inventory item record. For more information, see “Adjusting Inventory,” p. xxx.
Offering a new product for sale to your customers? Do not enter an amount in the On Hand field; instead, use the Items tab of the Enter Bills, Credit Card Charges, or Write Checks transactions to record the purchase of this new inventory item.
After you save a new item record, you cannot edit many fields, including the On Hand and Total Value fields.
Following are optional fields or actions in an item record (depending on the version of QuickBooks you are using) that are useful:
• U/M Set—Assigns default units of measure for purchases, sales, and shipping of the selected item.
• Notes—Provides internal notes for the currently selected item.
• Custom Fields—Give you the flexibility to add information that QuickBooks does not already track. Review the section in this chapter titled “Inventory Features by QuickBooks Edition” to see if the custom field you need is already tracked in a different edition of QuickBooks.
• Spelling—Click Spelling, and QuickBooks spell-checks the description fields of the individual item being added or edited.
• Item Is Inactive—Use only when the item inventory count for the selected item is zero and you no longer want the item to be included in drop-down lists. The section “Making an Item Inactive” in Chapter 4 has more information on efficiently managing your items.
Tip
The Cost field in a new (or edited) inventory part record is optional. Entering a default cost can be useful for automating entry on purchase transactions and, in some instances, can help with properly reporting a change in value when an inventory adjustment record is recorded.
Non-inventory Part
Your company might want to create non-inventory items. For example, a construction company that orders appliances for the new homeowner but does not stock the appliances would create non-inventory items.
When non-inventory is used, the expense account on the non-inventory item record is used to record the cost at the time of purchase. These items never increase your inventory asset balances.
To practice adding a new non-inventory item, open the sample data file as instructed in Chapter 1:
1. On the Home page, click the Items & Services icon. The Item List displays.
2. In the lower-left corner, click the Item button, and select New, or use the keyboard shortcut Ctrl+N. The New Item dialog box displays.
3. From the Type drop-down list that displays, select Non-inventory Part.
4. In the Item Name/Number field, type Stain.
5. Select the Subitem Of checkbox; from the drop-down list, select Lumber.
6. Leave the boxes for Manufacturer’s Part Number and U/M Set (for Unit of Measurement) blank.
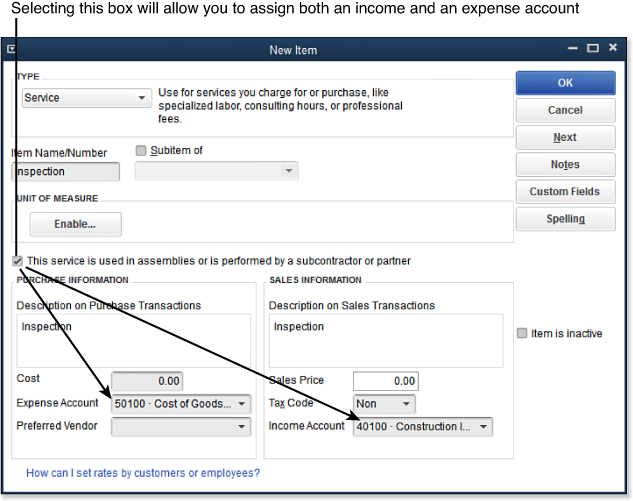
7. Check the This Item Is Used in Assemblies or Is Purchased for a Specific Customer checkbox as in Figure 5.7. See more details about the importance of this in the Caution that follows these instructions.
Figure 5.7. Use Non-inventory part type for items you stock but do not sell.
8. In the Description on Purchase Transactions box, type Stain.
9. In the Cost field, type 25.
10. In the Expense Account drop-down list, select the Cost of Goods Sold or, if you prefer, the expense account of your choice.
11. In the Preferred Vendor field, select or type Timberloft Lumber.
12. In the Sales Price field, type 100.00.
13. Leave the default of Tax assigned in the Tax Code field.
14. From the Income Account drop-down list, select the Construction Income:Materials Income account. You can also select the account by typing 40140 (the account number in this example).
15. Click OK to close the New Item dialog box.
Whether or not you are tracking inventory in your business, non-inventory parts are a great way to track items you consume as part of your business operations.
Entering or editing each inventory item can be time-consuming and takes you away from more important tasks. The next few sections provide alternatives for adding or editing multiple inventory items at one time.
Caution
Non-inventory parts require only one account by default. This is okay if you do not purchase and sell the item. To ensure proper accounting, I recommend that, when you create a non-inventory item type, you place a checkmark in the This Item Is Used in Assemblies or Is Purchased for a Specific Customer:Job box, as in Figure 5.7. This enables you to assign both an expense and an income account if you purchase and sell the item.
Using Add/Edit Multiple List Entries
Adding or modifying several list items in a single QuickBooks list can be a daunting task when you have to work with one list item at a time. In Chapter 1, you might have created your lists using QuickBooks Setup to add the people you do business with, the products or services you sell, and your bank accounts.
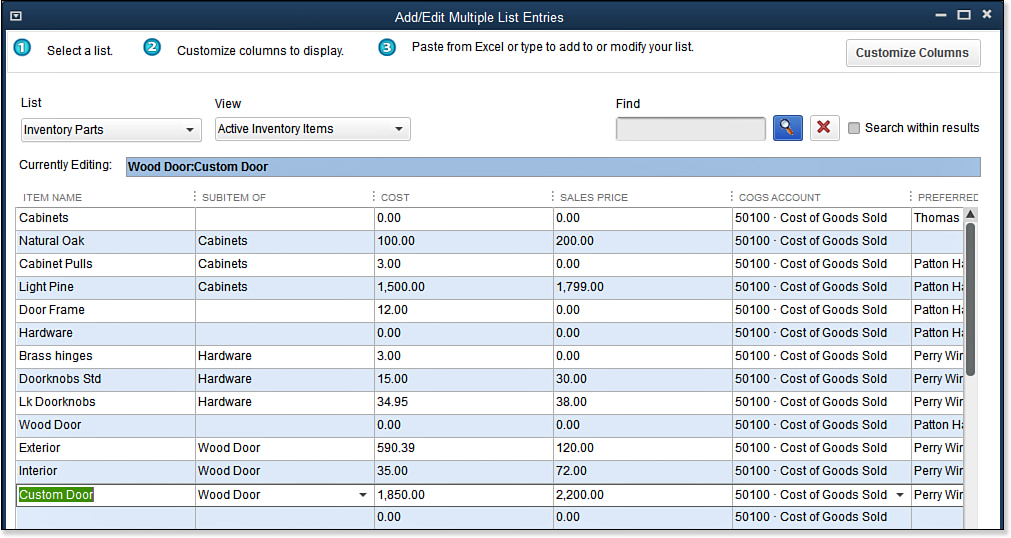
With the Add/Edit Multiple List Entries feature (see Figure 5.8), you can add to or modify service items or inventory and non-inventory parts. Using this feature can save you precious time, particularly when you want to add or make changes to multiple items on a list all at once.
Figure 5.8. Use the Add/Edit Multiple Lists Entries to add or modify multiple inventory parts efficiently.
With QuickBooks 2014, you can also access the Markup and Margin fields in the Add/Edit Multiple Lists feature when using QuickBooks Enterprise.
Tip
When using the Add/Edit Multiple List Entries tool, use the Tab key on your keyboard to move efficiently from one field to the next.
From the grid, you can right-click for other functionality. From the right-click menu, you can choose from Copy Down, Duplicate Row, Clear Column, and other useful features.
To view your newly added inventory item, in the Look For field at the top of the Item List, select Lists, Item List; then type Wood Door and press the Enter key on your keyboard. Do you see the newly created Custom Door listed? Click the Reset button to return to the original list.
You can also enter your inventory data into an Excel spreadsheet and then copy and paste it into the Add/Edit Multiple List Entries dialog box.
Caution
When cutting and pasting from Excel, make sure your columns of data in Excel match the order of the Add/Edit Multiple List Entries columns in QuickBooks.
Importing an Intuit Interchange Format File (IIF)
The term Intuit Interchange Format (IIF) refers to data exchange functionality that has been around for some time. It is a method for exporting lists from one QuickBooks file into a new QuickBooks file. The process creates a tab-delimited text file with the extension of .iif. You can view and edit this file using Excel.
The IIF format is a preferred and easy method to use if you already have a QuickBooks file with an items list you want to replicate in another QuickBooks file. To export an IIF-formatted items file from an existing QuickBooks file, follow these steps:
1. Open the QuickBooks file that has the items list you want to export and duplicate for another file.
2. From the menu bar, select File, Utilities, Export, Lists to IIF Files.
3. Select the Item List checkbox.
4. Click OK. You are prompted to provide a filename and to save the exported file. Remember the location where you store the file; you will need to browse to the .iif file to import it into another QuickBooks file.
5. Click OK to the message that your data was exported successfully.
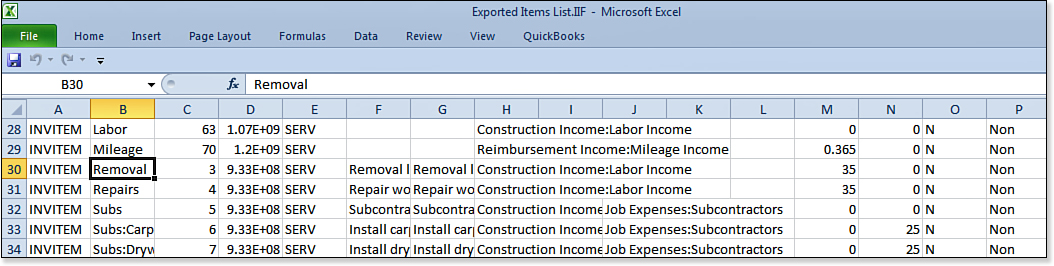
Figure 5.9 shows the exported items list in the IIF format in an Excel workbook. You can see that it is not as user friendly as the Add/Edit Multiple List Entries previously discussed.
Figure 5.9. An exported items list in IIF format can be imported into another QuickBooks file.
To import the saved IIF file into a new QuickBooks file, follow these steps:
1. Open the QuickBooks file you want to import the previously exported list into. If you have not already created your new file, select File, New from the menu bar and follow the prompts. (For more information, see Chapter 1.)
Caution
The IIF file format is a tab-delimited text file format with an extension of .iif. If you edit the details of the file, be sure to keep this format when saving your changes; do not save as an .xls or .xlsx Excel file type.
2. From the menu bar, select File, Utilities, Import, IIF Files.
3. When the Import dialog box opens, browse to the location of the stored IIF-formatted file.
4. Select the file and click Open.
5. QuickBooks then imports the IIF-formatted file into the QuickBooks data file. Click OK to the Your Data Has Been Imported message.
Now that you have your new data file with new lists from another file, you are ready to begin entering transactions. Just think of all the time you saved by not having to manually create each list item in the new file.
Changing Item Prices
Your business might have a variety of items, including Service, Inventory, Non-inventory Parts, and even Other Charge items. During the course of doing business, your costs of supplying these products or services will change, and you might want to update the Sales Price or Rate field stored with your items. Included with QuickBooks Pro, Premier, or Enterprise is the Change Item Prices tool (see Figure 5.10).
Figure 5.10. You can efficiently manage multiple inventory part sales price changes with Change Item Prices.
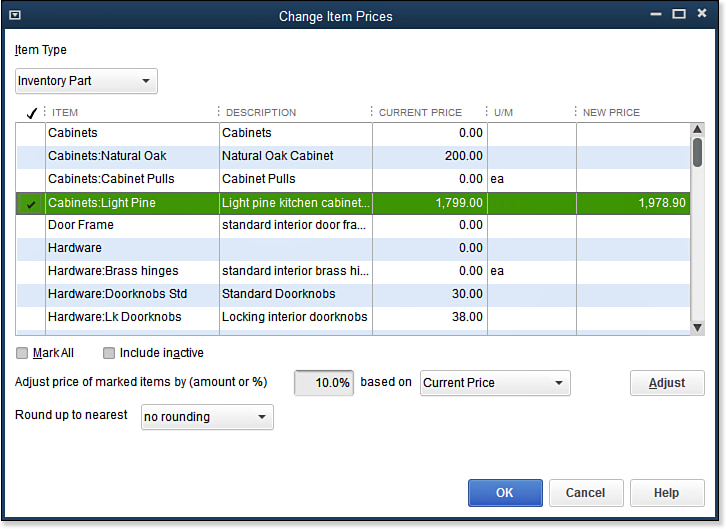
With this feature, you can change the price of the following:
• One item at a time
• More than one item at a time
• Several items by a fixed amount based on Current Price or Unit Cost
• Several items by a percentage based on Current Price or Unit Cost
Note
Do you want QuickBooks to automatically generate a sales price change based on some criteria, such as Class, Customer Type, or a specific time period for the new sales price?
QuickBooks Enterprise Solutions has this functionality with an Advanced Pricing subscription. See Appendix C for more details.
Caution
When using the Change Item Prices, if you want to increase the Current Price by a percentage, be sure to type the amount with the percentage symbol. For example, if you want to increase the New Price by 15 percent, you type 15%—without the % symbol, QuickBooks assumes that you want to raise the price by a fixed amount of $15.
Caution
In Chapter 9, you learn about working with memorized transactions. Note that changes made to item prices do not automatically change the prices you have previously recorded on a memorized customer invoice.
Using the Change Item Prices dialog box can be an efficient way of updating your pricing for multiple items at one time. QuickBooks Enterprise Solutions 14.0 provides more control over changes to the default part cost, sales price, and markup when an item’s cost changes. When entering a cost on a purchase transaction that differs from the cost in the item record, QuickBooks prompts the user to set a preference for updating the item record and sales price. See Figures 5.11 and 5.12.
Figure 5.11. Available only in QuickBooks Enterprise is the option to update the default cost and sales price when recording a purchase transaction.
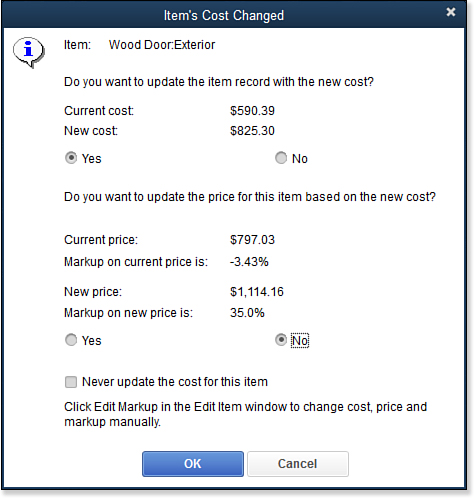
Figure 5.12. With QuickBooks Enterprise, you can define specific settings for handling markup percent or amount.

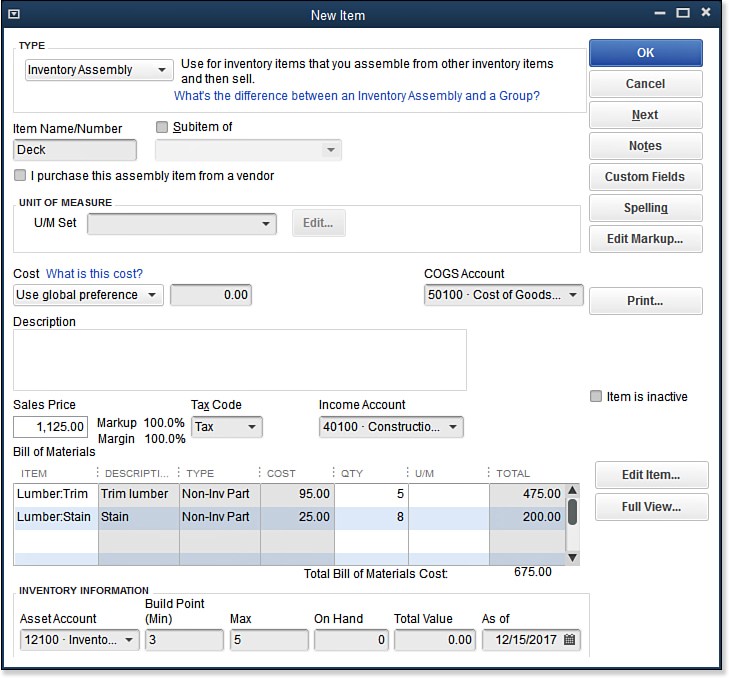
Creating Inventory Assemblies
The inventory assembly (see Figure 5.13) can include the following item types:
• Other Assemblies (Subassemblies)
• Inventory Parts
• Non-inventory Parts
• Service Items
• Other Charge Items
Figure 5.13. Inventory Assembly items are available in QuickBooks Premier, Accountant, or Enterprise.
Caution
Working with assemblies requires some care and attention on your part. A couple items are worth noting:
• Future changes to the Item default cost will update the costs of all assemblies that use that item.
• An assembly with items included that have zero for quantity cannot be built until the QTY has a number greater than zero. Using QuickBooks Enterprise can help with this, by building the subassemblies first. Appendix C has more details.
• QuickBooks Enterprise makes it possible to substitute parts in multiple assemblies at one time.
Carefully review the details of your assemblies by selecting Full View in the Add or Edit Assembly dialog box.
Creating the assembly is only part of the process. You also need to “build” the assembly.
Using inventory assemblies can help your business track whether you have enough components in inventory to build the finished product for your customers. You can edit inventory assemblies, but QuickBooks does not track the revision history for an item. If you are no longer selling a particular assembled item, you can make the item inactive so that it cannot be used on future purchase or sales transactions.
Note
You can include up to 50 different items in a Group Item. In versions earlier than QuickBooks 2013, you could have only up to 20 individual items in a Group Item.
Creating Group Items
Previously, Table 5.1 listed the differences between working with Group items (see Figure 5.14) and working with an Inventory Assembly. In this section, you learn how to work with Group items.
Figure 5.14. Creating group items can save you time when you need to enter multiple items.
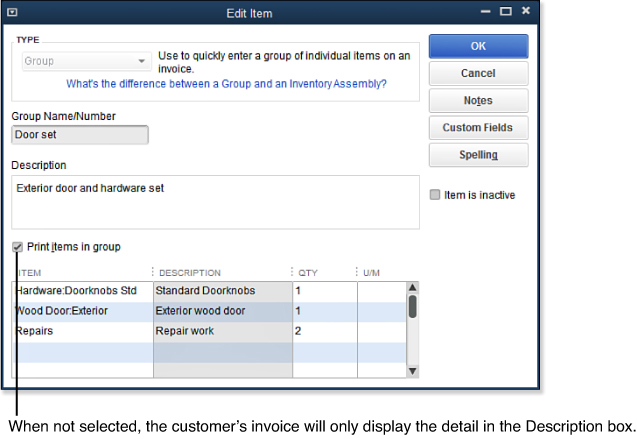
Unlike working with assemblies, when creating or editing a group item, you do not assign a cost for each item or a sales price for the group item. The cost and sales price are calculated for you from the respective totals for each of the included items.
→ To practice using this Group item on an invoice, see the section “Working with Group Items,” p. xxx.
Setting Up Multiple Unit of Measurement
If you are using QuickBooks Premier or Enterprise, you have the option to set up Multiple Unit of Measure. A benefit of this feature is the capability to assign a specific unit default for purchases, shipping, and sales transactions.
To begin using Multiple Unit of Measure in your Premier or Enterprise file, you need to enable the preference setting. To do so, follow these steps:
1. Log in to the file as the Admin or External Accountant user.
2. From the menu bar, select Edit, Preferences.
3. Select the Items & Inventory—Company Preferences tab.
4. In the Unit of Measure box, click the Enable button. This button is not present if the feature is already enabled.
5. Select either Single U/M Per Item or Multiple U/M Per Item (see Figure 5.15). For more information, see “Enabling Inventory Preferences,” p. xxx.
Figure 5.15. To begin using Multiple Unit of Measure, first enable the preference.
6. Click Finish. Click OK to close the Preferences dialog box.
Now that the preference is enabled, create the different unit measurements you will be tracking.
After enabling the Unit of Measure preference, you can create Multiple Unit of Measure for the Stain Non-inventory part. You created this part in the section of this chapter titled “Non-inventory Part”:
1. From the menu bar, select Lists, Item List.
2. Select the Stain non-inventory part you created earlier. Double-click the stain item to open the Edit Item dialog box.
3. From the Unit of Measure drop-down list on an existing item, select Add New to open the Unit of Measure dialog box.
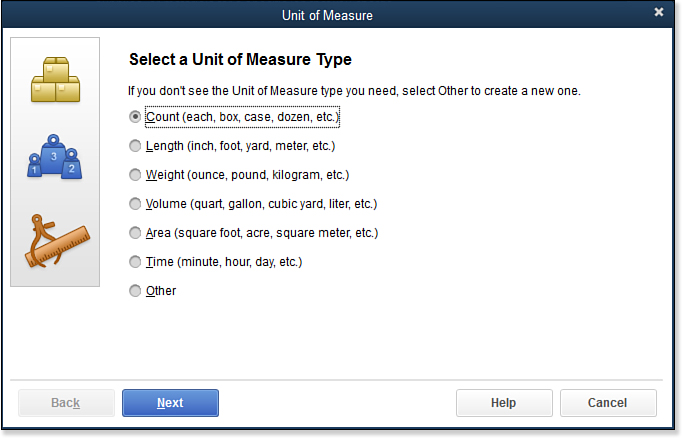
4. The Unit of Measure dialog box displays. Select Count (each, box, case, dozen, and so on). When working in your own file, if you do not see the desired unit displayed, select the Other option, as in Figure 5.16, and follow the instructions after you click Next to create a new base unit.
Figure 5.16. QuickBooks provides multiple units of measure types, or you can select Other to create your own.
5. Click Next and select Each (ea) as the Base Unit of Measure for this practice example (not shown).
6. Click Next to display the Add Related Units screen (see Figure 5.17).
Figure 5.17. For the unit of measure created, you define the number of base units (in this example, # of ea).
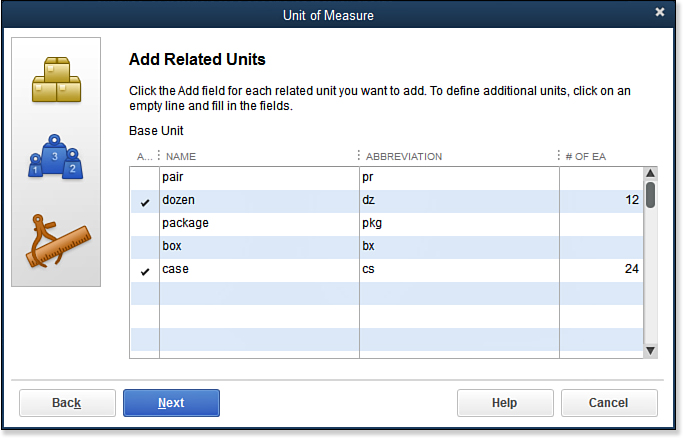
7. Place a checkmark next to the individual units of measurement you want to add to the selected item (see Figure 5.17 for the quantities used in this practice example). Click Next when complete.
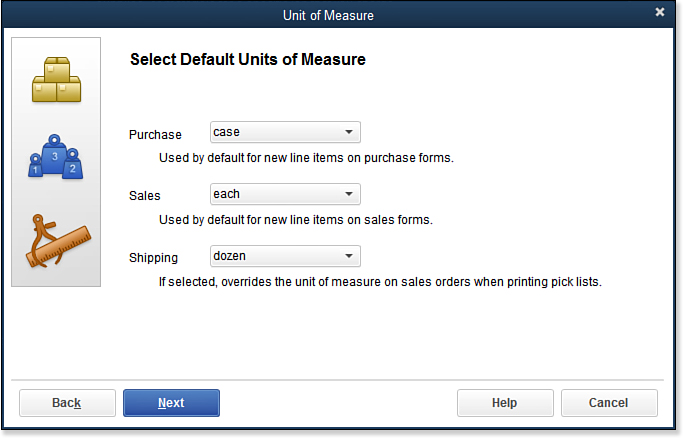
8. The Select Default Units of Measure screen displays. In the drop-down list, select the default units for Purchase, Sales, and Shipping transactions, as in Figure 5.18.
Figure 5.18. The benefit of working with Multiple Unit of Measurement is the capability to define the default units for specific transaction types.
9. Click Next.
10. The Name the Unit of Measure Set screen displays. Type a name for the unit of measure set, or accept the default name displayed.
11. Click Finish. The U/M Set now shows the configured Multiple Unit of Measurement assigned to the selected item.
12. Click OK to close the New Item dialog box or Edit Item dialog box.
With Multiple Unit of Measure defined for this item, entering inventory on transactions will be easier and more accurate.
Caution
When working with Multiple Unit of Measure, if you edit an existing unit of measure assigned to an item, you are warned, “Any changes you make to this unit of measure set will affect all items that use this set.”
Proper Inventory Processes
Understanding the recommended inventory process and the associated transactions can help you properly use the inventory feature. If you are new to inventory management, QuickBooks makes getting started with it easy, via the workflow outlined on the Home page, as shown previously in Figure 5.2.
Use a Purchase Order if you want to compare the bill the vendor sends with the original agreed-upon quantity and cost. With purchase orders, you can also keep track of what items have been ordered and have not yet been received.
You can receive inventory in one of two ways. With one method, you receive inventory with the vendor’s final bill. If you record full receipt of the quantity, QuickBooks marks the purchase order as closed. You can also choose to receive inventory without a bill. QuickBooks creates an Item Receipt document that is included in the accounts payable reports but cannot yet be paid in the Pay Bills dialog box.
Rest assured that, as you create the vendor’s final bill, QuickBooks recognizes whether you have outstanding purchase orders or item receipts that you want to associate with the vendor’s bill.
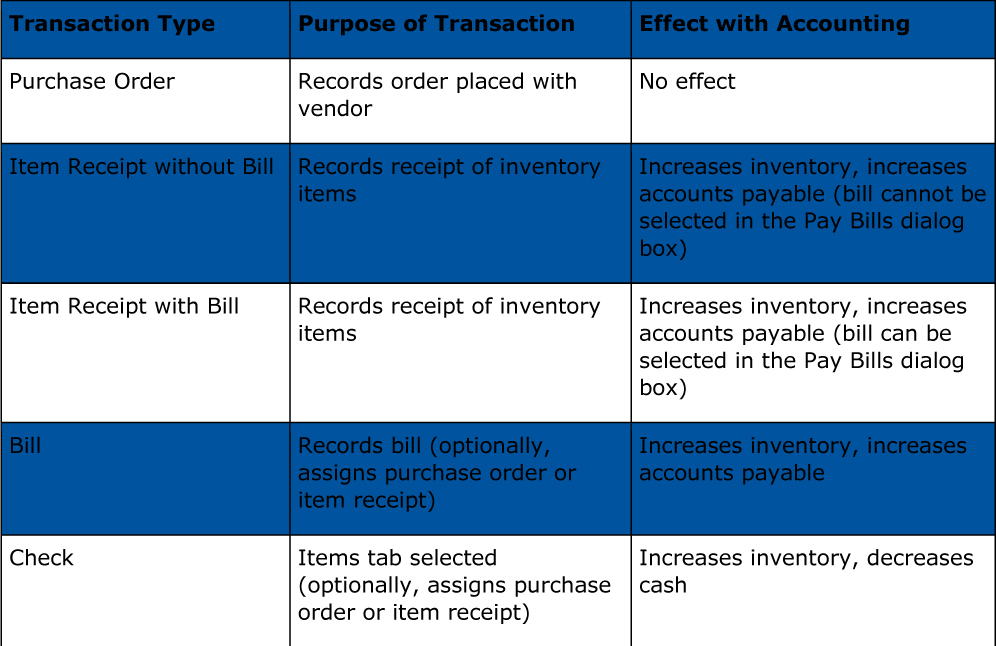
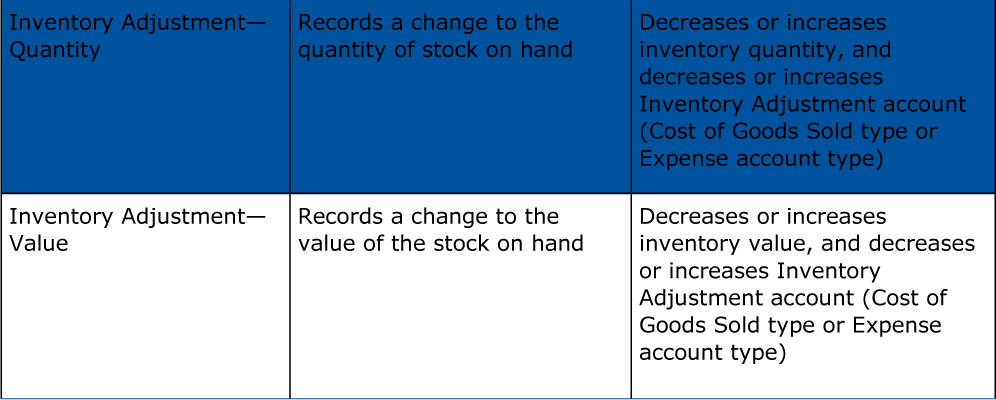
Table 5.2 shows a listing of all transaction types you should use when working with inventory and their related effects on the company’s accounting.
Table 5.2. Inventory Transaction Types
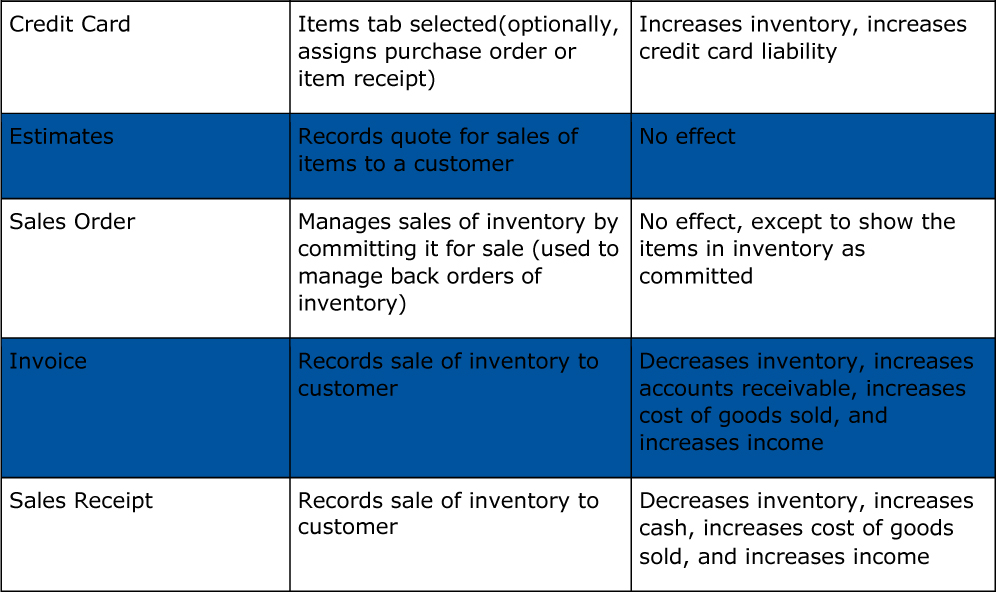
Tip
QuickBooks Enterprise Solutions 14.0 (all industry versions) includes the option to use Enhanced Inventory Receiving. When this feature is enabled as detailed in Appendix C, QuickBooks records an item receipt as an increase to Inventory and an increase to an Inventory Offset account (other current liability account created automatically by QuickBooks). Later when the vendor bill is entered, Accounts Payable is increased and the Inventory Offset account is decreased.
As a business owner, you do not need to worry about the details; QuickBooks Enterprise does all the behind-the-scenes accounting for you.
→ To learn more, see Appendix C, section titled “Enhanced Inventory Receiving,” p. xxx.
Purchasing, Receiving, and Entering the Vendor Bill
An important reason to purchase accounting software is to have the capability to track the expenses incurred in providing products or services to your customers. In fact, you can improve the business’s profitability by effectively managing your purchasing costs. In this section, you learn a recommended purchasing process specifically for inventory items and non-inventory items. This process is similar to the steps outlined in Chapter 7, “Setting Up Vendors.”
Review Table 5.2 in the previous section for how QuickBooks handles the accounting for inventory. To manage your inventory purchasing with the greatest level of control, follow these three steps:
1. Create a Purchase Order recording a commitment to purchase.
2. Receive inventory without a vendor bill to create an Item Receipt.
3. Enter Bills upon receipt and associate it with the open Item Receipt.
Caution
You can use other transaction types to pay for your inventory purchase: Write Checks or Credit Card Charges. If you use these transaction types to record your inventory purchases, you must use the Items tab to enter the items being purchased. However, these transactions do not track the vendor’s bill reference number.
Creating the Purchase Order
If you are practicing in your own data file, make sure you have read the section in this chapter titled “Enabling Inventory Preferences.”
Using the sample company referred to in Chapter 1, let’s practice creating a purchase order and receiving the inventory:
1. On the Home page, shown in Figure 5.2, click the Purchase Orders icon to open the Create Purchase Order transaction.
2. In the Vendor drop-down list, begin typing the letters Th. QuickBooks automatically prefills with the vendor Thomas Kitchen & Bath. Alternatively, you can scroll through the drop-down list and click to select a vendor for the purchase order.
3. Use the Tab key to move to the Class field, and select New Construction. If you have not enabled class tracking in your file, you will not have this field.
4. In this example, leave the Drop Ship To field blank. Accept the default Template, Date, P.O. No., Vendor, and Ship To details.
5. From the Item drop-down list, select the Light Pine item, a subitem of Cabinets.
6. Accept the default description.
7. In the Qty field, click the icon (see Figures 5.19 and 5.20) to view the Current Availability of the item. This useful feature is available only with QuickBooks Premier or Enterprise. Click Show Details for. From the Show Details for drop-down list, select Sales Orders.
Figure 5.19. Creating a purchase order helps you manage your expected costs.

Figure 5.20. Current Availability information for inventory items is conveniently included on purchasing and sales transactions in Premier or Enterprise editions only.
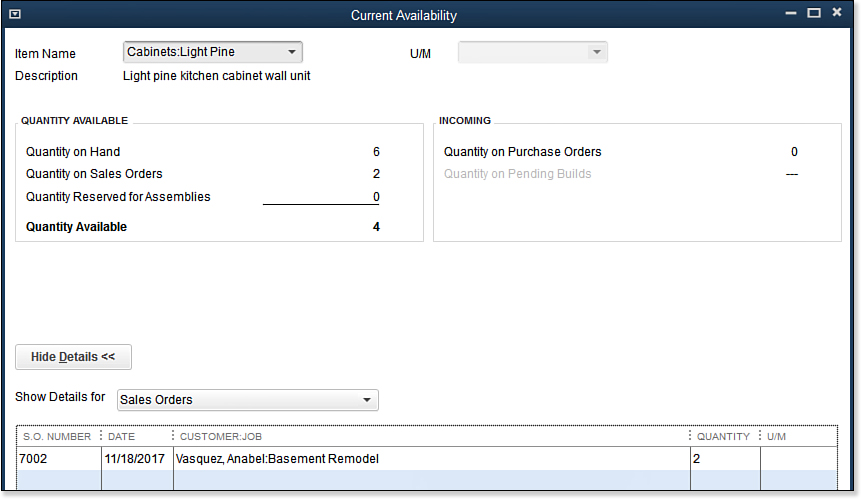
8. Click Close to close the Current Availability dialog box.
9. In the Qty field, type 2.
10. Accept the default Rate.
11. Leave the Customer field blank. For inventory items, the cost is assigned to the customer when the inventory item is included on a customer’s invoice. Select the customer only if you are using an item type other than inventory, and only if you know the customer at the time of purchase.
12. For this exercise, if U/M (Unit of Measure) is enabled, leave the field blank.
13. Accept the default Amount.
14. (Optional) In the lower-left Vendor Message field, type a message to the vendor.
15. (Optional) Enter a Memo. This field displays on reports and can be useful when you have multiple open purchase orders for one vendor at a time.
16. (Optional) Select the Print Later or Email Later box at the top of the transaction. Emailing transactions and reports requires the Send preference be enabled. You can access this preference from the Send Forms—My Preferences tab of the Preferences dialog box (from the menu bar, select Edit, Preferences).
17. For this practice example, click Save & New. If the Check Spelling on Form warning displays, select the Ignore All option.
18. Let’s preview the purchase order just created. From the Create Purchase Orders transaction, click the arrow (top left) pointing to the left. The purchase order just created displays.
19. Click Preview from the drop-down menu under the Print icon found on the Main tab of the transaction ribbon.
20. Your newly created purchase order displays using the default purchase order template.
→ For more information, see “Customizing QuickBooks Forms,” p. xxx.
21. Click Close to close the preview, and click Save & Close to close the Create Purchase Orders transaction.
Tip
Did you know that, by default, QuickBooks would have you use the Tab key on your keyboard to advance from one field to another with certain transactions?
If you inadvertently used the Enter key on your keyboard, QuickBooks might store the incomplete transaction. If this happens to you, use the arrows at the top left of the open transaction to find the transaction you did not fully complete.
If you prefer to use the Enter key on your keyboard to advance between fields, you can set that preference on the General—My Preferences tab of the Preferences dialog box (select Edit, Preferences, General from the menu bar). Select the Pressing Enter Moves Between Fields checkbox, and click OK to save your preference setting. Later, when recording transactions, you can press Ctrl+Enter on your keyboard to save a transaction.
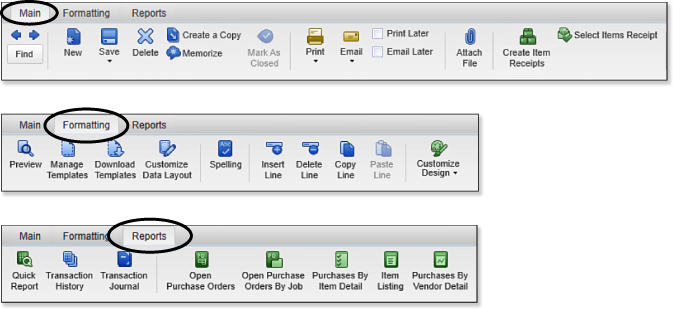
To simplify creating purchase orders, you can access useful tasks from the ribbon toolbar on the top of the Create Purchase Orders transaction. The ribbon toolbar includes the following tabs, shown in Figure 5.21.
• Main—Central location for common tasks related to working with purchase orders. From this tab, you can use the Find, Save, Print, and Email functions and access other purchase order functions.
• Formatting—Preview, manage, download, and customize the purchase order form. Chapter 9 has more information.
• Reports—Get quick access to common reports for the displayed purchase order, and get useful purchase order reporting on all purchase orders.
Figure 5.21. Use the transaction ribbon toolbar to access commonly used tasks and reports.
Tip
If you want to minimize the ribbon toolbar at the top of a displayed transaction, click the arrow on the top right that is pointing up. Clicking expands or collapses the ribbon toolbar, depending on its present state.
To the right of a displayed purchase order, you might see the following tabs, which Figure 5.19 showed earlier. If you do not see these tabs, click the small arrow pointing to the right next to the Template to view them:
• Vendor—Review summary and recent transaction information for the vendor selected on the purchase order. Also includes links to edit the vendor record, create a QuickReport, and enter notes for the current transaction.
• Transaction—View summary information, related transactions, and notes for the currently displayed purchase order.
If you are using QuickBooks Enterprise software, you have the added feature of automatically creating purchase orders from your inventory stock status reports. New for QuickBooks 2014, the Auto Create Purchase Orders now suggests a quantity to purchase. The suggested Quantity factors in the Quantity Available and Quantity on Purchase Orders and then compares this to the Reorder Point, Max value for the item.
To use QuickBooks Enterprise to automatically create multiple purchase orders, follow these steps:
1. From the menu bar, select Reports, Inventory, Inventory Stock Status by Item or Vendor.
2. On the top of the displayed stock status report, click the Create Auto PO’s button, shown in Figure 5.22.
Figure 5.22. With QuickBooks Enterprise, review your stock status reports and prepare replenishing purchase orders easily.
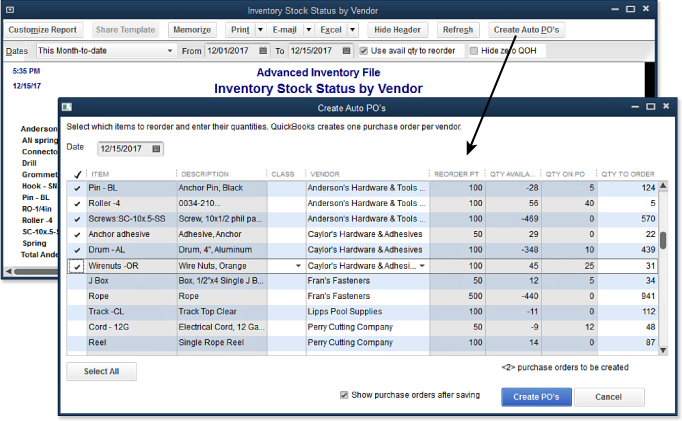
3. The Create Auto PO’s dialog box displays (see Figure 5.22).
4. Items with Preferred Vendors stored on the part record display with that vendor’s name. In the vendor column, change the vendor as needed.
5. Place a checkmark next to the parts you want to include on the purchase orders. QuickBooks creates one purchase order per vendor.
6. QuickBooks suggests a quantity to order based on the Max reorder point value stored with the inventory item. You can change the Qty to Order as appropriate.
→ For more information on how easy it is to upgrade your Pro or Premier file to QuickBooks Enterprise, see “Upgrading Your QuickBooks Version,” p. xxx.
Congratulations on taking the first step toward successfully managing your inventory!
Receiving Item(s) into Inventory
Next, you work with receiving your items into inventory. You will find many of the same ribbons on top and tabs to the right that were available on the purchase order transaction.
Continuing with your practice using QuickBooks sample data and building on the previous exercise, let’s record the receipt of the inventory:
1. From the Home page, from the drop-down list next to the Receive Inventory icon, select Receive Inventory Without Bill. The Create Item Receipts transaction opens.
2. In the Vendor field, begin typing the letters Th and press the Tab key on your computer keyboard. QuickBooks automatically prefills the rest of the vendor’s name.
3. The Open POs Exist dialog box displays. Click the default Yes.
4. Click to place a checkmark in the first column to assign the purchase order to this Item Receipt (see Figure 5.23).
Figure 5.23. When creating an item receipt, QuickBooks lists open purchase orders for that vendor.
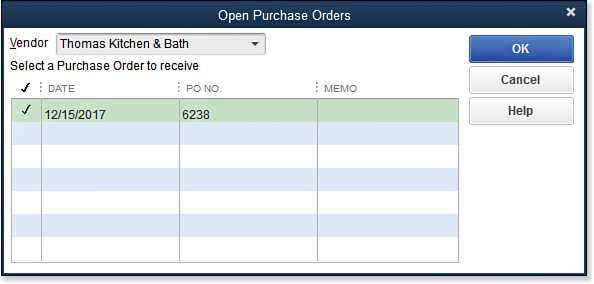
5. Click OK. The Create Item Receipts transaction prefills with the information from the original purchase order.
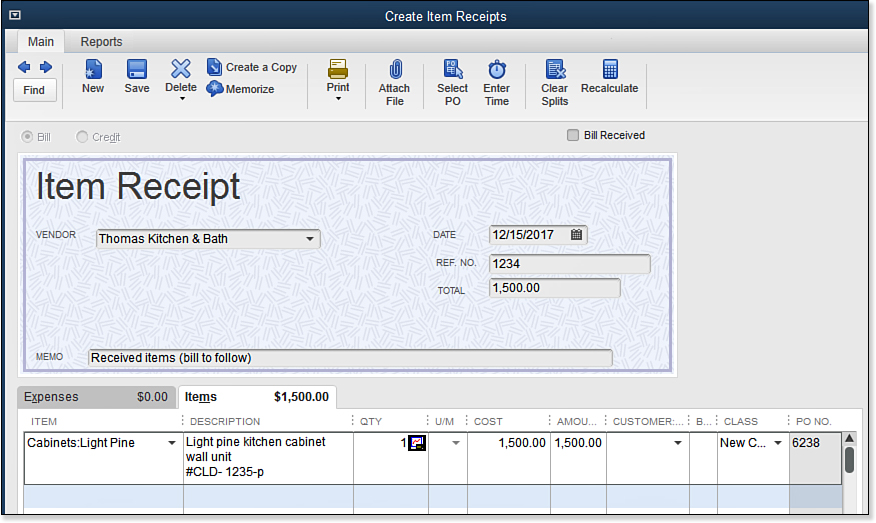
6. In this exercise, accept the default date. In the Ref. No. field, type 1234.
7. To continue with the practice example here, record only a partial receipt of the inventory items, and replace the 2 in the Qty field by typing 1 (see Figure 5.24).
Figure 5.24. When receiving inventory without the final vendor bill, QuickBooks creates an Item Receipt.
8. Leave the Customer:Job and Billable? fields blank. Accept the default Class and PO No. assigned.
9. Notice other useful buttons on the Create Item Receipts transaction:
• Clear Qtys—Click this if you want to clear all quantity fields and enter them manually.
• Show PO—Click this to open the selected purchase order. It is useful if you need to make changes to the purchase order details.
10. To continue with the practice, click Save on the Main tab of the ribbon toolbar on the Create Item Receipts transaction. This saves the details but leaves the current transaction displayed for this exercise. (Normally, you will be selecting Save & New or Save & Close at the bottom of the transaction.)
11. Click the Transaction tab to the right to view Related Transactions, including a link to the Purchase Order used to create this item receipt. Another option is to select Transaction History on the Report tab of the ribbon toolbar.
12. Click the Purchase Order link in the Related Transactions section of the Transaction tab to view the Purchase Order that the Item Receipt is linked to.
13. The Create Purchase Orders transaction now includes a column with the Backordered quantity.
14. Click Save & Close to close the Create Purchase Orders transaction.
15. Click Save & Close to close the Create Item Receipts transaction.
Notice other useful features or reports found on the Create Item Receipts ribbon toolbar:
• Main—Central location for common tasks related to working with item receipts. From this tab, you can find, save, create new item receipts, enter time (from time sheets), and clear splits (remove the line detail), to name just a few of the additional functions available.
• Reports—Quick access to common reports for the displayed item receipt. New for QuickBooks 2014, the Report tab of the ribbon toolbar includes access to more reports.
Tip
Did your vendor not supply you with a vendor bill number (same as Ref. No.)? You might want to use the same date as the vendor bill in the Ref. No. field. The primary purpose of the Ref. No. field is to warn you if you enter a bill with the same reference number more than once.
Now might be a good time to advance to the section titled “Inventory Reporting,” p. xxx in Chapter 6. Specifically, look for reports in the Report Center, Vendors and Payable section. You can review several excellent purchasing reports.
Tip
Do you have freight, shipping, or handling charges to add from the vendor’s item receipt? To track them as an added expense but not as part of the average cost of this inventory item, click the Expenses tab on the vendor bill, or write a check transaction and add the additional charges.
Entering the Vendor Bill
When it comes to inventory, the more controls you have in place surrounding your purchasing process, the more accurate your accounting data will be. In the next step, you learn how to enter a vendor bill and assign it to the previously recorded item receipt.
Continuing with your practice using QuickBooks sample data (as discussed in Chapter 1), let’s record the vendor bill and assign it to the open item receipt from the previous exercise:
1. On the Home page, click the Enter Bills Against Inventory icon. The Select Item Receipt transaction opens.
2. In the Vendor field, select Thomas Kitchen & Bath as the vendor from the drop-down list.
3. (Optional) Select the Use Item Receipt Date for the Bill Date checkbox. Because QuickBooks removes the item receipt and replaces it with a bill, you want to be sure to use the date you want your financials affected. You can also set a Default Date to Use for New Transactions by selecting Edit, Preferences, General—My Preferences tab from the menu bar.
4. Select the appropriate item receipt to associate with this bill, as in Figure 5.25.
Figure 5.25. Be certain your item receipt is highlighted before clicking OK.
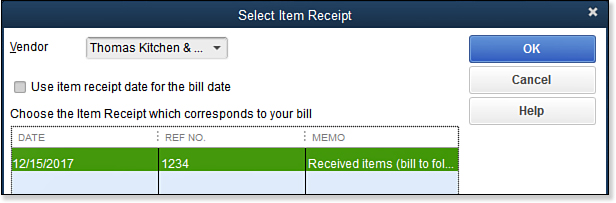
5. Click OK to close the Select Item Receipt transaction. The Enter Bills transaction displays and the item receipt no longer exists as an item receipt transaction.
6. In this exercise, accept the vendor’s Ref. No., Qty, and Cost. When you are creating your own vendor bill transactions, you should carefully inspect that the vendor’s bill details for Ref. No., Qty, and Cost agree with your records generated by the original purchase order.
7. Click Save & Close. If the message stating you have changed the transaction displays, click Yes.
Your business will benefit from the added cost controls put in place when you use a purchase order and receive item transactions. This process is particularly useful when the vendor sends the final bill separately from the original shipment. When you do get the vendor bill in the mail, you can review the details to make sure they agree with your records.
Paying for Inventory
You have now learned how to efficiently manage your inventory, beginning with the purchase order that tracks the quantity ordered and the agreed-to cost. Next, when the product is delivered to your warehouse, you enter an item receipt with or without the vendor bill.
After creating a vendor bill in the previous section, you are ready to process a payment by check, credit card, or electronic funds transfer (ACH) to your vendor.
Using the sample company referred to in Chapter 1, you will now create a payment to the vendor for the bill created in the earlier exercise:
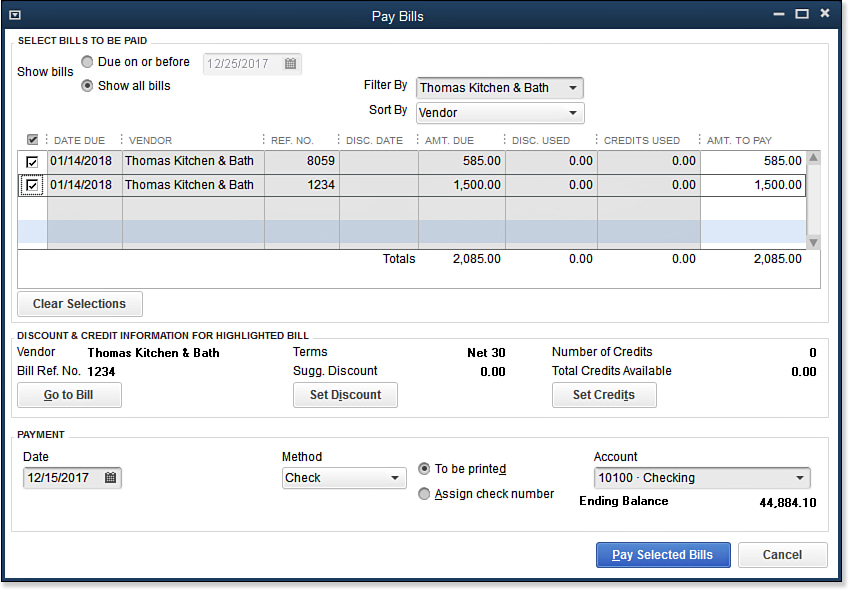
1. On the Home page, click the Pay Bills icon. The Pay Bills dialog box displays.
2. Leave the Show All Bills option selected.
3. In the Filter By drop-down list, select Thomas Kitchen & Bath. When you are ready to pay your bills in your own QuickBooks file, you will probably not need to filter for a specific vendor because you will process multiple checks for many vendors at once.
4. In the Sort By drop-down list, view the other options for sorting the bills in the Pay Bills dialog box.
5. Place a checkmark next to both of the bills in the first column on the left. Notice that, after you place a checkmark, the Amt. to Pay column for each bill equals the Amt. Due column (see Figure 5.26).
Figure 5.26. You can filter the Pay Bills dialog box for a single vendor.
6. With a bill selected, click the Go to Bill button. Notice how easy it is to get to the original transaction. Press the Esc key on your keyboard to close the Enter Bills transaction and return to the Pay Bills dialog box.
7. For this exercise, leave the default Payment Date. When working in your own data, enter the date you want to print on the vendor checks.
8. Accept the default of Check for Payment Method.
9. In the Account field, accept the default of Checking account. (When working with your own data, you will select the account you are recording the payment from.) Notice that QuickBooks displays your projected Ending Balance for your bank account.
10. Click Pay Selected Bills. QuickBooks opens the Payment Summary dialog box.
11. Review the details displayed, including payment date, account, and method.
12. Choose from Print Checks, Pay More Bills, or in this exercise click Done if you do not want to practice printing (using plain paper).
13. If you selected the option to Print Checks, the Select Checks to Print dialog box displays. Accept the defaults for Bank Account and First Check Number.
14. Review the list of checks to be printed. Each will have a checkmark in the column to the left. Remove the checkmarks from any checks you do not want to print at this time.
15. Click OK to open the Print Checks dialog box. Select your printer from the Printer Name drop-down list, and then choose the proper Check Style from Voucher, Standard, or Wallet. Chapter 13, “Working with Bank and Credit Card Accounts,” has more detailed instructions on setting check printing preferences
16. Click Print. For this exercise, make sure you have plain paper in your printer. A check printed to plain paper is not a negotiable document.
17. The Print Checks—Confirmation dialog box displays. In this exercise, click OK to close the confirmation.
See how easy it is to print checks paying your vendors? You can order checks from most reputable check suppliers or order directly from Intuit. To order checks from Intuit, select the Print Checks icon on the lower right of the Home page, or click the Order Checks button at the bottom of the left icon bar. An Internet connection is required.
In the next section, you learn how to handle selling inventory on a customer invoice.
Tip
When selecting vendor bills to pay, you can override the Amt. to Pay and type an amount of your choice. QuickBooks keeps track of the remaining balance due to the vendor.
Tip
Did you know that you can pay your vendors by a number of methods? These methods include printing a check, recording a manually written check, using credit card, and even making an online bank payment. To learn more about preferences for printing checks or making online payments directly from your QuickBooks file, see Chapter 13.
Selling Inventory
For your business to survive, you need to sell your products (or services) to customers. The next important task discussed in this chapter shows just how easy it is to prepare invoices for your customers in QuickBooks.
First, it might be helpful to review the proper accounting for inventory at the time of sale. Recall that Table 5.2 detailed the impact an invoice or sales receipt has on accounting—namely, to decrease inventory, increase accounts receivable or cash, increase cost of goods sold, or increase income.
Your inventory item setup does all this complicated work for you behind the scenes. First, each inventory item in QuickBooks is assigned an inventory asset account, COGS (cost of goods sold account), and an income account. Second, QuickBooks uses the average cost method to calculate the cost of your product at the time of the invoice.
→ For more information, see “Reviewing the Recorded Average Cost Valuation,” p. xxx.
QuickBooks truly makes it easy to create invoices for your customers. Getting your customers to pay them is another task! Join me later in Chapter 10, “Managing Customers,” in the sections “Income Tracker” and “Enable the Collections Center”.
Tip
When recording customer invoices in your own data, you have the option to click the Save button at the top. Typically, you do not need to do this each time. Instead, you can choose between the Save & Close button and the Save & New button on the lower right.
Working with Group Items
Using Group items can save time when you need to enter several items on a purchase or sales transaction.
Using Group items makes data entry more efficient when you need to enter multiple items at one time. An added benefit is that using Group items also provides the option to hide individual line details on the invoice provided to the customer.
Next, continue your practice by working with assembly items.
Working with Assemblies
Assemblies are used when you want to enter multiple items at one time and track the on-hand quantity for the finished good. Inventory assemblies are available only with QuickBooks Premier (all editions), Accountant, and Enterprise (all editions).
Working with assemblies is a two or three-step process:
1. Create the assembly.
2. Build the assembly.
3. If the assembly contains other assemblies as a component, build the “nested” assembly first.
New for QuickBooks Enterprise 14.0 are many improvements for working with assemblies.
→ For more information, see “Working with Assemblies” in Appendix C, p. xxx.
Using the sample company referred to in Chapter 1, let’s practice building an assembly and creating an invoice with an assembly item in your sample data:
1. From your Home page, from the drop-down list next to the Inventory Activities icon, select Build Assemblies. The Build Assemblies dialog box opens (see Figure 5.27).
Figure 5.27. You must first build the assembly to track the quantity of manufactured products.
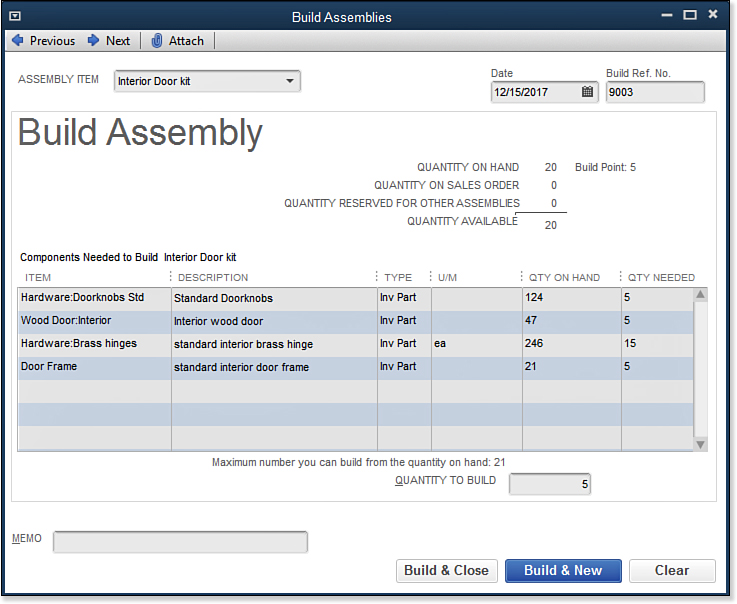
2. In the Assembly Item drop-down list, select Interior Door Kit.
3. Accept the default Date and Build Ref. No.
4. Review the individual items and note the reported maximum number of items that can be built with the stock on hand (lower right).
5. In the Quantity to Build box, type 5. Enter an optional memo for your own reporting.
6. Click Build & Close.
With the assembly now built, you are ready to add the assembly to a customer’s invoice. To do so, follow these steps:
1. On the Home page, click the Create Invoices or Invoices icon. The icon name differs, depending on whether you have enabled specific Time and Expenses preferences. If another menu drop-down list displays, select Create Invoices.
2. In the Customer:Job drop-down list, select the Baker, Chris:Family Room job. Select Remodel for the Class field. Accept the default Template, Date, Invoice #, Bill To, Ship To, Terms, and Due Date fields.
3. In the Item column, select Interior Door Kit.
4. In the Quantity field, type 1.
5. In the Rate field, type 125.00. This rate would have been prefilled if a sales price were associated with the inventory assembly.
6. Click Save & Close to close the Create Invoices transaction.
How do you handle your accounting when you do not have enough inventories on hand to ship to a customer? Join me in the next section for details on working with sales orders to track these backorders.
Tip
The sales order transaction type is available only in QuickBooks Premier (all editions), QuickBooks Accountant, and QuickBooks Enterprise Solutions (all editions). If you need this functionality, consider upgrading your file to Premier or Enterprise. For more information, see “Upgrading Your QuickBooks Version,” p. xxx.
Additionally, working with sales orders is a preference that is enabled by logging in to the file as the Admin or External Accountant. From the menu bar, select Edit, Preferences, Sales & Customers—Company Preferences, and click the Enable Sales Orders checkbox.
Handling Inventory Backorders
Do you want to “commit” inventory to a customer ahead of purchasing the inventory? Handling backorders for your customers is best tracked using the Create Sales Order transaction available with QuickBooks Premier (all editions), QuickBooks Accountant, and QuickBooks Enterprise Solutions (all editions).
Using sales order transactions, you can record that you have committed inventory (backordered) for sale to the customer, provide the customer details of the sale for prepayment, and later create the customer invoice directly from the sales order details. If you do take a prepayment from a customer, you will want to review the instructions included in Chapter 9, in the section “Recording the Customer Payment,” p. xxx.
Sales orders are considered a nonposting document, meaning that when they are created, they do not affect inventory, revenue, or costs until the sales order is converted to an invoice; on the other hand, if you use a sales receipt, you affect your inventory, revenue, and costs when the sales receipt is recorded.
Using this sales order transaction type is the best solution if you must provide a sales document to a customer before the customer receives the merchandise.
Using the same sample data discussed in Chapter 1, let’s create a sales order after enabling this in preferences:
1. On the Home page, click the Sales Orders icon. If you do not have this icon, make sure sales orders are enabled in the Sales & Customers—Company Preferences.
2. In the Customer:Job drop-down list, select the Home Remodel job for the customer Bauman, Mark, as in Figure 5.28.
Figure 5.28. Use a sales order to commit inventory for a future sale.

3. For the Class field, select Remodel.
4. Leave the default template, date, S.O. No., Ship To, and P.O. details.
5. In the Item column drop-down list, select the Wood Door:Exterior inventory part. Accept the default description.
6. In the Ordered column, type 2. Leave the other fields on the row as the default. If you are using the QuickBooks-supplied sample data for this practice, you will have a Sales Order for 2 Exterior Wood Doors with tax.
7. For this exercise, click Save at the top of the transaction. This saves the sales order and assigns the sales order number, but it keeps the sales order open for viewing. We do this just for the purposes of this practice example. In your own data, you would want to select Save & Close or Save & New at the bottom of the transaction.
8. In the Print drop-down list, at the top of the open sales order, select Preview. Click Close when you are done with the Print Preview dialog box.
9. Click Save & Close (or Save & New) to practice creating another sales order.
10. Next, create an invoice for the open sales order. On the Home page, click the Create Invoices or Invoices icon. (Optional) From an open sales order, you can click the Create Invoice icon at the top of the transaction to create the invoice.
11. In the Customer:Job drop-down list, on the Create Invoices transaction, select Bauman, Mark:Home Remodel job. The Available Sales Orders dialog box shown in Figure 5.29 displays.
Figure 5.29. Don’t forget to place a checkmark next to each available sales order you want to invoice.
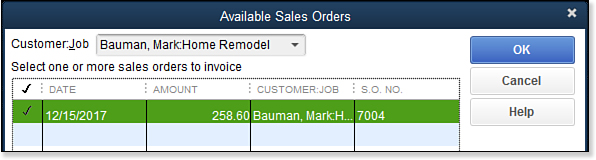
12. Click in the first column to place a checkmark next to the listed open sales order(s) you want to include on the invoice to the customer.
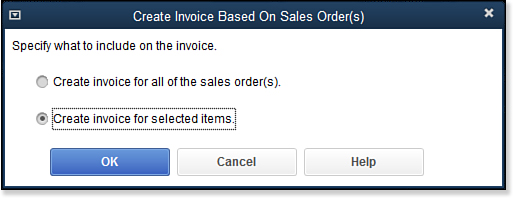
13. Click OK. The Create Invoice Based on Sales Order(s) dialog box displays. For this exercise, select the Create Invoice for Selected Items option button, shown in Figure 5.30.
Figure 5.30. Invoicing a partial sales order.
14. Click OK. QuickBooks displays the Specify Invoice Quantities for Items on Sales Order(s) dialog box, as in Figure 5.31.
Figure 5.31. Use this dialog box to specify the quantity of the sales order items you want to invoice.
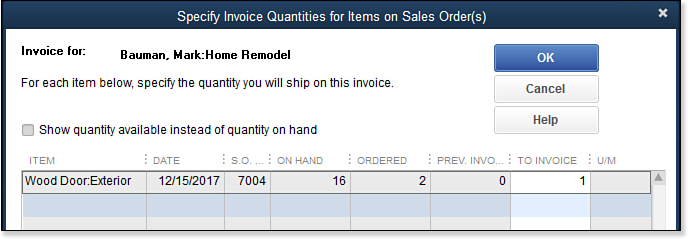
15. (Optional) Select the Show Quantity Available Instead of Quantity on Hand checkbox. How quantity available and quantity on hand differ is determined by your settings in Inventory preferences (see Figure 5.1).
16. In the To Invoice column, type 1 (to record a partial invoice).
17. Click OK to return to the Create Invoices transaction.
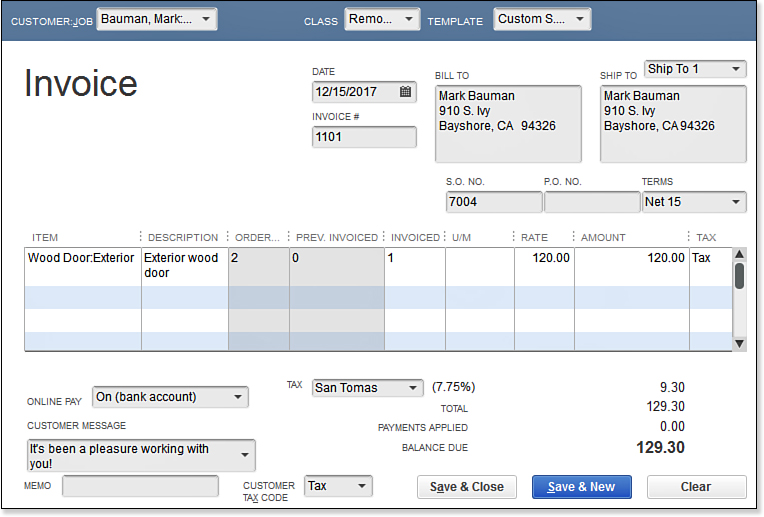
18. Review the details on the invoice (see Figure 5.32) for the Wood Door:Exterior with details for Ordered, Prev. Invoiced, and Invoiced. If you selected multiple sales orders to invoice, you will also have a column for Backordered on the invoice template. Click Save on the top of the transaction.
Figure 5.32. The invoice now shows separate columns for Ordered, Prev. Invoiced, and Invoiced.
19. In the Recent Transactions section on the Customer tab (on the right side of the dialog box), click the link to the Sales Order you created in this exercise. (Optional) From a displayed transaction, select Transaction History from the Report tab on the ribbon toolbar.
20. The Create Sales Order transaction displays with the details of the original sales order. Notice the new columns of detail for Backordered and Invoiced on the sales order.
If your customer orders inventory before you have made or ordered the part, using the sales order transaction can keep track of these committed sales. Reviewing your open sales orders is important for effective inventory management.
Handling Customer Inventory Returns
When your company offers an inventory product for sale, you will probably also have customers returning product. In QuickBooks, you use a credit memo transaction to record the return.
Processing your customer returns correctly can be important to your company’s financials. A returned inventory product from your customer affects the following:
• Inventory physical count and inventory valuation on the balance sheet
• Accounts receivable balance on the balance sheet
• Income and cost of goods sold
• Sales tax payable (if applicable to your business and product)
To help you be more efficient with this process, you can create a credit memo directly from the original customer invoice. This functionality can help QuickBooks users be more accurate when recording customer returns.
Using the same sample data discussed in Chapter 1, you can continue with the practice exercise you completed earlier when creating an invoice:
1. On the Home page, click the Customers icon to open the Customer Center (see Figure 5.33).
Figure 5.33. The Customer Center can be the easiest place to find specific transactions.
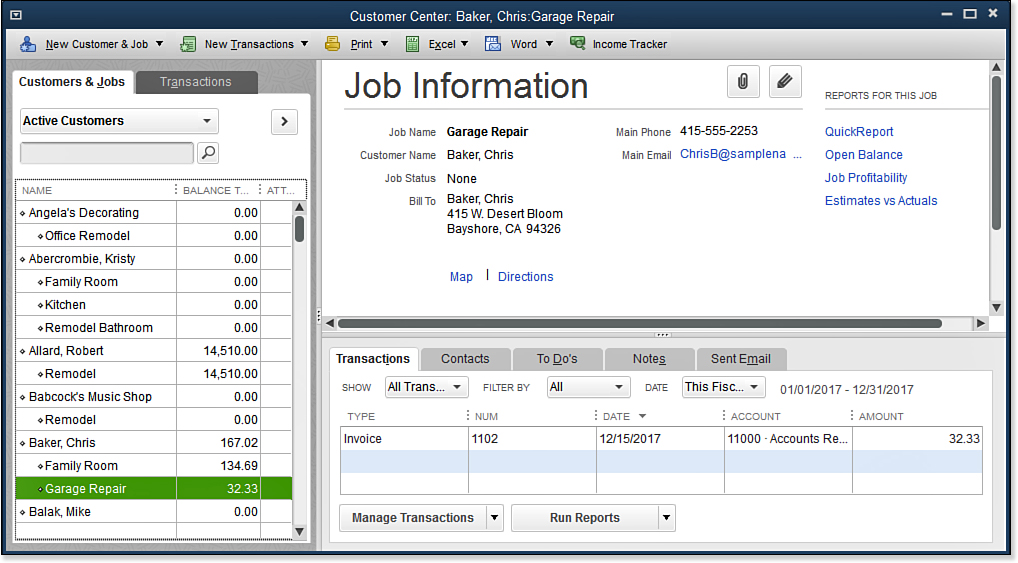
2. On the Customers & Jobs tab, select the Garage Repair job for the customer Baker, Chris.
3. On the right side of the Customer Center, you should see the invoice you created in the earlier practice example. Double-click it to open the selected invoice.
4. With the customer invoice open, from the Main tab of the ribbon toolbar (at the top of the Create Invoices transaction), select Refund/Credit.
5. The Create Credit Memos/Refunds transaction displays with the same item(s) that was included on the original invoice. Review and leave the default information. In your own data, you might need to add or remove items from the Create Credit Memos/Refunds transaction.
6. Click Save & Close. The Available Credit dialog box displays, as shown in Figure 5.34, with these options:
• Retain as an Available Credit
• Give a Refund
• Apply to an Invoice
Figure 5.34. Multiple options are available for handling customer credits.
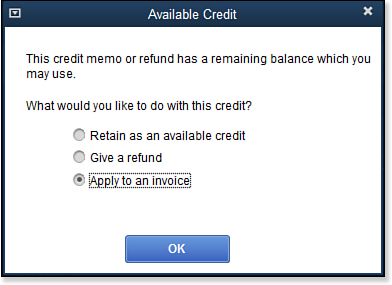
7. For this practice, select the Apply to an Invoice option button. Click OK. The Apply Credit to Invoices dialog box displays (see Figure 5.35). In this practice example, QuickBooks has automatically selected the invoice you created in the previous practice.
Figure 5.35. You can manually override the amount or invoice selection in how a customer credit is applied.

8. Click Done. You return to the Create Invoices transaction that, for this exercise, shows a Balance Due of 0.00 in the lower-right corner with a Paid stamp on the invoice.
9. Click Save & Close.
QuickBooks makes it easy to create and track customer returns.
Handling Vendor Inventory Returns
Perhaps after receiving the returned inventory from your customer, you find that the product was not manufactured to your specifications and needs to be returned to the vendor.
Handling these types of returns properly is important and can affect these financial balances:
• Inventory physical count and inventory valuation on the balance sheet
• Accounts payable balance on the balance sheet
Tip
When applying a credit memo to an invoice in the Apply Credit to Invoices dialog box, shown in Figure 5.35, QuickBooks matches the credit to an invoice of the same amount if there are multiple invoices with open balances by default. If no match is found, QuickBooks applies the credit to the oldest invoice(s) first.
To create a vendor return in your QuickBooks data file, follow these steps:
1. On the Home page, click the Enter Bills icon.
2. Select the Credit radial button at the top of the Enter Bills transaction to create a vendor credit.
3. From the Vendor drop-down list, select the vendor you are returning the product(s) to.
4. For the Date field, enter the date you want to record for the return of the inventory.
5. In the Ref. No. field, enter your vendor’s credit authorization number, if supplied.
6. Click the Items tab and select the inventory item(s) being returned.
7. In the Qty field, type the number of units being returned.
8. Review the default Cost, and adjust as needed to agree with your vendor’s credit authorization.
9. Click Save & Close (or Save & New) to enter another vendor credit.
Entering a vendor credit is the first step in the process. When you know which bill your vendor applied the credit to, you can assign the credit to the same bill. For more detail, see “Applying Vendor Credits,” p. xxx.