
2. Getting Around QuickBooks
You can make the most of your QuickBooks software when you learn how to navigate and customize the options available to meet your business’s specific needs. This chapter shows you just how easy that task can be. For example, if your business does not need to track inventory, you can turn off that feature. However, as your business grows and the products and services you offer change, you can later enable these features again.
Home Page and Navigation
QuickBooks 2014 makes this easy-to-use and popular accounting software even easier to customize and navigate. Let’s start by making this your software!
Title Bar
At the top of your open QuickBooks file is the title bar, which Figure 2.1 shows on the Home page.
Figure 2.1. Working with the many QuickBooks navigation points is easy.
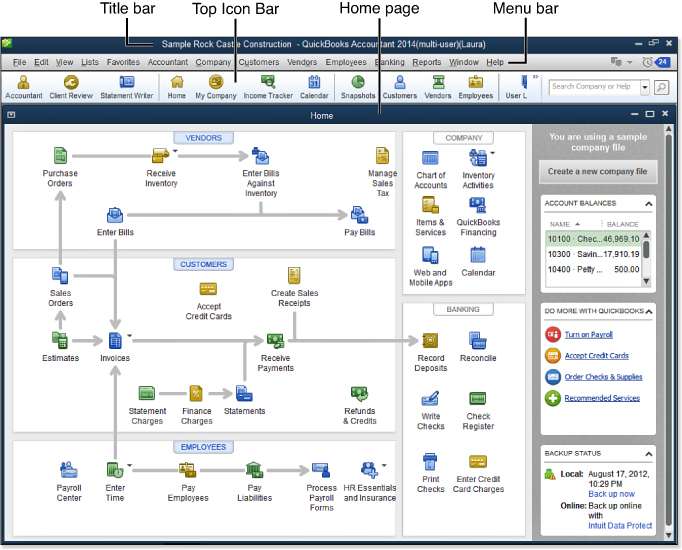
The title bar indicates the following information about your file:
• The name of your file as it is assigned in the Company Name field, which is in the My Company dialog box (from the menu bar, select Company, My Company to open this dialog box).
Caution
If you are following along with this text using one of the sample data files installed with your QuickBooks file, take note of any customization you do. This customization in the sample file does not affect your own QuickBooks file.
• Your QuickBooks software year and edition, including Pro, Premier, or Enterprise. Also indicated (if applicable) is the industry specification, such as accountant, retail, professional services, and so on.
• Multiuser and the username currently logged in, if more than one user has access to the company file at a time.
Menu Bar
The menu bar includes almost all the tasks, reports, forms, alerts, reminders, and functionality available in QuickBooks. For companies that share their data with their accountant, the new QuickBooks Client Collaboration tool is also accessible from the menu bar.
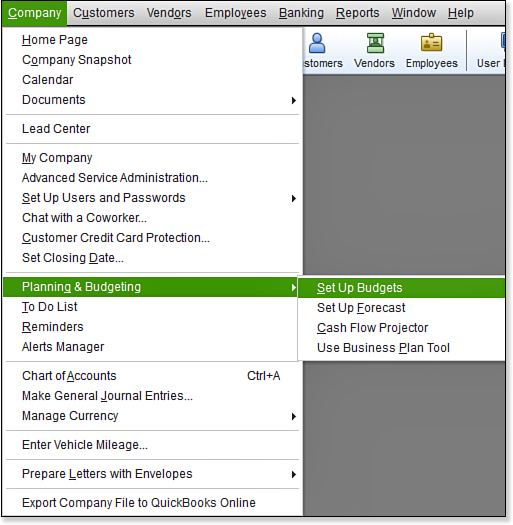
If you are a new QuickBooks user, I encourage you to review all the menus and submenus. Look at what is included in the Company menu in Figure 2.2. Discovering these features can be valuable for your business because many of these additional QuickBooks tools are beyond the scope of this book.
Figure 2.2. Review the menus for useful tools and features not shown on the Home page or icon bar.
Top Icon Bar
Users can choose to have the icon bar placed at the top (see Figure 2.1). The choice is personal and can help maximize the vertical working space for today’s widescreen monitors.
The Top Icon Bar (see Figure 2.1) provides quick access to the tasks and reports you frequently use. You can customize the Top Icon Bar by selecting the color version and adding or removing shortcuts; it is uniquely customizable for each user.
The Top Icon Bar has two color choices:
• Default dark blue with white icons and text
• Colored icons with light-colored background and black text
For companies that have multiple users accessing the same data file, the choice is an individual preference setting and does not affect all users. To select the Top Icon Bar with colored icons, follow these steps:
1. On the menu bar, select View, Top Icon Bar. The Top Icon Bar displays above the Home page. By default, the icon bar is dark blue with white icons, as in Figure 2.3.
Figure 2.3. The Top Icon Bar has a default dark blue background.

2. To change the Top Icon Bar to display with a light background and colored icons, on the menu bar, select Edit, Preferences, Desktop View and choose the My Preferences tab.
3. Place a checkmark next to Switch To Colored Icons/Light Background on the Top Icon Bar in the Desktop settings.
4. Click OK to close the preferences dialog box. The icon bar now has color icons, as in Figure 2.4.
Figure 2.4. The Top Icon Bar looks like this after enabling the color feature in preferences.

To customize the icon bar for a particular user, make sure you are logged in to the file with that username before making any changes.
→ For more information see, “Setting Up Users and Permissions,” p. xx.
You can customize the icon bar by doing the following:
Tip
When you first begin working with QuickBooks 2014, a new tips banner might display. If you click the message to turn off the banners, you can bring them back by selecting Help, What’s New from the menu bar.
• Adding icons (shortcuts)
• Editing existing icons
• Rearranging the order of the icons
• Grouping icons
• Removing icons
The icon bar provides quick access to the most common tasks. You can customize the icon bar to be at the top or to the left in your QuickBooks data. Pick a style that works best for you and your specific monitor size.
The icon bar can be placed either on the top of your QuickBooks Home page or to the left. Follow these instructions for customizing the icon bar.
Use these steps to add the Calculator to the Top Icon Bar and reposition the new icon next to the Calendar icon:
1. From the menu bar, select View, Top Icon Bar. (If you selected the Left Icon Bar, view the instructions in the next section.)
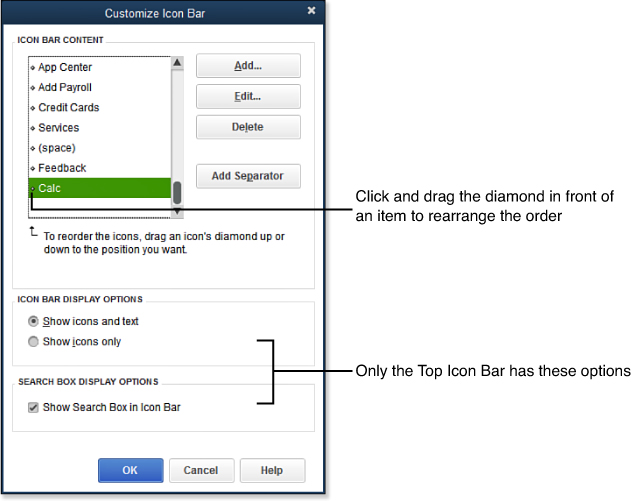
2. On the Top Icon Bar, click the small double arrows on the far right near the search box and select Customize Icon Bar. The Customize Icon Bar dialog box displays your currently selected icons (see Figure 2.5).
Figure 2.5. Add, remove, and reposition icons on your personal icon bar.
3. Click Add and, in the Add Icon Bar Item dialog box, select Calculator. The Calculator icon image is selected for you, but you can choose another icon image from the available choices.
4. Accept or edit the default Label. Keep the text as short as possible here; long labels can crowd the available space on the icon bar.
5. Accept or edit the default Description. The description displays when you hover over the icon with your cursor.
6. Click OK to close the Add Icon Bar Item dialog box.
7. To reposition the Calc icon next to the Calendar icon, click the diamond in front of the Calc item. Drag the item up the list (refer to Figure 2.5), releasing the mouse when the Calc icon is next to the Calendar icon. Look at your icon bar; you will see the Calc icon is next to the Calendar icon. How easy was that?
Tip
Now that you know how to drag and drop a list item by clicking the diamond in front of an item, you can rearrange many other QuickBooks lists this way.
8. (Optional) If you are modifying the settings for the top display of the icon bar, keep the default Show Icons and Text option, or select Show Icons Only.
9. (Optional) If you are modifying the settings for the top display of the icon bar, select the Search Box Display Options checkbox to display the search bar on the far right of the icon bar.
10. Click OK to close the Customize Icon Bar dialog box.
Left Icon Bar
The Left Icon Bar placement takes advantage of our wider computer monitor screens by allowing more space top to bottom for your QuickBooks transactions and reports. If you selected to use the Left Icon Bar, from the View menu on the menu bar, follow the instructions provided in this section for customizing the Left Icon Bar.
The icon bar provides quick access to the most common tasks, alerts, and reminders, as well as the option to collaborate with your accountant. You can customize the Left Icon Bar similar to how you customized the Top Icon Bar.
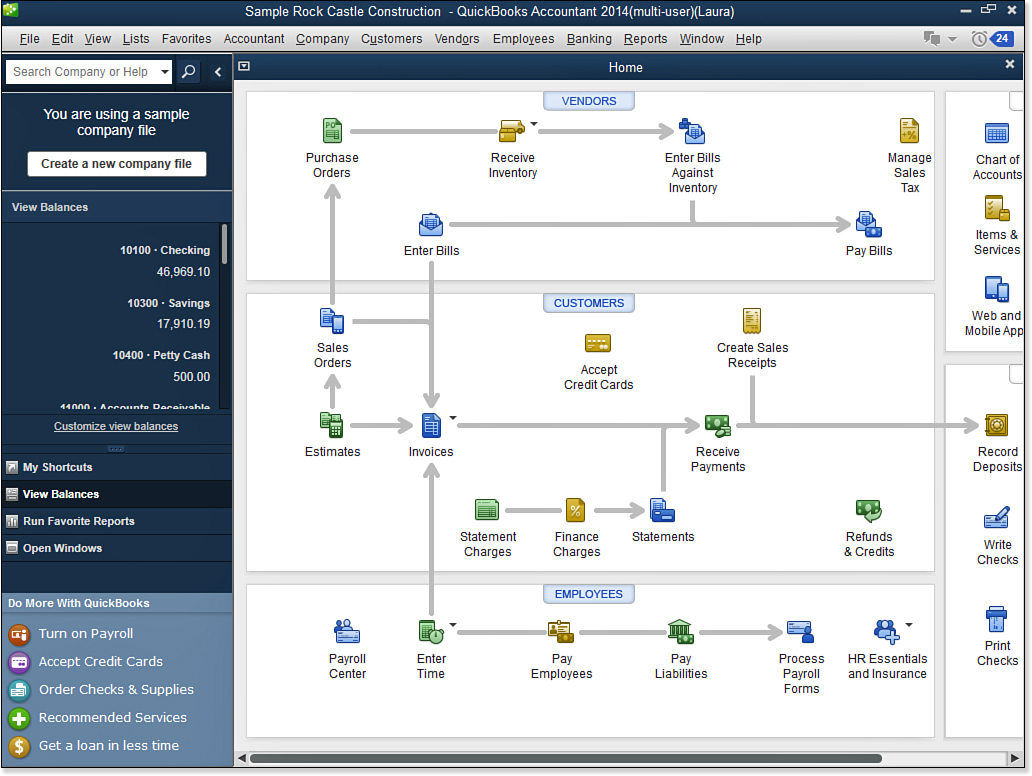
The Left Icon Bar (see Figure 2.6) provides easy access to common tasks, reminders, reports, and services. Use these steps to add the Calculator icon to the Left Icon Bar and reposition the new icon next to the Calendar icon:
Figure 2.6. QuickBooks provides the option of using the icon bar placed to the left of the Home page.
1. From the menu bar, select View, Left Icon Bar. (If you selected the Top Icon Bar, view the instructions in the previous section.)
2. On the Left Icon Bar, in the middle, click the My Shortcuts bar and scroll to the bottom link titled Customize Shortcuts. The Customize Icon Bar dialog box displays, as previously shown in Figure 2.5; it displays your currently selected icons.
3. Click Add and, in the Add Icon Bar Item dialog box, select Calculator. The Calculator icon image is selected for you, but you can choose another icon image from the available choices.
4. Accept or edit the default Label. Labels can be longer than those on the Top Icon Bar, but only the first 28 or so characters display.
5. Accept or edit the default Description. The description displays when you hover over the icon with your cursor.
6. Click OK to close the Add Icon Bar Item dialog box.
7. To reposition the Calc icon next to the Calendar icon, click the diamond in front of the Calc item. Drag the item up the list (refer to Figure 2.5), releasing the mouse when the Calc icon is next to the Calendar icon. Look at your icon bar, and you will see that the Calc icon is next to the Calendar icon.
8. Click OK to close the Customize Icon Bar dialog box.
An added benefit to using the Left Icon Bar is the ease in customizing the balances that display on the View Balances tab. Follow these steps to customize the list of accounts displayed in the View Balances window of the Left Icon Bar:
1. From the Left Icon Bar, click View Balances.
2. Click the Customize View Balances link at the bottom of the View Balances view. The Customize Account Balances dialog box displays (see Figure 2.7).
Figure 2.7. Customize the accounts displayed in the View Balances section of the Left Icon Bar.
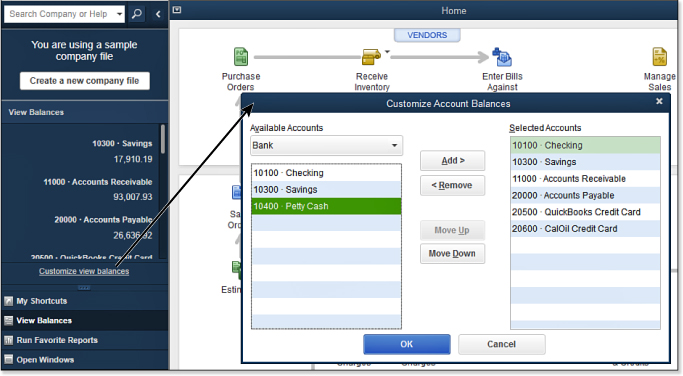
3. On the left, from the Available Accounts drop-down, select the type of account to display.
4. From the accounts displayed, select with your cursor the account on the left and click the Add button in the center. QuickBooks adds the account to the Selected Accounts on the right.
5. On the right, with an account selected, optionally click Move Up or Move Down to reposition the order of the account balances displayed.
6. Click OK when you are finished with this task to close the Customize Account Balances dialog box.
Complete similar steps to customize the listings on the My Shortcuts and Run Favorite Reports tab of the Left Icon Bar.
Home Page
The best place to start customizing QuickBooks specifically for your business needs is the Home page. The Home page displays by default when you create a new QuickBooks file and include tasks and workflows you can customize (refer to Figure 2.1). You can add or remove icons from the Home page. You cannot rearrange the order or placement of icons on the Home page. (Some Home page icons cannot be removed if related preferences are enabled.)
When you customize the Home page to include or remove specific icons, you are often redirected to the related preference. For more detailed instructions on working with individual preferences, see the “Preferences” section in this chapter or the related preferences section included with most chapters in this book.
To edit the Home page icons, you must be logged in to the file as the Admin or External Accountant user (see Chapter 1, “Getting Started with QuickBooks”).
What if you’re not sure whether you are logged in to the file as the Admin user? If you are working with a multiuser file (see Chapter 17, “Managing Your QuickBooks Database,” for more details), the title bar shows the user currently logged in to the opened file (see Figure 2.1). However, if you are in the file in single-user mode, or if you renamed the Admin user, the username might or might not display “Admin.”
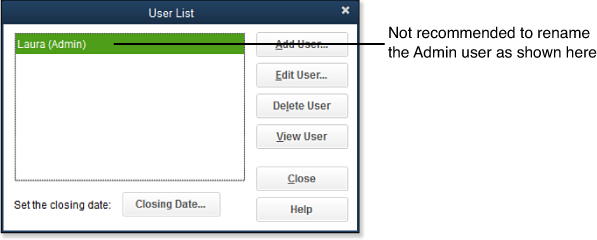
To determine whether you are currently logged in to the file as the originally created default Admin user, on the menu bar, select Company, Set Up Users and Passwords, Set Up Users to open the User List dialog box. Figure 2.8 shows how the original Admin user was renamed to Laura. A renamed Admin user still has all the same privileges as the original Admin user.
Figure 2.8. Viewing the User List shows whether the Admin user was renamed (not recommended).
Many preferences and features require you to be logged in to the file as the Admin user. If you are not currently logged in as the Admin user, from the menu bar, you can log off by selecting File, Close Company/Logoff.
Customizing Icons (Tasks)
The QuickBooks Home page displays common tasks and workflow for vendors, customers, employees, and other activities and information. You can add or remove some tasks, depending on the needs of your business.
If your Home page does not automatically display, you can always open it by clicking the Home page icon on the icon bar, as in Figure 2.1. In this section, you learn to manage the preference to display the Home page each time you launch QuickBooks.
To make changes to the Home page icons, follow these steps:
1. First, log in to your file as the default Admin or External Accountant user in single-user mode (File, Switch to Single User Mode). Enter the appropriate password, if one was set.
2. From the menu bar, select Edit, Preferences to open the Preferences dialog box, which displays the preferences available in your file.
3. In the left column, select the Desktop View preference.
4. At the top of the Preferences dialog box, select the Company Preferences tab. The following options are provided:
• Customers—Choose to add or remove the following Home page icons:
• Invoices—Can be removed only if Estimates, Sales Orders, and Sales Tax tracking is disabled. Either Sales Receipts or Statement and Statement Charges must be enabled to remove Invoices from the Home page.
• Sales Receipts—Remove the checkmark if you do not want Sales Receipts included on the Home page.
• Statements and Statement Charges—Remove the checkmark if you do not want these included on the Home page.
• Vendors—Here you have the option to remove both the Enter Bills and Pay Bills icons. If this option is grayed out, it is because another preference is enabled that depends on using vendor bills. For example, if Inventory is enabled, you cannot remove the vendor icons of Enter and Pay Bills.
• Related Preferences—Click the corresponding links to enable or disable features globally for all users. These preference settings are discussed in more detail in their related chapters.
• Estimates—See Chapter 9, “Setting Up Customers.”
• Sales Tax—See Chapter 9.
• Sales Orders—See Chapter 9.
• Inventory—See Chapter 5, “Setting Up Inventory.”
• Payroll—See Chapter 11, “Setting Up Payroll.”
• Time Tracking—See Chapter 11.
5. Click OK to close the Preferences dialog box.
If you know you want to remove an icon (task) from the Home page by deselecting it in the Preferences dialog box, you can safely do that. You can later reinstate these icons to your Home page.
Caution
Read the referenced chapter before adding a new Home page icon. Often you need to define other unique settings when adding a new icon to your Home page.
Customizing Data Displayed on the Home Page
If you have chosen to use the Top Icon Bar, the right side of the Home page (see Figure 2.1) displays several additional panels of information (see Figure 2.9). Click the upward-facing arrow to expand or collapse the detail displayed.
Figure 2.9. When using the Top Icon Bar, you can expand or collapse each panel of information.
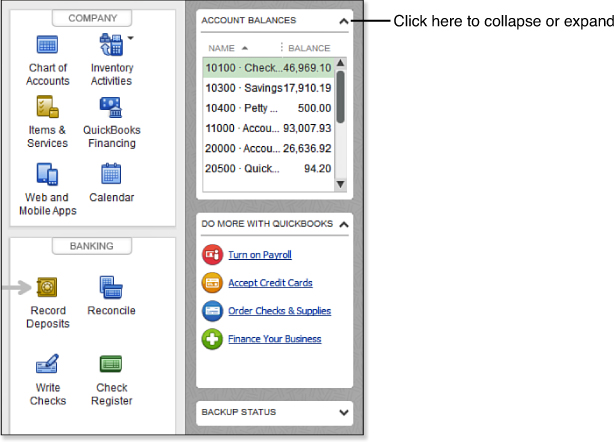
These panels include the following:
• Account Balances—Click the column headers to sort the accounts by the Name or Balance column.
• Do More with QuickBooks—Follow these links to other products or services offered for QuickBooks users.
• Backup Status—Get notifications on when the last backup was completed and links to information on storing your data online.
• Reminders and Alerts—Check out these links to view the reminders and alerts you have enabled in your QuickBooks file.
Open Windows List
Are you ready for another personal preference for navigating in QuickBooks? Try the Open Windows list. The Open Windows list will show each QuickBooks form or report you currently have open. With computer monitors getting larger, you will most likely have plenty of room to use it with your QuickBooks file. This feature works with both the Top and Left Icon Bars; how you access the feature depends on which icon bar you are using.
When Using the Top Icon Bar
From the menu bar, select View, Open Window List. The Open Windows list displays on the left side of your Home page (see Figure 2.10), which enables you to move among many open reports or transactions easily by clicking on their name in this list.
Figure 2.10. The Open Windows List view looks like this when using the Top Icon Bar.
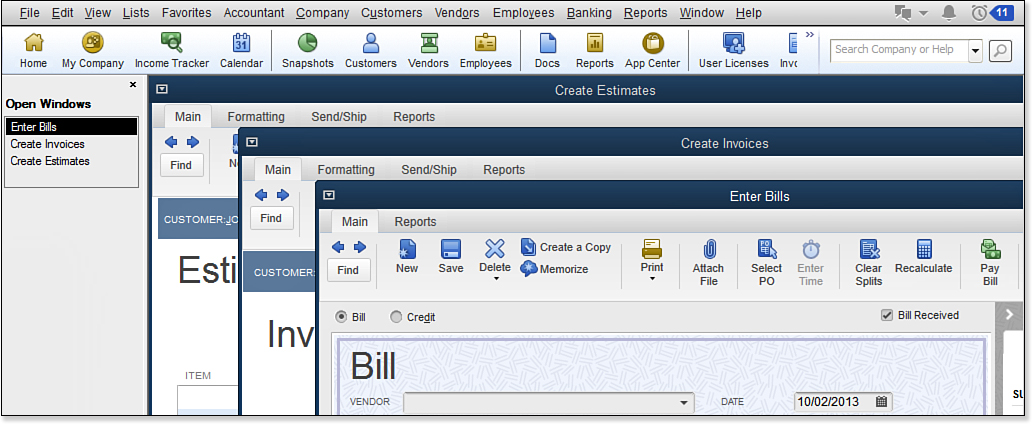
Your open windows might cascade over the top of another open window. If you find this distracting, select View, One Window from the menu bar to make all the windows use the full QuickBooks desktop area. You can also resize an open window by dragging its top, bottom, sides, or corners.
When Using the Left Icon Bar
Some users with wide monitors might prefer to use the Left Icon Bar. As instructed previously, from View on the menu bar, you can choose which icon bar to use. If you selected the Left Icon Bar, use these instructions to enable the same Open Windows list in Figure 2.11.
1. With the Left Icon Bar displayed, click the Open Windows bar. The Left Icon Bar lists any currently opened windows.
2. Optionally, from the menu bar, select View, One Window or Multiple Windows. Choosing Multiple Windows floats multiple open windows on top of each other. You can also resize an open window by dragging its top, bottom, sides, or corners.
3. Click any displayed icon in the Open Windows box to jump to that selected item.
Having the icon bar display the open windows makes it easy to work with multiple transactions or tasks at the same time.
Figure 2.11. The Open Windows List view looks like this when using the Left Icon Bar.

Tutorials
Included in your QuickBooks software are several tutorials to help you get started quickly. You can watch these as a supplement to this book.
To do so, select Help, Learning Center Tutorials from the menu bar. Click a category on the left, or select any of the links to jumpstart your use of QuickBooks. When you are finished viewing the tutorials, click Go to QuickBooks to close the Learning Center.
Tip
Click any icon on the Home page (other than the Home icon), and see the Open Windows list on the left grow with each transaction or task that is opened. Would you like to close all open windows quickly? From the menu bar, select Window, Close All.
After closing all open windows, if you want to return to the Home page, from the menu bar, select Company, Home Page.
Preferences
Preferences come in two types: Company Preferences, which are global settings that all users are assigned, and Personal Preferences, which are those preferences each user can select individually. You can customize QuickBooks to suit your specific business needs while maintaining individual preferences.
You are required to save your changes as you work with each preference. Some preferences might have you close all open windows to effect the change. Simply return to the Preferences dialog box until you are finished specifying all your preferences by selecting Edit, Preferences from the menu bar.
To return to the original preference setting, select a preference on the left side of the Preferences dialog box and click the Default button. Be aware that the Default button is not available for all preferences. Click OK to close the Preferences dialog box.
Preferences come in two important types:
• Company Preferences—Affect all users of the currently opened QuickBooks file. Only the QuickBooks Admin and External Accountant user have full rights to set these preferences. Learn more about different types of users and user permissions in Chapter 1.
• My Preferences—Specific to the currently logged-in user; do not affect the settings for other users of the same file or other QuickBooks files.
This section provides a review of the most common, general-use preferences. Most of the preference settings are self-explanatory and do not need to be discussed here. However, most chapters in this book include specific details about important preferences relevant to the specific topic in the chapter.
Accounting—Company Preferences
These are global preferences—when modified, they affect all users of the opened QuickBooks file:
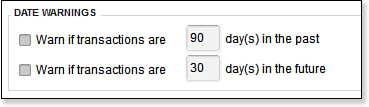
• Date Warnings—A new file defaults to Warn If Transactions Are 90 day(s) in the Past and Warn If Transactions Are 30 day(s) in the Future (see Figure 2.12). At times, you might want to edit these date ranges, such as when you are just starting to use QuickBooks and need to enter data for a period in the past.
Figure 2.12. QuickBooks can warn when transaction dates do not fall within a specific date range.
Desktop View—My Preferences
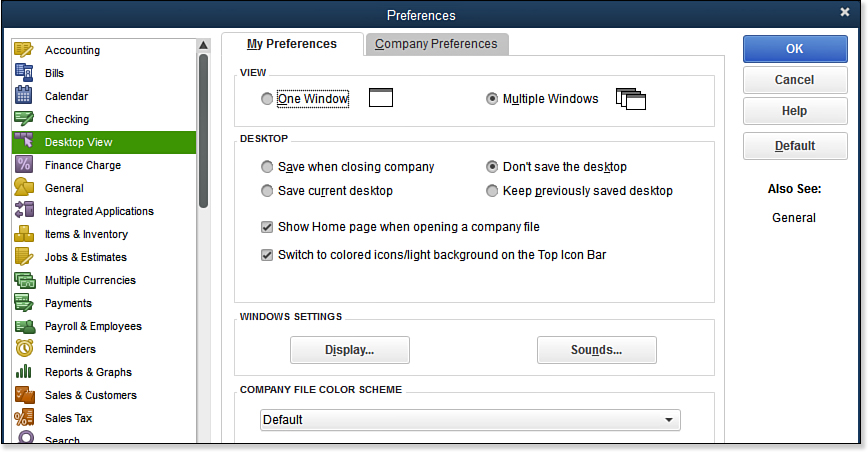
These are personal preferences; when modified, they affect only the currently logged-in user (see Figure 2.13):
Figure 2.13. My Preferences enables users to customize their view of the QuickBooks file.
Note
QuickBooks delivers enhancements to the software through maintenance release patches. To view the release you are using, from an open QuickBooks file, press F2 on your keyboard. The release displays at the top of the Production Information Window. For more information, see “Installing a QuickBooks Maintenance Release,” p. xxx. This book was written with the beta version of Release 3.
• View—One Window or Multiple Windows per user preference. This preference also can be selected from the View menu on the menu bar.
Tip
To simplify your daily QuickBooks use, select the One Window option and then, on the menu bar, select View, Open Window List.
• Desktop—Includes the following options:
• Save When Closing Company—Default setting that saves every open window when a QuickBooks session is closed. When QuickBooks is reopened, each report and transaction left open in the last session is restored. This preference is not recommended for a file that has multiple users logging in to the file simultaneously. Restoring multiple windows, transactions, or reports at startup can slow the time it takes for the QuickBooks file to open.
• Don’t Save the Desktop—Closes each open window automatically when the QuickBooks program is closed. This is the most efficient choice; if a transaction has not been completed, QuickBooks notifies you before closing the transaction and gives you the option to save any changes to custom report settings.
• Save Current Desktop—When you reopen QuickBooks, displays any previously opened nontransaction window.
• Keep Previously Saved Desktop—Selected for you automatically when you choose the Save Current Desktop option.
• Show Home Page When Opening a Company File—When you launch QuickBooks, displays the Home page automatically.
• Switch to Colored Icons/Light Background on the Top Icon Bar—Preference available after updating to Release 4 or newer. Many prefer this new colored icon bar to the default dark blue with white text icon bar.
• Windows Settings—Manages the Windows computer display and sound settings.
• Company File Color Scheme—Assigns a default color to a file to help visually identify a data file. Useful if you have multiple QuickBooks data files. Figure 2.1 shows the default dark blue color assigned. Choose from 14 other color choices.
Certain preferences override these defaults, particularly if you have selected Show Home Page When Opening a Company File. When this option is selected, the Home page always opens when you launch QuickBooks.
General—My Preferences
These are personal preferences—when modified, they affect only the currently logged-in user:
Tip
If you selected the preference Pressing Enter Moves Between Fields and you want to save a transaction or activate a highlighted command, use the combination Ctrl+Enter from your keyboard.
• Pressing Enter Moves Between Fields—When this is not selected, you use the Tab key to move between fields and the Enter key to save a transaction or activate a highlighted command.
If you want to use the Enter key to move between fields (perhaps you have grown accustomed to using the Enter key in this way with other software), place a checkmark in this preference. Using the Tab key on your keyboard also moves between fields.
• Automatically Place Decimal Point—When selected, .01 (instead of 1.00) displays when you type the number 1 in QuickBooks.
• Bring Back All One Time Messages—If data entry mistakes have been ignored in the past, turning on this warning can call attention to possible mistakes in the future.
• Keep QuickBooks Running for Quick Startups—When selected, the QuickBooks software might open faster. This is the only preference that also affects other data files.
Spelling—My Preferences
These are personal preferences—when modified, they affect only the currently logged-in user. Options include:
• Always Check Spelling
• Ignore Specific Words Or Word With Numbers, Internet Address, And So On
When enabled, the Description, Memo, Notes, and Message fields of the following transactions are spell-checked:
• Invoices
• Estimates
• Sales receipts
• Credit memos
• Purchase orders
If you do not select the option to always check spelling, on certain transactions, you will be able to manually run spell-check.
Help Options
As a business owner or accounting professional new to QuickBooks, you will find many resources for getting the help you need. To access Help in QuickBooks, you can press the F1 key on your keyboard or select Help, QuickBooks Help from the menu bar.
Also, QuickBooks 2014 has a search tool on the right side of the Top Icon Bar (or at the top of the Left Icon Bar). From the drop-down list on the icon bar search field, select Search Company File if you want to search through your lists or transactions, or select Help if you want to search technical resources. If you are using the Top Icon Bar, you can select Set Search Preferences to default what type of search you normally perform.
QuickBooks provides help in several distinct ways and enables you to search each with a single dialog box, as Figure 2.14 shows.
Figure 2.14. Search multiple help resources all at once.
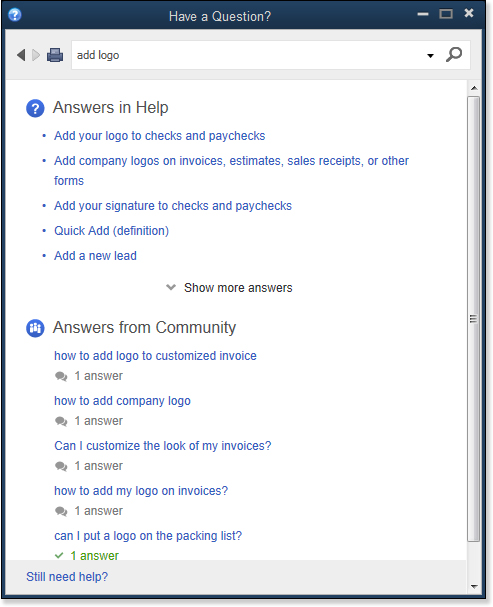
Search results can include how-to instructions from the in-product help content, as well as related content shared in the Ask Community forums.
If the displayed search results do not answer your question, click the Ask Community and pose the question to other QuickBooks users.
Would you prefer to have a local QuickBooks experienced professional come to your place of business to help you get started quickly? If so, from the menu bar, choose Help, Find a Local QuickBooks Expert. You are asked for your zip code to help locate a list of QuickBooks Certified ProAdvisors in your area, and fees might apply.
Selecting a Company File to Open
In general, you should not have any trouble opening your QuickBooks file because the software automatically opens your data file each time you launch QuickBooks. However, you can open your QuickBooks data file in several ways. Listed here are the most common.
Opening Your Data File for the First Time
After creating your new file, QuickBooks opens your data file each time you launch the software. However, if you are opening your data for the first time on a new computer, you need to follow these steps:
1. Launch your QuickBooks software by clicking the QuickBooks icon on your desktop.
2. From the menu bar, select File, Open or Restore Company.
3. In the Open or Restore Company dialog box, select the Open a Company File option button, in Figure 2.15.
Figure 2.15. If you have moved your file to a new computer, select the Open a Company file option and browse to the location of the stored file.
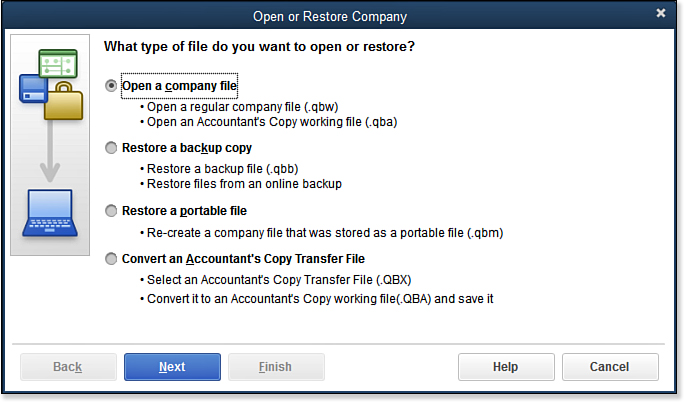
→ For more information about the other file actions in Figure 2.15, see. “QuickBooks File Types,” p. xxx.
4. Click Next.
5. QuickBooks defaults to the last known folder that a QuickBooks file was opened within, or you can browse to locate where you stored the file. Select the file and click Open. If required, enter your username and password to open the file.
Choosing from a List of Multiple Data Files
Chapter 1 introduced you to working with the QuickBooks sample data that installs automatically with your QuickBooks software. Using sample data can give you the freedom to practice what you learn and gain confidence in working with your software.
You also learned in Chapter 1 how to create your company’s QuickBooks file using a variety of methods.
Tip
Chapter 16, “Sharing QuickBooks Data with Your Accountant,” discusses in more detail different file types and their purposes. The QuickBooks instruction of selecting File, Open opens only a file with the extension of .QBW.
In this section, you learn how to open a QuickBooks file from a list, which is especially useful if you have multiple data files or want to open the sample data again after working in your own file.
To choose from a list of multiple data files, follow these steps:
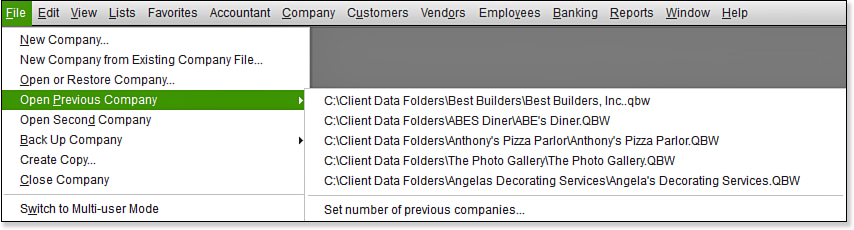
1. From the menu bar, select File, Open Previous Company. A list of previously opened files (up to a maximum of 20) displays, as Figure 2.16 shows.
Figure 2.16. Access previously opened QuickBooks files easily.
2. Select a file in the list to open it.
3. Enter your username and password, if required.
If you need to increase the number of files shown, open any QuickBooks file, and then from the menu bar, select File, Open Previous Company, Set Number of Previous Companies. QuickBooks can display up to 20 data files in this list. Enter the number you want to include in your list and click OK when finished.
In Chapter 1, you learned how to open and test with sample data and create your own file. In this chapter, you learned how to navigate the many features and tools in QuickBooks. Let’s take a quick break from QuickBooks and discuss some basic accounting in the next chapter, Chapter 3, “Accounting 101.” I promise, it will be worth your time and help you make better use of your QuickBooks file.