
B. QuickBooks Statement Writer
Overview
QuickBooks Statement Writer, formerly known as Intuit Statement Writer, is an extremely powerful and flexible reporting tool available for no additional fee with QuickBooks Accountant 2014 and all QuickBooks Enterprise Solutions 14.0 versions. Accounting professionals can use QuickBooks Statement Writer to prepare professional Generally Accepted Accounting Principles (GAAP)–compliant financials from QuickBooks data.
QuickBooks Statement Writer uses Microsoft Excel as the platform for creating customized financial reports from QuickBooks data. Additionally, QuickBooks Statement Writer keeps the statements synchronized with changes in the QuickBooks data. You can also add supporting documents created in Word and include them in your customized financials.
QuickBooks Statement Writer works with Excel 2003 or newer. (Note: It does not work with Microsoft Office 2003 Standard, 2003 Student Edition, or 2003 Small Business Edition.) Improved for QuickBooks 2014, QSW works with both the 32-bit and 64-bit install of Excel 2010.
Terms
The following terms help you when working with the QuickBooks Statement Writer:
• QSW—Refers to QuickBooks Statement Writer.
• Statement—Specific financial statement, such as a Balance Sheet or Income Statement.
• Documents—Created with Word, such as a cover sheet or letter.
• Statement Writer Report—Collection of statements and documents.
Note
The QuickBooks Statement Writer feature replaces the Intuit Statement Writer (ISW) and Financial Statement Designer (FSD) reporting tools used in earlier versions of QuickBooks.
If you are migrating from ISW or FSD to QuickBooks Statement Writer before preparing statements, visit http://accountant.intuit.com/ISW Go to “Product Support” for details and tools to help with the conversion.
Workflow
There are three main steps when working with the QSW tool:
1. Open the QuickBooks file that contains the data using your QuickBooks Accountant 2014 or QuickBooks Enterprise Solutions 14.0 software (all editions).
2. Use the Report Designer for a step-by-step approach to creating a Statement Writer report.
3. Output the customized financial to Microsoft Excel, and use common Excel features or functions to add additional customization.
Benefits
Benefits of using QSW include the capability to:
• Create customized, professional financial statements from your client’s QuickBooks data without manually typing data into Excel.
• Include multiple financial statements and supporting documents in a single QSW report.
• Use one of the many templates provided to create your own statements. Templates come in a variety of formats for the Balance Sheet, Income Statement, Cash Flow Statement, Retained Earnings Statement, and Budget to Actual Statements.
• Use Microsoft Excel (2003 or newer) as the platform for customizing and utilizing all the additional features and reporting flexibility available in Excel.
• Refresh customized financials with current QuickBooks data without leaving the Excel QSW report.
• Combine multiple QuickBooks account lines into one line on financial statements without changing your client’s QuickBooks data.
• Add your own rows or columns of detail.
• Drill down to QuickBooks data and make changes to transactions within the QSW tool.
• Easily view and add any missing accounts not included in the current statement.
• Create charts and graphs using Excel functionality.
• Add supporting documents, such as a cover sheet or compilation letter, created in Microsoft Word and you have a complete set of financials ready to print.
• Share your customized reports with clients as an Excel spreadsheet or PDF formatted document.
Getting Started
To launch QSW from your QuickBooks Accountant 2014 or QuickBooks Enterprise Solutions 14.0 software, follow these steps:
1. From the menu bar, select Reports, QuickBooks Statement Writer. If you are using QuickBooks Accountant or QuickBooks Enterprise Accountant software you can also launch QSW from the Accountant Menu or the Accountant Center.
→ For more information, see “Customizing the Accountant Center,” p. xxx.
2. If prompted, select Download Update and then select Install Update. If you are not prompted, skip to step 5.
3. Some computer systems require additional setup. If prompted with the User Account Control or other messages, follow the prompts to run QSW. You only have to do these additional setup steps once.
Note
If you are prompted to install an update, you might need to restart your computer to finish the update process.
4. Select Yes to the Install Shield Wizard and follow all prompts to install the update. Click Close to the QSW Update Manager message that you have the most current version.
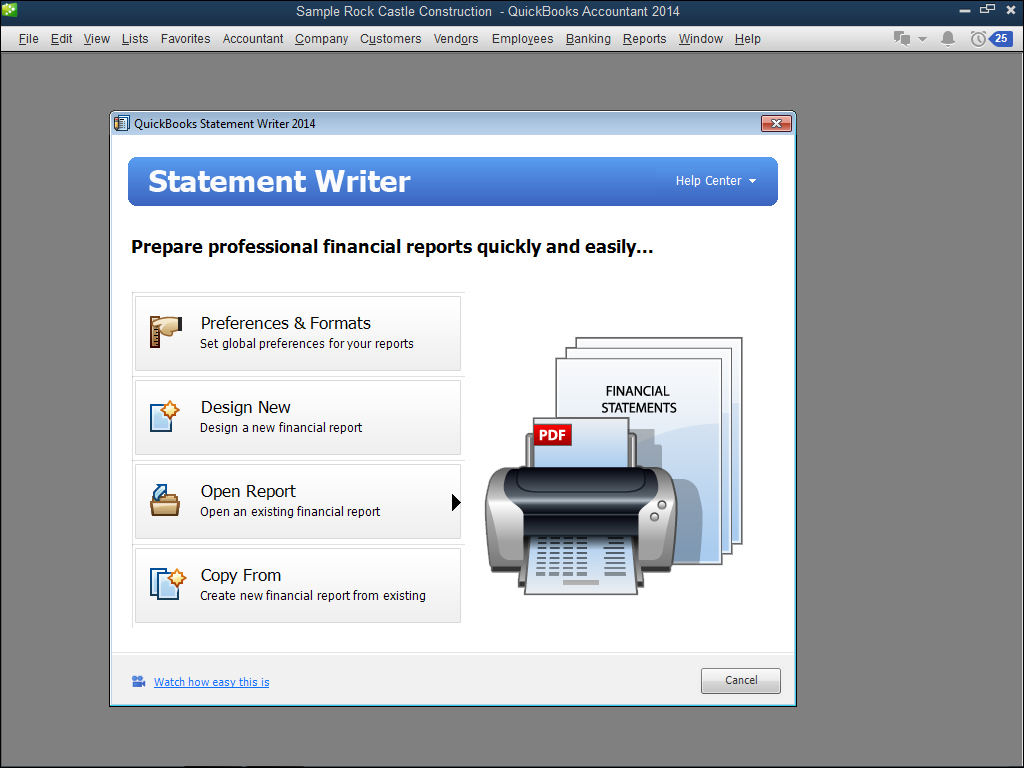
5. The main QSW screen displays as shown in Figure B.1.
Figure B.1. The QuickBooks Statement Writer main screen offers easy access to all the features.
The following sections detail the different global preferences that can be set in QSW.
Preferences & Formats
From the Preferences & Formats menu, you set global preferences and settings for customized reports prepared from all of your client’s files.
General Preferences
The General Preference settings dialog box opens when you launch the Preferences & Formats from the main QSW screen. These settings permit you to:
• Accept the default location for your stored reports or browse to a location of your choice.
• Accept the default location for storing QSW templates or browse to a location of your choice.
• Advanced setting for choosing to manually configure network permissions.
• Run Diagnostics Now, which checks if your system, QuickBooks, and QSW are configured correctly.
• Reset all warnings.
• Reset defaults.
Note
Selecting OK on the General Preferences dialog box closes Preferences and returns you to the main QSW screen.
Optionally select Apply as you make changes. Next, select the Your Details menu tab to the left.
Your Details
Complete your Firm Name, Address, and other fields on the Your Details tab. The information entered here appears for all client files you open with this registered copy of QuickBooks. See Figure B.2.
Figure B.2. Enter your firm information once and it is included with each client’s customized financial reports.

Click the blue-colored text to access help content about the currently displayed window.
Formatting
On the Formatting tab, you can define the following global settings (see Figure B.3) for formatting all QSW statements. You can override these settings on individual statements when needed.
Figure B.3. Set default format settings for all QSW statements.
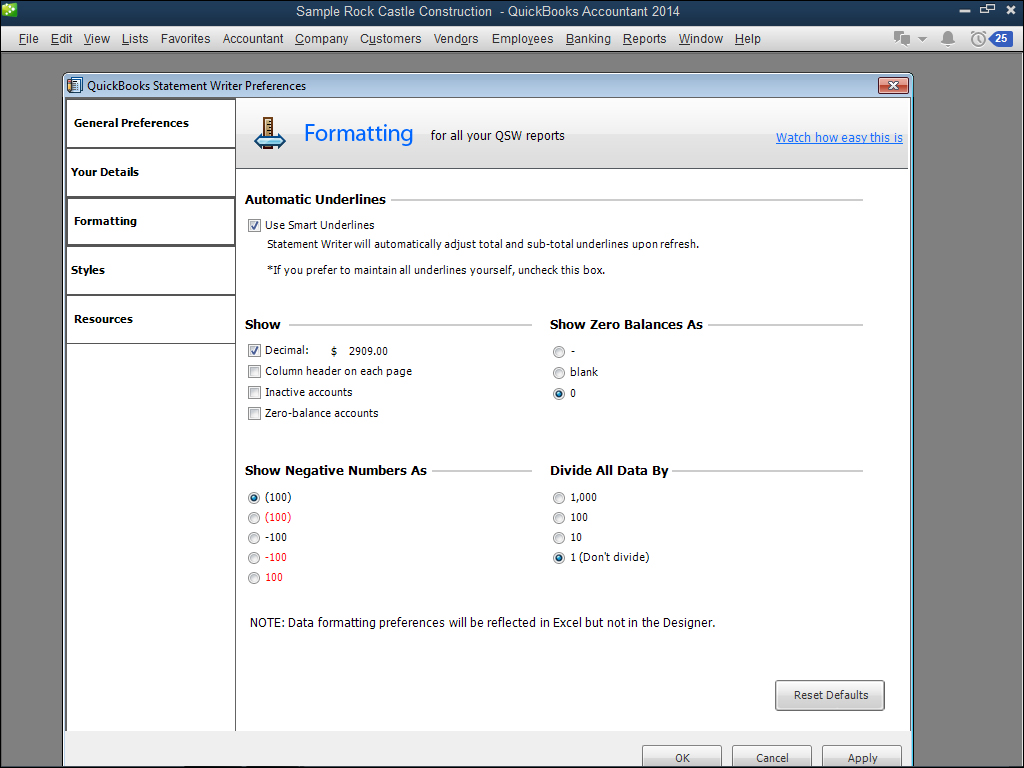
• Automatic Underlines—When total or subtotal rows are added to a statement, upon refresh underlines are added.
Caution
Data formatting preferences will be displayed in Excel, but not while working in the QSW Report Designer.
• Show—Set defaults for displaying or not displaying of decimals, column headers, inactive accounts, and zero-balance accounts.
• Show Zero Balances As—Default the format for displaying any cell with a zero balance.
• Show Negative Numbers As—Choose from several options.
• Divide All Data By—Option to round (or not) the displayed amount.
Click the Reset Defaults button to return to the original formatting settings. Click Apply to save your changes. Click OK to close and save changes.
Styles
Styles are used for formatting the font, font size, bold, italic, and justification of the text as shown in Figure B.4.
Figure B.4. Styles are used to set default font type and size. Style settings can be saved for reuse with other statements.
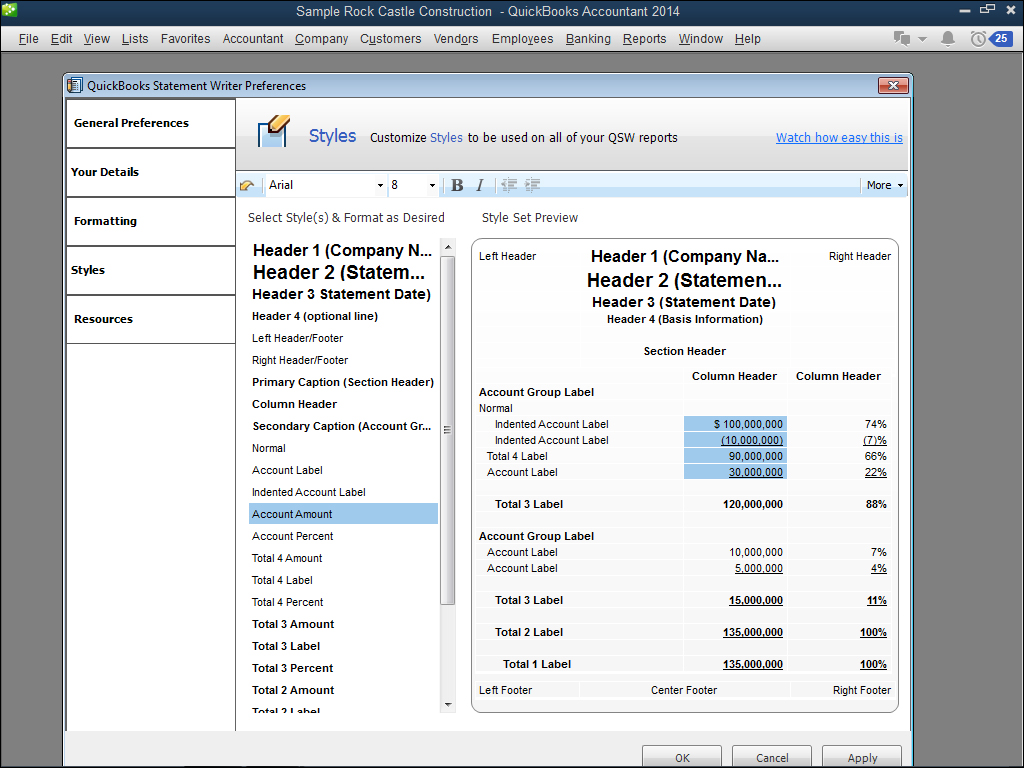
On the Styles tab, select any style(s) and change the format as desired.
Tip
While in the QSW Report Designer, on the Headers & Formatting tab hold down the Ctrl key on your keyboard when selecting multiple headers, labels, or cells. Then in the top right, select the More drop-down list and choose to Switch Style Set. After making these changes, from the More drop-down, you can choose to Save as New Style Set or Set as Default.
After customizing your style, from the More drop-down list, select Save as New Style Set. Enter a Style Set Name, and this customized Style is available the next time you create a new QSW statement.
Resources
Select the Resources tab for a listing of QSW resources and contact information. Additionally use this menu to download Intuit-provided statement and document templates.
Using the Report Designer
With the global preferences set, you are now prepared to create customized financials for your clients using QSW.
To begin using QSW, open your client’s file in your QuickBooks Accountant 2014 or QuickBooks Enterprise 14.0 software (all versions) and launch QSW (as previously instructed).
You can use the ease of the QSW Report Designer to customize the financial report before creating it in Excel. You can further customize the report once you’ve exported it to Excel from the QSW.
Report Content
The Report Content tab displays when you launch QSW and select Design New. From this dialog box, you select your Report Date from pre-defined periods or choose a Custom Date range. This date range can be changed later without returning to this dialog box.
Note
Each template in the Financial Report Contents column becomes a worksheet within a single Excel workbook.
You do not need to worry about the order the statements or documents are added to the Financial Report Contents. When you are ready to print the financials, you specify the print order within Excel.
Select from Accrual or Cash Basis. From the Statement and Document Templates panel, select the desired template. With the template selected, click the arrows in the center to add or remove statements and documents as well as arrange their order in the Financial Report Contents pane. See Figure B.5.
Figure B.5. The Report Date and Basis defined here can be modified later in the Statement Writer report.
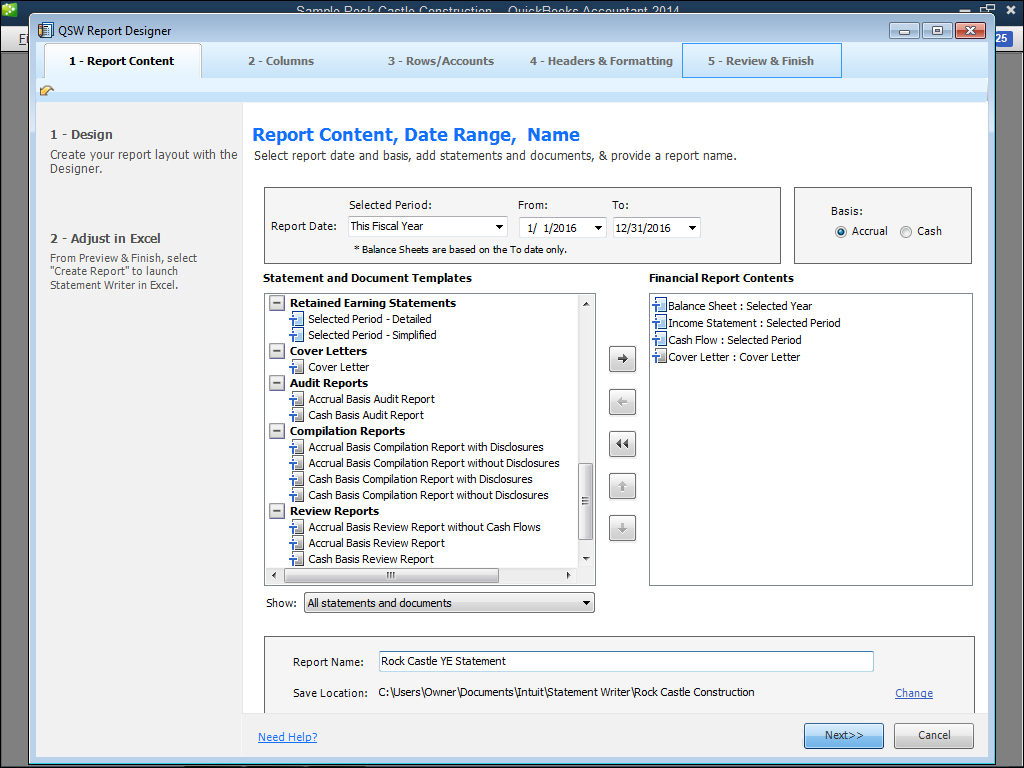
Finally, you are required to provide a name for the report. These reports will be stored in the default location defined in preferences.
→ For more information, see “General Preferences,” p. xxx.
Click Next to advance to the next task of customizing the columns of data to be included in the report.
Columns
Figure B.6 shows the Columns tab. A separate tab is created for each included statement or document. Click a specific statement to display data from the currently opened QuickBooks file (if a document is selected, instructions for modifying documents is provided).
Figure B.6. Use the QSW Report Designer to customize the column properties in the selected statement.

Features of customizing columns include the ability to:
Tip
Right-click a column within a report for a short-cut menu containing many of the Columns functions.
• Drag to insert columns, choosing from several types of columns including a Blank, QuickBooks Data, Variance, and Total columns to mention just a few.
• Refresh the data displayed in the QSW Report Designer, change the position of columns, remove columns, and modify the column header or dates from the toolbar.
Click the Undo icon on the toolbar (see Figure B.6) to undo the last action. Click Next to advance to the Rows/Accounts tab. Alternatively, click the Rows/Accounts tab at the top the QSW Report Designer dialog box to access this tab directly.
Rows/Accounts
Figure B.7 shows the Rows/Accounts tab. A separate tab (worksheet) is created in Excel for each included statement or document. Click a specific statement to display data from the currently opened QuickBooks file (if a document is selected, instructions for modifying documents is provided).
Figure B.7. Right-click to modify the currently selected row(s).
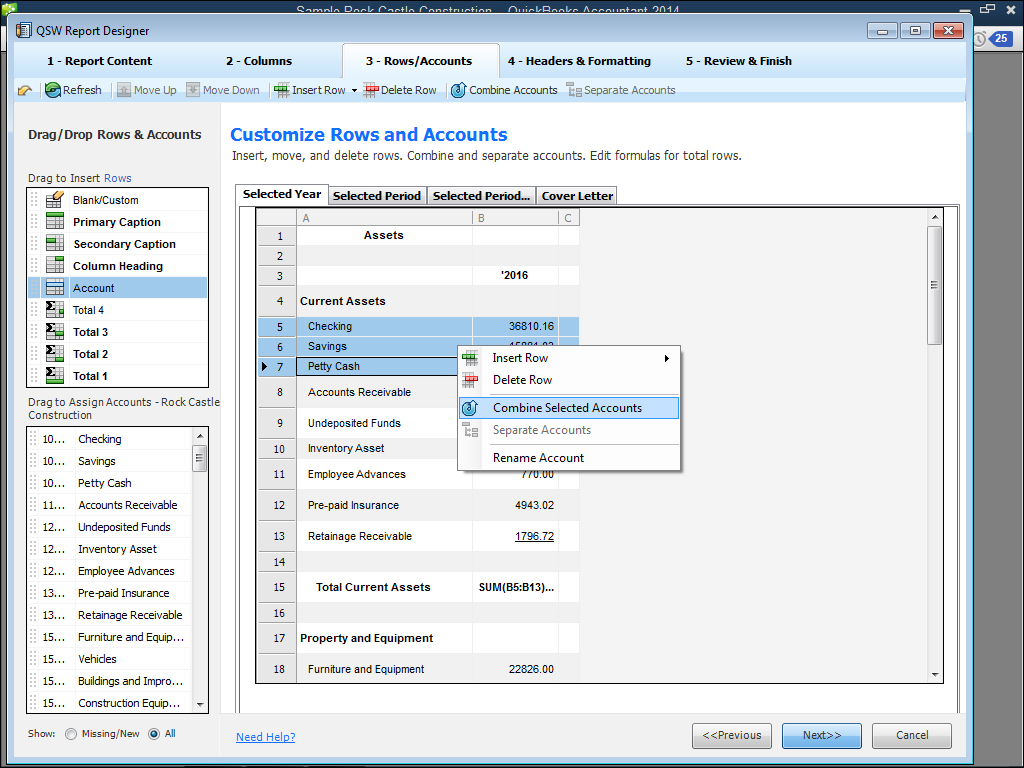
Features of this tab include the ability to:
• Drag to insert rows, choosing from several types of rows including a Blank/Custom, Account, and a variety of Total row options.
Tip
Combine rows together by selecting multiple rows with the Ctrl key on your keyboard. From the Rows/Accounts toolbar, select Combine Accounts.
• Use the following toolbar buttons to modify rows and accounts: Refresh, Move Up, Move Down, Insert Row, Delete Row, Combine Accounts, or Separate Accounts.
• Easily identify missing or new rows by selecting the Show: Missing/New option button in the lower-left corner.
On the left side of the toolbar, click the Undo icon to undo the last action. Refer to Figure B.6. Click Next to advance to the Headers & Formatting tab. Alternatively, click the Headers & Formatting tab at the top of the QSW Report Designer dialog box to access this tab directly.
Headers & Formatting
Figure B.8 shows the Headers/Footers Formatting tab. A separate tab is created for each included statement (tab) or document. Click a specific statement to display data from the currently opened QuickBooks file (if a document tab is selected, instructions for modifying documents is provided).
Figure B.8. Hover your cursor over blue text to view help content for that feature.
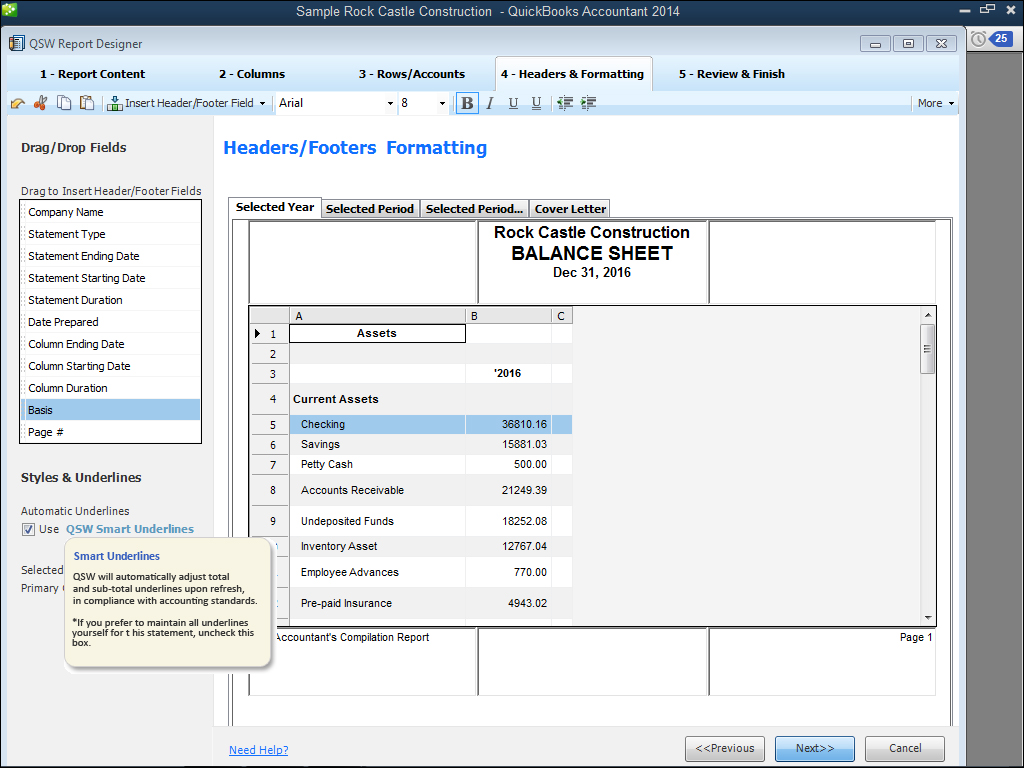
Features of this tab include the ability to:
• Drag to insert header and footer fields, choosing from several types of fields including Statement Ending Date, Date Prepared, Basis, and Page # to name just a few.
• Use the Header & Formatting toolbar buttons to cut, copy, and paste fields and change the font, size, and properties of a field.
• Use QSW Smart Underlines. For more information, click the blue text to display help content.
Click the Undo icon on the toolbar to undo the last action as shown in Figure B.6. Click Next to advance to the Review & Finish tab. Alternatively, click the Review & Finish tab at the top of the QSW Report Designer to access this tab directly.
Review & Finish
If this is your first time creating the report using Report Designer, on the Review & Finish tab, a separate tab is created for each included statement or document for review. Click a specific statement to display the customized formatting (if a document is selected, instructions for modifying documents is provided).
Note
If you are returning to the Report Designer from a previously prepared QSW report you will not see the individual statement tabs at the top. Instead, you have to select the desired statement in the Excel QSW then select the Report Designer icon from the QSW Document Actions pane toolbar to modify.
Select a specific statement and from the toolbar choose the Memorize Current Statement. You can then reuse this customized statement with new financial reports.
Choose Memorize Report Group from the toolbar to save the group of selected statements for use with a newly created financial report from another client’s data.
Click Create Report to send your customization into Excel. QuickBooks launches Excel and add the customized formatting you created in the Designer. Each statement is an individual worksheet tab in a single Excel workbook. See Figure B.9.
Figure B.9. QSW uses Excel for the completed report.
Opening a Previously Created Report
When a user clicks Open Report from the main QSW dialog box, the five most recently accessed reports for the currently opened company file displays. Optionally, a user can select Browse to Open, which by default looks to the same folder where the current reports are stored.
After selecting a report from the list or browsing to a report, QSW launches the report in Excel. If prompted by your system, select Yes to any prompts to trust the source of the file. (Your version of Excel might have security settings that will not recognize the .QSM extension of the QSW stored report without your granting permission to trust the file type.)
Creating a New Report from a Memorized Report
Click the Copy From button on the main QSW dialog box to reuse a previously memorized statement or report group.
Click Browse, and QSW defaults to the location where the most recent QSW report was stored. If necessary, browse to another location to find the report with the .QSM extension.
With the Source Report selected, click Open. The Copy From dialog box displays the Source Report location and the Destination Folder. Provide a New Report Name and click Copy.
Select or deselect the option to Open New Report.
Modifying a Statement Writer Report in Excel
Now that you have created a Statement Writer report, you might find the need to customize the content for future reports or for use with other client’s data files.
There are several methods you can use to edit an existing Statement Writer report, which include:
Note
If you have multiple statements in your report, you need to select the desired statement in Excel that you want to modify in Report Designer. Only the first time you created your QSW report will each statement display as an individual tab on the Report Designer, Review & Finish tab.
• Returning to the Report Designer
• Using the Document Actions pane
• Using the QSW icons on the Excel Add-Ins ribbon (or Excel 2003 toolbar)
• Right-clicking a report column, row, or cell in Excel.
You might use one, or all of these methods. The next sections provide additional details on working with each of these methods.
Method 1: Using the Report Designer
When creating the original Statement Writer report, you most likely used the Report Designer. You can return to this familiar tool to make edits to your existing Statement Writer report.
From a displayed Statement Writer report in Excel, click the Design icon on the Document Actions pane toolbar, as shown in Figure B.10.
Figure B.10. Access the Report Designer from the toolbar in the Document Actions pane.

Click to return to the Report Designer
If you have made formatting edits while in Excel, answer Yes or No to the warning message that displays. If you select Yes, the Report Designer for the current Statement Writer report opens.
→ For more information, see “Using the Report Designer,” p. xxx.
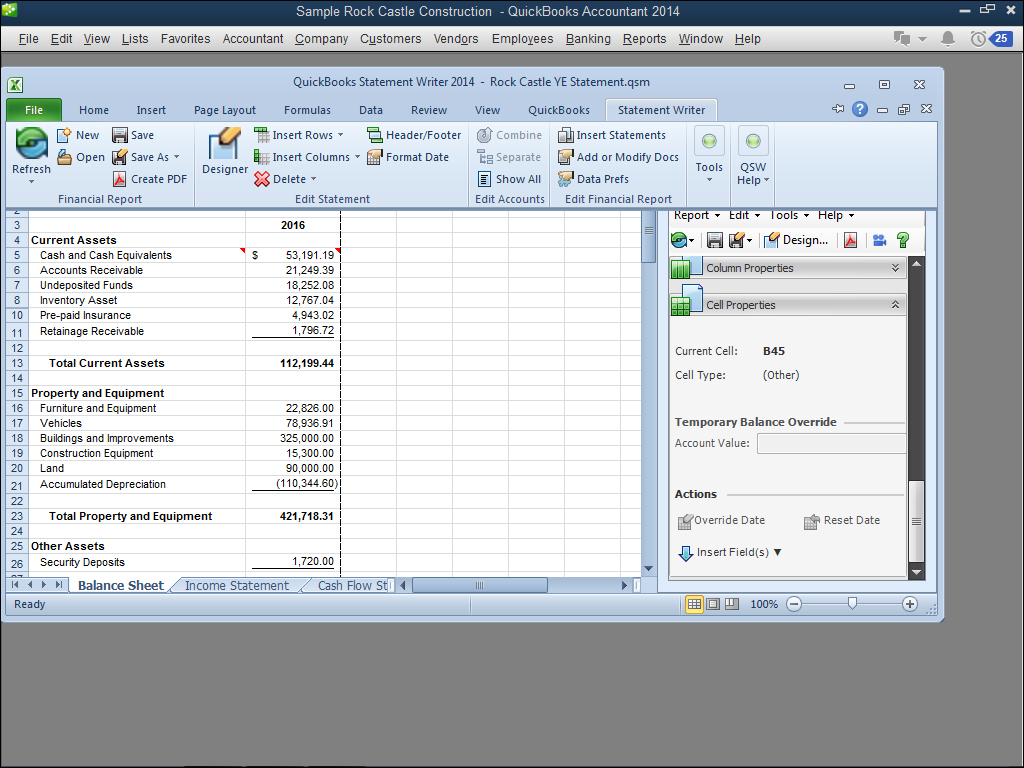
Method 2: Using the Document Actions Pane
There are several methods for editing an existing Statement Writer report; one method is accessing the many edit tools from the Document Actions pane.
The Document Actions pane, shown in Figure B.11, will only display when you launch QuickBooks and then open a Statement Writer report from within the QSW. The file extension of .QSM is assigned to these reports by QSW and cannot be opened directly with Excel.
Figure B.11. Use the Document Actions pane to add or edit the Statement Writer report.

Most, if not all, of the functionality detailed to this point in the chapter can be found by selecting one of the drop-down menus from the menu bar in the Document Actions pane.
Frequently used actions are included on the Documents Action toolbar, as shown in Figure B.11.
More detailed edits can be made by selecting one of the expandable panes for Report, Statement, Row, Column, and Cell Properties depending on the change you need to make.
Note
Are you having trouble viewing the Statement Writer pane in Microsoft Excel as shown in Figure B.11? First, be sure you have opened the QSW report from within the QuickBooks file. If you still do not see the Statement Writer pane, you might have inadvertently closed it.
Depending on which version of Excel you have, reopening the Statement Writer pane requires different steps. In Excel 2010, select the Statement Writer ribbon, in the Tools section and click the Show QSW Pane. In Excel 2007 and 2003, select the Add-Ins tab, select View, Toolbars, and place a checkmark next to QuickBooks Statement Writer. With Excel 2003, you might have to make the toolbar visible. Hover your mouse over the icons to find the icon that will reinstate your Statement Writer pane as shown in Figure B.19.
Identifying new accounts created by your client since the last time you prepared a Statement Writer report used to be a daunting task. Now, it is easier than ever.
From the toolbar in the Document Actions pane, select Edit, Show All Accounts. The All Accounts dialog box displays as shown in Figure B.12. Any missing accounts from the customized financials are displayed in red. Optionally select to show only the Missing accounts.
Figure B.12. Has your client added new accounts since preparing your last report? Locate them efficiently with the All Accounts dialog box.
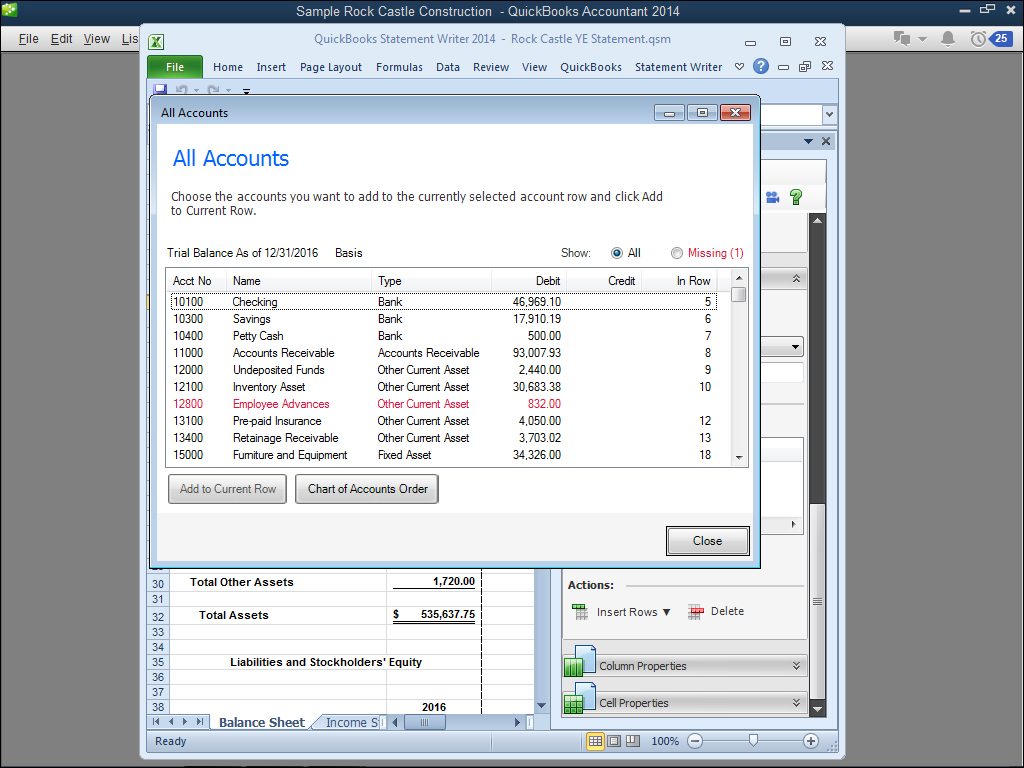
To review or add the missing account(s), follow these steps:
1. After reviewing the missing accounts, click Close on the All Accounts dialog box.
2. From the Row Properties, choose to add a new account row or highlight with your cursor an existing row you want to add the missing account(s) to.
3. With your cursor on the row you want to add the account(s) to, from the toolbar in the Document Actions pane, select Edit, Show All Accounts.
4. Select the missing account(s).
5. Click the Add to Current Row button. As you complete this for each missing account(s) there will no longer be any accounts in red.
6. Click Close to return to the modified Statement Writer report.
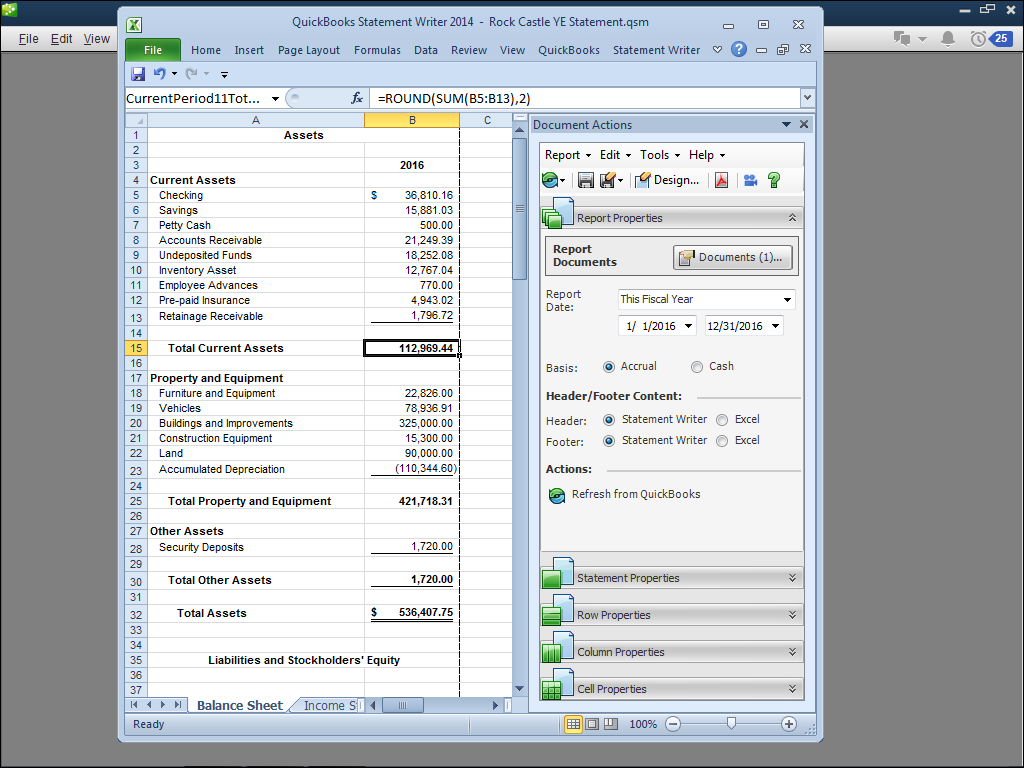
Report Properties
The term used by QSW for a collection of statements is a Statement Writer report. When you need to make global changes to all statements within a report, use the Report Properties. With report properties (previously shown in Figure B.10) you can manage the following:
• Documents—Add or modify supporting documents. See, “Working with Supporting Documents,” p. xxx.
• Report Date—Select from predetermined dates or choose a custom date.
• Basis—Specify whether you want to use accrual basis or cash basis reporting.
• Header/Footer Content—Designate if you want your changes in Excel to supersede changes you made in Report Designer.
• Refresh from QuickBooks—Restate the entire QSW Report (multiple statements) with updated QuickBooks data.
Statement Properties
When you need to modify properties that affect a single statement, not just a specific row or cell, use the Statement Properties task from the QSW Document Actions pane. The Statement Properties task (shown in Figure B.13), controls changes made to the currently selected financial statement:
Figure B.13. Modify a selected statement from the Statement Properties panel.
• Class Filter—Filter for all classes, a specific class, or for multiple classes.
• Jobs Filter—Filter for all jobs, specific jobs, or for multiple jobs.
• Zero-Balance Accounts—When selected, show accounts with a zero balance; when not selected, accounts with a zero balance are hidden.
• Balance Sheet Round-Off—Assign the account to use for any rounding differences.
• Refresh from QuickBooks—Restate the currently selected statement with updated QuickBooks data.
• Edit Header/Footer—Change to the Header/Footer.
• Delete Statement—Remove a statement from a QSW Report.
Row Properties
To make a change to a specific row, and not affect other rows, review the features of the Row Properties task of the QSW Document Actions. The Row Properties, shown in Figure B.14, affect formatting for the selected row and offer the following functionality when selecting a blank row:
Figure B.14. Use the Row Properties options to control the data you view in a particular row.
• Type—Change the type of data that is represented in the cell, including Blank, Captions, Headings, Account (QuickBooks data), or Total types. For more information see Table B.1 “Row Total Specifications” in this chapter.
• Name—Change the label of the cell (with the cell selected); the default is the account name.
Tip
Did you know that to change the text in a row label, you can make the change directly in the Row Properties pane with the row selected, or simply type the new text directly into the appropriate cell of the spreadsheet? Entering new text using either of these options updates the Row Properties pane and the row label viewed for the statement.
• Manage Accounts—Select from the following:
• Combine accounts from selected rows
• Add accounts by number, type, or name
• Separate accounts that were previously combined
• Remove accounts
• Override zero-balance settings (from Statement Properties)
• Reverse all the positive and negative numbers in the row.
• Insert Rows—Insert new rows. Choose from Blank, Captions, Headings, Account (QuickBooks data), or Total types.
• Delete—Delete the currently selected row. You have to use the QSW Delete Column function because the Excel worksheet is protected from using the Excel Delete command.
QuickBooks offers users a lot of flexibility when working with a chart of accounts. Often, several chart of account list items might have been created since your last review of the data. The QSW tool enables you to create customized financials grouping accounts together without affecting the client’s original chart of accounts.
To combine account rows, follow these steps:
1. With the QSW statement open with your Ctrl key pressed, click to highlight any two or more cells you want to combine into a single row. In the example shown in Figure B.15, the cells for Checking, Savings, and Petty Cash are selected.
Figure B.15. Combine multiple QuickBooks account rows into one in the customized financials. No change is made to the QuickBooks file.
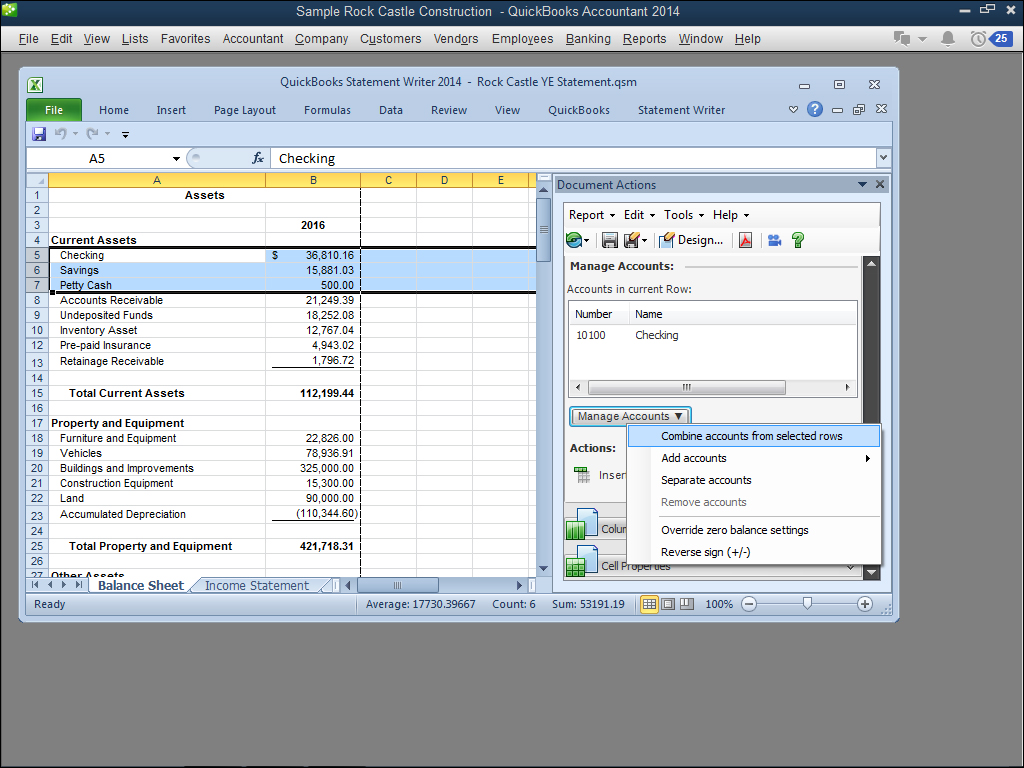
Use the control key on your keyboard to select multiple rows
2. With multiple cells selected that you want to “roll up,” select Combine Accounts from Selected Rows from the Manage Accounts drop-down list. (Optional) Click the Combine Accounts icon from the Excel Add-Ins ribbon.
3. Rename the label either in the Row Properties task or directly in the Excel cell. Figure B.16 shows that the row was renamed to Cash and Cash Equivalents.
Figure B.16. Multiple cash rows are now included in a single row. Mouse over the row to see the accounts included.
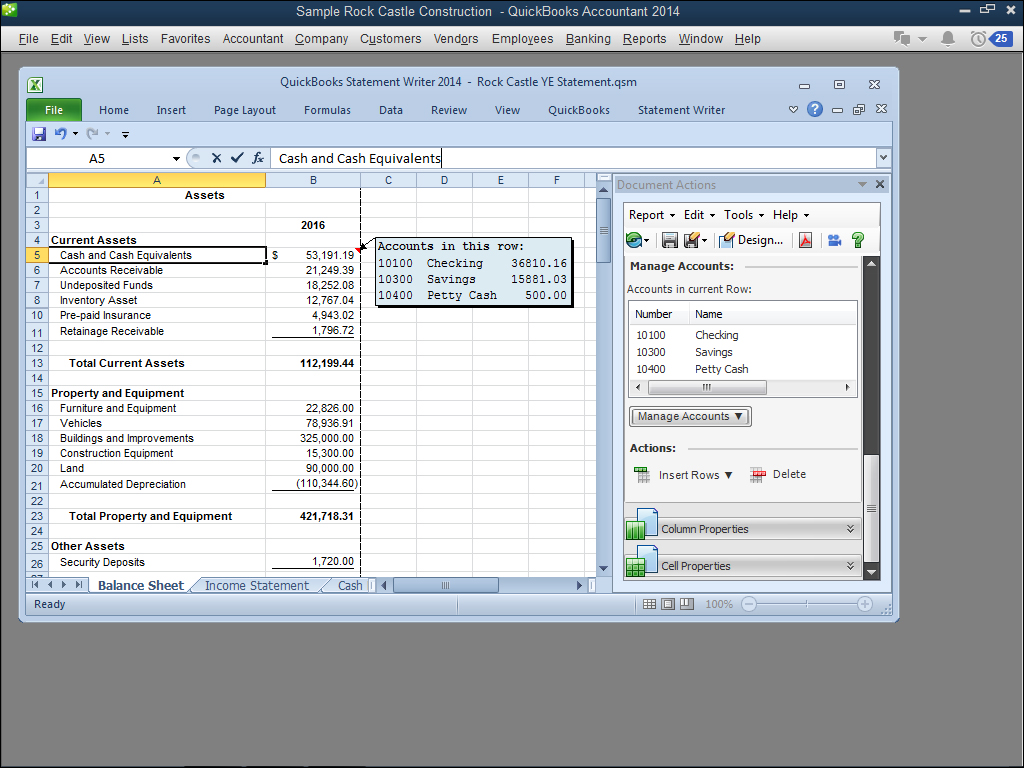
4. Hover your mouse over the row to see a note of the accounts that are included in the new cell total.
To separate the accounts, in step 2, choose the Separate Accounts menu choice.
One of the most efficient uses in customizing your client’s financials is the capability to combine “like” rows of data into a single row. Your financials will be more professional in appearance, while not affecting the client’s chart of accounts.
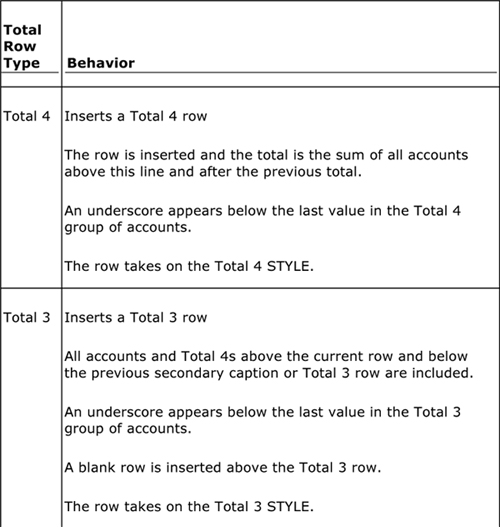
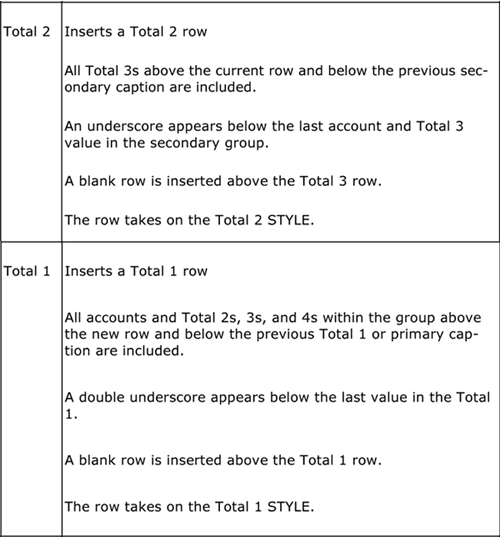
Table B.1 provides some technical information on the characteristics of the different row Total types:
Table Appendix B.1. Row Total Specifications
Column Properties
Use the Column Properties pane (see Figure B.17) to change the properties of the selected column in the QSW statement. The options available in the Column Properties pane change depending on the type of column that is current when the pane is selected.
Figure B.17. Place your cursor in a column and then from the Column Properties panel control the contents of that column.
• Type—Choose the type of data in the column: Blank, Accounts (the column or statement header), Variance, % of the Whole, Summary Total, and Grand Total. Each type has its own unique column property options.
• Heading—Control the heading title of the currently selected column.
Depending on what type of column you have selected, the following menu options change:
• Period—Change the accounting period for the currently selected column.
• Show Data—Select to display past years for the same accounting period; used side-by-side analysis.
• Filter for Class—If you are using class tracking, select all classes, combination of classes, or a single class.
• Filter for Job—Filter for all jobs, combination of jobs, or a single job.
• Insert Column(s)—Use to add columns from the specified allowed types. Types include Blank, Account Numbers, QuickBooks Data, Variance, % of the Whole, Summary Total, and Grand Total.
• Delete—Click to select the column you want to delete and then click the Delete Column button on the Column Properties pane. You have to use the QSW Delete Column function because the Excel worksheet is protected from using the Excel Delete command.
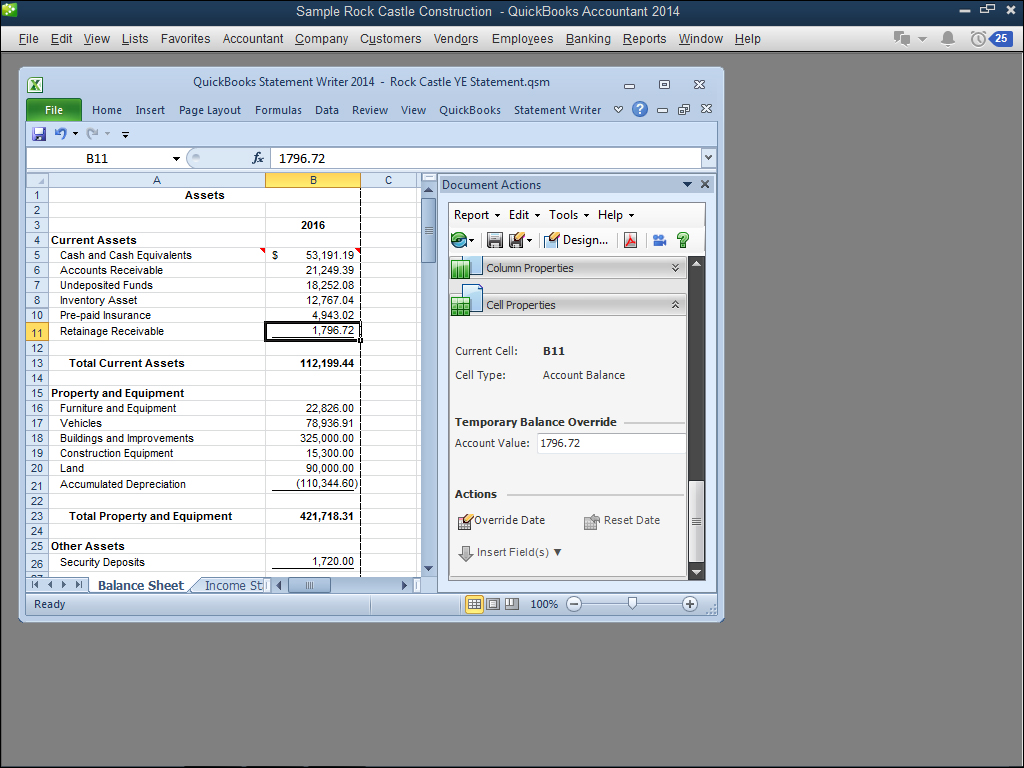
Cell Properties
The Cell QSW actions will vary by the type of cell selected. In Figure B.18 an account amount cell is selected. Cell Properties include:
• Current Cell—Indicate the cell reference for the currently selected cell.
• Cell Type—Determined and set by either row or column properties.
• Temporary Balance Override—Define a manual amount for an account cell.
• Override Date—Override the selected date for a specific cell, so the date range differs from the rest of the statement data.
• Reset Date—Return the cell date to match the date assigned to the entire statement.
• Insert Field(s)—Add any of the following information to a selected blank cell:
• Accountant Information
• Client Information
• Basis
• Statement “From” Date
• Statement “To” Date
• Formatted Statement Date
Figure B.18. Use the Cell Properties to manage the information displayed in a specific data cell.
Method 3: Using the Excel Add-Ins Ribbon Icons
You can also access selected editing functions from the Excel Add-Ins ribbon icon shown in Figure B.19.
Figure B.19. Reinstate the QSW Document Actions pane and other activities available from the QSW toolbar.
Working with Supporting Documents
Another feature of the QuickBooks Statement Writer 2014 tool is the capability to create supporting documents to the customized statements.
There are two types of supporting documents you can add to your QSW statement:
• Documents From Templates—Created from templates that merge accountant and client information from the company file with present text. These documents are created with Word and have a file extension .dot.
• Documents From My Computer—Word documents you have already created and do not contain merged information. There are no limitations to the content of these documents.
You can add documents from templates or documents stored on your computer. Templates are both those that are shipped with the QSW product and those you can download directly from Intuit.
→ For more information, see “Resources,” p. xxx.
The following sections detail how to create or modify existing document templates and then attach them to your Statement Writer report. When you complete your client’s customized financials, you can specify the order the documents are to print in.
Overview
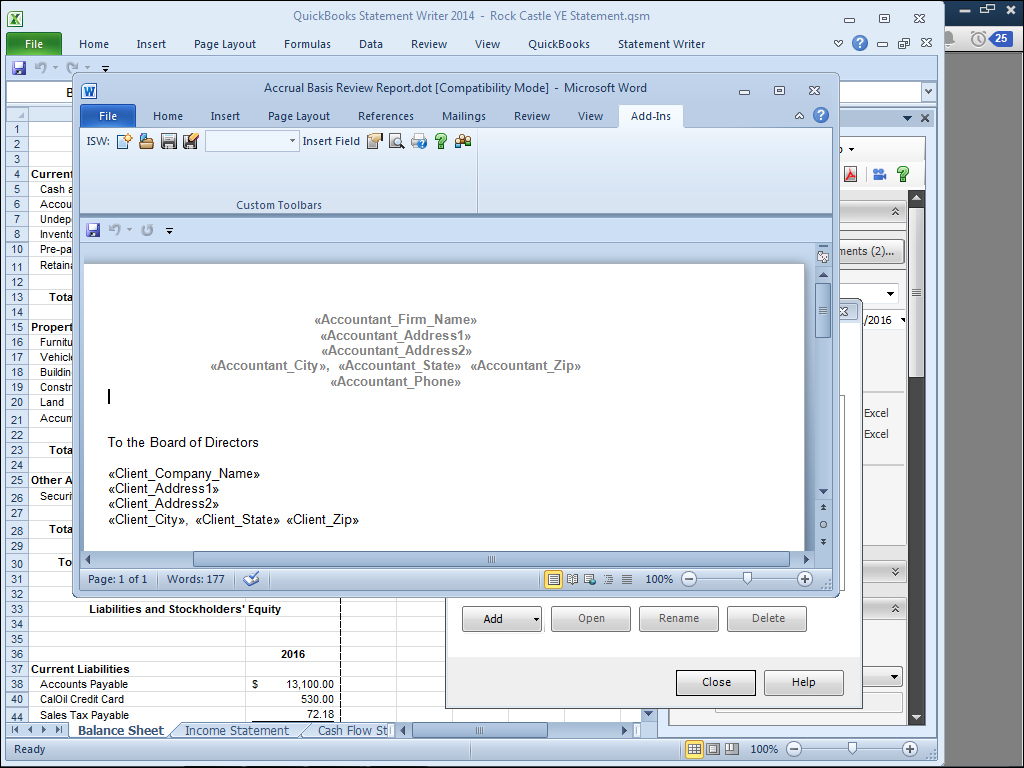
You can add or modify the provided supporting document templates or you can create them on your own using Microsoft Word. Supporting documents can be a combination of text (your own manually typed content) or dynamic data fields from the QuickBooks file, which are selected from a predefined list. For example:
“We have audited the accompanying statement of assets, liabilities, and equity—(cash, income tax basis) of «Client Company Name».”
In the text above, the first part of the sentence is manually typed text. The field name is Client Company Name. The chevrons («») are required and are added automatically by Microsoft Word. When the final report is printed, the data from QuickBooks (in this example, the Client Company Name) is replaced where the field name is listed in the template.
When you are creating a template with merged fields, you use a Microsoft Word .dot file. The only time you open the .dot file is when you need to modify the template details. When the final report is prepared, the field names refresh with current data from the QuickBooks file you are using with QSW.
Adding or Modifying a Supporting Document
You might have added a supporting document when you created the Statement Report using the Report Designer. In Figure B.5 a Cover Letter document was added to the Financial Report Contents in Report Designer. If you did not add documents during the Report Designer setup, you can add them from the Document button in the Report Properties panel as shown in Figure B.20.
Figure B.20. View, add, open, rename, and delete supporting documents.
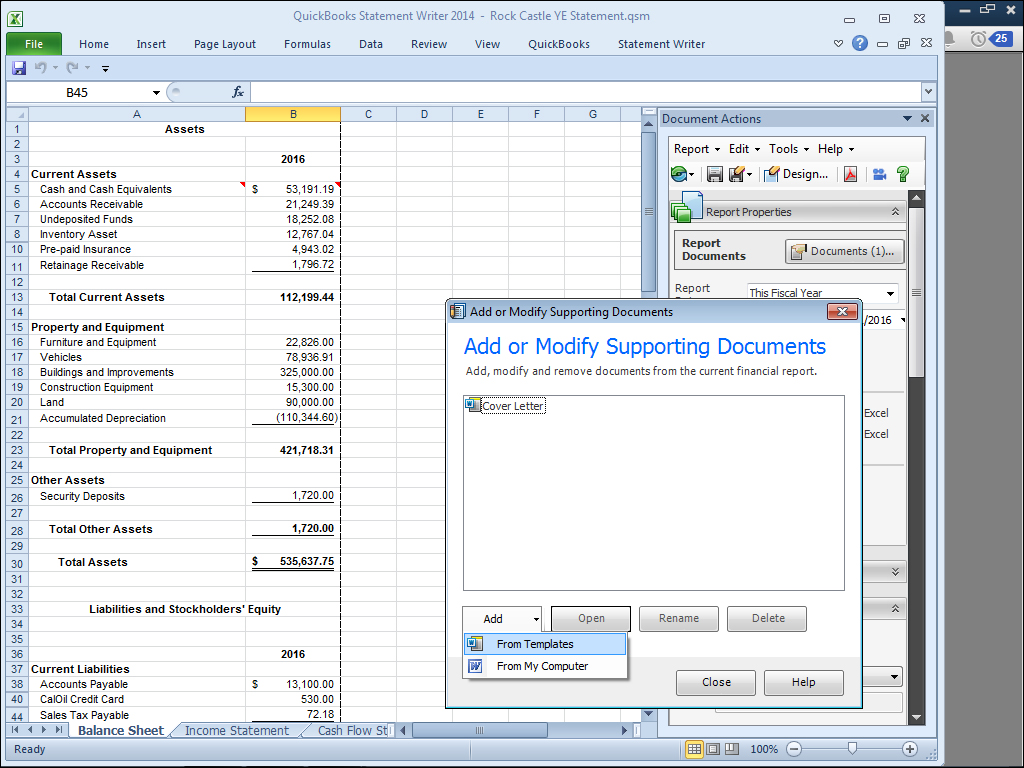
To add or modify a supporting document, follow these steps:
1. Open a Statement Writer Report. From the Document Actions pane, expand the Report Properties panel.
2. Click the Documents button. The Add or Modify Supporting Documents dialog box displays any documents currently included in the Statement Report.
3. Click Add, to choose to add From Templates or From My Computer.
4. If you select From Templates, the Insert Documents dialog box displays as shown in Figure B.21.
Figure B.21. Insert ready-made supporting documents or those you created.
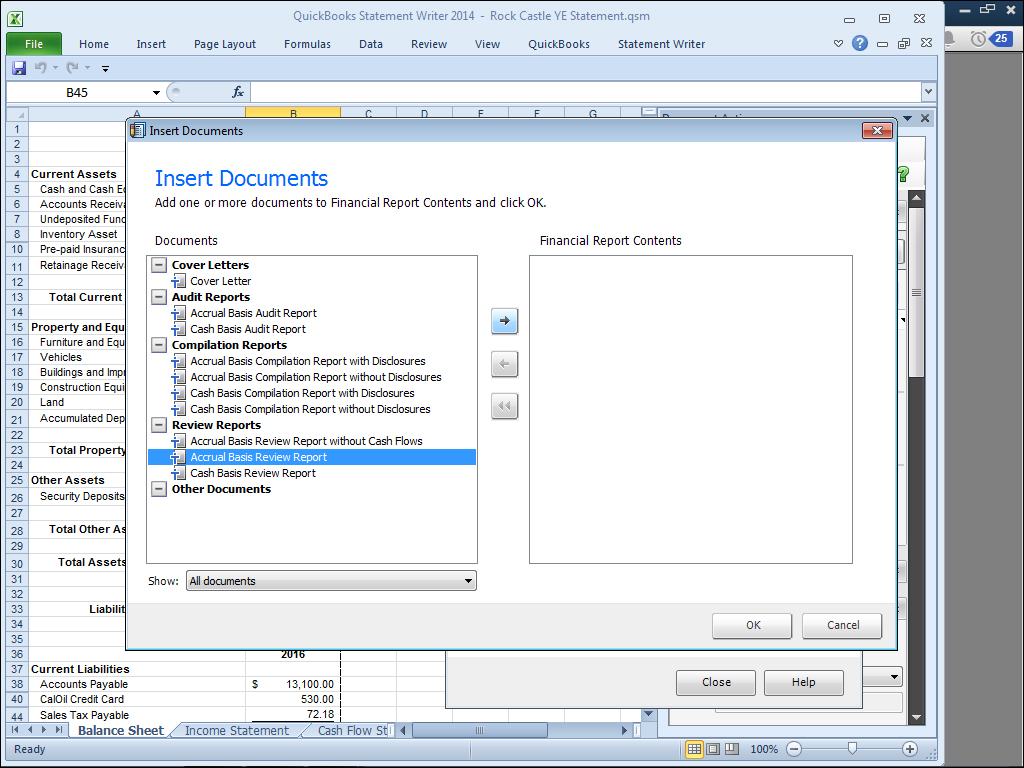
5. Select the desired document template on the left and click the arrow pointing to the right to include the document in the Financial Report Contents.
6. Click OK. The new document displays in the Add or Modify Supporting Documents dialog box.
7. (Optional) With a document selected, click Rename or Delete.
8. To modify a selected document, click the Open button. QSW automatically launches Word.
Using templates saves you time by creating customized financial templates you can use with multiple clients Statement Writer reports.
Using the QSW Toolbar in Word
QSW adds a toolbar to Word to help you properly create supporting documents.
To access the toolbars in Word 2003, select View, Toolbars, and place a checkmark next to QuickBooks Statement Writer. In Word 2007 select the Add-Ins ribbon and the QSW toolbar displays as shown in Figure B.22.
Figure B.22. Use the QSW toolbar in Word to create supporting documents with merged fields from the client’s data.
New Document Template
Save
Click arrow to view and select merge fields
Instructions for printing
Statement Writer Community
Open Document Template
Save As Document Template
Manage document template
Help
Editing an Existing QSW Supporting Document
You might find it necessary to edit the text or fields in an existing QSW supporting document. You can access the Microsoft Word .dot templates directly from a QSW Report or you can browse to the stored templates directly from within Word.
To edit an existing QSW supporting document, following these steps:
1. Launch the QSW tool from within QuickBooks.
2. From the Document Actions pane, Report Properties, click the Documents button.
3. A list displays any supporting documents currently assigned to this QSW Report (see previous Figure B.20). Select a supporting document then click the Open button and skip to step 9. If no supporting documents are listed, go to step 4.
4. Click the Add button, and select From Templates.
5. The Insert Documents dialog box displays as shown in Figure B.21. Select a specific document and in the center of the window, click the arrow pointing to the right to add the selected document to the Financial Report Contents pane.
6. (Optional) Select Show, All Documents, Intuit Documents, Custom Documents, or Custom Template Groups to filter for specific documents to choose from.
7. Repeat step 5 until you have added the necessary documents to your QSW report. Click OK to close the Insert Documents dialog box.
The Add or Modify Supporting Documents dialog box displays with a list of added documents.
8. Click the Rename button if you want to give the document a new name for this QSW report.
9. Click the Open button. QSW opens the .dot template in Microsoft Word.
10. Edit the text as needed using Word’s editing functions.
11. To add or edit merged data fields in Word 2003, click the QSW toolbar. For Word 2007 and 2010 users, click the Add-Ins ribbon.
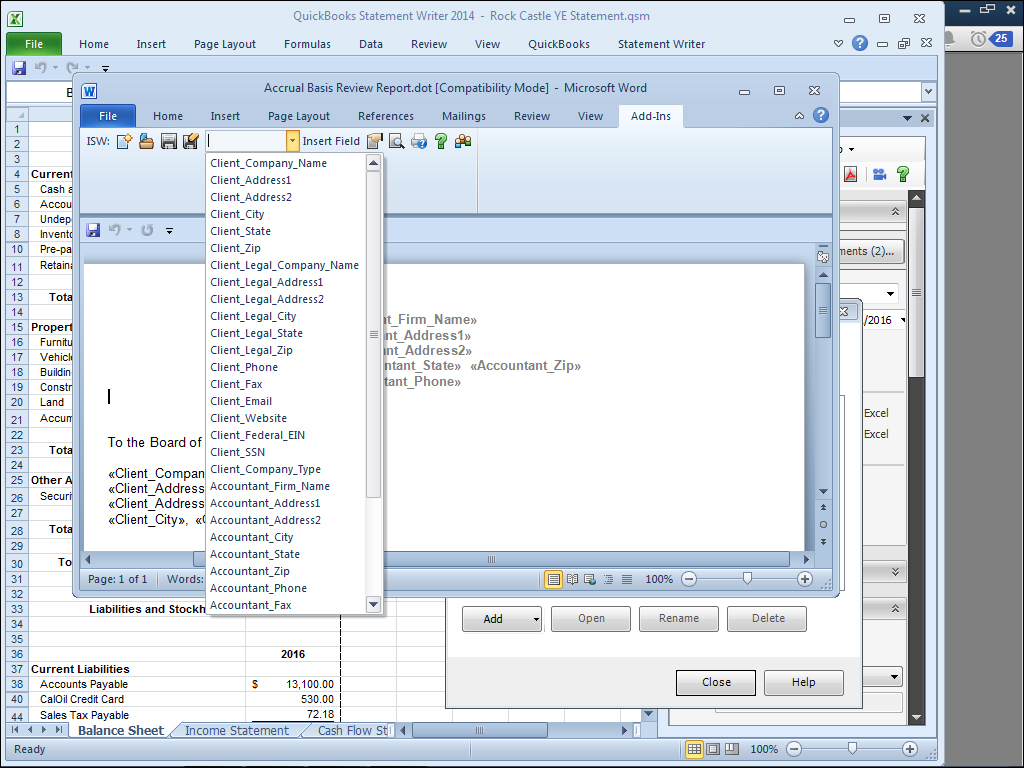
12. With your mouse in the location on the document where you want to add the merged field, select the desired field from the Insert Field drop-down menu as shown in Figure B.23.
Figure B.23. Add QuickBooks data fields to customized document templates.
13. When you are finished with your edits on the QSW toolbar, click the Save button to save over the original document. Click the Save As button to save the document with a different name.
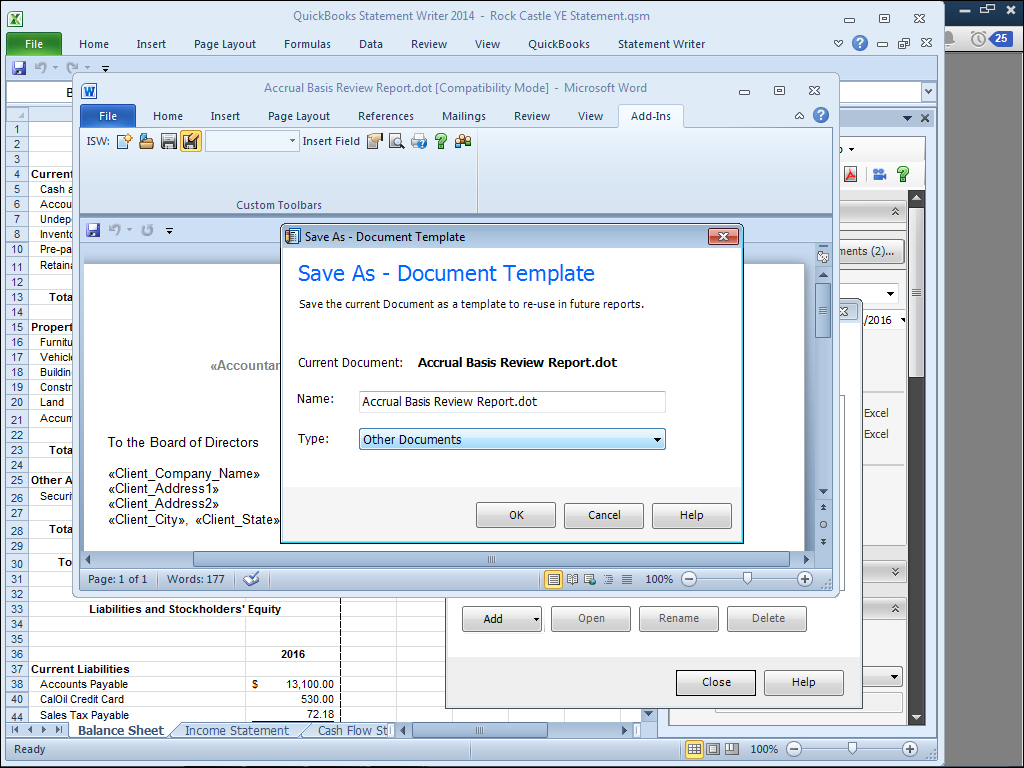
14. When you click Save As, the Save As—Document Template dialog box displays. Provide a Name for the template and choose a Type from the drop-down list as shown in Figure B.24.
Figure B.24. Save your new supporting document as a template to be used with other client files.
15. Click OK to close the Save As—Document Template dialog box.
Creating a New QSW Supporting Document
You can optionally create your own supporting document templates and store them on your computer.
To create a new QSW supporting document, follow these steps:
1. Open Microsoft Word.
2. Add the text or images as needed using Word editing functions.
3. To add or edit merged data fields in Word 2003, click the QSW toolbar. For Word 2007 or 2010 users, click the Add-Ins ribbon.
4. With your mouse in the location on the document where you want to add the merged field, select the desired field from the drop-down list items.
5. Click the Insert Field link (see previous Figure B.23) on the QSW toolbar.
6. When you are finished with your edits on the QSW toolbar, click the Save button to save over the original document. Click the Save As button to save the document with a different name.
7. When you click Save As, the Save As—Document Template dialog box displays (refer to previous Figure B.24). Provide a Name for the template and choose a Type from the drop-down list.
Now that you have created a new supporting document, you can attach the document to your QSW report so you can print a complete set of customized financials for your clients. Read on to the next section to learn more about attaching supporting documents.
Printing or Exporting a Statement Writer Report
In the previous section you learned how to add or modify supporting documents to your QSW report, making it a complete set of custom financials ready to print. QSW creates a PDF of the complete report set so you can print, send via email, and store for future reference.
To print or export a Statement Writer report, follow these steps:
1. Launch the QSW tool from within QuickBooks.
2. If you have just opened your QSW Report, the QuickBooks data has automatically refreshed. If you have been modifying the QSW report or QuickBooks data, refresh the data by clicking the Refresh button on the Document Actions pane.
3. From the Document Actions pane, select Save As, QSW Report, Excel Workbook, Template Group, or PDF.
4. If you selected Save as PDF, the Create PDF dialog box displays as shown in Figure B.25. The Available Report Contents show each of the statements and supporting documents you have included in this QSW report. On the left pane, select a statement or document to include in your PDF.
Figure B.25. You define the print order of the documents when creating a PDF.
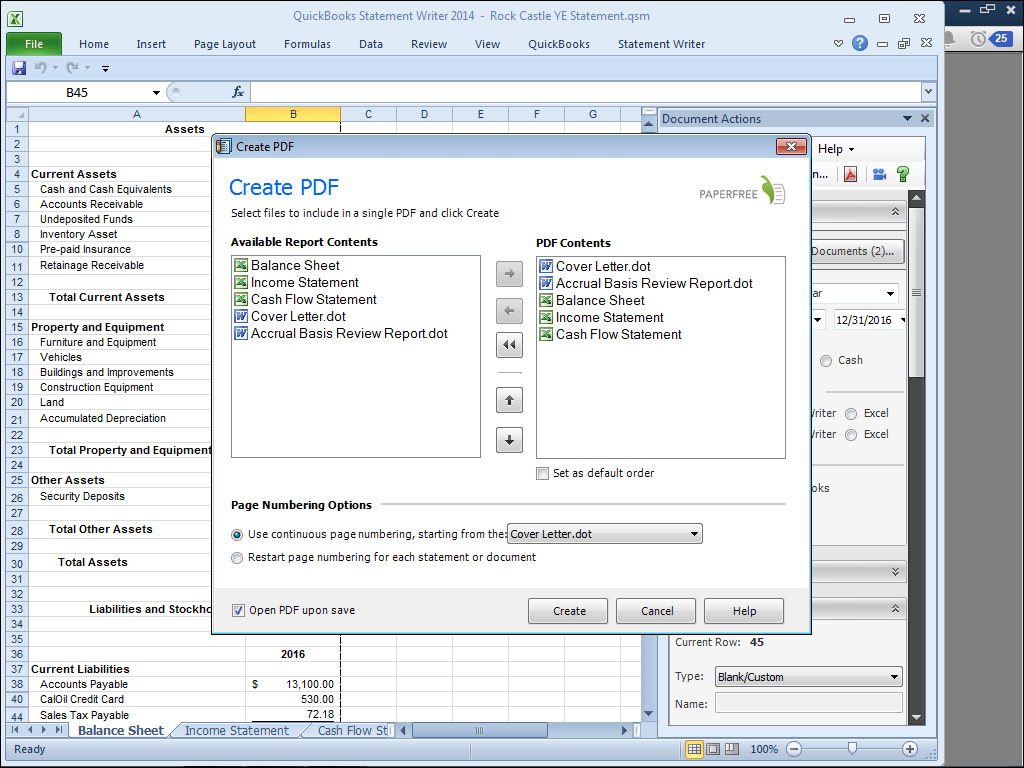
5. Use the arrow pointing to the right to include the selected statement or document in the PDF Contents pane.
6. Select an item in the PDF Contents pane, and use the up or down arrow to organize the print order for your financials.
7. (Optional) Select Set as Default Order so you do not have to make these choices again.
8. (Optional) Select Open PDF upon Save.
9. Click Create.
10. Select Save as Excel Workbook, QSW opens a Windows Explorer window.
Caution
When you export your QSW report to Excel, it is no longer linked to QuickBooks and therefore cannot be updated or refreshed.
11. Browse to the computer folder to which your Excel workbook should be saved and give the workbook a filename. Click Save.
Accounting professionals can use QSW to create financial reports that include statements and supporting documents. These reports can be saved as templates for use with other client files and for updating with future dated information.