
11. Cloud Persistence with CloudKit
iCloud is a set of cloud-based services provided by Apple. It was introduced with iOS 5 as a replacement for MobileMe, and generally provides cloud storage and automatic syncing among iOS devices, OS X devices, and the Web. iCloud includes email, address book, notes, reminders, and calendar syncing; automated iOS device backup and restore; a Find My iPhone feature to locate and/or disable a lost device; a Find My Friends feature to share locations with family or friends; Photo Stream, which automatically syncs photos to other devices; Back to My Mac, which allows for configurationless access to a user’s Mac over the Internet; iTunes Match, which provides access to a user’s music library without uploading and syncing; iCloud Keychain, which syncs passwords; and iCloud Drive, which allows for storing files and documents in the cloud. In addition, iCloud provides the ability for apps to store app-specific data in the cloud and automatically sync between devices. At the time of this writing, iCloud provides 5GB of storage free, and offers paid plans for additional storage.
For app-specific storage and syncing, iCloud supports four different approaches: document-based storage and syncing (based on NSDocument or UIDocument), key-value storage and syncing (similar to NSUserDefaults), remote structured data storage with CloudKit, and Core Data syncing. This chapter explains how to set up an app to use remote structured data storage with CloudKit.
CloudKit Basics
CloudKit was introduced with iOS 8. CloudKit offers remote data storage, data syncing between the local device and remote storage, and push notification-based subscriptions for data changes for users with iCloud accounts. Apple provides CloudKit free of charge up to certain storage and data transfer limits, based on the number of users in the app. If the limits are exceeded, Apple charges for CloudKit, but pricing has not been disclosed at the time of writing.
CloudKit includes a Web interface for setting up and managing the database schema and public data, and CloudKit includes an API for accessing, retrieving, and maintaining data from an iOS (or OS X) client. Note that CloudKit does not offer any mechanism for local data storage, so it is up to the app developer to select and implement a local storage approach, and integrate that local storage with CloudKit. See Chapter 15, “Getting Up and Running with Core Data,” for more discussion on selecting a local storage mechanism. In addition, CloudKit does not offer a way to implement any logic on the server, so any application logic related to the data must be performed on the client.
The Sample App
The sample app for this chapter is called CloudTracker, which is a basic data-tracking app for races and practice runs that stores data using CloudKit. CloudTracker takes advantage of the public database to store race results and the private database to store practice run results. CloudTracker illustrates iCloud user discovery to get and display information about the current user. In addition, CloudTracker uses a CloudKit subscription to be notified when new race data is available.
Setting Up a CloudKit Project
To set up an app to use iCloud, several steps used to be required. Entitlements for the app needed to be set up, and the app needed to be configured in the iOS Provisioning Portal for iCloud support. Some iCloud functions can be tested only on the device, so the provisioning profile work needed to be completed in order for an iCloud app to work. Since Xcode 5, this process has been significantly streamlined and can be done entirely within Xcode.
Account Setup
Xcode needs iOS developer account information in order to connect to the Member Center and perform all the setup necessary for iCloud on the developer’s behalf. Select Xcode, Preferences from the Xcode menu, and then select the Accounts tab, as shown in Figure 11.1.

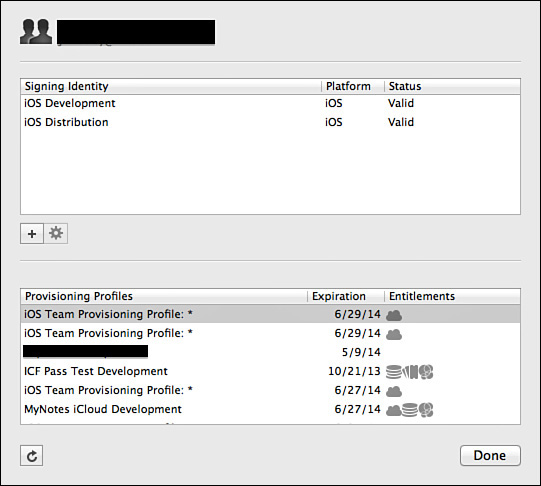
To add a new account, click the plus sign in the lower left of the Accounts tab, and select Apple ID. Enter the account credentials and click the Add button. Xcode validates the credentials and gathers account information if valid. Click the View Details button to see what certificates and provisioning profiles are currently configured for an account, as shown in Figure 11.2.
Enabling iCloud Capabilities
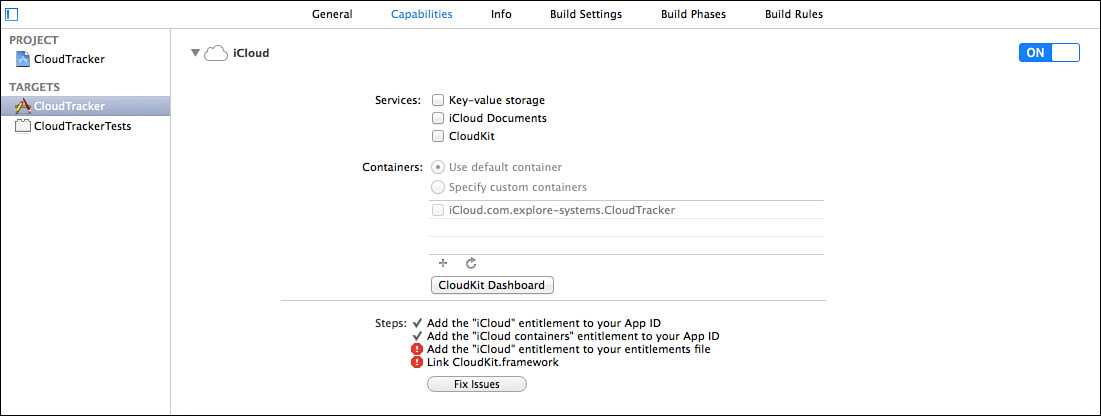
After Xcode has account credentials, it can configure apps with capabilities on behalf of the account. It can set up App IDs, entitlements, and provisioning profiles as needed. To set up the iCloud capability, view the CloudTracker Target in Xcode, click the Capabilities tab, and find the iCloud section. Change the iCloud switch to On, and Xcode will automatically create an entitlements file for the project. Check the CloudKit checkbox to enable CloudKit for the app. Xcode will automatically populate an entry with the project’s bundle ID in the Ubiquity Containers table. For the sample app, this is all that is needed; for a more complex app that shares with a Mac OS X application and that would need to support more than one ubiquity container name, additional ubiquity container names can be added here. Xcode will check with the developer portal to see whether the App ID is configured correctly for iCloud. If not, Xcode will display the issue, as shown in Figure 11.3. Tap the Fix Issues button, and Xcode will communicate with the developer portal and fix any issues with the app setup.
After the iCloud capability is enabled, and there are check marks by CloudKit and all the listed steps, the app is ready to use CloudKit.
CloudKit Concepts
CloudKit introduces several concepts to consider when developing a CloudKit app.
Containers
The container object, CKContainer, represents the iCloud container where all the CloudKit information is stored. iCloud uses a special directory in the iOS file system called the ubiquity container to manage data syncing between the app and iCloud. A container is identified with a container identifier, which can be either the default container identifier (which is the same as the bundle ID), or a custom container identifier. The CKContainer object has class methods to get references to the default container or a custom container by ID (defaultContainer and containerWithIdentifier:). A reference to the container is needed in order to access the CloudKit databases.
Databases
CloudKit supports both a publicly accessible database and a private database. Each database can store data defined by record types. The public database can be read by any user (even a user without an iCloud account), but can be written to only by an iCloud user. The public database is theoretically accessible by any user, but access to it is limited by the design of the app in practice. Records stored in the public database count against the app’s CloudKit storage quota. To access the public database, use the publicCloudDatabase method on the container:
CKDatabase *publicDatabase = [[CKContainer defaultContainer] publicCloudDatabase];
The private database is specific to an iCloud user for the app. Data in the private database can be read and updated only by the user; even the app administrator cannot see or update data in the private database. Records stored in the private database count against the iCloud user’s storage quota. To access the private database, use the privateCloudDatabase method on the container:
CKDatabase *privateDatabase = [[CKContainer defaultContainer] privateCloudDatabase];
Records
CloudKit stores structured data in records, or instances of CKRecord. Records are defined by record types (similar to an “entity” or “table” in relational database terminology), which can be set up either in the CloudKit dashboard or just by saving a new record while operating in the development environment. The server will return an error when attempting to save unknown record types or unknown attributes for record types in the production environment.
CKRecord instances can function much like instances of NSMutableDictionary, in that the attribute or object values can be set for keys, or attribute names. Records support several attribute types, as shown in Table 11.1. CloudKit has special support for querying by CLLocation, and supports relationships with other records using a CKReference. In addition, records can use a CKAsset to store data (see the “Assets” section).

Users represent a special type of CKRecord. User records cannot be queried; rather, a user record has to be fetched directly using the record ID, or the user record needs to be accessed through the user discovery process, which will find users that exist in the iCloud user’s list of contacts (by email address). See the section “User Discovery and Management” for more details.
Record Zones
Record zones (CKRecordZone) are a way to organize related record types together. A record zone functions as a container for related record types. In the public database for an app, there is only one record zone, which is called the default zone. Customized record zones can be created for the private database. Note that changes to records in the same record zone can be committed or rolled back together. References between records can exist only within a record zone.
Record Identifiers
Each instance of CKRecord by default is given a unique identifier by CloudKit when it is initialized, which is an instance of CKRecordID. This record identifier will be based on a UUID and is guaranteed to be unique, is safe to store locally, and can be used to fetch instances of CKRecord when they are needed.
CloudKit can also support custom record identifiers. Record identifiers can be supplied when a record is created, and must be unique to the database the record will be saved to. Custom record identifiers must be used when saving records outside the default zone for a database.
Assets
A CKAsset can be used to store attribute data in a file, rather than directly in an attribute for a record. This approach is appropriate for images, sounds, or any other relatively large pieces of data. Remember that a CKRecord can have a maximum of 1MB of data, and an asset can store up to 250MB.
When the related CKRecord is fetched, the CKAsset will also be downloaded. The data for the CKAsset can be loaded from the fileURL of the CKAsset.
If the data for the asset should be available locally while offline, it should be copied from the CKAsset to a locally accessible file URL.
CloudKit Basic Operations
CloudKit offers two different approaches to working with data: robust NSOperation-based tools and block-based convenience methods from the CKDatabase object. This chapter illustrates working with CloudKit using the block-based approaches in order to be easier to follow; but be advised that the NSOperation-based approaches provide some additional power that the convenience methods do not, such as the ability to save multiple records simultaneously or get progress updates on larger operations.
Fetching Records
To fetch records from a CloudKit database, a query is needed. In the sample app, both the races view and the practice runs view use a query to pull records from CloudKit, and then display those records in a table view. Because the races view pulls race information from the public database, a reference to the public database is needed:
CKDatabase *publicDatabase = [[CKContainer defaultContainer] publicCloudDatabase];
Queries in CloudKit leverage the power of NSPredicate. To query records from CloudKit, build an NSPredicate that expresses the conditions to be satisfied, using the attribute names for the record in the selection criteria (see the “Using Predicates” section in Chapter 15, “Getting Up and Running with Core Data,” for more information on building predicates). If all records are desired, a predicate is still needed for the query. In this case, there is a special way to declare a predicate for everything:
NSPredicate *predicate = [NSPredicate predicateWithFormat:@"TRUEPREDICATE"];
After a predicate has been created, a CKQuery instance can be created, specifying the record type and the predicate.
CKQuery *query = [[CKQuery alloc] initWithRecordType:@"Race" predicate:predicate];
Then a convenience method on the database can be used to execute the query. The convenience method either will return matching records in an instance of NSArray, or will return an error in an instance of NSError. Note that passing a zone ID of nil, as shown in the example, will execute the query in the default zone.
__weak ICFRaceListTableViewController *weakSelf = self;
[publicDatabase performQuery:query
inZoneWithID:nil
completionHandler:^(NSArray *results, NSError *error) {
dispatch_async(dispatch_get_main_queue(), ^{
weakSelf.raceList = [[NSMutableArray alloc] initWithArray:results];
[weakSelf.tableView reloadData];
});
}];
The completion handler will be executed on an arbitrary queue. It is not likely to be executed on the main queue, so it is absolutely necessary to dispatch to the main queue to handle the results if there will be any user interface updates as a result. Dispatching asynchronously reduces the likelihood of a deadlock.
In this example, the view controller stores the results array in a property, and then informs the table view that it should reload to display the data from the stored results, so dispatching to the main queue is a requirement. The races in the public database will be displayed, as shown in Figure 11.4.

Create and Save a Record
To create a new record in the sample app, tap the plus sign in the upper-right corner of the race view (as shown in Figure 11.4). The app will present a form that will accept data for a new race record. When the user has filled out the form and tapped the Save button, the view controller will present an activity indicator since the save operation will likely take a noticeable amount of time. A reference to the public database will be established, and then an instance of CKRecord will be initialized for the record type “Race.”
if (!self.raceData)
{
self.raceData = [[CKRecord alloc] initWithRecordType:@"Race"];
}
The race record will be updated with data from the user interface. First, the racer, or user who is entering the record, will be pulled from the app delegate and set up as a reference to the user record using a CKReference. See the “User Discovery and Management” section later in this chapter for more information on how the user record was populated. The racer’s name will be pulled from the user record and stored for convenience on the race record.
if (![self.raceData objectForKey:@"racer"])
{
AppDelegate *appDelegate = (AppDelegate *)[[UIApplication sharedApplication] delegate];
CKRecord *userRecord = appDelegate.myUserRecord;
if (userRecord)
{
CKReference *racerReference = [[CKReference alloc] initWithRecord:userRecord
action:CKReferenceActionNone];
self.raceData[@"racer"] = racerReference;
self.raceData[@"racerName"] = userRecord[@"name"];
}
}
Next each attribute will be given a value from the associated form object.
self.raceData[@"raceName"] = self.raceName.text;
self.raceData[@"location"] = self.location.text;
self.raceData[@"distance"] = [NSNumber numberWithFloat:[self.distance.text floatValue]];
self.raceData[@"distanceUnits"] = [self selectedDistanceUnits];
self.raceData[@"hours"] = [NSNumber numberWithInteger:[self.hours.text integerValue]];
self.raceData[@"minutes"] = [NSNumber numberWithInteger:[self.minutes.text integerValue]];
self.raceData[@"seconds"] = [NSNumber numberWithInteger:[self.seconds.text integerValue]];
self.raceData[@"raceDate"] = [self.datePicker date];
Finally, the race record will be saved, using a convenience method on the database. The save method requires a CKRecord parameter and completion handler.
__weak ICFRaceDetailViewController *weakSelf = self;
[publicDatabase saveRecord:self.raceData
completionHandler:^(CKRecord *record, NSError *error) {
dispatch_async(dispatch_get_main_queue(), ^{
[weakSelf.saveRaceActivityIndicator setHidden:YES];
if (weakSelf.indexPathForRace) {
[weakSelf.raceDataDelegate raceUpdated:record forIndexPath:weakSelf.indexPathForRace];
} else {
[weakSelf.raceDataDelegate raceAdded:record];
}
[weakSelf.navigationController popViewControllerAnimated:YES];
});
}];
Again, note that the completion handler will be called on an arbitrary queue, so if the user interface will be updated, it is necessary to dispatch to the main queue. The completion handler will hide the activity indicator, tell the race list view controller to either update the saved record or handle adding a new race record, and then dismiss the detail view controller.
Update and Save a Record
To update a race record, tap on a race row in the race list in the sample app. The CKRecord for the race associated with the view will be passed to the detail view controller in the prepareForSegue:sender: method. The index path will also be passed to the detail view controller so that when the update is complete, only the affected row will need to be refreshed.
if ([segue.identifier isEqualToString:@"updateRaceDetail"])
{
NSIndexPath *tappedRowIndexPath = [self.tableView indexPathForSelectedRow];
CKRecord *raceData = [self.raceList objectAtIndex:tappedRowIndexPath.row];
[detail setIndexPathForRace:tappedRowIndexPath];
[detail setRaceData:raceData];
[detail setConnectedToiCloud:self.connectedToiCloud];
}
The user interface for the detail view will be populated from the passed-in race record.
if (!race)
{
return;
}
[self.raceName setText:race[@"raceName"]];
[self.location setText:race[@"location"]];
[self.distance setText:[race[@"distance"] stringValue]];
[self.distanceUnit setSelectedSegmentIndex:
[self segmentForDistanceUnitString:race[@"distanceUnits"]]];
[self.hours setText:[race[@"hours"] stringValue]];
[self.minutes setText:[race[@"minutes"] stringValue]];
[self.seconds setText:[race[@"seconds"] stringValue]];
[self.datePicker setDate:race[@"raceDate"]];
After the information has been updated and the user has tapped the Save button, the race record will be saved using the same logic as a new record (as illustrated in the preceding section).
Subscriptions and Push
CloudKit offers the capability to subscribe to, or listen for, data changes, and then receive notifications when relevant data has changed. This enables an application to be very responsive to data changes without expensive polling, and even enables an application to keep up-to-date when it is not actively being used. CloudKit leverages push notifications (refer to Chapter 10, “Notifications,” for more details, and recall that push notification delivery is not guaranteed) and predicates to enable this powerful feature.
Push Setup
For the app to receive push notifications related to subscriptions, some setup is required. First, the app needs to register for remote notifications and receive a device token in order for CloudKit to be able to send pushes to the device. Note that a push certificate does not need to be set up for CloudKit notifications; CloudKit manages the notifications internally.
The sample app registers for push notifications in the application:didFinishLaunchingWithOptions: method in the app delegate. It will frequently be better to place the push registration logic in a different context in the app so that the user understands what benefits push notifications will provide and will be more likely to accept them. First, the sample app registers for remote notifications:
[application registerForRemoteNotifications];
Then the sample app registers the desired user notification settings, which can be customized.
UIUserNotificationSettings *notifSettings =
[UIUserNotificationSettings settingsForTypes:UIUserNotificationTypeAlert |
UIUserNotificationTypeBadge | UIUserNotificationTypeSound categories:nil];
[application registerUserNotificationSettings:notifSettings];
After the two registrations are complete, the app is ready to receive push notifications from CloudKit.
Subscribing to Data Changes
The sample app sets up a subscription for race data after the registration for remote notifications is complete (in the application:didRegisterForRemoteNotificationsWithDeviceToken: method in the app delegate). In a real app it is more likely that a subscription would be set up in a different context in the app. The sample app subscription will receive notifications for any new or updated race records. The subscription (an instance of CKSubscription) requires a record type, a predicate, a unique identifier, and some options. One good option for a unique identifier is to use the vendor identifier, since it will be unique to the device and app combination. It can be augmented with additional information to make it specific to a record type or predicate just by appending data to it. The unique identifier is necessary to remove the subscription, so it needs to either be stored when created, or be reproducible in some other way. The subscription options indicate under what circumstances the notification should fire (creates, updates, deletes), and can be specified in any combination desired. Multiple subscriptions can be registered to handle different situations.
CKDatabase *publicDatabase = [[CKContainer defaultContainer] publicCloudDatabase];
NSPredicate *allRacesPredicate = [NSPredicate predicateWithFormat:@"TRUEPREDICATE"];
NSString *subscriptionIdentifier = [[[UIDevice currentDevice] identifierForVendor] UUIDString];
CKSubscription *raceSubscription =
[[CKSubscription alloc] initWithRecordType:@"Race" predicate:allRacesPredicate subscriptionID:subscriptionIdentifier options:CKSubscriptionOptionsFiresOnRecordCreation | CKSubscriptionOptionsFiresOnRecordUpdate];
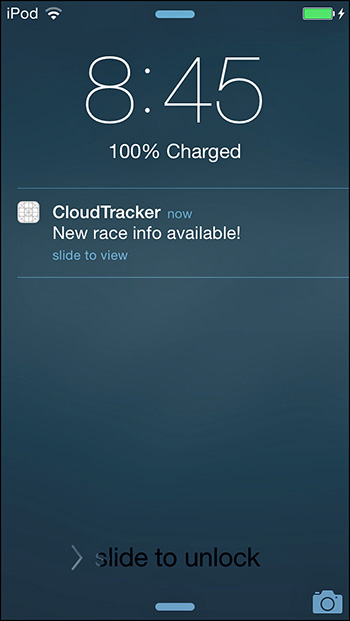
After the subscription is instantiated, notification preferences need to be set for it. The sample app will just use an alert, but badging and sounds can also be used. Note that the alert message can be customized to use replacement variables as well.
CKNotificationInfo *notificationInfo = [[CKNotificationInfo alloc] init];
[notificationInfo setAlertBody:@"New race info available!"];
[raceSubscription setNotificationInfo:notificationInfo];
The subscription then needs to be saved to the database to become active.
[publicDatabase saveSubscription:raceSubscription
completionHandler:^(CKSubscription *subscription, NSError *error) {
if (error)
{
NSLog(@"Could not subscribe for notifications: %@", error.localizedDescription);
} else
{
NSLog(@"Subscribed for notifications");
}
}];
The completion handler will be called on an arbitrary queue, and will contain the subscription if it was saved successfully, or an error if not. After the subscription is saved, the app will receive notifications any time the criteria for the subscription are met, as shown in Figure 11.5.
User Discovery and Management
To fully use CloudKit in an app, the user must have an iCloud account. For non-iCloud users, CloudKit will allow read-only access to the public database; in order to write to the public database or have any access to a private database, an iCloud account is required. At the same time, Apple requires that apps using CloudKit not require an iCloud account, so a CloudKit app must know whether an iCloud account is present, and adjust the user interface accordingly.
Tip
Although the simulator can be used to test with an iCloud account (just sign into iCloud in the simulator just as on the device), testing without an iCloud account on the simulator does not work in all cases. For non-iCloud account testing, use a device to be certain everything works.
In the sample app, the race list is the only view that can function correctly without an iCloud account. A non-iCloud user should be able to view the race list but not add or update races. The race list view controller will use the accountStatusWithCompletionHandler: method on the CloudKit container to determine the current iCloud account status of the device:
[[CKContainer defaultContainer] accountStatusWithCompletionHandler: ^(CKAccountStatus accountStatus, NSError *error) {
dispatch_async(dispatch_get_main_queue(), ^{
self.connectedToiCloud = (accountStatus == CKAccountStatusAvailable);
[self.addRaceButton setEnabled:self.connectedToiCloud];
});
}];
The completion handler will store the information as to whether there is a current iCloud account so that the detail screen can be updated accordingly when a row is tapped, and will update the Add Race button to be enabled only when an iCloud account is available.
In CloudKit, the user record is a special case of CKRecord. The user record always exists in the public database with no custom attributes, and custom attributes can be added to it. Information about the current user cannot be queried directly; rather, the app has to go through the user discovery process to see what users are visible to the iCloud account, using email addresses in the user’s address book. After that process is complete, the current user’s information will be accessible to the app. That user information can be used to update the user record.
The My Info view will perform the user discovery task, beginning with the permissions check.
[[CKContainer defaultContainer] requestApplicationPermission: CKApplicationPermissionUserDiscoverability completionHandler:^(CKApplicationPermissionStatus applicationPermissionStatus, NSError *error) {
if (error)
{
NSLog(@"Uh oh - error requesting discoverability permission: %@",error.localizedDescription);
} else
{
if (applicationPermissionStatus == CKApplicationPermissionStatusGranted)
{
[self lookUpUserInfo];
}
}
}];
The app will present an alert to request the user’s permission to perform the user discovery process. The dialog will be presented only once. Assuming that the user grants permission, the next step is to fetch the recordID of the current user, which will be used to determine which user information belongs to the current user:
[[CKContainer defaultContainer] fetchUserRecordIDWithCompletionHandler: ^(CKRecordID *recordID, NSError *error) {
if (error)
{
NSLog(@"Error fetching user record ID: %@",error.localizedDescription);
} else
{
[self discoverUserInfoForRecordID:recordID];
}
}];
After the recordID is available, the user discovery process will be performed with a call to the discoverAllContactUserInfosWithCompletionHandler: method on the container:
[[CKContainer defaultContainer] discoverAllContactUserInfosWithCompletionHandler: ^(NSArray *userInfos, NSError *error) {
if (error)
{
NSLog(@"Error discovering contacts: %@",error.localizedDescription);
} else
{
NSLog(@"Got info: %@", userInfos);
for (CKDiscoveredUserInfo *info in userInfos) {
if ([info.userRecordID.recordName isEqualToString:recordID.recordName]) {
//this is the current user's record
dispatch_async(dispatch_get_main_queue(), ^{
NSString *myName = [NSString stringWithFormat:
@"%@ %@",info.firstName, info.lastName];
[self.name setText:myName];
self.myUserRecordName = info.userRecordID.recordName;
self.currentUserInfo = @{@"name":myName,
@"location":self.location.text,
@"recordName": info.userRecordID.recordName};
NSUserDefaults *defaults = [NSUserDefaults standardUserDefaults];
[defaults setObject:self.currentUserInfo
forKey:@"currentUserInfo"];
[defaults synchronize];
[self fetchMyUserRecord];
});
}
}
}
}];
If the user discovery process is successful, it will return an array of CKDiscoveredUserInfo instances. The logic will iterate over that array, and compare the CKDiscoveredUserInfo’s userRecordID to the recordID of the current user. If they are the same, the first and last name will be pulled from the CKDiscoveredUserInfo and put into the name text field. A dictionary of information about the current user, including the name, provided location, and record name, will be created and stored in NSUserDefaults so that it will persist across launches without the need to refetch.
With the record name of the current user saved, the current user record can be fetched.
CKRecordID *myUserRecordID = [[CKRecordID alloc] initWithRecordName:self.myUserRecordName];
CKDatabase *publicDatabase = [[CKContainer defaultContainer] publicCloudDatabase]; [publicDatabase fetchRecordWithID:myUserRecordID
completionHandler:^(CKRecord *record, NSError *error) {
if (error)
{
NSLog(@"Error fetching user record: %@", error.localizedDescription);
[self setMyUserRecord:nil];
} else
{
AppDelegate *appDelegate = (AppDelegate *)[[UIApplication sharedApplication] delegate];
[appDelegate setMyUserRecord:record];
[self setMyUserRecord:record];
}
}];
If the fetch is successful, the CKRecord representing the current user will be stored on the app delegate so that it will be easily accessible to the race detail view controller that will use it when saving new races.
If the user updates the name and location and taps the Save button, the changes will be saved to the user record.
if (self.myUserRecord) {
self.myUserRecord[@"location"] = self.location.text;
self.myUserRecord[@"name"] = self.name.text;
CKDatabase *publicDatabase = [[CKContainer defaultContainer] publicCloudDatabase];
[publicDatabase saveRecord:self.myUserRecord
completionHandler:^(CKRecord *record, NSError *error) {
if (error) {
NSLog(@"Error saving my user record: %@", error.localizedDescription);
}
}];
}
Any CloudKit app that stores data locally specific to an iCloud account should also listen for the NSUbiquityIdentityDidChangeNotification, which will identify when the iCloud account status has changed, and then be able to handle the use case in which the user has logged out, or in which a different iCloud user has logged in.
Managing Data in the Dashboard
In addition to the iOS SDK, CloudKit provides a Web-based dashboard to manage the server portion of CloudKit. To access the dashboard, click the CloudKit Dashboard button from the iCloud Capabilities tab, as shown in Figure 11.6.

The CloudKit dashboard will open in the default Web browser, and will request authentication. Provide developer account credentials to access the dashboard. The dashboard will display several categories of information about the server in the left panel. Selecting a category will display more detailed information or additional choices in the middle panel. Selecting a choice in the middle panel will present detailed information or editing capabilities in the right panel.
Record types can be edited by selecting the Record Types item under the Schema header, as shown in Figure 11.7. A record type can be added or deleted by the icons at the top of the right panel, and attributes and index settings for a selected record type can be managed in the lower part of the right panel.
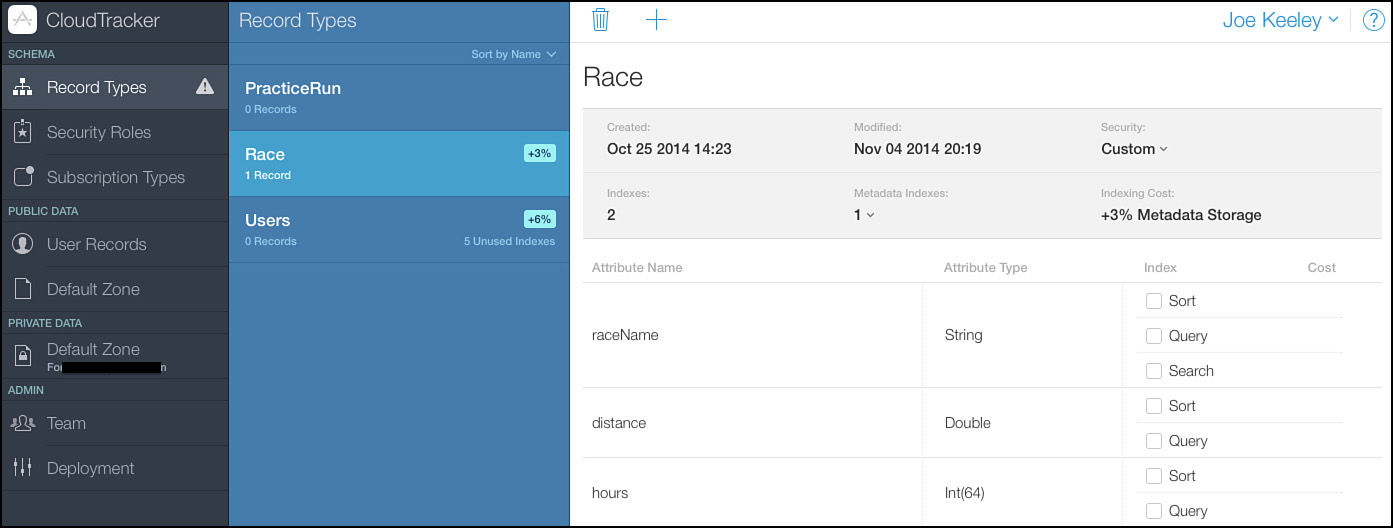
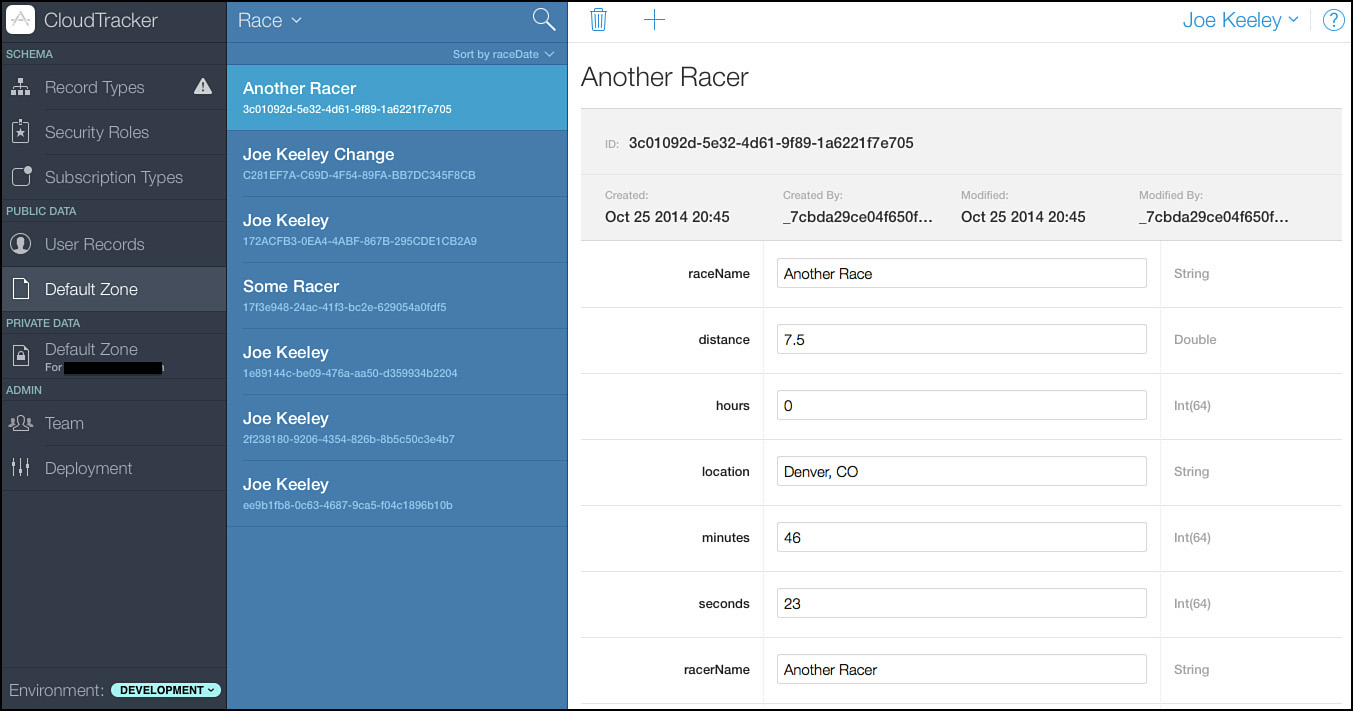
Data in the public database can also be viewed and managed through the dashboard. Users can be viewed by selecting the User Records item under the Public Data header. Data can be viewed by selecting the Default Zone header under the Public Data header. After the Default Zone is selected, data for record types can be viewed and edited by selecting a record type in the upper part of the middle panel, as shown in Figure 11.8. Sorting can be adjusted, and records can be searched. Individual records can be viewed, added, edited, or deleted.
Private data is visible only to the individual iCloud user. Selecting Default Zone under the Private Data heading will display data only for the currently logged-in iCloud user in the dashboard.
In the Deployment section under the Admin heading (as shown in Figure 11.9), there are options to reset the development environment or to deploy to production. Resetting the development environment is the “nuclear option”—it will change all the record types back to match the production environment, and will delete all the data in the development environment.

Summary
This chapter discussed using CloudKit in an app. It covered setting up the app to use CloudKit, some of the basic CloudKit concepts, and how to perform basic CloudKit operations, such as querying records, displaying data from records, and creating, updating, and saving records. The chapter then explained how to set up a subscription to receive data update notifications via push. It showed how to customize user records and how to perform user discovery. Finally, this chapter explained managing CloudKit using the CloudKit dashboard.