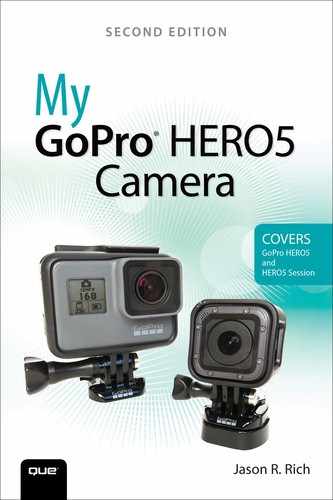
13. Strategies for Shooting Awesome HD Video
In this chapter, you find out how to combine your working knowledge of how to operate the GoPro camera with your own creativity to use strategies designed to help you shoot better videos in a wide range of situations. Topics include:
![]() Choosing the best Resolution, FPS, and FOV for a particular shooting situation
Choosing the best Resolution, FPS, and FOV for a particular shooting situation
![]() Using the light within your shooting area to its utmost advantage, and compensating in low-light situations
Using the light within your shooting area to its utmost advantage, and compensating in low-light situations
![]() Deciding on the best mount to use to shoot video from the perfect angle
Deciding on the best mount to use to shoot video from the perfect angle
![]() Making sure you have the right equipment on-hand to achieve your filming objectives
Making sure you have the right equipment on-hand to achieve your filming objectives
There are a lot of similarities between using your GoPro camera for shooting high-resolution digital images and using it to shoot HD video. Thus, many of the strategies in Chapter 10, “Strategies for Taking Professional-Quality Digital Pictures,” also apply when shooting video.
However, instead of simply pressing the shutter button and holding the camera steady for a fraction of a second to capture a single image, shooting HD video requires that you hold the camera steady for longer periods and that you use slow and steady movements while moving the camera as you’re filming.
In many video-shooting situations, you need to ensure you’re able to record the best-quality audio while also focusing on how to capture the best visuals. So, there’s a lot to think about and prepare for when it comes to shooting HD video, which offers a lot of opportunity for things to go wrong.
Shooting Strategies
By following the video-shooting strategies offered within this chapter, combining them with the rest of the knowledge you’re acquiring from this book, and tapping into your own creativity, you’ll be able to shoot high-quality HD video using your GoPro camera that you’ll be proud to share with your audience (once it’s edited, of course).
Planning Is Essential
Before you start shooting, think about what you’re trying to accomplish, and create a plan for yourself. If you can envision your edited video in your mind prior to shooting, you can take a more organized approach during the shooting process and will be less prone to forget to shoot essential content. Feel free to write down your ideas, create a visual storyboard, or compile a detailed shot list on paper.
Even though you want to plan your shots as much as possible, always be open to spontaneous creative inspiration that often strikes while you’re actually filming.
As you’re planning your video, consider the following things:
• What the topic of your video will be. If you’ll be telling a story, outline the story. Create a storyboard or shot plan that lists the key scenes or shots that you don’t want to miss shooting.
• How you want to showcase your main subject(s).
• What shooting conditions you’ll encounter, and what challenges you should be prepared for.
• The types of shots you want to capture, and from what shooting perspective(s).
• Whether you want to capture the same shots repeatedly from different perspectives using the same camera, or if you can set up and control multiple cameras at once to capture the same action. Having multiple choices for each scene or shot makes editing your video easier and makes the final video project more enjoyable to watch.
• How you’ll record quality audio in conjunction with the video, if necessary.
• The anticipated length of your final edited video.
Thanks to Video Editing, You Don’t Need to Shoot in Order
Being Prepared
After you’ve planned your video, gather together all the camera equipment you need to actually record each shot or scene. You already know the importance of bringing along extra fully charged batteries for your HERO5 Black (or a mobile charging option for your HERO5 Session or HERO Session), and one or two extra microSD memory cards for saving your content. This can’t be overstated enough because running out of power or not having enough storage space are the two most common problems amateur GoPro videographers encounter. Follow these steps to prepare:
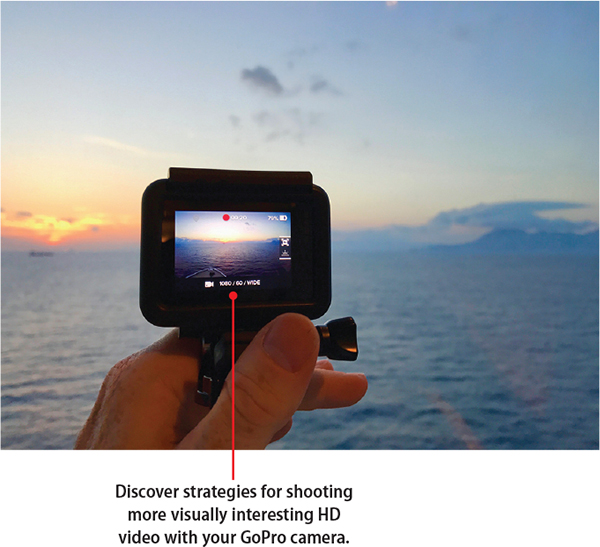
![]() Bring along the appropriate camera housing for the shooting conditions you’ll encounter. Most of the time, you need the Frame housing that came with the camera. However, if you’ll be shooting deep underwater or in very harsh conditions, the HERO5 Black’s optional Super Suit might be more suitable.
Bring along the appropriate camera housing for the shooting conditions you’ll encounter. Most of the time, you need the Frame housing that came with the camera. However, if you’ll be shooting deep underwater or in very harsh conditions, the HERO5 Black’s optional Super Suit might be more suitable.
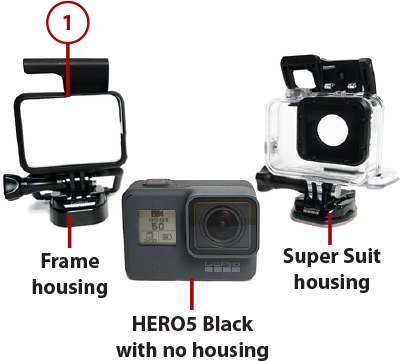
![]() Determine whether you need to remove the side door from your camera so you can access the camera’s ports while shooting. This is important if you need to connect the Pro 3.5mm Mic Adapter or an external battery pack. Remember: When the side door is removed, the camera is no longer waterproof!
Determine whether you need to remove the side door from your camera so you can access the camera’s ports while shooting. This is important if you need to connect the Pro 3.5mm Mic Adapter or an external battery pack. Remember: When the side door is removed, the camera is no longer waterproof!
![]() Select the best mount(s) so you can position the camera at exactly the right height and angle to capture each shot that you want or need and to hold the camera firmly in place.
Select the best mount(s) so you can position the camera at exactly the right height and angle to capture each shot that you want or need and to hold the camera firmly in place.

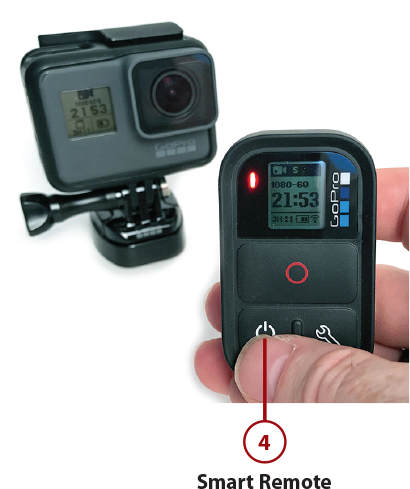
![]() Think about how you’ll actually control the camera: by pressing buttons on the camera itself, using the Smart Remote, or via the Capture mobile app and your mobile device. Make sure you bring along the Smart Remote (with its battery fully charged), or your smartphone, smartwatch, or tablet.
Think about how you’ll actually control the camera: by pressing buttons on the camera itself, using the Smart Remote, or via the Capture mobile app and your mobile device. Make sure you bring along the Smart Remote (with its battery fully charged), or your smartphone, smartwatch, or tablet.
![]() Don’t forget the ancillary GoPro accessories, such as a microfiber lens cleaning cloth, a camera tether, lens filters, the 3.5mm Mic Adapter, an external microphone, Anti-Vibration Locking Plugs, and/or extra adhesive strips for specific mounts (not shown).
Don’t forget the ancillary GoPro accessories, such as a microfiber lens cleaning cloth, a camera tether, lens filters, the 3.5mm Mic Adapter, an external microphone, Anti-Vibration Locking Plugs, and/or extra adhesive strips for specific mounts (not shown).
Choosing the Shooting Resolution
Each GoPro camera model is capable of shooting HD video at a variety of different resolutions. The resolution you select determines how many pixels are used to record each frame of your video. This affects things like the image clarity, vividness of color, and the level of detail depicted in your shots.
For example, if you shoot at 1080p resolution, each frame is recorded at a screen resolution of 1920 × 1080 pixels and includes a total of more than two billion individual colored pixels. This resolution is suitable for viewing on any HD 1080p flat-screen television set or most computer monitors.
Which resolution you choose depends on
• The shooting situation
• How the content will be presented and shared later
• What you’ll be shooting (your subject matter) and the shooting perspective you’ll be using
• How you’ll be mounting the camera
• How much content you want to appear within the frame
• The impact the fish-eye effect will have on your shots, and whether this is acceptable
The higher the resolution you choose, the larger your video content files will be, and the more memory card storage space you’ll need. It’s also important to make sure that your computer is capable of editing video shot at the camera’s higher resolutions, as this requires more processing power, RAM, hard drive space, and a higher-end graphics card. (Refer to the minimum system requirements for the video-editing software you’ll be using, and confirm your computer meets—or, ideally, exceeds—those requirements.)
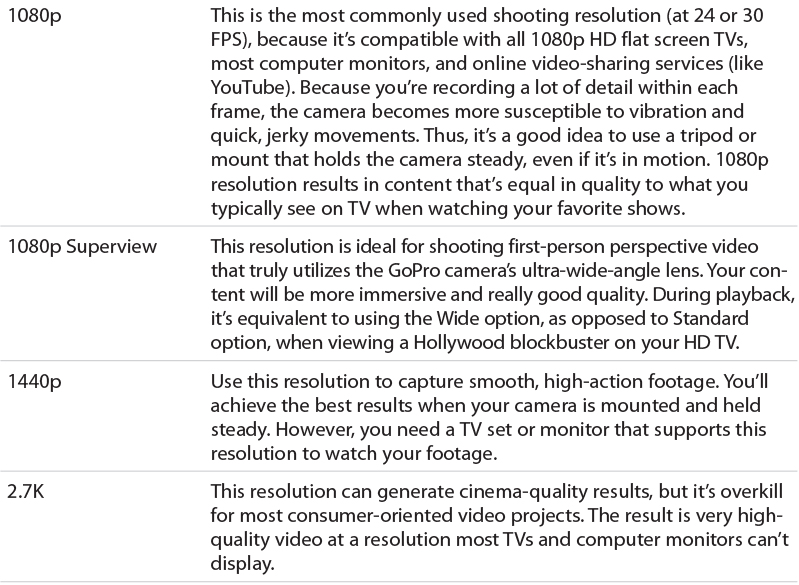
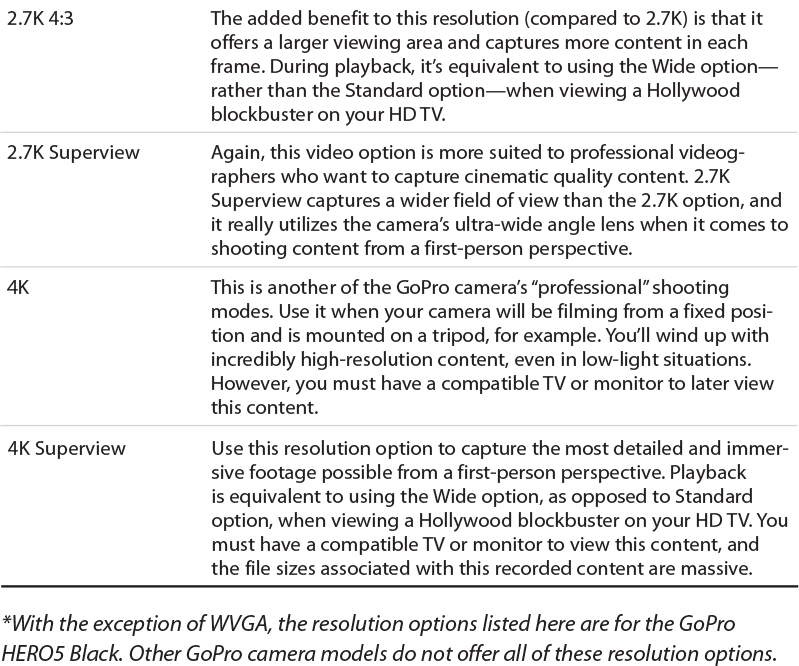
Table 13.1 offers suggestions for choosing the optimal resolution related to specific shooting situations, based on what you’re trying to achieve. In conjunction with selecting a shooting resolution, you also need to select a Frames Per Second (FPS) rate and a Field of View (FOV) setting.
Plus, you can turn on or adjust advanced shooting features, such as Protune-related settings, Video Stabilization, Wind Noise Reduction, Exposure Control (or Exposure Control with Locked Exposure), Auto Low Light, and/or Manual Audio Control. These features are discussed in Chapter 11.
Adjusting Your Camera’s Settings

Selecting the Best FPS Rate
The Frames Per Second (FPS) option allows you to determine how many individual frames of video your camera records each second. Most TV shows and movies are shot at 24 or 30 frames per second when standard playback will be used. However, if you plan to incorporate special effects into your video or play the content back at faster or slower speeds, you should use a higher FPS rate.
For example, if you want to shoot a high-action scene but play it back in your edited video in slow motion, you achieve the best results and are able to see the most detail during that slow-motion sequence when shooting at the highest FPS rate possible. Slower frame rates, however, are better suited for time-lapse videography.
If you know the video you’ll be shooting will be used for normal-speed playback, stick to 24 or 30 frames per second, keeping in mind that when you increase the FPS rate, you need more storage space for your video content.
Deciding Which FOV Option to Use
By default, your GoPro HERO5 Black or HERO Session is designed to shoot video using an Ultra Wide Field of View (called SuperView). This is ideal for shooting extremely immersive video from a first-person perspective. However, there will be shooting situations where capturing so much content within your frame won’t be advantageous.
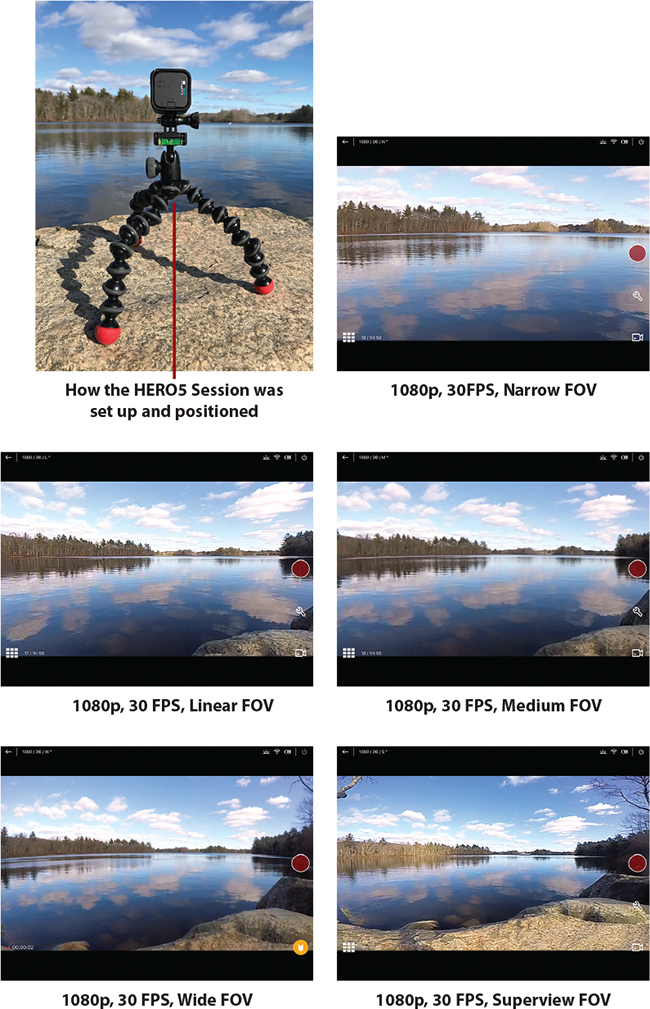
To see the difference between the Narrow, Linear, Medium, Wide, and SuperView FOV options when shooting at 1080p, take a look at the following examples from a video that was shot using the GoPro HERO5 Session. For each of these examples, the position of the camera remained fixed, and the only setting altered was the FOV. How the camera was set up is shown in the first figure.
The real-time viewfinder feature of the GoPro Capture mobile app (running on an iPad) was used to demonstrate the difference in FOV appearance. The fifth example shows the same shot captured using the 1080p Superview setting, which is what the GoPro cameras do best, especially when shooting at a first person perspective. Notice how much scenery is included on the left and right edges of the frame as you look at the viewfinder when shooting video at each FOV setting.
Planning Your Shots
Many amateur videographers tend to position their intended subject in the center of the frame and then shoot that subject from a head-on perspective. However, if you watch any television show or movie shot by a professional cinematographer, you’ll notice that this approach is seldom, if ever, used.
Instead, find an interesting shooting angle or perspective from which you capture your subject within each shot. This might mean shooting from above the subject (in a slight downward direction), from below your subject (in a slight upward direction), from the side of your subject, or from a slight diagonal.
There Are No Rules!
You do not always need to shoot from a head-on perspective, and your subject does not need to be positioned in the center of the frame.
When choosing how you’ll mount the camera, you can decide the height the camera will shoot from, and, in most cases, also adjust the shooting angle after the camera is mounted. Most of the Quick Release Buckles associated with the popular mounts allow you to adjust the camera’s angle up and down, and some even also allow you to rotate the camera sideways. A slight change in camera height or angle can dramatically alter how you capture a scene.

If you opt to hold the camera using a camera grip, handle, or stabilizer (such as GoPro’s The Handy, 3-Way, or Karma Grip), you have unlimited options for positioning the camera and moving it around while shooting. However, for the best results when shooting HD video, don’t hold the camera directly in your hands.
Using Lighting to Your Advantage
To recap an important concept from Chapter 9, “Shooting High-Resolution Photos,” when it comes to framing your shots, you always want to pay attention to the position of your primary light source. This is just as important when shooting video.
In general, you want to position your primary light source behind you (the videographer), and try to ensure that it’s shining evenly onto your subject. If light shines directly into the camera’s lens, you could wind up with unwanted glares or the footage could easily become overexposed because the camera’s lens is taking in too much direct light. The exception to this is when you’re shooting a sunrise or sunset, or want to create a glare or silhouette effect for creative purposes.
You can also get unwanted shadows when the primary light source isn’t shining evenly on your subject, so look for shadows and make sure they’re not ruining your shots. Shadows can be very distracting to your audience and take away from the professional look for your production.
As you learned in the previous chapter, your GoPro camera is capable of handling low-light situations very well, thanks to the Auto Low Light (HERO5 Black) and Spot Meter (HERO5 Session and HERO Session) options, which you can turn on after selecting the Video, Video+Photo, Looping, or Time Lapse Video shooting mode.
Using Slow and Steady Movement
When you’re shooting video and the camera will be in motion—whether you’re holding the camera in your hands, using a handle or grip, or have the camera mounted to yourself or your equipment—always hold the camera as steady as possible. Avoid excessive shaking or quick, jerky movements.
When you’re panning with the camera, always use very slow and steady movements. When the camera is mounted in equipment, make sure it is held securely in place, so it can’t move around or shake excessively while it’s in motion.
For the most professional results, don’t hold the camera in your hands while you move; use a stabilizer to capture smoother movement. One low-cost option is the Tiffen Steadicam Curve ($14.95, www.tiffen.com/steadicamcurve), which is perfectly weighted for specific GoPro camera models. It automatically helps compensate for sudden or jerky movements as the camera is in motion. This GoPro accessory is a scaled-down version of the Steadicams used by professional cinematographers for their high-end cameras. Because this accessory requires that you hold the Steadicam and the camera, it’s best suited for when you’re shooting other subjects rather than engaged in the activity. If you’re also engaged in an activity, you should use a hands-free mount that allows the camera to be attached to your body or equipment.
Marking Your Best Shots
The GoPro HERO5 Black, HERO5 Session, and HERO Session have a built-in HiLight Tag feature you should use while shooting video to mark specific moments that you want to quickly find and refer back to later. Refer to the “The HiLight Tagging Function” section in Chapter 11 to find out how to use this feature. Later, when editing your video using the GoPro QUIK Desktop software, you’ll be able to see the tags within your raw footage and find them easily, although they won’t appear in your final edited video.
Shoot Plenty of Raw Footage, Then Edit Later
As the videographer, you always want to shoot much more raw video footage than you actually plan to use—or could possibly need. As you’re editing, you’ll trim down scenes or shots plus cut out content. Whenever possible, you also want to have multiple options (or takes) for each key shot or scene to choose from.
When time and conditions permit, try to shoot the same shots or scenes from different angles or perspectives, so you have multiple takes. While filming, you’re better off shooting two, three, or even five times the amount of content you’ll actually use. This way, you can later choose only the best shots to showcase in your edited video project, and you always have options while editing.
Knowing you’ll be shooting a lot of extra content takes preparation. Have extra microSD memory cards and fully charged camera batteries on hand.