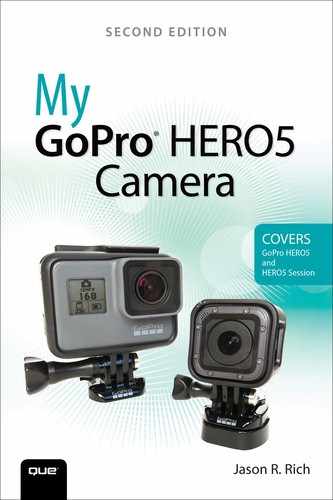
09. Shooting High-Resolution Photos
In this chapter, you learn more about the features and functions built into the GoPro HERO5 Black, HERO5 Session and HERO Session cameras that are used for taking digital photos. Topics include:
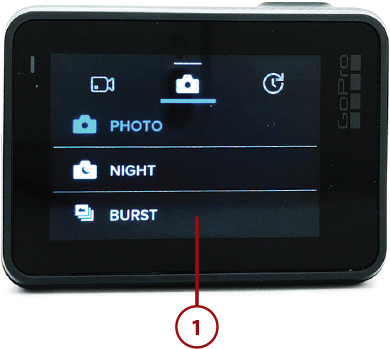
![]() Get to know the Photo, Night, Burst, Time Lapse Photo, and Night Time Lapse Photo shooting modes that are built into your camera
Get to know the Photo, Night, Burst, Time Lapse Photo, and Night Time Lapse Photo shooting modes that are built into your camera
![]() Determine when and if you should use any of the advanced, Protune-related features
Determine when and if you should use any of the advanced, Protune-related features
![]() Find out how to preview or view your photos.
Find out how to preview or view your photos.
For many people, the primary use of their GoPro camera is to shoot HD video, often from a first- or third-person perspective. However, it’s just as easy to shoot high-resolution digital photos that can fully utilize the camera’s wide-angle lens.
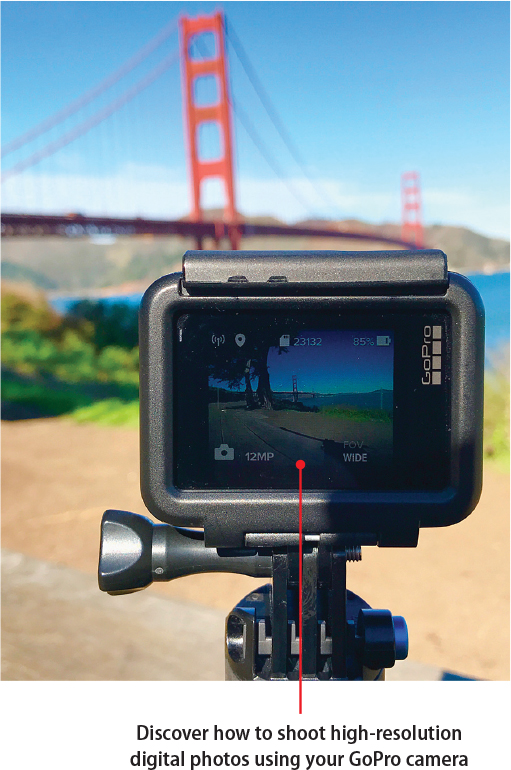
However, using the Linear, Narrow, and Medium field of view (FOV) options when in Photo, Night, or Burst shooting mode, the GoPro cameras can replicate a more traditional point-and-shoot digital camera. In other words, your still images do not have to feature a wide-angle shooting perspective and don’t have to include the fisheye effect that’s often caused when you utilize a Wide FOV with the GoPro camera’s lens.
The HERO5 Black and HERO5 Session cameras allow you to choose between Linear, Narrow, Medium, or Wide FOV in Photo shooting mode. The HERO Session is limited to Medium and Ultra Wide FOV.
The following sample images demonstrate how your FOV choice affects a photo. When these shots were taken, the HERO5 Black was placed on a tripod and kept in exactly the same position. Pay attention to the right and left sides of each shot and how much of the landscape was captured within each shot. Also, notice whether or not the fisheye effect is present.
Because of their small size and durability, the GoPro cameras allow you to take high-resolution and extremely detailed photos in situations where other point-and-shoot or digital SLR cameras aren’t designed to go, including underwater.
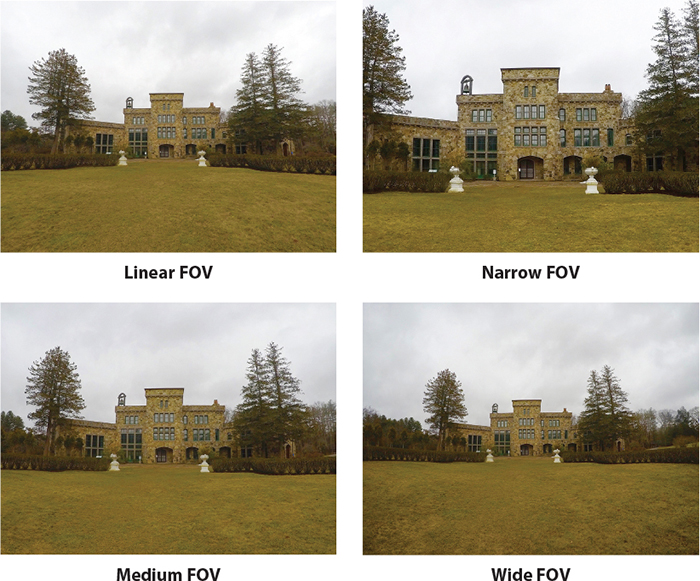
Comparing GoPro Camera Models for Taking Pictures
The HERO5 Black includes all the picture-taking features and functions covered within this chapter, so this is the camera model that is primarily discussed. The most important thing to understand about taking pictures with the HERO5 Session and HERO Session is that they shoot at a lower resolution than the HERO5 Black. As a result, regardless of the shooting situation, you always get higher quality and more detailed photos using the HERO5 Black camera.
Table 9.1 compares the still photo features of the three camera models.
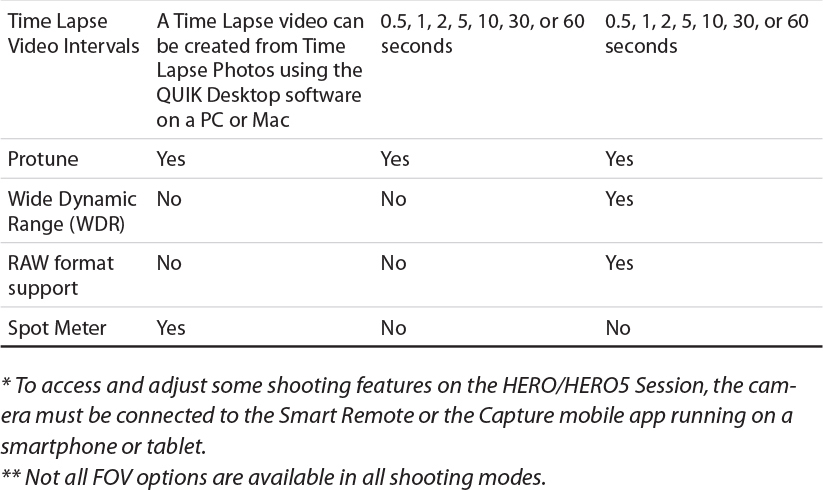
Spot Meter Only on the HERO Session
Working with Protune
The Protune (PT) features are designed for more advanced GoPro users. They allow you to have greater manual control over specific picture-taking settings.
By turning on the Protune feature and then adjusting the available options from the submenu, it’s possible to capture higher quality results because the camera utilizes less data compression on your images, plus does a better job capturing natural colors within your shots.
These digital image files are then more compatible with higher-end photo-editing software packages, which means you can take full advantage of the more advanced photo-editing tools built into software like Adobe Photoshop CC to digitally edit and enhance your images after the fact.
Access the Protune Menu Using the HERO5 Black
To turn on Protune and access the Protune submenu using a HERO5 Black, follow these steps:
![]() Select any of the Photo camera modes: Photo, Night, or Burst.
Select any of the Photo camera modes: Photo, Night, or Burst.
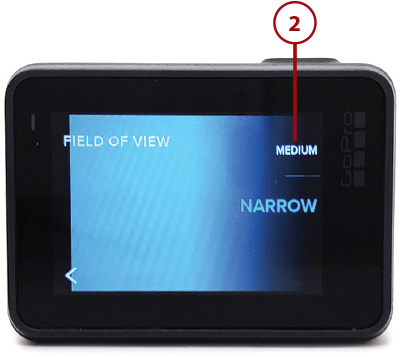
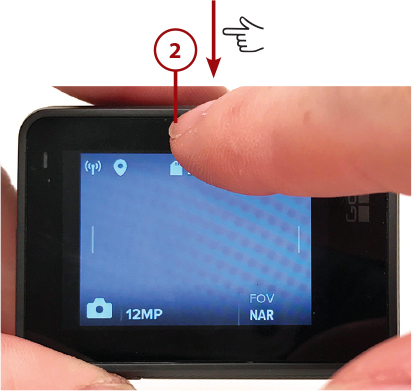
![]() Tap the FOV option to access the FOV submenu (shown) and adjust the FOV (if desired).
Tap the FOV option to access the FOV submenu (shown) and adjust the FOV (if desired).
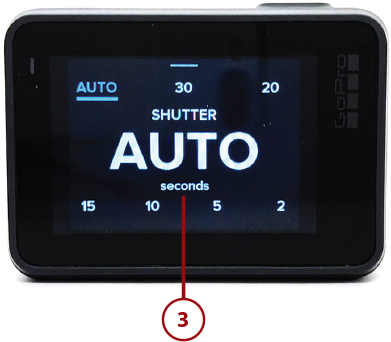
![]() If you’re using the Night Photo shooting mode, tap the SHUTR option, access the Shutter submenu (shown), and select a Shutter Speed.
If you’re using the Night Photo shooting mode, tap the SHUTR option, access the Shutter submenu (shown), and select a Shutter Speed.
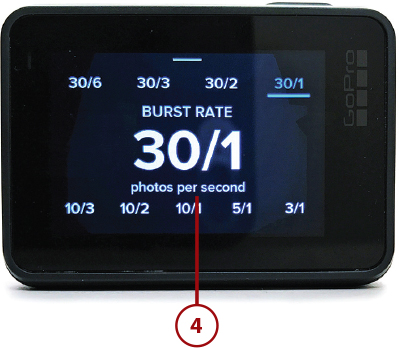
![]() If you’re using the Burst shooting mode, tap the RATE option, access the Burst Rate submenu (shown), and select a Burst Rate.
If you’re using the Burst shooting mode, tap the RATE option, access the Burst Rate submenu (shown), and select a Burst Rate.
![]() If you’re using the Time Lapse Photo shooting mode, tap the INTR option to access the Interval submenu (shown) and select an Interval rate.
If you’re using the Time Lapse Photo shooting mode, tap the INTR option to access the Interval submenu (shown) and select an Interval rate.

![]() If you’re using the Night Time Lapse Photo shooting mode, one at a time, adjust the Shutter Speed (SHUTR) and Interval (INTR) options. Tap one option on the viewfinder screen (shown) to access the appropriate submenu, and then make your selection.
If you’re using the Night Time Lapse Photo shooting mode, one at a time, adjust the Shutter Speed (SHUTR) and Interval (INTR) options. Tap one option on the viewfinder screen (shown) to access the appropriate submenu, and then make your selection.
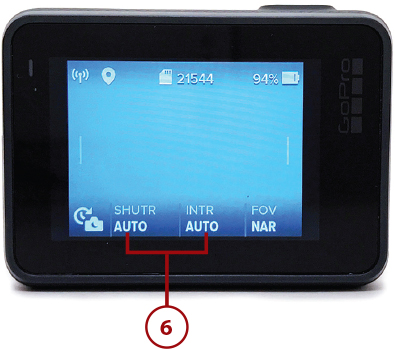
![]() After adjusting these main features, you return to the viewfinder screen. Place your finger near the right side of the touchscreen and swipe to the left.
After adjusting these main features, you return to the viewfinder screen. Place your finger near the right side of the touchscreen and swipe to the left.
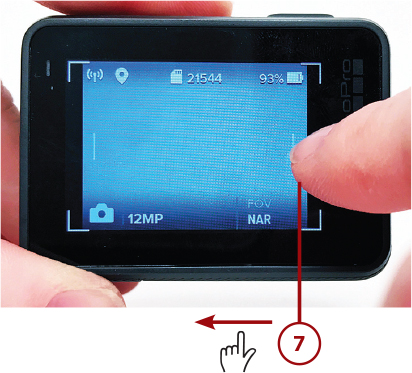
![]() Swipe to the left repeatedly until the Protune menu option is displayed (not shown).
Swipe to the left repeatedly until the Protune menu option is displayed (not shown).
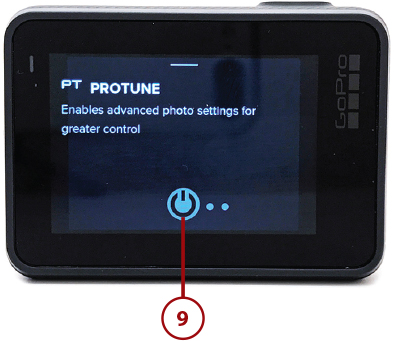
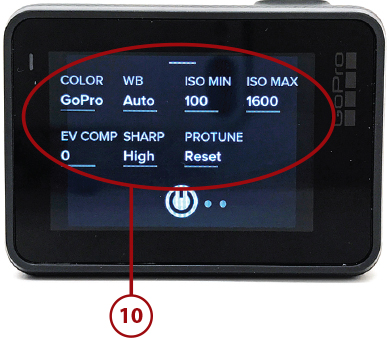
![]() Tap the Protune on/off icon to turn on Protune and access the Protune submenu for picture-taking.
Tap the Protune on/off icon to turn on Protune and access the Protune submenu for picture-taking.
![]() Tap each option on the Protune submenu that you want to manually adjust. Each setting has its own submenu associated with it.
Tap each option on the Protune submenu that you want to manually adjust. Each setting has its own submenu associated with it.
Reset the Protune Options
Tap the Reset option on the Protune menu to quickly reset all the options to their default settings. These changes only apply to the Protune options for the specific shooting mode the camera is currently set to, however.
Adjusting White Balance
The White Balance setting affects the colors and tones displayed within an image based on what the camera perceives to be the color white in your shots. When this option is set to Auto (which is the default), the camera automatically analyzes each shot as it’s being taken, and adjusts the color tone based on the conditions it senses. Use these guidelines for adjusting the White Balance setting:
• If you’ll be taking photos in an area with natural warm light, such as incandescent lighting (indoors), or during a sunrise or sunset, consider selecting the 3000K White Balance option to capture more authentic, warmer tones in your shots.
• If you’ll be shooting in areas lit by fluorescent lighting, or in average daylight, select the 5500K White Balance option.
• When shooting in cool lighting (such as when outside in overcast conditions), use the 6500K White Balance option.
HERO5 Black Options for White Balance
When it comes to picture-taking, the available White Balance options include Auto (the default option), 3000K, 4000K, 4800K, 5500K, 6000K, 6500K, and Native. If you plan to use higher-end photo-editing software that offers White Balance controls, select the camera’s Native White Balance option when taking pictures.

Adjusting Color
The Color option allows you to manually select the color profile the camera is using. The default GoPro Color option uses the same color profile as when the Protune feature is turned off. When you select the Flat option, you can more easily edit the color in photos using photo-editing software so that you can showcase truly natural or authentic-looking colors within an image.
Adjusting ISO Minimum and ISO Maximum
ISO Minimum and Maximum settings are used to manage the camera’s sensitivity to light, especially when shooting in low-light situations. While shooting, you can manage the brightness of an image and somewhat control the unwanted graininess (or noise) captured within an image by the camera due to poor lighting.
To achieve a brighter image when shooting in low light, select ISO 800 or 1600. The less ambient light that’s available, the higher the ISO you should use. The images will likely showcase some noise (graininess) in your shots, which takes away from the detail, image sharpness, and the vibrancy of color that’s depicted.
The 400 ISO Limit option results in a slightly darker image (when shooting in low light), but the image contains less noise than with the 800 ISO Limit option. As a result, images contain a bit more detail and sharpness.
If you’re shooting indoors with decent (but not bright) lighting, choose the 200 ISO Limit option. When shooting outdoors in daylight, the ISO 100 Limit option offers the least amount of image noise, resulting in a sharper, brighter, and more vibrant image.

Adjusting Sharpness
When it comes to manually adjusting an image’s Sharpness while shooting, the Protune option for the various digital photo-related shooting modes offers three options—High (which is the default setting), Medium, and Low.
Choose the High setting to achieve ultra-sharp image quality in your photos. Choose the Medium setting to capture what GoPro calls “moderately sharp” photos, or use the Low option to capture softer photos.

Adjusting EV Comp
EV Comp, which stands for “Exposure Value Compensation,” also affects the brightness of the photos as they’re being taken. If you’re shooting in areas with contrasting lighting conditions, adjusting this setting can help you capture better-quality images.
Using the QuikCapture Feature
When you want to use the Time Lapse Photo option of your HERO5 Black or HERO5 Session, the QuikCapture option offers added convenience. Once set up, this feature automatically starts shooting as soon as the camera is turned on.
To use the QuikCapture feature to shoot time-lapse photos, set up your camera like you normally would prior to shooting. Place the camera within a housing, connect the housing to a mount, and then adjust your shooting angle. When you’re ready to begin shooting using the Time Lapse Photos mode, simply press and hold down the Shutter button for three seconds.
Your camera turns itself on, beeps multiple times, and automatically begins shooting photos. To quit shooting, press the Shutter button again. The camera saves the images and turns itself off.
Setting Your HERO5 Black’s Default Mode
Default mode also makes shooting with your GoPro camera more convenient. The camera’s Default mode is the shooting mode that is automatically activated every time you turn on the camera.
This feature can be set up in advance to work with any of the camera’s shooting modes. Unfortunately, the Default mode can’t be adjusted on the HERO5 Session or HERO Session.
To choose your camera’s Default mode, follow these steps:
![]() Turn on the HERO5 Black camera (not shown).
Turn on the HERO5 Black camera (not shown).
![]() Place your finger near the top of the touchscreen and swipe down.
Place your finger near the top of the touchscreen and swipe down.
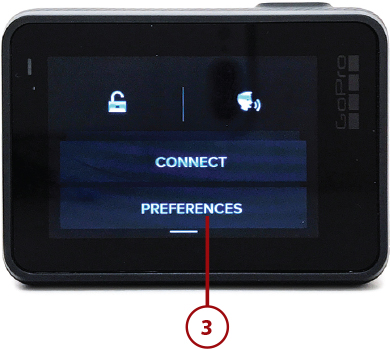
![]() Tap Preferences.
Tap Preferences.
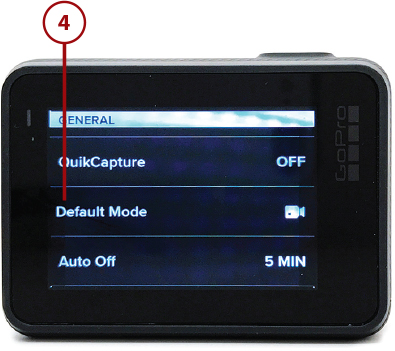
![]() Scroll down to the Default Mode option and tap it.
Scroll down to the Default Mode option and tap it.
![]() Using your finger, scroll up or down along the right margin of the screen to see each of the shooting mode icons (Video, Time Lapse Video, Video+Photo, Looping, Photo, Night, Burst, Time Lapse Photo, and Night Time Lapse Photo).
Using your finger, scroll up or down along the right margin of the screen to see each of the shooting mode icons (Video, Time Lapse Video, Video+Photo, Looping, Photo, Night, Burst, Time Lapse Photo, and Night Time Lapse Photo).
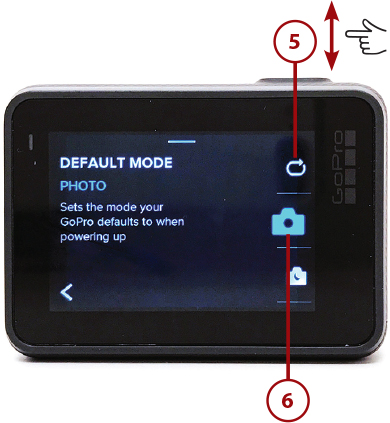
![]() Tap your desired Default shooting mode. The icon turns blue. In this example, Photo shooting mode is selected.
Tap your desired Default shooting mode. The icon turns blue. In this example, Photo shooting mode is selected.
![]() Exit the Preferences menu. The Default shooting mode you selected will be active each time you turn on the GoPro camera. After you turn on the camera and the viewfinder screen is displayed, you can adjust any of the shooting mode options (such as FOV or FPS) before you actually begin shooting (not shown).
Exit the Preferences menu. The Default shooting mode you selected will be active each time you turn on the GoPro camera. After you turn on the camera and the viewfinder screen is displayed, you can adjust any of the shooting mode options (such as FOV or FPS) before you actually begin shooting (not shown).
Options for Viewing Your Photos
As soon as you snap a photo, that digital image (along with its related metadata) is stored on the camera’s memory card. You can then view your images using one of these options:
• Preview the images on the HERO5 Black’s touchscreen (HERO5 Black only).
• Connect the camera directly to an HD television set or monitor using the optional Micro HDMI Cable ($19.99).
• Connect your camera directly to your PC or Mac using the supplied USB cable and then transfer your photos to the computer to view, organize, edit, print, share, and store them using photo-editing software.
• Remove the memory card from your camera and insert it into a Quik Key accessory ($19.99/$29.99) to transfer content to your smartphone or tablet. You can then edit photos using your mobile device’s Photos app, for example, or use another third-party photo app.
• Remove the memory card from your computer and insert it into a compatible memory card reader that’s connected to your computer. Next, transfer your content to the computer.
• Use the Wireless feature of your camera to link the camera with your smartphone or tablet, and then wirelessly transfer your content to your mobile device. How to do this is covered in Chapter 15.
• Subscribe to the GoPro Plus service and set up your camera to automatically upload your content to your online account. The files will be accessible from all of your Internet-connected computers and mobile devices. See Chapter 16, “Getting to Know the GoPro Plus Online Service,” for more information on how to use this option. (This option is not available using the HERO Session camera.)
View Your Photos on the HERO5 Black’s Touchscreen
After you’ve shot one or more photos (or any type of content) using your HERO5 Black, you can preview that content on the camera’s touchscreen:
![]() Turn on the camera and access the viewfinder screen.
Turn on the camera and access the viewfinder screen.

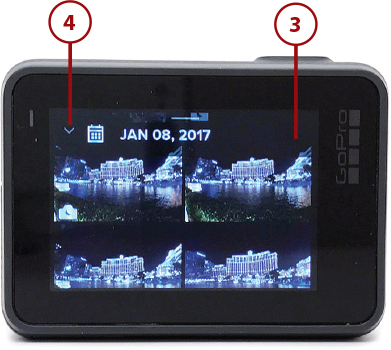
![]() Place your finger near the left side of the touchscreen and swipe to the right (not shown). You see a Loading message on the screen for several seconds.
Place your finger near the left side of the touchscreen and swipe to the right (not shown). You see a Loading message on the screen for several seconds.
![]() A gallery of image and video thumbnails appears on the screen in a grid. Each thumbnail represents a single piece of content that’s stored on the camera’s memory card. Use your finger to scroll up or down to explore the gallery.
A gallery of image and video thumbnails appears on the screen in a grid. Each thumbnail represents a single piece of content that’s stored on the camera’s memory card. Use your finger to scroll up or down to explore the gallery.
![]() By default, your content is sorted chronologically, based on time and date. Tap the downward-pointing arrow to change how the content is sorted and displayed.
By default, your content is sorted chronologically, based on time and date. Tap the downward-pointing arrow to change how the content is sorted and displayed.
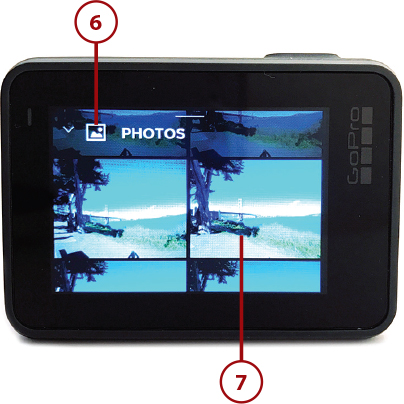
![]() Select the options to sort by Date, All Media, Video Clips, Photos, Videos, or Delete. For this example, tap the Photos option.
Select the options to sort by Date, All Media, Video Clips, Photos, Videos, or Delete. For this example, tap the Photos option.

![]() The gallery now shows only Photos (as opposed to other types of content).
The gallery now shows only Photos (as opposed to other types of content).
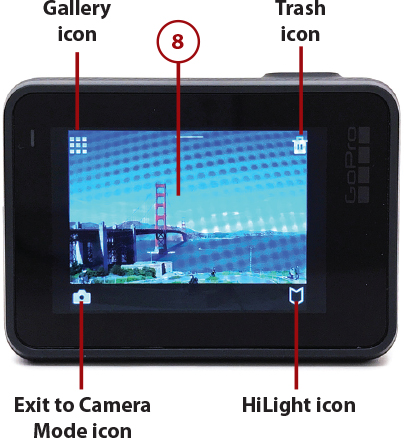
![]() Tap any thumbnail to view that photo or video content on the entire screen.
Tap any thumbnail to view that photo or video content on the entire screen.
![]() Tap the Trash icon to delete the photo, or tap the HiLight option to make it easier to find later. Tap the Gallery icon to return to the gallery view of your content.
Tap the Trash icon to delete the photo, or tap the HiLight option to make it easier to find later. Tap the Gallery icon to return to the gallery view of your content.
Preview Burst Photo Image Sequences
If you used the Burst shooting mode, tap the first thumbnail for the Burst sequence. When the image is displayed on the full screen, you can swipe left or right to see each image in the Burst sequence. As you’re viewing a particular image, tap the Trash icon to delete that one image (not the entire sequence), or tap the HiLight icon to highlight that image to make it easier to find later. A similar function is offered for viewing Time Lapse Photo and Night Time Lapse image sequences.