05. Must-Have GoPro Camera Accessories
In this chapter, you learn about optional accessories that you can use with your GoPro camera, its housing, and many of the mounts, stands, camera grips, and extension poles that are available. Topics include the following:
![]() How optional accessories can improve the quality of your photos or video
How optional accessories can improve the quality of your photos or video
![]() Tips for choosing the best accessories to meet your needs
Tips for choosing the best accessories to meet your needs
![]() Overview of optional accessories available for the various GoPro camera models
Overview of optional accessories available for the various GoPro camera models
In addition to using your GoPro camera with a housing and mount that’s best suited to your shooting situation, GoPro offers several extremely useful but optional accessories that make the camera easier to use, give it added functionality, and/or that allow you to capture better photos or videos.
Several of the most useful accessories include the Smart Remote, REMO, Quik Key, and Supercharger. If you’ll be using your camera in or around water, the Floaty and the optional lens filters for shooting underwater also help you improve the quality of your photos and video footage.
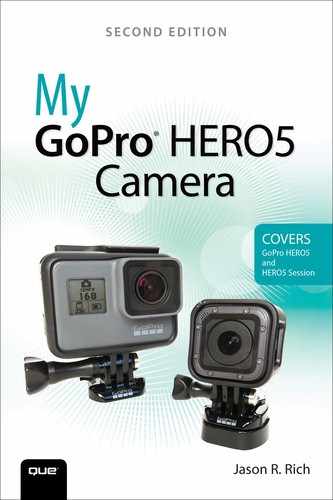
Using The GoPro Smart Remote
Built into the optional Smart Remote ($79.99) is an LCD status screen that mirrors the information displayed on the camera’s status screen (as well as on the touchscreen, if you’re using a HERO5 Black).
The benefit to using the Smart Remote is that it can wirelessly control up to 50 GoPro cameras simultaneously, from up to 600 feet away from the cameras. The Smart Remote is also waterproof to a depth of 33 feet.
The Smart Remote comes with an attachment key and ring, a wrist strap, and a USB charging cable.
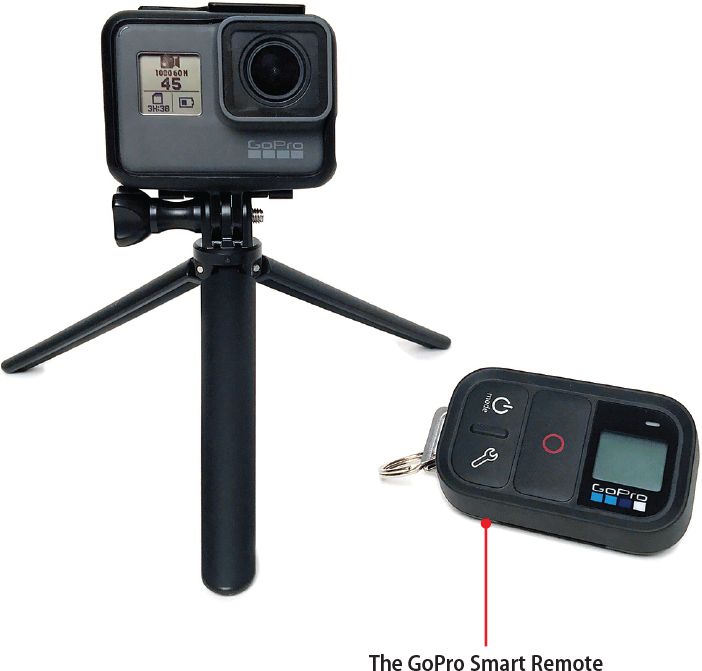
The Anatomy of the Smart Remote
The front of the Smart Remote contains a status light, status screen, Shutter/Select button, Power/Mode button, and a Settings/Tag button. On the bottom of the remote is the charging port/attachment key slot, and the back of the remote has slots for inserting the wrist strap and the latch lever used for removing the charging cable or key.
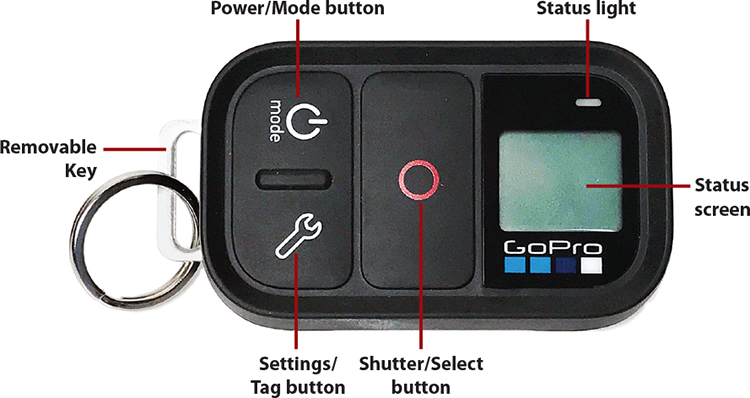
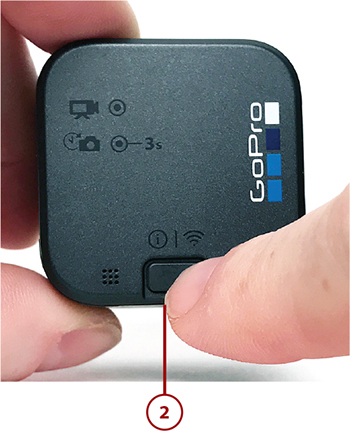
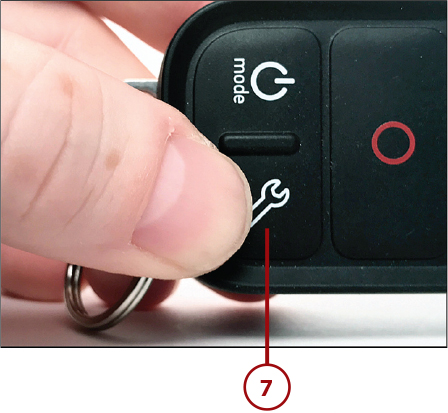
![]() Remove the metal key by using your finger to move the latch lever (on the back of the remote) in the direction of the displayed arrow, and then pulling the key out.
Remove the metal key by using your finger to move the latch lever (on the back of the remote) in the direction of the displayed arrow, and then pulling the key out.
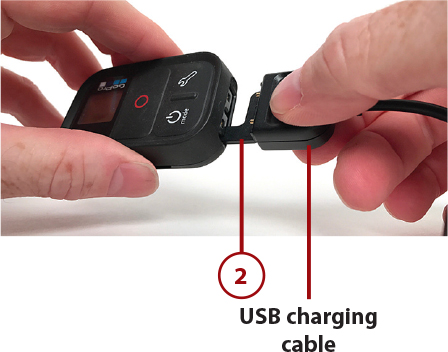
![]() Insert the USB charging cable into the bottom of the Smart Remote.
Insert the USB charging cable into the bottom of the Smart Remote.
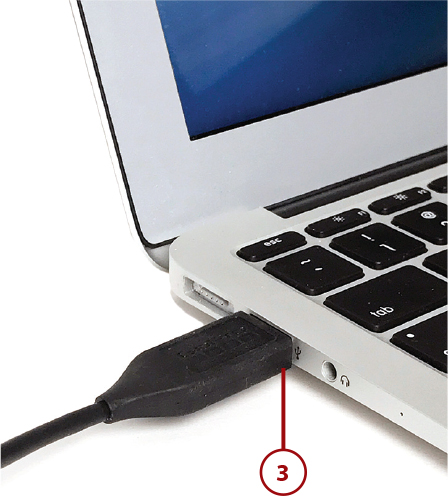
![]() Plug the opposite end of the USB cable into the USB port of your computer (shown), or use an optional power adapter to plug the cable into an electrical outlet.
Plug the opposite end of the USB cable into the USB port of your computer (shown), or use an optional power adapter to plug the cable into an electrical outlet.
![]() When the Smart Remote’s battery is fully charged, remove the USB cable and reinsert the key (not shown). You’re now ready to use the Smart Remote.
When the Smart Remote’s battery is fully charged, remove the USB cable and reinsert the key (not shown). You’re now ready to use the Smart Remote.
Know When the Smart Remote Is Charged
When the Smart Remote’s battery is fully charged, a graphic of a fully charged battery displays on the remote’s status screen.
Pair Your HERO5 Black Camera with the Smart Remote
The first time you use this accessory, you need to pair it with your HERO5 Black camera:
![]() Make sure the Smart Remote’s battery is charged (not shown).
Make sure the Smart Remote’s battery is charged (not shown).
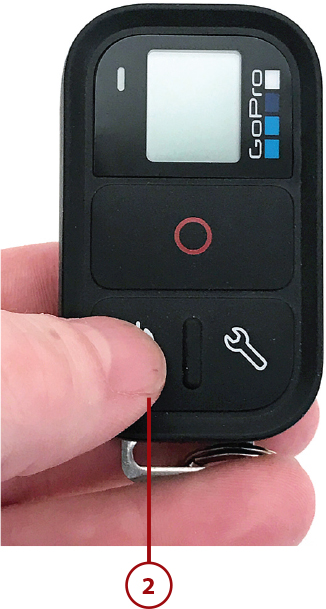
![]() Turn off the Smart Remote by pressing and holding Power/Mode button for two seconds.
Turn off the Smart Remote by pressing and holding Power/Mode button for two seconds.
![]() Turn on the GoPro HERO5 Black camera, place your finger near the top of the touchscreen, and swipe down.
Turn on the GoPro HERO5 Black camera, place your finger near the top of the touchscreen, and swipe down.

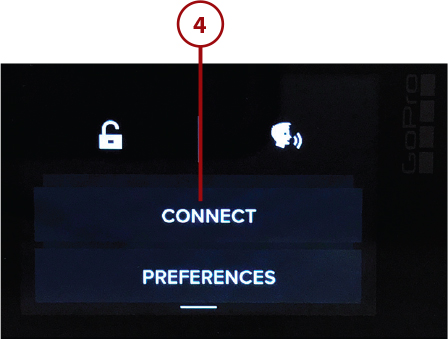
![]() Tap Connect.
Tap Connect.
![]() Scroll down and tap Smart Remote. The camera enters pairing mode. You see the message “Put Smart Remote In Pairing Mode” on the touchscreen.
Scroll down and tap Smart Remote. The camera enters pairing mode. You see the message “Put Smart Remote In Pairing Mode” on the touchscreen.
![]() Turn on the Smart Remote by pressing the Power/Mode button.
Turn on the Smart Remote by pressing the Power/Mode button.
![]() Place the Smart Remote in pairing mode by pressing and holding the Settings/Tag button for about four seconds. If you’re using the remote for the first time, it automatically enters pairing mode.
Place the Smart Remote in pairing mode by pressing and holding the Settings/Tag button for about four seconds. If you’re using the remote for the first time, it automatically enters pairing mode.
![]() Within a few seconds you see a “Connected” message on the touchscreen. On the Smart Remote’s status screen is a message that asks if you’d like to pair another camera with the same Smart Remote. If you choose no, the status screen begins to mirror what’s on your camera’s status screen, and you can remotely control the camera from the Smart Remote.
Within a few seconds you see a “Connected” message on the touchscreen. On the Smart Remote’s status screen is a message that asks if you’d like to pair another camera with the same Smart Remote. If you choose no, the status screen begins to mirror what’s on your camera’s status screen, and you can remotely control the camera from the Smart Remote.
Pair Your HERO5 Session Camera with the Smart Remote
The first time you use this accessory, you’ll need to pair it with your HERO5 Session camera.
![]() Turn off the camera and the Smart Remote (not shown).
Turn off the camera and the Smart Remote (not shown).
![]() On the HERO5 Session camera, press the Menu button. The camera turns on and displays information on the status screen.
On the HERO5 Session camera, press the Menu button. The camera turns on and displays information on the status screen.
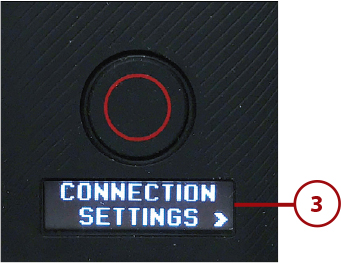
![]() Keep pressing the Menu button to toggle through the menu options until you see the Connection Settings option. Select it by pressing the Shutter button.
Keep pressing the Menu button to toggle through the menu options until you see the Connection Settings option. Select it by pressing the Shutter button.
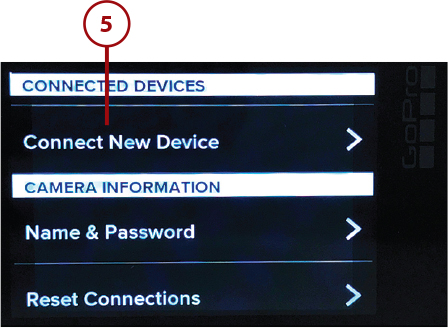
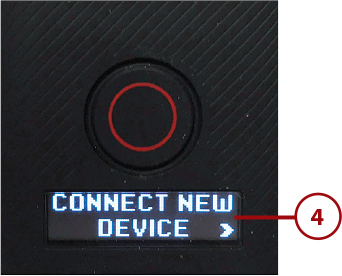
![]() Keep pressing the Menu button to toggle through the menu options until you see the Connect New Device option. Press the Shutter button to select it.
Keep pressing the Menu button to toggle through the menu options until you see the Connect New Device option. Press the Shutter button to select it.
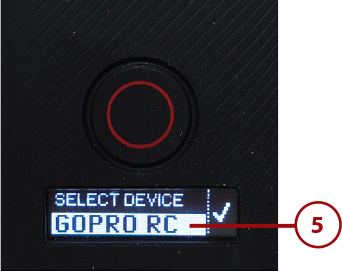
![]() Press the Shutter button until you see the GoPro RC message on the camera’s status screen.
Press the Shutter button until you see the GoPro RC message on the camera’s status screen.
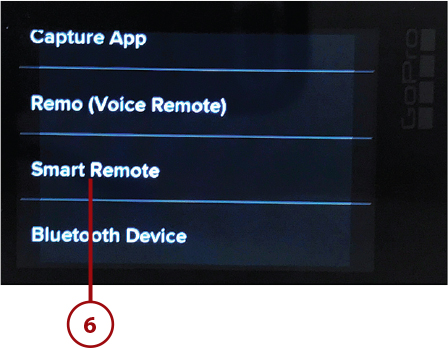
![]() Press the Menu button to select the GoPro RC option, and then press the Shutter button to select the RC (remote control) option (not shown).
Press the Menu button to select the GoPro RC option, and then press the Shutter button to select the RC (remote control) option (not shown).
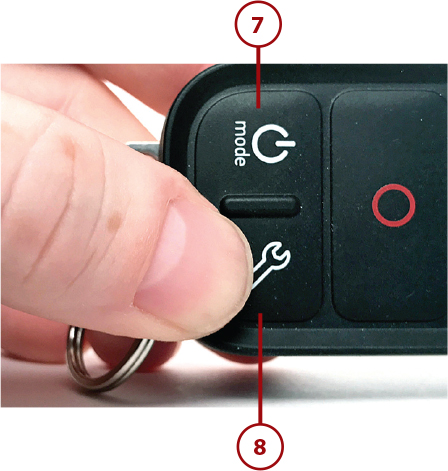
![]() Turn on the Smart Remote, and then press and hold the Settings/Tag button until it enters pairing mode.
Turn on the Smart Remote, and then press and hold the Settings/Tag button until it enters pairing mode.
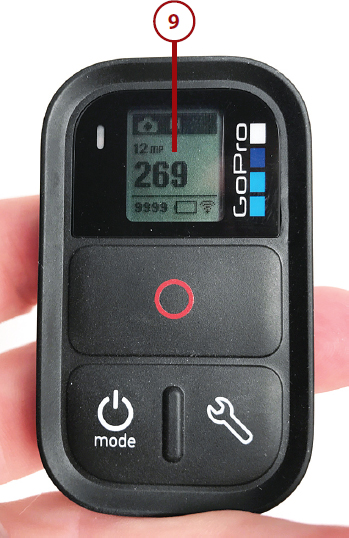
![]() Within a few seconds the Smart Remote and HERO5 Session establish a wireless connection. On the Smart Remote, you see the “Connect Another?” message. Select No by pressing the Mode button followed by the Shutter button. You’re now ready to use the Smart Remote with the HERO5 Session.
Within a few seconds the Smart Remote and HERO5 Session establish a wireless connection. On the Smart Remote, you see the “Connect Another?” message. Select No by pressing the Mode button followed by the Shutter button. You’re now ready to use the Smart Remote with the HERO5 Session.
What the Status Screen Is Telling You
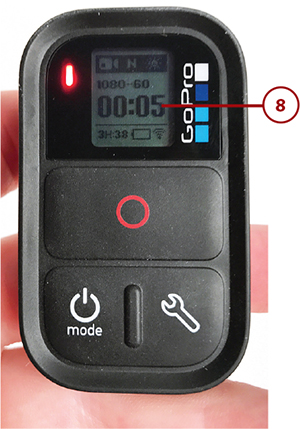
In the figure for step 8, the camera is shooting video at 1080p, 60 FPS, and Narrow FOV. Five seconds of video has been recorded already, and 3 hours and 38 minutes worth of video storage space remain on the memory card. The camera’s battery is almost depleted, however.
Working with the Smart Remote
To turn on the Smart Remote, simply press the Power/Mode button. When you’re ready to turn off the remote, press and hold the Power/Mode button for two seconds. When the remote is turned on, its status screen mirrors the information on the GoPro camera’s status screen.
Once a connection between the camera and the Smart Remote is established, you’re able to control the camera using the Smart Remote up to a distance of 600 feet. On the Smart Remote, press the Power/Mode button multiple times to toggle through the camera mode options (Video, Photo, and so on) and choose the mode you want to use. Next, press the Shutter/Select button on the remote to begin capturing video, or to snap a photo (depending on which mode you’re using). If you’re shooting video, press the Shutter/Select button again to stop recording.
While you’re recording video, if something exciting happens that you want to be able to find later during the editing process, press the Settings/Tag button on the remote. This activates the HiLight Tag feature, which is explained in Chapter 11, “Shooting HD Video.”
The Smart Remote buttons work just like the corresponding buttons on the camera’s body. So if you want to turn on the camera remotely and begin taking digital photos using the Photo settings you’ve previously selected (or the default Photo settings), follow these steps:
1. Make sure the camera’s Wireless mode is turned on.
2. From the Smart Remote, press the Power/Mode button for two seconds to remotely turn on the camera. The status screen on the remote will display the camera’s menu.
3. Press the Power/Mode button repeatedly to cycle through the menu options until you see the Photo option, and then choose it by pressing the Shutter/Select button on the remote.
4. Set up the camera itself and frame your shot.
5. Press the Shutter/Select button on the remote to take individual photos. You can also use the Smart Remote to first adjust the Photo mode’s settings.
Using the REMO for Voice Control
In addition to or instead of using the Smart Remote and/or Capture mobile app, you can easily use more than a dozen different voice commands to control your HERO5 Session or HERO5 Black camera. Make sure the Voice Command feature is turned on for this feature to work. (Read the “Using Voice Commands” section in Chapter 2, “Getting Started with Your GoPro HERO Black,” for information on how to turn on the Voice Command feature.)
Normally, you need to be in close proximity to your camera to issue voice commands. Even when you’re close to the camera, if you’re in a noisy or windy environment, the camera’s microphone might not hear you speak or be able to understand what you say.
With the REMO accessory ($79.99), you can be up to 33 feet away from your HERO5 Session or HERO5 Black camera and still issue voice commands. The REMO accessory is a small, battery-powered device that you can carry, attach to your clothing, or wear on your wrist. The Voice Command feature of the HERO5 Session and HERO5 Black works without the REMO, but at a much shorter range.
To turn on the REMO, press and hold the Power button on the side of the device for about two seconds, until you hear a beep. To turn off the device, press and hold the Power button for about 5 seconds.
Whenever the REMO is turned on and linked with your camera, all you need to do is speak a voice command, and the REMO translates the command and sends it wirelessly to the camera. How to use the Voice Command feature is covered within Chapter 2.
Using a Quik Key to Transfer Your Content
As you shoot photo or video content, it gets stored within the microSD memory card that’s installed in your camera. If you’re a subscriber to the GoPro Plus service (which is covered in Chapter 16, “Getting to Know the GoPro Plus Online Service”), you can set up the camera to automaticaly and wirelessly transfer all content, as it’s shot, to the GoPro Plus online service, which makes it accessible to all of your Internet-connected computers and mobile devices.
Alternatively, you can use the supplied USB cable to connect your camera directly to your computer. After the connection is established, use the QUIK Desktop software or your other photo- or video-editing software to transfer content from the camera’s memory card to your computer.
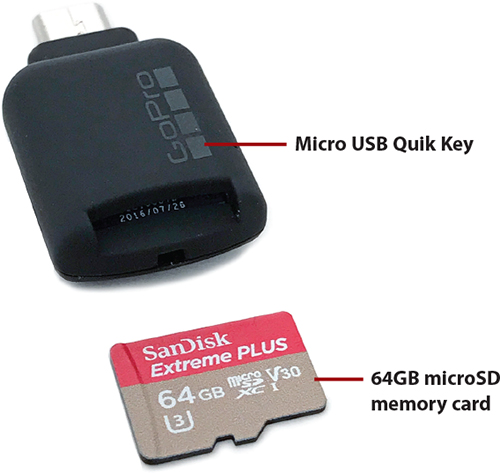
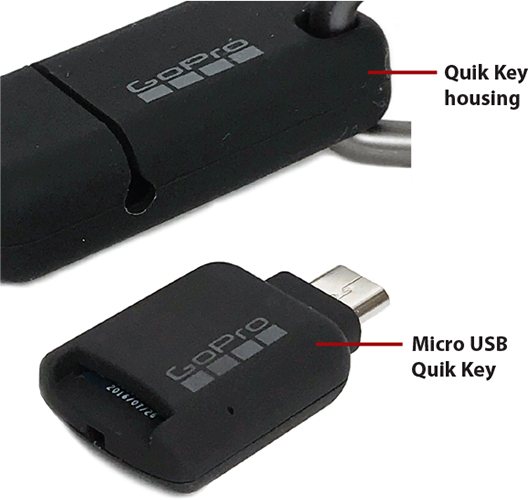
Yet another option is to use a Quik Key accessory. A Quik Key is basically a tiny microSD memory card reader. After removing the microSD memory card from your camera, insert it into the end of the Quik Key that contains a memory card slot. On the opposite end of the Quik Key is a Lightning Port connector, Micro USB connector, or USB-C connector (depending on which version of the device you’ve purchased; each version of the Quik Key is sold separately).
The Lightning Port connector version of the Quik Key ($29.99) allows you to plug the accessory directly into your iPhone or iPad’s Lightning Port (located on the bottom of the device), and then transfer content from the camera’s microSD memory card into the Capture app running on your iPhone or iPad via the Quik Key accessory.
The Micro USB version of the Quik Key ($19.99) allows you to plug the device into a compatible Android smartphone or tablet, or a computer with a Micro USB port, and the USB-C version of the Quik Key ($19.99) plugs into any mobile device or computer that has a USB-C port built in.
Hitting the Road with the Seeker
The GoPro Seeker ($169.99) is a rugged backpack with a variety of water-resistant pockets and compartments designed to hold your GoPro camera(s), mounts, and accessories, along with the Karma Drone (if applicable), and/or your own gear.
The compartments and pockets are designed to keep your equipment well organized and easily accessible, and the backpack includes a built-in chest mount, plus a separate mount on the shoulder strap. Thus, you can attach your GoPro camera and film what’s in front of you while wearing the Seeker.
The built-in side mount is designed for use with the 3-Way mount (sold separately), so you can extend the camera from the Seeker over your shoulder or above your head, and angle the camera in almost any direction.
More Useful GoPro Accessories
Both GoPro and many third-party companies (including those listed in the previous chapter) offer a wide range of optional accessories for the various GoPro cameras.
For example, if you want to protect the camera from scratches when it’s not within a housing, a company called iStyle (www.istyles.com/shop/GoPro-Hero5-Black/Skin) offers a vast selection of stylish vinyl skins that can semi-permanently stick onto the camera. They’re priced between $6.99 and $11.99 each.
Keeping the camera’s lens clean is an absolute must, and a company called GoWorx (www.goworx.com) offers a special water-repellent solution for the lens, called GoSpot ($14.99). It’s ideal if you’ll be using the camera in the rain or around bodies of water. This product makes water drops simply slide off the lens.
Shed Light On The Scene
The Floaty Won’t Let Your GoPro Sink
Available from GoPro, the Floaty is a bright-colored (orange) floatation device that attaches to the camera’s housing. It keeps your camera from sinking if it gets loose in any body of water, and the bright color makes the camera easier to spot and retrieve. If you’ll be using the camera in or near a lake or ocean, for example, seriously consider attaching a Floaty to your camera’s housing.
Separate versions of the Floaty are available for the HERO5 Black and the HERO/HERO5 Session. Both are priced at $19.99. With the HERO5 Black, the Floaty is attached to the back door of the Frame or Super Suit housing using the supplied adhesive. The HERO/HERO5 Session version of the Floaty fits snuggly around the Frame housing without requiring adhesive.