08. Controlling Your Camera

In this chapter, you learn how to set up your camera prior to shooting. Topics include the following:
![]() Determining how you’ll control the camera
Determining how you’ll control the camera
![]() Preparing your camera for shooting
Preparing your camera for shooting
![]() Selecting the camera mode, shooting mode, and related settings
Selecting the camera mode, shooting mode, and related settings
![]() Getting to know more advanced shooting features
Getting to know more advanced shooting features
Before you start taking pictures or shooting video with any model of GoPro camera, you have a few important decisions to make that directly affect the quality of your content. The very first thing to do is quickly analyze your shooting situation and then make sure your camera is properly set up to handle that situation.
Analyzing Your Shooting Situation
Analyzing your shooting situation means that you decide, in advance, what you want to shoot, how you want to shoot it, and then determine the best way to set up your GoPro camera. After you know what you want to shoot as still photos, consider your available lighting, backgrounds, shadows, shooting angle or perspective, frame for your shots, and any other obstacles that could keep you from capturing the best possible shots.
Take Awesome Photos with Your GoPro
If you’re planning to shoot video, you have some additional considerations that involve movement of the camera, movement of your subject, how you’ll present the video content, and what sound you want to capture. Obviously, the GoPro cameras are designed to capture fast-action and will compensate for some of the natural camera movement that’s to be expected when you attach the camera to yourself or your equipment and then engage in some activity. However, to achieve the best shooting results, you need to eliminate excessive camera movement and vibrations by making sure you use the most appropriate mount and accessories for the situation.
Whether you’re taking photos, shooting video, or doing both of these tasks simultaneously, try to plan your shots and the approach you’ll use to get them. If you go into a shooting situation with a clear understanding of what you’re trying to accomplish, you’re more apt to have all the right mounts and accessories on hand. You’ll also have an easier time selecting the most appropriate camera mode and shooting mode (and related settings) based on what you’re trying to achieve in each unique shooting situation.
Choosing How to Control Your Camera
After you know what you’re trying to achieve, how and where your camera will be mounted, and whether you need to keep your hands free while shooting, determine the most convenient and least-intrusive way to control your camera.
Holding the camera in your hands requires the least amount of extra equipment because you’re able to directly control the camera’s features and functions, frame your shots, and press the Shutter button as needed. However, there will often be times when it’s much more convenient to control the camera remotely using optional equipment. The following sections describe your options for remotely controlling the camera.
Voice Commands
When the Voice Command feature of the HERO5 Session or HERO5 Black is on, you can speak directly to your camera and instruct it when to take photos or when to start and stop shooting video. You can also easily switch between shooting modes. Read Chapters 2 or 3 to find the instructions for turning on the Voice Command feature on your HERO5 Black camera or your HERO5/HERO Session camera.
With the optional REMO accessory (which can be worn like a watch or clipped to your clothing), you can be up to 33 feet away from your camera when issuing verbal commands. The REMO accessory is covered in Chapter 5, “Must-Have GoPro Camera Accessories.”
The Smart Remote
The optional Smart Remote is ideal for remotely controlling one or more GoPro cameras from up to 600 feet away. The Smart Remote is waterproof (up to 33 feet). You can wear it around your wrist (using the supplied wrist strap), or you can attach it to your clothing or equipment for easy access.
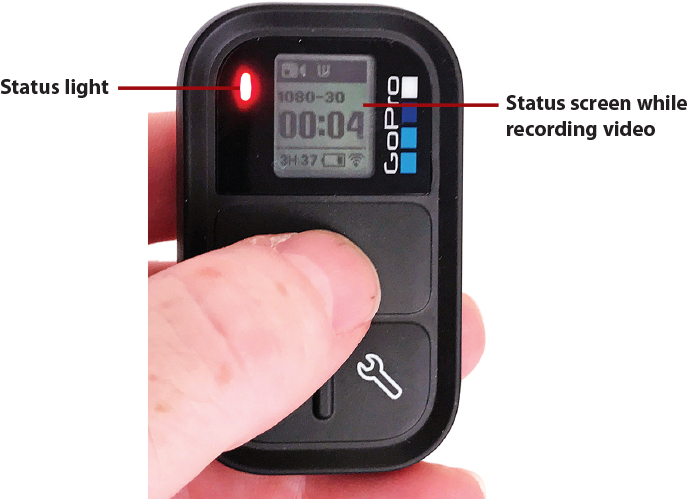
The benefit to the Smart Remote is that its built-in status screen tells you exactly how the camera is set up and what it’s doing at any given moment. When you press the Shutter button to begin shooting video, for example, the Smart Remote’s status light begins to flash, and you can see the timer on the status screen (shown here), so you know the camera is operating correctly and recording video.
The Capture Mobile App
If you have a smartphone, tablet, or smartwatch, you can use GoPro’s Capture mobile app to remotely control the camera from your mobile device via a wireless connection between your device and the camera.
The mobile device’s screen serves as a live viewfinder, so you can see exactly what you’re shooting. The controls within the Capture app allow you to quickly set or modify the camera’s shooting mode and related settings with a few on-screen taps.
When you turn on the Wireless feature of your GoPro camera, the camera itself creates a private, password-protected, Wi-Fi hotspot that your mobile device needs connect to. You do not need to be within the signal radius of a public Wi-Fi hotspot or your home wireless network for this feature to work. However, the mobile device needs to stay within the signal radius of the wireless hotspot created by the GoPro camera.
The main drawback to this remote shooting method is that when your mobile device is wirelessly linked with your GoPro via Wi-Fi, that mobile device cannot simultaneously access the Internet via a Wi-Fi network. Thus, if you need an Internet connection for some other task, the smartphone, tablet, or smartwatch has to rely on a cellular data connection (if available).
It’s also important to understand that while the Smart Remote allows you to remotely control your GoPro camera from up to 600 feet away, the distance you can be from the camera while using the smartphone, tablet, or smartwatch is much less. Plus, chances are your mobile device isn’t waterproof or as durable as your GoPro camera, so you might need to be careful to protect your mobile device based on the shooting situation.
Preparing to Shoot
When you know what you plan to shoot, and the approach you plan to take to capture the desired content, make sure you have all of the necessary mounts and accessories on hand to achieve your shooting goals. Here’s a short pre-shooting checklist:
1. Clean your camera’s lens and make sure it’s spotless. Always carry a microfiber lens-cleaning cloth with you so you can keep the lens clean while shooting in harsh environments that involve dirt, dust, water, rain, or snow.
2. Make sure the camera’s battery is fully charged. If you’re shooting with a HERO5 Black, also have one or two extra, fully charged batteries on hand.
3. Insert a microSD memory card into the camera. If necessary, transfer previously shot content that you want to keep from the memory card to another device and format the memory card to free up plenty of space to store the content you’re about to shoot. It’s always a good idea to have one or two empty, formatted memory cards on hand, especially if you’ll be shooting video.
4. Based on your planned shooting situation(s), bring along all of the optional mounts you’ll need. Make sure you have the proper thumb screw for each mount. (See Chapter 4, “Overview of GoPro HERO Mounts,” for more information about mounts and thumb screws.)
5. Collect all of the accessories you plan to use while shooting, and make sure any electronics are fully charged. If you’ll be shooting in or around water, make sure you have a Floaty (see Chapter 5) and any special lens filters you’ll need.
6. When you get to your shooting location, turn on the camera and select the camera mode, shooting mode, and related settings you plan to use while shooting.
7. Set up the camera by placing it in the proper housing, connecting the housing to the most suitable mount, and then connecting the mount to yourself or your equipment as the situation requires. This might include connecting the camera to a camera grip or handle, an extension pole, a stabilizer, or a tripod.
8. Test the camera and make sure everything is operational. Take a few test photos, or shoot a 10- to 15-second video, and then preview the content. If the quality of the test shots or video footage isn’t as good as you’d like, consider altering the camera settings.
9. If you’ll be remotely controlling the camera, test it to make sure the remote control option you’ve selected is working.
10. Double-check (and even triple-check) that the camera housing is securely held in position and adjusted for the desired shooting angle.
You’re now ready to begin shooting, when the activity you plan to shoot begins and/or your subject is in place.
Adjusting Your Camera Mode, Shooting Mode, and Related Settings
HERO5 Black users can easily adjust the camera mode, shooting mode, and related settings via the touchscreen. HERO Session and HERO5 Session users need to use the camera’s Menu and Shutter buttons and information on the status screen to adjust the camera’s settings prior to shooting.
Work with the HERO5 Black’s Touchscreen
While the screen displays the viewfinder mode, follow these directions to alter the settings:
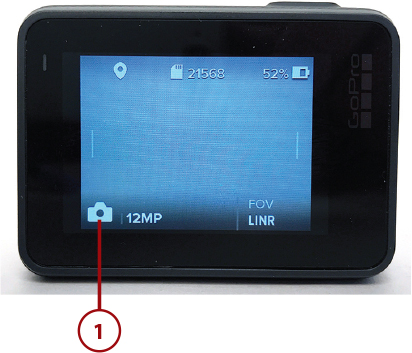
![]() Tap the shooting mode icon to change camera modes. Shown here is the Photo icon, because the camera is currently in Photo mode.
Tap the shooting mode icon to change camera modes. Shown here is the Photo icon, because the camera is currently in Photo mode.
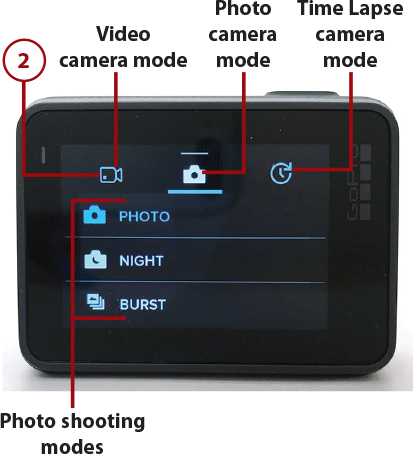
![]() Tap one of the three camera modes icons. In the figure, Photo mode is selected, so the Photo, Night, and Burst shooting modes are displayed. For this example, tap the Video camera mode icon to access the Video shooting modes.
Tap one of the three camera modes icons. In the figure, Photo mode is selected, so the Photo, Night, and Burst shooting modes are displayed. For this example, tap the Video camera mode icon to access the Video shooting modes.
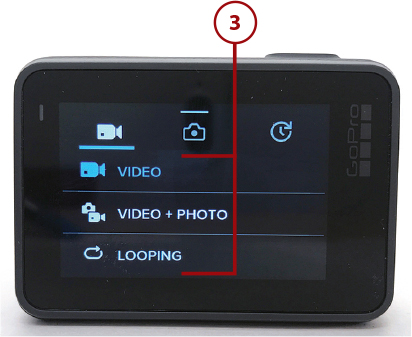
![]() Tap one of the shooting mode options. Here the Video camera mode has been selected, so the Video, Video+Photo, and Looping shooting mode options are displayed.
Tap one of the shooting mode options. Here the Video camera mode has been selected, so the Video, Video+Photo, and Looping shooting mode options are displayed.
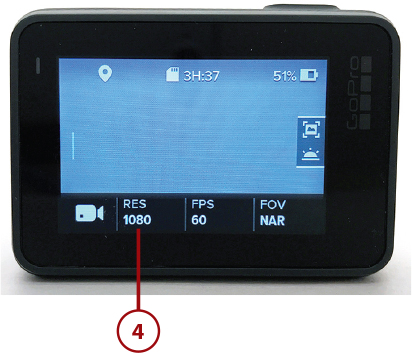
![]() When the viewfinder screen reappears, if applicable, tap the RES (resolution) option to see the available shooting resolution options.
When the viewfinder screen reappears, if applicable, tap the RES (resolution) option to see the available shooting resolution options.
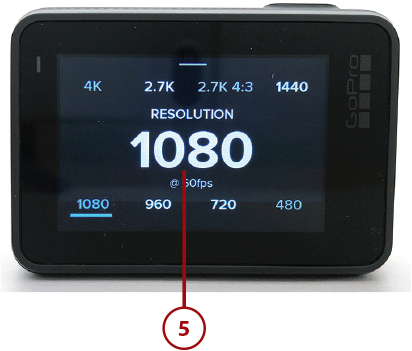
![]() Tap your resolution selection from the submenu screen. Your available options, based on the other active settings, are displayed on the touchscreen. The selected option is displayed in the center of the screen (1080p). Tap a different option to change to it.
Tap your resolution selection from the submenu screen. Your available options, based on the other active settings, are displayed on the touchscreen. The selected option is displayed in the center of the screen (1080p). Tap a different option to change to it.
Still Photo Resolution
If you’re using any of the Photo camera modes, the camera automatically shoots at its maximum resolution, which on the HERO5 Black is 12MP.
![]() Return to the viewfinder screen and then tap on the FPS option to adjust the frames per second setting from this submenu. Available options are based on which camera model, which resolution, and which FOV you’ve already selected. The selected option is displayed in the center of the screen.
Return to the viewfinder screen and then tap on the FPS option to adjust the frames per second setting from this submenu. Available options are based on which camera model, which resolution, and which FOV you’ve already selected. The selected option is displayed in the center of the screen.

No FPS for Still Photos
The FPS option is not available if you’re using Photo mode.
Watch for Warning Message
As you’re adjusting your camera’s shooting options, if you select an option that is not available based on other options already selected, you see a warning message. This happens, for example, if you select 4K resolution and then try to select an FPS option that is not supported by this resolution.
![]() Return to the viewfinder screen and tap the FOV option to adjust the Field of View setting from the submenu screen (shown). Scroll up or down to see the available options. Depending on which resolution and FPS you’ve selected for Video modes or which resolution you’ve selected when shooting with Photo modes, your options will vary. The selected option is displayed in blue.
Return to the viewfinder screen and tap the FOV option to adjust the Field of View setting from the submenu screen (shown). Scroll up or down to see the available options. Depending on which resolution and FPS you’ve selected for Video modes or which resolution you’ve selected when shooting with Photo modes, your options will vary. The selected option is displayed in blue.

![]() When you’re ready to start shooting, return to the viewfinder screen, and press the Shutter button (not shown).
When you’re ready to start shooting, return to the viewfinder screen, and press the Shutter button (not shown).
Select Advanced Options on the HERO5 Black
To select and adjust an advanced shooting feature, follow these steps:
![]() After choosing the camera mode, shooting mode, resolution, FOV, and FPS (if applicable), return to the main viewfinder screen.
After choosing the camera mode, shooting mode, resolution, FOV, and FPS (if applicable), return to the main viewfinder screen.
![]() Place your finger near the right edge of the touchscreen and swipe left. The Advanced feature menu opens. The options available for your camera display one at a time.
Place your finger near the right edge of the touchscreen and swipe left. The Advanced feature menu opens. The options available for your camera display one at a time.

![]() Swipe your finger left or right across the touchscreen to view your available options. If an additional submenu option is available, you see it when you tap the feature. Shown here is the Video Stabilization feature turned on. Tap the On/Off icon to toggle this option on or off.
Swipe your finger left or right across the touchscreen to view your available options. If an additional submenu option is available, you see it when you tap the feature. Shown here is the Video Stabilization feature turned on. Tap the On/Off icon to toggle this option on or off.

![]() When you’re ready to start shooting, return to the viewfinder screen and press the Shutter button (not shown).
When you’re ready to start shooting, return to the viewfinder screen and press the Shutter button (not shown).
Adjust Settings on the HERO5 Session
Using the Shutter button, Menu button, and information on the status screen, you can adjust the camera mode, shooting mode, and related settings on the HERO5 Session camera. You might find it easier, however, to remotely adjust the camera using the Smart Remote or the Capture mobile app on your smartphone, tablet, or smartwatch.
Attention HERO Session Users
Use these steps to adjust the camera mode, shooting mode, and related settings:
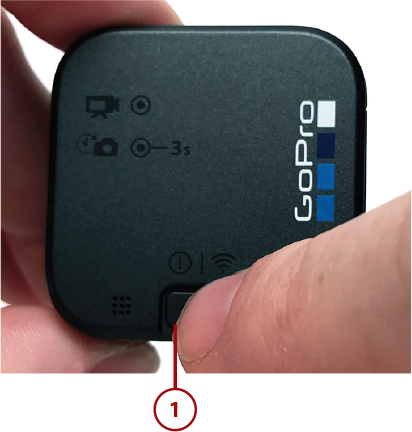
![]() Turn on the HERO5 Session camera, and press the Menu button to turn on the status screen.
Turn on the HERO5 Session camera, and press the Menu button to turn on the status screen.
![]() Keep pressing the Menu button until you see the Camera Settings option. Press the Shutter button to select it.
Keep pressing the Menu button until you see the Camera Settings option. Press the Shutter button to select it.

![]() Change the Camera mode by pressing the Shutter button repeatedly until you see the mode you want to use. Video, Photo, and Time Lapse are your options. In this example, Video is selected and highlighted. Press the Menu button to make your selection.
Change the Camera mode by pressing the Shutter button repeatedly until you see the mode you want to use. Video, Photo, and Time Lapse are your options. In this example, Video is selected and highlighted. Press the Menu button to make your selection.

![]() Press the Menu button to highlight the Resolution setting. Press the Shutter button to scroll through your available options, and then press the Mode button to select your choice. 1080p is highlighted and selected here.
Press the Menu button to highlight the Resolution setting. Press the Shutter button to scroll through your available options, and then press the Mode button to select your choice. 1080p is highlighted and selected here.
![]() Select and highlight the FPS option by pressing the Menu button. When it’s highlighted, press the Shutter button repeatedly to scroll through the FPS options. When you see the option you want, press the Menu button to select it.
Select and highlight the FPS option by pressing the Menu button. When it’s highlighted, press the Shutter button repeatedly to scroll through the FPS options. When you see the option you want, press the Menu button to select it.

![]() Select and highlight the FOV option by pressing the Menu button. When it’s highlighted, press the Shutter button repeatedly to scroll through the FOV options. In this example, the Wide (W) FOV option is selected. Press the Menu button to select your choice.
Select and highlight the FOV option by pressing the Menu button. When it’s highlighted, press the Shutter button repeatedly to scroll through the FOV options. In this example, the Wide (W) FOV option is selected. Press the Menu button to select your choice.

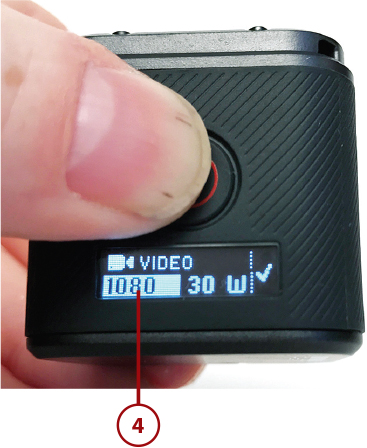
![]() When you’ve adjusted all of the necessary settings, press the Menu button to highlight the check mark icon, and press the Shutter button to confirm it. This saves your changes to the camera mode, shooting mode, resolution, FPS, and FOV options. In this example, the camera is set to Video mode, 1080p resolution, 30 FPS, Wide FOV. You’re now ready to start shooting.
When you’ve adjusted all of the necessary settings, press the Menu button to highlight the check mark icon, and press the Shutter button to confirm it. This saves your changes to the camera mode, shooting mode, resolution, FPS, and FOV options. In this example, the camera is set to Video mode, 1080p resolution, 30 FPS, Wide FOV. You’re now ready to start shooting.

Getting Acquainted with Your Camera’s Shooting Modes and Settings
To create the best possible content using your GoPro camera, you need to understand the camera modes, shooting modes, settings, and advanced shooting features available to you, so you can pick the best features and functions available to you, based on each particular shooting situation.
Know Your Icons
Each shooting mode and setting has an icon that displays on the camera’s status screen or touchscreen. Get to know which icon corresponds with which feature so you can glance at the camera’s screen and quickly understand exactly which features and functions are currently active.
Camera Modes
Regardless of whether you’re using the HERO5 Black, HERO5 Session, or HERO Session, the camera has three main camera modes—Video, Photo, and Time Lapse. As their names suggest, Video is for shooting HD video, Photo is for taking high-resolution still images, and Time Lapse is for capturing time-lapse sequences.
Table 8.1 shows icons for the GoPro HERO5 Black’s camera modes, shooting modes, settings, and advanced features. These are the icons that are displayed on the camera’s touchscreen and status screen. (The appearance of the icons also applies to the HERO5 Session and HERO Session cameras, when applicable.)
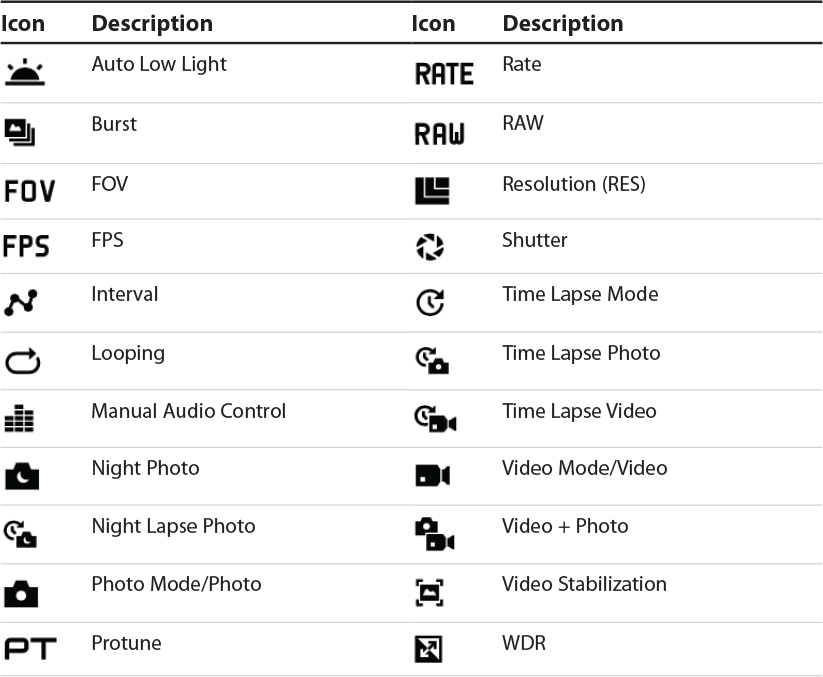
Table 8.1 Mode and Setting Icons
After you choose one of these three camera modes, you need to select a shooting mode. The following is a summary of the shooting modes.
Video Camera Mode, Settings, and Advanced Features
The Video camera mode has three shooting modes to choose from: Video, Video+Photo, and Looping.
The Video mode is for capturing high-definition video. Once you choose this shooting mode, you need to choose Resolution, FPS, and FOV settings, plus decide whether or not to activate any advanced shooting features that might be useful for a particular shooting situation, such as Auto Low Light, Video Stabilization, or Protune (all of which are explained shortly).
The Video+Photo shooting mode allows you to shoot HD video using the settings you select while also capturing separate high-resolution digital photos. Photos are taken at a preset (but adjustable) time interval while video is being captured.

In other words, once you select this shooting mode, adjust its settings, and then press the Shutter button to begin shooting video, every 5, 10, 30, or 60 seconds, the camera automatically snaps one digital photo using the same resolution and FOV at which the video is recording. The video and photo digital files are stored separately on the microSD memory card.
The Looping mode allows the camera to record HD video for 5, 20, 60, or 120 minutes. There’s also a MAX option, which records as much video as possible until the camera’s memory card is filled.
After the designated loop time that you set, the camera records over the previous loop (deleting that content), and begins recording a new loop. This process begins after you select the Looping mode and press the Shutter button to begin filming. The camera continues filming until you press the Shutter button again to stop filming. You can then view and edit the most recently shot video loop.
You also need to choose the resolution, FOV, FPS, and related settings you want to use. Depending on which GoPro camera you’re using, your resolution options vary, but they range from 480p (lowest resolution) to 4K (highest resolution). The available FOV, FPS, and related settings also vary based on the camera you’re using. The figure shows the resolution submenu with 1080p selected.

After you choose your shooting resolution and field of view, you see the available FPS options. For example, if you’re using the HERO5 Black and have chosen 1080p resolution and Wide FOV, your FPS options are 24, 30, 48, 60, 90, or 120.
You can also activate advanced shooting options that give you more flexibility to handle specialized shooting situations. The advanced shooting options are described later in this chapter in the “Understanding Advanced Shooting Features” section.
Photo Camera Modes
The Photo camera mode also offers three shooting mode options: Photo, Night Photo, and Burst. You use the Photo shooting mode to take individual still images. Each time you press the Shutter button, one photo is taken and stored on the camera’s memory card. After you activate the Photo mode, you need to select your FOV.
The HERO5 Black shoots photos at 12MP resolution, and the HERO5 Session shoots photos at 10MP resolution. The Photo resolution of the HERO Session is 8MP. The available FOV options depend on which camera model you’re using. The HERO5 Black, for example, allows you to choose between Narrow, Linear, Medium, and Wide.
Finally, before you start taking pictures using Photo mode, select which advanced shooting features, if any, you want to use. The Wide Dynamic Range, RAW Format, and Protune are among the advanced options available when using the HERO5 Black. Read more about the advanced settings later in this chapter.
The Night Photo shooting mode, as its name suggests, is designed to help you achieve better results when taking pictures in low-light situations. For example, when Night Photo is active, you can manually select the camera’s shutter speed.
With burst shooting mode, you press the Shutter button once to quickly capture a group of photos in quick succession. This is ideal for capturing a specific moment when your subject is moving fast.
Instead of relying on perfect timing to press the Shutter button at exactly the right moment, Burst mode captures up to 30 individual photos per second when you tap the Shutter button.
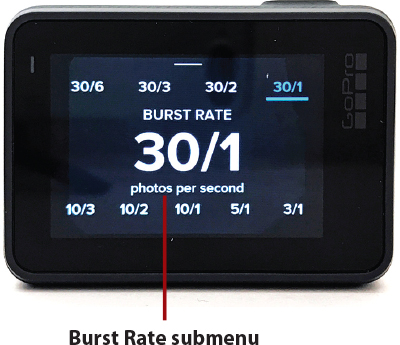
On the HERO5 Black, for example, you can choose between the following Burst settings:
• Thirty photos in a 1-, 2-, 3-, or 6-second burst
• Ten photos in a 1-, 2-, or 3-second burst
• Five photos in 1 second
• Three photos in 1 second
When you select either the Night Photo or Burst shooting mode, you’re prompted to select an FOV. Then you can activate any of the compatible advanced shooting features you deem necessary for a particular shooting situation.
The Time Lapse Shooting Mode
With the Time Lapse camera mode, the camera should remain in a fixed position, so this mode is best used when the camera is mounted on a tripod. The Time Lapse camera mode has three shooting mode options: Time Lapse Video, Time Lapse Photo, and Night Lapse Photo.
Time Lapse Video captures the Time Lapse footage you shoot and stores it on the camera’s memory card as a video, whereas Time Lapse Photo takes a series of photos over time and stores each photo separately as a series of digital image files on the camera’s memory card. The Night Lapse Photo works the same way as Time Lapse Photo but offers an additional setting for shooting in low-light situations.
When you select the Time Lapse Video feature, and then press the Shutter button to begin filming, the camera records an HD video but records only at a preset Time Interval. On the HERO5 Black, the Time Lapse Video Interval options are 0.5, 1, 2, 5, 10, 30, and 60 seconds. Interval refers to the rate at which photos are automatically taken once you press the Shutter button to begin filming.

After selecting any of the Time Lapse shooting modes, you can select a shooting resolution, FOV, and interval. Choosing the Auto Interval option when you’re using Night Lapse Photo results in the camera automatically matching the Interval setting with the camera’s shutter speed. Thus, if you set the Shutter Speed to two seconds, which is ideal for capturing a sunrise or sunset, the Interval setting is also set at two seconds, so one photo is automatically taken every two seconds until you press the Shutter button a second time to stop the Time Lapse process.
Time Lapse Option Clarification
Understanding Advanced Shooting Features
The advanced shooting features that are available to you are based on which GoPro camera model you’re using, which camera mode you’ve selected, which shooting mode is active, and which settings you’ve chosen to use for a particular shooting situation.
The advanced shooting features give your camera additional functionality. When used correctly and in the right situations, the features allow you to consistently capture higher quality photos and/or videos that showcase sharper clarity, smoother motion, and more vivid colors. With some of the advanced features, your camera also makes better use of existing light. How and when you use these features is covered more in the next four chapters. However, this section gives a brief description of many of the advanced shooting features.
Aspect Ratio
When shooting video, the GoPro cameras can capture video using either a 16:9 or 4:3 aspect ratio. HD television sets and video-editing software (including QUIK Desktop) use a 16:9 aspect ratio, which results in a rectangular, high-definition video image. If you shoot footage using a 4:3 aspect ratio, the frame is 33 percent taller, but it’s more square, which is suitable for viewing on an older, non-HD television set. If you attempt to view video shot using a 4:3 aspect ratio on an HD television set, black bars display on the left and right margins of the video.
Auto Low Light
The Auto Low Light setting is ideal for shooting in low-light situations or when you’re shooting video and moving between low-light areas and well-lit areas. This feature automatically adjusts the FPS and exposure to achieve the best possible result. When you’re shooting video, this feature works only when the FPS is set at 30 or higher.
Color
This feature allows you to manually adjust the color profile for capturing and storing photos or video content. The effect of your changes to this setting are displayed in real-time on the HERO5 Black’s touchscreen when you’re using it as a viewfinder. Your setting options include GoPro Color (the default option) or Flat (a neutral color profile that can be color-corrected and adjusted when you edit). Flat allows you to capture more detail in shadows and highlights, which can be enhanced or reduced while you’re editing your content.
Exposure Control with Auto Exposure
Typically, when auto-adjusting the exposure level, the camera analyzes everything in the frame. However, this Explore Control feature allows you to manually select the area of the frame that you want the camera to focus on (prioritize) when adjusting the exposure level.
This feature is most useful when an area of the frame would otherwise wind up being overexposed or underexposed. When you use the Exposure Control with Auto Exposure feature, you select an area on the HERO5 Black’s touchscreen so that the camera prioritizes it when adjusting the exposure for the shot. To activate the feature, press and hold your finger on the screen until the exposure control frame appears on the viewfinder. You see a square with a dot in the middle when this feature is on. Use your finger to drag this box to the area of the frame you want to focus on (that’s directly in front of your intended subject). When the box is displayed, you can also tap your finger elsewhere on the touchscreen to move it.

Exposure Control with Locked Exposure
When you select this option, you set the exposure control once and choose the area of the frame that you want the camera to focus on when adjusting the explore level. This selection remains active until you change it, even if you move the camera, the lighting changes, or what you’re shooting (your subject) moves. This option works best if you want the camera to remain focused on one moving object in your frame and ignore whatever else is happening in the foreground, background, or to the sides of that intended subject when the exposure control is automatically being adjusted.
Exposure Value Compensation (EV Comp)
This is one of the manually adjustable features that allows you to control the brightness of your content as you’re shooting. If you’re working in a setting that has contrasting lighting conditions, you can adjust the EV Comp setting to improve image quality. However, unless you truly understand how this feature works and you’re looking for maximum camera control, this is one feature you should allow the camera to automatically adjust for you (which is the default setting). As you make adjustments to the EV Comp settings, you see the effect the change has on the HERO5 Black’s touchscreen when you use it as a viewfinder.
GPS
When you turn on the HERO5 Black’s built-in GPS, the exact location where photos and/or video is shot is automatically recorded. You can use this location information, plus the automatically recorded time and date, for a variety of purposes during the editing process and when showcasing your photos or video. If you don’t need GPS information, turn off this feature to extend the camera’s battery life between charges. (You access this feature from the Preferences menu.)
ISO/ISO Minimum/ISO Maximum
The ISO setting allows you to manually adjust the camera lens’s sensitivity to light, which is something that the camera typically automatically adjusts on your behalf. When you’re shooting in low light, choose a higher ISO level (up to 6400) to boost the light in your content. Note that higher ISO levels create noise (graininess) within the content.
The ISO setting works hand-in-hand with the Shutter Speed setting. In Photo mode, the ISO Minimum and ISO Maximum options allow you to set a range for the camera’s sensitivity to light rather than using a fixed setting. If you want a fixed ISO setting, adjust the ISO Maximum and ISO Minimum option to the same setting.
Manual Audio Control
The microphones built into your camera are designed to record in stereo and filter out wind noise so you end up with the clearest audio possible. By turning on the Manual Audio Control feature, you can opt to turn on or off the stereo recording and/or wind noise filter option. If you’re shooting indoors where there is no wind, consider turning off the wind noise filter (turning on the Stereo Only feature). However, if you’re shooting outside and it’s very windy, turn on the Wind Only feature.
Protune
In addition to the fixed lens that allows the GoPro cameras to capture an ultra-wide field of view, the Protune feature can be used to enhance the overall image quality of what you’re shooting, whether it’s photos or video. This feature works with professional color-correction tools that are built into advanced photo- and video-editing software applications. When you shoot content with Protune, you have full control over color, white balance, shutter speed, and other features—both while you’re shooting and during the editing process. The specific Protune submenu depends on which camera mode you’ve selected. The submenu displays each of the options you can separately adjust.

RAW Audio
Typically, when you record video with your GoPro camera, the audio is automatically captured by the camera’s built-in microphones (or the microphone connected to the camera), and stored as part of the video file on your camera’s memory card. When you turn on this feature, the video and audio files are stored as separate files. The video is saved as a .wav file, and the audio is stored as a .mp4 file. This option gives you greater editing control over the audio later when you use professional-level audio-editing software on your computer. When you turn on this feature, you can control how much audio processing the camera does while recording the audio file (as video is also being recorded). Your options include Low, Med, or High. If you plan to edit and enhance the audio file using audio-editing software on your computer, choose the Low option.
RAW Format
The RAW Format option is available only when you’re shooting with the Photo camera mode (and WDR is turned off). This feature allows your digital photos to be captured and stored as .gpr files rather than .jpg files. A photo captured in the RAW format is saved as a much larger digital file that contains much more detail than files captured when this setting is off. These images can be viewed and edited only with compatible photo-editing software on a computer or mobile device, such as Adobe Photoshop Lightroom CC. Certain FOV options cannot be saved using the RAW format. By default, this feature is turned off.
Sharpness
Whether you’re shooting photos or video, you can manually adjust the Sharpness setting, which allows you to better control the quality of the visible detail in your content. Options include High (the default setting), Medium, or Low. If you plan to adjust the sharpness of your content during the editing process, turn this feature to Low while you’re shooting. When you make changes to this option, the impact it has is immediately obvious on the HERO5 Black’s touchscreen when you’re using it as a viewfinder.
Video Stabilization
This shooting feature is designed to compensate for a constant camera vibration. For example, if you have the camera mounted to a car, motorcycle, off-road ATV, motor boat, personal watercraft, or airplane and the motor causes a continuous vibration. If you don’t turn on this feature, your video content typically appears blurry or very shaky. This feature helps to eliminate the vibration. You can turn on or off this feature, but it’s not available when shooting at 4K video resolution or at frame rates higher than 60 FPS. The feature is also unavailable when you’re using the Video+Photo or Looping shooting modes on the HERO5 Session or HERO5 Black. It’s not available at all on the HERO Session.
White Balance
When this feature is turned on, you can manually adjust the color temperature within your photos and video content. Adjustments you make are immediately visible on the HERO5 Black’s touchscreen when you’re using it as a viewfinder. You have the ability to set this option to Auto (the default option), 3000k, 4000k, 4800k, 5500k, 6000k, 6500k, and Native. The lower settings translate to warmer tones. However, if you select Native, the camera does little color correcting on its own as you shoot, giving you more control over color when you edit files.
Wide Dynamic Range (WDR)
When WDR is turned on, the camera captures and retains more detail in the darkest and brightest areas of an image. This feature helps you automatically capture properly exposed images, especially when shooting in very bright or very dark areas. For example, consider turning on this feature if a lot of bright light is behind your intended subject, but what’s in the foreground is dark. This is a common situation if you’re photographing people in front of a sunrise or sunset. Without using this feature, the people appear as silhouettes, with little or no detail, but the colors of the sunrise or sunset are vivid.