12. Capturing Sound and Using Artificial Light
In this chapter, you learn how to properly record sound and use external lights when shooting video with your GoPro camera. Covered topics include:
![]() Recording sound using the camera’s built-in microphone
Recording sound using the camera’s built-in microphone
![]() Using an optional and external microphone with your camera
Using an optional and external microphone with your camera
![]() Using a constant artificial light source when shooting video
Using a constant artificial light source when shooting video
Your GoPro camera is capable of recording decent-quality sound using its built-in microphones. However, how well these microphones work depends directly on the shooting situation and how you adjust the camera’s advanced options related to sound recording.
Meanwhile, lighting is an important production element to consider when shooting video. Your GoPro camera has several optional settings that can help you compensate for low light or poor lighting conditions. However, in some cases, you might want to use optional external lighting options to shed more light on the scene and have control over that light source—as well as the unwanted shadows lighting can cause.
Recording High-Quality Sound
If you require higher quality audio than what’s possible using the built-in microphones of the HERO5 Black or HERO5 Session, invest in the optional GoPro 3.5mm Mic Adapter ($49.99) and a third-party microphone.
Another option is to use the GoPro QUIK Desktop software, or other video-editing software, to later add background music, sound effects, and/or voiceovers to your video project. Some video-editing software can also be used to “clean up” the audio quality that was recorded during filming. However, if you turn on the RAW Audio Track option (HERO5 Black) when shooting video, you can later use any audio-editing software on your computer to edit, enhance, or clean up the audio recorded by your camera before you incorporate it into your edited video project.
The following are some popular audio-editing software applications for PCs and Macs:
• Adobe Audition CC—This PC and Mac software from Adobe is offered via a subscription plan, starting at $19.99 per month. Other plans offer users unlimited access to Adobe’s entire collection of more than 20 popular applications.
• Audacity—This professional-level audio-editing software is open source and available for free. Visit https://sourceforge.net/projects/audacity.
• Logic Pro X—This $199.99 software from Apple is exclusively for the Mac and is available from the Mac App Store.
• WavePad Audio Editing Software—This easy-to-use software is available for the PC or Mac. The Standard Edition is priced at $39.95, and the Master’s Edition is priced at $69.95. You can also get iOS and Android mobile app versions from the applicable app store. Visit www.nch.com.au/wavepad/.
Using the Camera’s Built-In Microphone
The microphones that are built into your GoPro camera may be extremely small, but they’re capable of capturing decent-quality sound (in stereo) as you record video.
Use the following strategies to capture and record the highest quality audio possible:
• Adjust the HERO5 Black’s Manual Audio Control and RAW Audio Track options to the most optimal settings based on each shooting situation.
• Mount the camera in a way that the microphones are exposed to the least amount of direct wind blowing.
• Consider using an optional windscreen, which helps muffle wind noise. Several third-party companies have windscreens that wrap around the body of the HERO5 Black, HERO5 Session, or HERO Session cameras. One example is the MegaGear Windjammer for GoPro HERO5 Black ($14.99, https://www.amazon.com/MegaGear-Windscreen-Windjammer-Sj4000-Sj5000/dp/B00LWZ8522).
• Plan on adding voiceovers, music, and sound effects to your video during the editing process rather than using the audio recorded by the camera in your final video production.
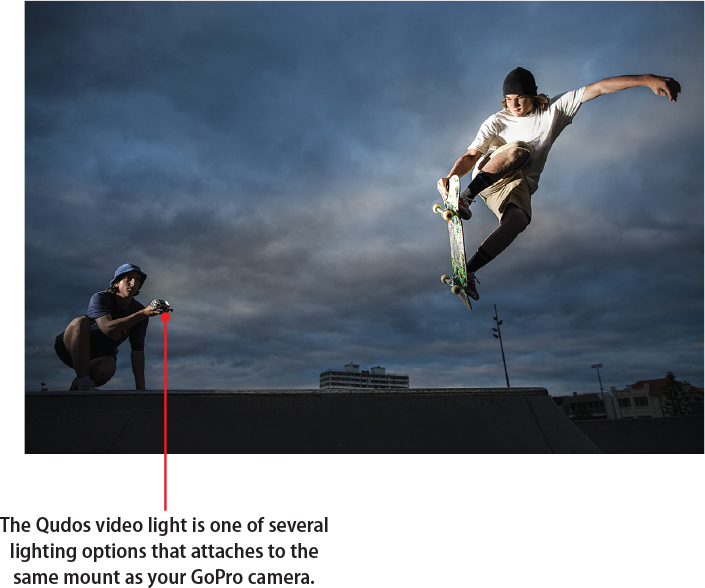
Connecting an External Microphone
Instead of relying on your GoPro camera’s built-in microphones, consider connecting the optional Pro 3.5mm Mic Adapter to the camera’s USB-C port and then plugging an external microphone (sold separately) into the adapter.
Optional and external microphones that utilize a 3.5mm plug are available from consumer electronics stores (such as Best Buy), music specialty stores (such as Guitar Center), photo/video specialty stores, and a wide range of online-based merchants, such as B&H (www.bhphotovideo.com).
External microphones vary in price from less than $25.00 to more than several hundred dollars. In addition, there are microphones designed for very specialized uses that are capable of recording audio in mono or stereo. For example, if you want to record a person talking, a lavaliere microphone (that clips onto a shirt collar or lapel) might be suitable. There are also handheld and shotgun microphones designed for recording voice, and other microphones specialize in recording music.
If you’re a musician, consider using a specialized microphone that attaches directly to your instrument. With a small amount of research, you’ll also find microphones designed to pick up and record only audio that’s within very close proximity to the microphone, and others that are extremely sensitive and will pick up and record even subtle sounds that originate from far away.
Based on what type of audio you’re trying to record in conjunction with your video, choose an appropriate microphone type, and select the highest quality microphone you can afford for that purpose. Choose a microphone designed for use with a GoPro camera that has a USB-C connector that can be plugged directly into the camera, or choose one with a 3.5mm plug that fits directly into the Pro 3.5mm Mic Adapter.
In addition to the microphones listed in the sidebar, you can use any search engine or the search field on Amazon.com or B&H websites to find many other options; use the search term GoPro microphone. Just make sure the microphone is compatible with the camera you’re using and not an older GoPro camera model.
Adding Sound Effects and Music
After you’ve recorded video and transferred it to your computer, you can use video-editing software to edit your video and incorporate professionally recorded music, sound effects, and/or voiceovers into the production. Music and sound effects can set the tone of your video (or a scene within your video), and, if used correctly, will help capture and maintain the attention of your audience.
If your video production is being created purely for personal use, you’re welcome to use any music from your digital music library (or music that you acquire) as background music within your video productions.
However, if the video will be used for professional purposes, distributed publicly, or broadcast in any way, you need written permission to use your favorite music (because it’s copyrighted) or you need to acquire royalty and/or license-free music and sound effects to use within your video productions. Keep in mind that music copyright issues also apply to videos you plan to publish on YouTube. For more information about copyright issues related to publishing video content on YouTube, visit www.youtube.com/yt/copyright.
You can acquire music from online-based music and sound effect libraries for little or no cost. The files you obtain from these libraries can be used within any video production without worry about copyright infringement or other legal issues. These music libraries offer hundreds (or thousands) of music tracks (with or without vocals), that are divided by music genre. Try checking out some of these music production libraries:
• 123RF (www.123rf.com/stock-audio/)
• Audio Library YouTube Channel (http://goo.gl/YmnOAx)
• IB Audio (www.ibaudio.com)
• Music Case (www.themusicase.com)
• Premium Beat (www.premiumbeat.com)
• Royalty Free Music (www.royaltyfreemusic.com)
• SmartSound (www.smartsound.com/royalty-free-music)
Achieving Good Lighting
All of the GoPro cameras are designed to work well in a wide range of lighting situations. However, you might encounter shooting situations where the ambient light in your shooting area is not adequate for capturing decent-quality video. In this case, using an optional, external, and continuous light source might be a viable option to enhance the visual quality of your video. This includes if you’re shooting video underwater.
Setting Your Camera’s Lighting Options
When using the Video shooting mode (at an FPS rate of 30 or higher) on the HERO5 Black, to deal with low lighting or poor lighting, turn on the Auto Low Light feature. Also use this feature if the camera will be moving between bright lighting and low lighting while continuously shooting. On the HERO Session and HERO5 Session, be sure to turn on the Spot Meter function when shooting in low or changing light situations.
Set Exposure Control (HERO5 Black)
The HERO5 Black’s Exposure Control option enables you to prioritize what area of the video frame the camera focuses for adjusting the exposure. Thus, you can manually adjust how the camera captures and utilizes existing light:
![]() From the viewfinder screen, set the HERO5 Black to Video shooting mode and adjust your Resolution, FPS, FOV, and other related settings as you deem appropriate (not shown).
From the viewfinder screen, set the HERO5 Black to Video shooting mode and adjust your Resolution, FPS, FOV, and other related settings as you deem appropriate (not shown).
![]() Press and hold your finger near the center of the touchscreen. The frame outline shrinks to a small square in the center of the screen.
Press and hold your finger near the center of the touchscreen. The frame outline shrinks to a small square in the center of the screen.

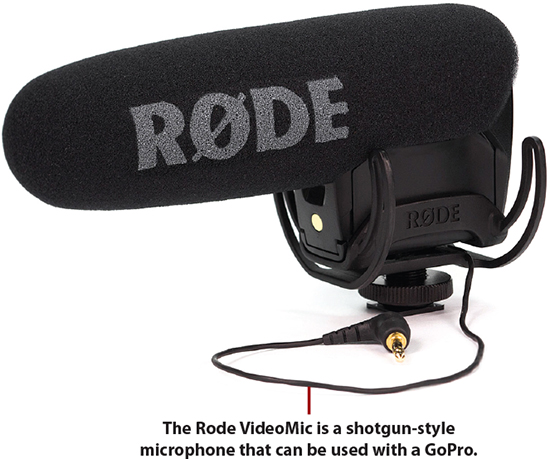
![]() Drag this smaller square to the area of the frame you want the camera to focus on, such as directly over your intended subject. Alternatively, tap the viewfinder screen at the appropriate location to move the square. The exposure square repositions and you see the Auto Exposure option at the bottom of the screen.
Drag this smaller square to the area of the frame you want the camera to focus on, such as directly over your intended subject. Alternatively, tap the viewfinder screen at the appropriate location to move the square. The exposure square repositions and you see the Auto Exposure option at the bottom of the screen.
![]() Tap the check mark to save the new Exposure Control setting.
Tap the check mark to save the new Exposure Control setting.
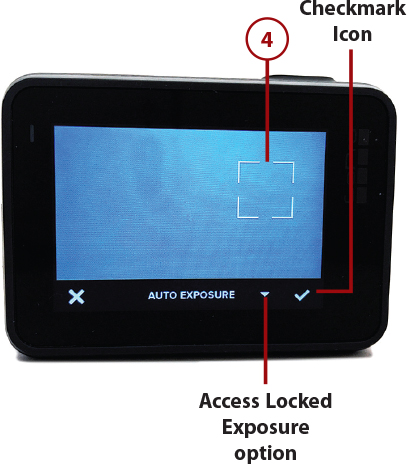
Activate Exposure Control with Locked Exposure
If you’ve positioned the small Exposure Square on your subject and that subject will be moving around within the frame but you want the camera to keep adjusting the exposure based on your subject, tap the downward-pointing arrow to the left of the check mark and then select the Locked Exposure option. A lock icon displays within the Exposure Square.
![]() You’re now ready to begin filming, or continue filming, video using this new Exposure Control setting. The viewfinder screen is once again displayed, but the Exposure square remains in the position you set it.
You’re now ready to begin filming, or continue filming, video using this new Exposure Control setting. The viewfinder screen is once again displayed, but the Exposure square remains in the position you set it.
Keep Watching the Viewfinder Screen
Any time you adjust the Exposure Control setting, you can immediately see the effect of the change on the viewfinder screen of the camera, as well as on the viewfinder screen of the Capture mobile app (if applicable).
Using External Lighting Options
Because your GoPro camera has technology built into it that allows you to shoot quality photos or video in low-light situations, you’ll probably find that whatever light does exist in your intended shooting situation will work. For certain situations, however, additional lighting might be necessary to achieve the high-quality video you want or need for a project. For example, scuba divers who shoot video at depths below 15 feet often use a battery-powered and waterproof external light source with their GoPro cameras.
TecDiveGear.com (www.tecdivegear.com) offers several custom GoPro lighting solutions for scuba divers, including the 6400 Lumen Scuba GoPro Camera Video Lights Set ($799.00) and the Flex 6400 Lumen Underwater GoPro Video Lighting Set ($799.00), which includes two battery-powered lights and a proprietary camera/lighting mount. The difference between these two lighting solutions is that the second “flex” edition uses flexible and adjustable arms to connect the lights to the proprietary camera/lighting mount.
In general, there are several additional things to be careful of when you add artificial light to a shooting situation:
• Adding unwanted shadows to what you’re shooting, including onto your subject(s).
• Drowning out the natural colors in a setting by using harsh, bright white lights.
• Overexposing your video by shedding too much light onto your subjects, so they look washed out.
• Capturing inconsistent lighting within your video if you (the photographer) or your subjects are moving around while you’re shooting.
• Too much light shines directly into the camera’s lens while shooting. If you’ll be using artificial light, make sure it shines as evenly as possible onto your subject but does not shine directly into the camera’s lens.
Depending on what type of artificial lighting you opt to use, many of these obstacles can be overcome, but you need to be aware of them and then address them during the shooting process. For example, if you start seeing unwanted shadows in your shots, move the position of the lights, change your shooting angle or perspective, or instruct your subject(s) to move into better lighting.
If you notice the natural colors in your shooting area as being drowned out, try using a less bright light or move the lights farther away from your subject(s). This strategy can also help you prevent overexposing your video with too much light.
Choosing the Best Continuous Lighting Solution for Your Shooting Situation
When shooting video in low light, if you opt to add artificial light to the shooting situation, you need to choose a continuous light source that’s appropriate. There are small, battery-powered LED lights that can be attached to a GoPro mount to light a small radius directly in front of your camera. These small lighting solutions are relatively inexpensive (between $50.00 and $200.00) and offer portability and mobility while you’re shooting. To find them, use the search phrase GoPro light within any Internet search engine, or while visiting a site such as Amazon.com, B&H (www.bhphotovideo.com), Adorama (www.adorama.com), or eBay.com.
The Qudos Action Video Light for GoPro by Knog (www.knog.com.au/qudosaction.html) is priced between $99.95 and $119.00. You can use it on land or underwater to shed up to 400 lumens of light onto your subjects while filming. This small, battery-powered light also comes with a proprietary mount that accommodates a GoPro camera and the light. One version of the light serves as a targeted spotlight, and the more expensive version serves as a targeted spotlight, floodlight, or adjustable ambient light. The light’s internal battery lasts for about four hours of continuous use.

Another versatile, small, waterproof, mountable, and battery-powered lighting solution is the Lume Cube Video Light for GoPro ($79.99 each, www.lumecube.com), which was designed by independent inventors and funded via Kickstarter.com. Each light generates 1,500 lumens of light per 1.5-inch light cube, and you can use multiple light cubes in any given shooting situation. The $179.99 Lume Cube Kit for GoPro includes two cube lights and a proprietary GoPro mount that holds the camera and the lights.
These tiny light cubes can also be placed exactly where they’re needed, and the intensity of the lights can be remotely controlled via a smartphone or tablet while you’re shooting video with the GoPro.
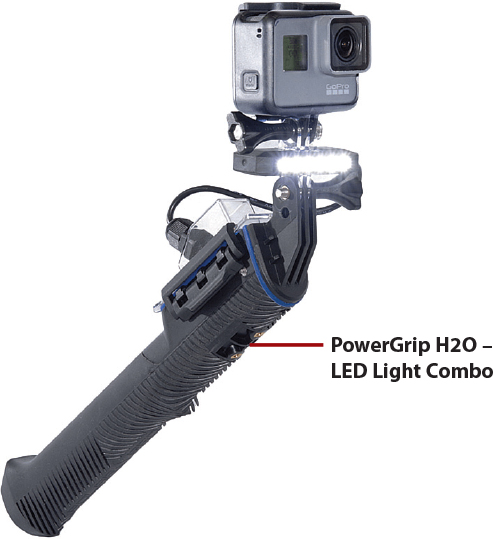
The PowerGrip H20 & 500 Lumen LED Light Combo from PolarPro ($149.99, www.polarprofilters.com) serves as a camera handle for any of the GoPro cameras, but it also has a built-in, 500 lumen LED light panel that can add continuous light to a scene for up to 3.5 hours of continuous use.
In addition to being waterproof to a depth of 99 feet, this camera handle contains a built-in rechargeable battery that keeps the GoPro camera powered for up to 12 hours of continuous shooting (or recharges the camera’s battery up to six times). Plus, the PowerGrip H2O – LED Light Combo has a built-in extension pole that expands to 22 or 33 inches, and there’s a tripod mount at the bottom of the handle, so it can be attached to any tripod for added versatility.
There are also larger and more powerful lighting solutions that require their own stands (and that typically need to be plugged into an electrical outlet). You can place this style of lighting within and around your shooting area. These more advanced and costly lighting kits and solutions are sold by photo and video specialty stores and online merchants (including B&H and Adorama). Here are some examples:
• Barndoor Lighting Outfitters (www.filmandvideolighting.com/litepanelsled.html)
• Celibex (www.celibex.com/Video-Lighting-Kits/shop-html)
• VideoLighting.com (http://videolighting.com)
• Genaray (www.genaray.com)