03. Getting Started with Your HERO5 Session or HERO Session
In this chapter, you learn about the GoPro HERO5 Session and lower-end HERO Session cameras. Topics include the following:
![]() What’s included with the HERO Session and HERO5 Session cameras
What’s included with the HERO Session and HERO5 Session cameras
![]() An overview of the camera’s buttons and ports
An overview of the camera’s buttons and ports
![]() Ways to control the camera remotely
Ways to control the camera remotely
![]() How to get started using one of these cameras
How to get started using one of these cameras
The GoPro HERO Session camera is designed for entry-level photographers and videographers who want to be able to capture their activities from a first- or third-person perspective by wearing the camera or attaching it to their gear.
This cube-shaped camera offers some impressive features and functionality packed into a tiny housing, but it’s limited in terms of the resolution and field of view (FOV) options it offers for shooting photos, and the resolution, FOV, and frames per second (FPS) options it offers when shooting video.
The HERO Session also lacks the ability to accept voice commands, doesn’t offer video stabilization, and isn’t enabled with an auto-upload feature that works nicely with the GoPro Plus online service.
By spending just $100.00, you can get (and probably be happier with) the GoPro HERO5 Session. From the outside, these two cameras look almost identical, but the HERO5 Session offers higher shooting resolutions, more customizable camera settings, the voice command feature, video stabilization, and full compatibility with the GoPro Plus online service.
Pros and Cons of the HERO Session and HERO5 Session
When compared to the HERO5 Black camera, GoPro’s most advanced camera to date, the less-expensive HERO Session and HERO5 Session cameras lack certain highly useful features, but offer some benefits as well.
Pros
The following are some of the benefits to shooting with the HERO Session or HERO5 Session cameras:
• Both of these cube-shaped cameras are waterproof (up to 33 feet), shock proof, temperature resistant, and can be used in a wide range of indoor and outdoor settings.
• Thanks to the smaller size and lighter weight of these cameras, they can more comfortably be worn on clothing or equipment, without getting in the way.
• The camera’s body features just two buttons—the Shutter button and the Menu button—so it can easily be turned on and activated.
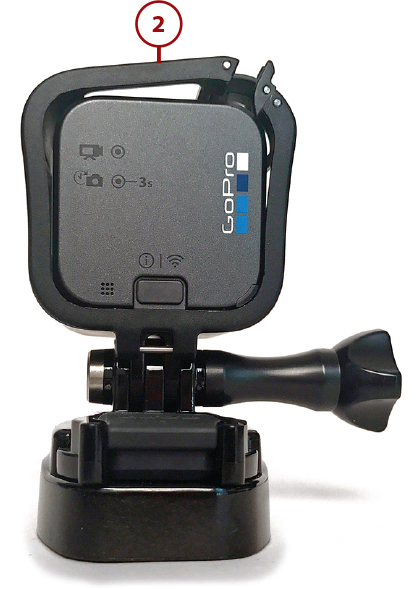
• Both cameras come with the Frame housing.
• Many optional mounts and accessories are available, providing versatility in a wide range of shooting situations.
• Due to their compact size, either of these cameras can be mounted in very tight spaces, or in places that not even the HERO5 Black could fit. It’s also easier to shoot covertly (undetected) using one of these smaller size cameras.
Cons
The following are some of the potential drawbacks to shooting with the HERO Session or HERO5 Session cameras:
• Neither of these cameras has a built-in touchscreen display/viewfinder, so the only way to see what you’re shooting is to wirelessly link the camera with a smartphone, tablet, or smartwatch that’s running the GoPro Capture app.
• The camera’s status screen is very small, providing only the most basic information about what the camera is doing at any given time. Users need to rely more on the LED status lights, as well as information displayed on the status screen of the Smart Remote, or the mobile device’s screen when the camera is wirelessly linked with a Smart Remote, smartphone, tablet, or smartwatch.
• These cameras have one built-in rechargeable battery that’s not interchangeable. When the battery is depleted, the camera is nonfunctional until it has been plugged into a power source and recharged.
• Although it’s possible to upgrade the camera’s operating system (Camera Software) periodically as GoPro releases updates, from a hardware standpoint, it is not possible to upgrade the camera itself. So, if you purchase the HERO Session but later want the features and functionality that are built into the HERO5 Session, you’ll need to buy a whole new camera.
What Comes with the HERO Session and HERO5 Session
With the exception of a microSD memory card, as well as optional mounts and accessories, just about everything you need to get started shooting photos or video content with the HERO Session or HERO5 Session comes with the camera.
Here’s a summary of what’s included:
• The GoPro HERO Session or HERO5 Session camera with a built-in (non-interchangeable) battery
• A USB cable used for connecting the camera to a computer and/or a charger
• The Frame housing
• A mounting buckle that works with some of the optional mounts
• One flat-surface adhesive mount
Depending on what and where you’ll be shooting, you’ll probably find it advantageous to use a variety of different mounts and accessories. For example, when shooting video, some type of mount, an external microphone, and/or optional lighting might be necessary to achieve the professional results you desire. How and when to use these optional mounts and accessories are covered in later chapters.
In addition to the camera’s two-button design that allows you to take photos or begin shooting video with the touch of a single button (after you’ve selected the camera’s shooting mode and related settings), there are a variety of ways to remotely control the camera.
What and where you’re shooting affects the best way to control the camera. In addition to using the controls built into the camera, your additional options for controlling the camera include using
• Voice commands (with or without the optional Remo accessory, which extends the distance you can be from your camera when issuing voice commands to up to 33 feet). Remember, this feature is not offered within the HERO Session.
• The optional GoPro Smart Remote.
• The Capture mobile app running on your smartphone, tablet, or smartwatch (after establishing a wireless connection between the camera and the mobile device).
Turning On or Off Your Camera
As long at the battery has at least some power remaining, you turn on the camera and access the status screen by pressing the Menu button for one to two seconds.
You can then press the Shutter button to activate the default shooting mode or press the Menu button to scroll through the camera’s menu options and adjust the shooting mode and/or related settings.
To turn off the camera, make sure the camera is not shooting video and then simply leave it alone. It turns itself off after a predetermined amount of time, which you can adjust from the Settings menu. Alternatively, with the Voice Command feature turned on, simply say, “GoPro Power Off,” if you’re using the HERO5 Session.
When the camera is powered off, you can turn it on and immediately begin filming using the default video shooting mode (Video, Video+Photo, or Looping) by using the camera’s QUIKCapture feature. Each of these shooting modes, and how to use them, is explained later in this book.
Overview of the Camera’s Body
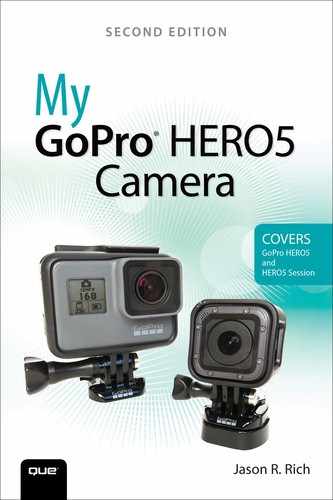
Unlike all of the other GoPro cameras, including the HERO5 Black, both the HERO Session and HERO5 Session feature a compact, cube-shaped design. This section helps you quickly get acquainted with the layout of the camera and explains where the various buttons, ports, and features are located, as well as what they’re used for.
The Front of the Camera
Almost the entire front side of the HERO Session and HERO5 Session is occupied by the fixed, wide-angle lens that makes these cameras so versatile. Located in the upper-right corner (when the lens is facing you), is one of the camera’s LED status lights, and in the upper-left corner is one of the camera’s two built-in microphones.
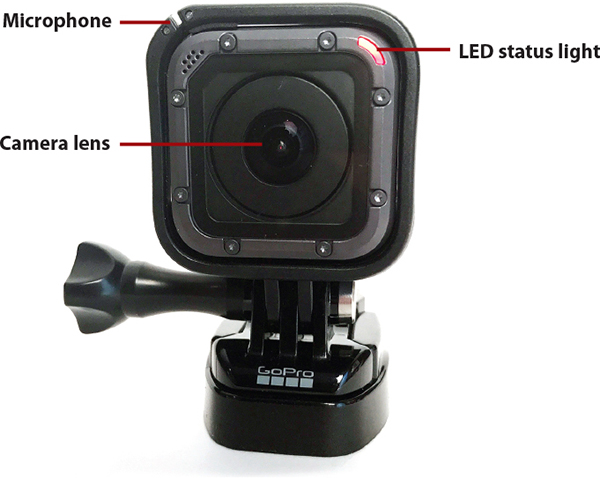
Before you start shooting with the camera, use a microfiber lens cleaning cloth to wipe off the front of the lens. Make sure no fingerprints, smudges, dirt, or water drops (shown) are on the lens. These unwanted materials may be hard to see on the lens, but they will ruin your shots if the lens is not clean when you shoot photos or video.
The Back of the Camera
On the opposite side of the camera from the lens is the back of the camera. Located in the bottom-right corner (when the camera’s lens is facing directly away from you) is a second LED status light. Also on the back of the camera, near the bottom center, is the Menu button. To the left of the menu button is a built-in speaker.

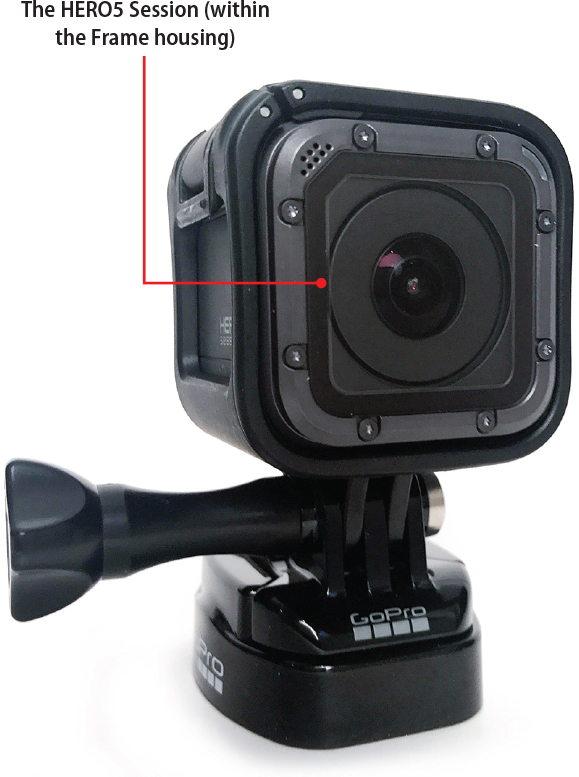
The Top of the Camera
Located on the top of the camera is the Shutter button and the status screen. The Shutter button is used to snap photos, or to start/stop shooting video. You also use it in conjunction with the Menu button to adjust the camera’s settings.
The status screen on these cameras is much smaller than the one on the HERO5 Black, for example, but it still uses a combination of text, numbers, and icons to inform you of which camera features and functions are activated. Other details pertaining to how the camera is currently being used are also displayed.
When the camera is turned on, the status screen displays information about how much memory remains on the installed microSD memory card, based on how the camera is being used. Because this display is backlit, you can easily read it in almost any lighting situation.
From the icons you can easily determine which shooting mode is active. For example, you see a camera icon when the Photo mode is selected or a movie camera icon when the Video mode is selected.
Located just below the shooting mode icon are abbreviations for the camera’s current settings. For example, if you’ve set the camera to Video mode and have chosen to film at 1080p resolution, at 30 FPS, using the Wide FOV, near the bottom of the Status Screen, you see “1080 30 W” displayed.
If you’re using Video Stabilization, Protune, and/or Spot Meter (which you’ll learn about in later chapters), tiny icons for these features are displayed. In the upper-right corner of the display, an icon representing the battery status is shown; to the immediate left is an icon for Wireless mode, which displays only when the mode is turned on.
At the bottom-right corner of the screen is the Voice Command icon. When this feature is turned on, the icon looks like it’s speaking. When the feature is off, there’s an X near the icon’s mouth.

The Bottom of the Camera
The bottom of the HERO Session and HERO5 Session contains no buttons, ports, or access to any features or functions. However, when the camera is enclosed within a housing, there’s a mounting buckle on the bottom, which enables the housing to be securely connected to almost any GoPro-compatible mount. Behind the mounting buckle is the tether bar, to which you can attach a camera tether (sold separately).
Remove the Camera from the Frame Housing
When you purchase the HERO Session or HERO5 Session, it’s already securely housed within the Frame housing that comes with the camera. Follow these steps to remove the camera from the housing:
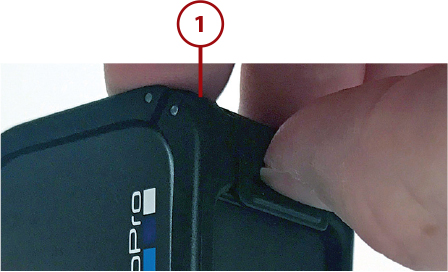
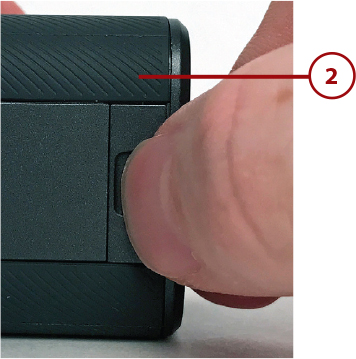
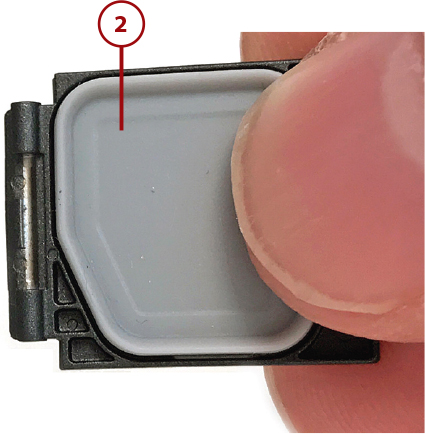
![]() With the front of the camera facing away from you, place your finger on the Frame housing’s latch, which is located on the right side of the housing, and pull the latch up.
With the front of the camera facing away from you, place your finger on the Frame housing’s latch, which is located on the right side of the housing, and pull the latch up.
![]() The Frame housing loosens around the camera.
The Frame housing loosens around the camera.
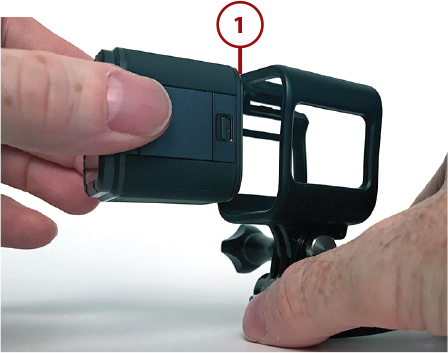
![]() Gently push the camera forward to remove it from the housing. Be prepared to catch the camera with your hand while holding the mount, so the camera doesn’t accidently drop as it becomes free from the housing.
Gently push the camera forward to remove it from the housing. Be prepared to catch the camera with your hand while holding the mount, so the camera doesn’t accidently drop as it becomes free from the housing.
Inserting the Camera into the Frame Housing
![]() Place the back end of the camera into the front of the Frame housing, and gently slide the camera into the frame.
Place the back end of the camera into the front of the Frame housing, and gently slide the camera into the frame.
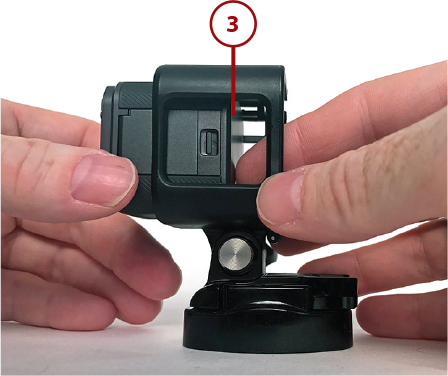
![]() When the back of the camera reaches the back of the housing, use your thumb and index finger on one hand to press the left and right sides of the housing together.
When the back of the camera reaches the back of the housing, use your thumb and index finger on one hand to press the left and right sides of the housing together.

![]() Close the latch on the top of the housing by pushing it down. It snaps into place.
Close the latch on the top of the housing by pushing it down. It snaps into place.
The Right and Left Sides of the Camera
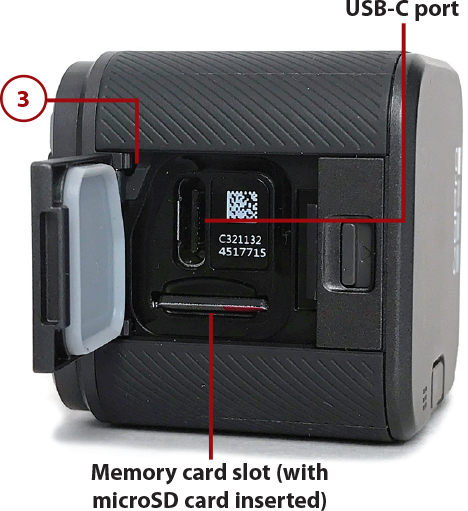
The right side of the camera (when the front is pointing away from you) has no ports or buttons. The left side of the camera, however, contains the port compartment door, which includes access to the camera’s microSD memory card slot and a USB-C port.
You can open the port compartment door only when the camera is not enclosed within a housing. However, you can remove the door from the camera altogether, so you have access to the microSD memory card slot and the USB-C port while the camera is within the Frame housing and is being used to film.
Removing the door and placing the camera within the Frame housing is necessary if you plan to film video and connect an external microphone to the camera using the optional Pro 3.5mm Mic Adapter cable. It’s also necessary to remove the door if you want to connect the camera to a GoPro Karma drone (which is covered in online Chapter 18, “Taking Flight with the GoPro Karma Drone”).
Inserting a microSD Memory Card
Prior to using the HERO Session or HERO5 Session for the first time, you need to install a microSD memory card into the memory card slot of the camera. More information on selecting a memory card and inserting it properly into the camera is in Chapter 6.
Opening the Port Compartment Door
To open the port compartment door of the HERO Session or HERO5 Session camera, follow these steps:
![]() Remove the camera from the Frame housing as described earlier in this chapter.
Remove the camera from the Frame housing as described earlier in this chapter.

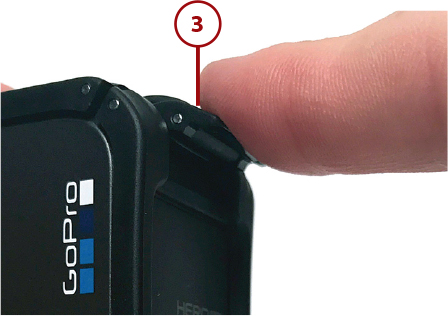
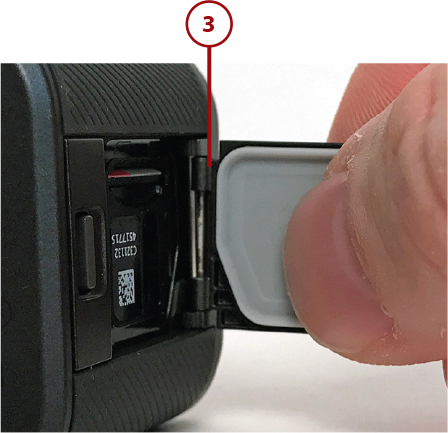
![]() Hold the camera sideways so the lens is pointing to the left, and pull the door’s release latch gently to the right using your finger. The latch pops open.
Hold the camera sideways so the lens is pointing to the left, and pull the door’s release latch gently to the right using your finger. The latch pops open.
![]() Use your finger to open the door wider in order to access the USB-C port or the microSD memory card slot.
Use your finger to open the door wider in order to access the USB-C port or the microSD memory card slot.
Closing the Door
When pushing the port compartment door closed, make sure it locks into place. You should hear a click, and the door’s latch should not show any red. The port compartment door must be closed and locked in position for your camera and memory card to be fully protected.
Removing and Reattaching the Port Compartment Door
Once the latch is open, position it straight up, at a 90-degree angle from the side of the camera.
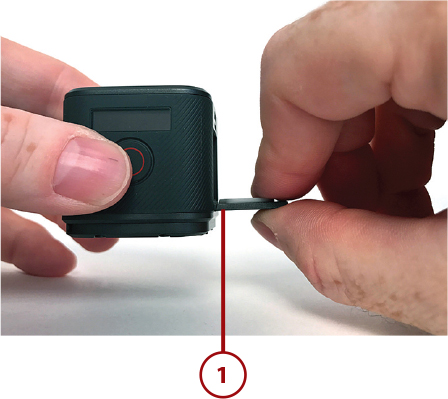
![]() Use your thumb and index finger to pull the door straight out. The door will snap away from the camera with minimal force. Always pull the port compartment door off, or push it back into position, from a 90-degree angle from the camera.
Use your thumb and index finger to pull the door straight out. The door will snap away from the camera with minimal force. Always pull the port compartment door off, or push it back into position, from a 90-degree angle from the camera.
![]() Place the loose door somewhere it will not get lost.
Place the loose door somewhere it will not get lost.
In Case of Emergency
If you break or lose the port compartment door, you can get replacement doors from the GoPro website for $19.99 (http://shop.gopro.com/accessories-2/replacement-door-hero5-session/AMIOD-001.html).
![]() Reattach the door by holding it at a 90-degree angle from the camera. Line up the door hinge with the hinge built into the camera, and push the door gently in until it clicks into place. You can then close and lock the door.
Reattach the door by holding it at a 90-degree angle from the camera. Line up the door hinge with the hinge built into the camera, and push the door gently in until it clicks into place. You can then close and lock the door.
Setting Up the Camera for the First Time
Each time you begin using your HERO Session or HERO5 Session camera, regardless of the shooting situation, you need to properly prepare the camera, but the first time you turn on the camera to begin using it, you have to take a few extra steps to properly set it up.
Remove the camera from its packaging and then remove the camera from the Frame housing. (See the task earlier in this chapter for instructions.) Next, open the port compartment door on the bottom of the camera and insert a microSD memory card (sold separately) into the camera.
The camera’s built-in rechargeable battery might be partially charged, but you probably want to fully charge it before using the camera for the first time. See Chapter 7, “Keeping Your Batteries Charged,” for information on ways to charge the camera’s battery.
When you turn on the camera for the first time, you need to adjust a handful of settings, which you can do directly from the camera. Follow the prompts that are displayed on the status screen, and use the Menu and Shutter buttons to browse through menus and make your selections.
Set Up the Camera
1. Select your primary language by pressing the Shutter button to scroll through your options and pressing the Menu button to select the desired option.
2. If you have not already done so, insert a microSD memory card into the camera when prompted.
3. When the camera’s main display shows the default Video mode, the battery status indicator, and details about the remaining microSD memory card status, you’re ready to further adjust the camera’s settings by pressing the Menu button repeatedly until you see the Camera Settings option. Press the Shutter button to select this menu.
4. Go through each menu option and choose the setting that’s relevant to how you’ll be using the camera. What options are available vary based on which version of the camera operating system your camera is running and which camera you’re using (the HERO Session or the HERO5 Session). Some of the settings include Date and Time, Video Format, Auto-Rotation, Beeps, LEDs (status lights), Voice Control Language (HERO5 Session only), and Delete.
Summary of Settings Options
Adjust Settings Remotely
Using Voice Commands
You can set up your HERO5 Session (not the HERO Session) camera to listen for voice commands, which allows you to speak directly to your camera and have it respond to the command you’ve issued. For this to work, you can’t be in an overly noisy or windy environment, and you must be within close proximity to the camera.
However, if you purchase the optional and waterproof Remo accessory ($79.99), which you can clip onto your clothing or wear like a watch (using the supplied wristband), you can issue voice commands to your camera when you’re within 33 feet of it.
Turn on Voice Control
1. Turn on the camera and press the Menu button repeatedly until the Start Voice Control option is displayed, and then press the Shutter button.
2. Select a language for this option.
3. Select the Turn On Voice Control option.
4. The Voice Control icon (located in the bottom-right corner of the display on the status screen) indicates the feature is turned on. (Refer to the figure in the “The Top of the Camera” section earlier in this chapter.) Your camera is now “listening” for appropriate commands.
Learn to Speak GoPro
Viewing or Playing Back Your Content
Neither the HERO Session or HERO5 Session has a built-in screen that allows you to view the photos or videos that you’ve shot. As a result, to play back your content, you need to use one of the following options:
• Wirelessly link your camera with the Capture or QUIK mobile app that’s running on your smartphone or tablet and then use your mobile device’s screen to view or play back your content.
• Use the optional Micro HDMI Cable to connect the camera to an HD television set or monitor.
• Use the supplied USB cable to link your camera to your PC or Mac computer and transfer your photo or video content from the camera’s microSD memory card to your computer. Use software on your computer to view or play back your content. See Chapter 14, “Discovering the GoPro QUIK Desktop Software,” for more information.
• If you’re using the HERO5 Session, auto-upload your content to the GoPro Plus online service and then access it from any of your computers or mobile devices. (See Chapter 16 for more information.)
Updating the Camera’s Operating System
When you purchase a new GoPro camera, the operating system that controls the camera and its operation comes preinstalled. However, GoPro periodically updates this operating system to fine-tune the features and functions your camera offers. Eventually you’ll have to update the operating system.
GoPro refers to this operating system software as the Camera Software. There are three ways to update the Camera Software: via the Capture mobile app, using the QUIK Desktop software on your PC or Mac, or manually (after downloading the updated software to a microSD memory card that you insert into your camera). Read the “Updating Your Camera’s Operating System” section in Chapter 2 for more details about these methods.
Doing a Manual Update
When using the manual option, follow the directions offered on one of these two GoPro web pages:
• GoPro HERO Session Camera Software Update Page at https://gopro.com/update/hero_session
• GoPro HERO5 Session Camera Software Update Page at https://gopro.com/update/hero5_session