11. Shooting HD Video
This chapter covers what you need to know about your GoPro camera’s video shooting modes, resolutions, features, and functions. Topics to be covered include:
![]() Choosing the Video, Video+Photo, Looping, and Time Lapse Video shooting modes built into the HERO5 Black and HERO5 Session, and the Video and Looping shooting modes offered by the HERO Session
Choosing the Video, Video+Photo, Looping, and Time Lapse Video shooting modes built into the HERO5 Black and HERO5 Session, and the Video and Looping shooting modes offered by the HERO Session
![]() Determining the best video resolution to shoot with based on your situation or needs
Determining the best video resolution to shoot with based on your situation or needs
![]() Navigating through the video-related menus using the camera’s controls
Navigating through the video-related menus using the camera’s controls
If you want to shoot HD video in traditional shooting situations, there are literally thousands of video cameras to choose from. In fact, your smartphone or tablet probably has a decent quality HD video camera built in.
However, if you want to capture stunning, clear, and extremely high-quality video in and around water, snow, or other harsh conditions; capture first-person shots by mounting the camera onto yourself or your equipment; or mount the camera in a tight space and at a specific angle to capture your subject perfectly, these are the situations where your GoPro camera is designed to truly excel.
Especially when shooting with the HERO5 Black or HERO5 Session, your camera is chock full of video-related features and functions, and it gives you plenty of options for shooting resolution, frames per second (FPS), and field of view (FOV) combinations.
When you use a mount that’s best suited for your shooting situation, you quickly discover that what’s possible using your GoPro camera is limited only by your imagination and not by the technology built into the camera or its design.
The Skill and Art of Videography
As stated in other chapters of this book, digital photography and videography are both skills and art forms. This chapter focuses on helping you understand how to use each camera’s shooting modes that relate to shooting video, as well as the options related to them. In other words, the focus is on the skill aspect of videography using your GoPro camera.
Because shooting video typically also requires you to record audio, and lighting is an essential element of good quality video, the focus of Chapter 12, “Capturing Sound and Using Artificial Light,” is on these two important aspects of videography.
Chapter 13, “Strategies for Shooting Awesome HD Video,” then shows you how to put this knowledge to work, and incorporate your own creativity, as well as proven video-shooting strategies, to help you consistently shoot the highest-quality and most visually interesting videos possible using the GoPro camera and related equipment that’s at your disposal. In other words, the next chapter is all about the art of shooting video.
After you capture your raw video footage, you need to edit it using the free GoPro QUIK Desktop software for the PC or Mac (see Chapter 14), or you can use any third-party video-editing software on your computer or mobile device.
When you’re planning your video shots and ultimately shooting video, keep in mind that you’ll most likely be editing the raw footage before you show it off to other people, so your ultimate goal should be to quickly set the scene and tell some type of story and/or illicit some type of emotion from your viewers. Especially if you’ll be sharing your videos online, it’s a good idea to keep them short, meaning you need to edit together your best footage in a way that makes sense and is entertaining to the people watching.
Comparison of GoPro Camera Models for Shooting Video
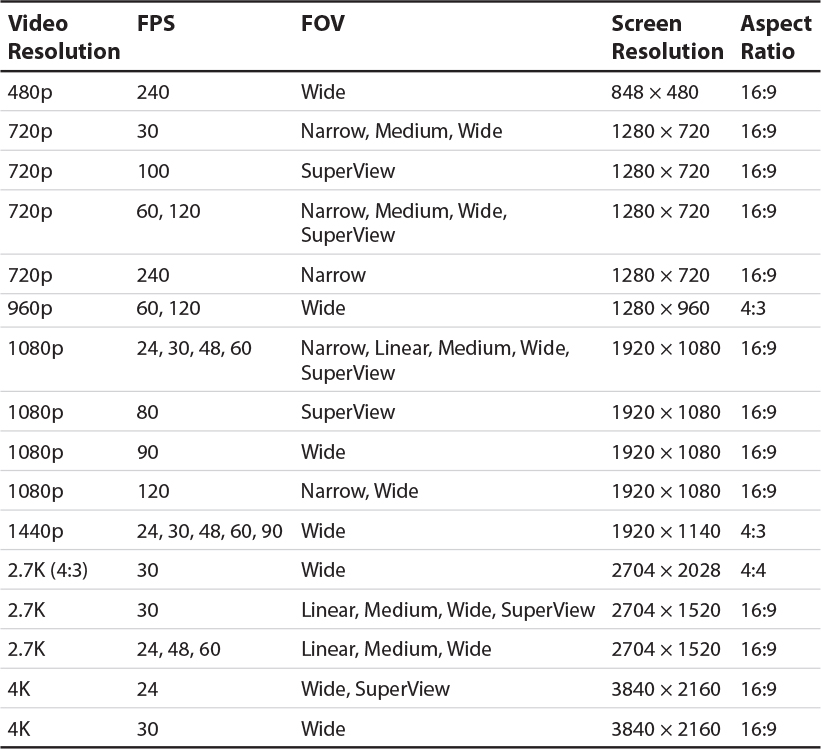
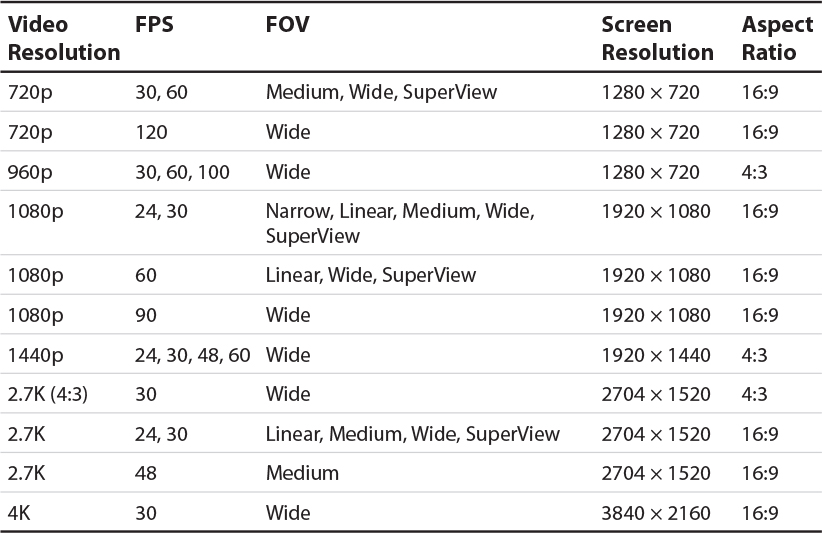
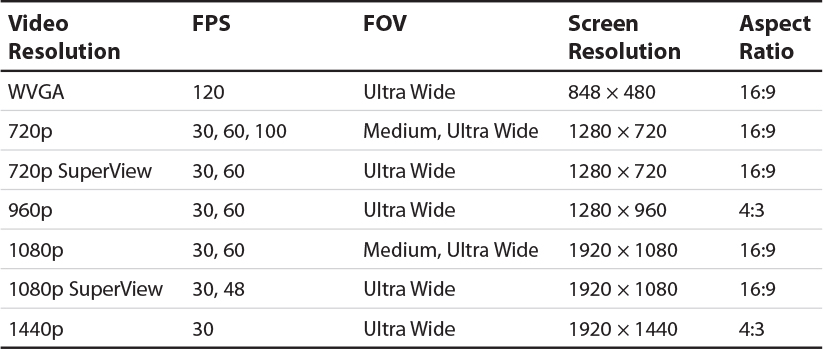
Each GoPro camera model offers a different selection of video features and functions and is capable of shooting at a variety of different resolutions. Because the top-of-the-line HERO5 Black includes all of the video features and functions to be covered in this chapter, this is the camera model that I primarily discuss. Tables 11.1 through 11.3 describe the shooting resolutions, FOV, and FPS options available for the HERO5 Black, HERO5 Session, and HERO Session, respectively.
The GoPro HERO5 Black’s Shooting Modes
The HERO5 Black offers four video-shooting modes—Video, Video + Photo, Looping, and Time Lapse Video—each of which is useful for specific types of shooting situations. You will find, however, that you’ll use the Video shooting mode the majority of the time.
When adjusting video settings, three of the more important decisions you’ll make, based on your shooting situation, as well as your own creativity and what you’re trying to achieve, will be about the most appropriate shooting resolution, FPS rate, and FOV.
The Video shooting mode allows you to activate and adjust a series of advanced features, including Protune, Video Stabilization, Auto Low Light, and Manual Audio Control. The Protune feature offers a selection of user-adjustable settings, which are explained later in this chapter.
Don’t Forget to Set Your Camera’s Default Shooting Mode
Video Shooting Mode
This shooting mode allows you to capture HD video, complete with audio. Whether you’re holding the camera, have it mounted on yourself or your equipment, or you position it using a mount, extension pole, stabilizer, or tripod, when you press the Shutter button, the camera begins recording and continues until you press the Shutter button a second time.
When you press the Shutter button, the camera beeps once to let you know recording has started. As you’re recording, the red status lights on the camera flash, indicating that recording is underway. When you press the Shutter button to stop recording, the camera beeps three times to indicate recording has stopped.
Following are the options you can adjust before you begin recording:
• Resolution—The available Resolution options vary based on the camera you’re using. As you saw in Table 11.1, the most comprehensive selection of Resolution options is offered by the HERO5 Black camera.
• Frames Per Second (FPS)—The FPS options are dependent on your choice of resolution.
• Field of View (FOV)—FOV is also based on which resolution and FPS options you select. FOV determines how much you’ll take advantage of the camera’s fixed wide angle lens, and how much of what’s in front of and to the sides of the camera’s lens will be caught in the frame and recorded.
• Auto Low Light—When turned on, the camera automatically compensates for low light or changing light as you’re shooting video. This is a useful feature to use when shooting in the evening or at night or when you’re indoors and minimal lighting is available. It also works well when the camera is moving between well lit and poorly lit areas while shooting video.
• Protune—When turned on, this option allows you to manually adjust specific camera settings that are otherwise controlled automatically by the camera. Protune-related options for video include Color, White Balance, ISO Limit, Shutter, EV Comp, Sharpness, and Audio. When you turn on the Protune feature, the Protune submenu is displayed. From this menu, it’s possible to adjust each setting.
Turn On and Customize the Protune and Advanced Features for Video
After you’ve set the HERO5 Black to the Video shooting mode, follow these steps to access and adjust the Protune settings:
![]() From the viewfinder screen, place your finger near the right edge of the touchscreen and swipe to the left.
From the viewfinder screen, place your finger near the right edge of the touchscreen and swipe to the left.

![]() Scroll through the advanced settings menu until you see the Protune option. If you want to adjust one of the other advanced settings, such as Video Stabilization, Auto Low Light, or Manual Audio Control, tap its menu screen to access that feature’s submenu.
Scroll through the advanced settings menu until you see the Protune option. If you want to adjust one of the other advanced settings, such as Video Stabilization, Auto Low Light, or Manual Audio Control, tap its menu screen to access that feature’s submenu.
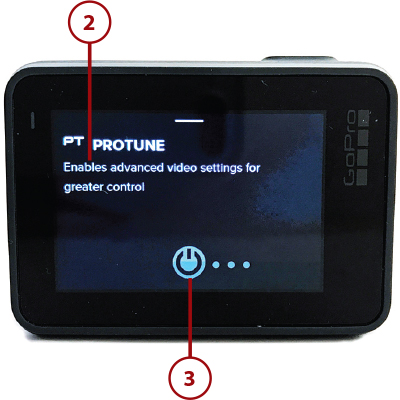
![]() Tap the Protune On/Off icon to turn on the feature.
Tap the Protune On/Off icon to turn on the feature.
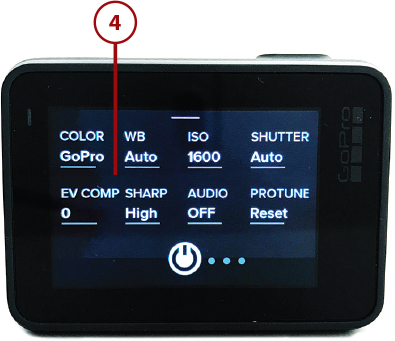
![]() From the Protune submenu screen, tap each option you want to manually adjust.
From the Protune submenu screen, tap each option you want to manually adjust.
Different Options
The Protune submenu in Video mode is slightly different than the Protune submenu for the Photo shooting mode.
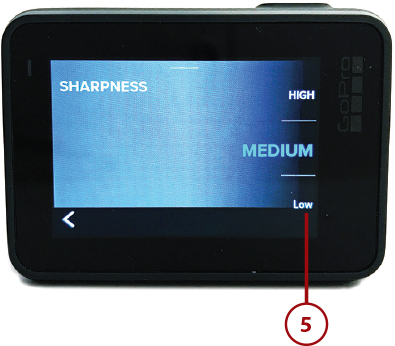
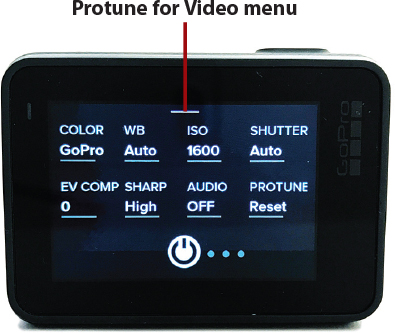
![]() Each Protune option, including Color, White Balance, ISO Limit, Shutter, EV Comp, Sharpness, and Audio, has a separate submenu screen where you can select specific settings for the option. Shown here is the Sharpness option submenu screen.
Each Protune option, including Color, White Balance, ISO Limit, Shutter, EV Comp, Sharpness, and Audio, has a separate submenu screen where you can select specific settings for the option. Shown here is the Sharpness option submenu screen.
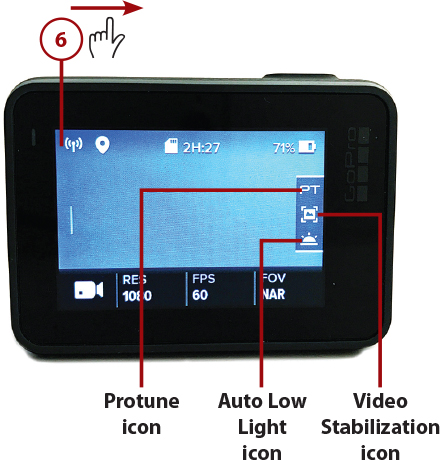
![]() Return to the viewfinder screen by placing your finger near the left edge of the touchscreen and swiping to the right. The viewfinder screen displays icons representing the Protune features you’ve activated or customized.
Return to the viewfinder screen by placing your finger near the left edge of the touchscreen and swiping to the right. The viewfinder screen displays icons representing the Protune features you’ve activated or customized.
![]() Press the Shutter button when you’re ready to begin filming (not shown).
Press the Shutter button when you’re ready to begin filming (not shown).
HERO/HERO5 Session Users
To access the Protune and other advanced video features from the HERO and HERO5 Session cameras, you need to use the Smart Remote or wirelessly link your camera with your smartphone or tablet and use the Capture mobile app. You can’t access or adjust the Protune options directly from the camera.
Video+Photo Shooting Mode
This shooting mode allows you to shoot HD video and simultaneously take digital images at a predetermined resolution and time interval. After you select the Video+Photo shooting mode, you choose your video Resolution, FPS, FOV, and Interval settings. Protune is not available with this shooting mode.
The video content files are stored separately from the photo files on your camera’s memory card, although both are created at the same time.
Resolution Options
Looping Video Mode
This video option allows you to select a time interval, such as 5, 20, 60, or 120 minutes, and have the camera capture and record video during that time period. When the selected time period ends, if you press the Shutter button, the video recording is saved onto the microSD memory card and a new recording begins.
However, if you fail to press the Shutter button at the end of the time period, the recording will not be saved, and the camera begins recording again.
If you set the Max option on the Interval submenu for the Looping Video feature, the camera keeps recording HD video (using the settings you choose) until the microSD memory card reaches its capacity. At this point, you can either save the footage, or allow the camera to automatically erase the previously recorded footage and begin recording again until the camera’s memory card is filled.
With the Looping shooting mode, you can adjust the resolution, FPS, FOV, and interval, but Protune is not available. Compared to the Video shooting mode, your resolution and related settings are more limited.
The Camera Records Separate Video Files
Time Lapse Video
To access this shooting mode, you first need to choose the Time Lapse camera mode. Then, prior to shooting, you can adjust the resolution, interval, and FOV options. Protune is not available. The resolution and FOV options are more limited than what’s available for the Video shooting mode.
What’s the Difference?
Advanced Video Features
In addition to the Protune options related to video, you can choose from some other advanced video while shooting video on the HERO5 Black and HERO5 Session: Video Stabilization, Auto Low Light, and Manual Audio Control.
You should use Video Stabilization when you’re mounting the camera to something that vibrates, like a boat, car, or airplane. This feature will reduce the negative effect the vibration has on the video you shoot.
Use Auto Low Light when you’re shooting in low light situations or when you’ll be moving the camera between low light and well-lit areas while shooting video. This feature works only when you’re shooting using an FPS rate of 30 or higher.
Manual Audio Control allows you to choose which of the camera’s audio filters will be used, based on the shooting situation. Typically, the camera records audio in stereo. In windy situations, however, you can turn on a special filter to help control the negative effect wind has on your video’s audio. Manual Audio control enables you to manually turn on or off the stereo or wind filter.
The RAW Audio feature allows you to record video with sound, but save the video file and audio file separately on your camera’s memory card. Then you can use audio-editing software on your computer to enhance or edit the audio before you merge it with the video file.
The HiLight Tagging Function
One of the skills you’ll need to fine tune as you become a videographer is keeping track of what raw footage you might want to use later as you edit. In many situations, you will shoot 5, 10, or even 20 times more video footage than you’ll actually feature in your final video project.
As you’re filming, one feature that can help you keep track of awesome scenes or shots is what GoPro refers to as the HiLight tagging feature. If you want to mark a specific moment or shot so you can quickly find it later when editing, simply press the Mode button on the side of the HERO5 Black while filming.
Add HiLights When Previewing Video on the HERO5 Black’s Screen
It’s also possible to HiLight tag video as you’re previewing it on the HERO5 Black’s screen:
![]() Place your finger near the left edge of the viewfinder screen and swipe to the right to access the Gallery screen (not shown).
Place your finger near the left edge of the viewfinder screen and swipe to the right to access the Gallery screen (not shown).
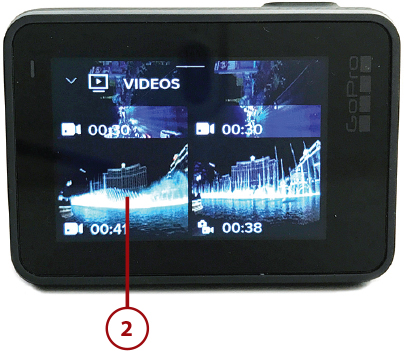
![]() Scroll through the Gallery to find the thumbnail that represents the video (or photo) you want to view, and then tap on that thumbnail.
Scroll through the Gallery to find the thumbnail that represents the video (or photo) you want to view, and then tap on that thumbnail.
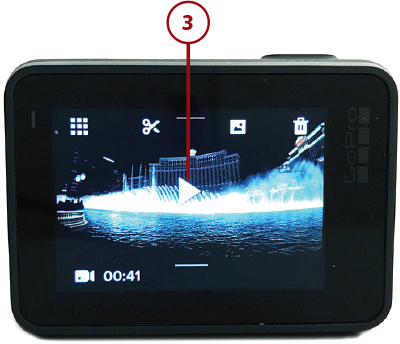
![]() Tap the Play icon to watch the video on the camera’s touchscreen.
Tap the Play icon to watch the video on the camera’s touchscreen.
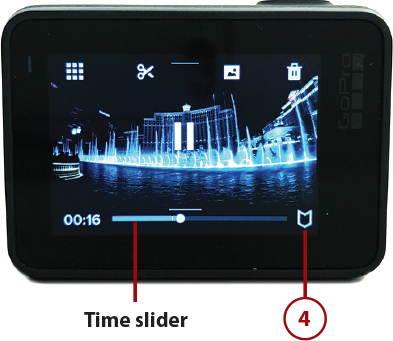
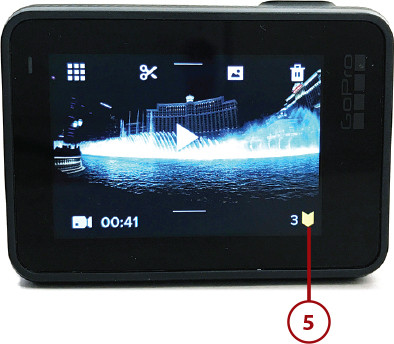
![]() As the video is playing, tap the HiLight icon to add a tag at a particular moment. A time slider is displayed along the bottom of the screen, and your tag is recorded and saved.
As the video is playing, tap the HiLight icon to add a tag at a particular moment. A time slider is displayed along the bottom of the screen, and your tag is recorded and saved.
![]() When the video clip’s playback is finished, the Play icon returns to the center of the screen. In the bottom-right corner you see how many HiLight tags have been selected and saved. Later, you’ll be able to view these tags as you’re playing back video using the QUIK app on your mobile device, or the QUIK Desktop software on your computer. The tags, however, will not become part of your final video production, which will be seen by audiences.
When the video clip’s playback is finished, the Play icon returns to the center of the screen. In the bottom-right corner you see how many HiLight tags have been selected and saved. Later, you’ll be able to view these tags as you’re playing back video using the QUIK app on your mobile device, or the QUIK Desktop software on your computer. The tags, however, will not become part of your final video production, which will be seen by audiences.
Create HiLight Tags Using the Capture App or Smart Remote
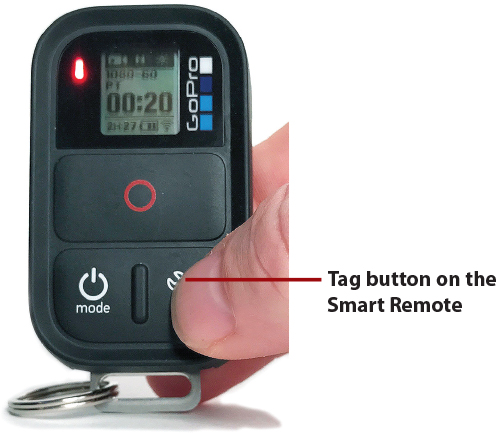
Instead of pressing the Mode button on the side of the camera while filming, you can also create HiLight tags using the Smart Remote or Capture mobile app.
When using the Smart Remote to remotely control the camera, while the camera is filming, press the Settings/Tag button on the remote control unit to add a tag to the video file as it’s being recorded.
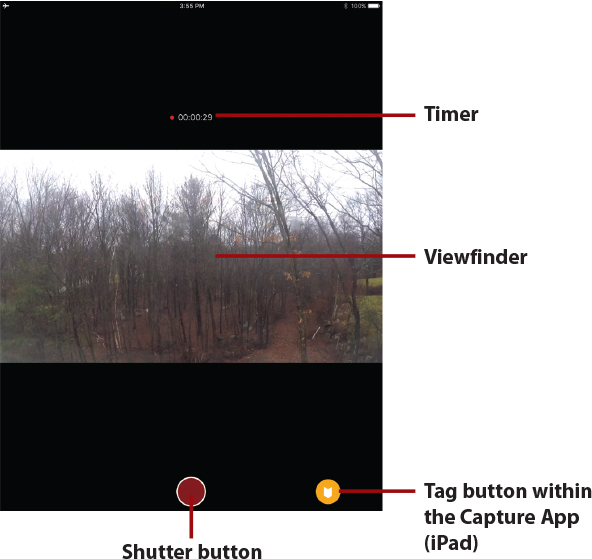
To add a HiLight tag using the Capture mobile app (shown here on an iPad), after you press the Shutter button to begin recording video, press the yellow HiLight Tag button.
Working with Protune
The Protune (PT) feature is designed for more advanced GoPro users. It allows you to have greater manual control over specific camera settings related to shooting video.
Using Protune, you can capture higher quality results because the camera uses less data compression on your raw video footage, plus it does a better job of capturing natural colors within your shots. The raw digital video footage is then more compatible with higher-end and professional-level video-editing software, which means you can take full advantage of the more advanced editing tools built into that software.
When you turn on Protune, several advanced feature options become available, and you can adjust each. Keep in mind that you can set the Protune-related settings differently for each video and photo shooting mode.
The adjustable Protune options for the Video shooting mode include
• White Balance
• Color
• ISO Limit
• Shutter
• Sharpness
• EV Comp (Exposure Value Compensation)
• Audio
When Protune is turned off, the camera automatically adjusts each of these settings on your behalf, which requires that you make fewer decisions and do less tinkering with camera settings before shooting.
Adjusting White Balance
The White Balance settings allow the camera to adjust all of the colors and tones in each video frame based on what the camera perceives to be the color white in each frame. When this option is set to Auto (the default), the camera automatically analyzes each video frame as it’s being shot and adjusts the color tone based on the conditions it senses.
You can use the White Balance submenu to manually set this feature to Auto, 3000K, 4000K, 4800K, 5500K, 6000K, 6500K, or Native. Here are some things to take into consideration when you’re adjusting the White Balance setting:
• If you’re shooting video in an area with natural warm light, such as incandescent lighting (indoors) or during a sunrise or sunset, consider selecting the 3000K White Balance option to capture more authentic colors.
• If you’re shooting in areas lit by fluorescent lighting or in average daylight, select the 5500K White Balance option.
• When you’re shooting in cool lighting (such as when outside in overcast conditions), use the 6500K White Balance option.
• If you plan to use higher-end video-editing software that offers White Balance controls when you later edit or enhance your raw footage, select the camera’s Native White Balance option when actually shooting video.
Adjusting Color
This option allows you to manually select the color profile used by the camera when shooting video. The default GoPro Color option uses the same color profile as when the Protune feature is turned off. When you select the Flat option, this allows you to more easily edit the color in your video later to showcase truly natural or authentic-looking colors within an image.
Adjusting ISO Limit
This setting is used to manage the camera’s sensitivity to light, especially when shooting in low-light situations. Based on which option you select, you can manage the brightness of your video footage, and somewhat control the unwanted graininess (or noise) captured within the footage by the camera due to poor lighting. ISO Limit options include 400, 800, 1200, 1600, 3200, or 6400.
To achieve brighter footage when shooting in low light, select the default 800 ISO Limit option. Bear in mind that at this setting, the video includes more noise (graininess), which takes away from the detail, image sharpness, and the vibrancy of colors that are depicted.
The 400 ISO Limit option results in slightly darker footage (when shooting in low light), but the video contains less noise than with the 800 ISO Limit option selected. As a result, your video showcases a bit more detail and sharpness.
If you’re shooting indoors with decent (but not bright) lighting, choose the 200 ISO Limit option. When shooting outdoors in daylight, the ISO 100 Limit option generates the least amount of noise, resulting in sharper, brighter, and more vibrant colors.
Adjusting Shutter Speed
You can determine how much of the ambient light the camera uses when shooting video by adjusting the amount of time the shutter remains open. The options available for this setting are determined by your FPS setting. Options include Auto (which allows the camera to adjust this setting automatically), as well as 1/30, 1/60, 1/120, and 1/240.
If you opt to tinker with this feature, it works best when your camera is mounted to a tripod and not moving while you shoot. Using the HERO5 Black, when you make an adjustment to the Shutter setting, you immediately see the effect of the change on the viewfinder screen.
Adjusting Sharpness
When it comes to manually adjusting Sharpness while shooting video, Protune’s Sharpness option offers three options: High (which is the default setting), Medium, and Low. Choose the High setting to achieve ultra-sharp image quality in your videos. Choose the Medium setting to capture what GoPro calls “moderately sharp” video footage, or use the Low option to capture softer video footage that showcases a bit less detail.
Adjusting EV Comp
EV Comp, which stands for Exposure Value Compensation, also affects the brightness of video as it’s being shot. If you’re shooting in areas with contrasting lighting conditions, adjusting this setting can help you capture better quality video overall. The available EV Comp options range from – 2.0 to 2.0, with the default option being 0.0.
Adjusting Audio
When the Audio setting is turned on, your camera creates separate video and audio files when video is shot. You’re then able to choose the level of processing the camera uses when recording the audio track. This level of processing relates to how much the camera attempts to remove unwanted noise (caused by things such as wind) from your audio recordings. Options include Off, Low, Medium, or High. Use this feature if you plan to use audio-editing software on your computer to enhance or edit the audio track separately from the video, before merging the audio and video together into a final video presentation.
Additional Options with the Capture Mobile App
When using the Capture mobile app to remotely control the camera (in this case, the HERO5 Session), tap the Settings icon (which looks like a wrench) to reveal a comprehensive Settings menu for the camera. This menu includes the options that are available directly through the camera as well as some additional advanced settings, such as Spot Meter.
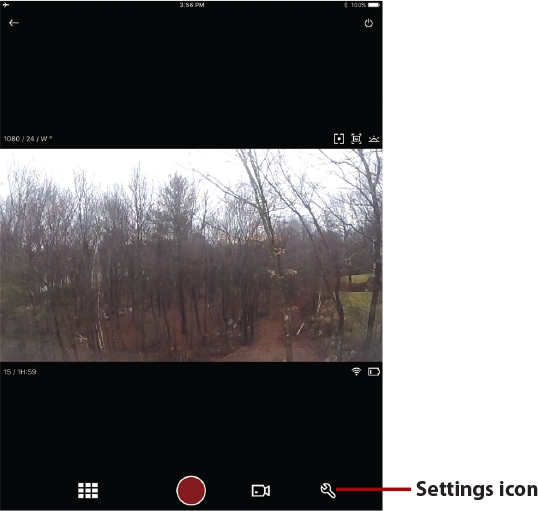
The Spot Meter feature on the HERO/HERO5 Session should be turned on when the lighting where the camera is positioned is different from where the camera is shooting—for example, if you’re using the camera from the audience area of a dark theater and you’re shooting video (or photos) of what’s happening on a well lit stage.
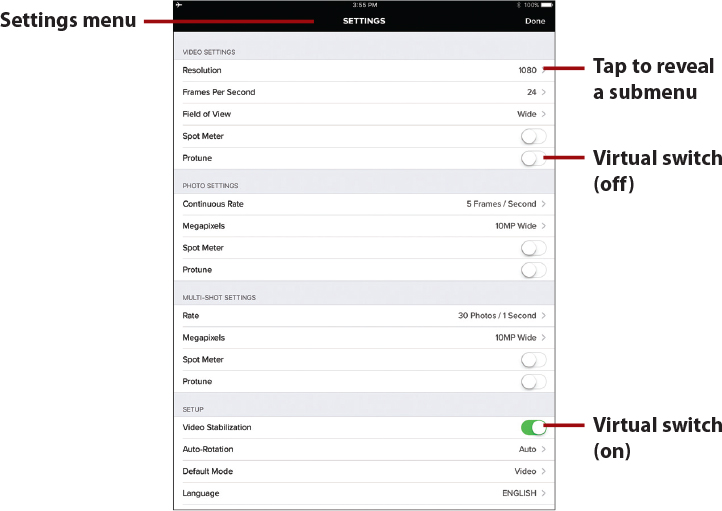
Using the Settings menu of the Capture mobile app (shown in the figure on an iPad), you can use virtual switches to turn on or off some settings, such as Spot Meter. Tap the virtual switch to toggle between the on and off positions.
The options that allow you to choose from multiple options, such as Resolution, FPS, and FOV, display the currently selected option. Tap the > icon to reveal a submenu with additional options for that feature.
Switching Between Shooting Modes
You can choose from four ways to switch between video-shooting modes and then adjust specific settings, including
• Directly from the camera
• With Voice commands (not available on the HERO Session)
• With the optional Smart Remote
• With the Capture app on your smartphone or tablet
Control the Camera Using the Smart Remote
You pair the camera with the Smart Remote one time and then the remote mirrors the information displayed on the camera’s status screen. You can adjust the camera mode, shooting mode, and related settings from up to 600 feet away. The Smart Remote works with all three camera models.
To adjust the camera shooting mode, follow these steps:
![]() After the initial pairing, press the Power/Mode button on the Smart Remote to turn on the remote (and the camera).
After the initial pairing, press the Power/Mode button on the Smart Remote to turn on the remote (and the camera).
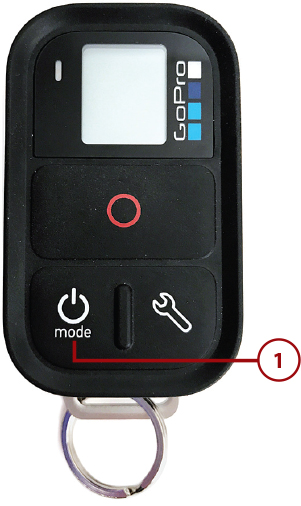
![]() Press the Power/Mode button repeatedly to scroll through the camera modes. When you see the setting you want, stop pressing the Power/Mode button. Here, the Video shooting mode has been selected.
Press the Power/Mode button repeatedly to scroll through the camera modes. When you see the setting you want, stop pressing the Power/Mode button. Here, the Video shooting mode has been selected.
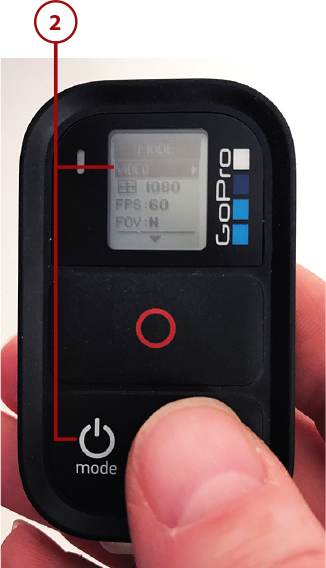
![]() To adjust the Resolution, FOV, and FPS options, press the Settings/Tag button once. The Resolution option is highlighted and displayed.
To adjust the Resolution, FOV, and FPS options, press the Settings/Tag button once. The Resolution option is highlighted and displayed.
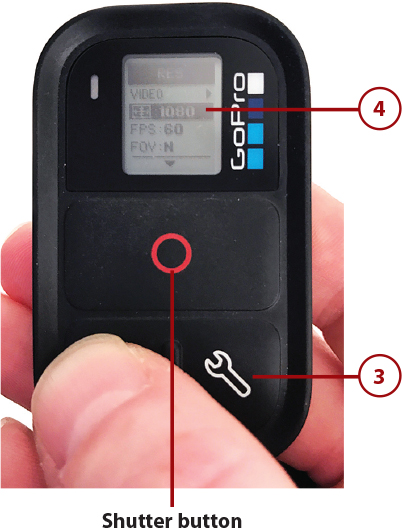
![]() Scroll through the Resolution options for the camera mode you’ve selected by pressing the Shutter button. When the Resolution you desire is highlighted, press the Power/Mode button to select it. In this example, 1080p is selected.
Scroll through the Resolution options for the camera mode you’ve selected by pressing the Shutter button. When the Resolution you desire is highlighted, press the Power/Mode button to select it. In this example, 1080p is selected.
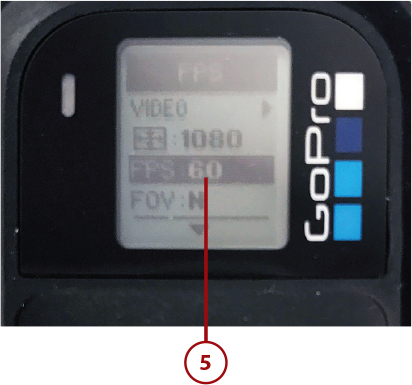
![]() The FPS option is highlighted next. Keep pressing the Shutter button until you see the desired resolution, and then press the Power/Mode button to select it. 60 FPS is selected in this example.
The FPS option is highlighted next. Keep pressing the Shutter button until you see the desired resolution, and then press the Power/Mode button to select it. 60 FPS is selected in this example.
![]() The FOV option is highlighted next. Again, keep pressing the Shutter button until you get to the desired resolution, and press the Power/Mode button to select it (not shown).
The FOV option is highlighted next. Again, keep pressing the Shutter button until you get to the desired resolution, and press the Power/Mode button to select it (not shown).
![]() Repeat this process for the rest of the adjustable options, including the advanced shooting options (not shown).
Repeat this process for the rest of the adjustable options, including the advanced shooting options (not shown).
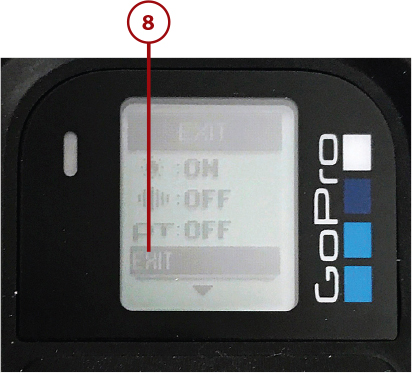
![]() When you’ve adjusted all the settings using the Smart Remote, highlight and select the Exit option. You’re now ready to begin shooting. Press the Shutter button to begin.
When you’ve adjusted all the settings using the Smart Remote, highlight and select the Exit option. You’re now ready to begin shooting. Press the Shutter button to begin.
Stabilizing the Camera
Chances are that you purchased your GoPro camera to shoot video of yourself and others engaged in some type of action-oriented activity. As discussed in the next chapter, the key to shooting smooth and in-focus video is to keep the camera as steady as possible, avoiding unnecessary shaking or sudden movements.
The easiest way to do this is to place the camera in the Frame housing and then attach the most appropriate mount, based on the shooting situation. Make sure the mount is securely attached to your body or equipment so it can’t move around. To achieve really smooth video, consider attaching the camera to an optional stabilizer. This helps you achieve more professional results.