Working with RAW Files
RAW formats vary from camera to camera and every manufacturer uses its own proprietary RAW file format (some have two) for storing image data. Sometimes a company will terminate support for a discontinued camera’s RAW format, leaving photographers high and dry. That’s why Adobe defined a non-proprietary format for RAW called Digital Negative (DNG) that can be used by hardware and software developers to provide RAW processing in the future. So far, Leica’s Digital Modul-R, Hasselblad H2D, Ricoh GR Digital, and the Samsung Pro815 use DNG as their native RAW format. Is this a trend? Let’s hope so.
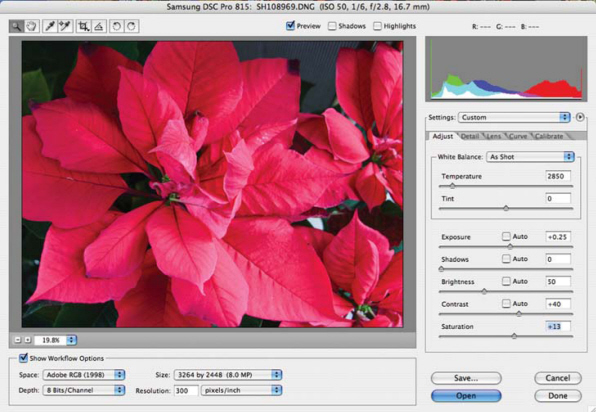
You can view the Samsung Digimax Pro815’s RAW files with the bundled Digimax Master software that integrates browser, viewer, and image-editing functions. Or any program, including Adobe Camera Raw, that opens a standard DNG file. ©2006 Joe Farace.
RAW file processing has entered the same era as traditional film processing at its height, when practitioners jealously guarded formulae for processing film. They would never reveal, for free anyway, that precise blend of Rodinal, grain alcohol, and rainwater, along with a shot of Dr. Pepper—shaken not stirred—that was required for perfect processing.
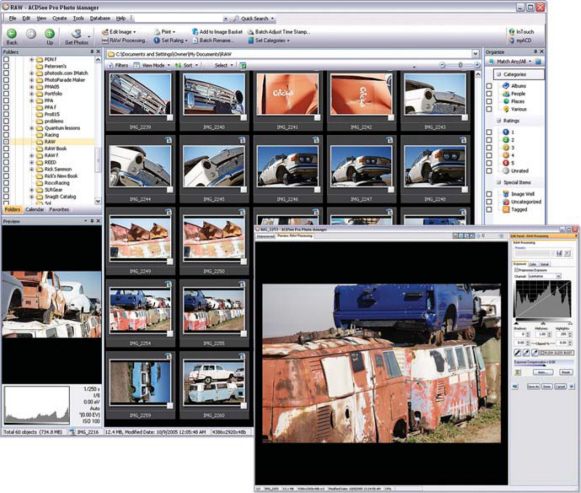
In today’s digital world, the primary buzzwords are workflow and “mine is better than yours.” The software tools are now dictated by the hardware—camera and computer—that you use. All you need is software that provides a way to manage everything from image management to processing to output. The Windows-based ACDSee Pro Photo (www.acdsystems.com) manages to do that in one affordably priced package. ACD Systems claims “lightning-fast RAW image previews,” and for the first time the claims meet reality. That includes pro support for RAW formats from Nikon, Canon, Konica-Minolta, Olympus, Fuji, and Pentax cameras, and support for Adobe’s DNG format.
To process a RAW file in ACDSee Pro, just highlight it and click the RAW Processing button in the toolbar. A separate window opens with tabbed controls, not unlike Adobe Camera Raw (ACR), but there are slightly fewer tabs—Exposure, Color, and Detail—and fewer controls. There are tools for adjusting white balance, exposure, sharpness, or noise, and for the less geeky among us, that’s a good thing. A histogram shows Red, Blue, and Green channels along with Luminance.
In ACDSee Pro, you bounce back and forth between unprocessed and processed images by clicking on two tabs at the top of the image preview window. You can also save settings as presets so you can use them repeatedly, and process multiple RAW images in a single step with batch RAW processing. ©2006 Joe Farace.
The 800-Pound Gorilla
RAW file support is directly built into Adobe Photoshop CS2. (With Photoshop 7.0, ACR plug-in must first be installed.) The latest version of ACR contains many new features that will enable you to get even better results from your files staring with automatically selecting and assigning your specific camera model. Access to Camera Raw is through Bridge. (File > Open in Camera Raw.)
The first thing that users of previous versions will notice about Camera RAW 3.0 is that there are more icons across the top left-hand side of the dialog box than before. In Photoshop CS there were just three icons; Photoshop CS2 has eight! Photograph © 2004 Joe Farace.
The first three tools are the same ones found in previous versions of Camera RAW: Clicking the Zoom tool (a.k.a. Magnifying Glass) inside the preview window allows you to zoom in and out of the details on a RAW file. Holding down the Option key (Mac OS) or Alt (Windows) while clicking reverses the zoom effect. The Move (Hand) tool does its same job of dragging the image in the preview window around after you’ve used the Zoom tool. My favorite tool was always the White Balance Tool; clicking anywhere that is neutral on the image in the preview windows brings the image into a “normal” white balance. It is always my first step before doing anything else with a RAW image file. The Rotate Image icons (90º Clockwise and CounterClockwise) have been moved from their previous location to keep all the tools together. You’ll find them at the end of the line. In between is the new stuff.
What’s New Pussycat?
The first new tool is the Color Sampler tool whose icon looks a lot like the White Balance Tool. In fact it displays different Red, Blue, and Green values when clicking on up to three places in your image. When used in conjunction with the White Balance Tool it helps you determine neutral colors or show where a certain neutral color may be heading—warmer or cooler.
The next two tools provide functionality that’s already available in current and previous versions of Photoshop, but add a new twist or two. The Crop tool gives ACR so much more functionality than the previous version that it starts to feel like a separate application, much like Bridge. You can only show the cropping area (the rest of the image is grayed out) and the actual crop is not applied until after you’ve finished other adjustments and click Done. The Straighten tool accomplishes the same goals as the Measure tool does in Photoshop but permits cropping the image, so you don’t have to use the Rotate command to complete the operation and then crop to remove extraneous white space.
There are three new buttons to the left of the new tools. Preview lets you toggle back and forth between your original RAW files and any adjustments you make with the slider (we’ll get to them, don’t worry) on the right-hand side of the Camera Raw dialog box. Next are check boxes to show the Gamut Clipping warning for Shadows, Highlights, or both. Clipping is the shifting of pixel values to either the highest highlight value (255) or the lowest shadow value (0). Areas of a photo that are clipped are either completely white or completely black and have no image detail. Both boxes can be checked together so you can see warnings for Highlights and Shadows.
ACR has a box for the Gamut Clipping warning for Shadows and shows the affected areas in blue. © 2004 Joe Farace.
What’s missing from previous versions? There used to be check boxes allowing you to choose between using “Basic” or “Advanced” modes for using Camera Raw. Both of these choices are gone. My guess is that Adobe Systems thinks that if you are experienced enough to use ACR you’re an advanced user.
ACR has a box for the Gamut Clipping warning for Highlights and shows the affected areas in red. © 2004 Joe Farace.
Show Workflow Options
Before getting to what the Show Workflow Options checkbox gives you, take a second to look at the plus and minus buttons above it. Clicking either of these buttons will make the image in the preview window larger or smaller depending on which button you click. I think you’ve already figured out what each one does. There is also a pop-up menu with presets allowing you to get to where you to make the preview image the size you want in a hurry. “Fit in View” is my favorite but you can also have preset viewing options from 6% to 400%.
The first choice you face when unlocking Show Workflow Options is assigning a color space to the file. If some of the terms used to describe color space are new to you, don’t panic. You can find them in the previous chapter and the Glossary in the back of this book. The Color Space choices available in Camera Raw’s pop-up menu are Adobe RGB (1998), ColorMatch RGB, ProPhoto RGB, and sRGB (IEC619664-1). Next you face two simple choices: Whether to assign a 16- or 8-bit color or bit depth to your image. The information to help you make your decision about which bit depth to use is covered in the previous chapter, so if you skipped over it to come here to get the good stuff, jump back a few pages, and find out the advantages and disadvantages of either choice.
Don’t be bashful, click the Show Workflow Options check box—you know you want to—but when you do, you come face to face with yet more choices. Let’s get the fear and loathing over with and jump in to see what all this gobbledygook really means.
Crop Size: does Matter
This pop-up menu shows the choices available in making your image resolution smaller (downsampling) or larger (upsampling). Photoshop itself provides a way to make larger images using the Image Size (Image > Image Size) command and there are third-party solutions including the useful Genuine Fractals (www.ononesoftware.com) Photoshop-compatible plug-in. Most users will find that using Camera Raw’s upsample will produce acceptable results, especially if starting with files from mid-sized (8 megapixels) or larger image files.
You can use Photoshop CS’s Image Size command to upsample your image instead of doing one big jump. Try doing it in successive steps, increasing each step by 10%, using Bicubic Interpolation. Some Photoshop users have called this process “Stair Interpolation.” Better yet, why not just upsample using Camera Raw? But, hey, it’s your choice.
Resolution: of the Matter
Two choices are provided here: one if you want to measure your pixels using English measurements, and the other if you want to use metric. The key is not how you measure but what you measure.
What’s the difference between “dots per inch” (dpi) or “pixels per inch” (ppi)? PPI and dpi are measures of resolution:
At the top of Camera Raw, you’ll find a color histogram. The histogram simultaneously shows all three channels (Red, Green, and Blue) of the image and is automatically updated as you make changes to the settings below. The histogram displays the tonal range of the entire image and gives an overall snapshot of the image’s tonal range, or key. A low-key image has detail in the shadows; a high-key image has detail in the highlights; and an average-key image has detail concentrated in midtones. An image with a full tonal range has a number of pixels in all of the areas. Being able to identify the tonal range helps determine what appropriate tonal corrections are needed—if any.
PPI relates to the smallest point that can render varying levels of tone and is the number of PPI in your image file that affects print size and output quality. If there are too few PPI, the pixels will be large and your image will appear “pixilated.” The “correct” ppi to use depends on print size. Larger prints are viewed at a different distance than smaller ones, so a lower PPI can still work.
dpi is simply how many dots of ink per inch can be output by the printer. The higher the dpi, the better the print’s tonality will be. Transitions between colors will be smoother, but your printer may be rated 2880dpi, while the ppi could only be 300. This is why the suggested file resolution for printing photographs on an ink-jet printer is most often around 300 PPI (or sometimes as low as 240 depending on the printer).
Settings? not more Settings?
Camera Raw’s Settings pop-up menu lets you chose one of the following options: Selected Image Settings uses data from the selected RAW image file. When a batch of RAW images is selected, this setting becomes the “First Selected Image.” The settings for the first image in the selected batch will be applied to all the images in the batch. Camera Default Uses the saved default settings for a specific digital camera. Previous Conversion uses settings from the previous image made with that same camera. Custom lets you create unique one-time-only custom images that you don’t want to save for the future.
When a RAW image file is opened with Camera Raw, settings are stored in the Camera Raw database file or a sidecar (Extensible Metadata Platform) file. It lets Photoshop remember the setting for each individual Camera Raw image file so that when you open a RAW image the next time, all the settings sliders default to the same values used the last time to open that specific RAW file. Image attributes such as target color space profile, bit depth, pixel size, and resolution are not part of the stored settings.
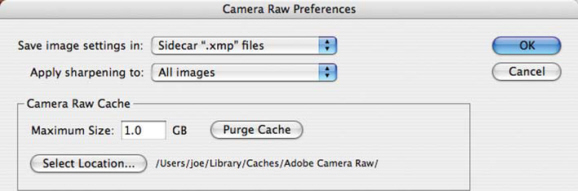
TIP: You can determine where the settings are stored using the Camera Raw Preferences by clicking the fly-out menu next to the “Settings” pop-up menu and selecting Preferences. These sidecar XMP files can be used to store IPTC (International Press Telecommunications Council) caption data or other metadata.
You can save ACR settings for a specific camera or specific lighting conditions and reapply them on other RAW images. You can also save a settings file that contains only a subset of the Camera Raw plug-in settings. When this subset file is then loaded, only certain sliders are updated. This lets you create settings presets for custom white balances, specific lens settings, and so forth. Using the Bridge (Edit > Apply Camera Raw Settings) you can also update all or a subset of the settings applied to Camera Raw images.
After making adjustments in the Camera Raw dialog box, do one of the following: You can Save Settings (or Save Settings Subset) from the fly-out menu to save the current settings and add them to the Settings menu, allowing them to be applied to another image. You might want to save as “Set Camera Default” to set a default setting for other images from the same camera and you can even have multiple defaults for different cameras.
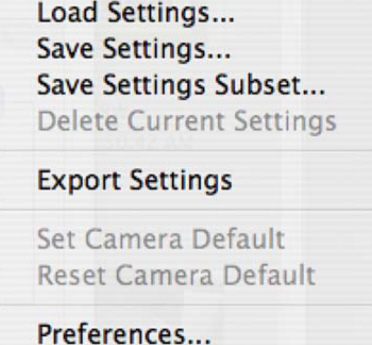
After you tweak all the settings in Camera Raw 3.0, you can save them in an XMP file that can be applied to images made at the same time, and the customized setting will appear in the Setting menu that can be accessed via the fly-out menu below the histogram display.
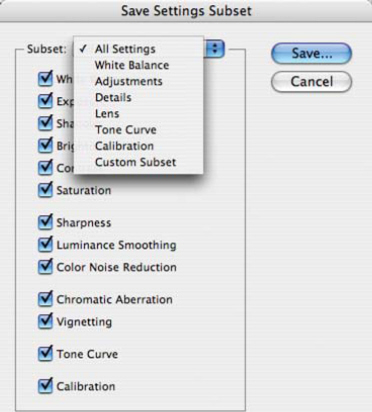
To save a settings subset:
Step 1: Choose Save Settings Subset.
Step 2: Specify the settings to be saved by choosing an option from the Subset menu or select/deselect settings from the “Settings” list.
Step 3: Click Save.
Step 4: In the Save Raw Conversion Settings dialog box, name and save the file.
Other settings in the menu include Camera Default that uses the saved default settings for a specific camera and Previous Conversion that the settings from the previous image of the same camera. Up to 100 file names can appear in the Settings menu.
Later on the process can be reversed to apply any saved Camera Raw settings. All you have to do is choose the name from the Settings pop-up menu.
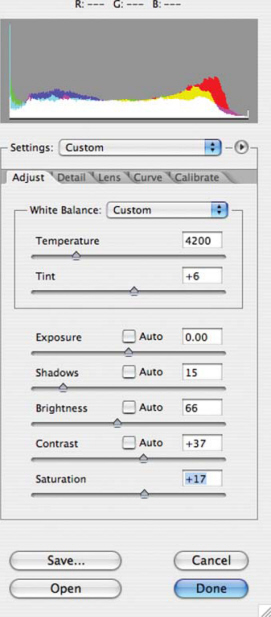
The Adjust Tab
Under Settings are the four tabs that contain the “meat and potatoes” of ACR including Adjust, Detail, Lens, Curve, and Calibrate.
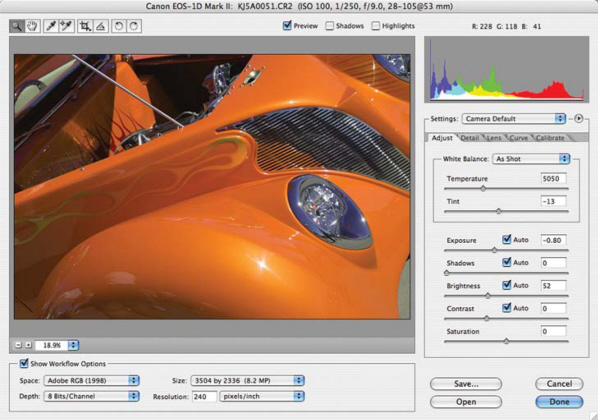
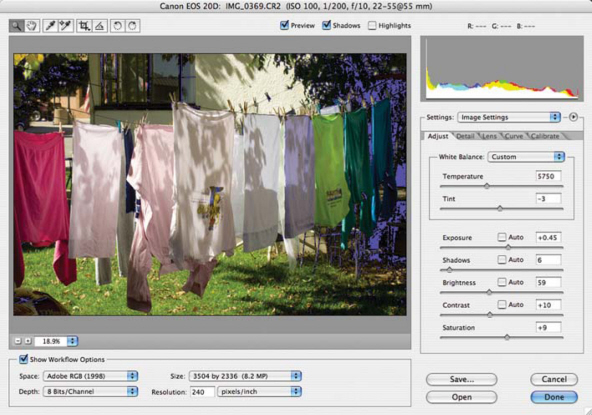
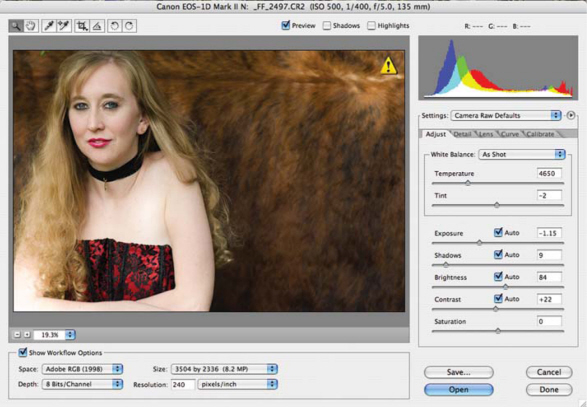
For most users, Adjust will be the only tab that they will ever use and contains controls for color and exposure. Unlike the last edition, some of the sliders (Exposure, Shadows, Brightness, and Contrast) in ACR contain an “Auto” check box that, when selected, automatically sets these parameters; and it does a pretty good job of it too. The terminally geeky will want to turn them off, but every time I tried, I ended up with near identical slider settings. Let’s start at the top of the list of sliders and work our way down.
Digital cameras record the white balance at the time of exposure as metadata. ACR reads this data and uses it as the initial setting when opening an image file. This usually comes close to being the correct color temperature, but you can fine-tune the adjustments if it’s not quite right. The Adjust tab in the Photoshop Camera Raw dialog box also has three controls for making adjustments to remove a color cast from the image.
White Balance sets the color balance of the image to reflect the lighting conditions under which the photo was originally made, but you may prefer to customize the white balance using the Temperature and Tint sliders that are located below this pop-up menu. Camera Raw reads the original white balance settings of most digital cameras, and leaving the White Balance menu set to “As Shot” uses the camera’s white balance settings. For cameras whose white balance settings are not recognized by ACR, setting the White Balance menu to As Shot is the same as choosing Auto. The Photoshop Camera Raw plug-in reads the image data and automatically adjusts white balance.
Other choices from the pop-up menu include Daylight, Cloudy, Shade, Tungsten, Fluorescent, Flash, and Custom, which lets you create a specific White balance for this image. You might try one of these if the image’s color is obviously not correct using the As Shot and auto options, but I have found that they seldom produce positive results. You may find that using the Temperature and Tint sliders (below) are a good combination when used with any of the automatic settings. Don’t take my word for it. Experiment and make up your own mind.
Temperature lets you fine-tune the white balance to a custom color temperature using the Kelvin color temperature scale (see “Who is This Kelvin Guy”). Moving the slider to the left corrects for a photo taken with a lower color tem-perature; Camera Raw makes the image colors bluer to compensate for the lower (yellow) color temperature of the ambient light. Moving the slider to the right corrects for a photo taken with a higher color temperature; the plug-in makes the image colors warmer (yellow) to compensate for the higher (blue) color temperature of the ambient light.
Tint is a less complex slider and lets you fine-tune the white balance to compensate for green or magenta tint in your photograph. Moving the slider to the left (negative) adds green to the photo, while moving the slider to the right (positive) adds magenta.
To adjust white balance quickly, select the White Balance tool in the top left-hand side of Camera Raw, and then click an area in the preview image that should be a neutral gray or white. When you do, the Temperature and Tint sliders automatically adjust to make the selected color exactly neutral.
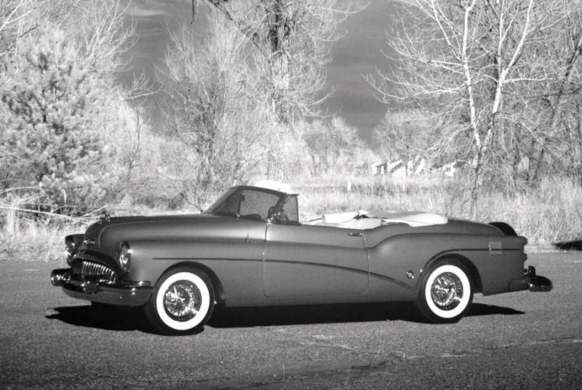
This digital infrared image of a classic Buick Skylark convertible was photographed in black and white mode with a Fujifilm FinePix S3 Pro digital SLR mounted on a tripod. Exposure, in manual mode at ISO 1600, was f/11 and 4 seconds, using a Hoya CR72 filter. Final exposure settings were determined by viewing the file’s histogram on the camera’s preview screen. ©2005 Joe Farace.
|
I am constantly amazed at the misinformation about the Kelvin scale. On the Internet, a power company states the “History of Kelvin temperature originally comes from the incandescent lamp.” Duh? Long before Edison invented the incandescent light, Lord Kelvin, an Englishman, proposed a new temperature scale suitable for measuring low temperatures. During the nineteenth century, he suggested |
that an absolute zero temperature, where all heat is removed from matter, should be the basis for a new scale. His idea was to eliminate the use of negative values when measuring low temperatures using either Fahrenheit or Celsius scales. In honor of Lord Kelvin’s contributions, this system is called the Kelvin scale and uses the unit “Kelvin” or sometime just “K.” |
There’s an old computer adage that goes: “Garbage in, Garbage out.” You can’t use any of ACR’s controls to make up for a hopelessly under- or overexposed image file. If your digital camera has a histogram feature, use it to home in on exposures while you’re shooting! If it doesn’t have a histogram, use the camera’s auto bracket control, or put the camera in Manual mode and bracket exposures for critically important photographs. One of Farace’s laws of the Computing Universe is that “The best captured files make the best photographs.”
The Exposure slider adjusts an image’s brightness or darkness. Moving the slider to the left darkens the image, while moving the slider to the right brightens the image. The values are in increments equivalent to f-stops. A + 1.50 adjustment is similar to increasing the aperture one and a half stops. A + 1.50 adjustment is like reducing the aperture by one and a half stops.
|
RAW Tip |
|
|
Holding the Alt (Windows) or Option (Mac OS) key while moving the Exposure slider gives you a preview of where the highlights become completely white or black, with no detail or are clipped. You can adjust the slider until the |
highlights (not specular highlights) are clipped, and then back off on the adjustment. Black indicates areas that are not clipped, and color indicates areas that are being clipped in only one or two channels. |
The most critical areas of RAW processing involve White Balance and Exposure. Many of the other controls in this tab are replicated in Photoshop CS prime, so that you can make these adjustments later without the loss of gamma that occurs during RAW processing. These other controls include: Shadows, Brightness, Contrast, and Saturation and the next chapter shows ways to adjust these image factors using Photoshop prime’s controls or using third-party Photoshop-compatible plug-ins.
And Now for the Rest of the Story
Shadows control what input levels will be black in the final image. Moving the slider to the right increases the areas that are mapped to black. Using the Shadows slider is similar to using the black point slider for the input levels in the Photoshop Levels command. (Image > Adjustments > Levels.) Sometimes this produces the impression of increased contrast.
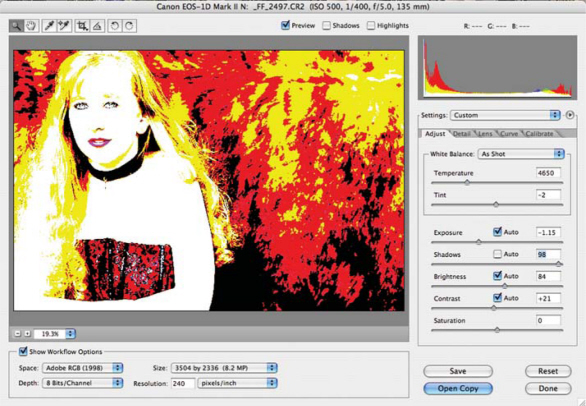
Holding down the Alt (Windows) or Option (Mac OS) key while moving the Shadow slider previews where the shadows become completely black with no detail. Move the slider until the shadows begin to get clipped, and then back off slightly on the adjustment. Color indicates areas that are being clipped in one or two channels, while white indicates areas that aren’t clipped.
The Brightness slider adjusts the brightness or darkness of the image, similar to the Exposure slider. Instead of clipping the image in the highlights (areas that are completely white, with no detail) or shadows (areas that are completely black and no detail), Brightness compresses the shadows and expands the highlights when the slider is moved to the left. A good rule of thumb, but by no means the only way, is to use this slider to adjust the overall brightness or darkness after setting the white and black clipping points using the Exposure and Shadow sliders.
Contrast adjusts an image’s midtones. Higher values increase midtone contrast, while lower values produce an image with less contrast. Generally, you use the slider to adjust the contrast of the midtones after setting the Exposure, Shadow, and Brightness values.
Saturation adjusts the color saturation of the image from minus 100 (pure monochrome) to plus 100 (double the saturation) and is similar to controls that you would find inside Photoshop CS2 prime. The only reason you might want to apply these last three corrections inside ACR instead of later is when converting a RAW file to an 8-bit image. Another good rule of thumb is to make global changes to the image file in ACR and local changes later inside Photoshop CS2.
The Detail Tab
The Sharpness slider is a variation of Photoshop’s Unsharp Mask filter, which locates pixels that are different from the surrounding pixels based on the threshold you specify and increases the pixels’ contrast by the amount you specify. When opening a RAW image file, ACR calculates this threshold based on your camera model, ISO, and exposure compensation, but you can choose whether sharpening is applied to all images or just the previews.
Almost all digital images, whether captured by scanner or digital camera can stand a little sharpening, but the edge-sharpening techniques used by Photoshop CS2 can create as many problems as it corrects. I prefer to not sharpen in ACR (or in camera for that matter) and use some of the techniques covered later in this book. Adobe Systems’ official recommendation is not to use Camera Raw sharpening if you plan to edit the image extensively later, and then only use Photoshop’s sharpening filters as the last step after all other editing and resizing is complete. I recognize that some of you may want to sharpen right now, so if you wanna do it, here’s how it works:
Step 1: Click the Magnifying Glass tool to zoom the preview image to at least 100%.
Step 2: Move the slider to the right to increase the amount of sharpening and to the left to decrease the amount of sharpening. A zero setting turns off ACR’s sharpening. For cleaner images set the Sharpness slider to a low value. (Nothing is uglier than an oversharpened image.)
Using either Luminance Smoothing or Color Noise Reduction will reduce an image file’s noise. Luminance Smoothing reduces grayscale noise, while Color Noise Reduction reduces chroma noise. (Chroma is a measurement of the relative purity of a color.) Moving the slider to zero turns off its noise reduction. When making adjustments to either Luminance Smoothing or Color Noise Reduction, first zoom in on the image for a close-up look so you can see the effect of the noise reduction.
|
Digital Noise |
|
|
The chips in all digital cameras add noise to images. Like grain in film, digital noise is worse at high ISOs and more noticeable in areas of uniform color, such as skies and shadows. Since noise can be objectionable in an image, there are more than 20 different DNR (Digital Noise |
Reduction) software products in additional to what’s built into Camera Raw. Chapter 9 will introduce you to a several other alternatives for fixing noise after a RAW file has been opened with your favorite digital imaging program. |
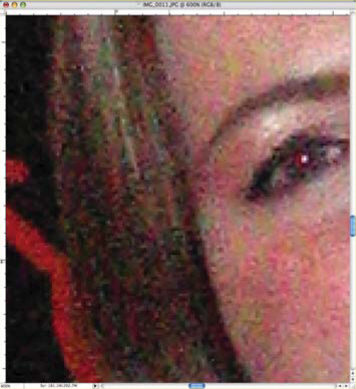
At 600% magnification, but visible at smaller sizes, the noise from compact digicams such as Canon’s SD-10 are noticeable at ISO 400. Surprisingly at ISO 200 the noise is significantly less. So the old rule of thumb for film applies to digital imaging as well: To maintain the maximum image quality, always use the lowest ISO settings that are practical. ©2003 Joe Farace.
The Lens Tab
Chromatic Aberration is a common lens defect where the lens elements focus different frequencies (colors) of light differently, so there are controls in the Lens tab to address this problem. One type of chromatic aberration results in the different colors being in focus, but each color’s image is a slightly different size. This type of aberration results in color fringing in areas both away from and toward the image’s center. The fringing can appear red on the side of an object toward the center of the image, and cyan on the side away from the center of the image. The Fix Red/Cyan Fringe and Fix Blue/Yellow Fringe sliders adjust the red and blue channels making them larger or smaller to remove fringing and increase corner sharpness. Some, especially wide angle lenses, create vignetting, or a darkening of the corners. Panoramic cameras, such as the Hasselblad Xpan offer “Center” filters that are lighter in the corners and darker in the center to even up the exposure across the image area.

In the Lens tab, two Vignetting controls are provided: Amount and Midpoint. To lighten the photograph’s corners, move the Amount slider to the right (positive) side. To darken an image’s corners of the image, move the slider to the left (negative). Move the Midpoint slider to the left (lower value) to apply the Amount adjustment to a larger area away from the corners, or move the slider to the right (higher value) to restrict the Vignetting Amount adjustment closer to the corners. You can enter a value in the Amount and Vignetting Midpoint text boxes. ©2004 Joe Farace.
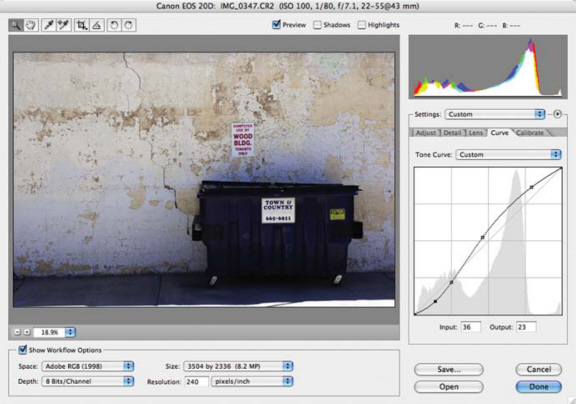
Hiding behind the new “Curve” tab is a version of Photoshop’s Curves control that layers an adjustable curve overlaying a histogram of the image file. The Tone Curve pop-up menu lets you apply some presets, including Linear, Medium Contrast, Strong Contrast; or you can use Custom, which lets you yank the curve at any point to fine-tune based on what you see in the preview window.
Calibrate, Calibrate, Dance to the Music
The Calibrate tab has been revised in Camera Raw 3 starting with a pop-up menu that lets you apply a Camera Profile from within, instead of waiting until the image is opened in Photoshop CS2. Every digital camera is unique. Most camera manufacturers apply some sort of correction to the files, but apply the same corrections to every camera. So why not create a camera profile? Some experts say digital cameras can’t be profiled, but based on variations in the hundreds of cameras that I’ve tested, I respectfully disagree (see “Profiles in Cameras”).
You can also enter specific numeric values in Input and Output boxes. Don’t know what values to enter? As you move the mouse over the curve, the pointer becomes a crosshairs that when placed over different areas of the curve change the values shown on the Input and Output boxes. ©2004 Joe Farace.

Even after adjusting highlight white balance with the Temperature and Tint sliders, there still might be a color cast in the shadows. The Calibrate tab’s Shadow Tint sliders change the color in the shadows but the colors it adjusts depends on your camera’s sensor and white balance. Moving the slider to the left (negative) adds green, and moving the slider to the right (positive values) adds magenta.
The Calibrate tab also has Hue and Saturation sliders to adjust Photoshop Camera Raw plug-in’s built-in camera profile to render other than neutral colors differently. Adjust hue first and then adjust its saturation. Moving a Hue slider to the left is like a counterclockwise move on the color wheel and moving the slider to the right is similar to a clockwise color wheel move. Moving the Saturation slider to the left desaturates the color and moving the slider to the right (positive value) increases the saturation. Watch the preview image as you make the adjustments until the image looks correct.
|
Profiles in Cameras |
|
|
Integrated Color (www.integrated-color.com) offers two profiling packages including commercial versions that include a batch reference file made from a group of targets, and Coloreyes 20/20 that uses a custom reference file for its target. The Commercial version is aimed at the average photographer but large format photographers who want critical color or Fine art reproduction will find that 20/20 is more accurate. I used the Commercial version to create a profile for my Canon EOS 10D. If you can read and follow instructions and use only one light source—an Elinchrom monolight in my case—you can light the target and make an even |
exposure of the target. Lighting setup may take some time, but after you’ve got the shot, the software will cook up a profile quicker than your Starbucks barista can whip up a latte. The software calculates the difference between what the camera saw and what the reference file says the color is supposed to be. The profile is based on using a custom color balance, so Integrated Color includes a Digital Gel Card that lets you shoot the card, color balance the camera, and apply the profile with complete consistency between shots and even under different lighting conditions. The chart includes six other smaller patches that you can use to warm up or cool off your image when applying your profiles. |
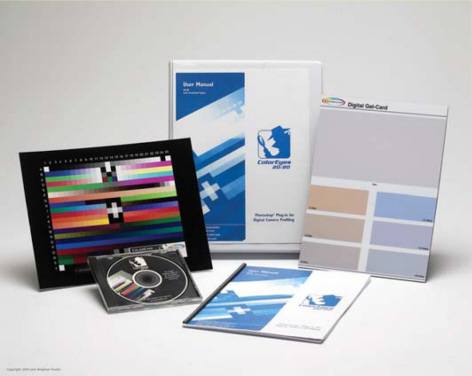
Every digital camera is unique. So why not create a camera profile for your specific camera? In additional to gray, the Digital Gel Card in the Coloreyes 20/20 package includes six color patches that you can use to warm up or cool off your image, when applying your profiles.
Many digital SLRs have the ability to directly capture digital images as monochrome files, but because there is image processing involved in producing the monochrome it is captured as a Joint Photographic Experts Group (JPEG) file. Some SLRs, such as Canon’s EOS 30D, offer the ability to capture RAW and JPEG files at the same time, so one of my favorite techniques is to shoot RAW (color) images along with a large JPEG (monochrome) file at the same time.
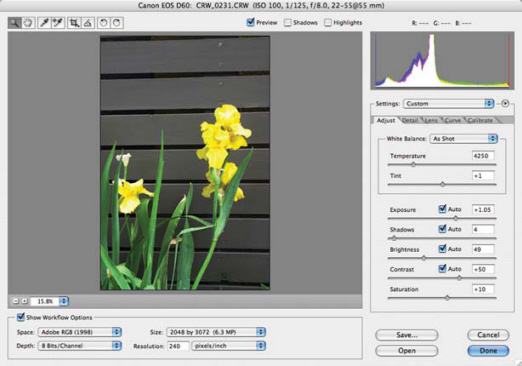
RAW files are unmanipulated and so when Camera Raw shows one of them to you for the first time it’s in color, like this image made with a Canon EOS D60. © 2005 Joe Farace.
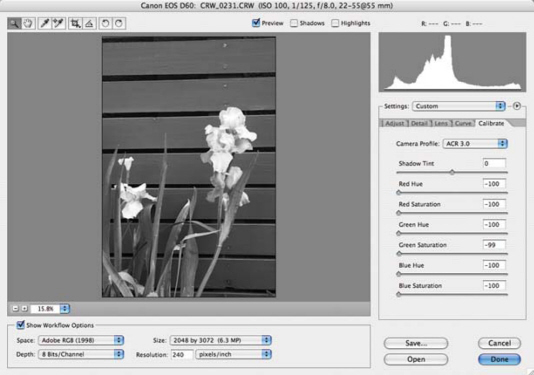
Turning a color RAW file into monochrome is simple: Go to Camera Raw’s Adjust Tab and move the Saturation slider all the way to the left. Bingo, here’s a black and white RAW file. Is this the best way to make a monochrome image from a color file? Note: See Chapter 10 for more than you ever wanted to know about creating monochrome digital images after the file has been converted into a file format other than RAW. © 2005 Joe Farace.
Transfers: Gateway to Photoshop
Bridge provides many ways to bring single or multiple image files into Photoshop for final preparation and editing of the photograph. You can start by creating a Photoshop Action to open RAW image files and saving the files in formats like Tagged Image File Format (TIFF), PSD, JPEG, Large Document Format (PSB), and PDF.

Before you can save documents in PSB format, the “Enable Large Document Format (.psb)” option must be enabled in the File Handling section of Preferences.
One of the most useful and fun features of Adobe Photoshop is called Actions. (You’ll learn more about Photoshop Actions in Chapter 9.) The Actions palette lets users record a sequence of image-editing steps as an “Action” that can be saved, then applied again at a future time. This Action can be applied to a selection in an image, another image file, or—in a batch operation—to hundreds of different image files. For example, you can create an Action that lets you acquire batches of images from a digital camera, allowing an entire set of photographs to be automatically imported, retouched, and saved. The order in which tasks are executed can be edited by dragging-and-dropping.
Actions can be saved and shared with others and are completely cross-platform. If you create an Action on your Mac OS computer, anyone using the Windows version of Photoshop can load and apply your original Mac OS Action. If you create an Action on your Mac OS, anyone using the Windows version of Photoshop can load and apply your original Mac OS action to their images.
To create an Action to open RAW files:
Step 1: Click the New Action button in the Actions palette or choose New Action from the palette menu. Enter a name for the action in the dialog box that appears.
Step 2: Click the Record icon. Open a RAW image file, and perform whatever operations you want to be a part of this Action. If you record the Action with a preset Image Settings, all of those settings (from the XMP sidecar file) will be used when playing back the Action. If you plan to use the action with the Batch command (more later), you may want to include a Save As operation and choose the file format to which you would like to save the image.
Step 3: Click the Stop button. The action you’ve created can be used every time you want to open one or more RAW image files.
Baking a Batch of Chocalate Chip Actions
In Photoshop CS2, you can also use the Batch command or Create Droplet command to open one or more RAW files.
Step 1: Choose File > Automate > Batch from within Photoshop.
Step 2: In the Play area of the Batch dialog box, choose the Action you created to open your RAW image files from the Actions menu.
Step 3: After choosing Folder from the Source menu, click Choose. In the Choose a Batch Folder dialog box, choose a folder of RAW files.
Step 4: Select Override Action “Open” Commands so the Open commands in the action refer to the batched files rather than the filenames specified in the action. Deselect Override Action “Open” Commands only if the action is to operate on open files or if the action contains Open commands for specific files that are required by the action.
Step 5: Select Include All Subfolders to process files in subfolders.
Step 6: Select Suppress File Open Options Dialogs. This prevents the Camera Raw dialog box from opening for each Camera Raw image file being processed.
Step 7: Select Suppress Color Profile Warnings to turn off the display of color policy messages.
Step 8: Choose a destination for the opened files from the Destination menu. It’s best to choose either “None” to leave the files open, or Folder to save the opened files to a specific folder preventing accidentally overwriting any files.
Step 9: Click OK.