
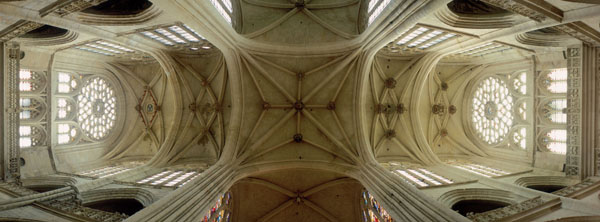

Photo by Arnaud Frich.
Solutions and Formats
A panoramic photograph can be created in a number of ways, and accounting for all of them can prove to be complicated. With any format, both specialty and nonspecialty cameras exist, as well as rotating and flatback ones, allowing for a wider or narrower angle of view.
Currently, numerous paths lead to panoramic photography. Before the advent of data processing and computer software, only three approaches existed, and as we have seen in the Preface, they date to the very beginnings of photography. The easiest approach always has been the classic letterbox (or elongated) format of an isolated photo, which remains more or less rectangular. Here, the field of view taken in is equal to the wide angle of the more conventional format (from which the panorama is taken). Whether one trims the top or bottom of the photo, the width remains the same.
This approach holds true for certain specialized camera bodies such as the Hasselblad XPan and the Fuji 617. The XPan is basically a reformatted 6 cm × 7 cm camera, and the Fuji 617, a 5 cm × 7 cm camera with the top and bottom of the film plane cropped. A second way to make a panoramic photograph involves rotating a lens mounted in a turret while the film is held against a curved plate (the angle of view, approaching 140°, comes close to the field taken in by human vision). Finally, a third method involves turning the entire camera, potentially reaching up to 360°.
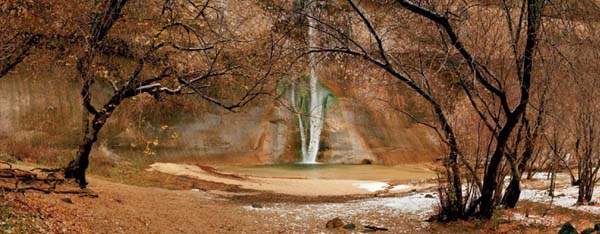
Photo by Macduff Everton.
Recently, more powerful computers and joining software programs have made it possible to create panoramic photographs in which the final quality sometimes surpasses that of specialized, traditional cameras. With a single camera body, preferably digital, it is possible to address the entire field of a panoramic photo obtained by cropping (i.e., rectilinear photography), and with the use of rotating equipment, to move from a 150° to a 360° angle of view. This development is a real innovation in the history of panoramic photography. In this way, anyone can pick a format, camera, and method based on his or her own sensitivities and vision.
To begin our discussion, we summarize an inventory of the characteristics pertaining to each of these equipment- or software-based solutions. This is followed by (1) a detailed discussion about choosing an angle of view that corresponds to the camera and method being used; (2) the impact of the original film’s or digital file’s size relative to the end result; and (3) a consideration of specific problems pertaining to focusing in panoramic photography, such as depth of field and determination of the hyperfocal distance.
Among the different options available to panoramic photographers, the equipment used to make the picture should be chosen according to certain aesthetic and technical criteria. Aesthetics being of primary consideration, the photographer must select from different angles of view and different types of distortion, as well as negatives and digital files of varying size. (However, as we will see later, the quality of an enlargement does not necessarily depend on the size of the original negative or digital file.) From a technical standpoint, the panoramic photographer should give preference to either a specialty camera or the joining method. Each of these has its advantages and disadvantages, but both are equally capable of producing high-quality work.
Although the joining methods have opened new doors to panoramic photography, traditional photography has been around for so long that a panoramic photographer is still quite able to satisfy him- or herself with both specialty and conventional cameras. Indeed, all of the angle of view and format options were available well before the first digital cameras were available.
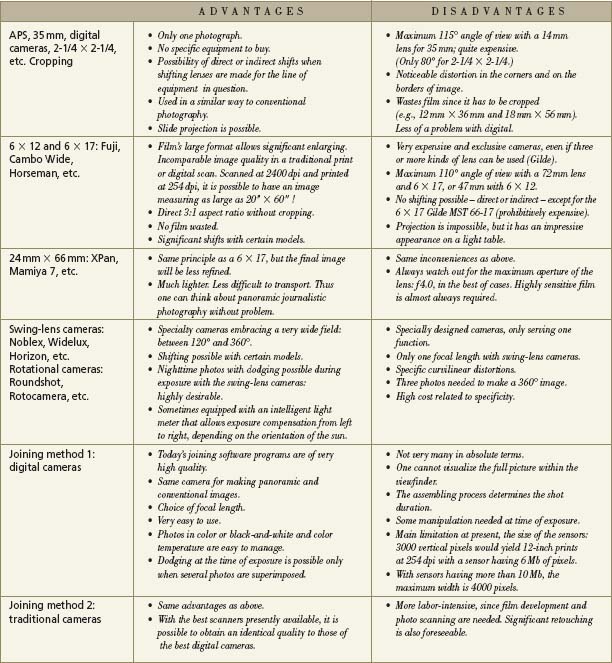
Characteristics of the different ways to take a panoramic photograph

These four photographs have all been taken from the same point of view.
1. Photo taken with a 24 mm lens for a 35 mm format (75°).
2. Photo taken with an XPan and a 45 mm lens (75°).
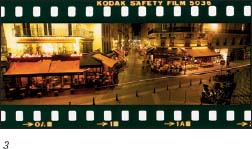
3. Photo taken with an XPan and a 30 mm lens (90°).
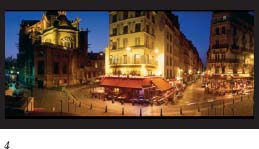
4. Photo taken with a Noblex 150 (140°).
A panoramic image is sometimes characterized by its angle of view, but more typically by an elongated format. A photographer can easily use a specialty camera such as the XPan to obtain photographs having an elongated format and an angle of view equivalent to a classic 35 mm wide-angle lens, but only the specialized rotating cameras and the joining method allow the creation of photographs that can truly be called panoramic.
Nevertheless – as is the case with all photography in general – the quality of a photograph is determined equally by the size of the original film or digital file. In fact, the entire appearance of relief, sharpness, and depth of field depends on it. A panoramist, who remains a photographer first and foremost, must always keep these parameters in mind.
The least that one can say about a panoramic photograph’s angle of view is that it is highly variable! If 360° photos are possible with certain cameras, it is equally possible to obtain panoramic photos with specialty cameras in which the angle of view is as narrow as 25°. Even if this angle has nothing “panoramic” about it, the photo will be stretched out nonetheless.
Angle of View and Focal Length
The angle of view does not just depend on the focal length, but also on the size of the film or sensor. The more the latter increases, the longer the focal length will need to be to achieve an equivalent angle of view. See “Format Size.”
Apart from the joining method, it is impossible to consider all of the possibilities that exist for a given camera. Choice of camera therefore should be guided by one’s aesthetic preference. For example, someone who wants to reproduce the angle of human vision will opt for a camera with a swing lens, which will provide for an angle of view of approximately 135°, which is much greater than the 65° of a 28 mm lens used with a 35 mm camera. With a fixed lens, it is impossible to obtain a 135° angle of view, since none are wider than the unusual fish-eye, which has a short 14 mm focal length and a 115° angle of view. For 360° enthusiasts, superb but very expensive rotational cameras do exist (the most well-known made by Roundshot); and the joining method has undeniably come of age with regard to the image-blending quality available due to the recent progress of stitching software.
Since both swing-lens and rotational cameras cause perspective lines to be deformed in a noticeable way, certain photographers will probably prefer to use a more conventional camera and crop the image later. In this case, an angle of view of at least 100° should be sufficient. It is worth noting that as panoramic photography achieves more and more attention, photographers are starting to take it in unexpected directions – for example, close-ups and telephoto panoramas.
Although some photographers think that a true panoramic photograph can made only with a swing-lens or rotational camera, it is generally conceded that a panoramic image consists of a lengthened format, or a minimum ratio of 2:1.
The more conventional formats have been determined by the various aspect ratios of the traditional cameras that have popularized panoramic photography (e.g., Widelux, Fuji 617, and more recently, the Hasselblad XPan). For example, let us consider 35 mm photography; though it obviously is not a panoramic format, it is at least familiar to everyone. Thus, the 35 mm format is relatively long (a 1.7:1 ratio). And if one wanted to, one could crop it until a panoramic format was achieved. Apart from this, when one wants to create a series of images, it is advisable to settle on a specific format from the start and stick to it. A 3:1 ratio (e.g., 12 mm × 36 mm for 35 mm film) is undeniably pleasing; one also finds more and more posters and frames in this format.
Those who use a 2:1 ratio for 6 cm × 12 cm cameras usually appreciate it, even if the format does not seem all that panoramic. Remember, it can always be cropped down for more interesting possibilities. Ratios like 2.4:1 for the Noblex 150 and 2.7:1 for the Noblex 35 mm are much closer to the 3:1 ratio of the XPan, and have become popular because of well-known photos by Philip Plisson and Hervé Sentucq, taken with a Fuji 617. Essentially, much the same holds true for format sizes and ratios with digital sensors; however, here one is no longer thinking in inches and centimeters, but rather, in pixels.

1. Issoudun Basilica, Indre, France. Photo by Arnaud Frich. This 35 mm photo has a 3:2 aspect ratio. This is a standard format, but its size does not allow cropping to 3:1 without a significant loss in quality.

2. Facade, Rome, Italy. Photo by Arnaud Frich. 120 and 220 roll films have a much larger surface area than small-format (35 mm) film – on average, five times larger.
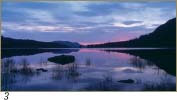
3. Loch Laggan, Scotland. Photo by Hervé Sentucq. This 56 mm × 120 mm photograph has the first aspect ratio considered panoramic, 2:1. The size of this image puts it in the large-format category. The sharpness and tonality of the enlargements will be incomparable.

4. Le Palais de l’Isle, Annecy, France. Photo by Arnaud Frich. Swing-lens cameras like the Noblex 150 allow you to obtain photographs with a 2.4:1 aspect ratio. Although pictures are not that elongated, it does allow the possibility of cropping from the top or bottom.
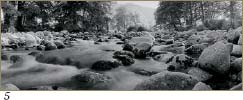
5. L’Ouvèze, Gard, France. Photo by Arnaud Frich. Having the same 2.7:1 aspect ratio as photographs taken with an XPan, this photo was made with a Noblex 135 U, using 35 mm film. The enlarging possibilities are already much better!

6. Facade, Provence, France. Photo by Hervé Sentucq. The Fuji GX 617 allows 3:1 aspect ratio photographs to be obtained directly. The resulting image is quite large and allows amazing enlargements to be made.

7. Pic du midi de Bigorre, Pyrenees, France. Photo by Franck Charel. The characteristic of rotational cameras and the joining method is to make photos that have a particularly elongated format, starting with a 4:1 aspect ratio.
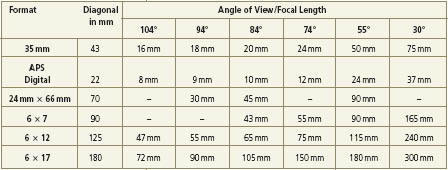
To make a photograph taking in a 104° horizontal field of view, it is necessary to use a 16 mm lens for 12 mm × 36 mm, and 72 mm for 6 × 17.
As the format of the film or digital sensor changes, its influence on the image affects the amount of tonal depth and detail in the photograph, irrespective of what one wanted from the start. And as either the film or sensor format increases, it becomes necessary to extend the focal length of the lens to obtain an equivalent angle of view. Using a longer focal length will make small details appear magnified, and the separation of focus between foreground and background elements will increase.
Divergent effects will also be noticeable with regard to the depth of field, or area that is in focus. On the one hand, it is difficult to obtain a lot of depth of field with long focal length lenses in traditional photography; on the other, it is equally hard to escape having too much with small digital sensors – and one is always prone to forget. So remember, they work in opposite ways!
Amateur and professional photographers who seek quality usually settle on film formats that are larger than 35 mm. And panoramists are no exception to this rule – in fact, rather the opposite holds true – regardless of the weight of the equipment they have to carry around. The larger the original image matrix is, the less one will have to enlarge when making the final print. Image detail will be enhanced, and tonal depth will be increasingly nuanced. For example, a color transparency made with a 6 cm × 17 cm format camera is 22 times larger than a cropped-down 12 mm × 36 mm transparency (thus, requiring only 1/22 as much enlargement). Given the larger image matrix, both traditional and digital prints of larger sizes will be of an incomparable quality. The comparable result will be less spectacular in the case of a Hasselblad XPan or a Mamiya 7; but what remains important is that the negative will be four times larger than 35 mm! And that’s why many photographers use these cameras in all kinds of locales, and in all parts of the world – even the most dangerous.
In order to arrive at an equivalent angle of coverage, one has to realize that the larger the image matrix is, the longer the focal length needs to be. Partly on account of their lenses’ slight telephoto effect, medium or large format panoramic cameras also have less of a tendency to lose small details in the film grain. A glance at the table of corresponding film and focal lengths reveals that a 90 mm lens used with a 6 cm × 17 cm format camera has the same angle of view as a 20 mm lens used in 35 mm.
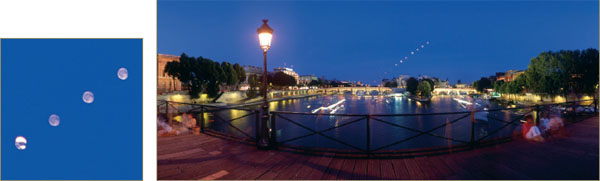
Moonrise seen from the Pont des Arts, Paris. Noblex 150 U, f11, three hour and 30 minute exposure!
Photo by Arnaud Frich.
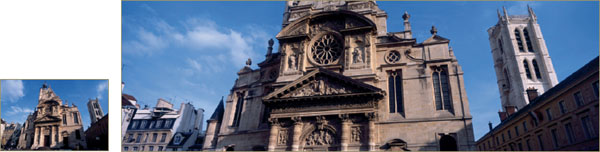
These two photographs were taken from the same point of view with a 35 mm camera (left) and a 6 × 17 camera (right).
Photos by Arnaud Frich and Hervé Sentucq.

Here are two enlarged details from the above photographs. The difference in quality is glaringly apparent! With the enlarged detail on the left, the smallest details are lost in the grain of the film.
A 90 mm lens is slightly telephoto with 35 mm. Used with 6 × 17, it becomes a bit like making a number of photographs with a 35 mm camera, where all the resulting pictures have been stuck together in order to obtain a much taller and wider panoramic photo. Not only will the details be more prominent than the film’s grain, but they will also be larger. Even more details will be noticeable in a giant print. Take the moon for example; instead of depicting a small round ball in the sky, as would be the case with a 20 mm lens on a 35 mm camera, you now will be able to make out some details.
The laws of optics teach us that the longer the focal length of a lens is, the shallower the depth of field will be for a given f-stop. Thus, a telephoto lens inherently reveals less depth of field than a wide-angle lens. And the less depth of field there is, the less sharp the subjects outside of the critical area of focus will be. Similarly, the longer the focal length is, the easier it will be to isolate a detail, since it will tend to stand out more as the focal length increases. Portrait photographers often use this technique to call attention to the face, which is presented in front of a completely out-of-focus background.
In dealing with space, making panoramic photographs with a shallow depth of field is a good way to force a part of the image to stand out and creates an opposition between the foreground and background. (Obviously, the opposite holds true when stopping down on the lens.)
Depth of Field
When one focuses on a plane or object, maximum sharpness is obtained for this distance. In practice, one can observe that certain planes beyond this distance – both in front and behind – are also in focus. But the further one moves from the area that has been focused upon, the more it appears out of focus. The more one stops down on the lens or the shorter the lens focal length is, the more the total area that is in focus will be. This is what is called depth of field. It does not occur in exactly the same way in front and behind the area that has been focused upon, but slightly more toward the rear.
However, it is equally important to keep in mind that a panoramic photographer is usually looking for a maximum depth of field – particularly with regard to landscapes, which have a long history in panoramic photography. And as it becomes harder to obtain depth of field as the size of the film format increases, it correspondingly becomes necessary to stop down on the lens to make up for this. All the same, achieving complete depth of field is not that difficult with larger formats because the quality of the optical engineering really comes into play as the lenses are increasingly stopped down. So if stopping down a 35 mm format lens to f5.6 or f8 is needed to achieve a desired effect, a large format lens would have to be stopped down to at least f22, perhaps even as much as f45, to obtain a similar result. At f45 – even with, say, a 90 mm lens on a 6 × 17 camera – the depth of field would be quite pronounced.
However, it is equally important to keep in mind that a panoramic photographer is usually looking for a maximum depth of field – particularly with regard to landscapes, which have a long history in panoramic photography. And as it becomes harder to obtain depth of field as the size of the film format increases, it correspondingly becomes necessary to stop down on the lens to make up for this. All the same, achieving complete depth of field is not that difficult with larger formats because the quality of the optical engineering really comes into play as the lenses are increasingly stopped down. So if stopping down a 35 mm format lens to f5.6 or f8 is needed to achieve a desired effect, a large format lens would have to be stopped down to at least f22, perhaps even as much as f45, to obtain a similar result. At f45 – even with, say, a 90 mm lens on a 6 × 17 camera – the depth of field would be quite pronounced.
With digital cameras the opposite holds true, and achieving a similar level of quality does not require the use of a sensor as large as traditional film. For example, a sensor with 6 Mb of pixels for the APS format (13 mm × 18 mm) with an 8-1/2 × 11 print-out would compare favorably to a 35 mm negative with regard to image definition and subject tonality. But with such a small format, only a 9 mm focal length is needed for a 90° angle of view (see Table 1.2). A very short focal length like this means that it is not necessary to be too concerned about achieving depth of field; rather, the smaller the sensor, the more difficult it will be to achieve shallow depth of field and isolate details.
The size of the sensors is often quite small, especially with the compact, pocket digital cameras. And their operation introduces noise since they have a large number of miniscule pixels. Using such a small sensor also means that one must understand the new optical environment where a focal length of only a few millimeters takes in a normal field of around 55°. That’s pretty much the same as using a 35 mm lens with a 35 mm camera! To repeat, with a 9 mm lens, the depth of field is already quite considerable, even when it is opened all the way to f4 or f5.6. And these tiny digital sensors make it extremely difficult to obtain a shallow depth of field. This means that the panoramic photographer will have fewer means of expression at his or her disposal.
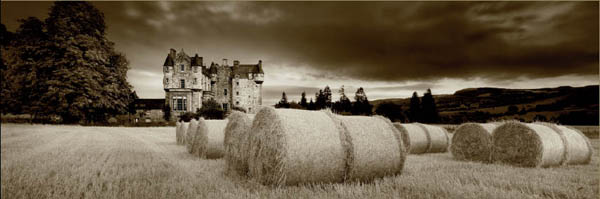
Photo by David J. Osborn.
In summary, the longer the focal length, the more difficult it is to obtain depth of field. On the other hand, it is much easier to isolate a subject by focusing on it and leaving its surroundings out of focus. The main difficulty lies in achieving complete depth of field, especially with landscapes. Regarding the often-tiny digital sensors, the opposite holds true: depth of field is inherently maximal due to the shortness of the lens focal length. Here, everything is sharp, or close to it.
Often used in panoramic photography, determining the hyperfocal distance allows a photographer to obtain the maximum depth of field for a given aperture setting. Therefore, this subject is particularly important – but to what does “hyperfocal distance” exactly refer?
When one places the critical focus at the horizon (with the aperture wide open), and then stops down on the lens, the depth of field increases with some of the foreground appearing in focus in addition to the background. Beyond the horizon, the depth of field theoretically continues to infinity. With the critical focus still being maintained at the horizon, and with the aperture partially stopped down, the closest foreground plane in front of the horizon that appears in focus is the hyperfocal distance. And the more the aperture is stopped down, the closer this plane will appear. Having successfully determined this, one opens up the aperture and replaces the critical focus at the hyperfocal distance. This is followed by stopping back down on the lens, whereby the maximum amount of distance between the horizon and the foreground will now be in focus.
Whether or not one makes panoramas, the hyperfocal distance will still need to be determined whenever one wants to obtain the maximum depth of field.

At first, the focus (F) is placed at infinity. Because of the depth of field (DoF), certain areas in front of infinity (the horizon) are also in focus. The closest area to the camera that is in focus is called the hyperfocal distance (HD).
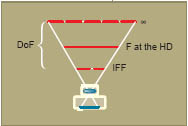
Afterward, the focus is no longer placed at infinity but exactly at the hyperfocal distance. Because of the depth of field behind the hyperfocal distance, everything will be in focus all the way to infinity (the horizon); and, in front of the area that has been focused upon, everything will be in focus up to a distance equaling the hyperfocal distance divided by two (HD/2), which is known as the initial foreground focus (IFF). By placing the focus at the hyperfocal distance, a photographer benefits from a maximum depth of field.