
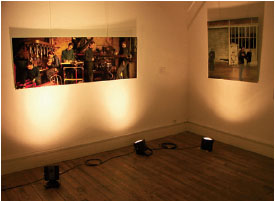
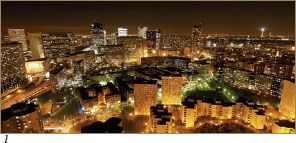
Photo by Christophe Noël.
Photographic Assemblage
Rendered almost automatic because of specialty software that is becoming more and more powerful, photographic assemblage, or stitching, opens new perspectives to all panoramic photographers.
Many ways exist to join or assemble images to make a panoramic photograph. At least one is well known to photographers since it involves retouching software programs like PhotoShop. The most creative photographers truly have arrived at amazing results! Here in particular, I am thinking about Christophe Noël and Jana Caslavska, whose photographs you will discover in this chapter.
Other more specialized software programs have several automated joining modes, some of them being among the most high-powered. Certain modes essentially serve to create images destined for the Web, in the form of small interactive photos. Others allow you to make photographs identical to those taken with specialty cameras. Three software packages actually are capable of simulating a lens shift. This is rather impressive on a technical level, but even more impressive on an aesthetic level as it allows you to make particularly successful images with a computer.
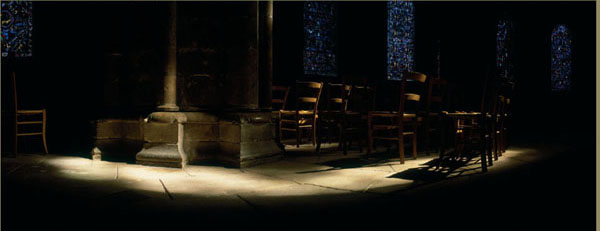
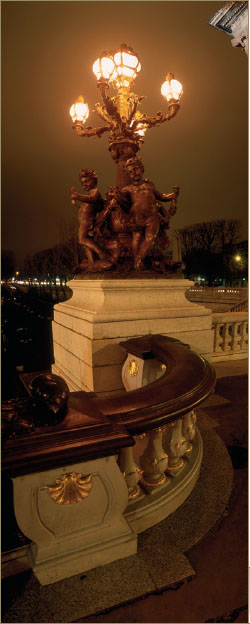
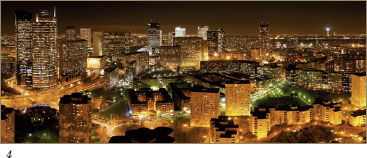
Photo by Arnaud Frich.
In Chapter Five, we looked at how to make the best possible images for producing a successful assemblage without visible overlapping, even when greatly enlarged. Now we will address the preparation of these images – and retouching, if needed – making an incomplete but representative list of the joining software on the market. Then, two types of assemblage will be described, featuring two of the main software programs: the tiled and rectilinear joining modes with the Panavue ImageAssembler and Realviz Stitcher.
Whether they come from a digital camera or a scanner, images often need to be reworked prior to being joined. Poor exposures, bad formats, a size that does not correspond to the project are all foreseeable examples. Above all, they could suffer from barrel or pincushion distortion stemming from optical problems. These faults often are noticeable with the shortest focal lengths and should be removed at all costs in order to guarantee a beautiful assemblage. Too few software programs are capable of automatically correcting them.
Since the component photographs are all taken in manual exposure mode, they can suffer from under- or overexposure throughout the whole series, but none will theoretically receive any more or less exposure than the others. Also, it is possible to retouch them one by one at this stage, either lightening or darkening them; but it will be more practical to do this just once, after the entire image has been joined.
In order to decide on which method to use, we have to reconsider the bit-size of the digital files. If the image series is recorded at 16 bits (i.e., with the TIFF format, or the RAW format with certain cameras), light-level and color corrections must be made for all the component photographs prior to combining them, since the large majority of joining software packages accept only 8-bit images (even with TIFF). Therefore, changes must be made prior to converting a series of 16-bit images to 8-bit. As a result, they will be of much better quality, especially in the difficult areas of the image (i.e., shadows and highlights). On the other hand, if the software accepts 16-bit images, as is the case with the Stitcher 5.0 and Autopane Pro 1.3 and more recently with the ImageAssembler, version 3, it is easier to make the changes later, over the entire joined panorama.
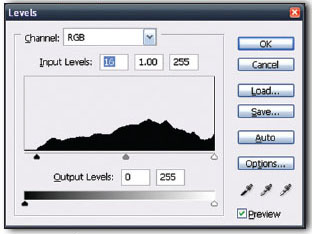
Falling on an image. If the blacks are not dark enough, slide the left-hand cursor (1) to the right; if the overall illumination of the photo is insufficient, move the middle cursor (2) to the left; if the highlights are too dark, slide the right-hand cursor (3) to the left.
A pixel is characterized by color and brightness, and may be coded in either eight or 16 bits. With an 8-bit image, the brightness level is divided into 256 sections, whereas with a 16-bit image, it is divided into more than 65,000! This is advantageous in terms of file size, which in this case is only twice as large. And the finer the sampling, the more one can work on an image, reducing the loss of information. This is even more true when an image has a lot of shadow and highlight information. In these delicate areas, retouching an 8-bit image will prove to be more destructive than a 16-bit image. If a photo contains few delicate areas, it will be practically impossible to detect the difference between it and a photo taken with a good camera; here, it is obviously preferable to work with smaller file sizes.
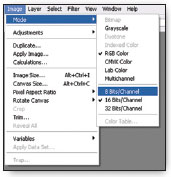
Via the menu Image>Mode, it is possible to know if one should make the image in 8 or 16 bits. Here, it’s a 16-bit image that converts easily into 8 bits by clicking just above.
One of the main advantages of digital cameras over traditional cameras is the possibility of precisely and easily regulating the white-balance when taking the picture. This works really well. There are only two types of color transparency film, daylight and tungsten, but with digital cameras there are almost an infinite number because of the white-balance. Thus, it is technically possible to obtain a series of images having the same color temperature without using color conversion filters (the well-known Wratten filters).
But as is the case with the light-level, additional corrections may need to be made in front of a computer monitor if the series is still a bit too warm or cold. When the photo contains many dark and light areas, it is better to make as many changes as possible to a 16-bit image. Either the joining software accepts 16-bit images and one works over the joined image, or one makes the corrections one by one over nonjoined 16-bit images before converting them all to 8-bit.
If the photos are taken with traditional film, the problem is a little different. The film always behaves in the same way with a given type of light. Contrary to when one forgets to override the white-balance with a digital camera, here all the photos will have a similar dominating color shift if the light does not match the film’s color balance. To correct this, the photographer uses an assortment of color correction filters and a color temperature meter. These are hard to manage in the field, so few photographers work with them outside of the studio. Also, some retouching will have to be anticipated here; and as was the case with adjusting light-levels, this will preferably be done at 16-bit.
Many wide-angle lenses introduce either barrel or pincushion distortion, these respectively referring to a bending of lines away or toward the center of the photograph. Sometimes the joining software anticipates these distortions by having a data bank (that obviously needs to be brought up to date on a regular basis) for the specific problems of many of the digital cameras on the market. In particular, this pertains to pocket digital cameras with fixed lenses. Prior to stitching, or joining, the images, one has to tell the software what camera and focal length were used in taking the picture, or else the assemblage will be of a rather poor quality. Some software packages, such as Stitcher 5.0, can automatically gauge the distortions prior to assemblage. This function is effective when the distortions are quite noticeable, and it can eliminate an additional step in preparing the images (e.g., in PhotoShop). The gain in time and productivity is significant, since the amount of distortion can be stored in the memory after being calculated.
This photo made with a wide-angle lens reveals a fair amount of distortion. The lines at the edges are bowed out from the center. This is known as barrel distortion. It is absolutely necessary to eliminate this before opening the images in a joining software program.
The numerous interchangeable lenses, although of high quality, produce even more noticeable distortions – sometimes as much as certain inexpensive pocket digital cameras. Because the software does not have any information about these distortions and the proposed corrections are often too approximate, I very much prefer to correct this fault prior to opening up the images in the joining software. To do this, I use Panorama Tools; but one also could use the PhotoShop Spherization filter (although, in my opinion it is not quite as good). With the latter, find that the corrected images lose a little bit of their initial sharpness.
Panorama Tools Correction Tool
This tool, made by an inventive German engineer named Helmut Dersch, can be hooked up with PhotoShop. It’s a supplementary filter for PC, Mac, or Linux that provides very precise correction of image distortions, and more easily than the Spherization tool just mentioned.
Once this filter has been installed, it is necessary to proceed in the following way to correct image distortions:
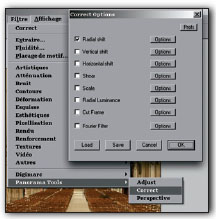
1. After opening one of the images in the series, from the menu Filters>Panorama Tools>Correct click OK.
2. Check the Radial Shift option to correct the distortions. (The other options do not concern us here.)
3. Click Options. A total of 12 boxes will appear (four columns and three rows corresponding to the three RGB channels). Only the second and forth columns concern us here. It is necessary to fill each of these with the same numeric values. The second and fourth columns’ numeric values must total 1.
If the image contains barrel distortion (lines bowed away from the center), the result of the fourth column will be greater than 1; conversely, it will be less than 1 with pincushion distortion. 1 corresponds to a 0 percent curvature. Therefore, a value of 1.012 corresponds to a correction of +1.2 percent. If the value of the fourth column is greater than 1, that of the second column needs to be negative; in this example, the value needs to equal 1 – 1.012, which would be –0.012.
For pincushion distortion, the value must be positive in the second column and less than 1 in the fourth column; for example, +0.016 and +0.984.
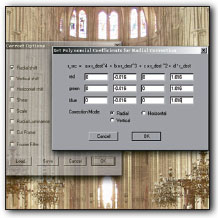
In the second and fourth columns, here are the values that I found through trial and error with my Olympus E 10 digital camera in the wide-angle, 35 mm position. (My lens produces barrel distortion.)
Installing the Correct tool is very simple; start by downloading Panorama Tools from the following address: http://home.no.net/dmaurer/~dersch/Index.htm. At the heading “Download,” select Mac 2.2, Windows 2.1, or Linux. Once the ZIP folder has been opened, install the two files on your computer: one in the root directory and the other in the PhotoShop Plug-In folder.
1. For a PC, copy the file pano12.dll in the folder C:/Windows/System. For a Mac, copy the file pano12.lib in the folder System Folder Icon.
2. From the PhotoShop Plug-In that you have downloaded, copy the Correct filter in the folder Programs>Adobe>PhotoShop>external modules>filters.
3. Open up PhotoShop (the opening can be a little bit longer than normal the first time) and the filter is installed.
After a bit of practice, it will be easy to determine what values work for correcting the faults of a lens at a given focal length. Once the percentage of correction has been determined, all that remains is to apply it systematically to all the images in the series. And these amounts are stored in memory, even after closing PhotoShop.
In the same window, under the columns, check the Radial box (this is the correction that actually eliminates the distortions) and click OK to apply the filter. The image starts to transform; if the determined value is correct, the fault will be eliminated.
With this filter, the image keeps the same number of pixels as the neighboring image. So it is very quick and easy to use in production work. To easily find the value of the correction to apply, it is better to be interested in photographing recent buildings (or better still, graph paper), which are geometric and have straight edges, while seeking to preserve a perfect parallelism between the sensor and the building (or sheet of paper). In this way, the distortions will be seen more easily.
One other bit of advice before ending: take notes of the operations in order to speed up the work and save time in the future.

Photo by Franck Charel.
PhotoShop Spherization Filter
Corrections for optical distortions can also be achieved with the PhotoShop Spherization filter. However, it is neither adaptable nor practical in the production of a large body of joined panoramas, and the application slightly degrades the photo. Gérard Perron describes it in detail in his book Photographie Interactive avec QuickTime VR [Interactive Photography with QuickTime VR] (see bibliography in Appendix A).
Remember, assemblages often are of better quality when the correction is done outside of the joining software. In such cases, remembering to deactivate the built-in correction mode becomes necessary, or the software will introduce the opposite distortion.
All photos need to have the same number of pixels, or the software will not open them. To redefine the number, use the PhotoShop menu Image>Image Size. Define the initial resolution (e.g., 72 dpi for the Web and around 254 dpi for printing, depending on the results, the size of the print, and your personal preferences), followed by the enlarge or reduce mode. In any case, it is necessary to check the Keep proportions option so that the geometry of the individual photographs will not be changed.
The choice of the resizing calculation for the image is also important. Normally, photographers use the PhotoShop bicubic Interpolation mode. Although it is undeniably suited for enlarging images (since it creates new pixels from preexisting ones), it is far from being ideally suited for reductions, where it often is preferable to use either Closer or Bilinear mode. The range of problems for reducing the size of an image is completely different: the image already contains all the useful information, so it becomes necessary to remove selected information in an intelligent way, to avoid degrading the image or causing it to lose sharpness.
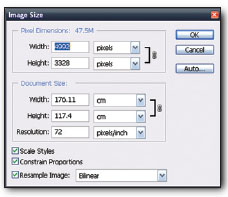
The change in image size is done via the menu Image>Image Size in PhotoShop.
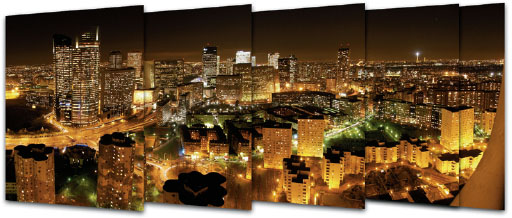
The lighter the image load, the quicker the joining software will work. Thus, it is not necessary to join the images at a high resolution in order to print the final photograph in a postcard format or publish it on the Internet. For example, if the final image is an assemblage of 10 photos containing 10 million pixels per image, the finished panorama would have around 100 million pixels. That a pretty heavy file!
The choice of image format is crucial. All the joining software packages accept JPEG or BMP files, but the same does not hold true for the TIFF format and even less so for the RAW format (the copyrighted one). Regarding the latter two files, the photographer needs to rerecord them in a format recognized by the software before opening the images. If the panoramic photographs are destined for publication on the Internet, one similarly records them onto a JPEG format at a low compression rate (i.e., the minimum required for a fine appearance on the Internet) in order to gain calculating speed in the joining step.
Retouching tools are wonderful for photographers who inevitably have to retouch their images on the computer. Incredibly effective, they almost justify the notion that one should scan all traditional photographs before printing them, if only to be able to touch them up in this way! (I have truly painful memories of retouching fiber prints with a brush.) Going beyond normal dust problems, these tools can also be used to eliminate other annoying details like halos caused by the sun or a streetlight.
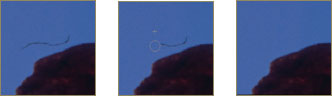
Because of the Touch-Up tools included in the retouching software, removing dust and other undesirable objects is child’s play.
Dust Problems
To many photographers, retouching usually means dust problems. Small digital cameras with fixed lenses have a large advantage since no dust can reach their sensors, which are hermetically sealed by a nonremovable lens. Just imagine how much touch-up work would be needed for a poster measuring 13″ × 39″ that was made from 10 35 mm slides scanned at 2,900 dpi. The antidust systems of the scanners would need to function exceptionally well! As a comparative example, it sometimes takes two hours to scan a 50 mm × 120 mm color transparency from my Noblex 150.
Interfering Objects
The Retouching tool can also be used to eliminate other bothersome details, but this is a question of personal taste. Personally, when a landscape moves me, it’s due to an absence of annoying or intruding details. So in the end, there is usually very little retouching to do in this regard.
Sunlight Halos
The flare effect – halos from the sun or from any other intense light source – not only diminishes photo contrast in a noticeable fashion, but produces an equally ugly visual result. As Gérard Perron has shown in his book, these effects are often difficult to remove since they are both numerous and present in significant areas. Even if the Correction tool that comes with, say, PhotoShop 7.0 is amazingly effective, nothing guarantees that you will properly eliminate the flare effect without several hours of work. One of the most helpful solutions is covering the sun with the hand, or better still, with a small black card (like the one used in the darkroom for dodging) that one can easily erase afterward with the Retouching tool. In this way, the card is placed in a highly overexposed area of the sky (i.e., where there is no fall-off in illumination) that makes it easy to remove later by retouching. Another method mentioned in Perron’s book consists of taking two photos, one with and one without the card, joining these with the retouching software, while being careful to join just the top portions of the images.
Completing all the retouching prior to the joining stage is not obligatory, since some of it can also be done on the final image. In this way, one has the advantage of standing back and viewing the entire panorama. A specific detail may not be so annoying when it is seen as part of the larger whole – especially since the whole view is the fundamental reason behind panoramic photography.
We now will consider some typical joining software packages and show how to arrange the component images to obtain a panoramic photograph. This can take from a few seconds to several minutes depending on the computer’s strength and final size of the joined image. (An image destined to be poster-sized could easily go beyond 150 million bytes.)
There are two large categories of software for joining a group of component images: retouching software like PhotoShop or Pro PaintShop and joining software proper (i.e., stitching software). They are designed for one or more specialized functions. The first type allows numerous montages, normal or artistic, but without automatic functions: it requires a bit of dexterity on the part of the photographer, and above all, time and experience. The second allows for the rapid and almost automatic joining of photographs, sometimes according to two different joining modes that start from the same images. But unfortunately, high-powered stitching software is still not widely available. The ones that are sold with small pocket digital cameras function well but are often very limited: they know how to join only tiled (curved-line) images, with a horizon line in the middle.
Each software program has its own interface, but the main steps are common to all of them:
1. Opening all the images that one wants to prepare in the software program.
2. Indicating what one wants to obtain: simple panorama, tiled, rectilinear, locked, and so on.
3. Indicating what focal length lens the photos have been taken with, as well as specifying the camera. This tells the software what kind of distortions the lens has (i.e., barrel or pincushion) and what it will need to correct (this information is in its database). Usually, I find that this tool does not work that well, so I prefer to correct this problem beforehand. After allg, the software already has enough to do!
What are the best-known joining methods? How does one join photographs depending on the type of result required? What software packages allow you to do this or that? These are the questions I will try to answer over the remainder of the chapter. After offering some important definitions, I will discuss some of the best joining software as well as their peculiarities. Then I will end with two technical examples taken from the most high-powered stitching packages.
Easier than it would appear, joining involves opening prepared photos so that the stitcher can combine them in a manner that becomes more and more automatic. The stitching software compares the elements of two consecutive photos and joins them together, transforming them according to the software and the desired final result: rectilinear or tiled.
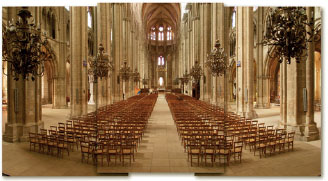
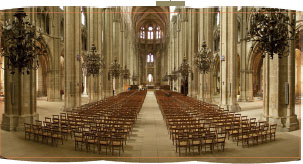
These three photographs were joined in the tiled and rectilinear modes. Here, the joining of the first row serves as the line of reference.
The following explains how the job of assemblage begins. Depending on the result, all that remains is to rework the possible areas that are poorly joined, then store the final image in a specific folder.
Differing from the joining function of retouching software like PhotoShop, this dedicated software can curve horizontal lines like a rotational camera. In other words, it rounds them so that they can match up. Thus, we have a real transformation of the image, rather than a simple collage-effect introduced by the retouching software.

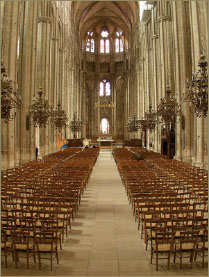
The stitching software truly has transformed the three images so that the row of chairs merges perfectly, forming a smooth curve. The images have been tiled, producing the same image as if it had been taken with a rotational camera.
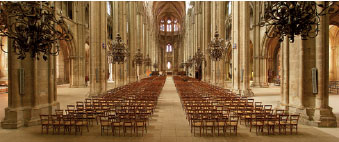
This time, the stitching software automatically merges the photos by stretching and distorting them so that the row of chairs remains straight and, in the present case, parallel to the camera back. A flatback camera would produce the same image.
It is possible to obtain a distortion-free assemblage with retouching software, but this is fairly rare with specialty packages. Here, the joined image resembles a photograph taken with a wide-field specialty camera like the Linhof Technorama, or a Hasselblad XPan with a 30 mm lens. In addition, the software can fix converging vanishing points caused by the camera being tilted while taking the picture.
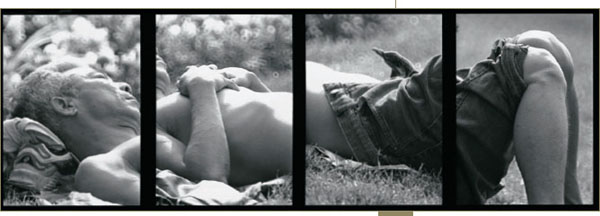
Photo by Jana Caslavska/chamber 5.
Photographers have used – for a long time now in some cases – PhotoShop’s collage possibilities to make photographic montages, and among these are some who make panoramas! Of course, these days one is able to easily join the images; but with PhotoShop, it is also possible to make some really creative montages. This remains and will remain its greatest strength. PhotoShop allows you to extend the boundaries of creativity, and panoramic photography is no exception in this regard. To show and explain all the tools of PhotoShop goes beyond the framework of this book, but in the expert’s opinion section of this chapter, Christophe Noël will reveal some of its hidden potential to us.
Photo by Jana Caslavska/chamber 5.
The Workshop Christophe Noël
I have always had dreams; photography is the first to allow me to cross this marvelous frontier between imagination and representation. Then, PhotoShop arrived: with the mouse, everything started to fall into place. My first goal is to surprise, to make something that I have never seen before, to try to be different. In a certain way, I need to be selfish, true to myself, so as not to be let down. I try to directly involve myself in my work and take part in it. I do not just seek to obtain a beautiful image: if my work is reduced to a simple illustration, I have failed. I always try to propose a subject or express a feeling, something that literally gnaws at the photographer as much as the viewer.
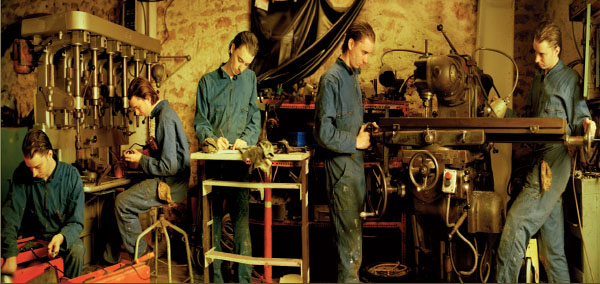
The photograph L’Atelier is taken from work that was commissioned by the regional Council of Seine-Saint-Denis, France, in collaboration with students from the Photography-Multimedia department of the université de Paris VIII, on the theme, Industrial Echos. I was interested in the worker mythology, proposing a group of staged images dealing with mealtime, the workplace, and so on, proposing the question of the identity of each of us in a world where the manufacture of serial objects privileges the uniform copy to the detriment of difference.
The construction of the image started with some research: looking at other images and books, consulting archives, and meeting people, in this case, workers. Next, it was necessary to combine their opinions on the chosen theme with my imagination, prejudgments, and slight personal experience as machine-shop mechanic.
Then came a time of wandering: to walk and lose oneself in the heart of abandoned industrial wastelands and old workshops. I wanted to make stagings recalling nineteenth-century tableaux vivants, like those enormous frescos that line the walls of museums. The panoramic format lent itself wonderfully to this, and the view camera was ideal for the perfect rendition of detail, an almost tactile rendering. I also like the view camera because it is heavier than the normal 35 mm, something which provides more of a feeling of making a film than a photograph. Everything takes a certain amount time, making it difficult to reconcile the imperative of delay within the framework of a commission.
Putting myself in the scene allows me to physically involve myself in what I want to call crossing the photograph; if I would have photographed someone else, the result would have been completely different. The blue overalls that I wear are mine, my blue mechanic’s overalls. The self-portrait not only permits using oneself as a subject, but it also creates something that perhaps approaches performance, allowing one to live more fully at the moment when the picture is made.
The joining takes place in PhotoShop. By swinging the back of the camera, I was able to make the first part of panorama without distortion. With the last part of the image on the right, I had to pivot the camera so as to include the rest of the scene. When the time came to retouch things, I recreated certain areas of the background in PhotoShop, using the retouching tool and some blending masks to correct the distortions and vanishing points. On the final image, the machines are not exactly positioned as they were in reality, a lever and a dial have been moved; but only the builder of the machine would know this. Exposure of the figures has been achieved by marking the ground in order to avoid impossible overlaps, and the arrangement of the whole has been done in PhotoShop using the blending masks.
Henceforth, I will no longer encounter any limit to my imaginary constructions. Only time imposes constraints, since it is obviously necessary to have patience. But here is time captured by the lens and manipulated in PhotoShop: anything becomes possible, bits of ideas or fragments of dreams that will soon exist on the surface of a piece of paper.
This photo also could have been made using the joining method.
Photo by Arnaud Frich.
The range of software packages is large: some are sold with digital cameras, and others can be downloaded from the Internet, sometimes for free. The objective of this section is to present software programs that pertain to panoramas. Fundamentally, these all function on the same principle, with more or less ability. Their shared characteristic, which separates them from PhotoShop, is the automatic way in which they join images. The Internet sources listed in the appendix will allow you to complete this list.
Certain software programs join only flat panoramas, and others offer a choice between flat (straight or tiled), cubic, or cylindrical panoramas. Flat panoramas can be printed or displayed on the Internet like normal panoramic photos (i.e., using the horizontal navigation control when the image is too large for the screen, or by moving the photo in a display window with a mouse). Cubic panoramas, of which the most spectacular shape is the 360° × 180° QTVR, can be displayed only in a window with a 4:3 ratio for the size in question. Here the mouse allows you to move it in every way, as well as zoom into the image.
Realvis Stitcher
Two versions of Stitcher exist: Pro 5.0 and the scaled-down EZ version-, which is indeed easier to use since it is almost entirely automatic. Sold for both PC and Mac, these software programs are formidable tools for making quality panoramas without a specialty camera.
The Pro version is an extremely powerful tool for those who want to make interactive panoramas for the Web, as well as for high-quality and large prints, and is well known because of its 360° × 180° views in the QTVR window. The software represents the latest in present-day assemblage possibility and will be studied in further detail later in this chapter. With this version, one can obtain images with the same geometry as an XPan, a Noblex, or a Roundshot, and with even more lens-shifting capability.
Autopane Pro from Kolor.com
This new assembling software has been developed by a newly born French company and is available for a PC or a MAC; the quality makes it worth the price and it is one of my favorite assembling software programs. It allows the user to create using all kinds of assembling processes except the QTVR assembling process. The assembling options are unique and especially powerful within a polished and clear interface – PT Gui – the software that best takes care of optical distortion and has the best harmonization tool of lights. If its monitoring publisher does not convince you, perhaps its operating speed and adaptability certainly should be proof of its reliability.
Panavue ImageAssembler
Sold exclusively for PCs, Panavue ImageAssembler has all the assembling capabilities required by today’s updated software except one. Unlike Stitcher, one cannot practice “authoring.” However, it runs a bit slower than its immediate competitors when setting monitoring points in order to get a perfect technical assembling result. This step has to be done manually, which consequently slows down the production flow. The ImageAssembler from Panavue has been one of the first software programs on the market, and is reviewed at the end of Chapter 6.
This program remains one of my favorite joining software programs. It allows for tiled montages only, but offers the wonderful possibility of tilting the camera while taking the picture, in order to place the horizon line where it seems best. To do this, the software distorts the images being joined in order to straighten the vertical lines; in this way, it eliminates any convergence toward a vanishing point. It also can indicate curvature of the horizon line.
Making images certainly takes a little bit longer here than with other software, but the result is of the highest caliber. I am always amazed by the result obtained after each assemblage, even in high-definition. Its range of ability is absolutely astonishing since you can make flat, cylindrical, QTVR, and interactive (Java) panoramas. Like all good, present-day joining software, it accepts TIFF images (16-bit). Truly, this is an excellent tool I use on a regular basis and recommend because the trade-off between quality and price is very good. Improving on this scenario, version 3 appears to have very good new functions (e.g., storing the joining image in the PhotoShop format), but at a higher price. This software program is studied in further detail at the end of this chapter.
PT Gui
Based on the renowned algorithm method by Professor Helmut Dersch, but in a much more adequate and economical interface, this software kept improving and has become one of the best PC assembling software programs currently on the market, even though it provides less performance capability than the MAC edition. Users are often real defenders and admirers of the PT Gui software. Nevertheless its adaptability regarding the harmonization correction is not as developed as the one offered on Autopane Pro. In any event, PT Gui is a wonderful professional tool.
Panorama Factory
This software program (only for PCs) presently exists in two versions. Version 1.6 can be downloaded for free, and the more recent 3.0 version is available for a modest sum. Version 3.0 has a new interface that simplifies things for the beginning photographer; it also allows you to make secured 360° panoramas for interactive applications.
The quality of the assemblage is all for a photographer could want, even if this software does not allow one to decide where the horizon line should be placed. Another nice positive feature is that this image-joining software accepts the 8-bit TIFF format, which is fairly rare with free or inexpensive software programs.
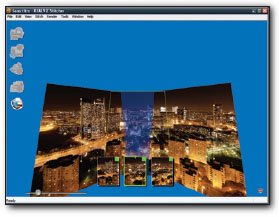
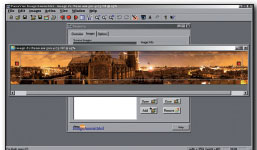
Joining with the Realviz Stitcher
This highly adaptable software program allows you to make all kinds of assemblages, as I already have mentioned. It comes with a very well-written guide, so I do not need to discuss all the details of its operation here. Nevertheless, in this section, I will attempt to explain what is possible to achieve concerning joined panoramic photographs.

© Realviz.
After having joined all the images of a project (the most time-consuming part), Stitcher makes it possible to store the finished montage in multiple formats: QTVR, up to 180° × 360°; interactive Java; distortion-free layouts; bowed or spherical (tiled) layouts; cubic; and so on. Simply put, it’s the most powerful and expensive stitching software program on the market.
Even though it remains less powerful for making tiled assemblages than, say, the Panavue ImageAssembler (3.5 version), it provides several options for joining images when exposure conditions have been less than ideal (e.g., balancing light-level differences, problems with joining a significant object, elimination of unwanted intrusions), as well as its own characteristic joining modes. Really an impressive array! And with the possible rare exception of Panorama Tools, it does not have any rival in the two following areas:
• The joining of several photos in order to make a distortion-free panorama, as though it had been done with a Fuji 617 equipped with a 90 mm lens (90° horizontal angle of view) or an XPan. It also has the ability to correct perspective, something these two cameras cannot do.
• The joining of numerous photos in order to make a 180° × 360° image displayed in a QTVR window. Because of the QuickTime Player display window, it is possible to make an image move completely, and in every direction (e.g., front to back, complete turns), as well as zoom in on the image. Here, the panoramic photograph is always viewable free of geometric distortion (i.e. without horizontal line curvature), and uniquely capable of conventional low-angle effects. This, I believe, is the Stitcher 5.0’s most striking feature.
These five elevated (–12°) shots are to be joined in Stitcher. This is its main strength, since it’s the only easy-to-use software that can make a rectilinear assemblage, both quickly and automatically.


Here are several of Stitcher’s features, depending on the nature of the rendering: 1. Rectilinear rendering, with vertical lines converging toward a vanishing point. 2. The same photo, but with the vertical lines corrected. 3. Tiled rendering, with repaired perspectives. (Note that for these three joined photos, I have not used all the photos in the series.) 4. Because of the spherical rendering, this time I have been able to join all the images to make a photograph identical to one made with a rotational camera – in this case because I have been able to shift downward significantly, in order to place the horizon line at the upper third of the composition.
These four renderings all have come practically from the same assemblage, in the main window. Only one or two supplementary manipulations have been needed. The gain in time is significant.
To start, the following is a small outline of the most important steps for using this software program:
1. Open the images to be joined, then choose two or three of them in order to calibrate the distortion of the lens. Contrary to many software programs, Stitcher has a good calibration tool for significant distortions. Thus, it is not always necessary to correct them later in PhotoShop.
2. Follow the assemblage for the remainder of the project by placing the images one by one in the stitching window.
3. Balance the color and light levels.
4. Align the panorama. This powerful tool is capable of straightening all perspective lines (i.e., convergence toward a vanishing point when the camera is tilted to take the picture) or of fixing problems with the horizon line.
5. Close the window if it is intended for the Web (QTVR).
6. Call up the result of the project. The software will join the images and record the panorama in a selected folder. Only then can one pick the manner of presentation (e.g., distortion-free, curved).
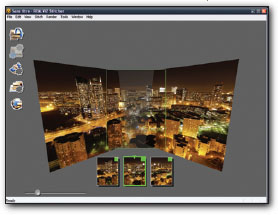
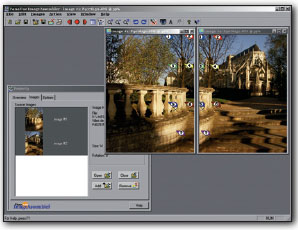
Here is the Stitcher workspace when first opened. The small green or red squares (in the upper-right corner of the component images in the gallery) indicate if the images are joined or not.
Stitcher is just about the only stitching software program with a tool for correcting optical distortions that actually works well. When you open a new project and load up a series of images (New File and File Menu>Load Up Images (Ctrl+L or Apple+L)), the images open in the lower part of the stitching window, Image Gallery.
From here, the first step consists of calibrating the lens used. This takes only a few seconds and the result of the measurement can be stored in the memory for future assemblages made with the same lens. To calibrate the lens, the software needs only two or three images. With the mouse, drag the first image into the work window just above, followed by the other two; then, roughly superimpose the areas to be joined. In the menu Tool>Strong Distortion>Calibrate, the software joins the images and calculates the distortions. Following this, one can open the property window (menu Editions>Property: Alt+Enter or Apple+Enter) and see the result.
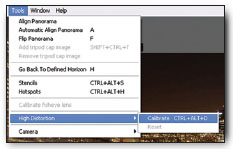
Menu – Calibrate Lenses: Stitcher can precisely and effectively calculate the distortions caused by the lens on the edges of the images.
Three images of the project have now been joined in advance; from here, it is necessary to continue with the rest of the series, taking the nonjoined images from the image gallery (by the red square in the upper-right corner) one by one and dragging them into the work area above. With the mouse, the transformation tools, and the positioning accessible by the Display menu (or by keyboard shortcuts), adjust the position of the images as needed before starting the assemblage (tap Entry). The red square then changes to green on the image in the gallery.
Once the automatic assemblage has been achieved, the Equalization function can balance the areas joined in the overlapping areas. Then, it is necessary to “line-up the panorama” in order to either straighten a tilted horizon or correct the perspective of images taken with a tilted camera (i.e., making it appear as though the photograph had been made with a shifting lens). Once the tool has been activated, it helps to put some reference points along the lines that need to be vertical after correction and then to confirm this. From here, the image is ready to be stored and the software can produce the result.
Because of Stitcher’s Alignment tool, it is possible to correct any kind of vertical line with a few clicks of the mouse.
It’s only now that one can choose the type of result wanted – size, photo export format (e.g., TIFF, JPEG) – and the folder where it will be stored. To do this, click the menu Result>Render (Ctrl+R or Apple+R). The configuring window that opens is divided into several parts, the first dealing with the format of the result, leaving one free to decide the following:
• Flat mode, which simulates the panoramic photograph that one intends to print; here, the image is free from distortion (i.e., like a Linhof 617 or an XPan)
• Cubic mode, which is intended only for the Web
• Spheric mode, which is to simulate a panoramic photograph taken with a rotating camera (e.g., Noblex, Roundshot); these images can be printed as well
• Cylindrical mode, also intended for the Web
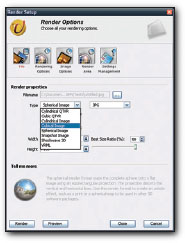
Stitcher’s rendering window is very comprehensive.
The Format field allows you to choose between different file-storing formats, for example, JPEG, TIFF, or PNG. Then, the options button allows you to select the amount of compression.
The second part of the configuring window, labeled Quality, shows two fields. It is usually necessary to retain the Mix 1 option of the first field. The second field concerns intensifying the images during treatment. Here, I prefer to check None, and to control things myself in PhotoShop according to the final destination of the image. A third part of the window is reserved for the title of the saved file and folder.
It is possible to choose the final size of the joined image without needing to take the size of the original images into account. In this way, the software effects an interpolation to enlarge the images as needed (and that explains the Sharpness function’s presence in the second field). The function Preview is also very helpful for getting an idea of the joined panoramic photo. Stitcher, version 4, which has more recently appeared on the market, allows you to make a joined image without interpolation (i.e., at a 1:1 ratio). Apparently, this has been a recurring complaint heard by the Realviz engineers.
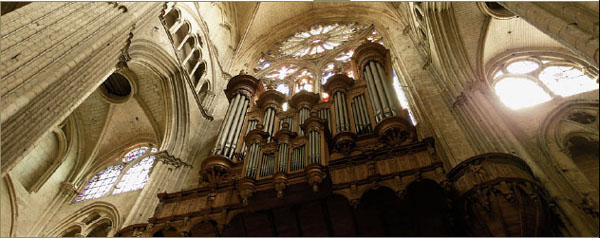
Five photos taken from a very low angle have been used to make this orthoscopic assemblage of an organ chest. The final result is equivalent to an image taken with an XPan or a 617 camera, and here it’s done with a few clicks of a mouse! It also would have been possible to obtain a similar result with PhotoShop, although less easily and definitely taking much longer.
Photo by Arnaud Frich.
To start the final assemblage and store it in the selected folder, click Result. The series of component photographs remains accessible in the main window of the software, so you can still modify it later in order to create another project, without having to start all over again.

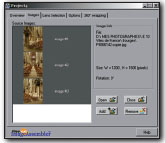
© Panavue.
Main screen of the Panavue ImageAssembler that appears when a new project is opened. The assemblage is made in two or three steps, depending on the type of project. 1. Lens Wizard. 2. Assemblage. 3. Locking the image in the QTVR format.
Joining with the Panavue ImageAssembler
Panavue ImageAssembler is one of the most powerful software packages for assembled panoramic photographs, and my favorite to use with a PC. It works quickly and efficiently, but it takes longer to work on than, say, Stitcher or Autopano Pro. But that’s the price one pays for so many unique functions! Here, one can make interactive panoramas (like extension.mov’s well-known QTVR), normal photos (without being obliged to put the horizon line in the middle of the image), and assemblages constructed from scanned-in images. This software is truly the one of the most complete for making technically irreproachable, high-definition panoramas. You will not necessarily detect any difference between its images and those made with a specialty camera. In the past, one could open images with all kinds of extensions like the 8-bit TIFF, but the more recent 3.0 version, mentioned earlier, also allows one to work with all kinds of file extensions except RAW files. In either case, the memory capacity is very large.
The following is a short outline of the important steps in using this software program:
1. Be sure to correct the lens distortions before opening the images in the software (its automatic tools have left me unconvinced).
2. Prepare a Lens Wizard project in order to tell the software what focal length, angle of view, and inclination (tilt) have been used. At this stage, the software needs to have only two images from the series.
3. Then, and only then, open all the images to be viewed. Indicate both the desired result (e.g., simple panorama, closed, interactive) and the Lens Wizard project in question.
4. Finally, start the assemblage after having selected all the images. The software begins to make its decision a few seconds later. Store the final image in a dedicated folder.
5. To create a locked panorama (visible in a display window like QTVR), open the 360° image. After it has been joined, start the locking-up process.
From the start, the software needs to be told what focal length was used to make the pictures and how many degrees the lens was tilted. To do this, open a new project (New Project, Ctrl+ N) and check Lens Wizard. As long as the camera has been truly leveled during exposure, only one Lens Wizard project per lens and focal length (if it’s a zoom) needs to be created. But if the camera has been tilted (i.e., elevated shot or low-angle), it is necessary to create a new Lens Wizard for each viewing condition, even for the same focal length. That’s the only drawback to this software; but what a pleasure to be able to place the horizon where one wants while keeping it completely horizontal! However, there is one small condition: when making the exposure, the horizon line needs to be included in the viewfinder’s field of view, or the assemblage will not work.
Once Lens Wizard is checked, the window, Gathering Information, appears. Tell it how many photos are being used so that it may calculate information about the conditions of exposure – information that will be essential for the joining software later. To do this, place numbered flags at the same places for two or three consecutive photos. I definitely prefer to check the option, 2 photos in a row, to lay down eight flags instead of four. In this way, the results will be perfect, even with the most difficult of calculation projects (e.g., when the lens has been seriously tilted).
As I explain in the retouching section, I prefer to correct the optical distortions (barrel and pincushion) in PhotoShop, aided by the Panorama Tools plug-in, prior to starting a Lens Wizard project. To create a high-quality assemblage, the software needs photographs that are perfectly identical in the overlapping areas for the most important architectural details. If people, leaves on a tree, or even clouds have moved, the software will disregard them in order to balance the images.
A small window opens with three tabbed index cards: Overview, Images, and Options. In the Options card, click Do lens fine tuning. Then, open the Images card and click the only active button (Add+) to select the folder and images that are to be used with the project. Warning: At this stage, I repeat, it is not recommended to make an assemblage, only to prepare for it. Just two images from the entire series that constitutes the final panorama will suffice. It is better to choose images with straight vertical lines along the entire height of each photo in order to facilitate flag placement and achieve an accurate calculation of the degree of lens tilt.
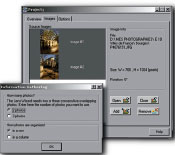
After opening a new project and choosing Lens Wizard, an Information Gathering window followed by a Project window are displayed. This last one has three tabbed index cards: Overview, Images, and Options.
Before moving on to placing the flags, click the icon of the menu, Arrange Windows. Then, place the flags one by one in the same areas of the two images being joined, using the loupe at a 200 to 300 percent magnification for more precision. A very practical way to do this consists of clicking one of the flags, followed by the Loupe+ found on the tool bar, as many times as needed: each image enlarges around the selected flag at the same time as the two photos. One changes the operation of the eight flags by placing them in groups of two. Here, it is desirable to do this in such a way that the flags 1 and 2, 3 and 4, 5 and 6, and 7 and 8 would be placed on the lines that are horizontal after the image is joined. In a similar manner, it is preferable that flags 1, 3, 5, and 7, and then 2, 4, 6, and 8 would be placed on lines that will be vertical in the final image. As a result, the degree of camera tilt can be more precisely calculated.
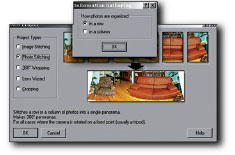
When you decide to create a Photo Stitching project, the software asks you to organize the photos in columns or rows.
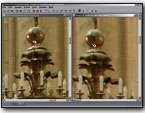
Using a loupe to assist you, place the small flags in the same locations of both photographs to connect them.
Among all the images of the series, I have chosen these two photos because of their vertical lines; all that remains is for me to place the flags at the same spots in both images.
From here, one starts the calculation by clicking the blue eye of the menu bar, or clicking Action>Full Run.
On the job bar below, in the right-hand corner, one can see the calculation advance. Once it has finished, a window opens up with two joined photos. Then, a second window appears with the options, New Stock Lens and Cancelled. If the assemblage looks good, click New Stock Lens.
The software recalls the various parameters of the calculated exposure (e.g., focal length, degree of tilt). Then, it asks you to select the type of film used (e.g., 35 mm, 6 cm × 7 cm, APS) and to title the project. In this example, I named it E10 35 mm Bourges. Finally, close the window and the project.
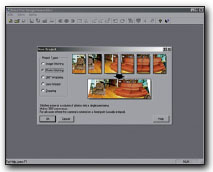
Second Step: Series Assemblage
This step starts by opening a new project, of which only one in a choice of five concerns us: Photo Stitching. Having selected this, the choice of a column or a row is then proposed in a new window. In most cases, click Row. to provide access to a new window with five tabbed index cards. (At this point, the 360° wrapping card does not concern us.) Click the card, Options, which contains the following three screens:
• Stitching Options. Provides a choice between a completely automatic assemblage and a manual mode. I have noticed that the quality of the automatic assemblage directly depends on the quality of the Lens Wizard calculation and the degree of camera tilt when taking the picture. If the Lens Wizard is well calculated, something you will know only after the assemblage, auto mode works as well as manual. If not, then it is preferable to select the stitching option, Manual stitch with 2 flags. This obliges one to manually place the two flags on all the images facing each other, which will quickly lead to a 300 percent enlargement. But when one has several images to join, it is surely preferable to redo the Lens Wizard calculation than place a large number of flags.
• Image Options. it’s better to leave this control alone and to turn off Adjust Color if the software has problems balancing the light-level and color in the joined areas. Clearly, ImageAssembler will work its wonders quite well here.
• Projection Type. The Spherical box must be checked, or the software will not curve the images.
Because of the similar appearance of images, make sure you have noted the numbers of the chosen photos before opening ImageAssembler if your are in either Details or List display mode. If not, you can move to Miniatures display mode.
The five tabbed index cards of a Photo Stitching project.
After joining, the three images of this project reveal traces of the tiled assembly. The Cropping tool of a good retouching software program can eliminate these.
On the index card, Lens Selection, check Use One of the Stock Lenses. Then, in the Stock Lenses field, select the focal length and degree of tilt prepared in the preceding Lens Wizard stage. Finally, on the index card, Images, click Add+ to open the folder containing the images that are to be joined, and position them from left to right depending on the order of the assemblage.
Before obtaining the final result, one can quickly obtain a low-resolution version of the assemblage by clicking the blue eye of the menu bar or by scrolling down Action>Preview Run. If the general aspect of the overall image seems right with regard the balance of light and color, and if no component image has been forgotten(!), start the assemblage (Action>Full Run) and wait patiently.
It is necessary to crop the panoramic photograph in the retouching software program, in order to eliminate any evidence of tiling, and to save it via the menu File>Save Image As. Store the completed image in a selected folder in either a TIFF or a JPEG format, depending on your preference. (Recently, it has also become possible to choose the PhotoShop extension PSD.) In this way, each image of the series will exist as a separate copy.
We are starting to see what the joining procedure is like for printing a high-definition panoramic photograph. If a 360° exposure has been made, it also possible to render it interactive for the Web or multimedia with ImageAssembler (which offers the possibility of saving it in the format .mov). To do this, open a new project and choose 360° Wrapping. Three new tabbed index cards appear, but only two are active:
• Options. Do not touch this card, except to disconnect Adjust Color if the software has trouble balancing the joined areas.
• Images. Click Add+ to open the image that is to be locked (one will be able to lock only one image presenting a 360° angle of view). A frame is then placed on the image with two red flags at each end. First, enlarge the height of this grey frame. (The frame does not need to be right in the middle of the image; it can be placed wherever it is deemed to be aesthetically pleasing.) Second, place the two flags from left to right on the same detail of the image, while greatly enlarging the image. Start the assemblage (Action>Full Run) and wait again.
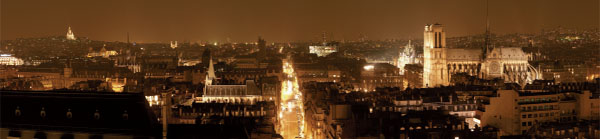
Photo by Arnaud Frich.
Place the red flags on the same pixels to the left and right of the panorama.
Now that the image has been cropped, locked, and glued in the right places, it is necessary to save it in QTVR (i.e., the MOV format) via the menu File>Save Image As.
It still may be necessary to retouch the image before completing the panorama, to correct some traces of joining, leveling, and so forth.