

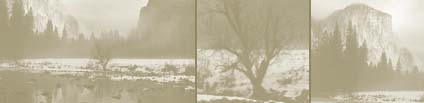
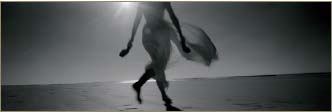
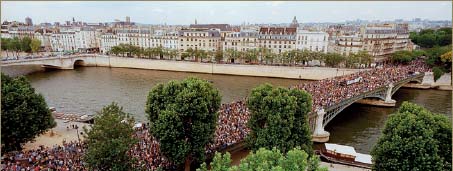
Photo by Macduff Everton.
Framing and Composition
For many photographers, the framing of a panoramic image naturally depends on the subject. However, with any kind of camera – specialized, rotational, or conventional – it remains necessary to know how to frame and compose, and to take account of certain image distortions.
“To compose is to form a harmonious whole from different parts.” Difficult to teach and understand, composition reveals our sensitivity and point of view with regard to the world around us. This is more than just a series of rules laid down by the great masters of painting and photography, so urge you to allow yourself to express your desires, feelings, and creative vision. Even though your point of view may change with time and experience, your letting go should always remain instinctive. With regard to panoramic photography, composition is influenced mostly by framing and certain telltale deformations that characterize the image, which are caused by either the camera used or the chosen joining method.
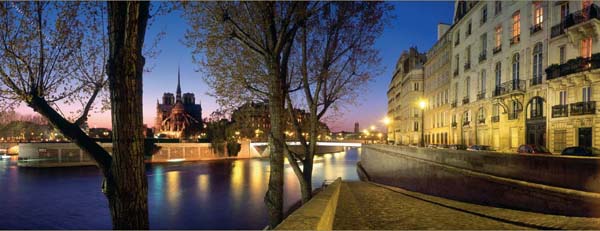
Photo by Arnaud Frich.
Using balance and harmony in a photo – or, in the opposite case, by deliberately introducing imbalance and disharmony – a photographer seeks to provoke an emotion or arouse a reaction. By suggesting a way to read the image along rhythmic lines, or determining the color saturation or level of grey, one strengthens his or her argument or point of view. And because it is difficult to eliminate an undesirable area at the moment of framing – when zooming, for example – the quality of the light, the color harmony, and the nuances of grey become ever more important in panoramic photography. Photographers working with large format go so far as to wait hours at a time for the ideal light needed to guarantee a beautiful photograph. Very often it’s the light that makes all the difference, even more than the framing.
Framing in panoramic photography is influenced by two fundamental criteria: the frame of the viewfinder and normal image distortions introduced by specialty cameras and joining software. These distortions are so noticeable that they cannot be overlooked at the moment of taking the picture.
With the so-called rectilinear cameras (e.g., Hasselblad XPan, Linhof Technorama, Fuji 617), image distortions typically are present because their lens focal lengths are very short – about the same as those observed in photographs taken with a 35 mm camera with a shorter than 24 mm focal length lens. As for the rotational cameras (Noblex, Roundshot, Spheron, etc.), the distortions curve any horizontal line departing from the median. Therefore, with these cameras, the entire art of composition consists of either concealing or exaggerating these tendencies. But the chance to take in the entire view of the human eye (or perhaps even more) in an individual photograph explains the passionate attachment that certain photographers have for it. In Chapters Five and Six, we will see that joined panoramic photography allows one to make photographs identical to those taken with these two types of camera, and that sometimes joining even goes further, most notably with regard to decentering the lens.
Because no panoramic camera, rotational or otherwise, is equipped with a reflex viewfinder, it is necessary to remain extremely vigilant when framing with auxiliary viewfinders because of parallax and focusing problems. With these cameras it also is impossible to directly control the focus, which normally is done with a rangefinder and a viewing window, rather than on the actual field being photographed.
A conventional 6 × 7 medium format camera is able to take the same photographs as an XPan: in geometric terms, the images have the same characteristics or “fingerprints.” The 43 mm lens of the Mamiya 7 and the 45 mm lens of the XPan have the same horizontal angle of view. But one element (fundamental in my opinion, even if it seems insignificant) makes all the difference: the viewfinder. It is very difficult to compose and frame in a format that is different than the viewfinder’s; it just doesn’t appear right. Therefore, when photographing with a nonpanoramic camera, I suggest that you buy a ground glass with grid-markings, or better still, that you install two small masks that cover up the high and low areas.
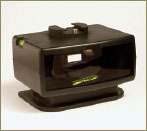
Detachable viewfinder for a Noblex 150 U.
Even if it is technically possible to make panoramic photographs with a modified, conventional format camera, my own experience, as well as that of my peers, has shown that it is difficult to work on a regular basis in this way. Don’t painters sometimes cut specific windows into cardboard to view the intended format at the end of their outstretched arms? This is a major reason why, apart from the simple fact of getting the most out the height of the film (35 mm or 120), fervent enthusiasts decide to purchase a real panoramic camera.
However, this process is reconsidered in discussions of joined panoramas made from conventional cameras. In that situation, it is impossible to have a preview of the final photograph, apart from sweeping the entire scene; and more and more, this is being done with the camera held in a vertical position. Only those already accustomed to the conventional cameras being used will be able to easily preview the future joined photograph and not be thrown off-track.
The viewfinders of panoramic format cameras (which are neither reflex nor capable of measuring distances) are often detachable and usually provide a sharp and very clear view. On the Noblex 150 and the Fuji GX617 for example, they contain three multicoated lenses, allowing for a very bold range of contrast. And once again, even though the viewfinders are normally quite sharp, they neither control the actual focus of the camera nor solve the parallax problem. Therefore, it remains necessary to pay close attention to position of the viewfinder at the moment of framing, always making sure that it is aligned directly behind the lens and on the same axis, regardless of whether the viewfinder is detachable.
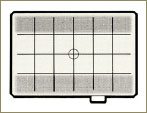
Sometimes the grid-markings of certain viewing screens are already marked with a panoramic format, as in this case. The two lines above and below the median line allow an elongated format with balanced proportions to be cropped from it.
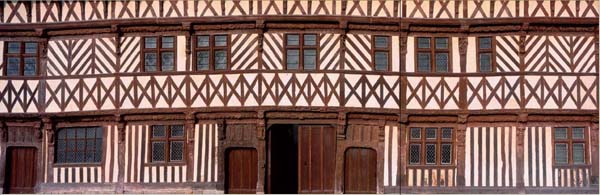
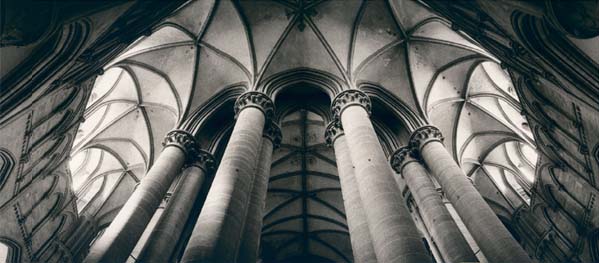
The geometry of this Norman facade is respected in this photograph taken with a Fuji 617 (90 mm).
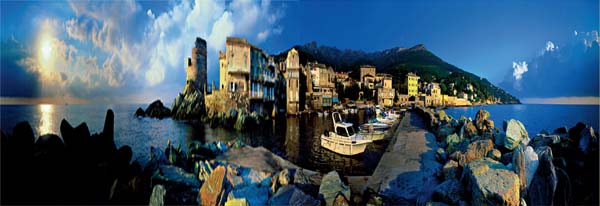
Photo by Hervé Sentucq.
Doubtless, everyone has already experienced framing and composing with a flatback camera – who has never used a 35 mm camera? Panoramic or not, these cameras project a recognizable image based on rectilinear geometry. Straight lines remain straight, even when they converge upon a vanishing point when tilting the camera. And to prevent the vertical lines from converging, no matter what camera one uses (since the problem is not specific to panoramic photography), shifting the lens from the optical center is required.
Because flatback panoramic cameras are essentially conventional cameras with the top and bottom of the image removed, the field of view being photographed is not all that different from the customary 35 mm format; and it will never extend much beyond 110°.
Horizontal Framing
Framing with a flatback camera is very easy, and that’s its main advantage. If the camera is aimed straight ahead, all the horizontal and vertical lines should remain straight as well. If the camera is tilted toward the sky (as when viewing something from below), the horizontal lines will remain the same, but the vertical lines will converge toward a vanishing point. To avoid this (i.e., to aim higher without tilting the camera and introducing convergence), a photographer could theoretically shift the lens from the fixed or zero position – a technique often used in architectural photography – but unfortunately, this is rarely possible with flatback panoramic cameras. None of the three most well-known models – Hasselblad XPan, Fuji 617, and Linhof Technorama – are capable of shifting. Only lesser-known 6 × 12 and 6 × 17 cameras like the Glide MST, the Cambo Wide DS, and the better-known VPan can do this.
The lens projects an image upon the entire surface of the film, whereupon the quality tends to diminish as it moves away from the optical center – most noticeably on the borders and in the corners. The only way to compensate for this age-old problem is to stop down on the lens in order to obtain a more consistent overall image.
Even more annoying is anamorphic distortion, which can be seen in the corners of the image when the angle of view is greater than 80°. Although this type of problem is infrequent in conventional photography (where a photographer does not normally use such short focal lengths), it is fairly endemic in panoramic photography. Indeed, this optical effect can be noticed in just about any panoramic photograph, whether it be taken by a 30 mm lens with a 24 mm × 66 mm format camera, a 72 mm lens with 6 × 17, or a joined panorama where the angle of view exceeds 80°.
The chandelier placed in the lower right corner of this cropped photograph reveals the disagreeable stretching tendency that flatback panoramic cameras introduce when used with very wide-angle lenses.
Photo by Arnaud Frich.
Vertical Framing
Vertical framing is much easier with a flatback camera than with a rotating camera, even if the percentage of vertical images in specialized photo collections remains low. Two reasons for this are (1) the angle of view is not as considerable, and (2) flatback cameras do not graphically bend straight lines. Thus, they might be the panoramic cameras of predilection for architectural photographers who are not necessarily expected to render really creative work.

The symmetry of this image would not accept the curvature of lines introduced by a rotational camera (image taken with a Fuji 617).
Photo by Hervé Sentucq.
Swing-Lens and Rotational Cameras
With cameras where either the lens or the entire body rotates, the framing and composition need to account for distortions caused by the rotation of the lens. These distortions are immediately recognizable, like those caused by a fish-eye lens in conventional photography. Certain precautions, therefore, need to be taken each time one frames the image, so as not to constantly fall into the same trap.
Of course, it is important to remain as alert with vertical framing as it is with horizontal. If rotational panoramic photography remains the privileged means to show a wide-vista landscape or a scene as a whole, other subjects are nevertheless quite suited for the game of framing them vertically in a pleasing way.
Horizontal Framing
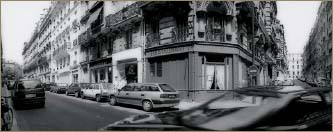
If the camera is aimed straight ahead, all vertical lines will remain vertical, as they would with a conventional camera. (This differs from a fish-eye lens, which curves all but the median lines.) The horizon line also is straight, but all the lines above and below this horizontal axis are noticeably curved. Even though the Earth is round, its curvature cannot be detected by viewing the horizon, so any curvature introduced by lens is a problem that needs to be addressed – except when called for in artistic photography. After a little practice, one can easily overcome this effect. All the same, it is necessary to note a few cases where it really can be quite discreet: in the city (e.g., old alleyways) where horizontal lines are not very long; and, of course, in natural environments.
If the camera is tilted, the horizon line curves as well. I do not find this aesthetically pleasing; however, I have noted a few cases where the effect was not too disturbing, and in some, even quite successful, especially since it breaks away from the rigid, geometric coldness that many photos can have. In these cases, any horizontal line that is too long is cut away from the bottom edge of the frame. Thus, the image resembles a typical low-angle shot, with a predominating convergence of vertical lines.
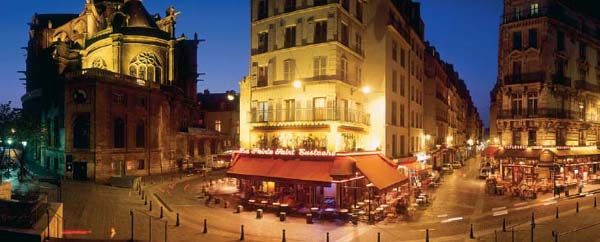
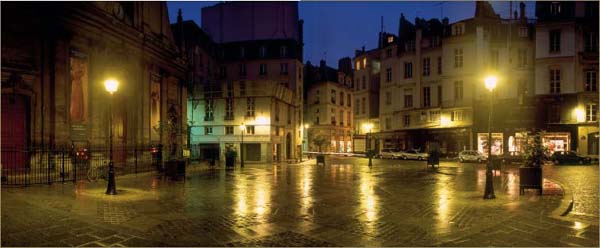
The angle embraced by this photograph of streets in Paris is 140° along the horizontal axis (Noblex 150U, plus lens shift).
Photo by Arnaud Frich.
An extreme low-angle shot makes the inevitable curving of horizontal lines introduced by rotational cameras fairly discreet.
Photo by François-Xavier Bouchart.
As mentioned earlier, only a lens-shift will allow one to raise or lower the vantage point without curving the horizon line. This can be done with certain Noblex 135, 150, and 175 cameras (the top-of-the-line models), and with rotational cameras with interchangeable lenses. Thus, it is necessary to buy shifting lenses that are compatible with the types of camera that actually allow for this kind of perspective correction, as we will see later.
Vertical Framing
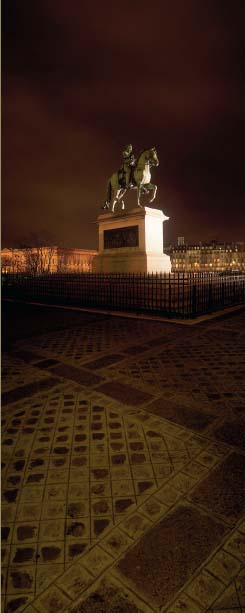
Few vertical photographs are taken with swing-lens cameras, since it is the vertical lines that curve here. The effect is largely unnoticeable, especially if the subject is either centered (e.g., a column) or relatively far off (e.g., buildings in the distance that appear quite small). This is the case in the photograph of the statue of Henry IV that I took from the Pont Neuf (see page 33).
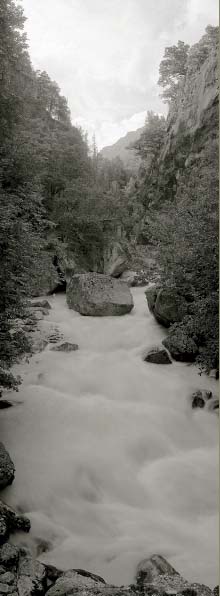
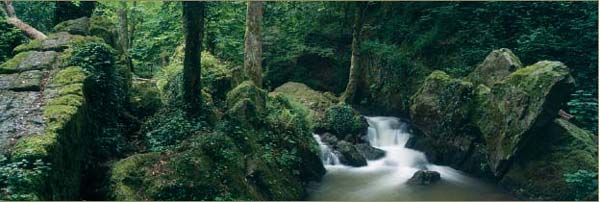
In natural settings, the curvature of vertical lines is quite discreet.
Photo by Arnaud Frich.
As agreeable as it is to embrace the entire field of human vision in a horizontal photograph, it seems rather excessive to embrace a 140° field of view along the vertical axis with a swing lens. In addition to the difficulty of preventing the feet of the photographer and the legs of the tripod from entering the picture frame, the very characteristic bending of vertical lines is also a problem. This method does not really lend itself to every kind of subject, however. Although I am very fond of some of my vertical images taken with a Noblex, I think that vertical framing remains mostly the domain of rectilinear cameras and wide-angle lenses, where a 90° angle of view normally works quite well.
By putting photographs together, currently it is possible to obtain the same kind of image (geometrically speaking) as a Fuji 617, a Noblex, or a Roundshot. The field of possibility even extends to lens shifts and formal composition. Here the component images are taken first with a conventional, traditional camera (35 mm, 120 film, or even 4 × 5) or a digital camera (3, 6, or 11 Mb of pixels) and then joined by a dedicated software package, such as the Panavue ImageAssembler or the Realviz Stitcher. This method lies somewhere between cropping with conventional format photography and using a rotational camera. The final result depends mainly on the mode of joining (tiled or rectilinear) and the type of software used. Chapters Five and Six will look more closely at this relatively new way to make panoramic photographs.
Types of Joining Methods
Certain software packages allow the possibility of joining images in different ways. The better ones permit the creation of tiled assemblages (curved fields ranging from 120° to 360°) or rectilinear ones (flat fields up to 110° wide) when working from the same set of component photographs. A tiled assemblage will require a few extra photos, since the angle of view extends beyond 110° to 120°. With this method, one can achieve exactly the same effect as with rotating panoramic cameras like the Noblex or the Roundshot, especially if the lens focal length is short. And the more the lens focal length increases, the subtler the curvature effect will be.
With a rectilinear (straight line) assemblage, one obtains the same kind of photo that a conventional camera with a wide-angle lens would produce. In this way, one can observe the characteristic limits and shortcomings of photos made with extremely short focal lengths: these tend to visibly stretch objects on the edges and in the corners of the image. With a 35 mm camera, this effect starts to be noticeable with a 20 mm lens. It is quite apparent with 14 mm – the shortest focal length presently made for this format.
With a conventional camera, optical quality diminishes both in the corners and on the edges of the photograph. However, this is definitely not the case with rotating cameras, because the lens’s optical center sweeps along the entire length of the film. In this way, image quality remains ideal, even at the edges. And for this same reason, corners and edges are not distorted by stretching. This is an undeniable advantage.
This photo, taken with a flatback camera, would look exactly the same if joined with software using a rectilinear mode.
Photo by Hervé Sentucq.
Types of Software Programs
The better joining software programs make it easy to frame things: they make it possible to tilt the camera and take a picture with the horizon line away from the middle of the photograph, while avoiding a convergence of vertical lines. With other software packages – those sold with pocket digital cameras – this is not possible.
The result obtained by tilting the camera upward (low-angle) or downward (elevated view) depends on the software being used. With the majority of software programs, it is absolutely impossible to join the images in a way that prevents the complete horizon from making a series of successive arcs at each (tiled) linkage, instead of the single, continuous curved line that the Noblex can achieve. With the Autopane Pro, Stitcher 5.0 from Realviz, ImageAssember from Panavue or also from PTGui, the Realvis Stitcher, and Panorama Tools, both the horizon and architectural lines remain straight, without any convergence toward the top or bottom, as though the photograph had been taken with a shifted lens.
It is never recommended to use lens movements in combination with software packages; when assembling the images, it would be a catastrophe. On the other hand, if the camera is aimed straight ahead while taking the picture, and if the photographer is careful to keep it at the entrance pupil, the joining will be perfect, no matter what software program is used (see Chapter Six).
This joined image has been adjusted to place the horizon line at the upper third of the composition and to keep vertical lines parallel.
Photo by Arnaud Frich.
Any subject can be taken with a panoramic format, although framing possibilities are more limited than with conventional formats (e.g., one cannot eliminate problem areas by opting for a closer view). Don’t let this keep you from moving around to find the best possible point of view! Any urban or natural landscape, even a street scene, is perfectly capable of contributing all of the necessary aesthetic qualities needed to make a beautiful photograph. One needs to decide only whether to frame a little to the left or the right, a little bit higher or lower. Similarly, a judicious placement of both the horizon line (possibly aided by shifting the lens) and the strongest elements of the scene will often result in a beautiful composition.

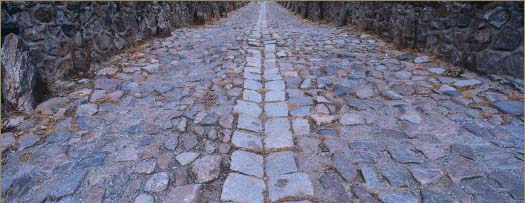
A balance is struck because of the subject’s perfect symmetry.
Photo by Macduff Everton.

The two summits of the Dune du Pilat have been placed at the two vertical thirds of the photograph (Roundshot 220).
Photo by Franck Charel.
I do not want to approach the thorny subject of explaining the composition of a photograph; however, I would like to share some observations drawn from my practice of panoramic photography for several years, primarily with rotary-lens cameras.
Photography is far too recent a means of expression in the history of art for photographers not to have benefited from the rules of composition laid down by painters in the Middle Ages and Renaissance. The rule of thirds, perhaps the most well-known rule, states that overall balance often is determined by mentally dividing the frame into three equal parts, either from top to bottom or from left to right, and then placing the significant subjects at the dividing lines. This constitutes an important start, even if one sometimes departs from it. Photographs made using this rule are undeniably harmonious, even if their uniformity can eventually become tiresome.
When using the rule of thirds, it is desirable from the start to imagine two vertical and horizontal lines dividing the frame into nine roughly equivalent areas, and to place the most significant lines there, most notably the horizon line and the main subject. As in reading from left to right, it is desirable that a photograph would be read in the same way as well. In this way, placing the subject to the right would tend to end the image, while placing it to left would begin it. Therefore, the position of the subject is never insignificant, even if it is difficult to always know what is the best option to take. Obviously, much of this depends on the subject, the lighting, the photographer’s style, or how long the resultant photograph will be. Apart from this, if the rule states that it is best to divide the image mentally into nine equal parts, and does so according to an aspect ratio of 2:1, to my mind it seems better to divide the image into three equal parts for a 360° photograph, which usually has a ratio exceeding 4:1.
Given the significant angle of view of rotational cameras, placing the horizon line on one of the two horizontal thirds is not required.
Photo by Arnaud Frich.
A well-placed horizon line is normally an important part of the aesthetic success of a photograph, and even more so with panoramas. Apart from shifting the lens, tilting the camera remains the only way to move the horizon line away from the middle of the photograph, or to photograph a monument. However, not bending the horizon line is sometimes so important that a photographer will keep it in the middle, in spite of knowing that this is not the ideal place for it in the composition. Because it lacks dynamism, leaving the horizon at the middle of a photograph can contribute to a sense of monotony. With flatback cameras, the horizon line remains straight at the cost of a strong convergence of vertical lines – something we are at least used to, even if it is not ideal. In this case, acceding to the temptation to place the horizon in a more graphic location could improve the overall aesthetic scheme.
Because most panoramic photographs are displayed lengthwise, keeping the horizontal line in the middle of the frame hardly disrupts compositional harmony, and does not go against the rule of thirds. In truth, the most important thing is simply to place the dominant visual elements on at least one of the two imaginary vertical lines that divide the frame into three equal parts. But if a photographer really wants to keep the horizon line straight, in order to avoid converging vertical lines, he or she will have to shift the lens.
To break up the monotony, and because this was closer to his personal vision, the photographer deliberately has placed the horizon line below the lower horizontal third.
Photo by Hervé Sentucq.
Shifting the lens can be an important technical element in determining the composition. As stated earlier, when one tilts the camera, the vertical lines converge toward a vanishing point. To avoid this, the rules of perspective state that the back of the camera and the vertical lines of a subject must remain parallel. For this reason, architectural photographs usually are created with bellows cameras that have moveable front and rear standards, or with smaller cameras equipped with PC (perspective-correcting) lenses that shift up and down. Obviously, one can shift the lens for other subjects as well.
The first cameras were large-format; largely to overcome their earlier bulk and weight, cameras became smaller, more portable, and quicker to operate. Originally intended for the press, these newer cameras eventually lost their earlier lens- and back-moving features (i.e., swings and tilts, rise and fall), which had provided an important control over the image. As a result, our eye has grown accustomed to longer images (e.g., 35 mm) rather than shorter ones (e.g., 4 × 5), and to uncorrected photographs of buildings depicted as trapezoidal forms.
Large-format view camera, in the raised and shifted position, which allows the horizon line to be placed at the lower third division of the panoramic photograph.
Today, photographers still use camera movements, but this is far from the rule, since the majority of large format cameras are used to take pictures in the studio. For photography in general, and for panoramic photography in particular, shifting the lens is nonetheless an important factor in the aesthetic success of an image. Tilting the camera is even more noticeable when the convergence of vertical lines is combined with a curvature of the horizon line (notably when using the Noblex, or with the joining method). If we have become accustomed to viewing photographs where the lines of buildings converge, it will be difficult to get used to photos where the horizontal lines are curved as well!
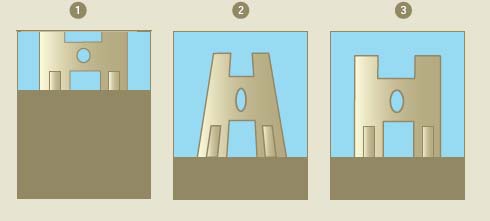
1. The camera, placed on the ground or a tripod, remains parallel with the building. The vertical lines do not converge, since they still remain parallel on the film. But the building is not entirely visible; the point of view of the camera is too low.
2. The camera has been tilted slightly upward: the building is now entirely visible, but the vertical lines converge toward a vanishing point. The film and the facade are no longer parallel.
3. To combine the two advantages (in this example, anyway), it is necessary to use a view camera or have a very high stepladder. Here, the lens has been raised, or shifted toward the top. The building is entirely visible and its geometry is respected.
Theory
Shifting the lens is possible when it projects an image circle significantly larger than the diagonal of the film format. For example, in 35 mm the diameter of the projected image circle needs to measure at least 43.27 mm, and at least 90 mm for 6 × 9. Returning to the example of 35 mm, if the lens projected an image circle of 60 mm, the lens could be shifted up to 12 mm vertically and 8 mm horizontally.
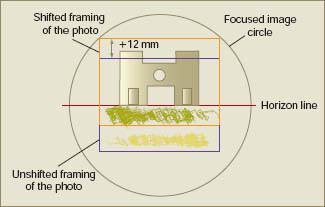
In this example, the focused image circle is larger than the 35 mm photographic format. By keeping the back of the camera parallel to the building, it is possible to shift the lens (up to a maximum of 12 mm in this case) in order to avoid cutting off the top part or causing the vertical lines to converge.
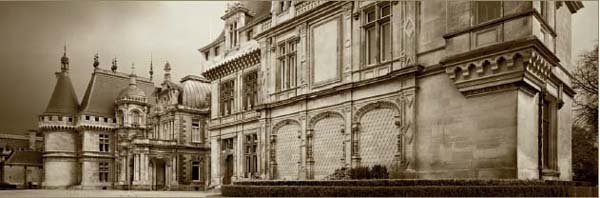
Because of the significant shifting of the lens, the lines of this castle remain completely parallel.
Photo by David J. Osborn.
Flatback Cameras
Different problems arise depending on the type of camera used. The simplest problem concerns how to crop a nonpanoramic photograph. In this case, one is not necessarily forced to work from the middle; it is equally possible to use either the top or bottom part of the entire image with the goal of profiting from an indirect shifting of perspective. When taking the picture, simply avoiding tilting the camera is sufficient when using the shortest lens possible; this will provide the maximum vertical angle of view. Also helpful is the use of a ground glass with grid-markings; the horizontal markings mark out the panoramic view and the vertical markings verify the parallelism of the camera in relation to the subject. By cropping the photograph in order to use the upper part of the image, the parallelism of the lines will be preserved, and the part of the ground, which is often of little interest, will eventually be cut away. To benefit from further shifting along the vertical axis, it becomes necessary to use a lens truly capable of shifting (called PC or Shift, depending on the brand in question), or a medium or large-format camera with an elongated back (6 × 12). Beyond this, only bellows cameras capable of shifting really short lenses are used in panoramic photography.
Apart from cropping, the only way to avoid the convergence of lines with a flatback panoramic camera is to shift the lens, which is possible only with certain top-of-the-line large-format cameras such as 6 × 12 (Cambo, Wide, Horseman SW Pro, Linhof Technorama 612 PC, Silvestri H) and 6 × 17 (VPan, Gilde MST). The Hasselblad XPan and the Fuji 617 do not allow for any control of perspective.
Swing-Lens and Rotational Cameras
All the recent rotating cameras – traditional or digital – are offered by some of the biggest makers of 35 mm and medium format cameras. Both Nikon and Canon sell three shifting lenses of different focal lengths, and Mamiya sells a shifting 50 mm, f4 lens. These are undeniable assets for composing harmonious images with medium format. The camera merely needs be squared up in relation to the horizon, and then there is nothing more to do than shift the lens, adjusting the amount of shift by looking through the view-finder, or at a portable computer screen.
Apart from these, one has to choose from cameras with noninterchangeable swing lenses. Only the Noblex 135, 150, and 175 cameras have true shifting lenses, but their movements end up being too restricted to be able to place the horizon line accurately (i.e., only 4 mm of shift for the 35 mm models and 5 mm for medium format). My idea was to combine the shifting capability of my Noblex with an indirect shift obtained by cropping my color transparencies (for photographs of mountains, for instance). Now the aspect ratio for the Noblex 150 is 2.4:1, as opposed to 2.7:1 for the 35 mm models. But ever since Philip Plisson exhibited his well-known seascapes taken with a 6 × 17 camera, a new ratio, 3:1, has been in demand for panoramas. With this in mind, I cropped the color transparencies from my Noblex to this slightly longer ratio, removing a portion of either the sky or the ground, and placing the horizon line where I wanted it.
Joining Method
This method not only allows for taking panoramic photographs with a conventional camera (making it more economically feasible), it also allows you to place the horizon more or less where you want it, without having to shift the lens. The converging lines caused by tilting the camera while taking the picture are corrected by the software, regardless of whether one makes a tiled or a rectilinear assemblage.
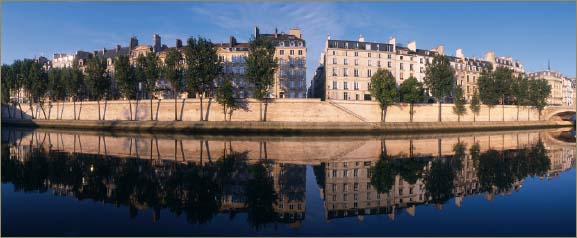
The panoramic format also lends itself to symmetrical subjects. The architectural lines of monuments and cityscapes work quite well in this format, enhanced by the combination of a long format with horizontal or vertical symmetry. And here the subject can be photographed with or without tilting the camera, as it will rarely harm or impair the overall scheme of this type of composition.
In nature, there still remains at least one subject that demands a centered horizon: a pond of water and its reflections. In this case, the use of symmetry would accentuate the serenity of the place, which could also be complemented by the absence of wind, to avoid having ripples on the surface of the water.


By cropping the image, I was able to move the horizon line and adjust the image’s proportions. The Alps, Aiguille du Midi, Chamonix, France (Noblex 150).
Photo by Arnaud Frich.
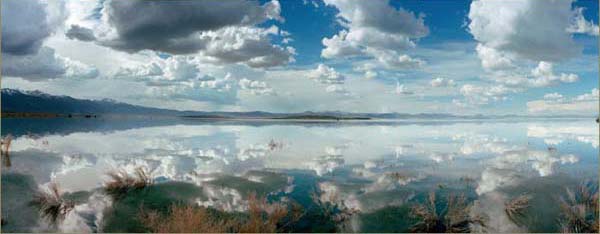
This subject typically works well with a centered horizon line. The presence of clouds in the sky serves only to reinforce the strength of this beautiful, symmetrical composition (Noblex 150).
Photo by Macduff Everton.
With swing-lens cameras, one must always avoid photographing the sun directly; wait until it is slightly covered by a cloud.
Photo by Macduff Everton.
The presence of the sun in the field of view embraced by the lens is no longer a problem with flatback cameras equipped with modern lenses.
Photo by Benoît Ancelot.
Due to the angle of view of the Roundshot (360°), the photographer is able to show both the sun and the building facades warmed by its light.
Photo by Franck Charel.
Depending on the weather and the time of day, the panoramist sometimes must compose with the sun. Although this does not pose a particular problem in the case of flatback cameras or when using the joining method, with rotational cameras and swing lenses it is impossible.
Midday
Due to the way in which they function – a rotating lens projecting an image through a slit onto the film – cameras with swing lenses cannot photograph overly bright subjects (e.g., the sun, public lighting). The excessive light seeps beyond the edges of the slit, resulting in very noticeable halos of light running along the height of the film (the effect is particularly noticeable on a light-table).
I do not know of any remedy for this, so I never photograph the sun directly, even at sunset, unless it is obscured by a thick, cloudy haze.
Rotational cameras like the Roundshot, in which the entire body rotates, are not quite as affected by this problem. Here, the light source has a tendency to spread out on both sides, rather than mark the entire height of the film. This is a lesser evil in my opinion, and not wholly unacceptable. Flatback cameras do not have this problem at all; however, it becomes necessary to guard against a diffuse halo known as lens flare (although they are becoming more and more protected against this as well).
Since the joining method makes it possible to create the same kind of image as a rotating camera, and since conventional cameras are not subject to flare problems, it seems better to use the joining method when photographing a direct light source (always be sure to avoid looking directly at the sun as this damages the eye!). I use it to complete work that could not be achieved with a swing-lens camera.
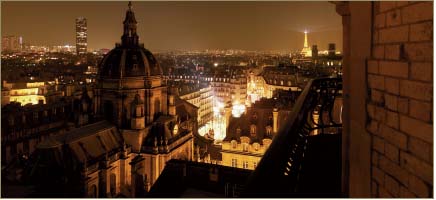
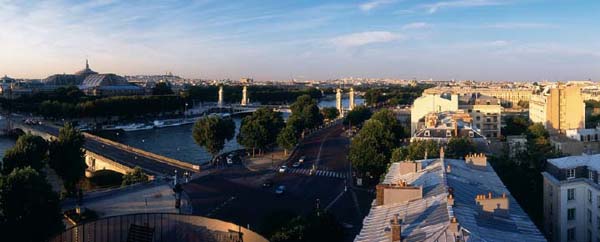
Place des Petit-Fréres, Paris. This photograph, taken at dusk, required an hour and 30 minutes of exposure in the rain.
Photo by Arnaud Frich.
The end of the day and the hour preceding are especially good times to make panoramic photographs with the Roundshot or joining method. For example, in the same photograph it is possible to see both the setting sun and the entire surrounding environment bathed in the glow of twilight. Concerning the overall plan of the composition, I want to draw your attention to a problem that I have encountered. With a rotational camera, the angle of view is so vast that the sun appears quite small. With an angle of only a fraction of a degree, the sun (and the moon) is represented by a miniscule point in photographs of 150° or more. Although we are charmed by a beautiful sunset, the resulting photograph will probably be a disappointment since the film will record only the tiniest star above the horizon.
This photo has two major problems: (1) taken at sunset with a Noblex 150, there are not enough illuminated areas and (2) the horizon line is too flat and centered.
Photo by Arnaud Frich.
Nighttime photography is linked directly to the ability of making long exposures. Some panoramic cameras, both rotating and flatback, lack shutter speeds slower than 1/2 second, making them unusable at night. Certain Noblex cameras allow an exposure of one or two seconds (i.e., certain 35 mm models and the 150, respectively – the 150 also has a handle for slow shutter speeds). This is often not enough, so they make up for it by adding a multiple-exposure function. No other swing-lens camera offers both possibilities at once, which is a real advantage and quite original. Thanks to this function, I have been able to make a series of twilight and nighttime photographs in several French towns, by manipulating the exposure of the picture. This possibility will be explained in more detail in Chapter Four.
Traditional rotational cameras allow for longer exposure times (sometimes up to 128 seconds), but their operation, which differs significantly from swing-lens cameras, makes long exposures fairly impractical. I remember once it took the camera a full hour to operate during an actual exposure of six to seven seconds. For an exposure of 45 seconds – something I often need in an urban setting – seven hours would be required.
At present, digital rotational cameras do not permit multiple exposures or exposures longer than a half-second; therefore, nocturnal panoramic photography is nearly impossible. Flatback cameras do allow nighttime photography, however, and have done so for some time now, thanks to their “B” (bulb) exposure setting. This has become even easier now that the new films don’t have the old problem of reciprocity failure that was inherent in long exposure times with traditional film.


The wind and fleecy clouds have allowed this photograph to be made under a mottled sky (Noblex 150 U).
Photo by Arnaud Frich.
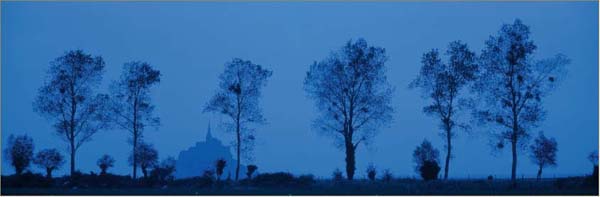
Twilight or Black Skies?
Although a question of personal taste, one thing is sure: a black sky will never be very aesthetically pleasing in a panoramic photograph, especially since the sky is located in a dominant area. Also, there is a greater chance that the photograph will be poorly composed; therefore, it is absolutely crucial that the exposure of the photograph not be done too late in the day. However, in large cities, where ambient, artificial light is always present, nighttime photographs are still a possibility, provided that the sky is covered with low-lying clouds. In this way, the city’s illumination bounces off the layer of clouds, providing a pleasing brownish or orange-colored aspect to the sky, which harmonizes nicely with the rest of the photograph. If the clouds are really low, irregularly shaped (i.e., cumulus), and pushed by the wind during exposure, this can provide a very interesting effect, as shown in Figure 2.28.
Although it requires a high degree of sensitivity, because the balance between the end of the day and onset of artificial lighting does not last longer than 10 minutes, twilight remains the best time to take photographs that have a nocturnal quality. And if the sky is clear, colors will be particularly intense and stand out from the rest of the photograph. The difficulty lies in starting the exposure at the right moment, and for this we will turn to an expert on the subject in Chapter Four.
Film sensitivity is given for a specific range of exposure time. However, when the exposure time is too long, or even too short, the sensitivity falls and no longer corresponds to the ASA number listed on the film packaging. Colors are no longer reliable and shift according to the manufacturer’s stated listings, since the three RGB layers have lost their nominal sensitivity (but never to an equal extent): thus, the photographs are dominated by one color that only a filter used during the time of exposure can correct. This is known as reciprocity failure, or the Schwarzchild effect (named for its discoverer). This effect no longer exists with digital sensors.
Reciprocity from Film and Sensors
Ten years ago, color films were not capable of exposure times longer than one second; beyond this, their sensitivity declined dramatically. For example, a film rated at ASA 100 actually had the sensitivity of ASA 12 with a one-minute exposure, so the rule was to give additional exposure to make up the loss of sensitivity. In addition to this major inconvenience, the problem of color shift made it difficult both to preview and correct. Today, the evolution of color films largely has eliminated this from the concerns of photographers. Manufacturers now market films that allow an exposure of a minute without much correction, both in terms of color shift and light sensitivity. And if digital sensors are spared these two technical constraints, the tiny sensors of pocket digital cameras, with pixels having less than four microns on each side, introduce excessive thermal noise as the exposure is extended. This translates into a multitude of colored dots covering the background of the image, which is most disagreeable.
Headlights
The traces of car headlights are another important element in the composition of photographs taken at night in urban settings. They form long red and white ribbon-like trails with conventional cameras, as well as with certain flatback cameras. Rotational cameras tend to produce more of a colored staccato effect, and because the angle of view is very wide, one even can see them register as two different colors. However, this sometimes gives a dynamic aspect to photos that lack movement.

These photographs show the different traces left by moving head- and taillights, depending on the type of camera used. On the left, a rotational camera was used, on the right, a flatback camera.
Photos by Arnaud Frich and Hervé Sentucq.
Composing with Passers-by
Rotational and swing-lens cameras produce different effects than flatback cameras do. With the former, it is absolutely necessary to anticipate the movement of both passers-by and cars due to a lag-time between the pushing of the shutter release and the moment where the lens truly starts to sweep the scene. Because this is often difficult to control, it is not uncommon to have to reshoot a photograph because someone has entered the field at the very moment the lens is sweeping that area. Here again, the problem does not affect the joining method since the photographer can always pause between consecutive exposures.
One can equally exploit the anamorphic distortions caused by the rotation of the camera or lens during exposure and their simultaneous movement with the subject being photographed. These are characterized by geometrical transformations: if the subject (i.e., a passer-by or car) moves in the same direction as the lens, it will appear extended in the photograph; moving in the opposite direction will make it appear compressed. One really can use this effect for creative ends.
The simultaneous movement of the camera and turret has created this anamorphic distortion that one could never tire of experimenting with (Noblex 135 U).
Photo by Arnaud Frich.
Noting location is very useful in urban and landscape photography, as it is in reporting. Like many photographers, whether I have a camera or not, I always am aware of my surroundings; this is where noting the location naturally begins. Very often, I carry two separate viewfinders with me. With these I note framing possibilities and surroundings that please me, and I try to anticipate what kind of light (e.g., morning or evening, winter or fall) would make for the most beautiful panorama. Nothing beats walking on foot and remaining vigilant; it is not always easy to fill a field of 120° or more in a pleasing way, especially in the city. Noting locations on maps can be difficult, no matter how precise they are, but there remain times when it is necessary, for example:
• To determine the time of year that the sun will shine on a certain facade or monument, and at what angle
• When visiting an unfamiliar place or area
• To determine where the moon will rise, and at what time of year (e.g., in order to integrate it into a landscape as a string of time-lapse exposures).
On the walls of my house, I also pin up precise maps of cities and places I want to photograph, noting observations there. A relief map is equally useful for mountainous regions if the relief is sufficiently pronounced. With this kind of map and a directional penlight, it is both easy and fun to simulate sunlight in order to anticipate how the mountains’ shadows will change during the day.
With panoramic photography, the angle of view is sometimes so wide that determining the location can be done only in the field. In other words, how can one totally predict that the sun will leave a particularly beautiful shadow on a certain facade at a specific time of year? Maps only allow you to predict the season. This being the case, there can be some surprises: with 150° to 360° in the city, either all the conditions are present at that very moment or it is already too late and one has to wait another six months or a year (see the expert’s opinion section in Chapter Four).
Urban or Natural Settings
In the city, filling an angle of view exceeding 100° in a pleasing way is never easy, especially because one often lacks enough room to move away from the subject (rotational cameras with more than a 140° angle of view are more appropriate here) and because sidewalks are often too narrow or busy to set up a tripod.
An urban milieu is also characterized by the constant presence of geometric lines, so the optical distortions produced by panoramic cameras, rotating or flatback, will automatically be revealed. A little experience is needed to know how to anticipate these curvatures, and how to discretely hide them. Facades can be covered with scaffolds, which can be detrimental to the photograph, or spoiled by road signs. Fortunately, retouching software allows one to eliminate them in some cases. But as I am not necessarily looking to reproduce an ideal city, I often leave them there.
For certain pictures, authorization is required, regardless of the destined use of the photos (even personal). During the period when I was still an amateur, someone asked me for $450 for a half-day of taking pictures in a courtyard interior that was open to everybody. One thing is sure, the law regarding the use of images is constantly evolving and its application perhaps even more so. Between 2002 and 2003, photography was faced with some dark moments and sensational trials; however, the future seems calmer.

Photo by Didier Roubinet.
In natural settings, the absence of geometric lines permits a great deal of freedom in choosing a panoramic camera, rotating or not.
Photo by Hervé Sentucq.
In natural environments, the limitations of camera choice are far fewer as there are not many straight lines that could betray the camera’s presence. Here, the difficulties concern mainly the weight of the equipment in transportation, which is a problem for all of large-format photography, not just panoramic photography.
Although it is sometimes difficult to get close enough to a scene, this distance is even more accentuated with the short focal-length lenses used with panoramic cameras. Here, the subject risks being small and far away in the image. This is a frequent pitfall with panoramic photography, especially rotational. Journalistic photographers who justifiably love to be at the center of action do not have this problem.
The Hasselblad XPan has achieved real success in journalistic photography. Thanks to this compact, modern camera, panoramic photographers have started covering events in places all around the globe, even the most dangerous. What better means exists to show an event and people in context? Before this camera came to prominence, journalistic photographers used the swing-lens Widelux camera, like Michael Ackerman did for his well-known work, End Time City.
Photo by Benoît Ancelot.
The elevated view and use of an XPan equipped with a 30 mm lens have allowed the magnitude of this event to be revealed.
Photo by Didier Roubinet.