
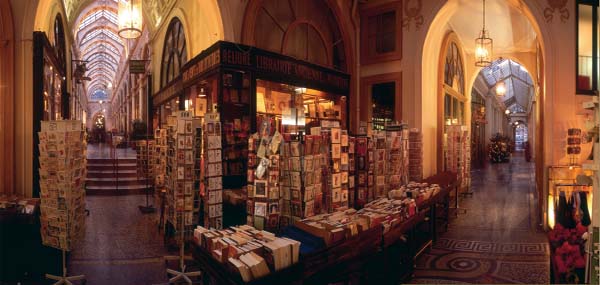

Photo by Arnaud Frich.
Picture-Taking with Swing-Lens and Rotational Cameras
Panoramic cameras first appeared in the nineteenth century, shortly after the beginnings of photography. Panoramic cameras with swing lenses and rotational cameras with completely rotating bodies are considered specialty items, and truly panoramic when the angle of view exceeds 120°.
Rotational and swing-lens cameras function quite differently than conventional cameras (e.g., 35 mm). In order to take in a large field of view from the same point of view, two solutions are possible: one, make the lens turn in front of the film (i.e., an angle of view between 120° and 150°); and two, cause the entire camera to make a complete turn, taking in the entire horizon. Certain panoramists even think that true panoramic photography exists only with these two methods.
Whether one uses a digital sensor or traditional film, rotational and swing-lens cameras come in many formats and will respond to all of a photographer’s demands for quality. Some of these take 35 mm film, others take 120 or 220 (medium format) films, and still others have digital sensors with varying numbers of pixels. Their way of functioning is so unusual that exposing film or a digital sensor requires some explanation. Combining this singular way of functioning with the ability to make multiple exposures on film makes it possible to create some particularly original photographs at night. This is notably the case with my Noblex, with which I have made a series of photographs of Paris and religious architecture. In this way, multiple exposure allows one to “sculpt” the light.
Photo by Franck Charel, with the assistance of Jacques Barthélmy.
To begin, I will explain how these two types of camera work; then, I will provide an inventory of the main kinds of rotational and swing-lens cameras (e.g., angle of view, format). Following this, and after having mentioned the characteristics of some useful and indispensable accessories, I will reveal what is so special about taking pictures with these cameras, especially at night.
How Do Swing-Lens and Rotational Cameras Work?
There are two categories of rotating panoramic camera, depending on whether the lens or the entire camera body turns. The former category consists of traditional film cameras that photograph a maximum angle of 145°; in the latter are both traditional and digital cameras that take in a much larger field (up to 360°).
Traditional rotational cameras take films (35 mm, 120, or 220) that unwind behind a slit located at the rear of the lens at the same time and speed as the rotation of the camera. Thus, the movement of the camera and the film are synchronized. In the case of digital cameras, the sensor remains fixed and simultaneously stores the information in its memory as the camera rotates. These are very precise machines.
Real Exposure and Effective Exposure
To be properly exposed, film needs to receive a certain amount of light, depending on the film’s light-sensitivity. In a conventional camera, exposure time is given by a shutter opening that passes across the totality of the film’s surface. In the particular case of rotational or swing-lens cameras, it is given by the speed of a slit’s sweep in front of the film. The width of the Noblex 150’s slit, for example, is 3 mm and does not change. Therefore, here it’s only the rotational speed of the turret that determines exposure time. If each section of the film effectively receives one second of exposure (for example), the camera will really have taken at least a minute to take the photo. During this minute, the camera should not be moved.
Both types of camera are, properly speaking, shutterless. Instead, they have a slit of a generally fixed height and a flap that prevents fogging the film between exposures. The speed of rotation in front of the film determines exposure time. An immediate problem presents itself: all the film does not receive exposure at the same time. This means that there always is a discrepancy in the time between the exposure of the left and right ends of the film. Although this is only a fraction of a second for short exposure times, unfortunately, it can be several minutes for, say, a full second of effective exposure! Except for a few of the shorter exposure times, instantaneous photography is thus off-limits, or at least a bit of anticipation will be needed when photographing moving people. Between the moment when one pushes the shutter release button and the moment when the film is truly exposed, the time delay can be fairly significant with speeds slower than 1/15 second. That’s the difference between real and effective exposure times. For example, it takes more than three minutes to make a complete rotation with a Roundshot camera, whereas on average the effective exposure would be only half a second!
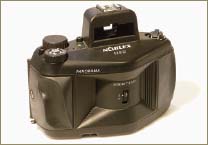
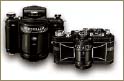
The Noblex and Horizon 202 are both swing-lens cameras. There are no digital versions, and there probably never will be, since it would be too complicated to install a digital sensor in the form of an arc at the back of the camera. With these cameras, a turret housing the lens rotates to photograph the panorama, usually embracing a 135° field of view. Some are relatively light and equipped with fairly bright viewfinders of high quality.
Exposure times vary from one camera to another; the more recent models can have exposure times up to 1/500 of a second, perhaps even 1/1000 of a second. At these speeds, the turret turns quite rapidly, and the exposure time is short enough to freeze almost any kind of action. At the other end of the scale, most of these cameras slow down to at least a half-second of exposure, and some even slow down two second exposures. And if that still isn’t enough to allow for night photography without using grainy, high-speed film, a few models offer a remarkable alternative: multiple exposure. With multiple exposure, it is necessary to make several two-second exposures; but this possibility is fairly rare, even with digital cameras (see the expert’s opinion later in this chapter).
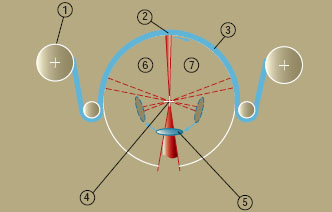
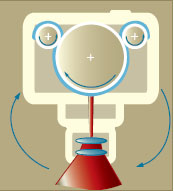
Cutaway view of a swing-lens camera. The film is held in an arc at the back of the camera body, and the lens sweeps the field, exposing the film. This technique does not work with digital sensors. 1. Film Spool; 2. Slit; 3. Film; 4. Nodal Point and Rotational Axis; 5. Lens; 6. Starting Point; 7. Stopping Point.
Focusing often is reduced to its most rudimentary function. The lens is set for the hyperfocal distance, with the depth of field extending from two yards to infinity with 35 mm film, and the critical focus being at five yards for medium format with the lens wide open. Everything is necessarily in focus, or close to it, with this kind of camera. The only way to achieve softness is to shake the camera during exposure, so as to create a blurred effect. By stopping down, one gains a few more inches in the foreground.
Turret cameras do not have interchangeable lenses, but the aperture can be changed. 35 mm models often have a lens where the widest aperture is f2.8, which always guarantees short exposure times with fairly bright subjects, and even shorter exposures when circumstances demand it (e.g., journalism, street scenes, brief events).
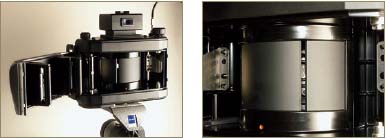
Interior view of a Noblex. The film is held against a round support and is exposed by a slit located behind the lens.

Photo by Arnaud Frich.
To photograph between 150° and 360° (sometimes in several passes), the entire camera must turn, which makes digital photography possible once again. A straight digital sensor is placed behind the lens – a CCD module, like that used with a laser scanner for prints or color transparency film – which stores the information on a memory card or computer while the camera turns. In a traditional film camera, a motor advances the film at the same time and speed as the camera. This demands a lot of precise engineering. These cameras are often very bulky and complex, and the price reflects this. And because the film advances as well as the camera, over-exposure is impossible. To permit photographs at night, rotational cameras sometimes offer far longer exposure times than the Noblex 150. The exposure is made in a single pass, but this takes an enormous amount of time: for example, it takes an hour to make an effective exposure of only nine seconds with a 360° view. On the contrary, the shortest exposure time (1/250 of a second) allows one to freeze fairly fast movement without problem.
The camera turns by itself to sweep a 360° field at the same speed as the film. A slit serves as the shutter. The faster the camera body turns, the shorter the exposure time will be.
These cameras, taking 35 mm and 120/220 films, sometimes accept interchangeable lenses with high quality optical components. This is becoming more commonplace, offering the convenience of continuous and precise focusing. These cameras also allow control over the vertical angle of the photograph and permit the use of a shifting lens, if it exists in the optical range in question. Apart from the cases of artistic and creative projects, tilting the camera is of course not feasible here, since it would result in moving from an elevated shot to a low-angle shot, or vice versa.
One specific quality of these cameras is that they produce an enormous image. Exposed on 120 film, which is 56 mm high, the resulting image will be more than 30 centimeters long. A lasting impression on a light-table is guaranteed!
Interior view of a Roundshot taking traditional film.
The further one moves from the optical center, the more the image quality degrades. Thus, the image is not quite as good in the corners and on the edges. Fundamentally, the same holds true for lenses used in rotational cameras, except that they sweep the entire length of the film with a straight slit that covers only the center of the lens. In this way, the image quality at the ends is absolutely identical to that of the center. The only noticeable difference occurs between the middle band of the photograph and the top and bottom edges. Consequently, all that is needed is to stop down a little on the lens to even out the image quality.
In this section, we discuss the swing-lens and rotational cameras currently on the market, both new and used, sometimes called “cylinder” or “turret cameras”. Some of the older cameras are found only on the used market or in collections representing the recent history of panoramic photo equipment.
In this category are specialty cameras that can make only one kind of photograph, but always in a remarkable way. Sometimes, their price and light weight put them in direct competition with fixed focal length cameras with very wide angles of view, both tending to be fairly expensive. For example, both Nikon and Canon market 14 mm lenses (115°) that cost more than $2,700, which matches the price of the top-of-the-line Noblex 135 (135°). Rotational cameras are often much more expensive than this.
Rotating cameras (camera body or lens) do not have reflex viewfinders. Thus, when looking through the viewfinder, it is impossible to determine exactly what will be photographed, and difficult to place the critical focus on a specific subject.
Both will be judgment calls, so it becomes necessary to pay attention to the issue of parallax when framing and to find the hyperfocal distance when focusing, as we already have noted several times.
Three major brands compete in the field of swing-lens panoramas: Noblex, Horizon, and Widelux. The last is an older model, but you can still buy it new. Thanks to its nice balance of quality and price, many photographers have begun making swing-lens panoramas with the Horizon 202. Much more recent, highly efficient, and versatile, Noblex cameras set the present standard for photographing approximately 140°.
As opposed to other swing-lens cameras, Noblex cameras have one interesting feature, although it is sometimes a handicap in instantaneous photography (if one can use this term in describing how these cameras operate) – their turret rotates 360°. Consequently, it returns to the original position after each exposure. After the shutter is released, it takes a half-turn to reach its operating speed after accelerating from the start. During this lapse of time, the lens is turned toward the film and the slit (covered by a protective flap) faces the scene. Once the operating speed has been reached, the lens faces the subject and the slit moves in front of the film. Then, the flap slides open with a brief mechanical sound, and the effective exposure of the film begins. During the initial rotation (i.e., when the slit is facing the subject), the time lag can be longer or shorter depending on the shutter speed. This feature must be considered when photographing passing moments (notably, the movement of people), but it guarantees that all of the film will be equally exposed.
Horizon 202
This Russian-made mechanical camera allows one to make truly panoramic, 24 mm × 58 mm photographs with a 120° angle of view on 35 mm film, with a fast (f2.8) 26 mm lens. As the length of the resulting image comes close to the standard 56 mm of the 6 × 6 format, it is possible to project them as slides while losing only one millimeter on each side. The lens, set at the hyperfocal distance, has a fixed focus and cannot be shifted, but the optical quality is quite good. A bonus of this camera is its low used price, which allows everyone to discover the joys of wide-field, swing-lens, panoramic photography. Consider this light, specialty camera as an option to buying a very expensive and sometimes heavy 14 or 17 mm lens., or
As opposed to the Noblex, the Horizon 202’s turret does not make a complete turn with each exposure. Thus, it can have problems with the exposure of the film from left to right, especially with very short exposure times. On the other hand, there is practically no lag time between the release of the shutter and the moment when the photo is actually taken. And it’s the only swing-lens camera that can vary the width of the slit. Here, the speed of rotation does not always change, but functions in relation to the slit. For example, the lens turns at the same speed for 1/250 and 1/125 of a second, while the width of the slit changes. However, due to a combination of two slit widths and three rotational speed settings, only six shutter speeds are possible. Note, however, the absence of two very practical shutter speeds: 1/30 and 1/15 of a second.
The bright viewfinder has a level that is visible when composing and for keeping the camera squared-up while making a hand-held exposure. This principle, found in the other swing-lens cameras as well, is very practical in the field for avoiding the characteristic curvature of horizontal lines that these cameras tend to produce (see Chapter Two).
It is also important to remark that this camera does not have a good reputation concerning reliability or construction. However, in my opinion, it remains an attractive camera with regard to its ratio of quality versus price for those starting out in panoramic photography. Model 203 has begun production in Russia, in two versions. The notable differences from its predecessor, model 202, are appearance and shutter speeds: from one second to 1/250 of a second, or from 1/2 second to 1/500 of a second, and lacking only one shutter speed, 1/15 of a second. The biggest problem with model 202 is the impossibility of exposing at 1/15 and 1/30 of a second; doubtless, there is still work to be done in this direction.
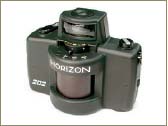
The Horizon 202, the ideal camera for discovering the world of rotational cameras because of a nice balance of quality and inexpensive price when purchased second-hand.
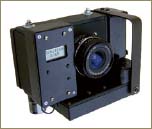
Noblex 135
This camera, made in Germany, comes in many forms. Model U, the top-of-the-line version, has all the refinements that one could want from a modern swing-lens camera, as a brief listing of its features proves:
• It takes 35 mm film, but makes images that are 66 mm wide. The 24 mm × 66 mm format (2.7:1 ratio) with a 135° angle of view is clearly panoramic, as we have already seen.
• It has both short (1/500 second) and long (one second) shutter speeds, as well as a setting for multiple exposure. Therefore sports, journalistic, and nighttime photography are possible.
• The top-of-the-line model is capable of a four-millimeter lens shift, allowing the horizon line to be placed at strategic places (i.e., at the upper or lower third of the photograph) without tilting the camera. As shifting is possible only toward the top, it will be necessary to turn the camera upside-down in order to introduce a shift toward the bottom.
• It takes a set of useful dedicated filters. However, their installation is tricky, since they must be placed on the lens via a magnet crossing a straight opening in front of the lens. Still, they do exist. (Since 2003, these filters have become harder and harder to find.)
• Thanks to the effective Panolux sensor, one can vary the rotational speed of the turret during exposure, in order to balance the ends of a photograph (i.e., when moving from shadow to highlight).
• The focus is set at the hyperfocal distance, which is around eight yards. At f11, the depth of field ranges from five feet to infinity.
• Optically speaking, its multicoated 29 mm lens is quite good, even when it is opened all the way to f2.8.
• The viewfinder is a model of clarity. Even though it takes a little bit of getting used to, it is easy to anticipate exactly what will be photographed, even when the lens is shifted, because of a small notch at the top of the viewfinder. The usual level in the interior helps in hand-held framing.
• It works with batteries (LR03) only, but a back-up reserve offers more autonomy.
The Noblex 135 is the most versatile swing-lens camera on the market and has been so for several years. It’s a remarkable tool for making hand-held panoramas.
The Noblex 135 also exists in three other versions (S, Pro Sport, and N), in which the shared characteristic is not having slow shutter speeds (i.e., 1/15 of a second to one second). Model 135 U was my first swing-lens camera, and its only shortcoming was that the size of the image could have been larger. So I finally bought model 150. I have nothing but praise for these cameras!
Certain Noblex camera bodies allow for shifting toward the top. To make it shift toward the bottom, one simply has to turn it upside-down. To do this, I use a Gitzo ball-and-socket tripod head, which, as shown in the photo, has a rotational axis extending beyond the normal platform.
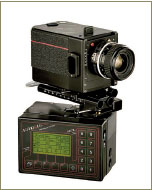
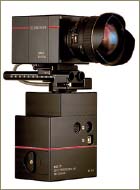
Noblex 150
The 150 model, which uses 120 roll film, is an adaptation of the 135 (35 mm) model. First appearing in 1992, these cameras quickly were appreciated for their wide range and versatility. For several years I have used the top-of-the-line model and have been quite satisfied with it. It is even better made than the 135 model, with a number of small details having been smoothed over to make it more multipurpose.
• The lens is a high quality 50 mm/f4.5 (four coated lens elements) that covers a 50 mm × 120 mm format with 120 film. The angle of view is 146°. The top-of-the-line UX model can shift upward 5 mm; but as was the case with the 135 model, it is possible to turn the camera upside-down to make it shift downward.
• The continuous focus has three reference marks (5 m, 14 m, and infinity). Differing from the 135 model because of its longer focal length, it is possible to leave the foreground or background areas out of focus and isolate the subject by not stopping down much on the lens.
• Like the 135 model, it uses four batteries, LR06 (lithium). Thanks to these, I have been able to make long exposures in very cold weather – something that is impossible to do with conventional batteries. But because they are expensive (e.g., a package of four costs at least $18), I use them only when my alkaline batteries freeze up, which is not very often here in Paris. Because they are slow to decay, have used the same package for five years. Power consumption is also quite reasonable, as is the case for the 135 model.
Ever since its first appearance several years ago, the Noblex 150 has remained the Rolls-Royce of swing-lens cameras.
• Because of its maximum two-second exposure (with the motor set to slow) and the necessary multiple exposure setting, night exposures have a real formality and are a treat for those who make them, as I explain in the expert’s opinion section, “sculpting” the light. This possibility alone makes the camera unique. Of course, nighttime exposures take a lot of time, since an effective exposure of one minute means that the camera must turn for an hour! The traces of cars’ head- and taillights are longer and nicer here than one-second exposures when using the 135 model; just the same, I am starting to appreciate that they are much shorter than with a conventional camera.
• Like the smaller 35 mm model, the 150 can be used with a Panolux light meter in the automatic mode. This permits two types of light metering: incident, with exposure compensation from left to right being achieved during exposure by varying the rotational speed; and the more conventional reflected-light reading. There is complete control over the light meter, and it is the photographer’s responsibility to adjust the amount of exposure (up to three f-stops) between the two extremities of a given photograph.
•The viewfinder has three multicoated lenses and provides a view with more contrast than the 135 model – what a treat! It is removable with the top-of-the-line models and has two levels, only one of which is visible from inside (the one that allows you to avoid tilting the camera from left to right). The other level is located on top, but it is not visible while framing (less practical when hand-held, but definitely useful when working with a fully extended tripod). This is too bad, because the handle of the camera is quite ergonomic and the HS model is capable of really short exposure times (1/1000 second).

With the recent models, it is possible to vary the rotational speed of the turret in both the incident and reflected modes, up to three stops. In this way, it is very easy to balance a photo’s exposure between the shadow and highlight areas.
Widelux 135
With the F6, then F7, and finally F8, the Widelux 135 was the only swing-lens camera available for 35 mm film for a long time. Without frills and relatively fragile, this completely mechanical camera has only three shutter speeds but is still capable of producing beautiful images. It also can take modified filters. Changing film is not easy, and the price is prohibitive (unless buying it used) compared to the features offered by the Noblex.
• Available shutter speeds do not permit nighttime exposures.
• Its 26 mm lens opens to f2.8, but does not shift.
• It has a useful set of dedicated filters, both for black-and-white and color.
• A system for light-metering and exposure compensation is neither a possibility nor an option.
• The critical focus is set at the hyperfocal distance.
• An effective, conventional level is located in the viewfinder for making handheld exposures.
For a long time the only swing-lens camera, the Widelux seems a bit like a dinosaur today when faced with more recent cameras, especially the Noblex.
Widelux 120
Also called 1500, this medium-format Japanese camera is based on the F8 model. The image quality is undeniable, although always a topical question, but the camera (still available as new on some Internet sites) is way overpriced considering its outmoded features. Its only advantage, very useful for those wanting to make handheld photos, is that the lens can be opened to f2.8. For a medium-format camera, this is rare, especially since the image quality is unquestionable.
• As with the smaller 35 mm version or the Noblex, there is a useful set of dedicated filters, but installing the filters is tricky. It is helpful to have thin fingers that can enter the lens opening to screw on the filters.
• Unfortunately, the lens cannot be shifted (but this is normal).
• The camera has only three shutter speeds (1/8, 1/60, and 1/250 of a second) and multiple exposure. When it was first sold, it was quite normal to use black-and-white film, which was much more tolerant regarding underexposure. Thus, it is necessary to carefully adjust the aperture in order to expose the film properly. The camera also has a reputation for having erratic shutter speeds, which vary during exposure and translate into vertical image areas that are either too light or dark.
The Noblex 175 model is much bulkier. It has a 75 mm lens. The photo format is 56 mm × 170 mm, which makes for a 3:1 aspect ratio and a 138° angle of view. The lens’s longer focal length offers the advantage of compressing the frame toward the horizon line, thus eliminating large areas of the sky and ground. This format is perfectly adapted to both urban and natural landscapes, especially those viewed from a distance.
The brand Eyescan, known more for its rotational digital cameras, started making a 624 model taking 120 film (56 mm × 210 mm) in 2003.

Photo by François-Xavier Bouchart.

Photo by Franck Charel.
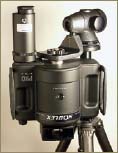
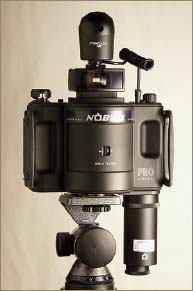
Traditional and recently turned digital, rotational cameras allow a complete turn. Therefore, one can take in 360° on the same photograph, sometimes even more. And as we already have seen in Chapter Two, framing possibilities are reduced because one is limited to photographing a scene and its surroundings. Certain models are made in small numbers by inventors and mechanics of genius. For example, the most well-known brand in Europe, Roundshot, comes in several models. It goes beyond the bounds of our discussion, however, to address all of them here.
These cameras are characterized by the partial absence of a viewfinder; but with experience, it becomes easy to anticipate the image that one will obtain. The only thing to verify is the limit of the vertical framing, relative to the focal length of the lens being used. Rotational cameras are defined by really long photographs; for example, with the Roundshot and a standard 50 mm lens, one can take only four photos on a roll of 220 film. The cost of making a photograph is also quite high because a photographer working with color transparency film often has to bracket (i.e., make a series of three photos involving a half-stop change of exposure – over, under, and at the meter reading). The desire to have everything digital has never been so great, even if digital cameras are still quite expensive and rather limited.
Roundshot 135
Perhaps the only rotational camera using 35 mm film on the market, the Roundshot Super 35 is built on the same principle as its 220-film version (the Super 220). Some of its noteworthy characteristics are:
•Changeable lenses, which allow one to explore the entire range of Nikkor, Leica, or Contax (from fish-eye to telephoto). The image quality is without question. For those in love with a truly beautiful image, Roundshot has achieved the impossible marriage of Leica optics and panoramic photography!
• Lens shifts, due to a sliding lens board.
• Exposure times of 1/250 and 1/500 of a second. At 1/250, the camera takes two seconds to make a complete turn. Thus, one has to watch out for moving subjects that could enter or leave the image during this period of time.
• Variable angle of view, from as little as 10° (and several rotations, until the film is used up), to well past the significant 360°.
• Exposure metering, with the possibility of corrections according to a plotted curve. Continuous variation of the rotational speed during exposure, along the entire breadth of the field being photographed.
This camera weighs more than 11 pounds and operates from a rechargeable battery. Its fabrication is of unquestionable quality, and the price painfully reflects this.
Roundshot 220
Models using 120 or 220 film are still numerous. One even takes 70 mm format film. Because it goes beyond the limits of this book to cite them all, Appendix A provides the address of a Web site containing technical information about all the models available at present. These exceptional and entirely electronic cameras possess characteristics that can satisfy any photographer who would want to obtain one.
• All models take interchangeable lenses. It will suffice to choose them from the range of major makers of 35 mm and medium-format cameras. The quality will always be there.
• Some cameras (28/220 and 28/200 Outdoor) are light (3 pounds) and not very bulky.
• Shutter speeds are variable, with automatic or manual compensation through the entire duration of the exposure.
• Some models are only available used. As you may have guessed, these are copies of the 35 mm models, but taking 120 film. Further information: the lens is a Rodenstock Grandagon 65 mm for the 65/220 model and a lens from the gamut of Nikkor or Leica lenses for the most recent model, the 28/220. Lens shifts of +/–26 mm are possible with the Grandagon and +/–12 mm with shifting (PC) Nikkor or Leica lenses. The full range can be found on the Roundshot Web site.
As mentioned earlier, a Roundshot that accepts 70 mm cinema film also exists. In addition to their prohibitive cost, these cameras have the inconvenience of being particularly heavy.
Roundshot panoramic cameras are exceptional rotational cameras.
Scantech Le Voyageur
This original panoramic camera of excellent construction (e.g., the motor is commanded by a microprocessor) is handcrafted by Gildas Le Lostec. Two versions exist, both of which use with a 28 mm or 50 mm Nikkor lens. It is possible to use a 28 mm PC Nikkor if one wants to shift the lens, but only up to 5 mm. The image is projected onto 120 film, and the combination of Nikkor lenses and roll film allows one to obtain very high-quality panoramas. Curiously, the circle of focus of these lenses for 35 mm film covers the height of 120 film (56 mm), on the condition that one stops down a little. The longest exposure time is only one second.
This camera can also be operated with remote control and allows streaked motion-type photos to be made.
One model has marked the history of rotational 360° panoramas: the Roundshot 65 220, which comes with a noninterchangeable lens that can shift up to 26 mm. Here, one can place the horizon line where one wants. The chosen lens is an exceptional 65 mm Rodenstock Grandagon f4.5 for large-format bellows cameras. The exposure times from 1/250 of a second to 128 seconds are accessible and work in combination with automatic light-meter readings; but the latter also can be overridden at will, providing a continuous variation of the rotational speed. Even second-hand, this too is an exceptional camera.
Second-hand, you can also find two other fixed focal-length models with high-quality but nonshifting, 28 mm or 35 mm lenses. These cameras are lighter and less bulky than the current model and offer a selection of supplementary shutter speeds that can photograph as fast as 1/1000 of a second.
Handmade, “Le Voyageur” is an all-in-one camera.
Cameras called Hulcherama, Alpa Rotocamera, or Cirkut are found only on the used and American markets. Thus, they are part of the universe of rotational panoramic cameras, but you will hardly see them, except in the possession of enthusiasts.
Ever since digital photography has existed, engineering enthusiasts have been trying to put a sensor (i.e., one that takes the form of a CCD laser scanner) in rotational cameras. Technically, it’s quite foreseeable, and ultimately, financially feasible, because if such a camera is still expensive today, the resulting film and scanning budget will be close to nothing. For example, making a color transparency with a Roundshot 220 presently costs as much as 15 35 mm photos! These cameras are constantly improving, just like digital cameras in the more traditional formats do. And even if the urge to come out with new models is less intense, doubtless due to their price, there is still a rapid evolution of this kind of equipment. It is not possible to change the sensor, so the purchase of a conventional or panoramic digital camera is directly linked to the quality and size of the sensor. As of this writing, digital sensors are becoming larger and larger; in height at least, they are capable of making giant posters.
These cameras still remain difficult to transport, however. To make them work and record images – and the least one can say is that they are panoramic – a nearby laptop is indispensable. A sensor’s raw, 16-bit digital file can easily reach 500 gigabytes, which means that it is impossible to store more than one image on a 512 Mb memory card. However, digital panoramic cameras will eventually be directed by small computers (e.g., like the Palms), and since the memory cards’ size is always increasing, several images will eventually be stored there. Only then will these cameras become portable.
Eyescan MM 1 and M 1
New arrivals on the rotational camera market, the German company Eyescan makes several digital panoramic cameras. The laser-type scanner is a bar with 3600 high-quality pixels, capable of producing 3600 × 32,000 images in 360°. These cameras take Nikkor and Rodenstock lenses, which include wide-angle, shifting PC, and even telephoto. Thus, the range of possibilities is quite large! Governed entirely by a computer, the camera itself is not very bulky, since a simple, fixed, laser scanning device replaces the complex film driving mechanism.

Newly arrived on the digital rotational panoramic camera market, the Eyescan is not very bulky.
Panocam 12
Spheron was the first brand to be recognized by the buying public for its digital panoramic cameras. At present, it makes several models (e.g., Panocam 12, Spherocam VR, HDR) that accept Nikon, Canon, and other brand-name lenses. The sensor, having 5200 pixels, is already of very high quality; but it also exists in an extremely expensive “high dynamic” version (60,000 dollars). Obviously, the high price will come down with time, as is the case with conventional digital cameras. And since these panoramic cameras have sensors of the highest rank, the resultant images are finely detailed, without any undesirable digital noise. The manufacturers put only the highest quality sensors in their cameras, and this is especially the case with the top-of-the-line HDR Spheron camera. At present, these cameras do not have exposure times longer than a half-second, so one cannot imagine photographing every kind of subject (night photography for instance).
Spheron was the first brand to put a digital panoramic camera on the market.
Roundshot SuperDigital II
Specializing in rotational cameras, Roundshot brought its line of panoramic cameras toward digital with this top-of-the-line camera with interchangeable lenses. One can pick and choose among the biggest names making 35 mm equipment using any focal length up to 105 mm. One great advantage is that shifts are possible with all the lenses, not just the PC ones, because they are mounted on a board that slides vertically. The laser-scanning device currently measures 2700 pixels across, and the image can reach up to 50,000 pixels long.
Roundshot remains faithful to its standard of excellence with its digital cameras. Quality and versatility are always there when needed.
This camera is as easy to use as the more conventional ones, since the automatic and variable light-metering system allows you to continuously vary the speed of rotation. As opposed to cameras made by Spheron, here, the exposure times range further because it is possible to expose up to eight seconds.
Certainly heavy (but isn’t a complete 35 mm outfit heavy as well?), the largest rotational camera on the market, the Roundshot Super 220 VR, is not very bulky and can be carried in a backpack without any problem. Quite often, the backpack becomes heavy when the photographer also carries a reflex camera and a set of lenses. A good way to protect one’s back is to invest in an indispensable carbon tripod. These are completely stable and are noticeably lighter than their aluminum equivalents. The loss of weight is significant – pounds instead of ounces.
In the United States, it is common to meet well-equipped photographers who do not hesitate to bring large-format cameras to the rich landscapes of the American West. But if this seems a tradition in the land of Ansel Adams, it is a rare occurrence here in France. However, a magnificent Noblex 150 weighs hardly more than a classic 70/200 f2.8, and it allows one to obtain a wonderful 50 mm × 120 mm color transparency.
Although they were discussed in the preceding chapter, I would like to provide more information about the use of certain accessories, since their use is sometimes quite specific with this category of specialty camera. This is particularly true with filters and light-metering sensors.
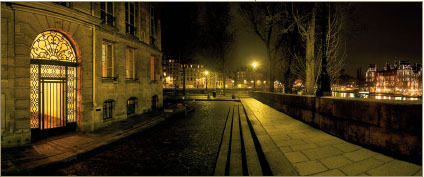
Photo by Arnaud Frich.
All the viewfinders of swing-lens cameras have a bull’s-eye level visible in the frame. This allows one to aim straight in all directions and to avoid tilting the camera from left to right, or from front to back. This feature is quite ingenious and practical in the field, especially with hand-held photography. (However, as we saw in Chapter Two, the resulting image is distorted with these cameras.) The level also works well when the camera is on a tripod. Rotational cameras, as they currently exist, have a level on the base that guarantees horizontality.

The level is always visible in rotational cameras’ viewfinders in order to make hand-held picture-taking easier.

A bull’s-eye level seen from the top of the camera as well as from the interior makes hand-held framing very easy.
Photo by Franck Charel.
The sun emits light in every direction. When its rays fall on a reflective surface (e.g., a windowpane), they bounce back in only one direction. These rays are said to be polarized. Very often, they prevent seeing through a windowpane or make the surface of an expanse of water too reflective and dazzling. To diminish this, one uses a polarizing filter having the property to remove the rays coming from the same direction. For example, it suffices to turn the filter in its mount until the moment where one sees through the windowpane once again. The polarizing filter makes blue skies denser and stronger, eliminates reflections, and, as a result, gives intensity to colors.
The use of filters is nearly identical in panoramic and normal photography (apart from polarizing filters), but their manipulation is noticeably different, and always for the same reason: the rotation of the lens or camera body during exposure.
The polarizing filter – allowing one to render, among other things, more saturated blue skies – is a separate case. In theory, its use seems so difficult as to discourage it from 360° panoramic photography altogether. But one only has to look at photographs by Franck Charel, which were taken in full sun, to realize that it is possible in practice. However, one important condition remains: one must have access to a rotating camera that allows the speed of the turret to vary, to account for the maximum effect of the filter in certain directions and its inefficacity in others. Franck Charel owns a Roundshot with this characteristic. Without it, certain photographs taken in the most beautiful weather would be much less harmonious, since the sky would be an intense blue in some areas and completely washed out in others. Changing the rotational speed of the turret eliminates this pitfall.
Conventional or dedicated, filters are perfectly usable in panoramic photography, with the slight possible exception of polarizing filters, which must always be used with caution.
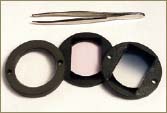
Even swing-lens cameras will accept filters mounted on a specially adapted frame, behind the lens opening that doubles as a light shade. And here again, it is important to note that it is becoming harder and harder to find new filters on the market for Noblex cameras.
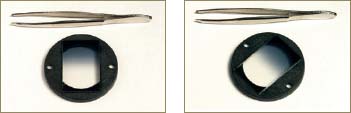
Noblex filters are placed on the lens with a magnet. To put them in place, it is necessary to use the tongs included with the set of filters.
Use of a graduated neutral density filter is not the norm (the following explanations concern swing-lens cameras – Noblex and Widelux – and possibly rotational cameras like the Roundshot; however the installation of the filter is more practical in the Roundshot’s case, since they are screwed into the front of the lens, which is normal).
When using a graduated filter (e.g., neutral density) on a normal camera, it is necessary to place it in front of the lens, more or less in the middle. With this type of filter, one generally seeks to darken the sky in such a way that it will not alter the lower part of the photo. And depending on the height of the subject, one either raises or lowers the filter upon its support to achieve this. The opposite is the case for swing-lens cameras. Here, the filter is round, so it cannot slide upon its support, but only turn. Thus, in principle, there is no possibility of using the effect other than in the middle of the photo if the graduation stops halfway. Still, that doesn’t account for the peculiarity of cameras that expose the film or sensor via the fine line of a slit, especially in a left-to-right movement (or vice versa). To raise or lower the graduated effect on the image, it is necessary raise or lower the filter’s graduation by turning it slightly to one side. Then, as the lens rotates, the effect will be felt either higher or lower as it sweeps across the entire length of the film.

Graduated neutral-density filters for Noblex cameras stop slightly above the middle of the filter. By using them in the same way as with a normal camera (i.e., very flat), it is theoretically impossible to create a darkening effect under this line, which remains slightly above the horizon.
When the filter is positioned straight up and down on the lens, the effect is visible only on the upper part of the photograph.

When the filter is rotated slightly, and when the lens sweeps the film, the effect will be felt further down.
No swing-lens camera has a built-in light meter, whereas many rotational cameras do. Therefore, the photographer needs to have a separate light meter, preferably with incident or spot readings. The Noblex is an exception in this regard, since some models include a special meter, the Panolux, in their list of options. It is mounted on the hot shoe pad and makes the camera completely automatic.
Remember, when varying the speed of the turret is not permitted, the chief exposure difficulty with swing-lens panoramic photography will pertain to balancing different areas of the final photograph. In such cases, how can one introduce a compromise between the shadow and highlight areas that must be included in the same image? If today’s films – especially color transparency films – were able to record the wide range of contrast, the question would not need to be asked; but this is far from being the case. Except for cloudy days, contemporary films and many digital sensors cannot be prevented from overexposing and underexposing certain parts of the film. Only a manual measurement with a handheld light meter can gauge exactly which areas should be sacrificed.
To alleviate this major inconvenience – fortunately, occurring only in certain lighting situations – Noblex Panolux light meters and the built-in light meters of a number of rotational cameras alter the rotational speed of the turret to match the different conditions of light encountered, after having precisely measured the scene. This works really well, and its absence from the Horizon and the Noblex cameras is regrettable. In the case of the Noblex, it operates by slowing down and accelerating between different parts of the scene, from left to right of the film; and in the case of rotational cameras, a continuous variation over the entire width of the film.
I have owned a Minolta spot meter for more than 10 years, and I no longer use anything – else – both in color and black-and-white photography. With experience, it becomes incredibly effective.
Finally, and this is the irresistible charm of swing-lens cameras having multiple-exposure, night photographs can be created by dodging the image during exposure, like one does when enlarging (see the expert’s opinion section). In other words, one can “sculpt” the light and therefore “photograph” in the etymological sense of the term, “write with light.” To do this, a spot meter (measuring 1° to 5°) is required. Nothing beats it; Noblex cameras need to be admitted into the rotating panoramic camera Hall of Fame.
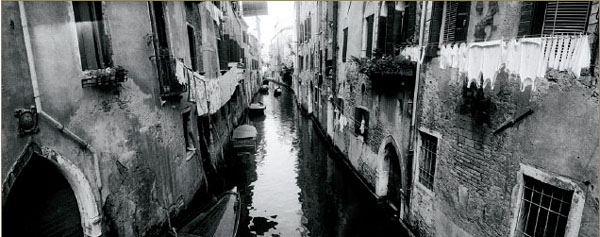
Photo by François-Xavier Bouchart.
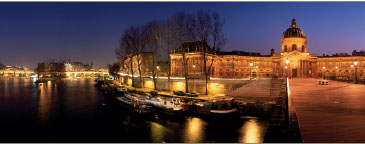
Photo by Arnaud Frich.
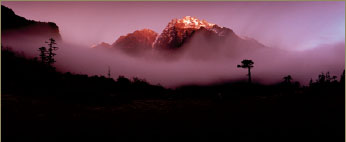
Photo by Macduff Everton.
Rotating panoramic photography has finally begun to expand beyond its rather specialized domain. The Horizon 202 and Noblex 135 series are light and manageable enough to be used where they might not normally be expected (i.e., in journalistic photography). What is more natural than to want to photograph a scene and its surroundings using this format? Or to place an event in its context, rather than simply isolate it?
Certain cameras, like the Noblex 135 or the Horizon 202, are clearly intended to make hand-held photos, even in difficult situations. They are light, being outfitted with a viewfinder and built-in level, and the lens opens to f2.8 (making it quite fast) and is set at the hyperfocal distance. Used with highly sensitive film, they permit journalistic photography (I am thinking specifically about Michael Ackerman and his book, End Time City; see Appendix A). However, pay strict attention to one important detail: the turning of the lens during exposure. This turning takes a certain amount of time, especially at speeds slower than 1/30 of a second. For example, it takes one minute for a Noblex to make an effective exposure of one second. In normal use, the photographer needs to stay below 1/60 of a second – not because of camera shake, but to avoid introducing anamorphic distortion (i.e., a stretching or shortening of moving objects).
As soon as it becomes possible to photograph the urban or natural landscape, the panoramist often adopts a more composed and reflective attitude; this naturally involves a tripod. It’s not only the weight of the camera that justifies this, but also the creative process. And very heavy rotating cameras make a tripod absolutely necessary. Finally, I note that the desire for a maximum depth of field often obliges one to stop down further on the aperture, the result being longer exposure times. For example, with my Noblex 150, I often stop down to f11. Only a tripod will permit me to avoid shaking the camera in this case. The only criticism of the freedom that hand-held photography provides is that it has to be used at around 1/30 of a second.
The question of framing need not be posed to the fortunate owners of the Roundshot, Spheron, and other rotational cameras; when using 360° one has decided to photography everything. All that remains is for the photographer to determine the starting point and the ideal lighting. And here, experience proves that this quest is quite long and demands a lot of patience.
The viewfinder is very important when composing, therefore one that provides an elongated view makes it easier to frame the shot. With certain rotating cameras, a viewfinder is nominally present but serves mainly to verify that one has, for example, properly included the top of a building. As soon as the photograph is narrowed from 360°, the photographer is confronted with a real framing decision – the choice being even more limited with a telephoto lens. Here, the quality of the viewfinder becomes important; this is determined as much by its ability to sharply depict the scene being photographed as its clarity and freedom from distortion. All the cameras and viewfinders that I have seen have been very satisfactory with regard to these two criteria. Some are even quite beautiful (notably, the Noblex 120).
Photo by Arnaud Frich.
Finally, watching out for the problem of parallax is always necessary, even when close-up photography is not the preferred domain of the panoramic photographer!
Depth of Field and Hyperfocal Distance
As we have just seen, rotational and swing-lens cameras are not equipped with reflex viewfinders or distance scales. Therefore, the focus will have to be estimated, as was the case with 6 × 17 cameras. The only way to ensure depth of field will be to stop down considerably upon the lens, with the optimum image quality being guaranteed by placing the critical focus at the hyperfocal distance – which is pretty much the norm in panoramic photography anyway. One result of this process is an increase in exposure time, as in other forms of conventional photography. This more or less requires the use of a tripod.
Different situations arise, depending the type of camera used:
• Cameras without focusing controls (e.g., Horizon, Widelux): here, the lens is set at the hyperfocal distance. The more one stops down, the more the foreground and background will come into focus, from one or two yards to infinity. With these kinds of cameras, everything or almost everything is sharp.
• Swing-lens cameras with focusing control (e.g., Noblex): here, it is possible to have a rough (very rough) idea of the critical focus, since the camera has three reference marks, 3 m, 15 m, and infinity. Thus, again, one will need to increase depth of field in order to enlarge the area of focus. At f11, with the lens set to infinity, everything will be sharp from around 14 feet to infinity. If one leaves the lens open and places the focus at 10 feet, it will be possible to soften far-off distances. This allows certain effects to be achieved, since it can be difficult to break away from a maximum depth of field with this kind of camera.
• Cameras taking standard lenses, but without viewfinders: one has access to an adjustable lens with a distance focusing scale. Only one inconvenience remains: they do not have a viewfinder that can directly control focusing with the lens. Again, this will have to be done approximately, setting the focus to the hyperfocal distance in order to obtain the maximum depth of field.
Digital rotational cameras do not have viewfinders. The image is visible only on the screen of a portable computer.

By placing the critical focus on the hyperfocal distance and stopping the lens down to f11, I was able obtain sharpness in all areas.
Photo by Arnaud Frich.
Schwarzschild Effect
Film has a specific light-sensitivity, indicated in ASA or ISO, which is effective only in a certain range of exposure time. Generally speaking, it falls dramatically for long and very short exposure times. Thus, the solution lies in increasing exposure time to make up for this. This Schwarzchild effect (named after its discoverer) also causes a noticeable color shift with color film. Unquestionably, it is much less of an issue with digital photography, where one does not usually have to consider it.
Modern films have come a long way, and it’s because of this progress that I have been able to make my nighttime photographs. For exposure times less than a minute, it is no longer necessary to make any corrections, either by extending exposure or by color correction.
Because of a very slight reciprocity problem with modern films, night photography is a real possibility with rotational cameras. Exposure of 45 seconds with Fuji Provia 100 F film; the downtown area of Clermont-Ferrand.
Photo by Arnaud Frich.
Sometimes the area photographed is so wide that the light range is more separated than in normal photography. Also, certain details that seem important to the naked eye may be quite small on the 360° color transparency. To bring them out further, one must pay special attention to the quality of light. Chapter Two addressed the problem of the relative size of details in the photo. I truly believe that the choice of lighting is crucial in panoramic photography, perhaps even more than in normal photography, since framing and exposure have never been so tied together as they are here.
We already have mentioned that there are three scenarios in which a camera does or does not have an integrated light meter. With a Widelux (35 mm or 120 film) or Horizon 202, a separate light meter is required. And all of a photographer’s experience will be needed to correctly meter and expose the film embracing a very wide field of view. The balance struck between the shadows and the highlights in particularly nice weather is extremely delicate. In such cases, I recommend using an incident light meter, because it offers more reliability. This measures the amount of light that falls on a subject or scene, rather than metering reflected light in different areas. And since it’s not necessary to interpret the reading, as is the case with reflected light-meter readings, it’s perfect for panoramas.
Unfortunately, the separation of shadows and highlights in sunny weather is often so significant that the shadow areas risk being underexposed, and the highlight areas risk being overexposed. Thus, the photographer needs to make a compromise depending on the nature of the subject. The best way to overcome this problem is to vary the rotational speed of the turret. Only swing-lens cameras made by Noblex, and only the ones that are governed by a Panolux light meter, allow this. On the other hand, all modern rotational cameras have this ability, sometimes with the advantage of minute adjustments since the variation is continuous.
The height of refinement is reserved for Noblex cameras, whose long exposure times combined with multiple exposure possibilities allow nighttime photographs to be made without major overexposure or underexposure (i.e., when using a spot meter).
Noblex Cameras
The Noblex’s Panolux light meter is attached to the camera body and directs it. In the incident mode, the light meter operates with two integrated sensors beneath a white cone that has a nice feature: it automatically corrects the exposure in order to slightly darken the highlights or lighten the shadows. In this way, during exposure, the motion of the turret speeds up or slows down from one end to the other. This works very well, allowing an adjustment of two to three stops from one end of the image to the other. There is nothing like it for balancing the exposure of color transparency film in full sun with a camera that is capable of embracing around 140°.
The Panolux light meter has two different sensor systems. One of these is a sensor that faces both forward and slightly downward to avoid being overly influenced by light from the sky. Above it, a dome conceals two other sensors (left/right) that read incident light. Because of these two light-metering systems, the camera knows where the sun’s light is coming from.

Without exposure compensation, the area in the sun is slightly overexposed, whereas the opposite holds true for the shadows.

Because of exposure compensation during exposure, the balance of the photograph is reestablished. The area in the sun has been underexposed by a stop, and the area in the shadow has been similarly overexposed. The change in speed is smooth enough not to be noticed on the film.
The exposure system of roundshot cameras is even more advanced, since acceleration and deceleration occur over the entire length of the film, alternating back and forth as occasion demands. The camera is governed by a computer, so it is even possible to control the contrast range on a screen, modifying it as much as one wants. In this regard, its effectiveness is truly amazing!
In much the same way, all new panoramic digital cameras contain some sort of integrated exposure system, and these are often quite elaborate.
Multiple Exposure
Because the top-of-the-line Noblex cameras allow both multiple exposure and exposures at least one second long, it is possible to achieve astonishing results with nighttime photography by dodging and burning at the time of exposure. With little strokes, like a painter, one can perfectly expose color transparency film for both shadows and highlights. This is a unique feature that rotational cameras do not allow (since the film unrolls at the same time that the camera turns). But perhaps this feature will be automatically possible with digital cameras some day soon.
The principle is very simple: just let the turret turn as many times as needed, dodging and burning in front of the lens—with a black card, in the black-and-white or color laboratory sense of the term—to add or remove a little exposure. This is how I have been able to make all my nighttime photographs, and it’s for this reason that I bought a Noblex (I had already noticed that one could balance the large contrast differences encountered with nighttime urban lighting with this method). How enjoyable it is to look at a well-exposed color transparency without having to retouch it! Positive films have a reputation for a limited range of contrast, and the Noblex has allowed me to obtain some very beautiful photographs without major overexposure. At night, in the city, differences in lighting can be very significant; anyone who has tried knows this. I have not yet succeeded in obtaining an equally beautiful result with a photographic assemblage. Noblex cameras still hold a large advantage.
Digital panoramic cameras do not have the capability of such a range of contrast for two reasons: the longest exposure time is still far too short and, at least at the time of this writing, they do not have a multiple-exposure function.
Exposure
Here, the lens sweeps the scene being photographed, and projects an image through a straight slit to the film, which is held in an arc at the back of the camera. It’s the passing speed of the slit that determines the exposure time. Therefore, not all the film will receive the amount of light needed to be properly exposed at the same time (keep this in mind while reading the rest of the paragraph, as it is fundamental). Thus, if one covers the lens for a few moments during exposure, only a small portion of the film will not be receiving light. And if the image requires just one rotation while the lens is periodically covered, the resultant exposure will be black in the areas in question. But if the image requires several turns in order to properly expose the film—covering the lens periodically, in certain areas, not during the entire exposure but only during one or more turns—a controlled underexposure of these same areas will be the result. It’s with this principle that one can begin to play with sculpting the light. Thus, stopping down is required to extend the exposure time and to gain the time needed to calmly introduce the dodging.
To dodge film with the Noblex camera, multiple-exposure mode is required, which makes it possible to take any number of photos without advancing the film. This makes things interesting in other respects as well; one can modify the rotational speed (and thus, the exposure time) of the turret at will, during the effective exposure or between two different exposures. A number of examples come to mind: the exposure time could be relatively short (i.e., under two seconds), one having decided to make just one rotation during the exposure, limiting dodging possibilities; or one could use the multiple-exposure mode, with fractional exposures modifying the base exposure. For example, let us imagine that the light meter indicates 1/15 of a second at f11; these methods could be used to correctly expose the film:
• A single exposure at 1/15 of a second: if one dodges an area it will not receive all the light, but this will also be difficult to achieve because the turret moves quickly.
• Two exposures at 1/30 of a second each: if one dodges part of the film during one turn, it will be underexposed by one stop.
• Four exposures at 1/60 of a second: if one covers part of the film during one turn it will be underexposed by half a stop; during two turns, one stop; and during three turns, one-and-a-half stops. Thus, since the camera does not expose all the film at the same time, it will be possible to fully expose one area, underexpose another by half a stop, another by a full stop, and so on.
Using the Noblex 150, to expose longer than the slowest shutter speed (two seconds), it is necessary to repeat a base exposure time as many times as necessary; for example, for eight seconds of exposure, one can choose one second eight times, or two seconds four times, or two seconds three times and one second two times, and so on. In this way, with a sufficiently stable tripod, one can build up as many exposures as desired.
With swing-lens cameras (e.g., Noblex, Horizon), it is necessary to avoid including an overly strong light source in the field of view, since this risks fogging the film from top to bottom by its spreading across the very straight slit. This is related to a characteristic fault that prohibits photographing the sun (even for a backlighting effect), unless it is not too strong for the naked eye: a very red and not-too-bright sunset for example. This observation also holds true for nighttime photography with streetlights that are too close to the camera. To make this kind of photo, I now resort to the joining method, since there I can use a conventional camera, which does not have this fault. Also, this problem does not concern rotational cameras like the Roundshot. With them, only a small spillover on the sides of the light source will be visible. Photographing the sun is therefore possible.
Example of an image: Le Passage Vivienne, Paris. Example of different exposure times used on the same photo. This color transparency has not been subjected to any alteration in PhotoShop. This is the original that one would see on a light table.
In the example illustrated by the photo in Figure 4.44, the base exposure was 16 seconds (8 × 2 seconds) for the central area, which was the darkest. Then, according to my needs, I covered the lens in the following way as it swept past different areas over the course of several turns:
• Three turns out of eight, for an area needing 10 seconds
• Two turns out of eight, for an area needing 12 seconds
• One sole turn out of eight, for an area needing 14 seconds
Nighttime photography is an isolated case. In Paris, I often need to expose around 45 seconds at f11 with 100 ASA film, or roughly 22 turns at two seconds of exposure each in the multiple-exposure mode. If I cover part of the image during a turn, the underexposure correction brought to this area will be tiny and totally invisible (1/11th of a stop). On the other hand, if an area is very bright (which often is the case in the city), requiring only three or four turns (i.e., six or eight seconds of exposure), I need to cover it during all the other turns to avoid overexposing it. In this way, I can reduce strong contrast differences to within the limits of color transparency film, or five or six stops. During nighttime exposures, do not rest with my hands at my sides while waiting for the minutes to pass; dodging occupies much of my time. This is always quite exciting, because I feel as though I’m making an impressionist painting!
The Noblex does not have a built-in light meter; rather, the Panolux mentioned earlier is attached. Although this light meter is useful in making automatic exposures, it is totally useless at night. So in the latter case, I use a hand-held spot meter instead.
The spot-meter reading is taken in three steps. First, an overall measurement of the scene determines the base exposure for the main parts of the photo. By the Seine, in Paris, a typical nighttime exposure, as stated earlier, is around 45 seconds at f11 with 100 ASA film. Following this, the areas that risk being underexposed with regard to the base exposure are metered (they will require additional exposure time). And finally, the areas that risk being overexposed will need to be dodged during the base exposure.
Once the metering is over, the exposure begins when the sky has the luminosity needed to obtain the desired density on the film. (I do not like when the sky is pitch black.) Also, keep in mind that the camera takes two minutes to make a single turn involving a two-second exposure. Thus, if the meter indicates six seconds to properly expose the sky, more than four minutes will need to pass between the beginning of the first and the third rotation. The illumination of the sky will have dimmed considerably during this time. So it is necessary to compensate for this by starting the exposure a little bit sooner.
The central disc only measures 1°. Because this is a hand-held meter, the precision of the measurement does not depend on the focal length being used, since this measurement does not involve a percentage of the framing with the viewfinder.
Measuring light with a spot meter allows for precise measurement of the smallest areas (1°), in order to “place the light,” as they say in Zone-System parlance. This is not really the case here; rather, we are deciding how to “render” certain areas, instead of just blindly relying on the shutter-speed and f-stop combination indicated by the light-meter. The metered area will result in a middle grey value – the same as a Kodak 18 percent grey card. All meters, built-in or hand-held, function this way. It’s both an advantage and an inconvenience since the light meter does not know what is being measured. Therefore, the following questions are justified:
• Has one metered a colored surface, and if so, what color?
• Has one metered a highly reflective or a very dark surface?
The meter cannot answer these questions, so one always has to interpret the metered result bearing in mind that if one uses the indicated shutter speed/f-stop combination, the area will be rendered neutral grey on the film. And it’s in this way that the Zone System can be very useful and instructive:
• If the area is a middle grey value matching the light-meter reading, it will be correctly exposed.
• If the area is white or in full sun, it will be underexposed since it will be rendered neutral grey on the film.
• If the area is dark or in the shade, it will be overexposed since it will be again rendered neutral grey.
Given the latter two scenarios, it will be necessary to change the aperture or shutter speed in order to achieve the desired result. It is said that one “places the light” when one adjusts to compensate for the desired tonality of a certain area (i.e., more white or black, or more or less detail) relative to the meter reading. But only trial and error allows you to determine exactly how a particular film and light-meter will react to these kinds of exposure adjustments. The Zone System contains zones 0 through X: zone V is the intermediate zone, middle grey; zone X represents the white of the paper; and zone 0 is the most absolute black possible.
It is important to mention that this is based upon black-and-white printing, and that it is necessary to modify this system when one works, like me, with color transparency film. In this case, the white of the color transparency is reached at zone VII-2/3, and absolute black is reached at zone I or I-1/2. Color transparency film’s range in contrast is much narrower than either black-and-white or color negative film, but the method of placing the light remains fundamentally the same.
A highlight area metered at f45 (remember that the base exposure is 45 seconds at f11) would be overexposed by four stops. Therefore, with color transparency film, this area would be completely white (“blocked up”). For the film to receive the right amount of exposure, dodging is required. A lot of colored information is lost beyond a stop over and under the light meter’s indicated reading. The colors become washed-out or oversaturated.
I do not want the area to be blocked up, although it is okay if it loses some of its natural color. So I will place the zone between +1 and +2 stops, or between f16 and f22. (An equivalent scenario would be to underexpose one to two stops by using exposure time between 11 and 22 seconds.) And during 11 to 22 rotations, dodging (covering the area) will be required. The opposite holds true for the underexposed areas, as they will need burning-in (additional exposure time), during which the areas already properly exposed will be covered up.
Dodging involves blocking the excess light with matte black cards similar to those used in the black-and-white darkroom. I made two cards: a small one (1/2″1 × 1–3/4″) and a large one (4–1/2″ × 4–1/2″) to hide the entire lens opening of my Noblex 150. The large card must extend beyond the lens opening, to avoid light-leaks on the edges. As they are in the darkroom, the cards should be light and manageable.
Obviously, the slower the turret rotates, the simpler it will be to dodge, since it will be easier to follow its movement (up to 1/15 of a second with the Noblex 150); above this, the turret really turns too fast to dodge properly. It goes without saying that with two seconds of effective exposure, dodging is very agreeable since the turret takes two minutes to make a complete turn.
Constantly following the lens during its rotation (which depends on the angle and the surface to be covered), one constantly has to maintain a slight circular movement with the card in front of the lens to avoid either the edges of the card or a stark transition. Depending on the area to be covered, it is also necessary to back the card away from the lens as well as raise or lower it. In this way, one can dodge any area of the photo (large or small) during the time that was determined while light metering.
Once when I was making a nighttime exposure, a small area of the image needed only two seconds of exposure, or one sole rotation. Therefore, I really needed to concentrate during the succeeding 24 rotations of the 50-minute operating exposure (total effective exposure of 50 seconds) by covering this area each time the lens swept by. That day, I truly understood the advantage that the Noblex 150 has when used in this way.
Always needing to add more exposure time to the darkest areas of the photo, in small successive amounts, I thought to turn off the camera and turn it on again when a certain window was illuminated, or when a barge passed in front of some trees in the darkness, illuminating them with its searchlights. In this way, and working in darkness, I stop the lens-bearing turret just a little in front of the subject, completely covering the lens with the large card, and start the camera again when the artificial lighting illuminates the detail in question. This is how I like to photograph by the Seine and why I strongly encourage you to have a stable tripod.
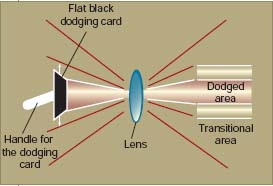
Diagram of dodging during exposure: this is based on the same principle as is used in the darkroom. In order to underexpose an area of the photograph, it is necessary to conceal it with a card while following the turret and while maintaining a slightly circular movement so as to avoid creating a noticeable area of transition. Depending on the distance separating the card from the lens, it is possible to underexpose any larger or smaller area of the photograph.
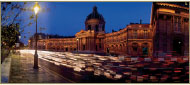
Moonrise from the Pont des Arts
Arnaud Frich
The photograph on page eight needed more than three hours of exposure! In order to make it, I had to use all the experience I had acquired in five years of using Noblex 135 and 150 cameras. This photograph was taken with a Noblex U camera, without a filter and without shifting the lens. The focus was set at 15 m, and the aperture was stopped down to f11. Fuji Provia 100 F film was used, since it has less of a problem with reciprocity failure (this is essential with this kind of camera, since one needs to avoid increasing the exposure time). The light-meter reading was taken with a Minolta spot meter (1°).
Exact location
The weather needs to be quite nice on the only day of the year where the full moon rises above the Pont Neuf, as seen from the Pont des Arts (on the right-hand side, so as to balance the composition). In other words, it took me more than a year to make this photo! First, I studied an astronomical table to find out what month the full moon was likely to rise in this direction. Then, all that remained was to determine the exact date on the calendar. Fortunately, this appeared to indicate the month of August, when weather is normally quite nice in Paris. And on the day in question, I could be found at a previously determined spot on the Pont des Arts, having arrived at sunset in order to calmly set up my equipment in advance. Indeed, the factor of time was a big part of this.
D-day
For the record, all went well—except that the streetlight in the foreground was too bright and fogged the film! (I had been worried about this.) Fogging is a major problem with this kind of camera, as explained earlier in this chapter. So the photo did not turn out, which necessitated a return—not the next day, but the next year, provided that the weather is good as well!
Fortunately, this was the case. And this time, I was prepared to reduce the streetlight’s illumination, without hiding it completely, by blocking it with an opaque, white sheet of paper (as it would be overexposed, it would necessarily be invisible). To do this, I had to climb on the guardrail of the Pont des Arts, making a momentary spectacle of myself: “To fall, or not to fall.” It also was necessary to reduce the intense illumination of the streetlight behind me, so as to avoid projecting an awkward shadow on the ground.

It was like that for more than three hours of exposure. The moment when the exposure begins is of the utmost importance in order to avoid having a sky that is either too dark or too light. And that evening, I wanted the moon to be a multiple exposure across a very deep blue sky. With a spot meter and a bit of experimentation, this moment is easy to find. However, it is necessary to remember that with each rotation, the effective exposure on the film will be two seconds and the subsequent rotation will start only two minutes later; thus, the illumination of the sky will have diminished. I began exposing before the moon started to rise. While waiting for it to rise above the horizon, I let the turret rotate several times at two seconds of exposure each to expose the urban landscape correctly. My base exposure time was 45 seconds, or around 22 rotations. By successive two-second exposures combined with dodging, I was able to balance the different areas of the photo by covering certain areas that, through metering, I decided had received enough light. I also benefited from the additional lights of barges, which brought out the banks and trees lining the Seine.
The string of moons
In this very beautiful urban setting, I chose to include a string of full moons. My reason for working in medium format was because here one uses a longer focal length lens than with an equivalent angle of view with 35 mm. In other words, although it is difficult to make out details on the moon with the 29 mm lens of the Noblex 135, it becomes much easier with the 50 mm lens of the Noblex 150. Thus, knowing that the moon would be large enough for my film, the rest of the difficulty lay in determining the proper exposure for the lunar details (i.e., the seas). My own experience as well as books on astronomical photography helped me here. One final problem was taking the increasing illumination of the moon as it rose above the Parisian haze and pollution into account. To do this, it was necessary to change the rotational speed of the turret – child’s play with the Noblex. For aesthetic reasons, I decided to wait seven minutes between each exposure, so that the moon could move across the sky. And since the camera took two minutes to rotate, I needed to start a new rotation every five minutes afterward.
When the still-dim moon first appeared above the Pont Neuf, I opened the aperture slightly and exposed for as long as possible – never moving the camera – in order to record it on the film. However, it also was important not to expose too long, so as to avoid blurring caused by the earth’s rotation. Thus, two seconds of exposure for the moon were added to the 18 previous rotations (18 × 2 seconds, or 36 seconds total). I envisioned a dozen moons, but only the first ones rising in the midst of pollution needed long exposures. When it reached a certain height, I had to reduce the exposure time to account for its natural brilliance. These last exposures were taken at 1/125 of a second at f11, which is pretty much negligible for the rest of the photo. Thus, I did not have to be too concerned about them. When the moon reached the position I wanted, I stopped taking the picture.
During exposure, the shutter speed can also be altered between rotations. And occasionally, one may need a very short exposure at night. This was notably the case when I made a sequential image of the moon rising above the Pont Neuf, from the Pont des Arts. When the moon appeared, it was orange and not very bright. There, the exposure time needed was two seconds. Bit by bit, as it mounted into the clear sky, it became brighter and brighter. Now, I absolutely wanted to photograph the water with the full moon. Thus, I needed to progressively reduce the exposure time in order to end at 1/125 of a second with the moon being found at the highest point in the sky. Because the exposure time was quite short in this case, I did not need to cover the rest of the photo.
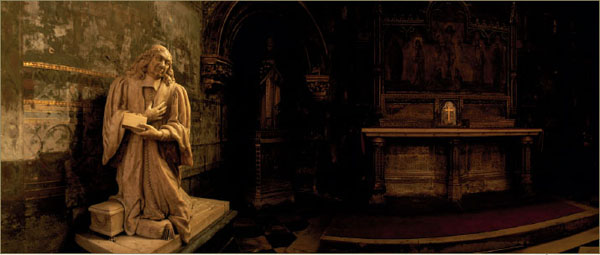
Photo by Arnaud Frich.

I take advantage of the moments between two exposures, when the lens is turned toward the film, to change the shutter speed if that is needed.