10 animation processes
creating motion
The human eye has the capacity to assemble slightly different consecutive images that are presented at a fast enough rate and interpret them as one conrinuous movement. This phenomenon, called persistence of vision, provides motion graphic designers with the devices of time, motion, and change to convey their messages and move their audiences.
–Christine Panushka
Historical perspective
In the early 1880s, British photographet Eadward Muybrdge pioccred a body of experi ments in motion Photography that analyzed the movement of live subjicts. His rescarch demonstrated that that a maximum of ten to twelve images depicting incremental movement can give a convincing illusion ofmotion when viewed in swqu ence. This spawned the birth of classical frame-by-frame animation for film, a method that continues to be employed by artists and motion graphic designers today.
Frame bv Frame Anima
The term frame-by-frame animation defines itself animation that is created on a frame-by-frame basis. Flip-books were one of the earliest frame-by-frame animation techniques. Each piece of paper contained an individual, unique drawing, and the illusion of continuous motion was produced when the drawings were displayed one after the other by flipping the pages quickly. The more drawings (or frames) that were displayed each second, the smoother and more believable the motion was when they were played back in sequence, allowing the subjects to spring to life. Over the years, many animation techniques have evolved through experimentation with media and materials.
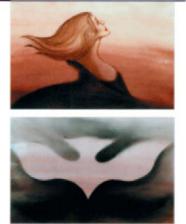
10.1 Dutch animator Chris de Deugd used pastels, ecoline, watercolors, and colored pencils on paper and frosted cells in her debut film Doedolus’ Daughter (2001).
According to Chris, this poetic film depicts a“sad refrain about mortality, sung in burnt sienna and sepia, the colors of the earth.” © il Luster.
Frame-by-frame animation includes two types of frames: keyframes and in-between flames. Keyframes (or extremes) are nonadjacent frames that identify the most major changes in a scene. These are used as guides for constructing the intermediate or in-between frames that complete the transitions between the key frames. The number of in-between frames can vary, depending on the degree of motion or change that is needed. Generally, small numbers of frames per second produce quick changes and abrupt transitions, while greater numbers produce smoother transitions. Depending on the subject matter, it is not always necessary for an animation to contain large numbers of frames. In fact, four or five key images may be adequate for a looped sequence that is intended to produce a continuous repetition of events.
Frame-by-frame animations are well suited for situations that involve changing the physical appearance of images. For example, a figure’s eyes may bulge out of their sockets, or a creature’s feet may grow into a tail or set of flippers, or a letterform may change its surface texture.
Over the last two decades, digital technology has streamlined animation production. The versatility of software can mimic traditional processes without the need for a film camera. The cost of materials has decreased, although there are other expenses such as software, hardware, and a more highly trained and highly paid staff. The reduction of time, labor, and cost justifies the industry’s eager embrace of digital production.
Whether your content is generated by conventional or digital means, animating on a frame-by-frame basis can be a time-consuming under-taking. Its great advantage, however, is having ultimate control over every mark, line, and brush stroke to develop your vision. Professional experience or a fine arts degree is not necessary to create meaningful compositions. In fact, the most primitive drawings can be provocative or humorous when played back in sequence. However, some degree of drawing or painting experience is beneficial, along with creativity, patience, and a familiaritywith the techniques that are described here.
classical “old school” animation
During the 1930s and 1940s, classical or “old school” animation for film was a labor-intensive undertaking that involved generating artwork on a frame-by-frame basis. Since film runs at a rate of 24 frames per second, a single minute of film required 1,440 ndividual drawings. These drawings were executed on paper or on semi-transparent sheets of vel- lum or onionskin to allow previous frames to show through the frame on which the artist drew. This technique was known as onion skinning. In later years, it involved placing a light source beneath a drawing on a translucent page. The animator referenced the positioning of elements to draw new elements in slightly different positions.
cell animation
Cell animation, invented by Earl Hurd in 1914, reduced the time and labor of classical animation. Celluloid film sheets were used to layer foreground, middleground, and background elements. Background images were usually executed on opaque media such as paper, and the cells would be superimposed in front of a camera. Only elements that changed needed to be recreated. Still, cell animation was a meticulous task, since 24 individual drawings were needed for each second of film. Since senior-level animators needed to focus their time on establishing the key actions, cleanup artists were hired to refine the key images by erasing and smoothing the pencil lines. The responsibility of executing all the in-between drawings was delegated to the “in-betweeners.”
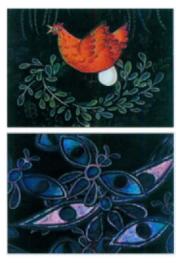
10.2 Frames from Madan and The Miracle Leaves, by Frederic Back © Trees for Life. Inc.
This animation is intended to promote the use of the drumstick tree-a rich source of vitamin A-in villages in India that face vitamin deficencies.
Historical perspective
Hand inking and xerography were two common techniques for transferring hand created artwork from papter to animation cells. Both practces are still practiced today. Hand inking invlved tracing drawings onto clear acetate cells with quill pens and brushes (similar to monks during the Middle Ages, who spent hours hunched over in scriptoriums to produce illuminated bibles.)An example is Disney’s Fantasia. hand-inked cells from the 1950s are popular collector’s item and can be seen in art gallcries. In the mid-1930s. Disney Studios devecloped a photographic process in which a drawing cluld be reproduced photographicallly onto an animaation cell. This technique was first utilized in Snow White and the Seven Dwarfs and contnued throughout the early 1950s. Xerography,aslo created by Disney, involved photocopying pencil drawings onto celluloid. It yielded a truer depiction of the original artwork and enabled greater spontaneity. Additionally,simulating camera zooms was po ssible by reducing or enlarging images with the Xerox technique.
direct-on-film
The term direct-on-filrn refers to the “cameraless” animation technique of creating images directly on a filmstrip. This method allows an endless variety of effects to be created with traditional media, chemical compounds, or processes such as scratching, burning, and rubbing. The emulsion of black film can easily be altered or removed chemically.
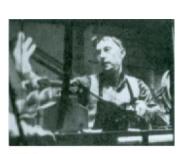
10.3 Len Lye. C. 1957. Courtesy of Cecile Starr.
American animator Len Lye was a major figure in avant-garde cinema, in that he pioneered the process of painting and scratching images directly onto the celluloid surface of film leader. Living in Samoa between 1922 and 1923, he became inspired by Aboriginal motifs and produced his first animated silent film, Tusalava (1929), which he created to express “the beginnings of organic life.” (The film’s title in Samoan means “things go full cycle.” British censors believed that it was about sex!) Grub-like images suggest a life cycle by coming together, dividing, and morphing into what Lye calls “a cross between a spider and an octopus with blood circulating through its arms” (10.4). This film took approximately two years to complete, since each frame was hand-painted and photographed individually.
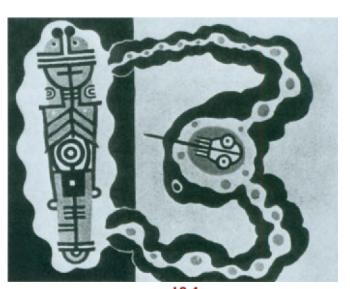
10.4 Frame from Tusalava ( 1929) by Len Lye. Courtesy of Cecile Starr.
Intrigued by the occult, Harry Smith spoke of his art in alchemical and cosmological terms. His process of painting onto 35mm stock was com-bined with stop-motion and collage. Similar to his life and personal-ity, his art was complex and mysterious ad has been interpreted as explorations of unconscious mental processes. In his first animation, he placed adhesive gum dots to the film’s surface, wet the film with a brush, and sprayed it with a dye. After the film ried, it was greased with Vaseline, the dots were pulled off with tweezers, and color was sprayed into the unprotected areas that were occupied by the dots. Another film was created with masking tape and a razor blade.
In American animator Stephanie Maxwell’s film entitled Driving Abstractions (1997), the experience of driving at night is conveyed in an abstraction of colorful, energetic bursts and patterns of light in a three-dimensional darkness. The imagery was created by draw-ing, painting, and tching onto the emulsion of clear and black35mmfilm stockwith mark-ers, paints, and dilutions of nitric acid (10.6).

10.5 Film strips from Early Abstractions. Courtesy of Harry Smith Archives and Anthology Film Archives.

10.6 Frames from Driving Abstractions by Stephanie Maxwell (animator) and Allan Schindler (composer).
freehand animation
Today, the process of freehand animation, whether it’s produced direct-on-film, on paper, or on the computer, covers a wide gamut of styles and genres, from traditional figurative animation to expressive abstract painting and spontaneous gesture drawing.
Many substrates are available for freehand animation. The advantages of paper are affordability, availability, and its acceptance of a wide range of media. However, its density makes it difficult to view previous frames while creating new frames. Since papers vary in opacity, a mini-mal amount of transparency may be enough to create an onion skin effect. Nonabsorbent substrates such as glass, Plexiglas, and ceramic tiles allow paint or ink to be wiped away easily and allow spontaneity and improvisation, since images are in a cons ant state of evolution.
Throughout history, animators have experimented with media and substrates. J. Stuart Blackton produced one of the earliest American animations entitled Humorous Phases of Funny Faces on a blackboard with chalk. After each frame was filmed, part of the image was erased and redrawn with a slight alteration (10.7).
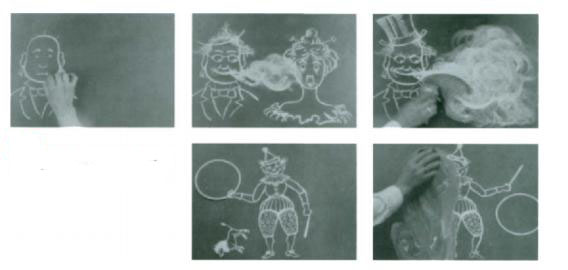
10.7 Frames from Humorous Phases of Funny Faces (1906). © Vitagraph.
Contemporar Polish animator Piotr Dumala etched images onto plaster and recorded each subtle alteration onto film (10.8). The more obscure stop-motion technique of sand animation involved drawning images into sand with brushes, wooden sticks, stencils, strainers, and fingers. After a frame was photographed onto film, portions of the image were wiped away, updated, and photographed again. This freeform process, which is still used today, keeps the artistic process fresh and spontaneous (10.9). Pinboard animation was another eccentric process that was invented in the early 1930s by Russian filmmaker Alexander Alexeieff and his American wife Claire Parker. A contraption consisting of closely-spaced pins that could be set to varying heights could cast shadows to produce dramatic expressionistic effects when subjected to light. The resulting forms had a soft, chiaroscuro effect, that resembled charcoal drawings or etchings (Chapter 6, Figure 6.23)).
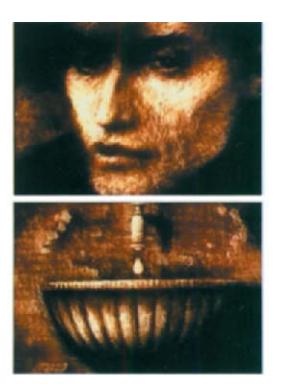
10.8 Frames from Crime ond Punishment (2000) by Piotr Dumala. © Acme Filmworks.
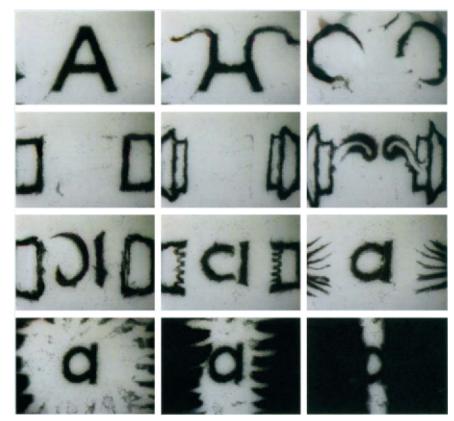
10.9 Frames from a sand animation for the letter “A” by Eliot Noyes. Courtesy of Sesame Workshop.
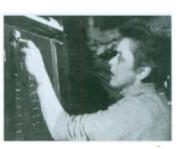
10.10 Claire Parker moving pins with a roller into a perforated screen that is lit to create areas of light and dark. From Experimental Animotion, courtesy of cecile Starr.
The depth of the pins affects the degree and distribution of light and shadows.
The development of desktop applications has provided a more afford-able range of ”natural media” tools that are designed to imitate tradi-tional media such as charcoal, acrylic, oil, and watercolor paint, cray-on, chalk, and fountain pens, to name just a few. Freehand drawing can be performed on a frame-by-frame basis. In fact, you can emulate the direct-on-film technique by painting on or altering multiple frames simultaneously, versus working on one frame at a time. Brushes can be customized with regard to their shape, size, and degree of softness.

10.11 Frames from a spot for lnfiniti Triant. Courtesy of Nissan North America, Inc. and Humunculus.
Original drawings were created freehand on animation cells.
Graphics tablets can heighten artistic expression by enhancing the process of drawing and painting in the digital environment. Lines can be drawn with increased sensitivity through pressure control to produce more natural results. Depending upon the speed and pressure that is applied, lines can become lighter, darker, thinner, or fatter. For these reasons, in addition to preventing carpal tunnel syndrome, they are wise, long-term investments.
collage and mixed media
The technique of collage, which involves assembling printed and found materials, provided early twentieth-century painters a heightened sense of spontaneous, artistic freedom. In many cases, surface texture and pattern dominated over the clarity of the subject matter. Animator and director Terry Gilliam popularized the technique of stop-motion collage in his work for Monty Python’s Flying Circus. Independent filmmakers Frank and Caroline Mouris pushed the envelope of mixed media col-lage in their classic short Frank Film (1973). Their innovative process has been featured in commercials, documentaries, music videos, and shows, including Sesame Street and 3-2-1 Contact. Filmmakers have continued developing a broad range of styles ranging from heavily lay-ered nonobjective compositions to conceptual, representational works.
A type of collage animation, known as cutout animation, was devel-oped by Lotte Reiniger during the sound-on film era of the 1930s. Her unique, silhouette style is evidet in The Adventures ©Prince Achmed, one of the first animated motion pictures to be produced (10.12)
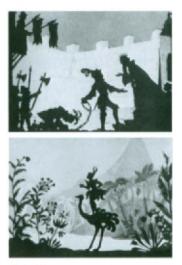
10.12 Frames from The Adventures of Prince Achrned. This film took almost three years to complete. The characters were black cardboard marionettes that were cut out with scissors and photographed frame-by-frame. Courtesy of Cecile Starr.
The beauty of collage in motion graphics is that images and type can be integrated in ways that would be difficult to achieve in the physical world. Digital layering can mimic the feel of collage or cutout anima-tion with the added components of transparency and blending.
stop-motion
The technique of stop-motion continues to be practiced in motion graphics. In a television spot for Nestlé, stop-motion animation was applied to still photographs of children to create the effect of implied movement. The resulting playful, refreshing mood communicates the sense of enjoyment and curiosity that a child would find as a participant in a scavenger hunt for chocolate (10.13).
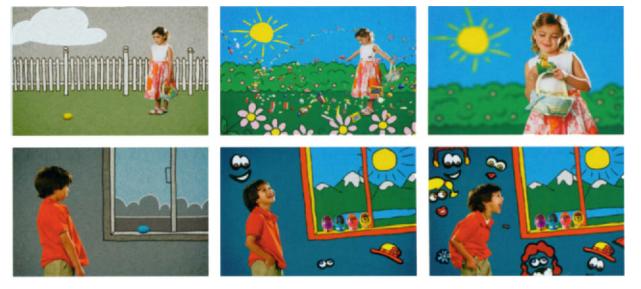
10.13 Frames from a TV commercial for Wonka Egg Hunt products. Courtesy of Shadowplay Studio.
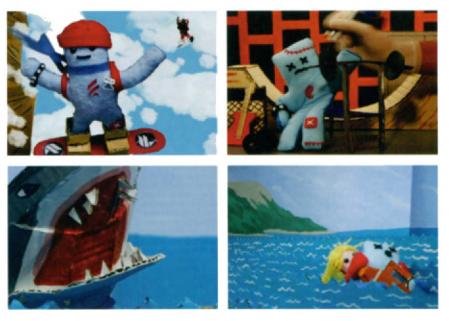
10.14 Frames from the Pinto network series of IDS for FUEL TV. Produced by Brand New School. Courtesy of FUE TV.
Stop-motion frames were shot with a digital camera, which enabled the director to instantly view small sequences. Pinto is a stuffed sports action figure who finds himself in dangerous situa-tions while skating, snowboarding, or riding his motocross bike.

10.15 Frames from a set of network IDs. Courtesy of FUEL TV.
Stop-motion was applied to a fictional demigod who invented Skatism and a clan of panda bears to create a feeling of“ intercepted communications from some distant planet whose daily realitiesdefy human comprehension.” (Advertising Age magazine).

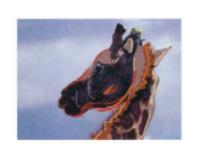
10.16 Loose gesture drawing over a live-action figure heightens the artistic expression of the image.
rotoscoping
Live-action imagery can serve as the basis for animation. The practice of rotoscoping—drawing or painting over live footage-covers a wide range of animation approaches, including freehand, image alteration, and compositing. Today’s digital technology can automate color and tonal adjustments, special effects, and standard operations such as blurring, dodging, burning, and tinting to individual frames or ranges of adjacent frames. The possibilities of “painting on movies” allow you seamlessly combine live-action images with animated content.
Rotoscoping can be a labor-intensive undertaking that requires time and patience. However, if your goal is to achieve realism, the results are extremely rewarding. Plan on creating a comfortable environment for yourself, and schedule adequate time so that you can work efficiently at a steady pace.
Rotoscoped animation looks only as mechanical as you make it. Simply tracing the outlines of filmed images can make a subject look lifeless and boring. Choreographing its movements and physical attributes beforehand, however, can help determine the right amount of exaggeration to make it appear more lively and animated. Devices such as acceleration and squash-and-stretch can heighten artistic expression and naturalize the subject, keeping it from clashing with other elements in the composition.
Using the right tools can help streamline your activity. A graphics tablet and a pressure-sensitive stylus can expedite the workflow while protecting your carpal tunnels.
Frame rate is also a consideration, and experimentation may be needed to find a compromise between smooth playback and the amount of drawing time needed to generate the content. High rates between 15
Historical Perspective
Rotoscoping was d eveloped in 1917 by Max Fleischer during the silcnt film era. It involved traciing stages of movement from live human adn animal subjects from film one frame at a time.Used as a learning aid for animators to become better acquainted with motion and timing, this practce held up over the years and soon became a cornerstone of Walt Disney’s in-house training. Accordi ng to American cato onist and animator Walter Lantz,“I would take the old Charlie Chaplin films and project them one frame at a time, make a drawing over Chplin’s action action, and flip the drawings to see how he moved. That’s how most of us learned to animate.”
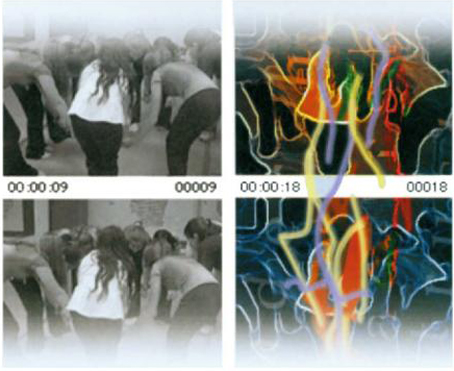
10.17 Adobe Photoshop’s unique Film-srip format allows you to paint on individual frames or across a series of frames to achieve a direct-on-film animation effect. Here, a movie clip was exported from Adobe After Effects in Film-strip format and rotoscoped in Photoshop.The filmstrip appears as long, vertical image that encompasses each video frame.The frames are subdivided by borders, each containing a number snd time code. Gesture drawing was performed on a transparent layer above the video clip layer, frame-by-frame.The file was Fithen flattened and re-saved as a lmstrip document to be played back in After Effects.
and 30 fps provide smooth playback but more frames. Lower frame rates will produce fewer frames but choppier moevements. Frame rates between 6 and 12 fps can achieve adequate, believable results. If you are stranded on a desert island or are serving a long prison sentence, rotoscoping at a frame rate of 24 or 30 fps might make you famous if you are rescued or released!
A fond memory from the 1980s is a-ha’s music video “Take On Me.” Its integration of line drawings and live-action color images is still refreshing to this day.
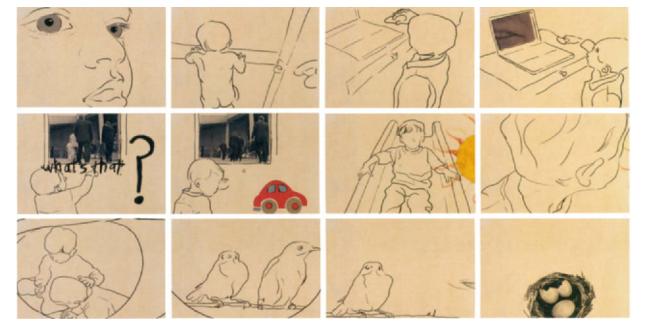
10.18 Frames from Siblings (2005). © 2007 Jon Krasner.
Generating simple line drawings from live footage of my children allowed me to express the idea of pure childhood experience in a world that can restrict personal expression and individuality.
film capture
The rich, soft quality of motion film is attributed to the light-sensitive emulsion that is capable of capturing high-resolution images photo-graphically (unlike video, which records images as electronic signals). Additionally, film cameras have the inherent ability to capture mate-rial one frame at a time, which is critical for any form of stop-motion animation. For these reasons, film continues to be a preferred medium by many independent and commercial animators.
Since most independent designers cannot afford 16mm film, Super 8mm is still considered to be an acceptable format. Companies such as Moviestuff (http://www.moviestuff.tv) specialize in transferring Super 8 footage to mini-DV tape, which then can be digitized from a DV camcorder to a computer for storage and postproduction.
digital capture
For processes that do not involve rendering frames by hand, the advantages of capturing frames on a computer are instantaneous play-back, preservation, and affordability. Instantaneous playback enables you to get the feel of the motion as it progresses without having to wait for a lab for development. Digital storage preserves the quality of the work, unlike film or videotape that degrades over the years. Finally, there are no developing costs.
The most efficient methods of digital capture are DV cameras, digital still cameras, scanners, and single-frame capturing software. Unlike film cameras, the majority of consumer camcorders do not have a built-in single-frame capture mechanism. Standard analog and digital video camcorders are made to shoot several frames each time the button is pressed. However, an analog or digital camcorder can be used as an input device to record frames into the computer (versus videotape). Alternatively, you can invest in software that allows for single-frame capture. Today, digital cameras are remarkably inexpen-sive, and most frame capture programs accept USB or FireWire con-nections. An alternative method to a camcorder or digital camera is to create your production on a piece of glass placed directly on a scanner. Each manipulation can then be digitized and saved as a frame.
There are a few important considerations that apply to digital capture. First, the input resolution should be determined in advance. Since the quality of raster-based images decreases when they are scaled up, be sure to digitize the artwork at a resolution that will accommodate seal-ing. Here is a standard formula that you can use: screen resolution x degree of scaling = input resolution. For example, if your images will be enlarged twice their size, scan them at 144 dpi (72 × 2 = 144).
When planning a project, be careful not to underestimate the amount of available disk space that will be needed; prepare for large storage requirements. FireWire devices have the best chance of playing the frames back smoothly, due to their high data transfer rates.
To streamline your process, keep different animation sequences in separate folders. Because frames are usually imported into applications in numerical order, name them with “padded” numbers (10.19).
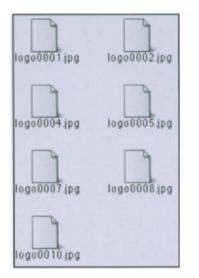
10.19 Sequences of frames from different segments of an animation are saved in separate folders and named with “padded” numbers.
tips
Depending on the length and complexity of your animation, all of the techniques discussed here require substantial time and patience. Here are a few additional tips to help streamline your process:
1. Start by creating thumbnails.
Loose drawings (or quick digital mockups on the computer) can go a long way in helping you resolve the basic motions of elements ahead of time. They can also help determine how your scenes will fit into the visual flow of the composition before you create a storyboard.
2. Work smart.
Since key frames depict the most dominant changes, create them first, and then generate the intermediate frames. Nonchanging elements such as backdrops and static images should be developed only once, since they can be used repeatedly. Objects that change their physical appearance should also be developed independently.
3. Enlist the photocopier.
The photocopy machine can be a wonderful production tool in creat-ing complex animations. The harsh or sketchy appearance of xeroxed images can be a satisfying tradeoff for the time and energy of creating individual frames by hand. Photocopying can also yield certain camera effects, such as zooming, by reducing or enlarging the images.
In collage or cutout-style animations, photocopying actual objects onto transparencies can eliminate the meticulous task of tearing out images from magazines or other sources. (Unless you are using a surgeon’s scalpel and a magnifying glass, the results are also much cleaner.) The raw, high contrast look of xeroxed images can add to the conceptual and aesthetic aspects of your design. Be sure to read the photocopier’s manual; extraordinary effects can be achieved by experimenting with its brightness and color settings.
4. Plan the duration of motions individually.
Choreographing simultaneous movements can be challenging, and establishing a game plan ahead of time will pay off in the long run. As a general rule, longer actions require more frames than shorter actions. Fifteen or more frames may be necessary for a walk cycle, while only two to three frames may be needed to animate a blinking eye.
5. Layer.
If you envision your animation having various levels of foreground and background elements, create them on overhead transparencies or on official celluloid sheets. Overlaying them allows you the freedom and flexibility of adding depth to the frame. As an alternative, consider photocopying opaque artwork onto transparencies. Your local Kinko’s, Office Max, or Staples are affordable options for accomplishing this.
6. Let the camera do the work.
Camera movements, such as pans, tilts, and zooms, can easily be achieved by changing the camera’s position in relation to the artwork in small steps, as opposed to having to emulate these effects by hand-executed means. Alternatively, you can move the imagery. Repet-itive motions, such as rolling, vibrating, or lifting the base, can produce the effect of waves at sea, walking, or experiencing an earthquake.
7. Loosen up and push the media!
Be expressive and experimental in your artistic style. (You do not have to be a cartoonist!) There is a wide range of drawing approaches, and content can be executed with any combination of media.
8. Sacrifice detail for pictorial continuity.
Complex textures and details can lead to inconsistencies that become eyesores when your frames are played in sequence. Moving foreground characters in traditional cell animations are usually painted with flat colors, as opposed to background scenery, which is often more de-tailed and complex.
9. Combine media and techniques.
Frame-by-frame animation does not need to rely on any one technique. Combinations of the traditional and digital media and techniques can contribute toward a richness of content and personalize your style. Investigate what feels natural; there is no “right” or “wrong” formula.
10. Consider lighting.
Lighting is one of the most vital aspects of filming. Bad lighting can cause unwanted shadows or overexposure. Be sure that you have plenty of light to work with. Studio lights are designed to match the color balance of film. If you cannot afford them, desk lamps or halogen lights can suffice with filters or manual white balance on digital cameras.
11. Shoot “on2s,” “on3s,”etc.
Animations that do not require seamless motion can be shot on every other or every third frame. This works well for collage or cutout anima-tions that are meant to look choppy.
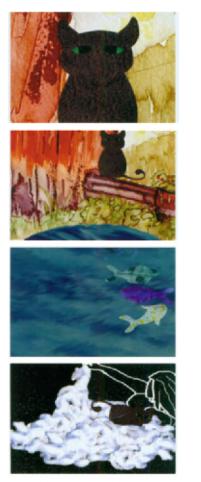
10.20 Alex Wall combined original watercolor illustrations with digitally-generated textures and graphics in this visually stunning composition. Courtesy of Alex Wall, Fitchburg State College. Professor Jon Krasner.
Interpolation: An Overview
Interpolation is the process by which an element’s spatial or visual characteristics are animated between two or more instances in time. Theses instances are known as key frames. Key frames designate where the most extreme changes occur on a timeline and contain data about an element, such as its position, size, orientation, transparency, or color. Unlke frame-by-frame animation, intermediate data between key frames are automatically calculated without having to create the in-between frames one at a time. For this reason, interpolation can generate animations much quicker, with less effort and with greater control over how motion and change are choreographed.
Interpolation can be applied to the primary motion of elements in a composition or to the secondary motion of a camera to achieve mobile framing. In figure 10.21, beginning, middle, and end key frame values describe an object’s spatial location at three different points in time. The data between these key frames are automatically interpolated to produce animation when the sequence is played back. This frame range marks the beginning and the end of the interpolation. The last key frame of the frame range denotes the beginning key frame of the next, adjacent frame range.
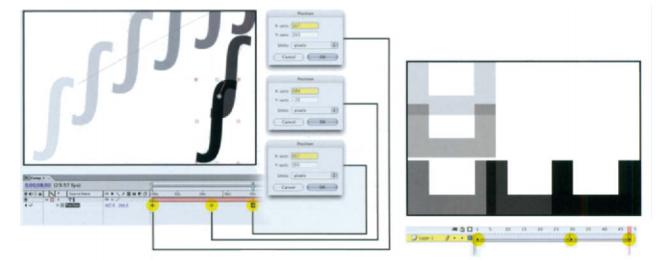
10.21 After Effects and Flash use key frame event markers.A beginning and end key frame value describes an object’s spatial location at two different frames or points in time. The last key frame of a frame range denotes the starting key frame of the next frame range.
Linear interpolation produces mechanical, uniform motion or change. Differences in the velocity values of the intermediate frames occur in steady time increments. The rate of motion progresses at a consistent pace until a new interpolation occurs at a new key frame. Nonlinear interpolation (or Bezier interpolation) produces less predictable, more lifelike results, and smoother transitions between interpolations. Spatial interpolation refers to the direction that objects travel over space. Viszial interpolation refers to visual properties, such as color, texture, opacity, and shape geometry. Temporal interpolation refers to the rate at which objects travel over time, taking into account factors such as acceleration and deceleration.
Spatial Interpolation
Spatial interpolation (also referred to as path animation) involves animating an object’s position, orientation, or scale. In applications such as Adobe After Effects, spatial interpolation is achieved by estab-lishing key frame values on a timeline (10.22). The property of position defines the horizontal and vertical direction that elements travel along a predetermined “route” or motion path. Linear spatial interpolation occurs on straight motion paths; nonlinear spatial interpolation occurs on curved motion paths. The geometry of a motion path can be modified to change an element’s course of travel (10.23).
10.22 In Adobe After Effects, spatial interpolation is established by key-framing an object’s position, rotation, and scale properties on a timeline.
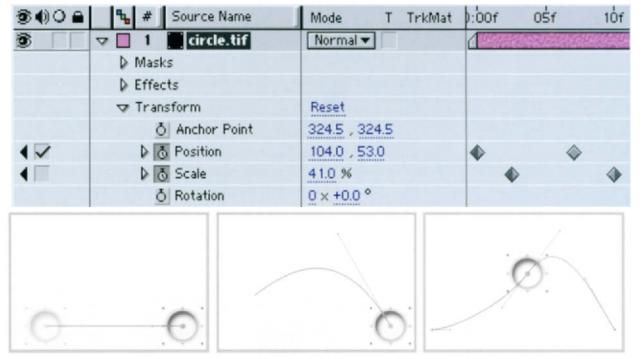
10.23 Motion paths can be represented as straight lines, curves, or a combination of lines and curves and can be modified to change an element’s course of travel.
Most applications offer motion tracking-a process that enables you to monitor an element’s movement and generate a motion path from the movement. The resulting path can then be applied to different objects to make it move along the same direction. Through this tech- nique, objects can be choreographed to mimic the movement of other objects in space. In figure 10.24, the x and y coordinates of groups of pixels that pertain to live-action elements in a video clip are tracked, and the resulting data is used to generate motion paths. The paths are then applied to other layers containing typography and graphics.
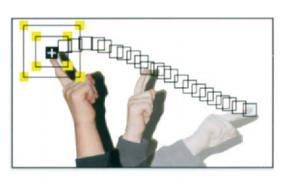
10.24 Motion tracking of a group of pixels is used to generate a motion path.The path’s data can then be applied to another image to make it appear to be following the movement of the hand.
Visual Interpolation
Visual interpolation involves animating an object’s visual appearance by changing its geometry, color, transparency, or surface texture.
interpolating form
Animating changes in geometry can be achieved by morphing or by applying distortion effects. Morphing produces seamless intermediate changes between two images. Cross-dissolving and warping are the two most commonly used digital morphing procedures. Cross-dissolv-ing involves interpolating the colors from the pixels of a source image to those in a corresponding destination image. Although this method does not alter shape geometry, it is effective when the initial images have similar structures. Warping, in contrast, shifts the physical loca-tions of pixels between images without transforming their colors. Point warping uses control points to govern the method in which pixels shift their positions in space (10.30). Combining these techniques can produce effective results
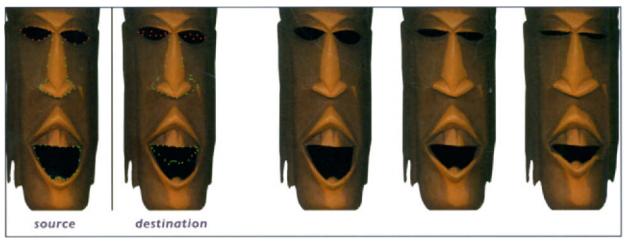
10.30 Point warping shifts the locations of an image’s pixels in space to distort its geometric appearance.
In Flash, the technique of shape tweening interpolates the vertex points of two vector-based shapes. Flash’s “shape hints” can be used to achieve increased precision when animating complex shape changes, since they identify points that are matched between starting and end-ing shapes (10.25). For example, in morphing a graphic of one animal into another, shape hints instruct the software to morph the legs, head, and tail regions of the start and finish image independently, giving you more control over each animation.
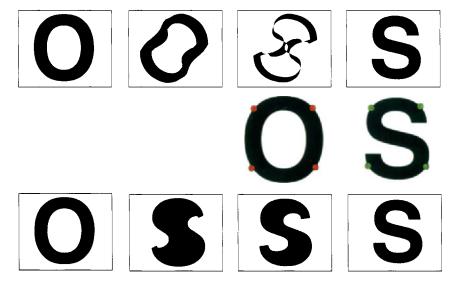
10.25 In Flash, shape hints are added to the start and end key frames and positioned relative to each other at each key frame.This gives you better control of how geometric changes will occur during the interpolation.
To achieve maximum results, it is best to morph images that are similar in size, shape, resolution, and background content. For example, if the starting image is a close-up of a face, a close-up of a different face would be a more appropriate choice than a full body shot of another person. Matching the general size and shape of the face can also improve a morphs transitional quality. If the source and destination im-ages have uniform or matching backgrounds, the effect will be focused on the subject-not on the background.
As an alternative to morphing, distortion filters can produce incremental changes in 2D or 3D form. 3D modeling and animation programs offer mathematical processes such as Free-Form Deformation (FFD), a common process that is used to twist, bend, and stretch 3D models in Computer-Aided Design (CAD). In the 2D environment, warping effects can shift an image’s pixels by altering sets of vertex points. This can be used to correct unwanted distortions or to emulate the effect of the image wind or water distortion (10.26).
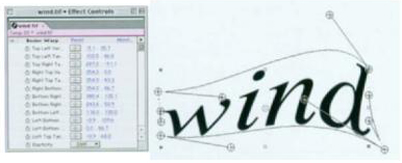
10.26 After Effects’ Bezier Warp filter can reshape an image by altering a set of vertex points. Interpolating this operation creates the effect of the image blowing in the wind.
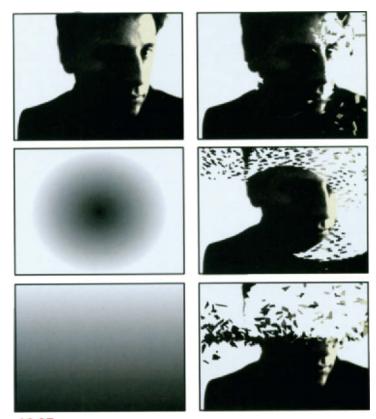
10.27 After Effects’ Shatter filter allows you to “blow things UP” by exploding a layer into pieces varying in shape and size and dispersing them over space.
interpolating form
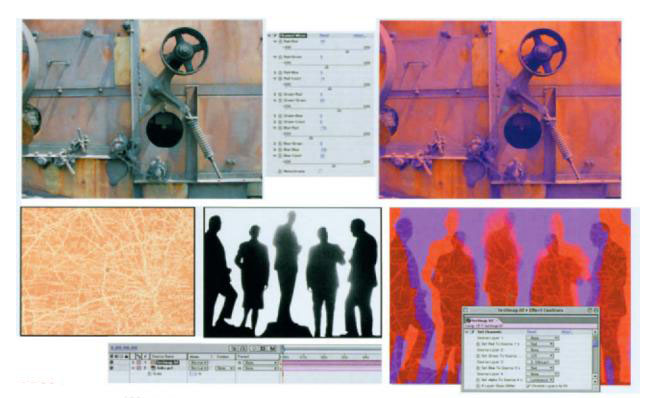
In addition to form, surface proper-ties, such as value, color, opacity, and effects, can be interpolated through key frames. Standard brightness operations, such as Levels and Curves operations, can be used to animate tonal effects by remapping an image’s distribution of dark, mid-tone, and highlights over time. Common color adjustment opera- tions, allow you to alter an image’s hue, brightness, or intensity level, or add a color tint to a monochromatic image. Advanced color channel operations, such as After Effects’ Channel Mixer, provide specific control over an image’s individual red, green, and blue color components (10.30).
The development of effects filters in the marketplace continues at a rapid pace. The possibilities of animating the ap- pearance of images are endless, espe-cially when they are used in combination. In addition to the multitude of filters that come bundled with software, third-party developers continue to create and distribute compatible “plug-ins,” many of which are intricate enough to serve as standalone applications. Some can generate textures, distortions, and sophisticated volumetric simulations to generate organic phenomena, such as fire and smoke. Others can produce photographic effects, such as solarizations, lens flares, camera shakes, and video malfunctions. All of these effects categories can be interpolated on a timeline by setting key frames.
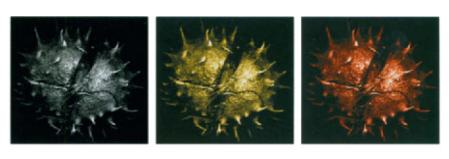
10.27 A grayscale image is tinted, and the tint is interpolated over time.
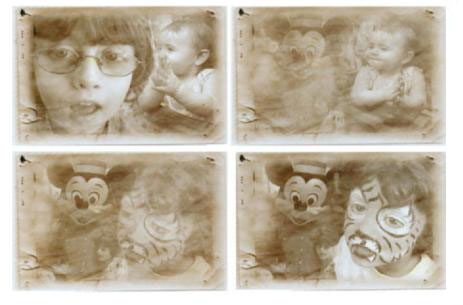
10.28 Opacity can be animated to create simple dissolves between images.
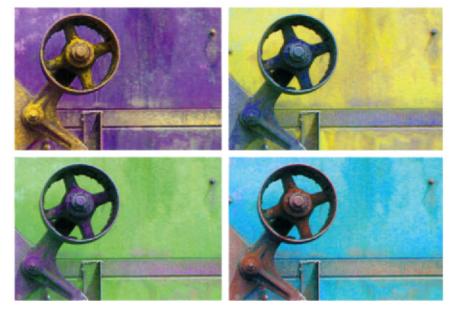
10.29 Hue/Saturation is interpolated to increase an image’s saturation levels, and Color Balance is key- framed to shift the image’s color cast over time.
10.30 After Effects’ Channel Mixer is used to blend the red, green, and blue data of an image. Entering different percentage values can create astonishing effects, such as sepia tones.A “Set Channels” effect can also create a variety of provocative color effects. Here, it is used to replace the luminance values of one image layer with the values from another layer.
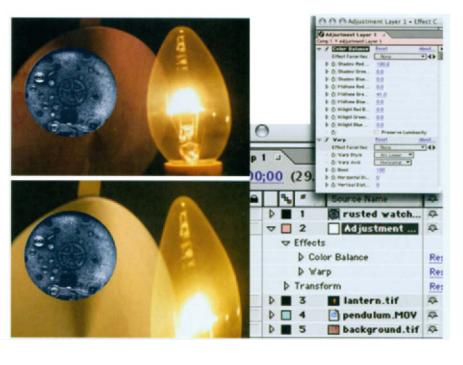
10.31 The use of adjustment layers in After Effects allows you to apply multiple tonal and color effects to all layers that appear underneath it in the timeline.Altering an adjust- ment layer’s opacity controls the degree to which the effects apply to its underlying layers.After Ef-fects’ ’Blend with Original” parameter is interpolated to animate the progression of an adjustment layer’s effect.
Temporal Interbolation
Temporal interpolation describes the manner that elements move through time. While controlling the direction of an object on a motion path affects its spatial interpolation, controlling the speed that the object moves affects its temporal interpolation.
Linear temporal interpolation produces mechanical, uniform motions and is represented by a straight line on a speed graph. Differences in velocity values between key frames occur in steady time increments, and the rate of motion or change progresses at a consistent pace. Non-linear (or Bezier) temporal interpolation involves acceleration or decel-eration, resulting in less predictable, more natural motions. Smoother transitions between frame ranges produce more realistic results.
controlling duration and velocity
Velocity is a temporal property that can be governed by controlling the distance between key frames. Closing down or opening up the space between key frames on a timeline shortens or lengthens the duration of events (10.32). You can also control velocity by modifying the degree of interpolation. For example, After Effects allows you to change the start or end values of the key frames corresponding to an element’s position, scale, or rotation numerically or manually (10.33).
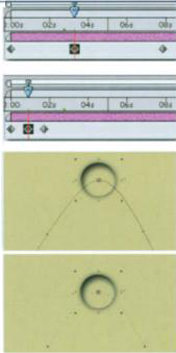
10.32 Adjusting the distance between key frames on a timeline can alter a motion’s velocity by changing its duration. Compressing the distance between the key frames produces greater velocities as the duration of the action is short- ened.The space between the dots on the motion path is wider, indicating a greater velocity.
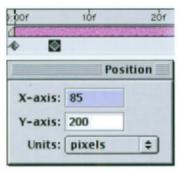
10.33 The amount of interpolation of key frames can control the velocity of an element’s motion.
In most applications, velocity curves can be altered to accelerate or decelerate an incoming and outgoing velocity. For example, an object can slow as it approaches the key frame and then speed up as it leaves the frame (10.34). Once an element’s velocity between key frames has been calculated, it can be adjusted so that elements play back at their normal rate, speed up, or slow down. The technique of time stretching allows you to control and change how fast the content in a layer moves by manipulating the layer’s duration. For example, stretching a layer to 200% doubles the frame length so that the animation plays back at half speed; shortening the length to 50% doubles the speed (10.35) Time stretching can be applied to an entire animation sequence or to its individual segments to introduce speed changes. For example, you can play a portion of a sequence in slow motion, while the remainder plays back at normal speed.
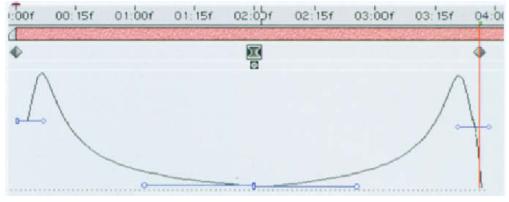
10.34 Using aVelocity graph, you can adjust the rate of motion to control how fast or slow changes occur between key frames. In this case, the velocity curve was manipulated to create the effect of the motion gradually stopping and starting again.

10.35 After Effects’ “Time Stretch” function allows you to speed up or slow down playback by entering key frame values on the timeline.
Most applications also offer built-in algorithms that can produce acceleration or deceleration. Flash’s “ease in” and “ease out” feature, for example, uses a standard velocity curve. In figure 10.36, After Effects’ Easy Ease In function is applied to the last position key frame, producing a gradual deceleration of an object as it approaches its final position. Acceleration in the velocity at the beginning of the inter-polation results when Easy Ease Out is applied to the first position key frame. When it is applied to both key frames, the incoming and outgoing velocities are affected. (The spacing between the dots on the motion path is uniform before each effect is applied.) Initially, the graph displays a straight line, indicating a constant speed of motion along the path. After each algorithm is applied, the spacing changes to represent acceleration and deceleration.
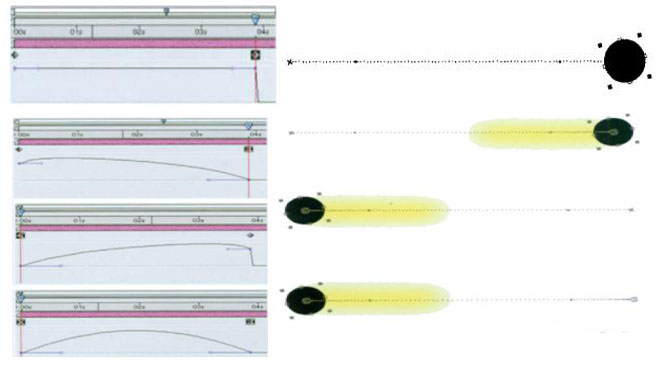
10.36 Adobe After Effects’ “Easy Ease” operation.
Coordinating Movemt
Multiple transformations can be combined on a timeline, allowing an element’s absolute and relative positioning, scale, and orientation to be animated simultaneously.
Advanced techniques, such as parenting and nesting, provide more control in coordinating different types of movements between ele-ments. For example, a figure’s hands, arms, head, and legs can be animated separately, and these animations can be combined into one. The entire subject consisting of moving parts can then be animated to walk across the screen.
parenting
Parenting in animation is a powerful technique that allows you to cre-ate relative (no pun intended) movements between elements by set-ting up hierarchical relationships. For example, the chimes and hands of the clock can rotate independently while following the position of their parent, the clock, as it moves across the screen.
The concept of parenting is easy to understand if you apply this simple analogy: When parents hold their child’s hand to keep him or her from straying away, the child naturally moves with the parent and follows wherever the parent goes. The child maintains the freedom to turn or move freely within his or her own space; however, those motions are not transferred back to the parent. The main actions of the parent are automatically passed on to its children; however, a child’s action does not necessarily affect the parent. A parent can have an infinite amount of children. (Having three, I would suggest stopping there!) However, a child can only have one parent. Children can be parents to other chil-dren, and there is no limit to the hierarchy that you can build.
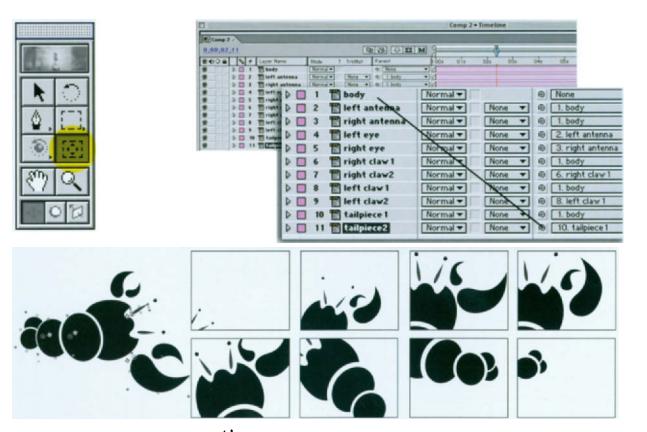
10.37 In After Effects, a parental hierarchy is built to coordinate the motions of the main “body” and its smaller parts.
nesting
Complex animations may consist of many different types of move-ments. The technique of nesting (referred to as precomposing in After Effects) allows you to organize individual movements into separate animations that can later be combined.
In figure10.38, symbol nesting in Flash is used to combine and coor- dinate individual movements. In Symbol 1, the rotation of the graphic is interpolated across a series of key frames. Symbol 1 is brought into Symbol 2. Inside Symbol 2, Symbol 1 is looped 4 times, and its opacity is interpolated to fade out at the end of the last sequence. Symbol 2 is then animated in the scene to a motion guide layer. Each individual component of the animation can be refined inside its original symbol.
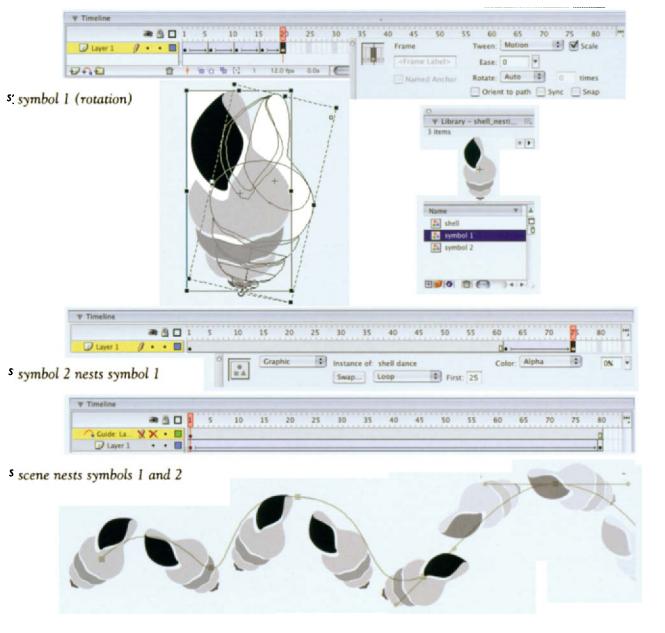
10.38 Symbol nesting is performed in Flash.
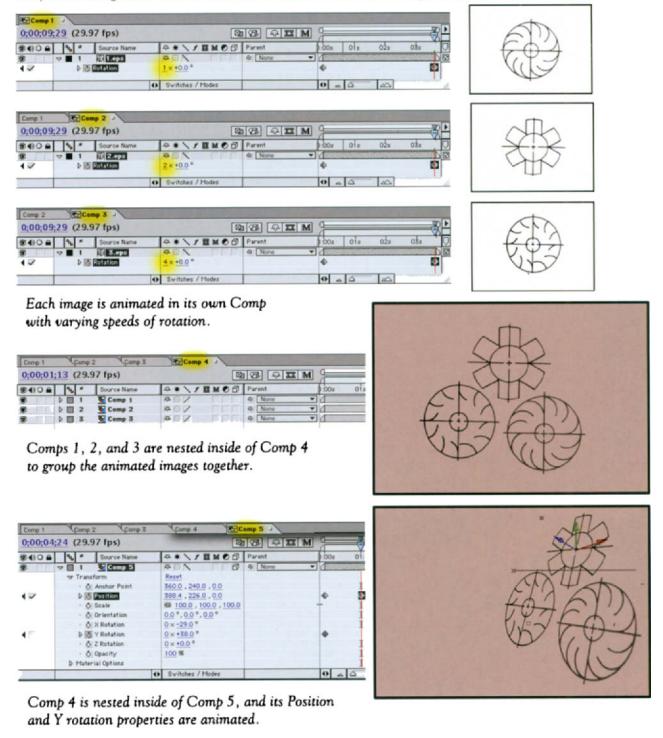
10.39 Composition nesting in After Effects is used to combine and coordinate individual layers that animate at different speeds.
mobile framing
Today, 2D and 3D motion graphics packages give designers consider-able control and flexibility to experiment with mobile framing. Insert-ing “camera objects” into a composition can portray various perspec-tives and viewpoints. Adobe After Effects, for example, provides several camera presets, all of which simulate the capabilities of common lens-es and 35mm film. These are named according to focal length, which describes the distance between the image display and the viewer’s perspective (10.40)). Editing between different camera views can show an action unfolding from different angles and spatial distances.
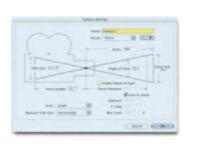
10.40 After Effects provides camera pre-sets that simulate the capabilities of common lenses and 35mm film.
Basic camera motions that are used in traditional filmmaking can be emulated through interpolation. Panning and tilting, for example, can be achieved by moving an image that is wider than its visual field across the frame. Zooming can be achieved by changing the camera distance in relation to a subject or by scaling the subject up over time.
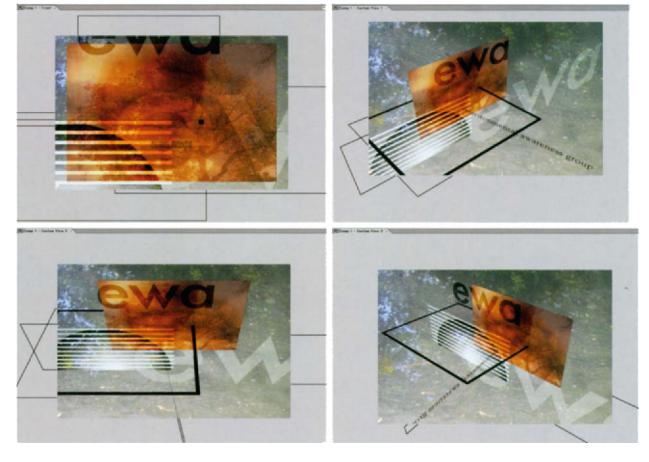
10.41 After Effects’ multiple-view layout allows you to view different views of a scene from different angles.
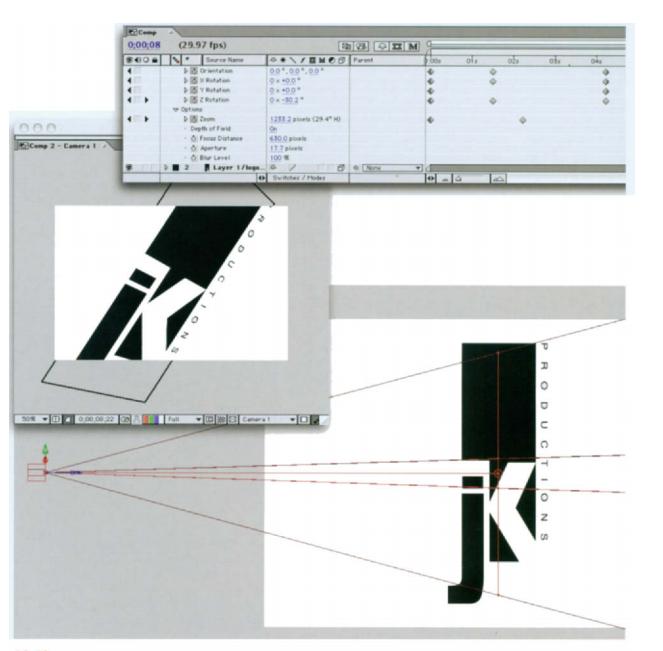
10.42 After Effects lets you navigate a camera in one view while observing the result in the other.
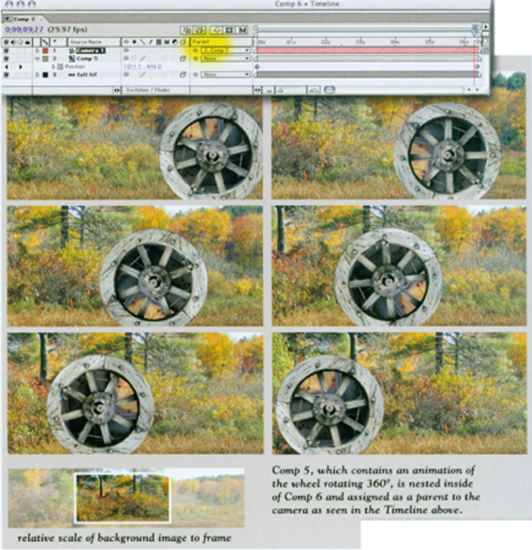
10.43 An object is interpolated to move across a background image that is larger than the dimensions of the frame. Dollying is performed by parenting a camera to the object. As a result, the camera (or our point of view) moves horizontally with the object on the x axis.
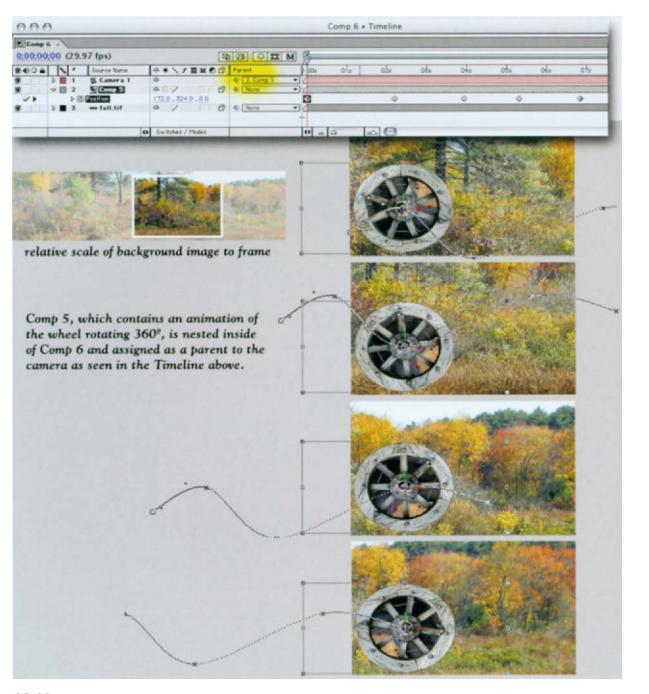
10.44 The object from figure 10.43 is interpolated to move across a background that is larger than the frame’s dimensi0ns.A camera that is parented to the object follows its course of travel or motion path.
Summary
Frame-by-frame animation involves creating individual images and displaying them in quick succession to create persistence of vision—the illusion of continuous motion. Key frames identify major changes in a scene and are used as guides for constructing the in-between or intermediate frames that complete the transitions between them.
During the 1930s and 1940s, classical frame-by-frame animation for film was a labor-intensive undertaking that nvolved executing drawings on paper or on semitransparent sheets of vellum or onionskin. Cell animation reduced te labor of classical animation by layering foreground, middleground, and background elements onto sheets of celluloidfilm. Experimental film pioneers popularized the direct-on-film or “cameraless” technique, which involved creatig images on filmstrips with traditional media, chemical compounds, or processes such as scratching, burning, and rubing, as well as collage and stop-motion animation. Today, desktop animation programs offer “natural media” toolsthat offer designers a heightened sense of freedom.
Unlike frame-by-frame animation, interpolation software can calculate intermediate data between key frames to produce linear or non-linear uniform motions. Spatial interpolation (or path animation) involves animating an object’s position, orientation, or scale, while visual interpolation involves animating its geometry, color, transparency, or surface properties. Temporal interpolation describes how elements move through time. Velocity is a temporal property that can be controlled by governing the distance between key frames as well as through the technique of time stretching.
Advanced animation techniques such as parenting and nesting allow you to coordinate and preserve types of motions and modify them independently. Further, most motion graphics applications allow you to work with “cameras” to portray various perspectives and viewpoints of a composition. Basic camera motions that are used in traditional cinematography can be emulated digitally through interpolation.

