11 motion graphics compositing
synthesizing the content
Motion graphics compositing techniques have become more advanced, allowing for the seamless integration of 2D and 3D images, typography, and live-action content. The advent of digital technology has both enhanced and complicated the process of compositing, and “thinking in layers” has become a standard trend.
The hybridization of digital and traditional media allows motion graphic designers to create complex compositions that are visually arresting and commercially effective. The unusual creative possibilities that exist in merging diverse imagery are pushing the limits of artistic experimentation and expression.
— Max Wertheimer

Compositing: An Overview
Compositing involves seamlessly merging a variety of separate visual elements into a uniform, seamless compositional space. It allows you to create unusual relationships that are impossible to achieve in the real, physical world by combining live-action footage, graphics, hand drawn elements, and typography.
Historical Perspective
In the carly twentieth century,Dadaist and Futurist artists were among the first to liberate ideas through the techniques of collage and photomontage. The German Dada movement at the end of world World War I prompted painters and graphic designers to explore collage, and photographers to experiment with multiple exposures, comebination printing, and assembling cutout pieces of photographs. The works of George Grosz, John Heart field, Herbert Matter, and Kurt Schwitters were among the most influential of this period, demonstrating a heavy reliance on experimentation playfulness, and spontaneity.
In a FUEL TV network ID produced by Brand New School in Los Angeles, images exist in a seamlessly layered magical world, where eagles fly over ancient landscapes, bikes leave trails of rainbow-colored paint, unicorns gallop over fire-engulfed swords, and skaters ride the edge of a rainbow, created to help brand the channel. Inspired by seventies airbrush art on surfboards, as well as the sides of vans and rock album covers, director Jonathan Notaro synthesized live-action footage, three-dimensional images, and digitally airbrushed graphics (11.1).
A variety of animated 2D and 3D graphics interact with one another in an instructional video for the music channel Fuse. Buck, a motion graphics design company in Los Angeles, aimed to make the content feel like the humorous nature of Fuse. Ryan Honey, Creative Director/ Co-owner of Buck, based his concept on how to make things out of brands that are related to music in some way. The Fuse Shoe Box theme, for example, shows how to make a speaker out of a Puma shoe box; the Winterfuse Fronts shows how to make metal teeth fronts of the word ‘Fuse’ out of a stick of Winterfresh Gum (11.2).
The role of the compositor used to be unique and specialized. When digital editing processes replaced troditionol video editing tools, the distinction between compositors. editors and CGL artists became blurred. The gop between video editing and motion grophics software has also narrowed, since live-action footage has become an integral component of motion graphic design Further, the processes of animotion and compositing are often performed at the same time and with the same software.
11.1 Frames from Fantasy, produced by Brand New School (Los Angeles). Courtesy of FUELN. TV

11.2 Frames from Winterfuse Fronts and Fuse Shoe Box 3000, IDS. Courtesy of Buck.
Blend Oberations
The most basic compositing techniques involve controlling the transparency of multilayered images and the manner in which their colors “mix” visually.
Degrees of transparency between static and moving elements in a composition can be established by specifymg a layer’s opacity value,Similarto interpolating an element’s positioning, scale, or rotation over time, opacity is an attribute that can be animated to emulate semiopaque materials, such as water or glass, or to create simple dissolves between key frames (Chapter 10, figure 10.28)

11.3 In the opening tide sequence to Boogeyman (2005), transparent moving words that fade in and out set the film’s mood Courtesy of Reality Check Studios.
Blend operations (also referred to as composite modes or layer modes) offer a journey of discovery by allowing you to mix the hues, saturation, and brightness values of superimposed images. Figure 11.4 illustrates standard blend operations. Multiply references the color and brightness data in the color channels of both layers and multiplies their pixel values, resulting in a blend of progressively darker colors. Multiplying any color with black produces black, while multiplying it with white leaves the color unchanged. Values between black or white produce progressively darker colors. Screen multiplies the inverse of each layer’s pixel values, producing lighter colors. The effect is similar to projecting photographic transparencies on top of each other. Overlay multiplies or screens a layer’s pixel values depending on the color and brightness information of the underlying layer. Darken overlays pixels from a top layer that are darker in value than the layer(s) below. Lighten produces the opposite effect of darken, overlaying the top layer’s pixels that are lighter in value than those of the layer below. Difference subtracts pixel values of the top layer from those of the bottom layer or vice versa, depending on which has the greater value. Exclusion produces a similar effect with lower contrast. Hue generates a result based on the brightness and saturation levels of the bottom layer’s pixels and the hue of the top layer’s pixels. Saturation considers the luminance and hue of the top layer’s pixels and the saturation of those of the underlying layer. Luminosity takes into account hue and saturation values of the bottom layer and the luminance values of the top layer.
During the mid-1990s, Fractal Design Painter and Specular Collage were among the first roster-bosed programs to introduce the concept of layering. Over a decode has passed since Adobe Systems featured layers as a major advancement in Photoshop Photoshop continues to reign as having the most superior layering fixates. while After Effects is still recognized as a leader for its intuitive layering processes in motion graphics compositing.
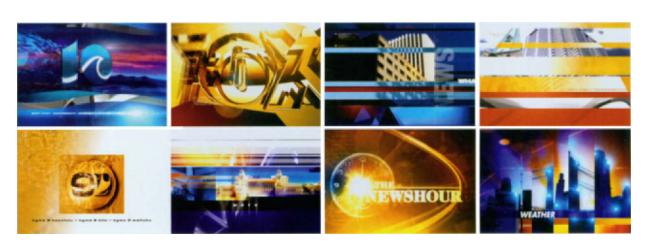
Figure 11.5 illustrates a rich arrangement of three-dimensional and two-dimensional animated images, colors, patterns, and textures. This was made possible by varying the opacity levels and blend modes of
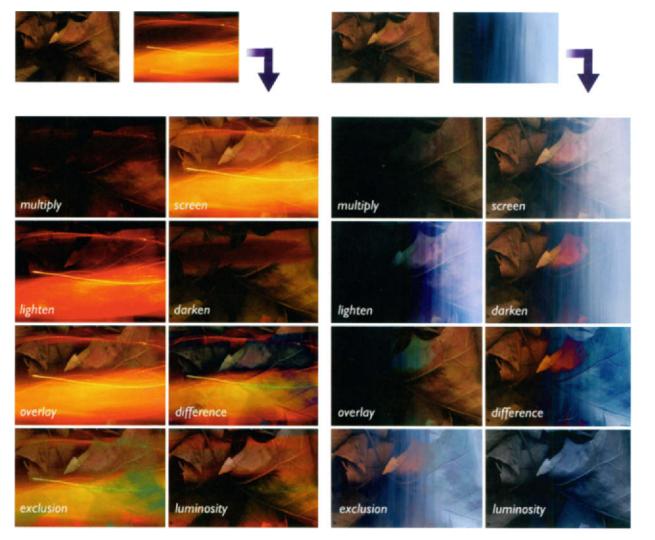

11.4 Homophily among Muslims and non-Muslims (source: Citizenship Survey 2008/9)
the layers. In figure 11.6, an organically rich and tactile palette of photographs, simple graphic forms, and brush strokes was achieved by assigning different composite modes to the composition’s layers in a multilayered promotional spot for explore. org.
11.5 Frames from Giant Octopus’motion graphics news reel.
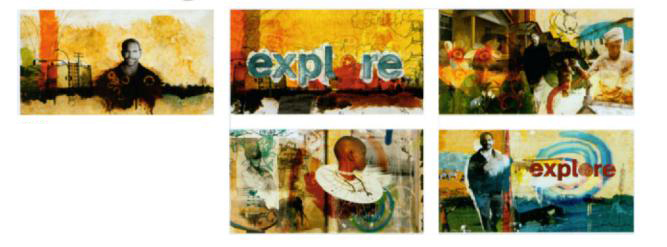
11.6 Frames from Explore. Courtesy of Belief.
In this composition, After Effects’ layer modes were used to achieve a richness of color and texture of images that were photographed from various world locations.
Keying
Keyingis a technique that eliminates a selected range of colors to create areas of transparency. It is often used to place actors or scale models shot against a solid green or blue screen into imaginary situations. For example, the classic Sgt. Pepper Party (1967) filmed an elephant against a green screen that was replaced with a “background plate” of the Adelphi Hotel. In Spider-man (2002), the hero is filmed leaping around a room painted with a flat color that was substituted with footage of a cityscape. The Matrix (1999) involved placing multiple cameras in a 360–degree room painted with green or blue. Computer-generated images were “keyed” into the scene to produce a seamless composite.
The term keying is derived from the word “keyole” and is interpreted as a signal from which a hole can be cut into an image and filled with another image.
chroma and luma keys
Chroma keys are single colors that are used to substitute parts of a scene with new data. The most well-known implementations of chroma keying in television occur in the local news. A talent who appears to be speaking in front of an animated weather map is most likely sitting in front of a blue backdrop. The blue hue is keyed out in the production room, and the animated map footage is inserted into the broadcast.
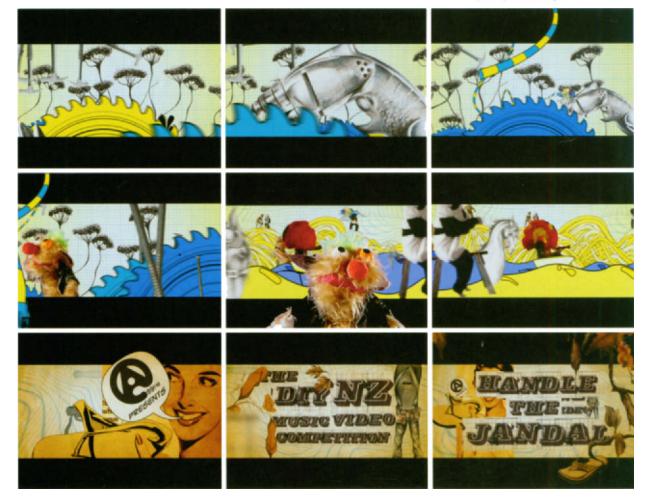
In a title sequence for a music video competition held in New Zealand, live-action subjects were shot against a green screen and cornposited with illustrations ranging from half fish-half drill, Jandal plants, span- ner trees, a skill saw ocean, and animal builders. This blending of images was created to convey the theme of “do it yourself” for a target audience of young artists between the ages of sixteen and thirty 11.7.
11.7 Frames from Hondle The Jandal 2005) Courtesy of G’Raffe
The term “chroma key” is often used in the video industry where as in film, the term“motte”is more common. Both proceses are related in that mattes are often generated from keys. When a subject is filmed against a blue screen, the blue hue is removed, and a matte is left behind from the foreground image (similar to a cookie cutter).
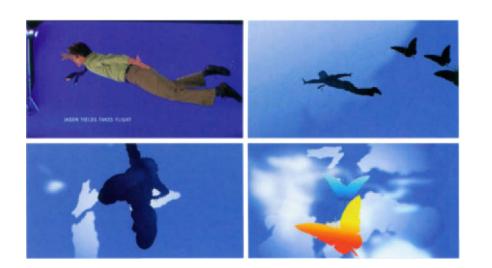
11.8 Frames from Untitled 003 Embryo 12007). Courtesy of Belief.
In this experimental narrative short. Santa Monica-based design studio Belief filmed the main character. a neurotic man stricken with agoraphobia. in Front of a blue screen to create the illusion of hint flying through the sky
Bright blue and green are considered to be the standards for chroma keying in the broadcast television industry.
Luma keys are brightness keys that enable a range of tonal values to become transparent. The technique of luma keying works best with high-contrast footage in which the background’s tonal ranges are significantly different than those of the foreground elements.
keying tools
In the past, keying tools were out of the price league of independent animators and motion designers and could only be found in professional television studios. Today, they are well integrated into most motion graphics compositing applications. Adobe After Effects, for example, contains versatile tools for refining mattes created from luma and color keys. In figure 11.9, a threshold value is asigned to a luma key to determine what pixels become transparent according to their level of brightness. After Effects’ color key operation can knock out evenly lit backgrounds that have minimal or no variation in color figure 11.10.
11.9 After Effects luma keying process allows you to specify a threshold value to determine what pixels become transparent according to their brightness.

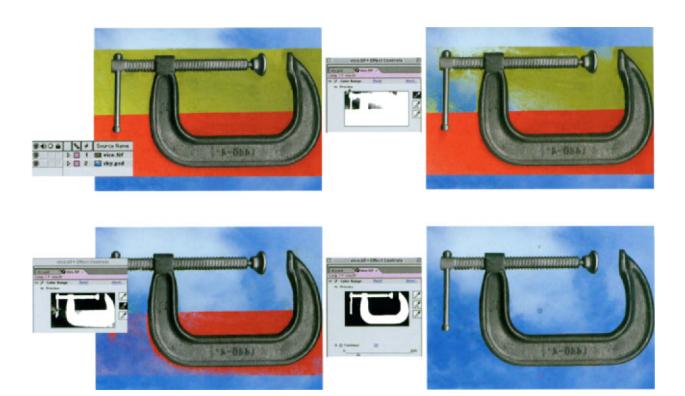
An edge thin operation can help eliminate edge pixels that contain the luma or key, and an edge feather option can soften the foreground-to-background transition (11.11). If a background contains subtle color fluctuations due to uneven lighting, a color tolerance function can knock out unwanted pixels (11.12). After Effects’ color range operation defines a matte using a color key eyedropper tool that allows you to select a range of colors to key out. The resulting matte can be refined, expanded, and “painted” over to achieve a better key. Additionally, the edges between the transparent and opaque areas of the matte can be feathered to soften the transition (11.13)

11.10 After Effects’ color key operation.
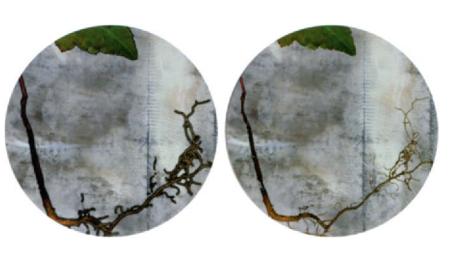
11.11 After Effects’ edge thin option can eliminate residual edge pixels containing the luma key and feather the transition from foreground to background.

11.12 After Effects’ color tolerance function can help knock out backgrounds that contain subtle fluctuations of color.
11.13After Effects’ color range option defines a matte that can be refined.
Since fine details can be difficult to key out, After Effects provides “choking” methods that can refine a key. For hard edges, a “simple choker” is ideal for cleaning or tightening up a key, while a “matte choker’s” detailed settings can blur the area between the subject and the background, providing a softer transition (11.14).

11.14 After Effects’ choking options.
keying tips
The process of keying takes time, patience, and the right tools if it is to be accomplished successfully. Here are a few general guidelines:
1 Avoid the key color, and choose the right color.
Be sure the subject that you are shooting or creating does not contain values or colors that are similar to the type of key being used. If it has bright values, luma keying it against a white background may result in “dropout.” You may need to reshoot or recreate the subject on a background that is more suitable for keying.
Be sure that the background is different from the colors or brightness levels of your subject. Some colors are more difficult than others to key, such as reds, because of the high constant of red in many color.
Historical persperctive
In the 1970s, Petro Viahos invented the Ultimatte—an analog video prcessor that performed soft edge matting. In the mid-1990s,the term “Ultimatte” denoted a closer association with charoma keying. During the 1990s, Ultimatte Corporation’s high-end Ulitimatte system was used by broadcasting and film studios around the world. When a subject was placed in front of a blue screen, the Ulitimatte acivated the background image and allowed it to appear in proportion to the amount of blue that it recognized in the camera’s blue channel. Areas containing the brightest and most saturated blues were replaced with the background source, while darker blue areas caused less of the background to show through
variations. Even the most subtle movements or changes in lighting can cause a red key to bleed into the image. In (Figure 11.15), red was not a wise choice because of the amount of red found in the subject’s skin tones. Green proved to be a more effective key color.

11.15 If a subject contains color or brightness values that are similar to the key, dropout may result.
A backdrop can be any color, as long as it is uniform and is not a part of the foreground subject. Green and blue are the most widely used in video, since they are built from red, green, and blue (or in some cases YW) signals. Skin pigments vary; some work well with a blue screen, while others are better equipped for green. If you are keying live footage, the DV format prioritizes luminance over chroma. Since green has a higher luma content than blue, green usually yields a better result.
2 Research your materials.
Your local hardware or home improvement store can provide you with affordable paint to be mixed at 100% purity at your request. As an alternative to paint, blue or green fabric can be used, as long as it is smooth and free of wrinkles. Muslin, which can be purchased at any art supply store, can be stretched over a wooden frame and painted to make the fabric tight. Bulletin board paper from any local school or office supply store can also be handy and allow you to extend the screen onto the floor. Rolls of green or blue photographers’ paper can also be used. Try to prevent wrinkling, crumpling, or tearing, which can cause subtle fluctuations in color value.
Many production houses have cyc walls (or infinity walls) consisting of two walls and a floor that curve into each other. Seamless transitions between wall and floor produce the illusion of infinite background space This facility can be rented with the inclusion of lighting equipment.
4 Light wisely
Lighting is a critical factor to keying. Color uniformity is critical, and the backdrop should be evenly lit with several bright, diffused light sources. Lighting inconsistencies can be caused by unwanted shadows from backgrounds that are not uniformly lit or from subjects placed in close proximity to the backdrop. Because of subtle fluctuations in tone, the color of shadows may not be uniform enough for your software to produce an accurate key. A handheld meter can confirm that light distribution is consistent. Place your subject as far away from the back- ground as possible to prevent shadows from falling onto the screen.
Measures can prevent or minimize the effect of spillover-a phenom- enon that occurs when background light reflects onto the subject. An overhead ambient light with an amber or yellow gel can wash out color that might spill over into hair detail. A backlight with a color gel that is complementary to the key color also can reduce spill by neutralizing the effect. (Try using a magenta gel against a green screen or an orange gel against a blue screen.) Be sure that light falling onto the subject is not falling onto the background. Separate the subject from the back- ground at a substantial distance. Finally, imitating the lighting of the environment that will be keyed in behind the subject adds a sense of realism to the final composite. Cheap floor fans can come in handy if you can’t afford a wind machine!
—Bill Davis
5 Use high-quality footage
Despite the superior quality of digital video over analog video formats, its compression codec is prone to producing video artifacts, blockiness, and noticeable aliasing along curved and diagonal edges when keying. Therefore, high-end analog video formats, such as Beta-SP, are recommended over DV when capturing footage to be keyed in the studio. S-VHS or Hi-8 produce troublesome edges, and VHS is out of the question. If your only choice is to capture your footage with a digital video camera, there are work-arounds.
6 Experiment
Spend considerable time experimenting with lighting, camera settings, and the positions of your subject and backdrop. Planning in advance will save time and labor in the long run.
7 Work closely
Zoom in closely to the composite to make sure that the edges of your foreground elements look clean.
9 Soften the transition.
Effective keys avoid the harsh look of hard-edged foreground elements that appear cut out with a pair of scissors. Softening a key’s effect with a slight feather or edge blur can help fuse foreground and background images together naturally, giving the appearance of the two being indistinguishable. Edge blurring works especially well with moving images, as the eye is more focused on the action than on the image. Adobe After Effects’ luma and color key operations allow you to soften transitions between subject and background by adjusting the opacity of edge pixels. figure 11.11, the edge thin operation was used to constrict the matte, and the edge feather setting was used to increase the foreground edge transparency.
10 Be patient.
Shadows and fine details can be difficult to work with, even with the most sophisticated software. Therefore, plan to dedicate considerable time to testing your key and cleaning up your mattes, if necessary.
Alpha Channels
Alpha channels are one of the most powerful compositing techniques of combining static and kinetic images and typographic content. The term “alpha channel” is based on a 32–bit file architecture. Unlike a 24–bit color (or RGB color) image that contains three channels of information, a 32–bit image carries a fourth alpha channel that functions to store transparency information. That data is used to determine image visibility when imported into a time-based animation or video environment. Transparency, like color, is based on 8 bits or 256 levels of data that dictate which areas of the image will become concealed, which areas will remain visible, and which portions will be semi-visible (or partially concealed). Alpha channels can contain any type of visual data, including simple graphic shapes, letterforms, gradient blends, and elaborate continuous-tone images.
The secret behind alpha is often first understood in the context of a static compositing program such as Photoshop. (Alpha channels have been one of Photoshop’s most powerful features since its inception in the 1980s.) Transparency data that is stored inside an alpha channel can be applied to an image as a mask (or a selection), or can be imported into a motion graphics environment (11.16)
When a 32-bit image is brought into a time-based environment, its visibility honors its alpha channel, meaning that it is only displayed where white or gray levels are present in the alpha channel. Areas that correspond to black are cropped (or “keyed”) out (11.17).
Alpha channels should not be confused with an image’s red, green, and blue color channels. Unlike a 24_bit color (or R&B color) image that contains three channels of information, a 32_bit image carries a fourth alpha channel that stores transparency (or alpha) data. The aloha channel’s B_bit data is reserved to give an image or video clip shape and transparency when composited in a motion graphics environment.
Adobe liiustrator and Photoshop content created an transparent backgrounds retain their background transparency when imported into a motion graphics application. This is because an alpha channel matte is automatically generated.
11.16 Transparency data that is stored inside an alpha channel can be applied to an image as a mask for a selection). or can be imported into a motion graphics compositing environment.
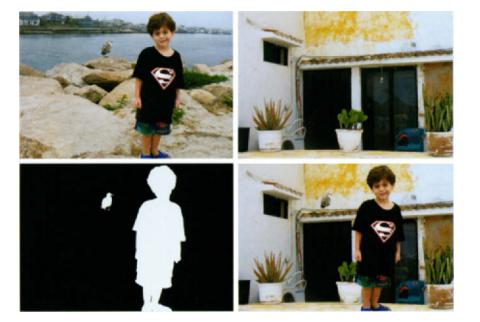
11.17 When a 32–bit image is brought into a time-based environment, its visibility conforms to the data stored inside the image’s alpha channel. Portions of the image corresponding to black areas remain invisible. When composited with a background image. the underlying image appears through the transparent or alpha portion.
Mattes
A matte is a static or moving image, which, like a stencil, can be used to govern the visibility of another image. In compositing, mattes provide unlimited creative possibilities.
Generating hand-executed mattes for moving images on a frame-by-frame basis depicts traditional rotoscoping in its true form—laborious hours spent on meticulous detail! The development of keys, alpha channels and masks (or splines) has automated this process by performing automatic matte extraction.
Alpha mattes, masks, and keys are terms that have been used interchangebly. Photoshop artists often refer to matted as “alpha channels”or “masks.” Analog video artists cammonly use the terms “matte” and “key” Although these processes work differently. they all aim to accomplish the same goal—to create transparency.
Historical perspective
Hand-executed mattes in the film industry have been used to create a variety of illusions since the beginning of motion pictures. One of the oldest special-effects techniques involved using a double-ex-posure matte. A cameraman would film a group of actors cautiously walking across a bridge, and a piece of black paper or tape would cover a portion of the lens corresponding to the sky, leaving that area unexposed.The film was rewound, and black paper exposed portion of the film.
A menacing thunderstorm scene was then filmed at a slow film speed, so that when played back normally, the clouds appear to be quickly rollong in across the sky. Both scenes might be shot separately on separate pieces of film, and through optical compositing, projected onto a third piece of film one frame at a time. Alternatively, both sequences might be scanned into a computer, digitally composited, and written back out to a third piece of film with a film printer.
luma mattes
A luminance matte (or RGB matte) is an external image that is used to make portions of another image transparent, based on its combination of RGB brightness values.
Luminance mattes should not be confused with alpha mattes, which are internal mattes that are derived from alpha channels. Alpha mattes are attached to images; the data residing inside of an alpha channel is used to control what parts of the image will be visible. (It also deter-mines how visible the parts will be, according to the brightness levels.) Luminance mattes are external to images and are needed when an alpha channel is not present (for example, QuickTime video). Alpha mattes are 8-bit, grayscale images, and luminance mattes can be 8–bit or 24–bit images consisting of three RGB channels. Luminance mattes can be static or moving, while alpha channel mattes can only be static.
In (Figure 11.19), the brightness levels of an external luminance matte govern the visibility of a superimposed image over a background. Black areas function as the mask, and white areas permit the background to pass through at 100% opacity, like paint being pushed through the holes of a stencil. Intermediate gray values represent varying levels of transparency, allowing the image to pass through partially, depending on how light or dark the gray levels are. (The lighter the gray, the more opaque the image will be; the darker the gray, the more transparent it will be. This is not physically possible with traditional stenciling.)
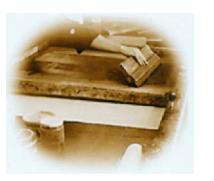
11.18 Traditional silkscreen printing offers an analogy to how mattes are created digitally. Ink is pushed through the unprotected areas of a screen to form a positive image. The areas of the screen that are covered with emulsion act as a matte, preventing the ink from being transferred to the paper.
11.19 A luminance matte is used to govern the visibility of a superimposed image over a background.
In (Figure 11.20), After Effects’ track matte feature involves the use of luminance and alpha mattes. Their difference has to do with where the information determining visibility resides—in an image’s RGB channels or in its alpha channel (if it has one).
11.20 A track matte consisting of black type on white is used to combine a static background with a superimposed Quitk Time layer The video layer referencing the matte is sandwiched between the matte and background layers. Dark areas of the matte clip the footage to the lettorforms. allowing the background imagery to show through regions outside the type.

matte styles
Both alpha channel mattes and luminance mattes can be composed of solid shapes, feathered shapes, gradients, typography, and entire images. Additionally they can be “painted” digitally from black, white, and gray values and from brushes varying in size and softness.
solid mattes
High-contrast black-and-white mattes mimic conventional stenciling or silkscreening in that they can confine images to shapes. In (Figure 11.21), an image appears through a white shape on a blackground. The image is clipped to the areas of the matte containing the brightest luminosity values, while the background image appears at full opacity through the regions of the matte that are black.

11.21 A solid. high-contrast hfack-and-white matte confines an overlying image to a specific shape
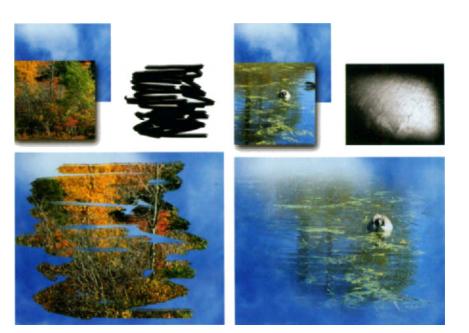
Unlike traditional mattes that act like cookie cutters, digital mattes can be composed of feathered edges, paint strokes, gradients, and images that have intermediate levels of gray. Portions of a matte containing pixel values of 128 (halfway between black-and-white or 0 and 255) allow superimposition to occur at 50% opacity. Values between black and white allow superimpositions to occur at varying degrees. This prospect of semi-permeability can lead to many exciting layering possibilities (11.22-11.24)
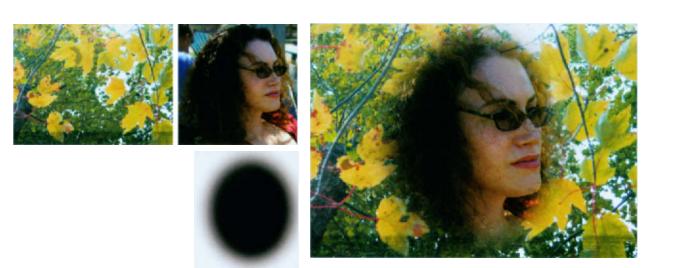
11.22 A matte containing a shape with feathered edges is used to create a vignette effect. As values become lighter over the transition from the edge to background. the image fades our accordingly.


11.23 Mattes consisting of complex bash strokes. shapes. or patterns offer a variety of artistic effects.

11.24 A gradient matte containing unnform changes of tone ics used to fade an image aut it its edges
traveling mattes
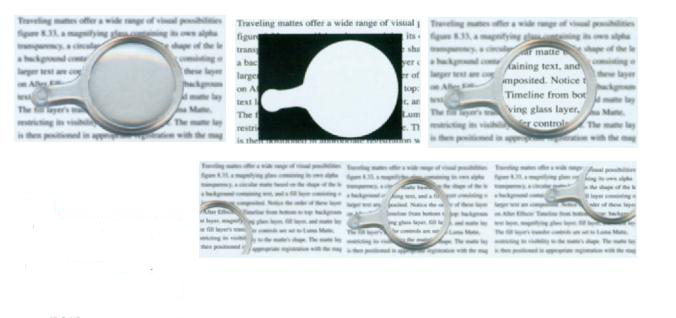
A traveling matte is a matte that changes its appearance or position for each frame in cases where the subject moves or changes. In (Figure 11.25), four different elements are composited in After Effects: an im-age of a magnifymg glass, a luma matte based on the shape of the lens, background text, and a fill layer containing larger text. The order of the layers on the timeline from bottom to top begins with background text, the magnifymg glass image, the large text, and the matte. The visibil-ity of the fill layer containing the large text is restricted to the circular shape of the luma matte. The matte layer is registered into position with the lens and is parented to the lens layer so that they both can move together as one unit. The lens’ position property is key-framed, and the matte pans along, revealing portions of the fill layer. At the same time, scale key frames are created for the fill layer to simulate the effect of zooming.
In the old days, individual mattes that conformed to the shape of a moving subject were created by hand, frame-by-frame--a tedious, time-consuming process. Today. the advantage of keying is that it performs automatic matte extraction.
11.25 A matte conforming to the shape of the magnifying lens is moved into registration. The visibility of the layer containing clear text is set to reference the matte. The lens layer is parented to the matte layer, allowing them to move as a unit. The matte layer’s position property is key-framed
Masks
the nature of splines
Masks offer an alternative compositing technique to keys, alpha channels, and luminosity mattes. Unlike mattes, which establish transparency through brightness data, masks are defined by splines-paths that consist of interconnected points that form a line segment or curve. (Figure 11.27) compares typography used as an alpha channel matte to type that is used as a Bezier spline. In the matte, a video clip appears through the white areas (or the alpha portion). In the mask, the splines of the letterforms can be manipulated to change their geometric appearance over time.
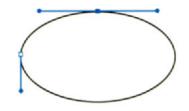
11.26 A spline’s vertices can be moved, added, deleted, or manipulated to change the shape of the mask

11.27 top row The image appears through the matte’s white areas I the letters).
bottom row:
Text outlines are converted into splines. and their geometry es animated through interpolation.
rotoscoping and animated masks
Generating precise hand-executed mattes for moving images on a frame-by-frame basis depicts traditional rotoscoping in its true form. This process constitutes laborious hours spent on meticulous detail. The technique of interpolating the changing geometry of a spline mask can automate this process.
In the film Titanic (1997), puffs of human breath were used to depict the chilled environment of the North Atlantic. (A large portion of the film was shot near the warm waters of the Pacific.) Several breath sequences were filmed and combined onto the original footage. Masks were created to protect foreground elements such as heads and shoul- ders so that a superimposed breath appearing come out of an actor’s mouth would disappear behind them. Each mask was animated with extreme precision to follow the motions of those foreground elements. At points where registration was inaccurate, the compositor manually refined the masks shape and position at certain key frames.
Most motion graphics packages allow mask properties to be key framed to change over time. In (Figure 11.29), a mask is created on a layer containing a live-action video clip of a books pages being opened by a gust of air generated from a fan. Key frames are established every ten frames for the spline’s shape, feathering, and expansion properties. New key frames are then generated at every fifth frame in between, allowing the mask to more closely adhere to the changing image.
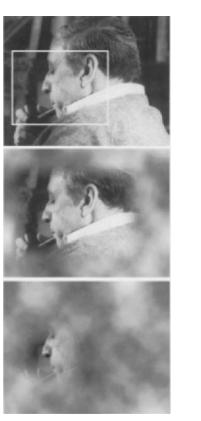
11.28 A mask can be expanded. contracted, or feathered to change its size or soften the transition from foreground to background.

11.29 Rocoscoping is used to perform mask interpolation.
In addition to the most common motion graphics packages, expensive high-end programs. such as Matador paint, Flame, Cineon, and Damino offer advanced masking tools that are specifically designed to perform rotoscoping on live-action footage.
Viewers become immediately drawn to elements that appear to be unnatural in the way that they move or change. Professional “roto artists” dedicate serious attention to maintaining visual consistency, since their goal is to minimize distractions that can be obvious to the most scrutinizing eyes. Even with today’s most advanced tools, “roto-masking” can be a tricky and meticulous process. Here are several tips:
1. Analyze the subject
Rotoscoping requires careful analysis of the subject. This means identifying the frames that represent the most extreme changes. Once these frames have been established, alteration can be performed at those time intervals to conform to the image, and the software’s ability to calculate in-between key frames saves a great deal of time and labor.
2. Zoom into your work
Working close up is critical for achieving precision, especially along complex edges.
3. Minimize the number of vertices.
An undesirable effect of sloppy compositing is edge chatter—a phenomenon that occurs when a masks outline changes irregularly from one frame to the next. This is usually a result of using too many vertex points and moving those points inconsistently between frames. Creating a mask on the frame where an element’s shape is intricate allows you to determine the minimum number of vertices needed to adequately mask it over the frames that are being rotoscoped.
4. Break down complex images into multiple masks.
Consider breaking the parts of a complex image down into separate masks and animating those masks individually. This will help establish accuracy and consistency and will help maintain the integrity of the paths. Some masks will only require interpolation of position or scale, while others may need shape alteration by repositioning the vertex points. Mattes that conform to different parts of a subject can be articulated and animated separately.
5. Weigh the options among masking, matting, and keying.
In compositing video images, there are advantages of masking over keying, such as the elimination of spillover caused by poor lighting conditions and the ease of performing in a natural setting versus on a synthetic blue-screen set (in the case of using people as subjects). On the other hand, keying elements that move against a uniform.
background can be easier than animating a masks position and shape frame-by-frame. if only a masks position changes over time, a luma matte or an alpha channel may be a better solution.
Nesting
One of the most powerful and convenient compositing techniques for constructing complex motion graphics sequences is nesting. The goal of nesting is to implement an organized hierarchy of compositions in order to make the editing process easier and more effective. This process involves two steps: 1) building a layered composition and 2) consolidating that composition into a single layer to be brought inside of another composition.
Most professional nonlinear editing tools leverage the ability to nest in their timelines. The Avid Xpress system, for example, allows you to combine multiple video layers into a single track. In Apple’s Final Cut Pro, any number of clips can be nested into a sequence, and audio tracks belonging to the original clips are automatically consolidated into a single track. Motion graphics applications, such as Adobe After Effects and Flash, are also capable of this. After Effects refers to an intermediate (versus a final) composition as a precornp. Precomps were used to integrate layers of complex visual information in “First Stop For The News,” a television commercial for NYl’s twenty-four hour cable news channel (11.30). Belief, a motion graphics firm in Los Angeles, created an impressionistic version of NYC based on NYl’s campaign to purchase the billboards that were showcased on the city’s buses. This concept spawned the idea of a traveling bus that brings the city to life. After taking numerous photographs of iconic intersections around the city, storyboard artists were hired to create traditional hand drawn sketches over the printed photographs on tracing paper. In After Effects, a precomp was built from the original photographs, and various camera movements were incorporated. This composition was duplicated, and in the duplicate precomp, the photographic images were replaced with the pencil sketches. In a third composition, the second precomp containing the pencil sketches was layered on top of the original composition containing the photographs. (Since precomps 1 and 2 shared the same key frames, both sets of images and camera movements were perfectly aligned.) A layer containing images of ink bleeding into paper was sandwiched between precomps 1 and 2 to allow transitions to occur between photographic and hand-drawn elements. The results were rendered out as QuickTime movies, and the movie files were imported back into After Effects to be layered over a paper-textured background. This process fostered artistic experimen-tation by reducing the amount of waiting time that it would normally take to render all the precomps and their respective layers.

11.30 Frames from “First Stop For The News,” a television commercial for NY I. Concept and motion graphics by Belief.
In Figure 11.31, several QuickTime video clips have been arranged to create the effect of an animated video wall. The precomp is brought into a new composition, and its position, scale, Y-rotation, and X- rotation is interpolated. Additionally, a color tint is applied. This is an example of how nesting allows you to efficiently organize your composites. Rather than having to apply a transformation or an effect to each layer individually, nesting gives you the benefit of applying it only once to affect all layers in the nest. If, at any point, the layers in the original composite are tweaked, those changes are automatically updated in the nested composition.
11.31 Nesting two levels in Adobe After Effects is used to create an animated video wall effect Comp I.consistmg of multiple live-action video layers, i5 nested into a second composition. Comp 2.M a single layer in the nested comp, a color effect is applied. and its position. scale, and Y rotation properties are interpolated as each clip plays separately.
In the television show opening to The Hungry Detective (Chapter 2, (Figure 2.18)), After Effects was used to connect multiple precomps. Each precomp consisted of its own internal camera moving in 3D space. Bezier masks, keying, and alpha channels were also used to composite live-action footage, photography, illustration, and 3D graphics. The magnifying glass at the beginning of the sequence communicates a “micro and macro” concept that allows us to “fly” inside the elements almost microscopically.
Color Correction
Representing color accurately and consistently is a critical part of compositing. Color correction and enhancement operations can rectify mismatched colors between different sources, enhance color, or alter color to achieve certain types of effects and consistency between visuals. Insufficient lighting conditions due to poor capture, inadequate scanning, or mismatched sources are all variables that may mandate performing color correction.
Since no two people will ever agree on what looks right (including your clients). it is best to trust your own eyes when color correcting your work. especially when attempting to match colors between sources.
improving luminance
Since color varies are highly dependent upon luminosity, improving luminance or brightness information is the first step to establishing color accuracy.
assessing tonal range
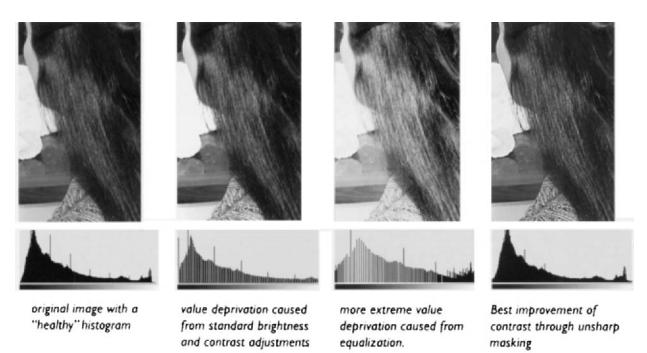
Assessing an element’s tonal range is achieved by referencing its histogram to identify its range and distribution of brightness values. (Figure 11.32) compares the histograms of a “healthy” and “unhealthy” clip of live-action video. The healthy version utilizes most of the avail-able values between 0 (black) and 255 (white), unlike the unhealthy version, which lacks detail in the shadow areas. Additionally, gaps in the central region of its histogram indicate that the footage is deprived of subtle mid-tone levels.
Once tonal range has been assessed, measures can be taken to improve tonal contrast and detail. The most ideal remedy would be to acquire a better original or improve the quality of the original by reshooting or rescanning it. Of course, this is not always possible due to financial and time restrictions. The next and most often the more pragmatic measure would be to improve the element’s luminance.
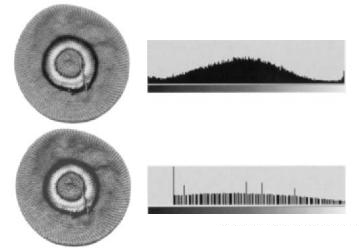
11.32 These histograms demonstrate “healthy” and “unhealthy” usage of an imag’s brightness levels.
standard luminance operations
Standard brightnesdcontrast operations can serve as a quick fix for content that lacks shadow or highlight detail by producing linear shifts in luminosity levels. Darkening shifts shadow details to black, elimi-of an image’s brightness-levels.- nating highlights, while brightening maps highlight details to white, eliminating shadows. Increasing contrast reduces mid-tone levels, causing subtle highlights to be mapped to white and shadows to black. The result, however, can deprive an image of its subtle mid-tone details. The process of equalization can produce a more uniform distribution of luminance by mapping the darkest values to black and lightest values to white while redistributing intermediate gray levels more evenly. It can, however, be detrimental to shadow and highlight details. In comparison, the technique of unsharp masking produces the most effective results, because shadow and highlight subtleties are accentuated (11.33)
11.33 Best improvement of tonal contrast is achieved through the process of unsharp masking.
Levels and curves operations offer more precise methods over how values are dispersed. For example, if shadows are too dark, they can be shifted to higher values without affecting an element’s mid-tones and highlights. This process can increase an image’s contrast while remov¬ing unwanted color casts (described in the next section). Cropping the histogram incorporates values on the extreme lower and upper scale, resulting in accentuated shadow and highlight detail (Figure 11.34).
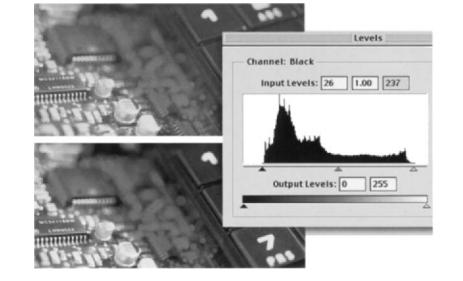
11.34 Cropping the histogram extends the image’s tonal range to include darker shadows and lighter high-light details.
11.35 Redistribution of tonal values on a gamma curve is achieved by shifting the points corresponding to the image’s input levels. In this case, only the mid-tone ranges were modified while shadow and highlight details were maintained.
Mid-tone ranges are difficult to target, unlike, black and white points. Although mid-tone levels can be set by selecting a neutral region of an image. the results are sometimes unpredictable. A“healthy”scan should contain sufficient mid-tone detail in its histogram. Color correcting poor scans wastes time and further hinders brightness detail.
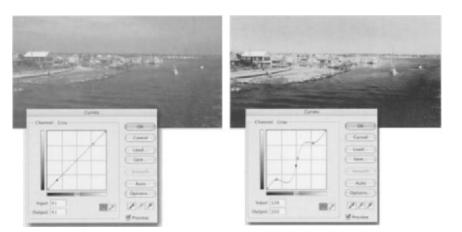
The most effective approach of improving an image’s color luminance is by remapping its original brightness levels to the full 8-bit (256 level) gamut by setting its black and white points. Levels and curves opera- tions allow you to set black and white points by permitting darks or lights above or below a specified threshold level to be remapped to black or white. In the curves operation in (Figure 11.36), the eyedropper corresponding to black is used to selects a pixel with a value of 25. As a result, all pixels between 0 and 25 are remapped to 0 (black). The right eyedropper, corresponding to white, selects a pixel with a value of 220, and all pixels between 220–255 are remapped to 255 (white).
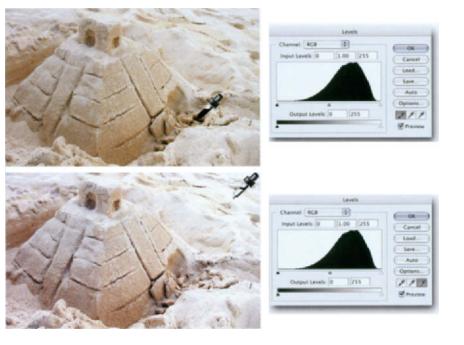
11.36 Improving an image’s tonal detail is accomplished by remapping the darkest and lightest pixels to pure black and white. a process referred to as”setting the black and white points.
value alteration
Alteration of luminosity values can be performed to enhance images or to experiment with tonal effects. Posterization, for example, reduces the amount of brightness levels that are used, producing a flatter and more graphic looking image. Inuersion produces a negative image as luminosity values or colors are reversed. Black becomes white, and a light gray with a value of 30 becomes a dark gray of 225. Mid-tone levels are changed the least (128, or 50% gray, remaining unchanged).
removing color casts
Once tonal range has been improved, adjustments can be made to remove color casts—unwanted colors that result when an element’s red, green, and blue channels are not properly balanced. Color casts can occur universally or can be limited to specific highlight, shadow, or mid-tone details.
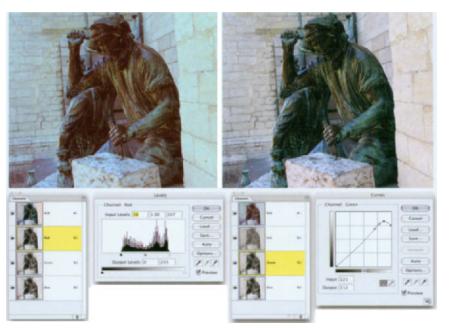
Color balance provides a quick method of removing casts by shifting specific color polarities simultaneously. The results are most promising if shadows, mid-tones and highlights are balanced separately. Entire ranges of hues are shifted on the color wheel, producing subtle to dramatic changes. Applying a levels operation to an image’s RGB channels can also improve color across its tonal range. Altering individual distributions of red, green, and blue may be more time-consuming, but it provides greater precision in enhancing color and identifying unwanted casts. Cropping the histogram can improve contrast and color depth, because it redistributes the value mapping to the full 256 spectrum. (This approach can also neutralize problematic casts.) Curves, in conjunction with levels, allow precise modifications to be applied to an entire color gamut or to any one or combination of color channels. For example, the red channel of the image in (Figure 11.37) has the poorest tonal quality as seen in its histogram. There is also a slight green cast evident in the image’s highlights. Extending the value range of the red channel by cropping the histogram, and decreasing the intensity of highlights in the green channel by altering the tonal curve resolves this issue.
Most motion graphics compositing programs feature tool sets that can be used for color correction. Their key-framing capabilities allow you to make fine adjustments to a portion of a scene or to animate a color effect over time. Apple’s Final Cur Pro’s levels operation. for example, allows you to alter the distribution of any one of o layer’s red, green, and Prue color channels at a time. Apple’s Shake provides a vast array of manipulation tools heat can correct enhance. and match colors from different sources and combine them with masks and other effects. Its color ’notch operation allows you to create o common color palette between romposated images to achieve natural looking results. After Effects’ color balance operation provides individual controls for the red. green. and blue channels for shadows, mid-tones, and highlights. Its channel mixer con modify oil of the available color channels {similar to how you Would mix audio channels using a mixer). A monochrome setting represents an image in block and White while allowing you to tweak the channels to achieve unusual effects. fecu. After Effects’ huelsaturation operation. lets you shift a layer’s hues while controlling its saturation and lightness levels. A “coloruce” option eliminates the existing colors and odds on overall tint to create effects, such as an old sepia look.
color manipulation
Any combination of techniques that have been discussed can be performed experimentally on individual elements or entire animation sequences. Color alteration can also be performed on grayscale images that have been converted to RGB color space prior to compositing. For
11.37 Color correction is performed through levels and curves operations in the image’s red and green color channels
If your work is intended for television display, it is best to view your color alrerations on an NTSC monitor as you create them to be sure that they are “broodcast safe.” Green and overly saturated colors can be sepecially problematic in yielding of equate results in video color space.
example, colorization techniques can emulate the effect of a handtinted photograph. Grayscale images that have been converted to 8-bit duotones, tritones, and quadtones also lend themselves to achieving dynamic color effects, and these can later be translated back into RGB color space. In figure 11.38, Photoshop’s duotone, tritone, and quadtone features are used to assign specific hues to the shadow, mid-tone, and highlight regions of the histogram. Once a desired color effect is achieved, the image was converted back to RGB color to be imported into a compositing program.

11.38 Photoshop’s duotone operation can be used to map a grayscale image’s brightness values to specific colors to achieve certain color elects. The Image can then be converted back to RGB to be imported into a motion graphic., environment.
Mixing brightness data between an image’s channels is another powerful and intuitive way to enhance color intensities. Brightness percentages from multiple channels can be combined and added to a specified target channel. For example, values within the red channel can be mixed with those from the green or blue components (11.39)

11.39 After Effects’ "channel mixer" can mix and match brightness values from different color channels to achieve compelling effects.
Summary
Motion graphics compositing allows you to seamlessly integrate many types of content into a uniform, multi-layered space to create unusual, visual relationships.
Blend operations allow you to determine how the pixel information of superimposed images blend to create intriguing effects. Keying involves eliminating a selected range of colors or brightness levels to produce areas of transparency. Alpha channels, which rely on 32–bit color architecture, can also combine different types of content by using transparency data to determine an element’s visibility. Splines offer an alternative technique of compositing—masking. The practice of nesting can be used to construct complex animation sequences by building an organized hierarchy of compositions in order to make the editing process easier and more effective. Most professional nonlinear editing tools leverage the ability to nest animations in their timelines.
Representing color accurately and consistently is critical to achieving effective compositing. Color correction and enhancement operations can rectify mismatched colors from different sources, enhance their color, or alter their colors. Assessing an element’s tonal range by identifying its brightness values on a histogram is an important step in establishing color accuracy.

