
Chapter 12. Libraries and Snippets
Back when I worked in advertising, I noticed that the art directors would stick little bits and pieces of type and logos on their mechanical board, drafting table, lamp, and wall. This made it easy to grab an often-used logo or piece of art.
Similarly, when you work with electronic page layouts, you use certain elements over and over. For instance, if you’re working on a magazine, you might want to have a series of different-sized frames to hold frequently used ads.
Rather than copying and pasting the frames from one part of the document to another, you can use InDesign’s libraries or snippets to hold the elements you use repeatedly.
Then, when you need to use an item from the library or the saved snippet file, you can simply drag it onto the page.
Storing Items in a Library
A library allows you to store elements, such as text frames, images, or empty frames. When elements are in a library, they can be dragged easily into open documents. Libraries are especially useful when you need to use the same element in many different places.
Tip
Libraries appear as panels that float above the open InDesign documents. Libraries are available to use with any InDesign document.
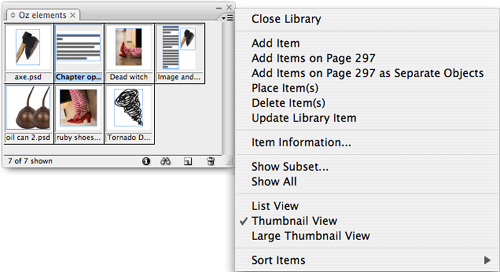
- Choose File > New > Library. This opens the New Library dialog box.
- Use this dialog box to name the library file and select its location.
- Click Save. The library appears as a floating panel
 .
.
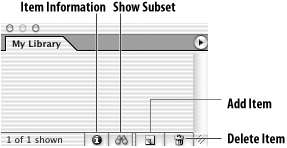 A new Library panel does not contain any items.
- With a library open, select the item you want to insert in it.
- Click the Add Item button at the bottom of the Library panel.
or
Drag the item into the library
 . The item appears in the Library panel.
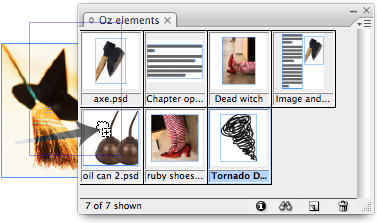 You can add items to a library by dragging them from the page into the Library panel.
or
Choose Add Item from the Library panel menu
 .
. The Library panel menu contains the commands for working with a library.
You can also add all the items on the current page to a library.
- With a library open, move to the page you want to add to the library.
- Choose Add Items on Page [number] from the Library panel submenu.
Instead of the Add Items on Page [number] command, you may want to add all the items on a page as individual library entries. Instead of dragging them one by one into the Library panel, you can add the items as separate elements.
To add all the items on a page separately:
- With a library open, move to the page that contains all the items that you want to add to the library.
- Choose Add Items on Page [number] as Separate Objects from the Library panel menu.
To delete items from a library:
- Select the item in the library.
- Click the Delete Item icon.
or
Choose Delete Item(s) from the Library panel menu.
- A dialog box appears asking for confirmation that you want to delete the items. Click Yes.
Applying Library Items to a Page
Libraries can be opened and the elements in the libraries dragged onto any InDesign documents.
To add library items to a document:
- Select the item in the library.
- Drag the items from the library onto the page
 .
.
 Items can be dragged from a library onto a document.
or
Choose Place Item(s) from the Library panel menu.
You may want to modify an item in a library with a new object, text, or image. The Update Library Item command makes this easy to do.
To update an item in a library:
- Select the item on the page that you want to use as the replacement in the library.
- Select the item in the library that needs to be updated.
- Choose Update Library Item from the Library panel menu. The library thumbnail updates to display the new item.
Setting the Library Display
If you have many items in a library, you may want to change how the items are displayed.
To change the library display:
• Choose List View in the Library panel menu to see the item name and an icon that indicates the type of item ![]() .
.
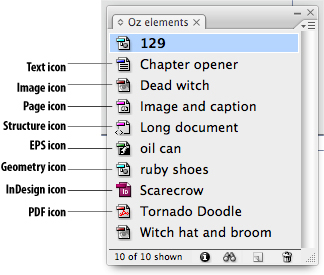
![]() The List View shows the name of the item and an icon that shows the type of item.
The List View shows the name of the item and an icon that shows the type of item.
or
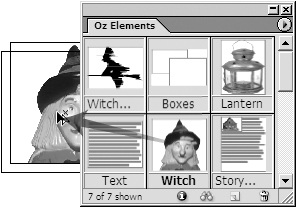
Choose Thumbnail View or Large Thumbnail View to see the name and a preview of the item ![]() .
.
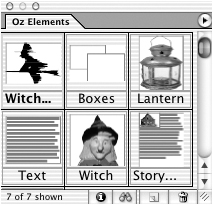
![]() The Thumbnail View shows the name of the item and a preview of the item.
The Thumbnail View shows the name of the item and a preview of the item.
You can also add information such as file type and keywords that makes it easy to search for library entries.
To modify the library item information:
- Select the item.
- Click the Library Item Information icon.
or
Choose Item Information from the Library panel menu. This opens the Item Information dialog box
 .
.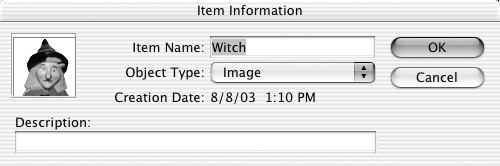 The Item Information dialog box lets you change the information assigned to each item.
 - Enter the name in the Item Name field.
- Use the Object Type list to choose one of following categories
 :
:
• Text contains text frames.
• Image contains raster images.
• Page is an entire page.
• Structure contains XML elements.
• EPS contains EPS files.
• PDF contains PDF files.
• InDesign contains InDesign files.
• Geometry includes frames and rules that do not contain images or text.
 Use the Object Type list to apply a label for the library element.
 - Enter a description for the item.
Searching and Sorting Libraries
If you have many items in a library, you may find it difficult to find specific library entries. InDesign has a powerful search feature that makes it easy to locate specific items in a library.
- Click the Show Library Subset icon.
or
Choose Show Subset from the Library panel menu. This opens the Subset dialog box
 .
. The Subset dialog box lets you find specific library items.
 - Choose Search Entire Library to search all entries in the library
 .
.
 The search criteria in the Subset dialog box let you specify where to search in the library.
or
Choose Search Currently Shown Items to search through only those items currently displayed in the library.
- Use the Parameters menu and fields to set the search criteria
 .
.
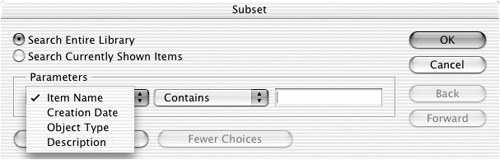 The Parameters menu lets you choose which part of the item information is searched.
 - Click More Choices to add up to five choices to the parameters list.
- Choose Match All to choose only those items that match all the search parameters
 .
.
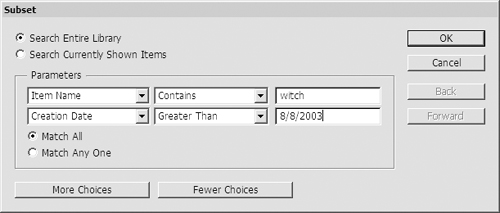 The match criteria in the Subset dialog box control how the search items are matched.
or
Choose Match Any One to find items that meet at least one of the search parameters.
- Click OK to display the items that meet the search criteria.
Once you have sorted a library, you may need to show all the items at some other time.
To display all the library entries:
• Choose Show All from the Library panel submenu.
You can also control the order in which the library items are displayed. This makes it easier to find items in large libraries.
To sort library entries:
• Choose one of the Sort Items options from the Library panel menu:
• By Name arranges the items in alphabetical order.
• By Newest arranges the items in the order they were added, with the newest items first.
• By Oldest arranges the items in the order they were added with the oldest items first.
• By Type arranges the items in groups according to their categories.
Creating and Using Snippets
Snippets are exactly what they sound like—little bits of a page that you snip off to use somewhere else.
To create snippets using the Export command:
- Select the items on the page that you want to turn into a snippet.
- Choose File > Export.
- In the Export dialog box choose InDesign Snippet from the Format list
 .
.
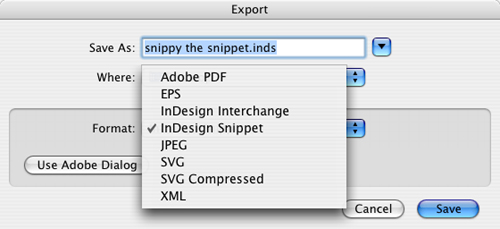 The Export dialog box lets you save items as InDesign snippets.
 - Name and save the file. The snippet icon appears in the directory.
To create snippets by dragging:
- Select and drag the items that you want to turn into a snippet onto the desktop. The Snippet icon appears with a bizarre temporary name.
- Change the name to something more understandable.
Once you have created snippets, you can drag them onto a page.
- Select the snippet on the desktop or in the file directory.
- Drag the Snippet icon onto the InDesign document page.
Tip
Use the Snippets Import setting in the Preferences > File Handling dialog to choose whether the snippet appears at its original coordinates or the cursor position
 .
. The Snippet Import setting in the File Handling Preferences lets you control where snippets appear when dragged onto a page.