
Chapter 11. Layers
When I was in advertising, we used to lay clear acetate sheets over our mechanical board as a way to create variations for our layouts. One acetate layer might have copy and prices for a test market newspaper ad. Another piece of acetate might have prices for a special Sunday-circular ad. Yet another might have copy without prices for the national magazine ads. The artwork and other graphics stayed on the bottom layer and were visible through the acetate layers.
When the mechanical was sent to be printed, the print shop workers flipped the different acetate sheets on or off the board to create the different types of ads. Because a new mechanical didn’t have to be created for each variation, it saved a lot of time and effort.
InDesign gives you the same sort of flexibility with electronic layers. You may have just two layers—one for text, the other for graphics. Or you may have a document with hundreds of different layers.
For instance, if you have English and French versions of a document, you can put the text for each language on its own layer. You can then display just one version at a time.
Creating and Deleting Layers
Every InDesign document opens with a default layer in the Layers panel. You don’t have to do anything special to work with this default layer. It is instantly active, and everything you do is automatically on that layer.
To open the Layers panel:
• If the Layers panel is not visible, choose Window > Layers to open it ![]() .
.
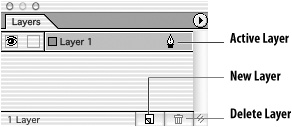
![]() The Layers panel for all new documents contains one layer.
The Layers panel for all new documents contains one layer.
As you work, you may want additional layers in your document.
- Choose New Layer from the Layers panel menu
 . This opens the New Layer dialog box.
or
Click the New Layer icon. This creates a new layer without opening the New Layer dialog box.
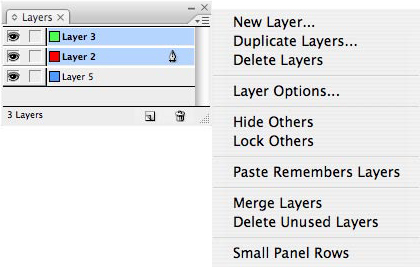 The Layers panel menu contains the commands for working with layers.
 - Set the layer options as described in the next section.
- Click OK to create the layer.
It may be easier to create different versions of a document by duplicating a layer, as well as the objects on that layer.
To duplicate a layer:
• Drag the layer onto the New Layer icon ![]() . This creates a copy of the layer, as well as all objects on that layer.
. This creates a copy of the layer, as well as all objects on that layer.
![]() You can duplicate a layer by dragging it onto the New Layer icon.
You can duplicate a layer by dragging it onto the New Layer icon.
You can also import the layers automatically when you paste items from one document to another. This behavior is controlled by the Paste Remembers Layers command.
To create new layers while pasting:
- Choose Paste Remembers Layers from the Layers panel menu. If there is a check mark next to the command, then it is already turned on.
- Drag and drop or copy and paste the items from one document into a second document. New layers are created in the second document as follows
 :
:
• The layers from the first document are added as new layers if they do not have the same name as the layers in the second document.
• The layers from the first document are merged with the layers if they have the same name as layers in the second document.
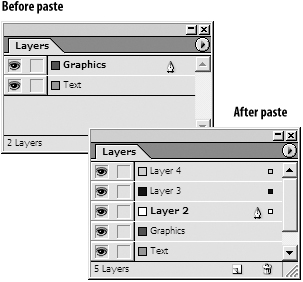 The Paste Remembers Layers command adds new layers when objects are pasted from one document to another.
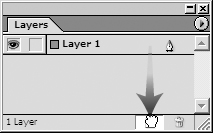
As you work, you may want to delete a layer. This also deletes all objects on the layer.
- Select the layer you want to delete.
- Click the Delete Layer icon. If there are items on the layer an alert box appears
 .
.
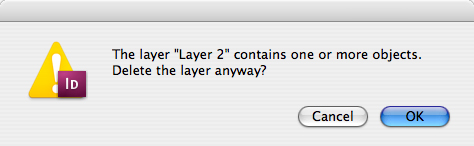 An alert dialog box makes sure you don’t inadvertently delete artwork when you delete a layer.
You can quickly delete layers with no objects.
To delete all unused layers:
• Choose Delete Unused layers from the Layers panel menu.
Setting the Layer Options
The Layer Options dialog box contains some housekeeping options that make it easier to organize and work with layers ![]() .
.
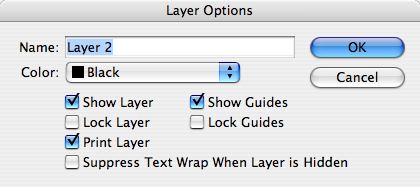
![]() The Layer Options dialog box is the command center for all the attributes of a layer.
The Layer Options dialog box is the command center for all the attributes of a layer.
To name a layer:
• Use the Name field to name the layer.
Tip
If you have many layers, you should use descriptive names instead of the default names Layer 1, Layer 2, etc.
Each layer has a color associated with it. This is the color used to highlight object frames and paths.
To set the highlight color for a layer:
• Choose a color from one of the 37 colors in the Color list ![]() .
.

![]() The Color list contains all the choices for highlighting objects.
The Color list contains all the choices for highlighting objects.
Tip
Each new layer is automatically assigned the next color in the Color list. This means you can have 37 layers without ever repeating a color.
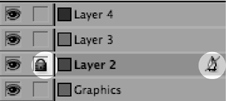
Layers help you organize your documents. For instance, if you lock a layer you lock all the objects, so they cannot be selected, moved, modified, or deleted.
To lock a layer:
• Choose Lock Layer from the Layer Options dialog box.
or
Click the Toggle Lock space in the Layers panel ![]() . A padlock indicates that the layer is locked. A blank space indicates the layer is unlocked.
. A padlock indicates that the layer is locked. A blank space indicates the layer is unlocked.
![]() Click the Toggle Lock space to lock the layer. The spotlighted icons indicate that the layer is locked.
Click the Toggle Lock space to lock the layer. The spotlighted icons indicate that the layer is locked.
Tip
Use the Lock Others command from the Layers panel menu or Opt/Alt-click the Toggle Lock space in one layer to lock all the other layers in the document ![]() .
.
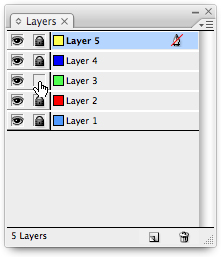
![]() Opt/Alt-click the Toggle Lock space to lock all the other layers in the document.
Opt/Alt-click the Toggle Lock space to lock all the other layers in the document.
To prevent a layer from printing:
• Deselect Print Layer from the Layer Options dialog box.
You can also use layers to hide and show the information on the layer. This can make it easy to focus on certain information.
To hide a layer:
• Deselect Show Layer from the Layer Options dialog box.
or
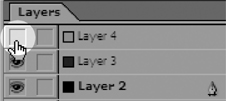
Click the Toggle Visibility space in the Layers panel so that the space is blank ![]() . When the space is blank, the layer is invisible.
. When the space is blank, the layer is invisible.
![]() Click the Toggle Visibility space to hide or show the layer.
Click the Toggle Visibility space to hide or show the layer.
Tip
Use the Hide Others command from the Layers panel menu or Opt/Alt-click the Toggle Visibility space in one layer to hide all the other layers in the document ![]() .
.
![]() Opt/Alt-click the Toggle Visibility space to hide all the other layers in the document.
Opt/Alt-click the Toggle Visibility space to hide all the other layers in the document.
To show a layer:
• Select Show Layer from the Layer Options dialog box.
or
Click the Toggle Visibility space in the Layers panel. When the eyeball is visible, the layer is visible.
To control the visibility of guides on a layer:
- Choose Show Guides in the Layer Options dialog box to display the guides for that layer.
- Choose Lock Guides to protect the guides on the layer from being changed.
Although hidden layers don’t print, they still can affect other objects on the page. The Layer Options dialog box contains the Suppress Text Wrap When Layer Is Hidden setting which controls what happens if you turn off the visibility for a layer that has a text wrap applied to images ![]() .
.
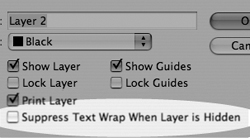
![]() The Suppress Text Wrap When Layer Is Hidden option controls what happens to the text wrap for hidden layers.
The Suppress Text Wrap When Layer Is Hidden option controls what happens to the text wrap for hidden layers.
To control the text wrap for hidden layers:
- Apply a text wrap to an image that is on one layer.
- Create text that is on another layer
 .
.
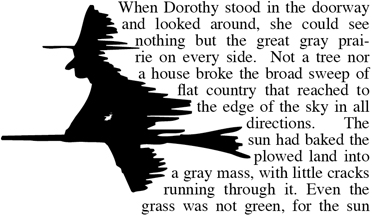 An image with a text wrap is placed on one layer affecting the text on another layer.
 - Set the Layer Options dialog box as follows:
• Turn off Suppress Text Wrap When Layer Is Hidden to maintain the text wrap when the layer is not visible
 .
. When the layer is hidden, the wrap continues to affect text when the Suppress Text Wrap option is turned off.
• Turn on Suppress Text Wrap When Layer Is Hidden to discard the text wrap when the layer is not visible
 .
. When the layer is hidden, the wrap does not affect text when the Suppress Text Wrap option is turned on.
Working with Layers
Once you’ve created additional layers in your document, you can move objects onto the new layers.
To apply objects to layers:
• Click the layer in the Layers panel so that it’s highlighted, and then create the object.
Rather than cutting or copying the object, selecting the new layer, and pasting it, you can use the Layers panel to move the object between layers.
To move objects from one layer to another:
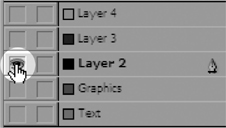
- Select the object. A square object proxy appears next to the name of the layer in the Layers panel.
- Drag the object proxy from one layer to another
 . This moves the object to a new layer.
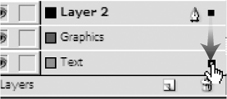 Drag the proxy square to move an object from one layer to another.
Tip
Hold the Opt/Alt key as you drag the proxy to create a copy of the object on the new layer
 . The original object stays on its layer.
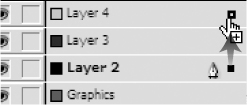 Hold the Opt/Alt key as you drag the proxy square to copy an object from one layer to another.
To reorder layers:
• Drag one layer above or below another to change the order in which objects appear in the document ![]() .
.
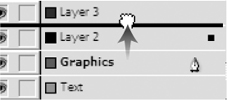
![]() Drag a layer up or down in the Layers panel to change the order of the layers.
Drag a layer up or down in the Layers panel to change the order of the layers.
You may want to combine the contents of one layer with another. This is called merging layers.
- Select the layers you want to merge.
- Choose Merge Layers from the Layers panel menu. All the objects on the layers are combined onto one layer.